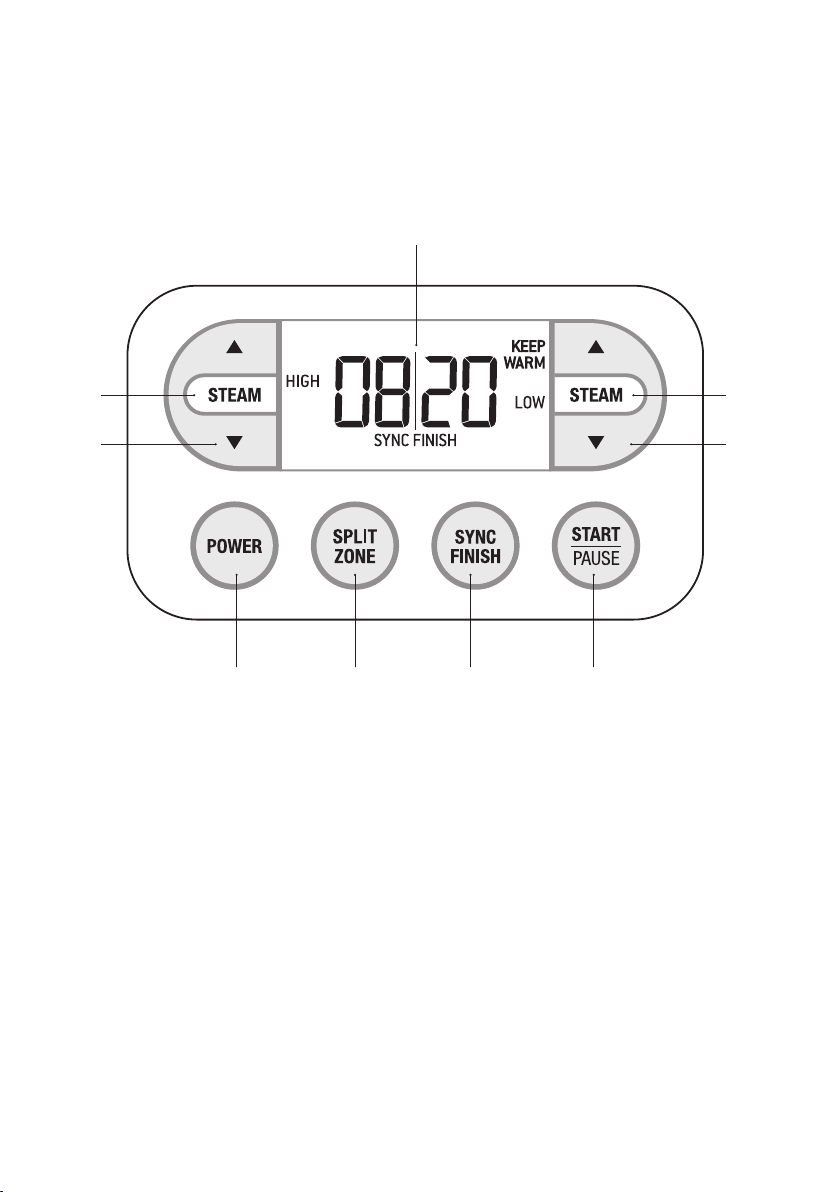
Sage Steam Zone BFS800 User manual

the Steam Zone™
BFS800/SFS800
EN QUICK GUIDE DE KURZANLEITUNG
FR GUIDE RAPIDE NL SNELSTARTGIDS
ES GUÍA RÁPIDA
IT GUIDA RAPIDA
PT MANUAL RÁPIDO

2
SAGE®
RECOMMENDS
SAFETY FIRST
At Sage®we are very safety
conscious.We design and
manufacture consumer
products with the safety of
you, our valued customer,
foremost in mind. In addition
we ask that you exercise a
degree of care when using
any electrical appliance
and adhere to the following
precautions.
IMPORTANT
SAFEGUARDS
READ ALL INSTRUCTIONS
BEFORE USE AND SAVE FOR
FUTURE REFERENCE
• A downloadable version of this
document is also available at
sageappliances.com
• Before using for the rst time
please ensure that your electricity
supply is the same as shown on
the rating label on the underside
of the appliance. If you have any
concerns please contact your
local electricity company.
• To eliminate a potential choking
hazard for young children, remove
and safely discard the protective
cover rst over the pins of the
power plug when unpacking
appliance for the rst time.
• Position the appliance on a
stable, heat resistant, level, dry
surface away from the edge and
do not operate on or near a heat
source such as a hot plate, oven
or gas hob.
• Do not place any part of the
food steamer in a gas, electric
or microwave oven, or on a hot
gas or electric burner.
• Position the appliance at least
20cm from walls or heat/steam
sensitive materials and provide
adequate space above and on
all sides for air circulation.
• Do not use food steamer on
metal surfaces, for example,
a sink drain board.
• Always ensure the food steamer
is properly assembled before
use. Follow the instructions
provided in this book.
• The appliance is not intended
to be operated by means of
an external timer or separate
remote control system.
2Sage®Recommends Safety First
5Components
7Functions
9Care & Cleaning
10 Guarantee
Contents

3
EN
• Do not put any food or liquid
other than water into the
water tank in the steamer
base. Only the steaming tray
and the steam baskets are
designed to cook food.
• Do not leave the appliance
unattended when in use.
• Do not move the food steamer
during operation.
• Avoid spillage over the power
cord and power connector.
• Do not touch hot surfaces.
Use the handles to remove
the lid and steamer baskets.
• Take care to avoid contact
with any steam escaping from
the steam outlet holes on the
steamer lid. Use dry oven mitts
to protect hands.
• Always lift the lid away from you,
when removing from steaming
basket, to avoid steam escaping
from under the lid. Carefully
lift and remove the steaming
baskets by the handles to
avoid scalding from escaping
steam. Use dry oven mitts to
protect hands.
• Allow the steamer base and
removable drip tray to cool
before disassembling for
cleaning and discarding liquid.
• Do not use harsh abrasives
or caustic cleaners when
cleaning this appliance.
• Keep the appliance clean.
Follow the care and cleaning
instructions provided in this book.
IMPORTANT
SAFEGUARDS FOR
ALL ELECTRICAL
APPLIANCES
• Fully unwind the cord before use.
• Do not let the cord hang over the
edge of a table or counter, touch
hot surfaces or become knotted.
• Connect only to a 220–240V
power outlet.
• Always turn the appliance to
the OFF position, switch o at
the power outlet, remove the
plug and allow all parts to cool
before attempting to move the
appliance, when the appliance
is not in use, before cleaning
and when storing.
• The appliance can be used by
children aged from 8 years and
above and persons with reduced
physical, sensory or mental
capabilities, or lack of experience
and knowledge, if they have
been given supervision or
instruction concerning use of
the appliance in a safe way and
understand the hazards involved.
• Children shall not play with
the appliance.
• Cleaning and user maintenance
shall not be made by children
unless they are older than
8 years and supervised.
• Keep the appliance and its
cord out of reach of children
less than 8 years.

4
• It is recommended to
regularly inspect the appliance.
Do not use the appliance if
power cord, power plug or
appliance becomes damaged
in any way. If damaged or
maintenance other than
cleaning is required, please
contact Sage Customer Service
or go to sageappliances.com
• This appliance is intended for
household use only. Do not use
this appliance for anything other
than its intended use. Do not
use in moving vehicles or boats.
Do not use outdoors.Misuse
may cause potential injury.
• Any maintenance other
than cleaning should be
performed at an authorised
Sage®Service Centre.
• The installation of a residual
current device (safety switch)
is recommended to provide
additional safety protection when
using electrical appliances.
• It is advisable that a safety
switch with a rated residual
operating current not exceeding
30mA be installed in the
electrical circuit supplying the
appliance. See your electrician
for professional advice.
CAUTION
• Do not operate the food
steamer on an inclined surface.
The symbol shown
indicates that this appliance
should not be disposed of
in normal household waste.
It should be taken to a local
authority waste collection centre
designated for this purpose or to
a dealer providing this service.
For more information, please
contact your local council oce.
To protect against electric
shock, do not immerse the
power cord, power plug or food
steamer base in water or any
other liquid.
SAVE THESE INSTRUCTIONS

5
EN
A
C
D
F GE
H
B
A. Polished stainless steel steaming lid
B. Stainless steel steaming baskets
with glass steaming lids
C. Steaming tray
D. Drip tray
E. Removable power cord
F. Water level window
G. Water ll spout
H. Steamer base with integrated water tank
(maximum capacity 1.8L)
I. Steam nozzles
I
Components
Rating Information
220–240V~ 50–60Hz 1900–2200W

6
A
CB D E
GG
FF
CONTROL PANEL
A. LCD screen
B. POWER button
C. SPLIT ZONE button
D. SYNC FINISH button
E. START/PAUSE button
F. TIMER button
G. STEAM button
H. RAPID START

7
EN
Functions
BEFORE FIRST USE
Remove any packaging material and promotional
labels from the food steamer.
Wash the steaming lids, steaming tray, steaming
baskets, and drip tray in warm soapy water. Rinse
and dry thoroughly. Wipe the inside of the water
tank and the steaming nozzles with a damp cloth.
Setting water hardness
1. Ensure tank is lled with cold water.
2. Press POWER button to turn machine on.
3. The LCD will display‘Hrd5’, prompting you to
set the water hardness level. Programming this
will determine the regularity of the ‘DESCALE
ME’ alert which indicates when the steamer
needs to be descaled.
4. Remove the supplied water hardness test strip
from the wrapper.
5. Dip the test strip into a sample of the water
you have lled the tank with so that all
5 squares are submerged for 1–3 seconds.
Remove strip from water and wait for one
minute.The water hardness setting is indicated
by the number of red squares displayed on the
test strip eg. 3 red squares indicates a water
hardness setting of 3.
6. Press UP or DOWN arrow to the required
setting from ‘Hrd1’ (softest water) to ‘Hrd5’
(hardest water). Press START button to set.
7. Your unit is now ready for use.
Checking/changing the water hardness level
1. With the unit in STANDBY, press and hold
the SPLIT ZONE button then quickly press
the POWER button.
2. The LCD will display your current water
hardness setting.
3. Press UP or DOWN arrow to the required
setting from ‘Hrd1’ (softest water) to ‘Hrd5’
(hardest water). Press START button to set.
4. Your unit is now ready for use.
5. Close the stainless steel lid when you are
cooking directly on the steaming tray.
6. When using the steaming baskets, only close
the basket lids. Never use the stainless steel lid
when cooking in the steaming baskets.
7. Do not touch the steaming lids during and after
steaming.The lids can get very hot.
8. If checking food during steaming, stop or pause
steaming before removing the steaming lids.
9. The captured steam in the steam zone is
very hot. Always keep your face and hands
away from the steamer when opening the
steaming lids.
10.Check the water level of the drip tray after each
cycle of steaming.Empty water when needed.
HOW TO USE YOUR FOOD STEAMER
Using STEAM button
Press the STEAM button to select the steaming
level and to automatically enable KEEP WARM
mode when steaming ends.
SETTING STEAM
COOKING KEEP WARM
HIGH High steaming level
for up to 45minutes.
No KEEP WARM mode
after steaming ends.
LOW Low steaming level
for up to 45minutes.
No KEEP WARM mode
after steaming ends.
KEEP
WARM
Very low level of
steam.
Programmable up to
45 minutes.
KEEP
WARM
HIGH
High steaming level
for up to 45minutes.
When steaming ends,
KEEP WARM mode will
automatically turn on and
run for up to 15 minutes.
The KEEP WARM time
is not programmable.
KEEP
WARM
LOW
Low steaming level
for up to 45minutes.
Quick start mode
Use the count-up timer to start steaming
immediately in both combined and split
zone modes.
1. Fill the water tank with clean tap water.
Ensure the MAX level on the water window
is not exceeded.
2. Place the drip tray and the steaming tray
on the steamer base.
3. Place food on the steaming tray or in one
or both of the steaming baskets.
4. Close the stainless steel lid when cooking
directly on the steaming tray.When using the
steaming baskets, only close the basket lids.
5. Press the POWER button.
6. Press the STEAM button on either side
of the control panel to select the steaming
level, steaming with automatic KEEP WARM
or KEEP WARM only. See "Using STEAM
button" .

8
7. Press the START/PAUSE button to start
steaming. RAPID START will ash on the
LCD screen while the steamer heats up.
8. The steaming level (HIGH/LOW) will ash
when steam is being produced.The timer
on the LCD screen will start counting up,
indicating the elapsed cooking time.
9. You can steam up to 45 minutes in this
steaming mode. Press the START/PAUSE
button at any time to stop cooking.After
45 minutes the steamer will beep three
times to indicate steaming is completed.
If KEEP WARM was enabled, the steamer
will automatically enter KEEP WARM mode
for 15 minutes. When KEEP WARM is nished,
the steamer will beep one time.
Combined zone steaming
Use the whole steam zone to cook foods
directly on the steaming tray.With this setting,
the LCD screen will display a single timer.
Split zone steaming
The steaming area can be divided into two
separate zones to cook foods that require dierent
steaming level and cooking times.The LCD screen
will display two separate timers.
Synchronised nish
1. Press the SPLIT ZONE button for split
zone steaming.
2. Press the SYNC FINISH button to enable
synchronised nish mode.
3. Set the steaming level and time for each zone
and proceed as directed for split zone steaming.
4. Press the START/PAUSE button and the
zone with the longer steaming time will start.
The second zone will automatically start so that
both zones nish steaming at the same time.
5. After the steaming time is finished,
the steamer will beep three times.If KEEP
WARM was enabled, the steamer will
automatically enter KEEP WARM mode for
15 minutes. When KEEP WARM is nished,
the steamer will beep one time.
Pause cooking
You can stop/pause steaming in all
steaming modes.
1. During steaming, press the START/PAUSE
button to pause the steaming.The LCD
backlight will change from orange to white.
2. When START is pressed to resume,
RAPID START will ash on LCD for 10 seconds.
Adding water while cooking
1. If the water level gets low during steaming,
the steamer will beep twice and FILL WATER
will ash on the LCD screen.
The steamer and timer will pause and the
LCD backlight will change from orange
to white.The steamer will continue to beep
every 30 seconds until the water is relled.
2. Pour water into water ll spout.
3. Once the water is relled, the steamer
will automatically restart.

9
EN
Descaling
DESCALE ME will display on your LCD
when it is time to perform the descale.
NOTE
If the DESCALE ME reminder is ignored,
the unit will prevent any further cooking
until a descale has been performed.
1. Add 1 cup white vinegar and 3 cups clean tap
water to the tank.
2. Place the drip tray, steaming tray and stainless
steel lid onto the steamer base.
3. Turn on the unit by pressing the
POWER button.
4. Press and hold the START button for 5 seconds
to activate the descale cycle.
5. The descale cycle will take about 20 minutes;
its progress will display on the LCD.
6. When finished empty the drip tray and
the water tank.
7. Use a damp cloth or paper towel to remove
any remaining scale from the edges of the
steam nozzles.
8. Add 2 cups clean tap water to the tank
and run the steamer on HIGH for 5 minutes
to purge any remaining descaling solution
from the system.
Care & Cleaning
1. Unplug the power cord of the food steamer
and allow the base, drip tray, steaming tray,
steaming baskets, basket lids and stainless
steel lid to cool down before disassembling
and cleaning.
2. When completely cool, detach the power cord
from the steamer base.Carefully discard the
remaining liquid in the drip tray and water tank.
Wipe the interior of the water tank with a damp
cloth then dry thoroughly.
3. The drip tray, steaming tray, steaming baskets,
basket lids, and stainless steel lid can either be
washed in a dishwasher or using warm soapy
water. Do not use abrasive cleaners, steel wool
or scouring pads as these can damage the
surface.Clean the food steamer after each use.
TO CLEAN THE EXTERIOR
The steamer base can be wiped with a damp
cloth then dried thoroughly.
Do not use abrasive cleaners, steel wool or
scouring pads as these can damage the surface
of the food steamer.
Take extra care when cleaning the water level
sensor. Scratches on the water level sensor may
lead to malfunction.
WATER LEVEL SENSOR
WARNING
Do not immerse steaming base, power cord
or power plug in water or any other liquid
as this may cause electrocution.
STORAGE
The steaming baskets and detachable cord
can be placed inside the basket lids for storage.

10
2 YEAR LIMITED GUARANTEE
Sage Appliances guarantees this product for
domestic use in specied territories for 2 years
from the date of purchase against defects caused
by faulty workmanship and materials. During this
guarantee period Sage Appliances will repair,
replace, or refund any defective product (at the
sole discretion of Sage Appliances).
All legal warranty rights under applicable national
legislation will be respected and will not be
impaired by our guarantee.For full terms and
conditions on the guarantee, as well as instructions
on how to make a claim, please visit
www.sageappliances.com.
Guarantee

the Steam Zone™
DE KURZANLEITUNG

2
SAGE®
EMPFIEHLT
SICHERHEIT
GEHT VOR
Wir bei Sage®sind sehr
sicherheitsbewusst.
Beim Design und bei der
Herstellung unserer Geräte
denken wir zu allererst an
Ihre Sicherheit. Darüber
hinaus bitten wir Sie, bei
der Verwendung jedes
Elektrogeräts angemessene
Sorgfalt anzuwenden und
sich an die folgenden
Vorsichtsmaßnahmen
zu halten.
WICHTIGE
VORSICHTSMASS
NAHMEN
BITTE ALLE ANWEISUNGEN
VOR DEM GEBRAUCH
LESEN UND ZUR
SPÄTEREN BEZUGNAHME
AUFBEWAHREN.
• Dieses Informationsbuch
steht zum Download unter
www.sageappliances.com
zur Verfügung.
• Vor dem ersten Gebrauch
prüfen, dass Ihre Netzspannung
mit der auf dem Etikett an
der Unterseite des Geräts
übereinstimmt. Bitte wenden Sie
sich bei etwaigen Bedenken an
Ihren örtlichen Stromversorger.
• Schutzhülle am Netzstecker
des Geräts beim ersten
Auspacken des Geräts
abnehmen und sicher entsorgen,
da sie für Kleinkinder eine
potenzielle Erstickungsgefahr
darstellen könnte.
• Gerät beim Betrieb nicht an
der Kante eines Tisches, einer
Theke oder einer Arbeitsplatte
sauber und trocken halten.
• Gerät nicht auf oder neben
eine heiße Gas- oder
Elektrokochplatte oder in die
direkte Nähe eines heißen
Ofens stellen.
Inhalte
2Sage®
geht vor
6Komponenten
8Funktionen
11
12 Garantie

3
DE
• Keinen Teil des Geräts in
einen Gas-, Elektro- oder
Mikrowellenherd oder
auf eine heiße Gas- oder
Elektrokochplatte stellen.
• Gerät von Wänden, Vorhängen
und anderen hitze- oder
fern halten.Mindestens 20 cm
Abstand halten.
•
Spüle verwenden.
• Gerät nur nutzen, wenn es
richtig zusammengesetzt ist.
Bitte die Anweisungen in dieser
Broschüre befolgen.
• Das Gerät ist nicht zur
Verwendung mit einer externen
Zeitschaltuhr oder separaten
Fernbedienung gedacht.
• Keine Lebensmittel oder
Flüssigkeiten außer Wasser
in den Wassertank im Fuß
des Geräts füllen. Nur die
Dämpfschale und Dämpfeinsätze
sind zum Garen konzipiert.
• Gerät während des Betriebs nicht
unbeaufsichtigt lassen.
• Gerät während des Betriebs
immer an Ort und Stelle lassen.
• Keine Flüssigkeiten über
das Netzkabel oder den
Steckverbinder verschütten.
•
berühren. Zur Entnahme von
Deckel und Dämpfeinsätzen die
• Kontakt mit Dampf vermeiden,
der aus den Dampfaustritten im
Deckel des Geräts entweicht.
Zum Schutz der Hände trockene
Grillhandschuhe tragen.
• Deckel stets vom Körper weg
vom Dämpfeinsatz abheben,
um Kontakt mit unter dem
Deckel entweichendem
Dampf zu vermeiden.
Dämpfeinsätze vorsichtig
abnehmen, um Verbrühungen
durch entweichenden
Dampf zu vermeiden.Zum
Schutz der Hände trockene
Grillhandschuhe tragen.
• Fuß des Geräts und abnehmbare
ehe die Teile zur Reinigung oder
zum Abgießen von Flüssigkeit
auseinander genommen werden.
• Zur Reinigung des Geräts keine
scheuernden oder ätzenden
Reinigungsmittel verwenden.
• Gerät sauber halten.
Die Reinigungs- und
Broschüre befolgen.

4
WICHTIGE
SICHERHEITS
HINWEISE FÜR
ALLE ELEKTRO
GERÄTE
• Netzkabel nicht über
Arbeitsplatten oder Tischkanten
hängen lassen, von heißen
Kabelgewirr vermeiden.
• Nur an Netzanschlüsse mit
220–240 V anschließen.
• Gerät immer AUSschalten,
sofern möglich auch an der
Steckdose, Netzstecker ziehen
und alle Teile abkühlen lassen,
ehe Sie das Gerät bewegen,
reinigen oder lagern, ebenso
wenn es nicht in Gebrauch ist.
• Dieses Gerät kann von Kindern
ab dem Alter von 8 Jahren
sowie von Personen mit
eingeschränkten körperlichen,
sensorischen oder geistigen
Fähigkeiten oder mit
mangelnder Erfahrung und
fehlenden Kenntnissen genutzt
werden, sofern sie beaufsichtigt
werden oder in den sicheren
Gebrauch des Geräts
eingewiesen wurden und sich
der entsprechenden Risiken
bewusst sind.
• Kinder nicht mit dem Gerät
spielen lassen.
• Die Reinigung und Wartung
des Geräts nicht von Kindern
vornehmen lassen, sofern sie
nicht mindestens 8 Jahre alt
sind und beaufsichtigt werden.
• Gerät und Kabel für Kinder
unter 8 Jahren unzugänglich
aufbewahren.
• Regelmäßige Sichtprüfungen
des Geräts vornehmen.Gerät
nicht verwenden, wenn das
Netzkabel, der Netzstecker
oder das Gerät selbst in
irgendeiner Weise beschädigt
ist.Wenden Sie sich bei
Schäden oder zur Wartung
(außer Reinigung) bitte an
den Sage-Kundendienst
oder besuchen Sie
sageappliances.com
• Dieses Gerät ist nur für den
Haushaltsgebrauch bestimmt.
Gerät nur bestimmungsgemäß
verwenden.Nicht in fahrenden
Fahrzeugen oder Booten
verwenden.Nicht im Freien
verwenden. Missbrauch kann
Verletzungen nach sich ziehen.
• Alle Wartungsarbeiten außer
Reinigung nur von autorisierten
Sage®-Kundendienststellen
vornehmen lassen.
• Die Installation eines Schutz-
oder Sicherheitsschalters
wird bei der Verwendung von
Elektrogeräten als zusätzliche
Schutzmaßnahme empfohlen.

5
DE
DIESE ANLEITUNG AUFBEWAHREN
• Es wird der Einbau eines
Fehlerstromschutzschalters mit
maximal 30 mA Nennleistung
im Stromkreis des Geräts
empfohlen. Fachgerechte
Beratung erhalten Sie von
Ihrem Elektriker.
VORSICHT
• Gerät nicht auf einer geneigten
Dieses Symbol zeigt, dass
das Gerät nicht im
normalen Hausmüll
entsorgt werden sollte.
Es sollte stattdessen bei einem
entsprechenden kommunalen
zur Entsorgung abgegeben
werden.Weitere Einzelheiten
erfahren Sie von Ihrer
Kommunalbehörde.
Zum Schutz gegen
Stromschlag Netzkabel,
Netzstecker oder Fuß des Geräts
nicht in Wasser oder andere
Flüssigkeiten tauchen.

6
A
C
D
F GE
H
B
A. Dampfgardeckel aus poliertem Edelstahl
B. Dampfgarkörbe aus Edelstahl mit
Glasdeckel
C. Dampfgartablett
D. Tropfschale
E. Entfernbares Netzkabel
F. Wasserstandsfenster
G. Wassereinfüllstutzen
H. Dampfgargefäß mit integriertem
Wassertank (max. Kapazität 1,8 L)
I. Dampfdüsen
I
Komponenten
Leistungsangaben
220–240V~ 50–60Hz 1900–2200W

7
DE
a
cb d e
gg
ff
KONTROLLPANEL
a. LCD-Anzeige
b. POWER (AN-Taste)
c. SPLIT ZONE (Taste für GETEILTES GAREN)
d. SYNC FINISH (Taste für SYNC FERTIG)
e. START/PAUSE (Taste für START/PAUSE)
f. TIMER (ZEITSCHALTER-Taste)
g. STEAM (DAMPF-Taste)
h. RAPID START (SCHNELLSTART)

8
Funktionen
VOR DER ERSTBENUTZUNG
Das gesamte Verpackungsmaterial und
Werbeetiketten vom Dampfgarer entfernen.
Gardeckel, Gartablett, Garkörbe und Tropfschale
in warmem Seifenwasser waschen. Gründlich
abspülen und trocknen. Das Innere des
Wassertanks und die Dämpfdüsen mit einem
feuchten Tuch abwischen.
Wasserhärte einstellen
1. Tank muss mit kaltem Wasser befüllt sein.
2. POWER-Taste drücken, um die Maschine
anzuschalten.
3. Die LCD-Anzeige zeigt Hrd5 an und fordert
Sie auf, die Wasserhärte einzugeben. Diese
Entkalkens und löst die Warnung für DESCALE
ME aus, wenn der Dampfgarer entkalkt
werden muss.
4. Entnehmen Sie den mitgelieferten
Wasserhärteteststreifen aus der Verpackung.
5. Stippen Sie den Teststreifen in eine
Wasserprobe (mit dem gleichen Wasser mit
dem Sie den Wassertank befüllt haben) und
tauchen Sie die 5 Quadrate vollständig für 1 – 3
Sekunden ein. Entfernen Sie den Streifen aus
dem Wasser und dann eine Minute warten.
Die Wasserhärteeinstellung wird durch die
Anzahl der roten Quadrate auf dem Teststreifen
angezeigt, z.B. bedeuten 3 rote Quadrate eine
Wasserhärteeinstellung von 3.
6. Drücken Sie den Pfeil von UP (HOCH) oder
DOWN (RUNTER) bis zur gewünschten
Härte zwischen Hrd1 (weichstes Wasser) und
Hrd5 (härtestes Wasser). START-Taste zum
Einstellen drücken.
7. Ihr Gerät ist nun zur Nutzung bereit.
Wasserhärte prüfen/wechseln
1. Wenn das Gerät auf STANDBY steht, die Taste
SPLIT ZONE drücken und halten, dann schnell
die POWER-Taste drücken.
2. Die LCD-Anzeige zeigt die aktuelle
Wasserhärteeinstellung.
3. UP- oder DOWN-Pfeil drücken bis die
gewünschte Härte zwischen Hrd1 (weichstes
Wasser) und Hrd5 (härtestes Wasser) erreicht
ist. START-Taste zum Einstellen drücken.
4. Ihr Gerät ist nun zur Nutzung bereit.
5. Den Edelstahldeckel schließen, wenn Sie direkt
auf dem Gartablett kochen.
6. Wenn Sie die Garkörbe benutzen, nur
die Korbdeckel schließen.Niemals den
Edelstahldeckel benutzen, wenn Sie mit den
Garkörben kochen.
7. Die Garkörbe nicht während oder nach dem
Garen anfassen.Die Deckel können sehr
heiß werden.
8. Wenn Sie die Lebensmittel während des
Garprozesses prüfen, dann stoppen oder
unterbrechen Sie das Garen bevor Sie die
Gardeckel entfernen.
9. Der konzentrierte Dampf in der Garzone
ist sehr heiß. Immer Gesicht und Hände
weg vom Dampfgarer halten, wenn Sie die
10.Nach jedem Garzyklus den Wasserstand
der Tropfschale prüfen. Wasser bei Bedarf
ausschütten.
BEDIENUNG IHRES DAMPFGARERS
Benutzung der STEAM-Taste (DAMPF-Taste)
Drücken Sie die STEAM-Taste, um die Garstufe auszuwählen und den Modus KEEP WARM
(WARMHALTEMODUS) automatisch zu aktivieren, wenn das Garen beendet ist.
SETTING (EINSTELLUNG) STEAM COOKING (DAMPFKOCHEN) KEEP WARM (WARMHALTEN)
HIGH (HOCH) Hohe Dampfstufe für bis zu 45 Minuten Kein KEEP WARM (Warmhaltemodus nach
beendeter Garzeit.
LOW (NIEDRIG) Niedrige Dampfstufe für bis zu 45 Minuten. Kein KEEP WARM (Warmhaltemodus nach
beendeter Garzeit.
KEEP WARM (WARMHALTEN) Sehr niedrige Dampfstufe. Programmierbar bis zu 45 Minuten.
KEEP WARM HIGH
WAMHALTEN Hohe Dampfstufe für bis zu 45 Minuten. Wenn das Garen beendet ist, stellt
sich KEEP WARM (Warmhaltemodus)
automatisch an und läuft bis zu 15 Minuten.
KEEP WARM LOW
WARMHALTEN Niedrige Dampfstufe für bis zu 45 Minuten.

9
DE
Schnellstartmodus
Use the count-up timer to start steaming
immediately in both combined and split
zone modes.
1. Wassertank mit sauberem Wasser aus dem
Wasserhahn befüllen.Vergewissern Sie
sich, dass die MAX-Markierung auf dem
Wasserfenster nicht überschritten ist.
2. Die Tropfschale und das Gartablett auf das
Dampfgargefäß setzen.
3. Die Lebensmittel auf das Gartablett oder in
einen oder beide Garkörbe legen.
4. Den Edelstahldeckel schließen, wenn direkt
auf dem Gartablett gekocht wird.Wenn
die Garkörbe eingesetzt werden, nur die
Korbdeckel schließen.
5. Die AN-Taste POWER drücken.
6. Die STEAM-Taste auf einer Seite des
Kontrollpanels drücken, um die Dampfstufe
auszuwählen; Garen nur mit automatischem
KEEP WARM (WARMHALTEN) oder KEEP
WARM. Siehe Anleitung zur Nutzung der
STEAM-Taste.
7. Drücken Sie die Taste START/PAUSE (START/
UNTERBRECHEN), um mit dem Garen zu
beginnen. RAPID START (SCHNELLSTART)
der Dampgarer aufheizt.
8.
wenn Dampf produziert wird. Die Zeitschaltuhr
auf der LCD-Anzeige beginnt mit dem
Hochzählen und zeigt die abgelaufende
Kochzeit.
9. Sie können bis zu 45 Minuten in diesem Modus
garen. Drücken Sie jederzeit dieTaste START/
PAUSE, um das Kochen zu stoppen. Nach 45
Minuten wird der Dampgarer dreimal piepen,
um anzueigen, dass das Garen beendet ist.
Falls KEEP WARM (WARMHALTEN) aktiviert
wurde, stellt sich der Dampfgarer automatisch
für 15 Minuten auf den Warmhaltemodus KEEP
WARM. Wenn KEEP WARM zu Ende ist, wird
der Dampgarer einmal piepen.
Kombiniertes Etagengaren
Die gesamte Garetage zum direkten Kochen auf
dem Gartablett verwenden. Mit dieser Einstellung
wird auf der LCD-Anzeige nur ein Zeitschalter zu
sehen sein.
Geteiltes Etagengaren
Die Garetage kann in zwei separate Garräume
unterteilt werden, um Lebensmittel mit
unterschiedlicher Garzeit und -stufe zu kochen.
Auf der LCD-Anzeige werden zwei separate
Zeitschaltuhren zu sehen sein.
Synchronisierte Garendzeit
1. Die Taste SPLIT ZONE (GETEILTE ETAGE) für
getrenntes Garen drücken.
2. Die Taste SYNC FINISH drücken, um den
synchronisierten Endmodus zu aktivieren.
3. Die Garstufe und -zeit für jede Etage festlegen
und dann den Anleitungen für das geteilte
Etagengaren folgen.

10
4. Die Taste START/PAUSE drücken und der
Garraum mit der längeren Garzeit startet
automatisch. Der zweite Garraum startet
automatisch, so dass beide Garräume das
Dämpfen zur selben Zeit beenden.
5. Nach beendeter Garzeit wird der Garer dreimal
piepen.Wurde KEEP WARM aktiviert, dann
beginnt der Dampfgarer aufomatisch mit dem
15-minütigen Warmhaltemodus KEEP WARM.
Wenn KEEP WARM abgelaufen ist, piept der
Dampfgarer einmal.
Kochen unterbrechen
Das Garen kann in allen Dämpfmodi mit STOP/
PAUSE gestoppt oder unterbrochen werden.
1. Drücken Sie während des Dämpfens die
Taste START/PAUSE, um denVorgang zu
unterbrechen. Die LCD-Anzeige wird sich von
orange auf weiß verändern.
2. Nach dem Drücken von START, um den
Kochprozess wieder aufzunehmen, wird auf
der LCD-Anzeige 10 Sekunden lang RAPID
Wasser während des Kochens hinzufügen
1. Sollte der Wasserstand während des Garens
zu niedrig werden, wird der Dampfgarer
zweimal piepen und die Nachricht FILL WATER
(WASSER AUFFÜLLEN) erscheint auf der
LCD-Anzeige. Der Dampfgarer unterbricht
und das LCD-Hintergrundlicht verändert sich
von orange auf weiß. Der Dampfgarer wird alle
30 Sekunden weiterpiepen, bis das Wasser
aufgefüllt ist.
2. Das Wasser in den Wassereinfüllstutzen füllen.
3.
automatisch wieder.
Entkalken
Die Nachricht DESCALE ME erscheint auf der
LCD-Anzeige, wenn Entkalken erforderlich ist.
HINWEIS
Das Gerät lässt kein weiteres Garen zu, wenn
die Nachricht DESCALE ME zum Entkalken
ignoriert wird.
1. Geben Sie 1 Tasse weißen Essig und 3 Tassen
sauberes Wasser aus dem Wasserhahn
in den Tank.
2. Die Tropfschale, das Gartablett und den
Edelstahldeckel auf das Dampfgargefäß
setzen.
3. Das Gerät mit der Taste POWER anschalten.
4. Die START-Taste 5 Sekunden drücken und
halten, um den Entkalkungsszyklus zu
aktivieren.
5. Der Entkalkungszyklus dauert ca. 20 Minuten;
die LCD-Anzeige informiert über den
Fortschritt.
6. Nach Beendigung des Entkalkens die
Tropfschale und den Wassertank ausleeren.
7. Mit einem feuchten Lappen oder Papiertuch
Kalkrückstände von den Rändern der
Dampfdüsen entfernen.
8. Zwei Tassen sauberes Wasser in denTank
geben und den Dampfgarer 5 Minuten auf
HIGH (HOCH) laufen lassen, um eventuell
verbleibende Rückstände der Entkalkerlösung
aus dem System zu entfernen.
This manual suits for next models
1
Table of contents
Languages:
Other Sage Electric Steamer manuals
Popular Electric Steamer manuals by other brands

Vitek
Vitek VT-1560 BK Manual instruction

Gallet
Gallet GALCUV 962 Pantin instruction manual

Henny Penny
Henny Penny SPACE SAVER 605ESC63XXXX Planning and installation guide

Crown
Crown ECX-10 Installation & operation manual

Clatronic
Clatronic DG 3270 instruction manual

Binatone
Binatone FS?211VS instruction manual