Sallmetall SALL LAMINATOR S1600 User manual

I
I
t
L
I
,
i-
I
l-
l
I-
I
I
I
I
II
I

;,,PERFtrKTTE
OP
MAffiII
SALLLAMrI{ATOR' S
1400,
S
1600,
S
2000.
i ii:.,r.:,;
,
' .,,,-::l-;'.-4r;.fl
: jÈ-;).."i:í"lr-.?_? /+:-
sallmetall

f\l'r1l "..))
.l"t . O/OO
*::t'l; f;

MANUAL
FOR THE SALL LAIVI]NATOR
S14OO/
1600
/2OOO
COLD MOUNTING PROCESS
Designed to increase profits of photo processors, bij expanding
the market for large prints, transparencÍes through mounli.rg
and protecting with first class equipment.

-1-
COLD PROCESSINGLA}4INATORTYPE S 14OO/1600/2OOO
1. Place the laminator on the spot where it is to be installed..
(Do not uncrate before the machine has reached the final spot).
2. Uncrate the machine and loose the four bolts that tighten the
machine on the bottom of the crate.
3. Lift the machine, mount the four feets, puIl away the skid
and place the machine on j-ts four feets (see FIG. 1),
4. Level the machine into a perfect, vertical and horizontal
position (see FIG. 2 and 3). For a detail of a foot see FIG.14.

-2-
ELECTRTCAL
(FIG. 4)
The SALL LAMTNATOR
s 1400
/1600/2000 runs on 220 vAC 1 phase
erectricity, frequency 50 or 60 Hz or when a transformèr has
been on 105, 115, 125 VAC.
First check if the transformer is connected j-n the right position
(connections 108 113), and after that put in the plugrturn the
key of the main sj-tch and measure the vortage on coinection
plug 1 and 2. It should be ZZ0 VAC
I 58.
When this is right, put in the pC boards.
The machine j-s now ready for running.
The'machines for onry 220 vAc normarly donrt have the main
transformer.
When you have a machine with a long swing arm mind thad you do not
turn around the control paner or the suing arm more than 360", you
can damage the cábles inside of the arm.
A. Main transformer 105/1j5/125/ 220 VAC
B. Transformer 220-24/12-0-12 VAC
. C. Inductance coil
D. PC board wind-up motor 56 (double sided 2x 56)
E. PC board maln motor 55 - ATTENTION:
C5 50 Hz 0,10 UF
60 Hz 0,047 UF
F. PC board stoppage waiter 54
c. PC board up/down upperroller 53
H. Fuse 2A, slow
I Fuse 4A, slow
An erectronic eye protects alien objects like ties and fingers
(FrG. 7
) .
CLEANTNG
To clean the rollers use alcohol or spirit on1y.

-J-
CONTROL
PANEL (FIG. 5)
A. ConLroI lamp for electric po\^/er (clear)
B. Roller-up button to reduce the pressure of the roller
C. Roller-down button to raise the pressure
D. Roller pressure indicator
E. Selection switch for automatic run or feet pedal control
F. Forward run button for continues run
G. Foot pedal for run and stop machine
H. Control lamp for running of pressure rollers (red)
I. Stop button for an interruption, and hold for powering wind-up
motor independent
J. Reverse button for opposj-te turning of pressure rollers
K. Speed control main motor
L. Vírinkle control, one button for right and one button for left
M. Unwind. brake power control
N. Wind-up switch and speed control
O. Emergency stops. Pushing stops the pressure rollers and brj-ngs
the upper pressure roIler in a higher position.
Fo reset puII out.
P. Zero for placing pressure meter in zero position (Iift rollers,
warm up the machine 1
5 minutes, turn to zerol
O. Gain is set by manufacturer (clo not turn)

ilrtrgo
--.1:.r
r
'i.-.: - l,:Í
,/ ''.;..This alloqrs for clecrrically
/ ' ,:. movcmcnt of thc qppcr .
' .:; --unwiod axle in larcral
r. , :_'-l:--1:-- -^ ^!- i-1-:-^
i; r-
-ilircction totbe{igtt orro

-4-
Clear power
turned into
ROLLER
UP
POIdER CONTROL LAMP (clear)
control lamp will light up, when main switch is
position one (F'ïc. 1 ) .
ROLLER PRESSURE ÏNDICATOR
when command
button "rolrer up" is pushed, the pressure of the
::++:I_rtll,ilcrease. The maximum
oiening between the pressure
rolrers is E€5-ffi]-There is an end switóh for maximum gap
between the rollers.
ROLLERDOWN
with command
button "rorler down" the pressure of the rorrer can
be increasing, til1 reaching the need.à pr"""ure position on
pressure indicator. Using the handwheel (ffC. Z) jroo ".r, give a
mor accurate pressure posltion set
ATTENTToN:
after usi-ng the machine it is necessery to raise the
Eop-roTTêr about 10 *;, to protect the rollers against fr.at spots.
The
The roller pressure indicator
maximumpressure is enouqh
quality lamination film]
shows the pressure from 0 - 1008.
to get good lamj_nation with
SELECTION
SWÏTCH
The operator can choose for a continues run with contror from
main switch board or contror by foot pedal. place serection
switch in desired position.
FORWARD
RUN
This command button for a forward and wind-up motor run, onry
--reacts when the selection switch is in the aitomatic position.
After pushing the button the red lamp lights.
lrÍhen speed control is in zero positión the machine will not run.
FOOT PEDAL
I{hen foot pedal is pushed
machine will run whón vou
has been turned up.
the red control lamp lights and the
hold the foot pedal and when speedcontrol

-5-
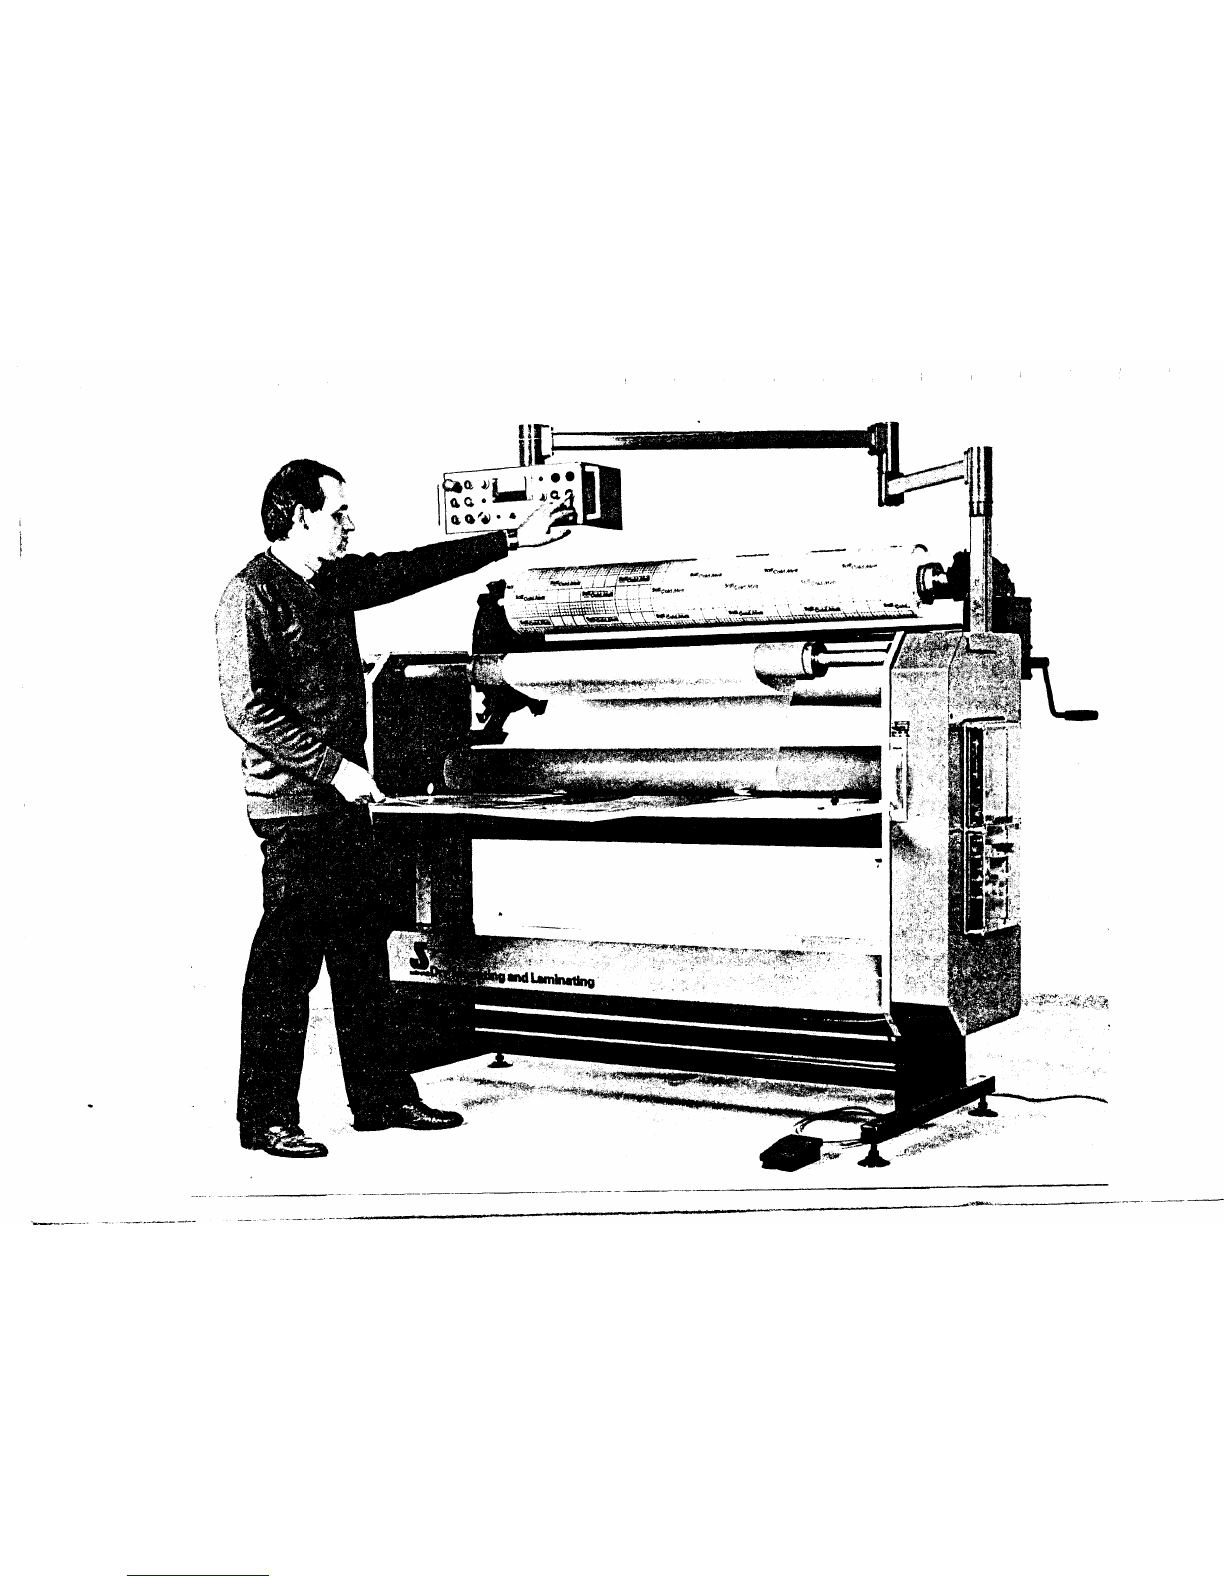
RUNNTNG PROCESS CONTROL LA]"IP
VÍhen foot pedal or forward run button is pushed the red control
Iamp will light up.
STOP SWITCH
FOR PRESSURE
ROLLERS
During a laminatj-on process in position automatic run, the process
can only be stopped by pushing the button stop.
After correction or inspection (of the picture, Iaminating process),
the process can be continued by pushing on button forward.
When holding the stop swj-tch you can control the wind-up motor
independent from main motor.
REVERSE
The reverse commandbutton only gives a reverse run when button
is pushed and speed.control has been turned up.
, SPEEDCONTROL
The pressure rollers can laminate with a variable speed from
0-8 mtr per minute (0-26 feet per minute).
Although the maximumspeed gives the user a quick resultr w€
suggest to run the machine with a lower speed, by way of
precaution.
This will give time to correct eventual problems, which might
show up (dust on the picture, creasing of a laminating film).
With the speed control you can start and stop the rollers and
wind-up motor (when itrs powered) after pushing the button
forward, the red control lamp should be in tight position.
I^IRfNKLE
CONTROL
By using the wrinkle control system, creasing of the mounting or
laminating film can be controlled.
Before starting a laminating process be sure the unwind shaft (FIG.6)
is in the middle position (the line on the shafts shoulC be in line
with the side of the beari.g).
This to be sure there is space to displace the unwind shaft.
When instructions are followed you will get a uniform, wrinkle and
bubble free bonding.
The right button moves the supply shaft to the right and the left
button moves the supply shaft to the left.

-6-
UNVíIND BRAKE
Each unwind shaft has an electrical brake to puII the web tight.
Make sure there is an equal tension across the web.
Donrt give the brake a too high power for than you can get such
a high tension in the film that after mounting or laminating Lhe
backgrounds might bow.
WIND-UP
The winding of the protective paper on the wind-up shaft can be
regulated individual by control switch. The start and stop of the
wind-up motor are automatically triggered by the pressure roIler.
Each wind-up shaft has an indivj-dual motor driven system, even
when the laminating porcess is in a hold position, the user can
wind-up the superfluous protective paper. By pushing the stop
button you can power the wind-up without runníng the pressure
rollers.
The wind-up motor has a PTC protection against overloading.
When it has been overloaded the wind-up motor will stop during
process. When happens turn back wind-up switch to zero, after
about a quarter of a minute the PTC will reset and wind-up is
ready for running again.
Donrt gÍve the wind-up motor more power than neccesary and check
this during the process, than overloading will never happen.
ATTENTION: Before turning the wind-up core by hand, the wind-up
switch has to be turned in an absolute zejq _peÊilion, ro
position, while you are turning the wind-up shaft by
hand.
EMERGENCY
STOP
In case of an emergency stop the large red push-pull button on the
control panel or the equal button (F,IG. 1) on the left side of the
laminator gives, when pushed, àD immediate stop and at the same
time the roller will tift from the subject.
This will continue intill the roller has reached its highest
position. For an interruption of the process pull out the red
button again.
ATTENTION: If one of the two emergency buttons is pushed, the

-7-
OPERATTON OF SALL LAMÏNATOR
First and most important is: all guards have to be in place at
all times before operating the
laminator.
Emergency stops are in close at hand position at all ti-me.
They are installed for your safety and should not be removed for
any reason, void this safety obligation of the manufacturer.
RECOMMENDED
STARTÏNGPOSITÏONSFOR 1 MTR (40"1 LAMINÀTINGMÀTERIALS
Pressure rollers 70? on pressure indicator (proportional to the width
of the backing material)
Wind-up shaft regulator 402
Un-wind shaft regulator 702
Because of variation in width of protection and mounting films,
the user has Lo work according following points:
A. AII mounting or laminating films have to be in a square position
on the shaft. This will prevent the wrinkle of the film.
B. Al1 backing materials are started into the laminator in a
sguare position and in the middle. l,lhen working on one side of
the laminator you get wrinkles. Use a piece of the same material
on the other side.
C. A little overlap on both sides of the backi-ng material will
prevent for running of the edge of the backing material.
D. The variable speed drive should be operated in its slowest
position when first operating. With the speed control it is
possible to stop ahd start the rollers.
Speed can be increased as the operator becomes more acquanted
with the machine.
E. The tension on the web should not destroy the laminating film.
If needed lower the electrj-c brake power by turning the un-wind
brake switch down.
F. The wind-up motor should not puII the protective paper more than
the un-wind brake can hold on the un-wind shaft.
If needed lower the electric power of the wind-up.
The wind-up shaft will start and stop with the rolleq, but when
the photo electric cell has been activated, the wj-nd-up shaft
will not sLop

-8-
MAKÏNG
A BACKGROUND
SELFADHESIVE
(FIG. 1B)
A. Set the pressure by placing the background or a strip in
same thickness between the rollers.
B. Run the background (st.rip) through the machi-ne (pressure
set for further processing).
C. Place the core with the mounting film on the un-wind shaft
D. Lay the mounting film over the roller with the glue outside.
Use a starting strip before running the actual background.
hïhen the starting strip is between the pressere rollers, set
the brake and un-wind tension.
E. Place the actual, to be glued background behj-nd the starting
strip and start the process.
F. Cut the mounting film behind the pressure rollersr or bring the
pressure roller in a hj-gher position, pull the backing
material together with the mounting film back through the
machine and cut it on the front side.
G. When runnj-ng a lot of long backgrounds in one run with an
uneven thickness it is possible that wrinkles are comi_ng.
ft is sometimes neccesary to hold a small space between the
backgrounds for lining up agaJ-n.
For mounting 2 mtr width take two films of one meter, with a
1ittle overlap.
H. Making a background selfadhesive up to 2 meter is not possible
in one run while there is no mounting film up to 2 meter.
It can be done in two manners:
1. Iríhen the machine has a second sypply shaft you can use this
one.
Put an 1 meter width roII of mounting film on the right side
of the supply shaft and put an 1 meter width roll of mounting
film on the left side of the second sypply shaft.
They should have an overlap af about 25-50 mm. l1-2 inch) .
First mount the film on the right side of the background,
than cut of f the mounting f -i-lmand reverse the background.
second mount the film from the second suppry shaft on the
left side of the background. After that, cut the second film
just along the side of the first mountèd firm, peer off the
overlap release paper.
Víhen you need a maximum result, run agàin the background
through the machine to get an almost seamless mounting fitm.
2. Ialhen
the machine has a 4-roller shift put in two shafts,
one with a mounting film on the right side and the other
on the left side.
Further follow the same way of use as written down at nbr. 1.
If using a mounting film without carrier like the SALL COLDMELT,
the glue will be cut of on the side of the release paper.
the
is

-9-
4-ROLLER
'SHIFT
To load the 4-ro11er shift put the take up blocks j-n a 45"
degrees up position on the back side
Pull the handle to the outside of the machine (Ffc. 11) and
open the lever up. Put the supply shaft into the take up blocs.
Mind that the female coupling side of the supply shaft is on
the same side as the male coupling side on': the machine (detail
FïG. 8 and 13).
After that click in the lever by pushing (FIG. 10), be sure by
testing that the levers are in the just position.
By turning the -roller shift with the handcrank you can fill
up the 4-rollers shift.
To load the machine with a supply shaft turn the to be used
shaft with film in the direction (about 30" up position) of the
bearings and open the lever by pulting the handle (ffC. 11).
Turn slowly ti11 the supply qoes rolling to the bearings.
t"lind that the shaft rolls over the bearing (FIG . 121
.
Turn down the supply shaft and line up the female coupling part
of the supply shaft and the male coupling part of the brake in
upright position (FIG. 8 and 13),
When the coupling part of the brake is adjusted, turn up the power
of the brake, than it will not turn during loading the machine
(FIc. I and 13).
Turn the 4-roller shift as far as the supply shaft can turn
around free.
To change a supply shaft into another or to unload the machine
Iine up the coupling in upright position (ffC. 8) and turn the
brake to maximum power
Turn back the 4-roller shift untill the lever touch the supply
shaft (Frc. 9). Turn the supply shaft in a higher position til1
the shaft rolls in the take up blocks, click in the lever and
control 1f they are locked before turning to another position.
ATTENTION: !{_hen
loa9ing_a4d. unloading the machine be careful that
the. supplv shaft coupling is lined up in an upright
position for otherwise it is possible to damage this
parts.
Ilind that when you are turning the roller shift the
Iever are lo"
ïdTre.n-ouE-

-1 1-
LA}4INATING (FIG. 19 And 20
)
Set upper pressure roller on required pressure by placing a piece
of the to be laminated material between the pressure rollers.
Run the backing material out through the pressure rollers.
Pressure is now set for the laminating process.
Lay the overlaminating film over the pressure roller, place a start
strip in front of the roller and push it together with the film
into the machine.
When pressure comes out on the pressure indj-cator stop the process.
Be sure tension on brake and wind-up of protective paper and
correct. If needed correct Iines or wrinkles with wrinkle corrector.
Place the actual, to be laminated picture in a correct angle behind
the start strip and start the laminating process.
Again we suggest to run the machine with a low speed, by way of
precaution. Lamínating of materials with a raw surface, always with
a low speed (rollers need time to reach the deeper spots in the
surface of the picture).
Poor lamination can also be caused by defective material, to
correct, replace meterials.
Double sided laminatinq: it is neccesarv to line up both films
exactlv and reiine if necóesarv
TROUBLE
SHOOTING
Before using the laminating film always check for consisting
wrinkles and equal winding of the film. Left and right diameter
should be the same (wrínkles can show up if the laminating film
is stored in a room with a high percentage of moisture).
Wrinkles or lines have to be cut out of the roll.
This laminator will not correct material defects.
String the web straigt and square around the un-wind and wind-up
shaf ts. It has to be square, when tension i's not even across
the web, wrinkles might show up during the process.
When the web is loosen between the un-wind and pressure rol1er,
turn brake control into a higher scale (check if the wind-up roller
pulls not to strong for the electric brake of the un-wi-nd shaft).
Do not wind-up more protective paper than needed.
Laminating film with exposed glue will dry out, dust will stick to
the film etc. Because of the individual motor driven speed control
for the wind-up shaft, the opeator can easily control the peeling
of the protecti-ve paper form the laminating film during the process.

THE
MOUNTING
OF
A PICTURE
ON
A SELFADHESIVE
BACKING
7.{!
.f,
- tu-
A. Peel of the protective sheet
for about 2,5 cm (1") on one
side of the backoround.
B. Line up the picture with the
background
and stick it on
the exposed
adhesive.
C. Place the background
with picture
in front of the Dressure rolLers.
Lay the picture over the pressure
rol-ler.
Pul away the protective sheet as
the material is pu1led through
the machi-ne.
1-:_.,
,í5si!,,-
't:1,1-::.,
'J'i'.i,,,,;2,'
:ffiriií.*j1:lrr
[:-.'-*.-*

1a
-tL-
MACHINE ADJUSTMENT
PARALLELLISM OF ROLLERS
\I
I
First check if the bottom and top roIler are in a parallel position.
It is easy to check with a PVC background of 1 x 2 mtr and
2 or 3 mmthick.
Run it through the machine with the roller pressure up to 60-70?.
Run it just in the machine over about 1
0 cm {4 inch) and check if
it is in square position.
Make on both sides of the background a line with a pencil on the
table. Run the background through the machine till the end is in
line with the front of the tab1e, the background should be in the
same position between the lines.
When the rollers are para.l-lel and the background has a variatj-on
in thickness between the left and the rj-ght side, it wiII go out
of the lines te one side.
Than reverse the background and turn it in the upside down position
and run it again between the lines.
When it goes out of the lines in the same distance to the other
side you can b sure that the roIls are in a parallel position.
ïf the rollers are not parallel the PVC background will go out
of the lines to one side and you have to control or adjust the
ro1lers.
First check Íf the disc spring bolts have the right position, turn
them into the end position and than turn them back exactly
2 revolutions (page 14 and drawing 040-4-103).
The rollers should not touch together during adjusting the springs.
After ad,justing this, repeat the running with the PVC background.
When the background goes to the left side on te feed table, Iower
the right side of te top roller and when the background goes to
the right side on the feed table, raise the right side of the top
roIler. It can be done by dislocking the 19 mmnut on the strain
gauge set and turning Lhe screw. By HEANS
OFHEXA601,
NUT22
H.M
Turn the screw clockwise to lower the top roller and counter
clockwise to raise the roller, after that lock the nut and test
again.
IrÍhenthe rollers are not adjusting very will you can get a lot of
wrinkles.
ROLLER
PRESSURE
Víhen
there is no electric power on the machj-ne, the roller pressure
indicator should show 08. If not, adjust by turning the black screw
in the middle of the indicator (F'IG. 5).
After turning the main switch, the rolIer pressure indj-cator should
show also 09. hlait 10-15 minutes before you can adjust this by a
screw in the hole on the left side of the roller pressure indj-cator.
On the right side of the roller pressure indicator, there is a
adjust screw in the hole for the gain, with the screw you can adjust
the roller pressure of the differce between the 0g output and the
1009 output of the strain gauge.

- tJ-
The roller pressure can be measured by a special pressure set
between the rollers. The difference between 08 and 1004 roller
pressure can be measured in the box of the roller pressure.
First dismount 4 screws to take out the roller pressure indicator,
than take off the cover by dismounting 2 screws.
See drawing PC board 51, strain gauge amp.
Voltages: A-B A + 6,2 VDC, when necessary adjust with P1
C-D 0t D-mVDC
100? D + mVDC
for difference mVDCC-D see controlpage
After measuring or adjusting, replace roller pressure j-ndj-cator.
When lowering the top roller in one run, the up/down motor
should slip on 1008 roller pressure.
ïf not, adjust the maximumtorque coupling (fig. 15 and 040-4-102)
on the roller up/down motor.
ADJUSTMENT
OF STOPPAGE
WAÏTER 54
On PC board 54 is a potmeter P1 for adjusting the switch voltage,
Put a 9 VDC power between terminal 30 and 31 of the pC board,
after that turn the potmeter till relais 5 switch on.
When the power voltage is not correct, please turn up a little
tiII machine will run.
ADHUSTI\ÍENT
PC BOARD
WIND-UP MOTOR
56
On PC board S5 are 2 potmeters, P1 and P2.
First adjust P2 without load tiII the DC voltage between
22 and 23 or 32 and 33 with the wind-up motor potmeter on
speed should be 26 VDC.
After that put an Àmp meter to measure the current, when
the motor on maxi-mum
speed it should be:
terminal
maximum
you stop
Motor 0 42 gearbox 1
042 " 'l
0 4g ,' 1
0 4g " 1
: 46,75 1,8 Amp
z 75 1,2 Amp
: 46,75 1,8 Àmp
: 75 1,2 Amp

-1
4-
ADJUSTING CHAINS
The laminators have 3 chains which needs some control.
Check these chains after 1 month running and than each
6 months.
Page 1
5 chain motor up/down 4 adjusting bolts
Page 16 chain main motor 4 adjusting bolts
Page 17 chain handwheel - 2 adjusting bolts
Donrt give the chain to much tension, one part should be movable
about 10-15 mm (l inch) between the wheels.
GREASINGAND LUBRICATTON
Chains: Víhenchecking chain grease them.
Gearboxes: Motor up/down Shell Omela 71 150 m'
Main motor Shel1 Omela 71 250 m3
Changing oil gearbox
First time after 500 hours
Than each 10.000 hours or each 2 vears
SCREW
JACK: Grease with K 00 E type of grease
Max. 0r1 kg
Grease each 500 hours
To remove the old grease loosen two hexagon socket
grub-, and head.less screws and turn counter clockwise
to open the screw jack.
New grease can put in by grease cup.
Grease screw too with the same grease.
l4ax. \^rear and tear of the screw is reached when the
screw has a diameter of 16 nm.
ADJUSTTNG
ELECTRICALBRAKE:
When tension from brake decreases, chack if there is to much gap
between anchor and brake housing and dislock'anchor bolts and
push anchor tiII it hits the brake housing.
ADJUSTÏNGBRAKETOP ROLLER:
On the bottom side of the left bearing block of the top roIler
is a adjusting bolt for the brake. ït is only for a littte heavy
running of the top roller.

ADJUSTMENT PC BOARD I\,IAÏNMOTOR (S5)
adiustment of minimum
number
of revolutions.Nmin._
Turn frontpanelmeter "speedcontrol" all to the left.
Adjust with potmeter P1 desired numberof revolutions.
(adjustrange 1 0-509á
of maximumnumber
of revolutions)
Motor should stop with speddcontrol on zero.
adjustment of maximum
numberof revolutions.Nmax._
Turn frontpanelmeter "speedcontrol" all to the right.
Nmax.
can be adjusted with potmeter P2.
While doinq thisrmeasure the anehorvoltage at terminal
ll-
,
12 and 8,9,
I0.
The anchorvoltage may
not be adjusted above 170V.
adjustment of currentlimiter at the motorcurrent
WARNING:
0n1y with a riqht adjustment the motor will
be protected for thermical troubl-e throuqh
the currentlimÍter.
example:
motordata Ua=
160V
Ia= 4A F=I
P= 4B0W
The qiven current Ia is the arithmetic,averaqe value,
avaifable at the given F-factor.The effective vaTue
of the current leff. is calculated after:
Ieff.=Ia.F=4.1=4A
This calculated val-ueof leff. may
not be exceeded,
even with a muchhigher F-faetor.Ieff. can be adjusted
with ootmeter Pl.
The maximum
adjustabl-e current for the l80W-motor
is 2A.
The maximumadjustabfe current for the lTnW-motor
is 4A.
Measureconnection
flor measuringthe effective current
and arithmetic,averaqe current.
adjustment of the I*R compensation
With potmeter P4 it is possibfe to eliminate the difference
of number
of revolutions betweenfreewheel"en
and full load.
The usua] adjustmentconditions are ? of maximumspeedand
? of full load.
WARNING:
When
potmeter P4 is to muchturned up,the motor
shall beqin to swinq.
introduction of control-fertest
As soon as the controll-er is connectedwith the erektricity,
the fuses are stilr in order and the fieldspool of the motor
is connectedrthe following voltages can be measured:
at terminal 21
r22r23,24 and 27,ZB: ZZOV
at terminal 17.18 and 19.20: I90V=
For futher testing of the control-ler the fortowing measuring
points can be checkedrsee
next paqe.
This manual suits for next models
2
Table of contents
Popular Laminator manuals by other brands

Royal Sovereign
Royal Sovereign NR-901 owner's manual

Swingline
Swingline FUSION 1000L instruction manual

Royal Sovereign
Royal Sovereign RSC-1650C Service manual

Banner American
Banner American BA-FS43 operating instructions

Royal Sovereign
Royal Sovereign NPH-900N owner's manual

Fellowes
Fellowes EXL 45 operating instructions