Sangean DMS-37BT User manual

Revision 2
中文
GB
DMS-37BT

1
The SangeanR App enables remote control of Sangean’s DMS-37BT running on your iPhone, iPod touch, iPad or Android smartphone, you can
experience control of the compatible app directly!
To use SangeanR App, simply download Sangean’s free SangeanR application onto your iPhone, iPod touch, iPad or Android smartphone and connect
to your Sangean DMS-37BT receiver via Bluetooth. Then you can control your DAB or FM radio stations, selection and control of media including CD,
SD, USB or Aux-in with an intuitive interface, formatted and designed specically on your iPhone, iPod touch, iPad or Android smartphone.
Download SangeanR from Apple iTunes (Apple Store) and Google Play now!
"Made for iPod," "Made for iPhone," and "Made for iPad" mean that an electronic accessory has been designed to connect specically to iPod,
iPhone, or iPad, respectively, and has been certified by the developer to meet Apple performance standards. Apple is not responsible for the
operation of this device or its compliance with safety and regulatory standards. Please note that the use of this accessory with iPod, iPhone, or iPad
may affect wireless performance.
Made for
● iPhone 4s
● iPhone 4
● iPhone 3GS
● iPad (3rd generation)
● iPad 2
● iPad
● iPod touch (4th generation)
● iPod touch (3rd generation)

2
GB
Contents
Introduction .................................................................... 3-9
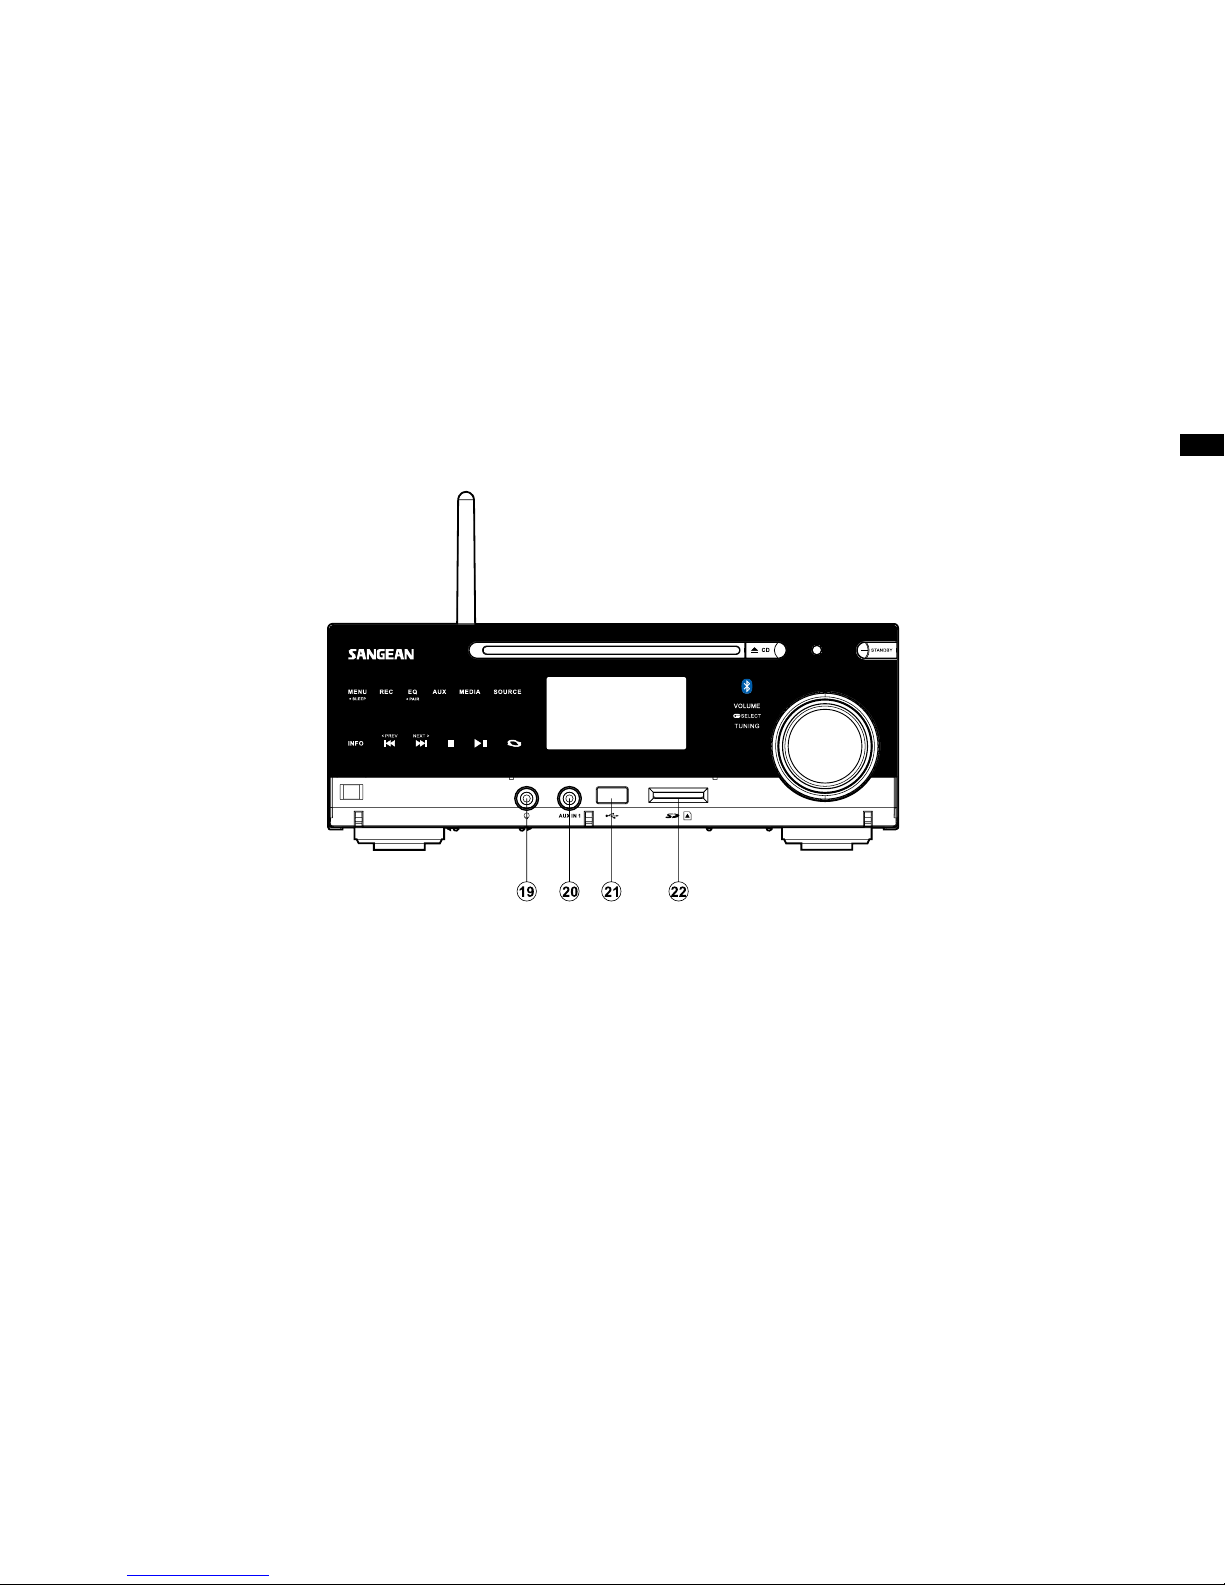
Controls and connections .............................................. 3-5
Remote control .............................................................. 6-7
Connect the speaker system ........................................... 8
Using the touch panel ...................................................... 8
Remote control functions ................................................. 8
Bluetooth remote control options ..................................... 9
Using the sound system for the rst time ......................... 9
DAB radio ................................................................... 10-16
Operating your sound system - DAB ............................. 10
Selecting a station - DAB ............................................... 11
Secondary services - DAB.............................................. 11
Display modes - DAB ..................................................... 12
Finding new stations - DAB ........................................... 13
Manual tuning – DAB .................................................... 14
Dynamic range control - DAB ........................................ 15
Prune station .................................................................. 16
Software version - DAB ................................................. 16
FM radio ...................................................................... 17-21
Operating your radio - search tuning FM ....................... 17
Manual tuning - FM ........................................................ 18
FM stereo / mono ........................................................... 18
Display modes - FM ....................................................... 19
Presetting stations ......................................................... 20
Recalling a preset station .............................................. 20
Software version ............................................................ 21
CD / MP3 / WMA ......................................................... 22-30
Compact discs .......................................................... 22-23
Playing a CD .................................................................. 24
CD search and repeat .................................................... 25
CD track programming ................................................... 26
MP3 / WMA CD mode .................................................... 27
MP3 / WMA le and folder selection ......................... 28-30
SD / USB playback and recording ............................ 31-37
SD / USB le and folder selection ..............................31-32
Recording to SD / USB ...............................................33-35
Deleting and formatting ..............................................36-37
Listening to Bluetooth music ................................... 38-39
Pairing your Bluetooth device ........................................ 38
Playing Bluetooth music ................................................ 39
Disconnecting your Bluetooth device ............................. 39
Timer Record .............................................................. 42-45
Timer recording ......................................................... 42-44
View record timer ........................................................... 45
Cancelling a recording ................................................... 45
Display and Auto ........................................................ 46-51
Standby brightness control ............................................ 46
Equalizer function .......................................................... 47
Bass and treble settings ........................................... 47-48
Mute function ................................................................. 48
Auxiliary input socket ..................................................... 49
Line output socket .......................................................... 49
Headphone socket ......................................................... 50
Aerial removal ................................................................ 50
Touch panel sensitivity control ....................................... 51
Information ................................................................. 52-55
System reset .................................................................. 52
Charging with USB socket ............................................. 53
Software upgrade .......................................................... 53
Cautions ......................................................................... 54
Specications ................................................................. 55

3
Controls and connections (Front)
1. Standby button
2. Remote control sensor
3. CD eject button
4. CD slot
5.Source button
6. Media button
13. Fast-forward button
14. Stop button
15. Play / pause button
16. Repeat button
17. Volume button / Select button / Tuning button
18. SD / USB / Aux in 1 / Headphone
socket (behind panel)
7. Aux in button
8. EQ button / Bluetooth pairing button
9. Record button (for recording tracks)
10. Menu button / Sleep button
11. Info button
12.Rewind button

4
GB
Controls and connections (Rear)
19. Headphone socket
20. Aux in 1 socket
21. USB socket (for playback / recording / charging)
22. SD card slot

5
Controls and connections (Rear)
23. Speaker output socket (left / right)
24. Bluetooth antenna
25. Line out socket
26. Aux in 2 / 3 / 4 socket
27. Micro USB for software upgrade
28. DAB / FM antenna
29. AC power cord socket

6
GB
Controls and connections (Rear)
On / standby button
Mute button
Key pad buttons 1-100
Folder up / down button
Tuning down / Rewind button
Menu button
Timer record button
Aux in select button
Auto tune button
Media button (CD / SD / USB)
Record button (for recording tracks)
Source button (DAB / FM / Aux / Bluetooth)
Sleep / Clock set button
EQ / Bluetooth pairing button
Alarm button (function not available)
Repeat button
Random button
Play / pause button
Select / stop button
Tuning up / fast-forward button
Info button
Volume up / down button
CD eject button
a.
b.
c.
d.
e.
f.
g.
h.
i.
j.
k.
l.
m.
n.
o.
p.
q.
r.
s.
t.
u.
v.
w.

7
Remote control battery replacement
1. Remove the battery cover on the rear of your remote control by applying pressure to the catch
in the direction shown by the arrow in the diagram, and then lifting the cover.
2. Insert 2 x AAA size batteries into the compartment. Make sure the (+) and the (-) ends of the
batteries are positioned as shown inside the compartment.
3. Close the battery cover by inserting the retaining lugs rst, then apply pressure to the free end
such that the catch latches the cover securely.
4. If the remote is not to be used for an extended period of time it is recommended that the
batteries are removed.
IMPORTANT:
The batteries should not be exposed to excessive heat such as sunshine, re or the like. After
use, disposable batteries should if possible be taken to a suitable recycling centre. On no
account should batteries be disposed of by incineration.
1. Battery compartment
2. Latch
3. Retaining lugs (inside)

8
GB
Connect the speaker system
1. Extend the speaker wires and connect to the speaker output L and R.
NOTE:
On the supplied wires, the copper wires is dened as Positive in polarity
while the tin plated wire is Negative in polarity
2. Make sure the Channel (L and R) and also polarity (+ and -) are all
correctly connected.
IMPORTANT:
Do not switch on the power until the speaker system is connected.
Using the touch panel
The DMS-37BT sound system has a stylish touch panel instead of
conventional buttons.
To operate the buttons simply touch the button area with the tip of a
finger for about half a second. Sleep function and Bluetooth paring
function marked with a dot (●) are accessed by means of a long touch
(2-3 seconds) on the appropriate button until the display on the sound
system shows that the command has been accepted.
You may find that at first, the sound system does not always detect
that you have touched a button. If so, try touching with a little more
pressure, or for slightly longer. You will soon find the optimum touch
needed to control your sound system. (See also the section of” Touch
Panel Sensitivity Control”)
The panel may be cleaned using a dry cloth. Do not use abrasives,
cleaning uids or solvents.
Remote control functions
Most of the functions of the DMS-37BT sound system can be controlled
using either the touch panel or the remote control.
However, there are a few functions which are only accessible using the
remote control. These are:
DAB / FM radio station presets DAB / FM auto-tune
DAB menu function CD / USB / SD CARD track access
by numbers
CD / USB / SD CARD random
track control
Audio mute
As with the front panel, some operations require a longer operation
of the button (explained in the relevant sections). In this case simply
keep your nger held on the remote control button for 2-3 seconds until
the display on the sound system shows that the command has been
accepted.

9
Bluetooth remote control options
Your radio has the option of being controlled by an application installed
on an Apple iPhone, iPod touch or iPod. The Bluetooth facility allows
you to ensure that your radio can only be controlled by your own Apple
device rather than someone else’s.
Download the control application of 'Sangean R' on Apple store if
you are using iOS system or Google play if Android system is used.
Details of how to link Bluetooth to you iPhone / iPod touch are explained
in the later section called “Listening to Bluetooth music”
Note:
Only support resolution of 400x800 pixel& 1080x1920 pixel of a Android
smartphone. Resolution other than the one mentioned above may result
in different screen display.
Using the sound system for the rst time
1. Place your sound system on a at surface.
2. Fully extend the telescopic aerial. The aerial should be fully extended
and positioned vertically for optimum reception.
3. Plug the mains lead into the mains socket located on the back of your
sound system ensuring that the plug is pushed fully into the socket.
4. Plug the other end of the mains lead into the wall socket and switch
on the wall socket.
IMPORTANT:
The mains plug is used as the means of connecting the sound system
to the mains supply. The mains socket used for the sound system must
remain accessible during normal use. In order to disconnect the sound
system from the mains completely, the mains plug should be removed
from the mains socket outlet completely.
5. When your sound system is first switched on the clock display will
show 12:00 and the unit will enter standby mode. It will then scan for
DAB radio stations and when stations have been found the clock and
date should be set automatically. Note that the display will not show
any scanning message for this rst scan.
6. If no stations have been found then the clock will not set. You may
need to relocate your sound system to a position giving better reception.
You should then carry out an auto-tune to nd DAB stations. See the
section of 'DAB operation' and also 'Finding New Stations' in the
following pages. The clock will then be set from a DAB broadcast.

10
GB
Operating your sound system - DAB
1. Fully extend the telescopic aerial. If your sound system is in standby mode, press and release
the On / Standby button to switch it on.
2. Press and release the Source button to select DAB mode. The display will show “DAB” for a
few seconds.
3. If this is the first time the sound system is used a quick scan of the DAB channels may be
carried out (depending on whether scanning was already completed in standby mode). If the
radio has been used before, the last used station will be selected.
4. When rst switched on, the rst station in the list of stations will be shown. Press and release
the Select button to tune to this station or press the Tuning Up or Down buttons to select an
alternative station. See selecting a station on the following page. The display will show the
station name on the upper line of the text display and broadcast information on the lower line.
5. If the station list is still empty after the scan operation or if the selected station cannot be
received your radio will display “Service not available”.
6. If no signals are found it may be necessary to relocate your sound system to a position giving
better reception, and then repeat the scan using the Auto-tune facility (see the section of
“Finding New Stations”).
Note that radio station name and frequency displays shown in this user guide may differ from
those that you see on your radio. Broadcasters may change radio station names that are
transmitted, and the frequencies used for DAB and FM radio stations may not be the same in all
parts of the country.

11
Selecting a station - DAB
1. When the unit is in DAB mode the upper line of the text display normally shows the name of
the station currently tuned.
2. Repeatedly press the Tuning Up or Down buttons to scroll through the list of available stations
on the lower line of the text display. Stop pressing the Tuning buttons when you nd the station
that you wish to hear. If you keep pressing one of the tuning buttons then the unit will rapidly
scroll through the list of available stations.
3. Press and release the Select button to cause the radio to tune to the chosen station. The display
may show “Now tuning” while your radio nds the new station. The use of memory presets is
described in the later section.
4. Adjust the Volume to the required setting. If after selecting a station the display shows “Service
not available” it may be necessary to relocate your radio to a position giving better reception.
Secondary services - DAB
1. Certain radio stations may have one or more secondary services associated with them. If a
station has a secondary service associated with it the display will show “>>” next to the station
name on the station list. The secondary service will then appear immediately after the primary
service as you press the Tuning Up button.
2. Press and release the Select button to select the station.

12
GB
Display modes - DAB
When in DAB mode your radio has a range of display options.
1. Press the Info button to cycle through the various modes.
a. Scrolling text Displays scrolling text messages such as artist / track name, phone in
number, etc.
b. Signal strength Displays signal strength for the station being listened to. The clear
rectangle shows the minimum required signal strength for clear DAB
reception.
c. Programme type Displays the type of station being listened to e.g. Pop, Classic, News,
etc.
d. Multiplex Name Displays the name of the multiplex to which the current station
belongs.
e. Frequency Displays the frequency for the current DAB radio station.
f . Signal error Displays the signal error for the station being listened to. The lower
the number the better the signal received.
g. Bit rate audio type Displays the digital bit rate and audio type for the current DAB radio
station.
h. Time Displays the current time.
i . Date Displays the current date.
1

13
Finding new stations - DAB
As time passes new stations may become available. To nd new stations proceed as follows:
1. With the unit in DAB mode press and release the Auto-tune button. The display will then show
“Scanning”. The radio will perform a scan of the DAB frequencies. As new stations are found
the station counter on the right-hand side of the display will increase and stations will be added
to the list.
2. Alternatively, press and release the Menu button.
3. Press the Tuning up or down button until ‘Full scan’ appears on the display.
4. Press and release the Select button. Your radio will perform a scan of the band III DAB channels.
As new stations are found the station counter on the right-hand side of the display will increase
and stations will be added to the list.
33
4
1
2

14
GB
Manual Tuning - DAB
Manual tuning allows you to tune directly to the various DAB channels.
1. Press and release the Menu button so that the display shows “Station list”.
2. Press the Tuning Up or Down buttons until “Manual tune” appears on the display. Press and
release the Select button.
3. Press the Tuning Up or Down buttons to select the required DAB channel.
4. Press and release the Select button to select the channel. A signal strength display will appear.
The clear rectangle shows the minimum required signal strength for clear DAB reception.
5. Any new stations that are found are automatically added to the stored list of stations.
6. Press and release the Select button to return to normal tuning mode.

15
Dynamic Range Control (DRC) settings – DAB only
DRC can make quieter sounds easier to hear when your radio is used in a noisy environment.
This function is only for the DAB waveband.
1. Press the On / Standby button to switch on your sound system.
2. Press and release the Menu button so that “Station list” appears on the display.
3. Press and release the Tuning Up or Down buttons until the display shows “DRC”.
4. Press and release the Select button to enter the DRC adjustment mode.
5. Press and release the Tuning Up or Down buttons to select the required DRC setting (the
default is off).
DRC off - DRC is switched off, Broadcast DRC will be ignored.
DRC low - DRC level is set to 1/2 that sent by broadcaster.
DRC high - DRC is set as sent by broadcaster.
6. Press and release the Select button to conrm the setting. The display will then return to the
previous radio display mode.
Note:
Not all DAB broadcasts are able to use the DRC function. If the broadcast does not support
DRC, then the DRC setting in the radio will have no effect.

16
GB
22
3
1
Prune station- DAB only
Over time, some DAB services may stop broadcasting, or you may change location and then not
be able to receive a station. In order to remove such stations from the DAB station list, the Prune
stations function will delete the DAB stations from your station list that can no longer be received.
1. Press and release the Menu button so that "Station list" appears on the display.
2. Press the Tuning Up or Down buttons until "Prune " appears on the display.
3. Press and release the Select button to cause the stations list to be pruned, eliminating
unavailable stations.
Software version- DAB only
The software version display cannot be altered and is provided for reference only.
1. To view the DAB software version installed in your radio, press and release the Menu button
so that "Station list" appears on display.
2. Press the Tuning Up or Down buttons until "Software version" appears on the display.
The software version will appear on the display.
22
1

17
Operating your radio - Search tuning FM
1. Fully extend the telescopic aerial.
2. Press the On / Standby button to switch on your sound system.
3. Press and release the Source button until the FM band is selected.
4. Press and release the Auto-tune button to cause your radio to scan in the direction previously
scanned and stop automatically when it nds a station of sufcient strength.
5. After a few seconds the display will update. The display will show the frequency of the signal
found. If the signal is strong enough and there is RDS data present then the radio will display
the station name.
6. To nd additional stations press and release the Auto-tune button as before.
7. To scan the FM band in a opposite direction press and release either the Up Tuning button (to
scan low frequency to high frequency) or the Down Tuning button (to scan high frequency to
low frequency) and then press the Auto-tune button again.
8. When the end of the waveband is reached your radio will recommence tuning from the opposite
end.
9. Adjust the Volume to the required setting.
10. To switch off your radio press the On / Standby button.

18
GB
Manual tuning - FM
1. Press the On / Standby button to switch on your sound system.
2. Press and release the Source button to select the FM band and fully extend the Telescopic
aerial for optimal FM reception.
3. Press the Tuning Up or Down buttons to tune to a station. The frequency will change in steps
of 50kHz. Pressing and holding one of the buttons will advance the frequency selection several
times each second.
4. When the end of the waveband is reached the radio will recommence tuning from the opposite
end.
5. Set the Volume to the desired setting.
6. To switch off your sound system press the On / Standby button.
FM stereo / mono
1. If an FM station is received with a weak signal some hiss may be audible. To reduce the hiss
press and release the Select button so that the Stereo indicator on the display is cancelled.
Your radio will switch to mono mode.
2. To return to stereo mode press and release the Select button so that Stereo indicator on the
display is visible. The radio will switch to stereo mode.

19
Display modes - FM
Your sound system has four display options for FM radio mode. In addition to the audio content
of the programme, data is broadcast using the Radio Data System (RDS). RDS is a system in
which inaudible digital information is added to the normal FM radio transmission.
In FM mode the lower line of the text display can be set to any of the following options. If RDS
data is received, the upper line of the text display is used to show the radio station name as well
as a stereo and RDS indicator (“St” and “RDS”)
1. Press the Info button to cycle through the various modes.
a. Radio text Displays radio text messages such as news items etc.
b. Programme type Displays the type of station being listened to e.g. Classic, News, etc.
c. Frequency Displays the frequency of the station being listened to.
d. Stereo / Mono Displays the stereo/ Mono mode of the current radio
e. Time Displays the current time
f . Date Displays the current date
Note:
When tuned to the FM band, information display is only available when the radio is able to
receive RDS information from the broadcaster. If there is no RDS data available (or if the signal
is too weak) then the radio will display only the FM frequency.
Table of contents
Other Sangean Stereo System manuals