Sanique S-3 User manual

S-3 SANITISING
ELECTRIC SPRAYER
USER
MANUAL

Sanique S-3 Electric Sanitising Sprayer
CAUTION
This manual contains important warnings and information
PLEASE READ & KEEP FOR FUTURE REFERENCE
VERSION S3-01-0420
Sanique
2b Stephenstown Industrial Park, Balbriggan, County Dublin, Ireland
Declares that the
Sanique S-3 Electric Sanitising Sprayer
is in compliance with the regulations included in:
2006/42/EC Machinery Directive
2014/35/EU Low Voltage Directive
2014/30/EU Electromagnetic Compatibility Directive
The standards applied by the manufacturer are:
EN55014-1:2006+A1; A1:2009+A2:2011
EN55014-1:2017
EN55014-2:2015
EN61000-3-2:2014
EN61000-3-3:2013
2

3
Check it’s on.
Turn pressure control knob clockwise to
increase pressure
Check plug & cable for loose connections
and/or damage
Make sure it’s in the prime position
Open prime valve and purge air from pump
Ensure it’s not clogged, clean where necessary
Tighten if loose
Tap the suction tube connection a few times to
loosen - if no result check that lower ball and/or
seat is not worn or scarred
Change packings; contact a Sanique dealer or
technician for advice
Check not empty
If clogged, reverse tip, aim gun at scrap and
pull trigger to clear
Check tip for wear, replace where necessary
Check all filters are clear of debris, clean
or replace
Check not obstructed with debris, contact a
Sanique dealer or technician for advice
Check not obstructed with debris, contact a
Sanique dealer or technician for advice
3
Power switch
Pressure control knob
Supply plug & cable
Prime valve
Air in solution
Suction lter
Suction tube
Lower ball
Pump leaking
Solution bucket
Spray tip
Filters
Hose
Prime valve
Motor won’t run
Pump won’t
prime
Insufcient
pressure at the
gun or sudden
loss of pressure
SYMPTOM CHECK OUT PROCEDURE
Quick check
The information on this page is intended only as a quick guide. It is no way intended as
a substitute to the information on the pages following, which the user should be fully
acquainted with before using a Sanique sanitising sprayer.

4
USE TO SPRAY
Most sprayable disinfectants
and other sanitising fluids
PERFORMANCE
Flow 1.9 ltr/min
MWP 1100 psi (regulated)
SPECIFICATION
Motor 700 watt
Weight 14.85 kg (complete)
Warranty 2 years
SUPPLIED COMPLETE WITH
Sanitising spray gun
Sanitising spray lance
Gold sanitising atomisation tip
1/4” x 15m textile braided
hose assembly
PRODUCT CODE
110 volt S3-110
240 volt S3-240

5
On/off switch
Suction tube
Pre-set
pressure control
knob
SANIQUE S-3
Sanitising
spray lance
Gold
sanitising
atomisation
tip
15m hose
assembly
Prime
valve
Sanitising
spray gun

Please read these instructions carefully
before using your Sanique sprayer.
GENERAL SAFETY
WARNING! Read and understand all instructions. Failure to follow all instructions listed
below may result in electric shock, re and / or serious personal injury. The term Sanique
sprayer in all of the warnings listed below refers to your mains-operated (corded) sprayer.
WORK AREA
+ Keep your work area clean and well lit.
+ Do not operate your Sanique sprayer in explosive atmospheres, such as in the
presence of ammable liquid, gases, or dust.
+ Keep bystanders, children, and visitors away while operating your Sanique
sprayer. Distractions can cause you to lose control.
ELECTRICAL SAFETY
+ Sprayer plugs must match the outlet. Never modify the plug in any way.
+ Do not expose your Sanique sprayer to rain or wet conditions.
+ Do not abuse the cord. Never use the cord for carrying, pulling or unplugging
the sprayer. Keep the cord away from heat, oil, sharp edges or moving
parts. Replace a damaged cord immediately.
Damaged or entangled cords increase the risk of electric shock.
+ When operating a Sanique sprayer outdoors, use an outdoor extension cord
suitable for outdoor use. Use of a cord suitable for outdoor use reduces the
risk of electric shock.
PERSONAL SAFETY
+ Stay alert, watch what you are doing and use common sense when operating
your Sanique sprayer. Do not use while you are tired or under the inuence of
drugs, alcohol, or medication. A moment of inattention could result in
personal injury.
+ Always wear the appropriate PPE as required by the facility being sanitised.
+ Avoid accidental starting. Ensure the switch is in the off position before
plugging in.
+ Do not overreach. Keep a proper footing and balance at all times.
6

SERVICE
+ Have your Sanique sprayer serviced by a qualied repair person using only identical
replacement parts. This will ensure that the safety of the sprayer is maintained.
If the supply cord of your Sanique sprayer is damaged it must be replaced by a
specially prepared cord available through the service organization.
SPECIFIC SAFETY RULES
WARNING: HIGH PRESSURE
Never leave pressurized system unattended. Take precautions to avoid high
pressure component rupture.
WARNING: FIRE AND EXPLOSION HAZARD
Take all precautions to avoid sources of sparks and ignition when spraying.
WEAR PROTECTIVE EQUIPMENT AT ALL TIMES
Always use a respirator, eye protection and protective clothing. Keep clear of
moving parts when starting or operating the sprayer. Do not put your ngers
into any openings to avoid amputation by moving parts or burns on hot parts.
When starting the motor, maintain a safe distance from moving parts of the
equipment.
EXPLOSION RISK FROM HALOGENATED HYDROCARBON SOLVENTS
Never use halogenated hydrocarbon solvents in this machine.
Contact with aluminum parts may cause an explosion.
Some of the most common of these solvents are:
Carbon tetrachloride
Chlorobenzene
Dichloroethane
Dichloroethyl Ether
Ethyl bromide
Ethyl chloride
Tetrachloroethane
7

8
MEDICAL ALERT INJECTION INJURIES
If any solution appears to penetrate your skin, GET EMERGENCY MEDICAL
CARE AT ONCE. DO NOT TREAT AS AN ORDINARY CUT. High pressure uids
from spray or leaks are powerful enough to easily penetrate the skin and cause
extremely serious injection injury, leading to the possible need for amputation.
+ NEVER point the spray gun at anyone or any part of the body.
+ NEVER put your hand or ngers over the spray tip. Do not use a rag or
any other materials over your ngers. Solution could penetrate through these
materials and into the hand.
+ NEVER try to stop or deect leaks with your hand or body.
+ ALWAYS have the tip guard in place when spraying.
+ ALWAYS lock the gun trigger when you stop spraying.
+ ALWAYS remove tip from the gun to clean it.
+ NEVER try to "blow back" solution, this is not an air powered sprayer.
+ ALWAYS follow the PRESSURE RELIEF PROCEDURE before cleaning or
removing the spray tip or servicing any system equipment.
+ Be sure the equipment safety devices are operating properly before each use.
+ Tighten all of the uid connections before each use.
+ NEVER alter equipment in any manner.
+ NEVER smoke while in spraying area.
+ NEVER spray highly ammable materials.
+ NEVER use around children.
+ NEVER allow another person to use sprayer unless they are thoroughly
instructed on its safe use and given this operator’s manual to read.
+ ALWAYS wear a spray mask, gloves and protective eye wear while spraying.
+ ALWAYS ensure re extinguishing equipment is readily available and
properly maintained.

9
NEVER LEAVE SPRAYER UNATTENDED WITH PRESSURE IN THE SYSTEM.
FOLLOW PRESSURE RELIEF PROCEDURES AT ALL TIMES.
ALWAYS INSPECT SPRAYING AREA
+ Keep the spraying area free from obstructions.
+ NEVER keep ammable material in spraying area.
+ NEVER spray in vicinity of open ame or other sources of ignition.
+ The spraying area must be at least 6 metres away from spray unit.
SPRAY GUN SAFETY
+ ALWAYS set gun safety lock in the "LOCKED" position when not in use
and before servicing or cleaning.
+ NEVER remove or modify any part of the gun.
+ ALWAYS REMOVE THE SPRAY TIP when cleaning.
Flush unit at the LOWEST POSSIBLE PRESSURE.
+ ALWAYS check operation of all gun safety devices before each use.
+ Be very careful when removing the spray tip or hose from the gun.
A plugged line will contain uid under pressure. If the tip or line is plugged,
follow the pressure relief procedure.
TIP GUARD
+ ALWAYS have the tip guard in place on the spray gun while spraying.
The tip guard alerts you to the injection hazard and helps prevent
accidentally placing your ngers or any part of your body close to
the spray tip.

10
HOSES
+ Tighten all of the uid connections securely before each use. High pressure
solution can dislodge a loose coupling or allow high pressure spray to be
emitted from the coupling and result in an injection injury.
+ Only use hoses with a spring guard. The spring guard helps protect the hose
from kinks or other damage which could result in hose rupture and cause an
injection injury. Do not allow kinking or crushing of hoses or allow it to vibrate
against rough, sharp or hot surfaces.
+ Use only conductive uid hoses for sanitising applications. Be sure the gun is
grounded through the hose connections. Only hoses as approved by Sanique
should be used with this sprayer.
+ NEVER use a damaged hose, which can result in hose failure or rupture and
cause an injection injury or other serious bodily injury or property damage.
Before each use, check entire hose for cuts, leaks, abrasions, bulging of the
cover, or damage or movement of couplings. If any of these conditions exist,
replace the hose immediately.
+ NEVER use tape or any device to try to mend the hose as it cannot contain
the high pressure uid. NEVER ATTEMPT TO RECOUPLE THE HOSE.
It is not possible to recouple a high pressure hose.
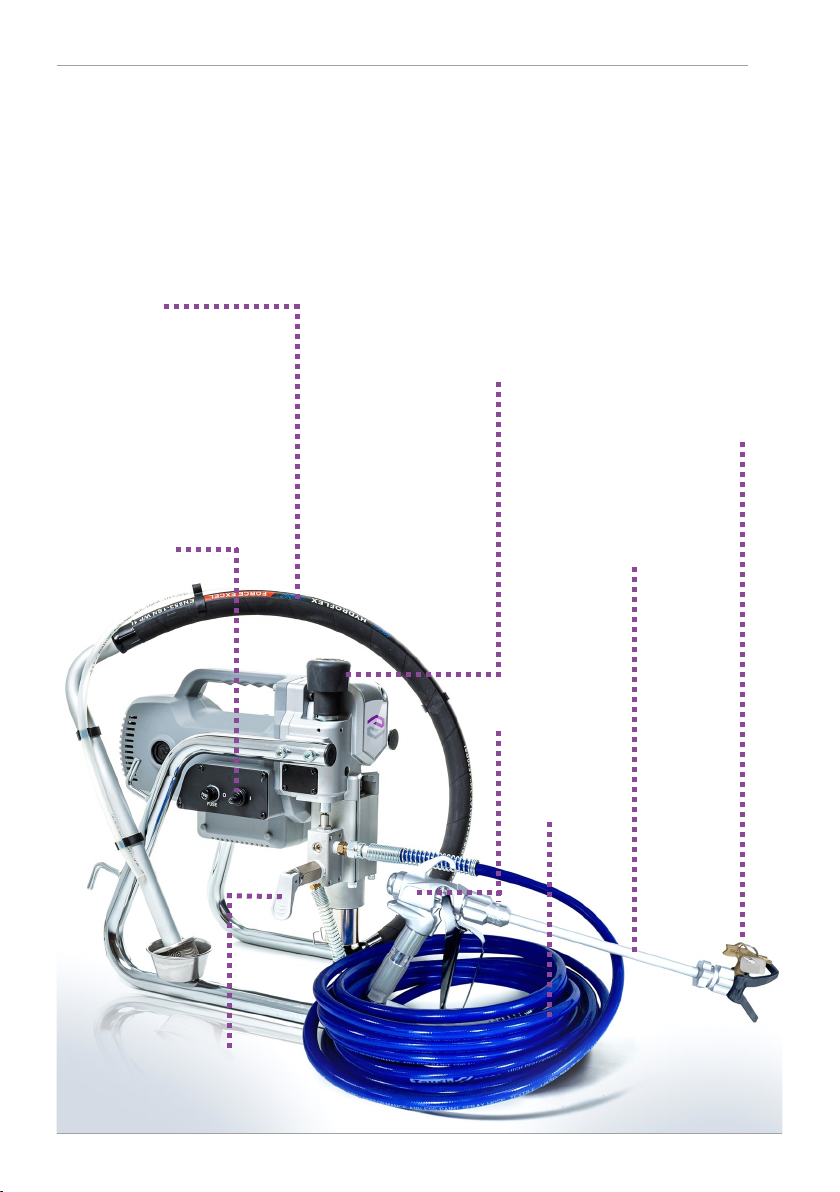
ASSEMBLY
1Attach the hose to the pump and tighten with a wrench.
2Attach the hose to the gun and tighten with a wrench.
OPERATION
1New sprayer / before you start. Your sprayer was factory tested in an oil
solution which was left in the pump. Before spraying, ush through with
warm water and detergent.
PACKINGS
The packings are a wearing part. If your Sanique sprayer can no longer maintain
pressure, has difculty priming and tightening the packing nut no longer helps,
then the packings will require replacement. This is best entrusted to a qualied
Sanique repair technician.

11
SPRAYING
1Connect the hose and gun.
2Check the electrical service. Be sure the electrical service matches the rating
on the machine’s nameplate and that the outlet you use is properly grounded.
3Fill the packing nut/wet cup with a few drops of QLube Piston Lubricant.
4Flush the sprayer
aPlace the suction tube into the media container.
bPrime Valve must be ‘Open’ in the priming position.
cWhen you have ensured that the gun safety latch is engaged, attach tip
and safety guard.
dTurn the power switch to the ‘On’ position.
eAllow the pump to prime. After the pump is primed, immediately turn
the Prime Valve to the ‘Closed’ position.
fTurn Pressure Control Knob to the desired spray pressure.
gDisengage the gun safety latch and you are ready to spray.
PRESSURE RELIEF PROCEDURE
IMPORTANT! To avoid possible serious body injury, always follow this
procedure whenever your Sanique sprayer is shut off, when checking it, and
whenever you stop spraying.
1Engage the gun safety latch.
2Turn the unit off and unplug it from the electrical outlet.
3Disengage the gun safety latch and trigger the gun to relieve residual uid
pressure. Hold metal part of the gun in contact with grounded metal pail.
4Turn the Priming Valve to the open (priming) position to relieve residual
uid pressure.
5Re-engage gun safety latch and close Priming Valve.
DAILY MAINTENANCE
1Keep the displacement pump packing nut/wet cup lubricated with
QLube Piston Lubricant at all times. Add a drop of oil with regular use to the
top of the pump. This helps protect the rod and the packings.
2Inspect the packing nut daily. If seepage of solution into the packing nut and/
or movement of the piston upward is found (while not spraying), the packing
nut should be tightened enough to stop leakage only, but not any tighter.
Over tightening will damage the packings and reduce the packing life.

12

13
* Included in Packing Kit 12-002

14
ITEM PRODUCT CODE DESCRIPTION QTY
112-190-001 SOCKET CAP SCREW M5 x 50 3
212-190-002 SOCKET CAP SCREW M5 x 25 1
312-190-003 SOCKET CAP SCREW M5 x 6 2
412-190-004 CRANK HOUSING 1
512-190-005 SCREW M4 x 8 4
612-190-006 COVER PLATE 30 x 45 x 1.5 1
712-190-007 SCREW M3 x 16 2
812-190-008 PRESSURE SWITCH 1
PCA KIT 12-190-009 PRESSURE CONTROL ASSEMBLY 9 - 17 & 82 1
9INC. IN PCA KIT SCREW M5 x 15 1
10 INC. IN PCA KIT PRESSURE ADJUSTOR KNOB 1
11 INC. IN PCA KIT PRESSURE ADJUSTOR SCREW 1
12 INC. IN PCA KIT SLEEVE 1
13 INC. IN PCA KIT SOCKET SET SCREW M4 x 4 2
14 INC. IN PCA KIT ADJUSTOR SLEEVE 1
15 INC. IN PCA KIT INTERNAL CIRCLIP IS-17 1
16 INC. IN PCA KIT SPRING TH14-040 1
17 INC. IN PCA KIT PRESSURE PISTON 1
18 12-190-010 BALL BEARING 6200-ZZ 1
19 12-190-011 INTERNAL CIRCLIP IR-28 2
20 12-190-012 CONNECTING ROD 1
21 12-190-013 NEEDLE BEARING TLA2212 1
22 12-190-014 CRANK SPINDLE 4.5mm 1
23 12-190-015 PARALLEL KEY 5 x 5 x 10 1
24 12-190-016 CRANK GEAR M1.0 x 86T 1
25 12-190-017 BALL BEARING 6000-ZZ 1
26A 12-190-018 MOTOR UNIT 110V 1
26B 12-190-019 MOTOR UNIT 220V 1
27 12-190-020 CARBON BRUSH 7 x 11 2
28 12-190-021 BRUSH CAP 2
29 12-190-022 FUSE PLATE 1
30A 12-190-023 FUSE 110V 1
30B 12-190-024 FUSE 220V 1
31 12-017 SCREW M4 x 12 4
32 12-190-025 SWITCH PLATE 1
33 12-190-026 POWER SWITCH 1
34 12-190-027 MOTOR HOUSING-RIGHT 1
35 12-190-028 CABLE GLAND SB8R-31
36A 12-190-029 ELECTRONICS BOX 110v 1
36B 12-190-030 ELECTRONICS BOX 220v 1
37 12-190-031 SCREW M4 x 14 4
38 12-190-032 MOTOR HOUSING-LEFT 1
39 12-190-033 SCREW M4 x 35 6
40 12-190-034 SCREW M4 x 30 2

15
ITEM PRODUCT CODE DESCRIPTION QTY
41 12-190-035 SCREW M5 x 25 2
42 12-190-036 SOCKET CAP SCREW M5 x 25 4
43 12-190-050 GUIDE CYLINDER Ø26 x Ø32 x 30 1
44 12-190-051 RETAINING RING IR-32 1
45 12-190-052 DRIVE PISTON 1
46 12-190-053 WRIST PIN-ROD Ø10 x 23.5 1
47 12-018 PACKING NUT 1
48 12-019 SEAL SEAT 1
49 12-012* O-RING S-31.5 1
50 12-013* O-RING Ø31.2 x Ø35.1 x 1.8 1
51 12-002 COMPLETE PACKING KIT 1
52 12-009 DISC SPRING 3
53 12-190-054 DISPLACEMENT PISTON 1
54 12-012 CHECK BALL Ø6.35 1
55 12-010 BALL SEAT-SMALL Ø4 x Ø13.8 x 4 1
56 12-011* O-RING 1
57 12-015 BALL SEAT FASTENER M16 x P1.0 1
58 12-008 PACKING SPACER 1
59 12-190-055 PUMP HOUSING 1
60 12-190-056 PRESSURE ACTUATOR 1
61 12-190-095 SPACER Ø10 x Ø15 x 2 1
62 12-003 OUTPUT NIPPLE PT 1/4" x 1/4"-19PF 1
63 12-190-057 SOCKET PRESSURE PLUG PT 1/4" 1
64 12-190-058 PRIMING VALVE 1
65 12-190-059 DRAIN TUBE PT1/8" x 0.92M 1
66 12-190-060 FLAT WASHER 1/4" x Ø10 x 1 4
67 12-190-061 SOCKET CAP SCREW M6 x 110 4
68 12-190-062 SPACER Ø25.5 x Ø38 x 7 1
69 12-190-063 INNER SPACER Ø22 x Ø32 x 9 1
70 12-007 BALL GUIDE 1
71 12-006 CHECK BALL Ø12.7 1
72 12-190-064 BALL SEAT Ø9 x Ø20 x 5 1
73 12-190-065 GLAND NUT 1
74 12-190-066 HOSE CLIP 1
75 12-190-067 O-RING Ø2.4 x Ø19.8 x Ø24.6 2
76 12-190-068 SUCTION HOSE 1
77 QF0535015B INLET STRAINER 20 MESH 1
78 12-190-090 SOCKET CAP SCREW M8 x 35 4
79 12-190-091 FRAME 1
80 12-190-092 FRAME LEFT 1
81 12-190-093 POWER SUPPLY CORD 1
85 12-190-094 TUBE HOLDER Ø11 x Ø22 5
86 12-001 PACKING NUT TOMMY BAR 1
88 61415EETD HIGH PRESSURE HOSE 1/4” x 15M 3300 PSI 1

Sanique
UK & Europe
2b Stephenstown Industrial Park
Balbriggan
County Dublin
Ireland
K32 KV26
Australia
27 Tatura Avenue
Gosford
NSW 2250
Email sales@sanique.co.uk
www.sanique.co.uk
www.sanique.com.au
Phone
UK 01494 360751
Ireland 1800 714005
Australia 1300 229 757
International +353 1690 3162
This manual suits for next models
2
Table of contents
Popular Accessories manuals by other brands

FilterSense
FilterSense DynaCHARGE PM 1 Series Installation and operating manual

Autonics
Autonics BJ Series product manual

Apogee Instruments
Apogee Instruments PAR-FAR owner's manual

Honeywell
Honeywell T87 installation instructions

Ecodhome
Ecodhome SmartDhome installation manual

urmet domus
urmet domus 729 manual

Assault Fitness
Assault Fitness Airbike Elite TECHNICAL SPECIFICATIONS & USE GUIDELINES

TWINBIRD
TWINBIRD SC-UD08 Operation manual

ARIETE
ARIETE ghiro il tuo dolce sonno Series manual

Fire-Lite Alarms
Fire-Lite Alarms CP355 Installation and maintenance instructions

Command access
Command access CAT-AIR Insert Instructions

Swann
Swann SR16220 Installation and user guide