Sanofi-aventis BG STAR User manual

Application number: 184338 Page 1 of 48
Date of revision: August 18, 2011
s-a Version 2.1 dated August 26, 2011
Blood Glucose Monitoring System
OWNER’S GUIDE

Application number: 184338 Page 2 of 48
Date of revision: August 18, 2011
s-a Version 2.1 dated August 26, 2011
Key Features of the BGStarTM
No Coding Required – The BGStar doesn’t require you to enter a code. Insert a test strip and
you are ready to start the test.
Pre/Post Meal Tagging – After you test, tag your reading with the mealtime. You can organize
your data, and see how your test results change before and after meals.
Positive Feedback – The BGStar will also display a smiley face icon if your result is within the
target range.
Toll free sanofi-aventis 24 hour support Tel.: 1-888-852-6887 or visit us at www.bgstar.ca
In case of emergency, contact your health professional or emergency medical response.
Manufactured by AgaMatrix Inc., 7C Raymond Avenue, Salem NH 03079 USA
For sanofi-aventis Canada Inc., 2150 St. Elzear Blvd. West, Laval (Quebec) Canada H7L 4A8
www.bgstar.ca
©2011 sanofi-aventis
Meter Firmware ©2011AgaMatrix, Inc.
U.S. and International Patents Pending. All rights reserved. All trademarks and/or copyrights are
properties of their respective owners.

Application number: 184338 Page 3 of 48
Date of revision: August 18, 2011
s-a Version 2.1 dated August 26, 2011
Contents
Chapter Page
1 Getting Started
2 Important Health-related Information
3 Important Information about Your BGStar System
4 About the BGStar System
5 Meter Basics
6 Preparing For a Test With Your BGStar Meter
7 Performing a Control Solution Test
8 How To Test Your Blood Glucose Level
9 Testing on Your Palm or Forearm
10
10.1
10.2
10.3
10.4
10.5
Data Management Features
Viewing Individual Results
Viewing 14 Day Statistics
Viewing 14, 30 and 90 Day Averages
Viewing Pre/Post Mealtime Averages & Glucose Variability Tracking
Viewing 1 Month, 2 Week, and 3 Day Trend Graphs
11 Setting the Mealtime Tag
12 Setting Meter Volume
13 Setting the Time
14 Setting the Date
15 Setting Hypoglycemic Warning Alarms
16 Setting Hyperglycemic Warning Alarms
17 Setting the Glucose Target Range
18 Setting Alarms
19 Errors and Troubleshooting
20 Display Messages
21 Batteries
22 Caring for Your Meter and Lancing Device
23 Meter Specifications
24 Symbols

Application number: 184338 Page 4 of 48
Date of revision: August 18, 2011
s-a Version 2.1 dated August 26, 2011
CHAPTER 1 Getting Started
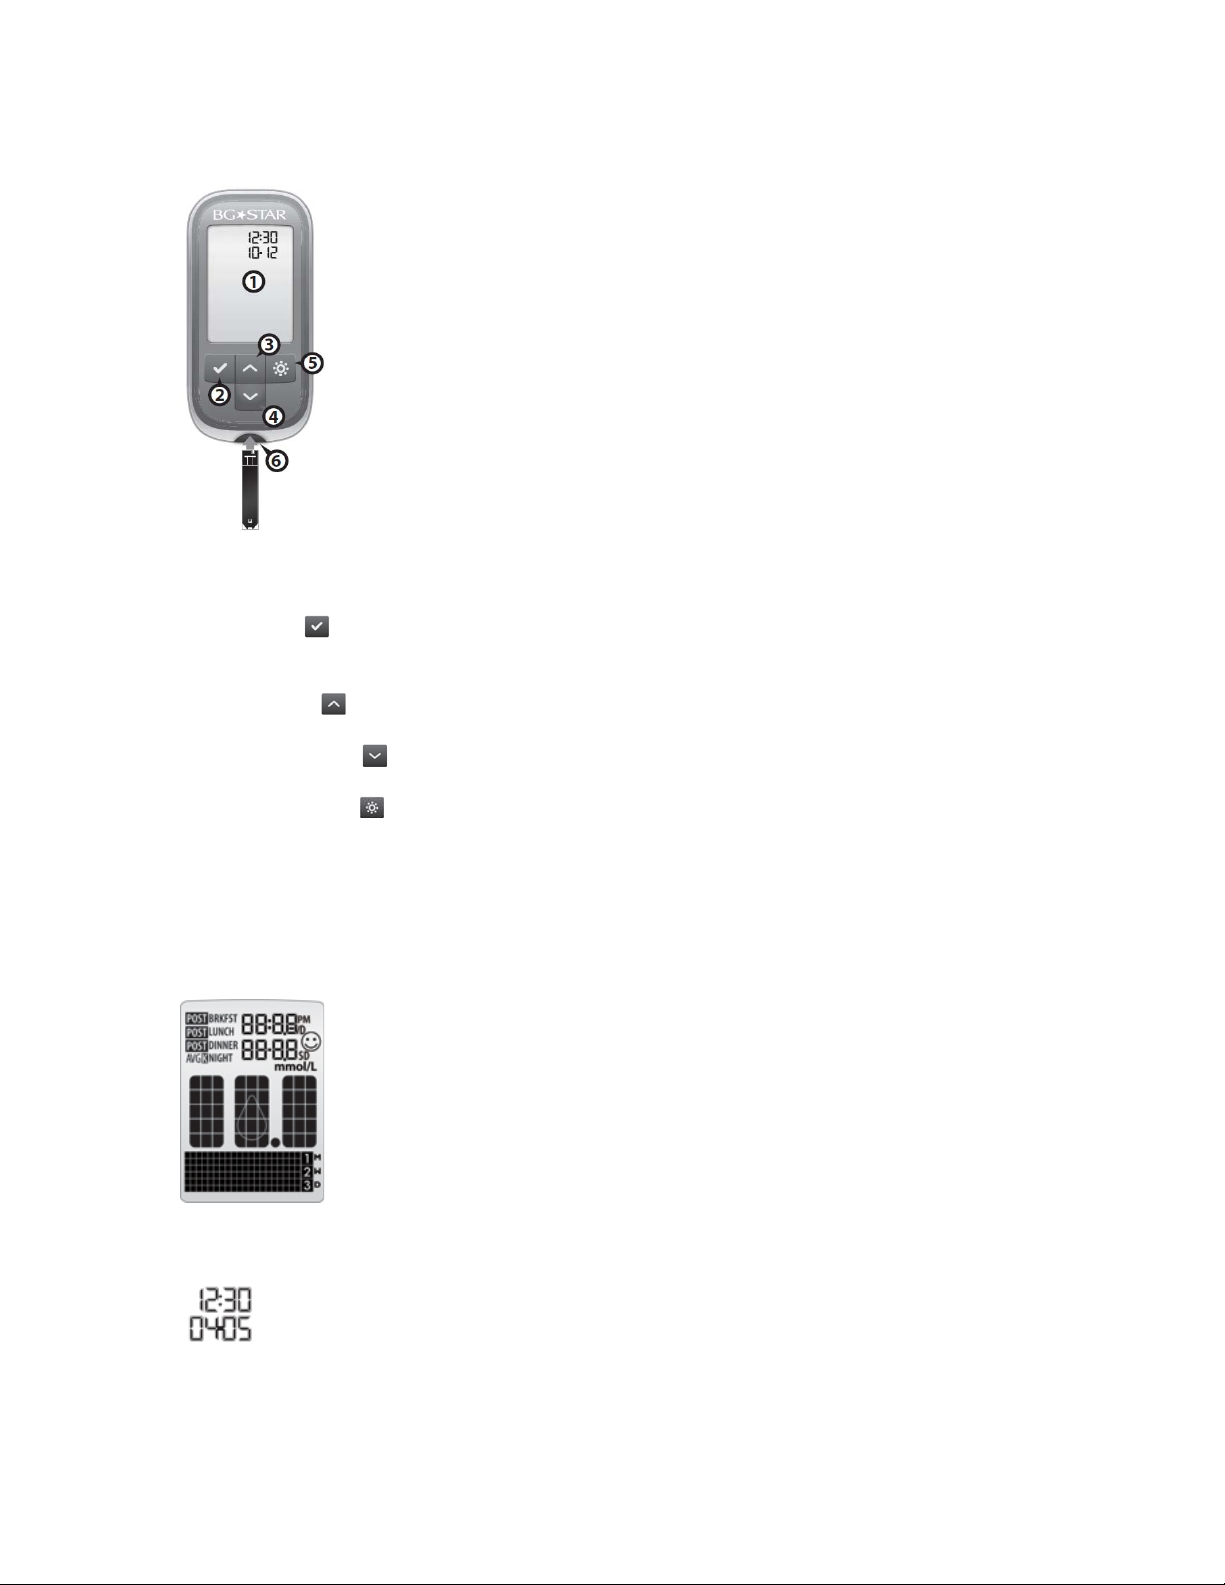
Unpack your BGStarTM System Kit. Dispose of the packing material properly.
IMPORTANT: To ensure accurate use of meter, verify the time, date and units of measure.
For step-by-step instructions on changing the time and date settings, please refer to chapters 13
and 14.
CHAPTER 2 Important Health-related Information
Please Read the Following:
[1] Inaccurate results may occur in severely hypotensive individuals or patients in shock.
Inaccurate low results may occur for individuals experiencing a hyperglycemic-hyperosmolar
state, with or without ketosis. Critically ill patients should not be tested with blood glucose
meters.
[2] Severe dehydration and excessive water loss may yield inaccurate results. If you believe you
are suffering from severe dehydration, consult your health professional immediately.
[3] Patients undergoing oxygen therapy may receive inaccurate results.
[4] Results below 3.9 mmol/L may mean low blood glucose levels (hypoglycemia).
[5] Results over 13.3 mmol/L may mean high blood glucose levels (hyperglycemia). Checking
ketones may be advisable.
[6] If you get results below 3.9 mmol/L or above 13.3 mmol/L and do not have symptoms of
hypoglycemia or hyperglycemia, repeat the test. If you have symptoms, or continue to get results
below 3.9 mmol/L or above 13.3 mmol/L, contact your health professional immediately.
[7] If you are experiencing symptoms that are not consistent with your blood glucose test and you
have followed all instructions described in the BGStar Owner’s Guide, follow the treatment plan
recommended by your health professional team or contact your health professional immediately.
[8] Do not use test strips that are expired or appear to be damaged as they may return inaccurate
results.
[9] Health professionals should follow their institution’s infection control protocols.
[10] Always follow your health professional’s recommendations.
CHAPTER 3 Important Information about Your BGStar System
The BGStar System should be used:

Application number: 184338 Page 5 of 48
Date of revision: August 18, 2011
s-a Version 2.1 dated August 26, 2011
[1] For quantitative measuring of blood glucose levels from fresh capillary whole blood samples
taken from the fingertip, palms (at the base of the thumb), or forearms.
[2] For in vitro diagnostic (i.e. outside of the body) use only.
[3] With BGStar Test Strips and BGStar Control Solution only. Do not use other brands of test
strips and control solution with this meter. This may produce inaccurate results.
[4] For use at home (over the counter (OTC)) by persons with diabetes, or in a clinical setting by
health professionals, as an aid to monitor the effectiveness of diabetes control.
Do not use the BGStar System for:
[1] The diagnosis of diabetes.
[2] Testing the glucose levels of neonates (children under 4 weeks).
[3] Testing glucose levels of arterial or venous blood.
[4] Testing glucose from sites other than the fingertip, palm (at the base of the thumb), or
forearm.
Possible test sites:
The BGStar System requires only 0.5 μL of blood to perform a glucose test. For best results, test
using blood from the tip of any finger. The palm (at the base of the thumb) and forearm are
alternate, but less accurate test sites. Only select soft and fleshy areas to lance. Avoid lancing any
bony areas, obvious veins and moles.
Physiological differences in circulation between the fingertip, palm (at the base of the thumb),
and forearm may result in differences in blood glucose measurements between these sites.
Differences in glucose concentrations may be observed after eating, taking insulin, medication, or
exercise. Changes in blood glucose may be detected at the fingertips before the palm (at the base
of the thumb) and forearm.
It is recommended that you use a fingertip sample if:
[1] you are testing for hypoglycemia or if you suffer from hypoglycemia unawareness;

Application number: 184338 Page 6 of 48
Date of revision: August 18, 2011
s-a Version 2.1 dated August 26, 2011
[2] you are testing your blood glucose within 2 hours of eating, taking insulin or medication,
exercising; or
[3] your blood glucose results obtained from the palm (at the base of the thumb) or forearm are
not consistent with the way you feel.
CAUTION: Please read all the instructions provided in this Owner’s Guide and practice the
testing procedures before using the BGStar Blood Glucose Monitoring System. Blood glucose
monitoring should be done under the guidance of your health professional.
CHAPTER 4 About the BGStar System
Your BGStar System includes:
BGStar Blood Glucose Meter
Two Pre-installed CR2032, 3 Volt, Lithium Batteries
Lancing Device with Gray Cap
Clear Alternate Site Testing (AST) Lancing Device Cap
10 Sterile Lancets (Gauge 33)
Carrying Case
Owner’s Guide
Quick Reference Guide
Warranty Card
Test Strips and Control Solution are sold separately.
About the BGStar Test Strip
With your BGStar System, you can test your blood glucose on your fingertips, palms (at the base
of the thumb) or forearms. Testing with the BGStar System requires a small sample size, 0.5 μL
of blood, about the size of a pinhead.
(1) Front of the Test Strip: The front of the test strip is black in color. Ensure that the front (black-
colored) side of the test strip is facing up when inserting a test strip into the meter’s test strip port.
(2) Back of the Test Strip: The back of the test strip is white in color. Ensure that the back (white-
colored) side of the test strip is facing down when inserting a test strip into the meter’s test strip
port.
(3) Contact Bars: This end is inserted, front of the test strip facing up, into the meter’s test strip
port.
(4) Sample Area: Blood or control solution should be applied to the tip of the test strip here.
(5) Visual Fill Window: This window will turn red when enough blood has been applied or blue
when enough control solution has been applied.

Application number: 184338 Page 7 of 48
Date of revision: August 18, 2011
s-a Version 2.1 dated August 26, 2011
CAUTION: Dispose used test strips properly.
IMPORTANT: Use a BGStar Test Strip only once.
IMPORTANT: Only use BGStar Test Strips with the BGStar or iBGStar
TM
System.
Important Test Strip Information:
[1] Store the BGStar Test Strip vial in a cool, dry place at 8°C to 30°C.
[2] Use BGStar Test Strips only within the system operating temperature range of 10°C to 40°C.
[3] Keep away from direct sunlight and heat.
[4] Store your BGStar Test Strips in their original vial only; never store them in another vial, any
other container, or outside the vial.
[5] With clean, dry hands you may gently handle the BGStar Test Strip when removing it from
the vial or inserting it into the meter.
[6] After removing a BGStar Test Strip from the vial, immediately close the vial cap tightly.
[7] Do not use BGStar Test Strips beyond the expiration date or 90 days after first opening the
vial. This may cause inaccurate results. Write the discard date (90 days from the first opening) on
the test strip vial.
[8] Do not bend, cut or alter BGStar Test Strips.
[9] Apply only fresh capillary blood or control solution to the sample area of the BGStar Test
Strip.

Application number: 184338 Page 8 of 48
Date of revision: August 18, 2011
s-a Version 2.1 dated August 26, 2011
About the BGStar Meter
(1) Display: Glucose test results, symbols, messages, and graphs appear here.
(2) CHECK ( ) Button: Use the CHECK button to confirm an option or make a selection in a
menu.
(3) UP Arrow ( ) Button: Use the UP arrow button to scroll backward through options.
(4) DOWN Arrow ( ) Button: Use the DOWN arrow button to scroll forward through options.
(5) BACKLIGHT ( ) Button: Use the BACKLIGHT button to turn the backlight ON and
OFF.
(6) Test Strip Port: Insert the BGStar Test Strip, with the contact bars facing up, into the strip
port.
About the BGStar Meter Display Symbols/Messages
(1) Date and Time: Appears here, including when the meter is deactivated. For details on setting
the date, refer to chapter 14.
(2) Glucose Test Results

Application number: 184338 Page 9 of 48
Date of revision: August 18, 2011
s-a Version 2.1 dated August 26, 2011
(3) Low Battery Message: Appears when battery #2 in your meter is running low.
(4) Dead Battery Message: Appears when battery #2 in your meter is dead.
(5) Temperature Symbol: Appears when the meter is outside its operating temperature range of
10°C to 40°C.
(6) Ketone Symbol: Appears when your glucose test results are higher than 13.3 mmol/L.
(7) Control Solution message: Appears after you have performed a control solution test.
(8) Units of Measurement symbol: Results will be displayed in mmol/L.
(9) Apply Sample to Test Strip message: The flashing droplet symbol and the word “fill” will
signal you to apply a sample to the test strip.
(10) Volume Message: Can be set to ON or OFF.
(11) 1 Month, 2 Week, 3 Day Indicators: The appropriate number of days will appear when
viewing graphical averages.

Application number: 184338 Page 10 of 48
Date of revision: August 18, 2011
s-a Version 2.1 dated August 26, 2011
(12) 1,2,3 Countdown: The 1, 2 and 3 symbols will appear during a glucose test.
(13) Graphing Area: Areas of the dot matrix will appear during a test and when displaying
graphs.
(14) Happy Face Symbol: The happy face is displayed with glucose test results that fall within
specific pre and post meal target ranges.
(15) Mealtime Tags: The mealtime tags appear after a test is complete and will help categorize
your results.
(16) /D, SD, and AVG Symbols: These symbols appear in the meter’s data management
functions.
About the BGStar Lancing System
(1) Arming Handle: Arms the device so it is ready to lance.
(2) Depth Adjustment Dial: Adjusts how deep the lancet will lance the skin.

Application number: 184338 Page 11 of 48
Date of revision: August 18, 2011
s-a Version 2.1 dated August 26, 2011
(3) Depth Indicator Window: Displays the depth setting of the lancing device.
(4) Release Button: Fires the lancet.
(5) Lancet: Lances the skin to produce a drop of blood.
(6) Lancet Cover: Covers the lancet for safety.
(7) Lancing Device Cap: Covers the lancet when in lancing device.
(8) Alternate Site Testing Cap: An AST clear lancing device cap used for obtaining a blood
sample on the palm (at the base of the thumb) or forearm.
(9) Lancet Holder Cup: Holds the lancet in place inside the lancing device.
CHAPTER 5 Meter Basics
METER SYSTEM CHECK
Each time your meter is activated, it will perform a meter system check. All display segments and
the backlight will briefly flash ON.
IMPORTANT: If all the display segments DO NOT flash ON (each time your meter is
activated), do not use the meter. Call sanofi-aventis toll free immediately at 1-888-852-6887.
HOW TO ACTIVATE THE METER AND ENTER MENU MODE
[1] When your meter is deactivated, press the CHECK ( ) button to enter the menu mode.
[2] Press the DOWN ( ) or UP ( ) arrow buttons to view the options: MEM, STATS, AVG,
MEAL, GRAPH, TIME, DATE, TAG, RANGE, BEEP, HYPO, HYPER, and ALARM. To
view/alter any of these options or settings press the CHECK ( ) button.
HOW TO ACTIVATE THE METER AND VIEW INDIVIDUAL RESULTS
[1] When your meter is deactivated, press the CHECK ( ) button to enter menu mode. The word
“MEM” is displayed. Press the CHECK ( ) button again to see your most recent test result.
[2] Press the DOWN ( ) or UP ( ) arrow buttons repeatedly to scroll through every test result,
starting from the most recent and ending with the oldest.
HOW TO ACTIVATE THE METER AND VIEW MEALTIME AVERAGES

Application number: 184338 Page 12 of 48
Date of revision: August 18, 2011
s-a Version 2.1 dated August 26, 2011
[1] When your meter is deactivated, press the CHECK ( ) button once to enter Menu mode. The
word “MEM” is displayed. Press the DOWN ( ) or UP ( ) arrow buttons until the word
“MEAL” appears in the lower part of the display. Press the CHECK ( ) button again to see your
most recent test result.
[2] Press the DOWN ( ) or UP ( ) arrow buttons repeatedly to scroll through your Breakfast,
Lunch, Dinner, and Bedtime Averages.
HOW TO DEACTIVATE THE METER
To deactivate the meter, press and hold the CHECK ( ) button for 2 seconds. If the meter is
inactive for 3 minutes, the meter will be deactivated automatically.
HOW TO ACCELERATE THROUGH OPTIONS
Hold down the DOWN ( ) or UP ( ) arrow buttons to accelerate through options or results.
CHAPTER 6 Preparing For a Test With Your BGStar Meter
[1] Insert a BGStar Test Strip: Insert a new BGStar Test Strip into the meter. Make sure you
insert the test strip, with the contact bars facing up, into the strip port. The meter will be activated
automatically.
Note: If you do not start the test within 5 minutes, the meter will be deactivated. To reactivate
your meter, remove the unused BGStar Test Strip and reinsert it into the meter.
[2] Meter Ready for Test: The meter now displays the blood drop symbol and the word “Fill”.
The BGStar System is now ready for you to apply control solution or blood.
CHAPTER 7 Performing a Control Solution Test
The control solution is used to:
[1] Ensure that your BGStar Meter and Test Strips are working together properly.
[2] Practice testing without having to use your own blood.
Control solution tests should be performed when you:
[1] First get your meter.

Application number: 184338 Page 13 of 48
Date of revision: August 18, 2011
s-a Version 2.1 dated August 26, 2011
[2] Suspect that your meter or test strips are not working properly.
[3] Think your test results are not accurate.
[4] Have dropped or damaged your meter or exposed your meter to liquids.
[5] Are advised by your health professional to do so.
Control solution should only be used for 90 days after first opening the bottle or until the
expiration date printed on the label, whichever comes first.
IMPORTANT: Count forward 90 days from the date you open a new bottle of BGStar Control
Solution. This is your discard date. Write the discard date on the BGStar Control Solution
bottle.
Important BGStar Control Solution information:
[1] Use only BGStar Control Solution with your BGStar System.
[2] Always replace the cap on the control solution bottle immediately after use.
[3] Do not add water or any other liquid to control solution.
[4] Control solution tests should be performed within the system operating temperature range of
10°C to 40°C.
How to perform a control solution test:
[1] Inserting a BGStar Test Strip: Insert a new BGStar Test Strip into the meter. The meter will
be activated when the test strip is fully inserted.
[2] Meter Ready for Test: The meter now displays the droplet symbol and the word “Fill”. The
BGStar System is now ready for you to apply control solution. You do not need to set a
calibration code for this meter.
[3] Applying Control Solution: Shake the control solution bottle. Discard the first drop of
control solution and wipe the bottle tip clean using a clean tissue or paper towel. Dispense a
second drop onto a clean surface, such as an unused resealable plastic bag.

Application number: 184338 Page 14 of 48
Date of revision: August 18, 2011
s-a Version 2.1 dated August 26, 2011
Bring the tip of the test strip to the control solution sample. The BGStar System will
automatically detect if a test is performed with BGStar Control Solution.
When control solution is applied, the visual fill window on the BGStar Test Strip turns blue. Your
meter will beep once indicating that you should remove the tip of the BGStar Test Strip from the
control solution sample. On the meter display, the droplet symbol fills. The scrolling bar and 1-2-
3 indicates that the meter is calculating your results.
[4] Viewing Control Solution Test Result: The result will appear on the display and, if the
volume is enabled, your meter will beep. The date and the abbreviation “Ctrl” will also appear on
the display.
Compare the result of your control solution test to the range printed on the BGStar Test Strip vial
label for the control solution level that you used. Your control solution result should fall within
this range. The control solution test result is stored in memory.
This is the visual fill window.
DO NOT PUT CONTROL
SOLUTION HERE.
Apply control solution here.
Droplet
Symbol:

Application number: 184338 Page 15 of 48
Date of revision: August 18, 2011
s-a Version 2.1 dated August 26, 2011
Normal: 4.4-6.7 mmol/L
FOR EXAMPLE ONLY.
Refer to your test strip vial
label for corresponding
range.
To deactivate the meter, remove the used BGStar Test Strip. Dispose of used materials properly.
If your control solution test results are out of the range, repeat the test. If the results from the
control solution tests continue to fall outside that range, do not use the BGStar System to test your
blood glucose. Call sanofi-aventis toll free at 1-888-852-6887.
IMPORTANT: Out-of-range test results may be due to one or more of the following factors:
[1] Expired or defective control solution.
[2] Expired or defective test strip.
[3] Error in performing test.
[4] Watered-down control solution.
[5] Meter malfunction.
[6] Control solution test done outside the system operating temperature of 10°C to 40°C.
[7] Failure to shake the control solution bottle vigorously before using.
[8] Failure to discard the first drop of control solution and to wipe the bottle tip clean.
CAUTION: Results from control solution tests do not reflect your blood glucose level. The
control solution range is a target range for control solution only. It is not a target range for
your blood glucose level. Control results are not included in the pre and post meal time, 14, 30
and 90 day averages.

Application number: 184338 Page 16 of 48
Date of revision: August 18, 2011
s-a Version 2.1 dated August 26, 2011
CHAPTER 8 How to Test Your Blood Glucose Level
CAUTION: To ensure accurate results, wash your hands with warm, soapy water and dry
before every test. Make sure there is no grease, oil or lotion on the test site. Use lancets only
once. Do not use any lancet or lancing device that has been used by another person. Unwashed
hands may lead to inaccurate results.
How to test your blood glucose level:
[1] Preparing the BGStar Lancing Device: Use the gray cap for testing on a fingertip and the
clear cap for testing on the palm (at the base of the thumb) or forearm.
Remove Lancing Device Cap: Snap off the cap from the lancing device.
Insert New Lancet: Insert a new BGStar Lancet firmly into the lancet holder cup. Pushing the
lancet into the lancet holder cup may arm the device; this is OK.
Twist the Lancet Cover Off: Hold the lancet firmly in place with one hand and use your other
hand to twist off the lancet cover. Do not discard the lancet cover. It should be used when
discarding your used lancet.
Replace Lancing Device Cap: Replace the lancing device cap until it snaps into place. Be careful
not to touch the exposed needle on the lancet.
Set the Lancing Level: The BGStar Lancing Device offers 8 depth settings. Rotate the dial to the
desired setting as shown in the depth indicator window. Level 1 is the most shallow; level 8 is the
deepest. If you have never lanced before, it is recommended that you start at level 3. If necessary,
set the depth level to a deeper setting to produce enough blood to fill the test strip (0.5 μL).

Application number: 184338 Page 17 of 48
Date of revision: August 18, 2011
s-a Version 2.1 dated August 26, 2011
Arm
the Handle: Pull the arming handle out until it clicks. You may have already armed the
handle accidentally while inserting the lancet; this is OK. The lancing device is now ready for
use.
[2] Insert a BGStar Test Strip: Insert a new BGStar Test Strip into the strip port of the meter.
Make sure you insert the test strip, with the contact bars facing up, into the test strip port. The
meter will be activated when the test strip is fully inserted.
Note: If you do not start the test within 5 minutes, the meter will be deactivated. To reactivate
your meter, take out the unused BGStar Test Strip and reinsert it into the meter.
Meter Ready for Test: The meter now displays the droplet symbol and the word “Fill”. The
BGStar System is now ready for you to apply blood. You do not need to set a calibration code for
this meter.
[3] Lancing: To ensure accurate results, wash hands with warm, soapy water and dry before
every glucose test. For details on possible test sites, refer to chapter 3.
For instructions on how to test on your palm or forearm, please refer to chapter 9.
Note: Keep your hand warm or gently massage the site you are lancing to stimulate blood flow.
Lance Test Site: Press the lancing device against the site to be lanced. Press the release button.
Obtain Blood Drop: When testing on a finger tip, wipe away the first blood drop that appears
using a clean tissue or paper towel. Squeeze from the base of your finger up towards the tip, until
a second small blood drop forms.

Application number: 184338 Page 18 of 48
Date of revision: August 18, 2011
s-a Version 2.1 dated August 26, 2011
Do not squeeze directly around the lanced area.
If necessary, set the lancing device to a deeper setting or use a larger lancet to produce enough
blood.
[4] Applying Blood Sample
Bring Test Strip to Blood Sample: The meter now displays the droplet symbol and the word
“Fill”. This means your BGStar System is now ready for you to apply blood. Immediately bring
the BGStar Test Strip to the blood sample.
The test strip fills from the tip. Do not apply blood on the top surface of the test strip. The BGStar
Test Strip acts like a sponge and draws the blood into the test strip through the sample area. The
visual fill window of the BGStar Test Strip will turn red.
WARNING: If the visual fill
window does not completely fill,
you may get an inaccurate result.
Retest using a new test strip and
ensure that the visual fill window
is com
p
letel
y
f
ull.
This is the visual
fill window. DO
NOT PUT
BLOOD HERE.
Apply blood
here.

Application number: 184338 Page 19 of 48
Date of revision: August 18, 2011
s-a Version 2.1 dated August 26, 2011
IMPORTANT:
[1] Remove the test strip from the blood sample as soon as you hear the beep.
[2] Do not press the BGStar Test Strip against the test site.
[3] Do not scrape blood onto the BGStar Test Strip.
[4] Do not apply blood to the top side of the BGStar Test Strip.
[5] Do not apply blood to the BGStar Test Strip when the test strip is out of the meter.
[6] Do not put blood or foreign objects into the BGStar strip port. Doing so may lead to system
failure.
[7] Do not apply more blood after beep.
[8] Carefully read the test results on the display before making any treatment decisions.
Remove Test Strip from Blood Sample when you hear the beep: Your meter will beep once,
when you should remove the tip of the BGStar Test Strip from the blood sample.
On the meter display, the droplet symbol fills. The scrolling bar and 1-2-3 indicates that the meter
is calculating your results.
Your test is completed when your blood glucose test result with time and date is shown on the
display. If the volume is ON, you will hear a beep. Your test result is now stored in the memory.
Droplet
S
y
mbol:
BEEP

Application number: 184338 Page 20 of 48
Date of revision: August 18, 2011
s-a Version 2.1 dated August 26, 2011
[5] Test Result Mealtime Tagging and Feedback
If the Mealtime Tag Feature is Enabled: The BGStar Meter allows you to add a tag to your test
result. Tagging results allows you to view averages before and after meals to see what effect food
has on your blood glucose levels.
After your result appears, a tag will flash on the display suggesting a mealtime tag (Breakfast,
Post Breakfast, Lunch, Post Lunch, Dinner, Post Dinner, and Night). For example, if you test at
12:30, the meter will flash the word “POST LUNCH.”
If the tag is incorrect, you can change it by pressing the DOWN ( ) or UP ( ) arrow buttons.
Pressing the UP ( ) arrow button would change the tag to Lunch, pressing the DOWN ( )
arrow button would change the tag to Dinner. Pressing the CHECK ( ) button confirms the
mealtime tag and it stops flashing. Your test result’s mealtime tag is now stored in the memory.
Example of Mealtime Tag:
POST LUNCH
You can still change this setting by pressing the DOWN ( ) or UP ( ) arrow buttons, if you
haven’t removed the test strip from the meter yet.
Example of Mealtime Tag:
POST BREAKFAST
Other manuals for BG STAR
2
Table of contents
Other Sanofi-aventis Blood Glucose Meter manuals