Sanofi-aventis BG STAR User manual

Blood Glucose Monitoring System
OWNER’S GUIDE
®
OWNER’S GUIDE
WNER’S GUID
Blood
G
lucose Monitorin
g
S
ystem
SAP-Nummer 508740
Sprachvariante 031
Erstellversion 5
Packmittel erstellt am 23.09.2011 / Keim
Packmittel geändert am 12.10.2011 / Keim
Abmessungen Format (B x H) 101,6 x 139,7 mm
Farben Cyan Magenta
Black Yellow

1
Key Features of the BGStar®
No Coding Required - The BGStar doesn’t require you to
enter a code. Insert a test strip and you are ready to start
the test.
Pre/Post Meal Tagging - After you test, tag your reading
with the mealtime. You can organize your data and see
how your test results change before and after meals.
Positive Feedback - The BGStar will also display a smiley
face icon if your result is within the target range.
Customer Care: AUS 1800 247 827 (BGStar)
NZ 0508 247 827 (BGStar)
In case of emergency, contact your healthcare professional or
emergency medical response.
Manufacturer:
AgaMatrix, Inc.
7C Raymond Avenue,
Salem, NH 03079 USA
©2011 sanofi-aventis
Meter Firmware ©2011 AgaMatrix, Inc.
U.S. and International Patents Pending. All rights reserved. All trademarks and/or
copyrights are the property of their respective owners.
Distributor:
sanofi-aventis australia pty ltd
12-24 Talavera Road
Macquarie Park, NSW 2113
<MAT<508740
sanofi-aventis new zealand limited
Level 8, James and Wells Tower
56 Cawley Street
Ellerslie
Auckland, 1050

2 3
Contents
Getting Started
Important Health-related Information
Important Information about Your
BGStar System
About the BGStar System
Meter Basics
Preparing For a Test With Your BGStar Meter
Performing a Control Solution Test
How To Test Your Blood Glucose Level
Testing on Your Palm or Forearm
Data Management Features
Viewing Individual Results
Viewing 14 Day Statistics
Viewing 14, 30, and 90 Day Averages
Viewing Pre/Post Mealtime Averages and Glucose
Variability Tracking
Viewing 1 Month, 2 Week, and 3 Day Trend Graphs
Setting the Mealtime Tag
Setting Meter Volume
Setting the Time
Setting the Date
Setting Hypoglycemic Warning Alarms
Setting Hyperglycemic Warning Alarms
Setting the Glucose Target Range
Setting Alarms
Errors and Troubleshooting
Display Messages
Batteries
Caring For Your Meter and Lancing Device
Meter Specifications
Symbols
1
2
3
4
5
6
7
8
9
10
10.1
10.2
10.3
10.4
10.5
11
12
13
14
15
16
17
18
19
20
21
22
23
24
CHAPTER PAGE PAGECHAPTER
4
4
5
8
14
16
17
22
30
32
33
34
34
35
37
40
40
41
42
44
45
46
48
50
55
58
61
61
63
TITLE TITLE

4 5
Unpack your BGStar System Kit. Dispose of the packing
material properly.
IMPORTANT: To ensure accurate use of meter, verify the
time, date and units of measure.
For step-by-step instructions on changing the time and date
settings, please refer to chapters 13 and 14.
Getting Started
1
CHAPTER
Please Read the Following:
[1] Inaccurate results may occur in severely hypotensive
individuals or patients in shock. Inaccurate low results may
occur for individuals experiencing a hyperglycemic-
hyperosmolar state, with or without ketosis. Critically ill
patients should not be tested with blood glucose meters.
[2] Severe dehydration and excessive water loss may yield
inaccurate results. If you believe you are suffering from severe
dehydration, consult your healthcare professional immediately.
[3] Patients undergoing oxygen therapy may receive
inaccurate results.
[4] Results below 3.9 mmol/L may mean low blood glucose
levels (hypoglycemia).
Important Health-related Information
2
CHAPTER
[5] Results over 13.3 mmol/L may mean high blood glucose
levels (hyperglycemia). Checking ketones may be advisable.
[6] If you get results below 3.9 mmol/L or above 13.3 mmol/L
and do not have symptoms of hypoglycemia or hyperglycemia,
repeat the test. If you have symptoms, or continue to get
results below 3.9 mmol/L or above 13.3 mmol/L, contact your
healthcare professional immediately.
[7] If you are experiencing symptoms that are not consistent
with your blood glucose test and you have followed all
instructions described in the BGStar Owner’s Guide, follow
the treatment plan recommended by your healthcare team or
contact your healthcare professional immediately.
[8] Do not use test strips that are expired or appear to be
damaged as they may return inaccurate results.
[9] Healthcare professionals should follow their institution’s
infection control protocols.
[10] Always follow your healthcare professional’s
recommendations.
The BGStar System should be used:
[1] For measuring blood glucose levels from fresh capillary
whole blood samples taken from the fingertip, palms (at the
base of the thumb), or forearms.
Important Information about
Your BGStar System
3
CHAPTER

6 7
Physiological differences
in circulation between the
fingertip, palm (at the base
of the thumb), and forearm
may result in differences in
blood glucose measurements
between these sites.
Differences in glucose
concentrations may be observed after eating,
taking insulin, medication, or exercise.
Changes in blood glucose may be detected at
the fingertips before the palm (at the base of
the thumb) and forearm.
It is recommended that you use a ngertip sample if:
[1] You are testing for hypoglycemia or if you suffer from
hypoglycemia unawareness,
[2] You are testing your blood glucose within 2 hours of
eating, taking insulin or medication, exercising, or
[3] Your blood glucose results obtained from the palm (at the
base of the thumb) or forearm are not consistent with the way
you feel.
CAUTION: Please read all the instructions provided in this
Owner’s Guide and practice the testing procedures before
using the BGStar Blood Glucose Monitoring System. Blood
glucose monitoring should be done under the guidance of
your healthcare professional.
[2] For in vitro diagnostic (i.e. outside of the body) use only.
[3] With BGStar Test Strips and BGStar Control Solution only.
Do not use other brands of test strips and control solution
with this meter. This may produce inaccurate results.
[4] For use at home (over the counter (OTC)) by persons with
diabetes, or in a clinical setting by healthcare professionals, as
an aid to monitor the effectiveness of diabetes control.
Do not use the BGStar System for:
[1] The diagnosis of diabetes.
[2] Testing the glucose levels of neonates (children under
4 weeks).
[3] Testing glucose levels of arterial or venous blood.
[4] Testing glucose from sites other than the fingertip, palm
(at the base of the thumb), or forearm.
Possible test sites:
The BGStar System requires only 0.5 μL of blood to perform a
glucose test. For best results, test using blood from the tip of
any finger. The palm (at the base of the thumb) and forearm
are alternate, but less accurate test sites. Only select soft and
fleshy areas to lance. Avoid lancing any bony areas, obvious
veins and moles.

8 9
About the BGStar System
4
CHAPTER
Your BGStar System includes:
• BGStar Blood Glucose Meter
• Two Pre-installed CR2032,
3 Volt, Lithium Batteries
• Lancing Device with Cap
• Clear AST Lancing Device Cap
Does not include:
The control solution is not provided as part of the kit but can
be requested through the customer care line on
AUS 1800 247 827 (BGStar) NZ 0508 247 827 (BGStar)
About the BGStar Test Strip
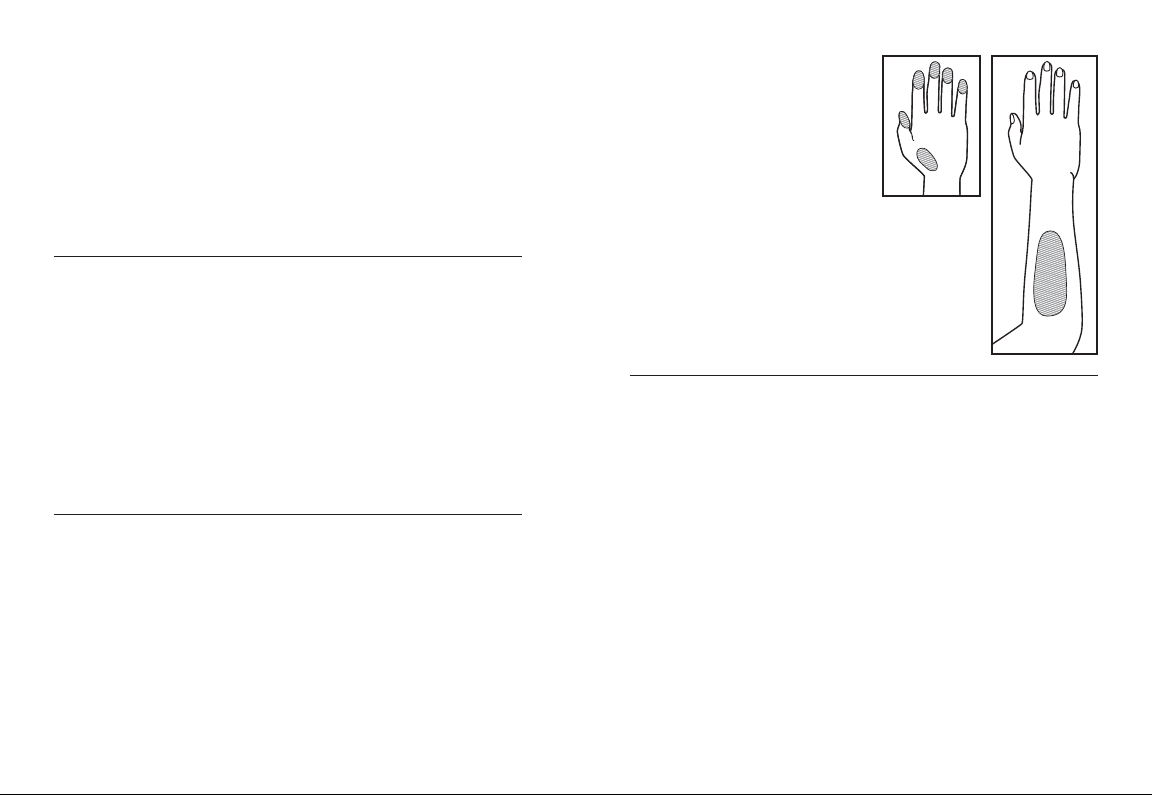
With your BGStar System, you can test your blood glucose on
your fingertips, palms (at the base of the thumb) or forearms.
Testing with the BGStar System requires a small sample size,
0.5 μL of blood, about the size of a pinhead.
CAUTION: Dispose of used test strips properly.
IMPORTANT: Use BGStar Test Strips only once.
IMPORTANT: Only use BGStar Test Strips with the BGStar
System.
Important Test Strip Information:
[1] Store the BGStar Test Strip vial in a cool, dry place between
8°C to 30°C.
[2] Use BGStar Test Strips only within the system operating
temperature range of 10°C to 40°C.
[3] Keep away from direct sunlight and heat.
[4] Store your BGStar Test Strips in their original vial only;
never store them in another vial, any other container, or
outside the vial.
[5] After removing a BGStar Test Strip from the vial,
immediately close the vial cap tightly.
[6] With clean, dry hands you may gently handle the BGStar Test
Strip when removing it from the vial or inserting it into the meter.
[7] Do not use BGStar Test Strips beyond the expiration date or
90 days after first opening the vial. This may cause inaccurate
results. Write the discard date (90 days from the first opening)
on the test strip vial.
[8] Do not bend, cut or alter BGStar Test Strips.
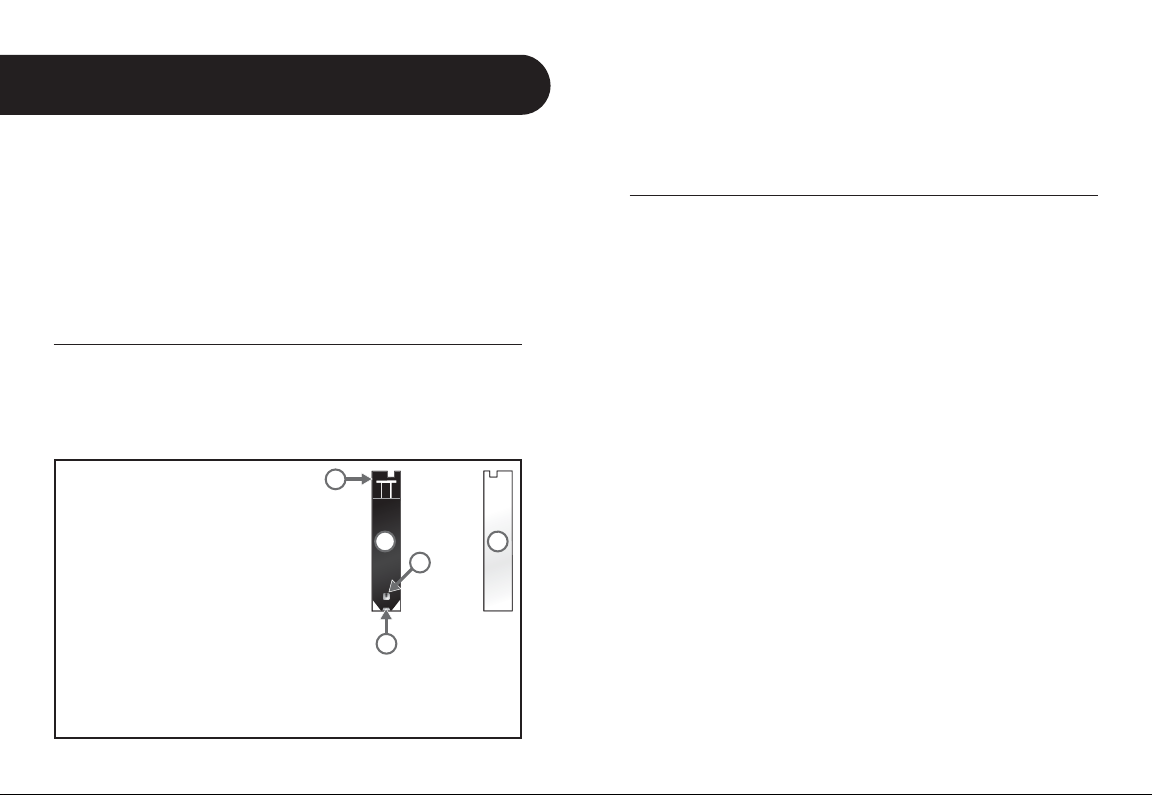
(1) Front of the Test Strip: The front of the
test strip is black in color. Ensure that the
front (black-colored) side of the test strip
is facing up when inserting a test strip
into the meter’s test strip port.
(2) Back of the Test Strip: The back of the
test strip is white in color. Ensure that the
back (white-colored) side of the test strip
is facing down when inserting a test strip
into the meter’s test strip port.
(3) Contact Bars: This end is inserted, front of the
test strip facing up, into the meter’s test strip port.
(4) Sample Area: Blood or control solution should be applied to the tip of the
test strip here.
(5) Visual Fill Window: This window will turn red when enough blood has
been applied or blue when enough control solution has been applied.
• 10 Sterile Lancets
• Compact Carrying Case
• 1 Vial of 10 Test Strips
• Owner’s Guide
• Warranty Card
4
3
12
5

10 11
[9] Apply only fresh capillary blood or control solution to the
sample area of the BGStar Test Strip.
About the BGStar Meter
(1) Display: Glucose test results, symbols,
messages, and graphs appear here.
(2) CHECK ( ) Button: Use the CHECK
button to confirm an option or make a
selection in a menu.
(3) UP Arrow ( ) Button: Use the UP
arrow button to scroll backward through
options.
(4) DOWN Arrow ( ) Button: Use the
DOWN arrow button to scroll forward
through options.
(5) BACKLIGHT ( ) Button: Use the BACKLIGHT button to
turn the backlight ON and OFF.
(6) Test Strip Port: Insert the BGStar Test Strip, with the
contact bars facing up, into the test strip port.
About the BGStar Meter Display Symbols/Messages
(1) Date and Time:
Appears here, including
when the meter is
deactivated.
(2) Glucose Test Results
(3) Low Battery Message:
Appears when battery #2 in
your meter is running low.
(4) Dead Battery Message: Appears when
battery #2 in your meter is dead.
(5) Temperature Symbol: Appears when the
meter is outside its operating temperature range
of 10°C to 40°C.
(6) Ketone Symbol: Appears when your glucose test
results are higher than 13.3 mmol/L.
(7) Control Solution message: Appears after
you have performed a control solution test.
(8) Units of Measurement symbol: Results
will be displayed in mmol/L.
(9) Apply Sample to Test Strip message: The
flashing droplet symbol and the word “fill” will signal
you to apply a sample to the test strip.
4
3
2
6
1
5

12 13
(10) Volume Message: Can be set to ON or OFF.
(11) 1 Month, 2 Week, 3 Day Indicators: The
appropriate number of days will appear when
viewing graphical averages.
(12) 1,2,3 Countdown: The 1, 2 and 3 symbols will
appear during a glucose test.
(13) Graphing Area: Areas of the dot
matrix will appear during a test and when
displaying graphs.
(14) Happy Face Symbol: The happy face is
displayed with glucose test results that fall within
specific pre and post meal target ranges.
(15) Mealtime Tags: The mealtime tags appear
after a test is complete and will help categorize
your results.
(16) /D, SD, and AVG Symbols: These symbols
appear in the meter’s data management functions.
About the BGStar Lancing System
(1) Cocking Handle: Cocks the device so it
is ready to lance.
(2) Depth Adjustment Dial: Adjusts how
deep the lancet will lance the skin.
(3) Depth Indicator Window: Displays
the depth setting of the lancing device.
(4) Release Button: Fires the lancet.
(5) Lancet: Lances the skin to produce a
drop of blood.
(6) Lancet Cover: Covers the lancet for
safety.
(7) Lancing Device Cap: Covers the lancet
when in lancing device.
(8) Alternate Site Testing Cap: An AST
clear lancing device cap used for obtaining
a blood sample on the palm (at the base of
the thumb) or forearm.
(9) Lancet Holder Cup: Holds the lancet
into place inside the lancing device.
2
1
3
4
8
7
5
6
9

14 15
METER SYSTEM CHECK
Each time your meter is activated, the
meter will perform a meter system check.
All display segments and the backlight
will briefly flash ON.
IMPORTANT: If all the display segments
DO NOT ash ON (each time your meter
is activated), do not use the meter. Call
Customer Care immediately.
HOW TO ACTIVATE THE METER AND ENTER MENU MODE
[1] When your meter is deactivated, press the CHECK ( )
button to enter the menu mode.
[2] Press the DOWN ( ) or UP ( ) arrow buttons to view the
options: MEM, STATS, AVG, MEAL, GRAPH, TIME, DATE, TAG,
RANGE, BEEP, HYPO, HYPER, and ALARM. To view/alter any of
these options or settings press the CHECK ( ) button.
HOW TO ACTIVATE THE METER AND VIEW INDIVIDUAL
RESULTS
[1] When your meter is deactivated, press the CHECK ( )
button to enter menu mode. The word “MEM” is displayed.
Meter Basics
5
CHAPTER
Press the CHECK ( ) button again to see your most recent
test result.
[2] Press the DOWN ( ) or UP ( ) arrow buttons repeatedly
to scroll through every test result, starting from the most
recent and ending with the oldest.
HOW TO ACTIVATE THE METER AND VIEW MEALTIME
AVERAGES
[1] When your meter is deactivated, press the CHECK ( )
button once to enter Menu mode. The word “MEM” is
displayed. Press the DOWN ( ) or UP ( ) arrow buttons until
the word “MEAL” appears in the lower part of the display.
Press the CHECK ( ) button again to see your most recent
test result.
[2] Press the DOWN ( ) or UP ( ) arrow buttons repeatedly
to scroll through your Breakfast, Lunch, Dinner, and Bedtime
Averages.
HOW TO DEACTIVATE THE METER
To deactivate the meter, press and hold the CHECK ( ) for
2 seconds. If the meter is inactive for 3 minutes, the meter will
be deactivated automatically.
HOW TO ACCELERATE THROUGH OPTIONS
Hold down the DOWN ( ) or UP ( ) arrow buttons to
accelerate through options or results.

16 17
The control solution is used to:
[1] Ensure that your BGStar Meter and Test Strips are working
together properly.
[2] Practice testing without having to use your own blood.
Control solution tests should be performed when you:
[1] First get your meter and you want to conduct the first
practice test.
[2] Suspect that your meter or test strips are not working
properly.
[3] Think your test results are not accurate.
[4] Have dropped or damaged your meter or exposed your
meter to liquids.
[5] Are advised by your healthcare professional to do so.
Control solution should only be used for 90 days after first
opening the bottle or until the expiration date printed on the
label, whichever comes first.
IMPORTANT: Count forward 90 days from the date you open
a new bottle of BGStar Control Solution. This is your discard
date. Write the discard date on the BGStar Control Solution
bottle.
Performing a Control Solution Test
7
CHAPTER
[1] Insert a BGStar Test Strip:
Insert a new BGStar Test Strip into
the meter. Make sure you insert
the test strip, with the contact
bars facing up, into the test strip
port. The meter will be activated
automatically.
Note: If you do not start the test within 5 minutes, the meter will
be deactivated. To reactivate your meter, press the CHECK ( )
button or remove the unused BGStar Test Strip and reinsert it into
the meter.
[2] Meter Ready for Test: The meter now displays the blood
drop symbol and the word “Fill”. The BGStar System is now
ready for you to apply control solution or blood.
Preparing For a Test With Your
BGStar Meter
6
CHAPTER

18 19
Dispense a second drop onto a clean surface, such as an
unused resealable plastic bag.
Bring the tip of the test strip to the control solution sample.
The BGStar System will automatically detect if a test is per-
formed with BGStar Control Solution.
When control solution is applied, the visual fill
window on the BGStar Test Strip turns blue. Your
meter will beep once indicating that you should
remove the tip of the BGStar Test Strip from the
control solution sample. On the meter display, the
droplet symbol fills. The scrolling bar and 1-2-3
indicates that the meter is calculating your results.
Important BGStar Control Solution information:
[1] Use only BGStar Control Solution with your BGStar
System.
[2] Always replace the cap on the control solution bottle
immediately after use.
[3] Do not add water or any other liquid to control solution.
[4] Control solution tests should be performed within the
system operating temperature range of 10°C to 40°C.
How to perform a control solution test:
[1] Inserting a BGStar Test Strip:
Insert a new BGStar Test Strip
into the meter. The meter will be
activated when the test strip is fully
inserted.
[2] Meter Ready for Test:
The meter now displays the droplet symbol and the word
“Fill”. The BGStar System is now ready for you to apply control
solution. You do not need to set a
calibration code for this meter.
[3] Applying Control Solution:
Shake the control solution bottle.
Discard the first drop of control
solution and wipe the bottle tip clean
using a clean tissue or paper towel.
This is the visual ll window.
DO NOT PUT CONTROL
SOLUTION HERE.
Apply control solution here.
The entire visual ll
window will turn blue.
Droplet
Symbol:

20 21
[4] Watered-down control solution.
[5] Meter malfunction.
[6] Control solution test done outside the system operating
temperature of 10°C to 40°C.
[7] Failure to shake the control solution bottle vigorously
before using.
[8] Failure to discard the rst drop of control solution and to
wipe the bottle tip clean.
CAUTION: Results from control solution tests do not reect
your blood glucose level. The control solution range is a
target range for control solution only. It is not a target
range for your blood glucose level.
[4] Viewing Control Solution Test Result:
The result will appear on the display and, if
the volume is enabled, your meter will beep.
The date and the abbreviation “Ctrl” will also
appear on the display.
Compare the result of your control solution
test to the range printed on the BGStar Test
Strip vial label for the control solution level
(Normal or High) that you used. Your control
solution result should fall within this range.
The control solution test result is stored in
memory.
To deactivate the meter, remove the
used BGStar Test Strip. Dispose of
used materials properly.
If your control solution test results are
out of the range, repeat the test. If the
results from the control solution tests
continue to fall outside that range, do
not use the BGStar System to test your
blood glucose. Call Customer Care.
IMPORTANT: Out-of-range test results may be due to one or
more of the following factors:
[1] Expired or defective control solution.
[2] Expired or defective test strip.
[3] Error in performing test.
Normal: 4.4-6.7 mmol/L
FOR EXAMPLE ONLY.
Refer to your test
strip vial label for
corresponding range.

22 23
How to Test Your
Blood Glucose Level
8
CHAPTER
CAUTION: To ensure accurate results, wash your hands with
warm, soapy water and dry before every test. Make sure
there is no grease, oil or lotion on the test site. Use lancets
only once. Do not use any lancet or lancing device that has
been used by another person. Unwashed hands may lead to
inaccurate results.
How to test your blood glucose level:
[1] Preparing the BGStar Lancing Device: Use the gray cap
for testing on a fingertip and the clear cap for testing on the
palm (at the base of the thumb) or forearm.
Remove Lancing Device Cap:
Snap off the cap from the
lancing device.
Insert New Lancet: Insert a new
BGStar Lancet firmly into the
lancet holder cup. Pushing the
lancet into the lancet holder cup
may cock the device; this is OK.
Twist the Lancet Cover O:
Hold the lancet firmly in place
with one hand and use your
other hand to twist off the
lancet cover. Do not discard the lancet cover. It should be
used when discarding your used lancet.
Replace Lancing Device Cap:
Replace the lancing device
cap until it snaps into place.
Be careful not to touch the
exposed needle on the lancet.
Set the Lancing Level: The BGStar Lancing
Device offers 8 depth settings. Rotate the
dial to the desired setting as shown in the
depth indicator window. Level 1 is the most
shallow; level 8 is the deepest. If you have
never lanced before, it is recommended
that you start at level 3. If necessary, set the
depth level to a deeper setting to produce
enough blood to fill the test strip (0.5 μL).
Cock the Handle: Pull the
cocking handle out until it
clicks. You may have already
cocked the handle accidentally while inserting the lancet; this
is OK. The lancing device is now ready for use.
[2] Insert a BGStar Test Strip:
Insert a new BGStar Test Strip into
the test strip port of the meter.
Make sure you insert the test strip,
with the contact bars facing up, into
the test strip port. The meter will be
activated when the test strip is fully
inserted.
Note: If you do not start the test within 5 minutes, the meter will
be deactivated. To reactivate your meter, take out the unused
BGStar Test Strip and reinsert it into the meter.

24 25
Meter Ready for Test: The meter now displays the droplet
symbol and the word “Fill”. The BGStar System is now ready
for you to apply blood. You do not need to set a calibration
code for this meter.
[3] Lancing: To ensure accurate results, wash hands with
warm, soapy water and dry before every glucose test. For
details on possible test sites, refer to chapter 3.
For instructions on how to test on your palm or forearm,
please refer to chapter 9.
Note: Keep your hand warm or
gently massage the site you are
lancing to stimulate blood ow.
Lance Test Site: Press the lancing
device against the site to be
lanced. Press the release button.
Obtain Blood Drop: When testing
on a finger tip, wipe away the first
blood drop that appears using
a clean tissue or paper towel.
Squeeze from the base of your
finger up towards the tip, until a
second small blood drop forms.
Do not squeeze directly around
the lanced area.
If necessary, set the lancing device to a deeper setting or use
a larger lancet to produce enough blood.
[4] Applying Blood Sample
Bring Test Strip to Blood Sample: The meter now displays
the droplet symbol and the word “Fill”. This means your
BGStar System is now ready for
you to apply blood. Immediately
bring the BGStar Test Strip to the
blood sample.
The test strip fills from the tip. Do
not apply blood on the top sur-
face of the test strip. The BGStar
Test Strip acts like a sponge and
draws the blood into the test strip
through the sample area. The
visual fill window of the BGStar
Test Strip will turn red.
This is the visual ll
window. DO NOT
PUT BLOOD HERE.
Apply blood here.
The entire
visual ll
window will
turn red.
WARNING: If the visual
ll window does not
completely ll, you may
get an inaccurate result.
Retest and ensure that
the visual ll window is
completely full.
Release
Button

26 27
IMPORTANT:
[1] Remove the test strip from the blood sample as soon as
you hear the beep.
[2] Do not press the BGStar Test Strip against the test site.
[3] Do not scrape blood onto the BGStar Test Strip.
[4] Do not apply blood to the top side of the BGStar Test
Strip.
[5] Do not apply blood to the BGStar Test Strip when the
test strip is out of the meter.
[6] Do not put blood or foreign objects into the BGStar strip
port. Doing so may lead to system failure.
[7] Do not apply more blood after beep.
[8] Carefully read the test results on the display before
making any treatment decisions.
Remove Test Strip from Blood Sample
when you hear the beep: Your meter
will beep once, when you should
remove the tip of the BGStar Test Strip
from the blood sample.
On the meter display, the droplet
symbol fills. The scrolling bar and 1-2-3
indicates that the meter is calculating
your results.
Your test is completed when your blood
glucose test result with time and date is
shown on the display. If the volume is ON,
you will hear a beep. Your test result is
now stored in the memory.
[5] Test Result Mealtime Tagging and
Feedback
If the Mealtime Tag Feature is Enabled: The BGStar Meter
allows you to add a tag to your test result. Tagging results allows
you to view averages before and after meals to see what effect
food has on your blood glucose levels.
After your result appears, a tag will flash on the display
suggesting a mealtime tag (Breakfast, Post Breakfast, Lunch,
Post Lunch, Dinner, Post Dinner, and Night). For example, if
you test at 12:30, the meter will flash the word “POST LUNCH.”
If the tag is incorrect, you can change
it by pressing the DOWN ( ) or UP ( )
arrow buttons. Pressing the UP ( ) arrow
button would change the tag to Lunch,
pressing the DOWN ( ) arrow button
would change the tag to Dinner. Pressing
the CHECK ( ) button confirms the
mealtime tag and it stops flashing. Your
test result’s mealtime tag is now stored in
the memory.
Example of
Mealtime Tag:
POST LUNCH
Droplet
Symbol:

28 29
IMPORTANT: If you do not remove the used test strip after
3 minutes of testing, the meter will deactivate. To activate
your meter with a used test strip still in the meter, press the
CHECK ( ) button once. Do not attempt to apply blood or
control solution to an already used test strip.
Remove the Lancet: When you
have finished testing, snap off
the cap from the lancing device.
While the lancet is still in the
lancing device, replace the
lancet cover onto the lancet.
You can then safely handle the
used lancet.
Extract the lancet from the
lancet holder cup by pulling on
the plastic collar of the lancet
(near the middle of the lancet).
Replace the lancing device cap
onto the lancing device until it
snaps or clicks into place.
Discard Properly: Discard the used BGStar Test
Strip and Lancet properly.
WARNING: The lancing device and lancets
should only be used by one person. Never
share lancing devices or lancets. Used test
strips, lancets, and lancing devices may be
considered biohazardous or medical waste in your city or
town. Follow all local regulations for proper disposal.
You can still change this
setting by pressing the
DOWN ( ) or UP
() arrow buttons, if
you haven’t removed
the test strip from the
meter yet.
If you don’t want to
tag a reading, scroll
through the options by
pressing the DOWN
() or UP ( ) arrow buttons. One of the options will leave the
tag field blank. If you do not want to tag meals, this feature can
be turned OFF in the menu mode.
Tagging Values:
The BGStar Meter suggests
mealtime tagging values
according to this chart:
Feedback: Depending on the
mealtime tag and your test result, the meter will
display positive feedback in the form of a happy face.
The happy face symbol is displayed with glucose
test results that fall within specific pre and post meal
target ranges.
[6] Final Steps
Remove the Test Strip: Remove
the used BGStar Test Strip. The
BGStar Meter will automatically
deactivate.
Example of
Mealtime Tag:
POST BREAKFAST
Example of
Mealtime Tag:
NO TAG (BLANK)
Breakfast: 5:00 - 7:59
Post Breakfast: 8:00 - 9:59
Lunch: 10:00 - 11:59
Post Lunch: 12:00 - 14:59
Dinner: 15:00 - 17:59
Post Dinner: 18:00 - 20:59
Night: 21:00 - 4:59

30 31
will be testing. Ensure that your palm or forearm is facing up
and held level.
[3] Lance Test Site: Press the tip of the clear cap against your
skin on the palm of your hand (at the base of the thumb) or
forearm. Hold the tip to the test site for a few seconds before
pressing the release button.
[4] Obtain Blood Drop: After lancing, hold the lancing device
against your skin until a blood droplet forms. Make sure the
blood drop is large
enough to completely
fill the visual fill
window of the test
strip. Pull the lancing
device directly off
your palm or forearm
to ensure that you do
not smear the blood
drop.
Return to Chapter 8,
step 4 to continue
with testing
instructions.
Testing glucose levels with blood obtained from the palm (at
the base of the thumb) or forearm may reduce the pain of testing.
The technique for testing on the palm and forearm is slightly
different than testing on the finger. Always discuss changes to
your testing habits with your healthcare professional.
IMPORTANT: When testing on the palm (at the base of the
thumb) or forearm, you may need to set the lancing device
to a deeper setting or use a larger lancet to obtain enough
whole blood to perform a test. Consult your healthcare
professional for a recommendation.
CAUTION: To ensure accurate results, wash your hands with
warm, soapy water and dry before every test. Clean and
make sure there is no grease, oil or lotion on the test site.
Testing on Your Palm or Forearm
9
CHAPTER
Follow Chapter 8, steps 1-2, to begin blood glucose testing.
For testing on your palm or forearm:
[1] Prepare Lancing Device: Always use the alternate site
testing clear lancing device cap on the lancing device.
[2] Rub Test Site: To
increase the blood
flow in your palm
(at the base of the
thumb) or forearm,
rub the area that you
Palm: Forearm:
Palm: Forearm:
Palm:
Palm: Forearm:
Forearm:
Release Button

32 33
About averages and standard deviations:
Control solution, out-of-temperature-range results, and results
without a valid time or date are not included in averages,
standard deviations and trend graphs. Hi and Lo test results
will be included in averages as values of 33.3 mmol/L and
1.1 mmol/L, respectively. 14, 30, and 90 day averages and trend
graphs are calculated by taking the average of all readings
within the respective time period. Standard deviations,
averages and trend graphs do not include the current day in
their calculations.
The standard deviation is an expression of the variation of
readings from the average reading. The greater this value the
more variation exists between individual readings and the
average. The standard deviation feature is a way to track your
glucose variability.
[1] When your meter is deactivated, press the
CHECK ( ) button once to enter menu mode.
The word “MEM” is displayed.
[2] Press the CHECK ( ) button again to enter
the individual results section.
[3] Press the DOWN ( ) arrow button to
scroll through the individual readings. Press
the UP ( ) arrow button to scroll backwards.
Note: When scrolling through, the oldest test
result will cycle back to the most recent test
result. To return to the menu, press the CHECK ( ) button.
Viewing Individual Results
10.1
Data Management Features
10
CHAPTER
IMPORTANT: Results, averages and graphs stored in
memory should only be used as a reference. Do not
make treatment decisions based solely on stored results,
averages and graphs. Consult with your healthcare
professional regarding treatment options.
This chapter covers the steps on how to view your:
• Individual Results (1865 past results, with time and date)
• 14 Day Statistics
• 14, 30, and 90 Day Averages
• Pre/Post Mealtime Averages and Glucose Variability Tracking
• 1 Month, 2 Week, 3 Day Trend Graphs
How to access all data management features:
All past test results are accessed the same way. The following
instructions will explain how to get to the different types of
data.
[1] When your meter is deactivated, press the CHECK ( )
button to enter menu mode. The word “MEM” is displayed.
[2] Press the DOWN ( ) arrow button to scroll forward and
press the UP ( ) arrow button to move backward through
the categories of data.
[3] Press the CHECK ( ) button to enter into a category and
view features.

34 35
[4] Press the DOWN ( ) arrow
button. The display now shows
your 30 day average and average
number of tests per day.
[5] Press the DOWN ( ) arrow
button. The display now shows
your 90 day average and average
number of tests per day.
Note: Press the UP ( ) arrow button
to scroll backwards. When scrolling,
you will cycle through the 14, 30 and
90 Day Averages. To return to the
menu, press the CHECK ( ) button.
The BGStar Meter categorizes readings as happening before or
after meals. These averages allow you to see how your blood
glucose levels vary by time of day. The pre/post mealtime
averages and standard deviations only include the first instance
of a particular mealtime tag (breakfast, post breakfast, lunch,
post lunch, etc.) per day over the last 14 day period. The second
and subsequent tests marked with the same time tag (on the
same day) are not included. The standard deviation feature is a
way to track your glucose variability.
Note: Standard deviation is always
displayed with a decimal point.
Viewing 14 Day Statistics
10.2
The stats feature allows you to compare your average test
result, the standard deviation between test results, and the
average number of tests per day over the last 14 day period.
[1] When your meter is deactivated, press the CHECK ( )
button once to enter menu mode. The word “MEM” is displayed.
[2] Press the DOWN ( ) or UP ( ) arrow buttons
until the word “STATS” appears on the display.
[3] Press the CHECK ( )
button again to enter the
statistics section.
Note: To return to the menu,
press the CHECK ( ) button.
Viewing 14, 30, and 90 Day Averages
10.3
[1] When your meter is deactivated, press the CHECK ( )
button once to enter menu mode. The word “MEM” is displayed.
[2] Press the DOWN ( ) arrow button until the
word “AVG” appears in the lower part of the
display.
[3] Press the CHECK ( ) button again to enter the 14, 30, and
90 day averages section. The display now shows your 14 day
average and average number of tests per day.
14 Day
Average
Test Result
30 Day
Average
Test Result
90 Day
Average
Test Result
Average
Number of
Tests Per Day
Average
Number of
Tests Per Day
Average
Number of
Tests Per Day
Viewing Pre/Post Mealtime Averages
and Glucose Variability Tracking
10.4
Example of a standard deviation of 2.0
Average number
of tests per day
Standard
Deviation
Average Test
Result

36 37
buttons until the abbreviation “GRAPH”
appears in the lower part of the display.
[3] Press the CHECK ( ) button again to enter
the graph section. The display now shows your
1 month graph.
[4] Press the DOWN ( ) arrow button. The
display now shows your 2 week trend graph.
[5] Press the DOWN ( ) arrow button. The
display now shows your 3 day trend graph.
Note: Press the UP ( ) arrow button to scroll
backwards. When scrolling, you will cycle through
the Trend Graphs. To return to the menu, press the
CHECK ( ) button.
[1] When your meter is deactivated, press the CHECK ( ) button
once to enter menu mode. The word “MEM” is displayed.
[2] Press the DOWN ( ) or UP ( ) arrow buttons
until the word “MEAL” appears in the lower part
of the display.
[3] Press the CHECK ( )
button again to enter the
mealtime averages section.
The display now shows your
breakfast average.
[4] Press the DOWN ( ) arrow
button. The display now shows
your post breakfast average.
[5] Press the DOWN ( ) arrow
button. The display now shows
your lunch average.
[6] Press the DOWN ( ) arrow
button. The display now shows your
post lunch average.
[7] Press the DOWN ( ) arrow
button. The display now shows your
dinner average.
[8] Press the DOWN ( ) arrow button. The
display now shows your post dinner average.
[9] Press the DOWN ( ) arrow button. The
display now shows your bedtime average.
[1] When your meter is deactivated, press the CHECK ( )
button once to enter menu mode. The word “MEM” is displayed.
[2] Press the DOWN ( ) or UP ( ) arrow
Number
of results
tagged
Note: Press the UP ( ) arrow button to scroll backwards. When
scrolling, you will cycle through the Pre/Post Mealtime Averages.
To return to the menu, press the CHECK ( ) button.
Viewing 1 Month, 2 Week,
and 3 Day Trend Graphs
10.5
Standard
Deviation
Average
Test Result
Other manuals for BG STAR
2
Table of contents
Other Sanofi-aventis Blood Glucose Meter manuals