Sanrio Hello Kitty User manual

JAMAC, INC.
1822 Brummel Drive
Elk Grove Village, IL 60007 USA
© Copyright JAMAC, INC.
Printed in Thailand • Impreso en Tailandia • Imprimé au Thaïlande


1

2
SECTION 1. NAMES OF PARTS
Names of Parts
Stitch selector
Bobbin winder stopper
Bobbin winder spindle
Bobbin winding tension disk
Thread take-up lever
Upper thread guide
Thread tension dial
Needle
Needle plate
Extension table
Presser foot
Reverse stitch control
Carrying handle
Spool pin
Handwheel
Power switch
Machine socket
Free-arm
Presser foot lifter
Standard Accessories
Bobbin
Seam ripper
Felt
Sliding buttonhole foot
Needle set
8
1 2 3
45
7
1
2
3
4
5
6
9
10 11
12
13
14
15
16 17
18
19
13
19
18
17
16
15
14
12
11
10
9
8
7
6
5
4
3
2
1
1
2
3
4
5

3
PARTIE 1.
IDENTIFICATION DES PIÉCES DE LA
MACHINE
SECCION 1.
NOMBRE DE LAS PARTES
Identification des pièces
Sélecteur de point
Butée d’enroulement de la canette
Enrouleur de la canette
Bobineuse a disque de tension
Releveur tendeur du fil
Guide du fil supérieur
Molette de réglage de la tension du fil
Aiguille
Plaque d'aiguille
Rallonge de plateau (Boîte à accessoires)
Pied presseur
Bouton de marche arrière
Poignée de transport
Porte-bobine
Volant à main
Interrupteur secteur
Prise de la machine
Bras libre
Levier de relevage du pied presseur
Nombre de las partes
Selector de patrón
Freno del devanador de canillas
Eje del devanador de canillas
Guíahilos del hilo de la canilla
Tirahilos
Guíahilos superior
Ajuste de tensión del hilo superior
Aguja
Placa de aguja
Estuche de accesorios (Ampliación móvil de la
superficie de costura)
Prensatelas
Control de puntada reversa
Asa de agarre
Portacarrete
Volante
Interruptor de corriente
Enchufe de la máquina
Brazo libre
Palanca de elevación del prensatelas
Accessorios Estándares
Cannila
Cortador
Fieltro
Prensatelas para ojales
Juego de agujas
Accessoires standard
Cannete
Découd-vite
Feutre
Pied à boutonière
Jeu d’aiguilles
13
19
18
17
16
15
14
12
11
10
9
8
7
6
5
4
3
2
1
13
19
18
17
16
15
14
12
11
10
9
8
7
6
5
4
3
2
1
1
2
3
4
5
1
2
3
4
5

4
SECTION 2. GETTING READY TO SEW
Connecting Machine to Power Supply
Power supply plug
Power switch
Outlet
Machine socket
Machine plug
Before connecting the power cord, make sure the
voltage and frequency shown on the machine
conform to your electrical power.
1. Turn off the power switch.
2. Insert the machine plug into the machine
socket.
3. Insert the power supply plug into the outlet.
4. Turn on the power switch to turn on the power
and sewing light.
1
5
4
3
2
1
2
3
45
Reverse Stitch Control
Press the reverse stitch control to sew in reverse.
1
3
2
Presser Foot Lifter
Presser foot lifter
Normal up position
Highest position
The presser foot lifter raises and lowers the
presser foot.
You can raise it about 1/4” (0.6 cm) higher than
the normal up position for easy removal of the
presser foot, or to allow you to place heavy fabric
under the foot.
3
2
1
2
3
Operating Instructions:
This appliance has a polarized plug (one blade
wider than the other). To reduce the risk of an
electric shock, this plug is intended to fit in a
polarized outlet only one way. If the plug does not
fit in the outlet, reverse the plug. If it still does not
fit, contact a qualified electrician to install the
proper outlet. Do not modify the plug in any way.
Foot Controller Model YC-482J or TJC-150 is used
with Sewing Machine Model 639X.

5
SECCION 2.
PREPARACION DE LA MAQUINA PARA
COSER
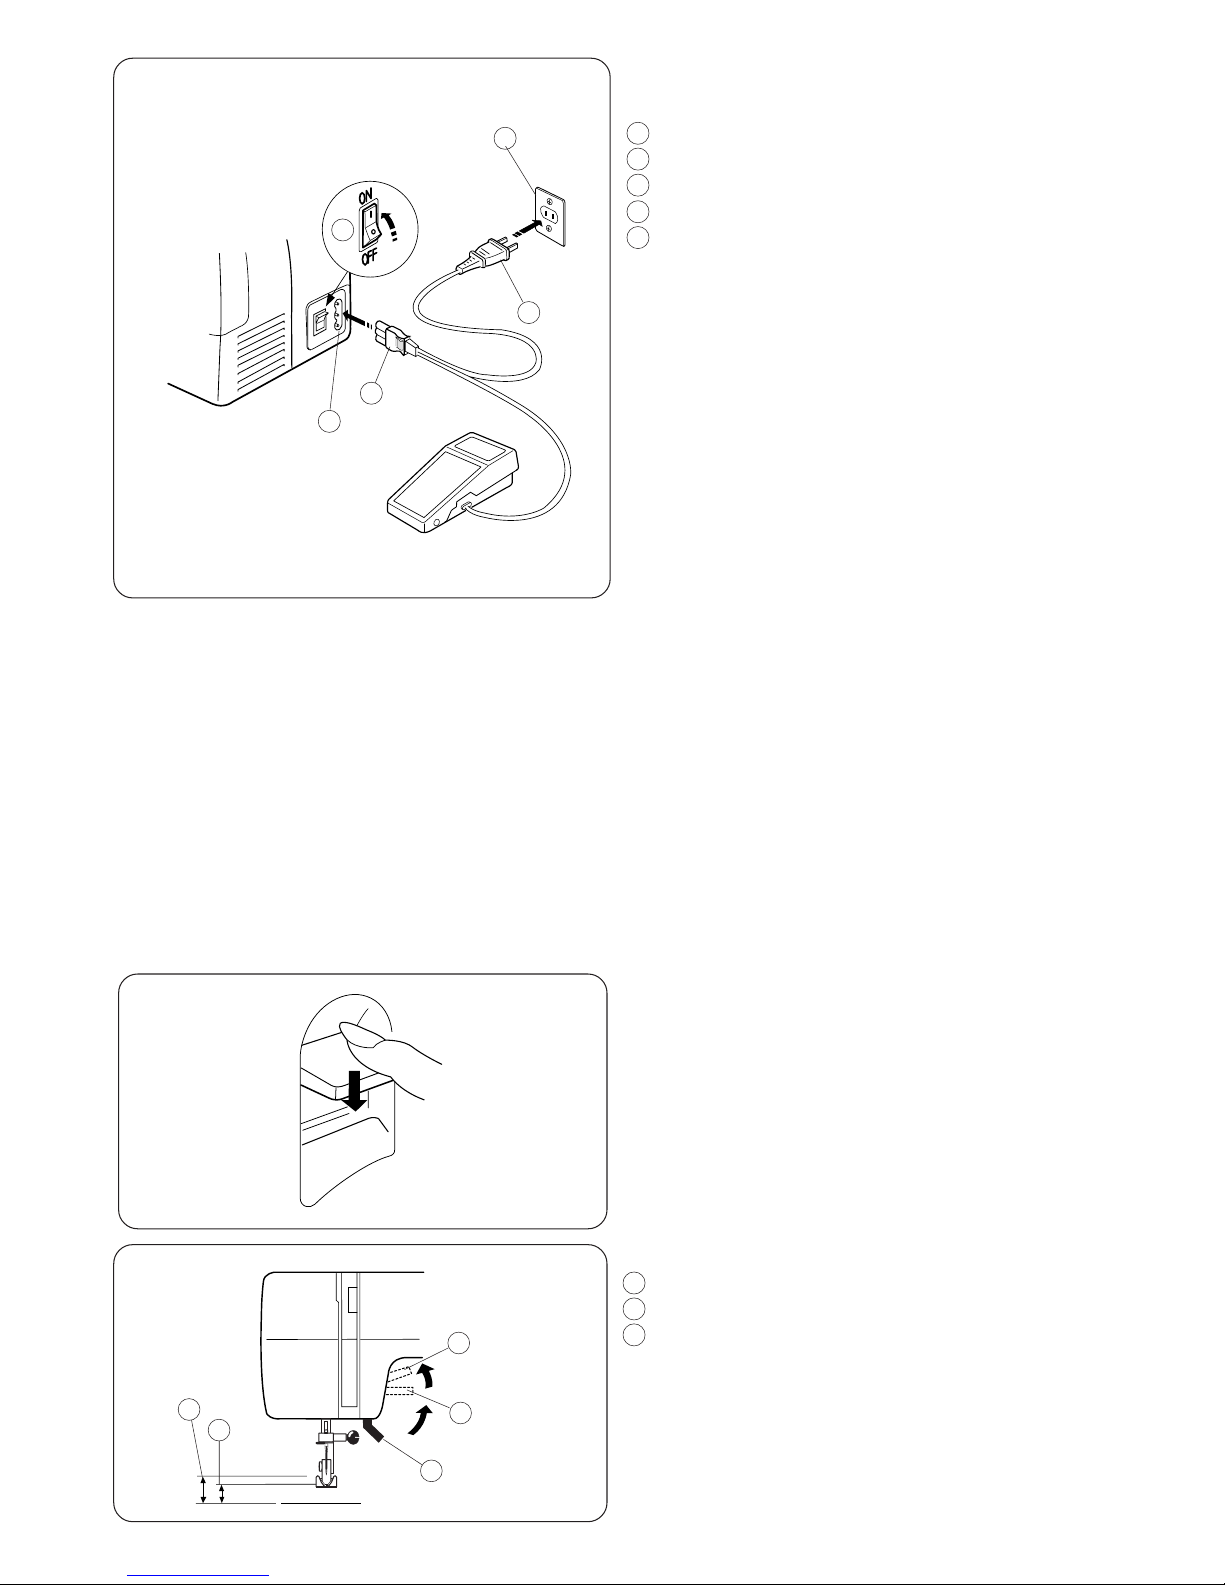
Conexión de la máquina a la red eléctrica
Clavija de toma de corriente
Interruptor de corriente
Red eléctrica
Enchufe de la máquina
Clavija de la máquina
Antes de enchufar el cable de conexión a la red de
corriente asegúrese de que el voltaje y la frecuencia de
la máquina, mostrados en la placa de identificación,
coincidan con los de la red de suministro en su hogar.
1. Desconecte el interruptor de corriente.
2. Introduzca la clavija de la máquina en el enchufe
de la máquina.
3. Introduzca la clavija de toma de corriente a la red.
4. Oprima el interruptor de corriente para encender la
máquina y la bombilla.
PARTIE 2.
PRÉPAREZ-VOUS À COUDRE
Branchez la machine
Prise électrique
Interrupteur de courant
Prise de courant
Prise de la machine
Fiche de raccord électrique
Avant de brancher le cordon d’alimentation, assurez-
vous que la tension et la fréquence indiquées sur la
machine sont conformes à votre installation électrique.
1. Tout d’abord, éteignez la machine (Basculez
l’interrupteur à OFF).
2. Ensuite, branchez la fiche de raccord électrique
sur la prise de la machine.
3. Connectez la prise électrique à la prise de courant.
4. Appuyez sur l’interrupteur pour mettre la machine
sous tension et allumer l’ampoule d’éclairage.
Clavija polarizada
Para aparatos con clavija polarizada (una pieza del
enchufe más ancha que la otra).
A fin de evitar el riesgo de descargas eléctricas, esta
clavija está diseñada de forma que sólo puede
introducirse en un sentido dentro de una toma de
corriente polarizada. Si no encaja completamente en la
toma de corriente, invierta la clavija. Si tampoco encaja
de esta forma póngase en contacto con un electricista
cualificado para que le instale una toma de corriente
apropiada. No intente modificar la clavija de ninguna
forma.
Con esta máquina de coser Modelo 639X deberá
usarse el pedal de control Modelo YC-482J o TJC-150.
Prise polarisée
Pour les appareils ayant une prise polarisée (une lame
plus large que l’autre). Afin de réduire les risques de
choc électrique, cette prise de branchement est conçue
pour s’adapter à la prise électrique murale dans un seul
sens. Si elle ne rentre pas complètement dans la prise,
retournez-la. Si elle ne se branche toujours pas, faites
appel à un électricien qualifié qui installera une prise
appropriée. N’essayez pas de modifier la prise.
La pédale de contrôle YC-482J ou TJC-150 s’utilise
avec la machine modèle 639X.
1
3
2
Palanca de elevación del prensatelas
Posición elevada normal
Posición más alta
La palanca de elevación del prensatelas se emplea
para subir y bajar el prensatelas. Usted puede subirlo
aproximadamente
0.6 cm (1/4”) más de la posición elevada normal para
que le resulte más fácil colocar telas gruesas o como
ayuda para quitar el prensatelas.
1
3
2
Relève-pied presseur
Position relevée normale
Position relevée maximum
Le relève pied presseur remonte et abaisse le pied
presseur. Vous pouvez le remonter d’environ 0.6 cm
(1/4”) plus haut que la position normale pour retirer plus
facilement le pied presseur ou pour vous aider à passer
un tissu épais sous le pied.
Control de puntada reversa
La máquina coserá hacia atrás hasta que suelte el
botón.
Bouton de marche arrière
La machine coud en marche arrière tant que l’on appuie
sur le bouton de marche arrière.
1
5
4
3
21
5
4
3
2

6
Extension Table
•Detaching the table
Pull the table away from the machine, as
illustrated, for “free-arm” sewing of cuffs and
sleeves. The extension table can be used as
accessory box.
•Attaching the table
Push the extension table until it snaps into the
machine.
1Extension table
2Tab
3Hole
Changing Presser Foot
Lever
Groove
Pin
•Toremove
Turn the handwheel toward you to raise the
needle to its highest position. Raise the presser
foot. Press the lever on the back of the foot
holder. The presser foot will drop.
•To attach
Place the presser foot so that the pin on the
foot lines up directly below the groove of the
foot holder. Lower the foot holder to lock the
foot in place.
1
23
2
1
1
3
Stitch Selector
Setting mark
Stitch selector
Raise the needle above the fabric.
Turn the dial to select the desired pattern.
NOTE:
To avoid needle or fabric damage, make sure
the needle is up and out of the fabric while
selecting a stitch.
2
1
3
2
1
1
2
12345 678910

7
Cambio del prensatelas
Palanca
Surco
Perno
•Para quitar
Gire el volante hacia usted para levantar la aguja a su
posición más alta. Levante el prensatelas. Presione la
palanca en la parte posteriora del sostenedor del pie. El
prensatelas caerá.
•Para poner
Ponga el prensatelas de modo que el perno del pie se
alinee directamente debajo del surco del sostenedor del
pie. Baje el sostenedor del pie para fijar el pie en lugar.
Changement de pied presseur
Levier
Enconche
Broche
•Pour retirer
Tournez le volant à main vers vous pour soulever
l'aiguille dans sa position plus élevée. Soulevez le pied
de presseur. Serrez le levier sur le dos du support de
pied. Le pied de presseur chutera.
•Pour attacher
Placez le pied de presseur de sorte que la broche sur le
pied soit alignée avec l’enconche du support de pied.
Abaissez le support de pied pour fermer le pied en
place.
Rallonge de plateau
•Pour retirer la rallonge
Éloignez-la de la machine comme illustré.
•Pour fixer la rallonge
Poussez la rallonge jusqu’ à ce qu’elle s’encliquète sur
la machine.
1Rallonge de plateau
2Patte
3Trou
Ampliación móvil de la superficie de costura
• Desmontaje de la ampliación móvil
Tire de la ampliación móvil hacia afuera de la máquina
tal como se ve en la ilustración.
• Instalación de la ampliación móvil
Empuje la ampliación móvil hacia que entre
completamente en la màquina produciendo un
chasquido.
1Ampliación móvil de la superficie de costura
2Tablilla
3Alojamiento
Selector de patrón
Marca de ajuste
Selector de patrón
Levante la aguja hasta la posición más alta.
Seleccione el patrón deseado girando el selector de
patrón.
NOTA:
Para evitar que la aguja o la tela se dañen, asegúrese
que la aguja esté arriba y fuera de la tela cuando esté
seleccionando una puntada.
Sélecteur de point
Repère de réglage
Sélecteur de point
Levez l’aiguille au-dessaus du tissu.
Tournez le sélecteur de point pour choisir le motif
desirée.
REMARQUE:
Afin d’éviter d’endommager l’aiguille ou le
tissu,assurez-vous que l’aiguille est toujours remontée
à sa position la plus élevée et hors du tissu, avant de
régler le sélecteur de point.
2
3
2
1
3
2
1
1
21

8
Changing Needle
Turn off the power switch.
Raise the needle to its highest position by turning
the handwheel counterclockwise, toward you, and
lowering the presser foot.
Loosen the needle clamp screw by turning it
counterclockwise.
Remove the needle from the needle clamp.
Insert a new needle into the needle clamp with
the flat side to the rear. When inserting the
needle into the needle clamp, push it up as far as
it goes.
Tighten the needle clamp screw firmly by turning
it clockwise.
Needle clamp screw
Needle clamp
Flat side
To check if a needle is bent, place the flat side of
the needle onto something flat (e.g needle plate
or glass). The gap between the needle and the
flat surface should be consistent. Never use a
bent or blunt needle.
A damaged needle can cause permanent snags
or runs in knits, fine silks and silk-like fabrics.
Selecting Needle and Thread
1
2
3
Fabric Thread Needle
Light
Weight
Medium
Weight
Heavy
Weight
Crepe de Chine,
Voile, Lawn,
Organdy,
Georgette, Tricot
Linen, Cotton,
Pique, Serge,
Double knit,
Percale
Denim, Tweed,
Gabardine,
Coating, Drapery
and Upholstery
Fabric, Canvas
80 to 100 Fine Silk
80 to 100 Fine Cotton
80 to 100 Fine Polyester
50 Silk
60 to 80 Cotton
50 to 80 Synthetic
Cotton Covered
Polyester
50 Cotton
50 Silk
40 to 50 Cotton
40 to 50 Synthetic
Cotton Covered
Polyester
30 Silk
30 Cotton
9 (65)
or
11 (75)
11 (65)
or
14 (90)
14 (90)
14 (90)
or
16 (100)
16 (100)
For general sewing use needle size 11 or 14. A fine
thread and needle should be used for sewing lightweight
fabrics so the fabric will not be marred. Heavy fabrics
require a needle large enough to pierce the fabric without
fraying the needle thread.
Use a blue needle to eliminate skipped stitches when
sewing knits and synthetic fabrics.
1
2
3

9
80 to 100 Soie fin
80 to 100 Coton fin
80 to 100 Polyester fin
50 Soie
60 to 80 Coton
50 to 80 Synthétique
Polyester renforcé avec
Coton
50 Coton
50 Soie
40 to 50 Coton
40 to 50 Synthétique
Polyester renforcé avec
Coton
30 Soie
30 Coton
80 to 100 Seda fina
80 to 100 Algodón fino
80 to 100 Poliéster fino
50 Seda
60 to 80 Algodón
50 to 80 Sintético
Poliéster recubierto de
Algodón
50 Algodón
50 Seda
40 to 50 Algodón
40 to 50 Sintético
Poliéster recubierto de
Algodón
30 Seda
30 Algodón
Para costura normal use agujas del tamaño 11 o 14. Hilo
y agujas finos deben ser usados con telas ligeras, para
que la tela no se desgarre. Telas pesadas requieren una
aguja lo suficientemente gruesa para traspasarla sin
deshilachar el hilo ensartado.
Use la aguja de punta azul para eliminar puntos pasados
por alto cuando cosa telas de punto y sintéticas.
Pour les coutures normales, utilisez une aiguille n 11 ou
14. On devrait utiliser du fil fin et une aiguille fine avec les
tissus légers pour ne pas les endommager. Les tissus
lourds nécessitent une aiguille assez grosse pour percer
le tissu sans effilocher le fil de l’aiguille.
L’aiguille à bout bleu s’emploie pour coudre les tissus
extensibles et les matières synthétiques sans rater de
point.
Cómo y cuándo cambiar la aguja
Apague la máquina con el interruptor de corriente.
Suba la aguja y baje el prensatelas.
Afloje el tornille de sujeción de la agujas. Retire la aguja
de su alojamiento tirando de ella hacia abajo.
Inserte la nueva aguja en el alojamiento de la aguja con
el lado plano mirando hacia atrás.
Empuje la aguja hacia arriba tanto como le permita el
tope superior y apriete firmemente el tornillo de sufeción
de la aguja.
Para verificar que aguja está bien, ponga el lado plano
de la misma sobre una superficie plana(placa de aguja,
tapa de acceso a canilla, cristal, etc.).
La separación entre la aguja y la superficie plana
deberá ser uniforme. No emplee nunca agujas
dobladas o con la punta en mal estado.
Changer l’aiguille
Eteignez la machine.
Faites monter l’aiguille et abaissez le pied presseur.
Desserrez la vis de blocage de l’aiguille en la tournant
en sens antihoraire. Retirez l’aiguille de son support.
Insérez la nouvelle auguille dans le support, avec le
méplatvers l’arrière.
Lorsque vous mettez en place une nouvelle aiguille,
poussez-la à fond vers le haut dans le support.
Serrez fermement la vis de blocage en la tournant en
sens horaire.
Vis de blocage de l’aiguille
Support de l’aiguille
Côté plat
Pour vérifier la qualité d’une aiguille, placez le méplat de
l’aiguille sur une surface plate (le couvercle de la
navette, un morceau de verre.).
L’espace entre l’aiguille et la surface doit être constant.
N’utilisez jamais une auguille tordue ou émoussée.
Tornillo de sujeción de la aguja
Alojamiento de la aguja
Lado plano
Seleccionar las agujas y los hilos
Tela Hilo Aguja
Ligera
Media
Gruesa
Crespón de china,
Voile, Batista,
Organdí,
Georgete, Tricot
Lino, Algodón,
Piqué, Sarga,
Punto doble,
Percal
Mahón, Tweed,
Gabardina, Telas
para farrar, para
cortinas, para
tapizar
9 (65)
u
11 (75)
11 (65)
o
14 (90)
14 (90)
14 (90)
o
16 (100)
16 (100)
Choisir les aigilles et les fils
Tissu Fil
Aiguille
Léger
Moyen
Épais
Crêpe de chine,
Voile, Linon,
Organdi,
Georgette, Tricot
Lainage, Coton,
Piqué, Serge,
Tricot double,
Percale
Denim, Tweed,
Gabardine, Tissu
de manteau, de
rembourrage
9 (65)
ou
11 (75)
11 (65)
ou
14 (90)
14 (90)
14 (90)
ou
16 (100)
16 (100)
1
2
31
2
3

10
To remove the bobbin case from the shuttle,
pull open the latch of the bobbin case. Pull
the bobbin case straight out of the shuttle.
Bobbin case
Latch
Bobbin Winding
• Removing bobbin case
Remove the extension table from the machine
by pulling it to the left. Open the shuttle cover
by pulling down the tab on the left of the cover.
Raise the needle to its highest position by
rotating the handwheel toward you.
Shuttle cover
1
2
• Removing the bobbin
To remove the bobbin, release the latch and
the bobbin will drop out of the bobbin case as
illustrated.
Bobbin
1
2
3
4
3
3
4

11
Para retirar el portacanillas de la lanzadera, jale el retén
del portacanillas para abrir. Deje recto hacia afuera el
portacanillas de la lanzadera.
Portacanillas
Retén
Embobinado de la canilla
• Cómo sacar el portacanillas
Retire la extensión deslizándola hacia la izquierda.
Abra la tapa lanzadera jalando hacia abajo la lengüeta
del lado izquierdo de la tapa. Levante la aguja
hasta la posición más alta, girando el volante hacia
usted.
Tapa
Retirez le porte-canette de la navette en tirant le loquet
de la canette vers vous. Sortez le porte-canette en le
tirant tout droit de la navette.
Porte-canette
Loquet
Remplir la canette
• Retrait de la porte-canette
Retirez l’emboîture du socle en la tirant vers la
gauche. A l’aide de le bouton située à la gauche du
couvercle de la navette, tirez le couvercle vers le bas.
Faites remonter l’aiguille à sa position la plus elevee
en faisant tourner manuellement le volant vers vous.
Couvercle
11
22
3 3
• Cómo sacar la canilla
Libere el retén del portacanillas luego saque la
canilla como se muestra.
Canilla
•Retrait d’une canette
Libérez le loquet de la cannete puis enlevez la
canette comme illustrée.
Canette44

12
Release the clutch by pulling out the
handwheel. This will stop the needle from
moving while you wind the bobbin.
1
2
34
5
6
7
8
2Draw thread from the spool. Guide the
thread around the thread guide.
Thread guide
Pass the thread between the tension disks.
Thread through the hole in the bobbin
from the inside to the outside.
Put the bobbin on the bobbin winder
spindle.
•Bobbin winding
The spool pin is stored in the back of the
sewing machine. Pull out the spool pin.
Place the felt and the spool in order.
The end of the thread should be coming
out from the spool as shown.
Spool pin
Felt
Spool of thread
Push the bobbin to the right.
With the free end of the thread held in
your hand, depress the foot control. Stop
the machine when it has made a few
turns, and cut the thread close to the hole
in the bobbin.
6
7
8
Depress the foot control again. When the
bobbin is fully wound, it stops automatically.
Return the bobbin winder to its original
position by moving the spindle to the left,
and cut the thread.
Push the handwheel to the left to engage
the clutch.
*The machine will not function until
the clutch is engaged.
3
4
5
12
3
4
3
1
2
4
1

13
Saque el hilo del carrete. Guíe el hilo alrededor del
guíahilos.
Guíahilos
Pase el hilo entre los discos de la tensión.
Pase el hilo por el agujero de la canilla desde dentro
hacia afuera tal como se indica en ilustración.
Coloque la canilla en el eje del devanador de
canillas.
Tirez sur le fil de la bobine. Passez le fil autour du
guide du fil supérieur.
Guide du fil
Passez le fil entra les disques de tension.
Passez le fil dans le trou de la canette, de l’intérieur.
Placez la canette sur l’axe de l’enrouleur de canette.
Empuje el volante a la izquierda para la engranar el
embrague.
*La máquina no coserá hasta que el embrague
esté engranado con la máquina.
Pousser le volant vers l’intérieur.
*La machine ne fonctionnera pas tant que
l’embrayage n’est pas engagé.
Appuyez de nouveau sur la pédale de contrôle.
Lorsque la canette est pleine, elle s’arrête
automatiquement. Remettez l’enrouleur de la canette
à la position d’origine, en poussant l’axe vers la
gauche, et coupez le fil.
Poussez la canette vers la droite.
En tenant l’extrémité libre du fil à la main, appuyez
sur la pédale de contrôle. Arrêtez la machine après
quelques tours, et coupez le fil au ras du trou dans la
canette.
Pise nuevamente el pedal de control. Cuando la
canilla esté llena dejará de girar automáticamente.
Empuje el eje del devanador hacia la izquierda para
volverlo a poner en su posición original, y corte el
hilo.
Sujete el final del hilo con los dedos y pise el pedal
de control. Cuando haya dado unas cuantas vueltas,
pare la máquina y corte el hilo que sale de la canilla.
Empuje la canilla a la derecha.
• Embobinado de la canilla
El portacarretes se almacene en la parte posterior de
la máquina. Levante el portacarretes. Ponga el fieltro y
el carrete sobre él. El extremo del hilo está soltándose
del carrete según lo demostrado.
Portacarrete
Fieltro
Carrete del hilo
•Bobinage d’une canette de fil
Le port-bobine est stockée dans le dos de la machine.
Soulevez le port-bobine. Placez le feutre et la bobine
là-dessus. L'extrémité du fil vient dehors de la bobine
comme montrée.
Port-bobine
Feutre
Bobine d’fil
Libere el embrague jalando el volante y así evita que
la aguja se mueva mientras devane la bobina. Tournez le volant vers la droite pour empêcher
l’aiguille de se déplacer lorseque vous bobinez la
canette.
7
88
7
6
6
5
4
3
2
5
4
3
2
1
1
3
1
23
1
2
4 4

14
2
3
1
• Inserting bobbin
1Place a bobbin in the bobbin case, making
sure the thread feeds clockwise from the
bobbin.
2Draw the thread through the slot of the case.
3Continue to draw the thread under the
tension spring and through the opening.
Pull out about 4˝ (10 cm) of thread.
Tension spring
4Holding the latch open, position the bobbin
case into the shuttle, and then release the
latch.
The case should lock into the place when the
latch is released.
4
1
1

15
• Colocación de la canilla • Insertion de la canette
El portacanilla deberá estar fijo en su lugar cuando
se libere el retén. La canette est bloquée en place losque le loquet est
engagé.
4Con el retén abierto, meta el portacanillas en la
lanzadera y libere el retén.
Continúe tirando del hilo debajo del resorte tensor y
a través de la abertura. Deje sobresalir
aproximadamente 10 cm (4”) de hilo.
Resorte tensor
Tire del hilo a través de la ranura.
Coloque la canilla en el portacanilla asegurándose
que el hilo se alimente en el sentido a las agujas del
reloj y salga de la bobina
Ouvrez le loquet pour engager le porte-canette à
fond dans la navette, puis relâchez le loquet.
Tirez le fil sous le ressort de tension et faites-le
passer par le trou. Tirez environ 10 cm (4”) de fil.
Ressort de tension
Tirez le fil par la fente du porte-canette.
Introduisez la canette dans le portecanette en
prenant soin que le fil se déroule vers la droite et
qu’il sorte de la canette.
11
2 2
33
4
1
1

16
1
2
3
4
5
1
3
2
5
4
Threading the Machine
•Threading the machine
*Place a spool on the spool pin, with thread
coming off as shown.
*Raise the thread take-up lever to its highest
position by turning the handwheel counter-
clockwise.
*Raise the presser foot.
Draw the end of thread around the thread
guide.
Thread guide
Slide the thread behind the needle bar thread
guide on the left.
Needle bar thread guide
Thread the needle from front to back.
Firmly draw the thread up along the left
channel. Slip the thread into the slit of the
thread take-up lever from right to left and
down into the take-up lever eye.
5
4
3
While holding the thread near the spool, draw
the end of the thread down along the right
channel and around the bottom of the guide
plate.
2
1
1
2
1
2

17
1
Enhebrado del hilo de la aguja
•Enhebrado del hilo de la aguja
*Suba el tirahilos hasta su posición más alta girando
el volante en el sentido contrario a las agujas del
reloj.
* Levante la palanca de elevación del prensatelas.
*Coloque un carrete en el portacarretes con el hilo
saliendo, tal como se muestra.
Enfilage de la machine
•Enfilage de la machine
* Faites monter le levier releveur tendeur de fil le plus
haut possible en tournant le volant à main en sens
antihoraire.
*Relevez le relève presseur.
*Placez la bobine de fil sur le porte-bobine, avec le fil
sortant de la bobine comme illustré.
Tire del hilo y colóquelo en el guíahilos superior.
Guíahilos superior
Sosteniendo el hilo cerca al carrete, tire del extremo
del hilo hacia abajo y páselo alrededor del
alojamiento del muelle recuperador del hilo.
Tire del hilo con firmeza y páselo de derecha a
izquierda por el tirahilos.
Tire hacia abajo y páselo por el guíahilos de la barra
de aguja.
Guíahilos de la barra de aguja
Enhebre la aguja pasando el hilo de adelante hacia
atrás.
Tenez le fil de l’aiguille et passez-le sous le guide fil.
Guide fil
En retenant le fil près de la bobine, tirez-le vers le
bas, et, de la droite vers la gauche, autour du
dispositif à ressort.
Tirez fermement le fil vers le haut, puis de la droite
vers la gauche dans l’oeillet du levier releveur de fil.
Par la gauche, glissez le fil derrière le guide situé sur
la barre d’aiguille.
Guide situé sur la barre d’aiguille
Enfilez l’aiguille de l’avant vers l’arrière.
1
2
3
4
5
1
2
3
4
5
1
1
2 2

18
1
2
33Pull both threads 4˝ to 6˝ (10 to 15 cm)
under and behind the presser foot.
2Bring the bobbin thread up by pulling the
needle thread.
Bobbin thread
• Drawing up bobbin thread
Raise the presser foot. Hold the needle thread
lightly with your left hand and rotate the
handwheel counterclockwise, toward you, for
one complete turn.
Needle thread
1
1
2
1
2
1
Other manuals for Hello Kitty
1
This manual suits for next models
1
Table of contents