Sanyipace F5800ADJKABTX User manual

Sewer Inspection Camera System
User Manual
Model No:F5800ADJKABTX
-------------------------------------------------------------------------------------------------------------------------------------------
Please contact us at first time if you got issues with the product

Catalog
1. Note .........................................................................................................1
2. Scope of Product Use ...........................................................................1
3. Product Specification ............................................................................1
4. LCD Monitor Operation ........................................................................ 3
5. Counter Function ...................................................................................5
6. Keyboard Input ...................................................................................... 5
7. Battery & Adapter .................................................................................. 6
8. Camera with Self-leveling Function & 512Hz Transmitter ............... 7
9. Cable Coil ...............................................................................................9
10. Device Installation .............................................................................10
11. Structure & Accessories ................................................................... 11
12. Trouble & Troubleshooting ...............................................................12
13. Warranty ............................................................................................. 13
Attention: The illustrations and screenshots of this manual are to explain the product's
operation, which may be a little different from actual products due to the products' version
upgrades and different production batches. If the content in this manual does not match your
machine, please refer to the machine!

1
1. Note
a. Please read the manual carefully before using the product.
b. Handle the device with care when operating, do not drop or push hard.
c. Do not dismantle the machine without permission.
d. Please turn off the monitor and disconnect the device after use.
e. Before inserting the TF card into the device, please back up the
information on the TF card to avoid loss of information.
f. Do not cut off the power suddenly during recording and playback,
otherwise, the product and video files may be damaged.
2. Scope of Product Use
a. Household pipeline blockage inspection
b. Pipe inspection camera, pipeline tools
c. Underground water pipes, HVAC systems, oil and gas pipelines
d. Rescue operations in narrow spaces
e. For underground exploration
f. Scientific research on underwater riverbeds
g. Sewer system inspection
h. Any other hard-to-reach locations/areas
3. Product Specification
---Camera and Cable---
Sensor: 1/3 CMOS
Resolution: AHD 1080P
Camera diameter: 0.9in/23mm (built-in 512Hz transmitter, self-leveling)
Camera light source: 12pcs 1W high white LED (adjustable)
Camera angle: 145 degrees
Camera material: stainless steel IP68 waterproof camera
Camera protective cover size: 1.5in*1.1in/38mm*28mm
Camera pipe pulley: 5.1in*1.1in/130mm*28mm
Cable diameter and material: 230ft/70m and 328ft/100m of 0.2in/5mm

2
harder high elastic cable; 164ft/50m of 0.28in/7mm hardest high elastic
cable (optional)
---Monitor Screen---
Size: 10.1-inch
Camera/monitor picture: IPS LCD color
Function: Video recording, audio recording, speaker, capture photos, 5X
digital zoom, battery level display, depth counter, 512Hz transmitter,
self-leveling, keyboard input (support English), etc.
Monitor input voltage: DC 12V
SD card: package includes 16GB card, support max 128GB
Display resolution: 1024*600 IPS
Menu Language: Chinese/English/Russian/French/German optional
Screen port: power input/video
Screen operation: press buttons
Video format: AVI
Photo format: JPG
Working temperature: -4~140℉/-20~60℃
Storage temperature: -22~176℉/-30~80℃
---Battery Control Box---
Video Output
Power Output
LED Brightness Adjustment (0-5 gear)
Count Clear
Keyboard USB Port
Video Cable Port
DC Adapter Charging Port
Switch ON/OFF (Note: please turn off when not in use)
---Battery---
Charger : 100VAC-240VAC/DC 12.6V 1000MA
Battery: lithium battery 4500mAh
Battery continuous working time: about 6-8 hours

3
4. LCD Monitor Operation
TF card: including 16GB, maximum support 128GB card
Built-in microphone and speaker
Display Operation :
- Turn On
Connect all the cables of the device, turn on the battery switch button and
press the power button on the screen, and the system starts.
- Menu Settings (need to exit REC mode):
Press the "MENU/EXIT" key to enter the menu settings.
Press "<" ">" to select, press "Rec/-" to confirm, and press "EXIT" to return.
Allow operating time setting/playback setting/display setting/recording
setting/system setting.

4
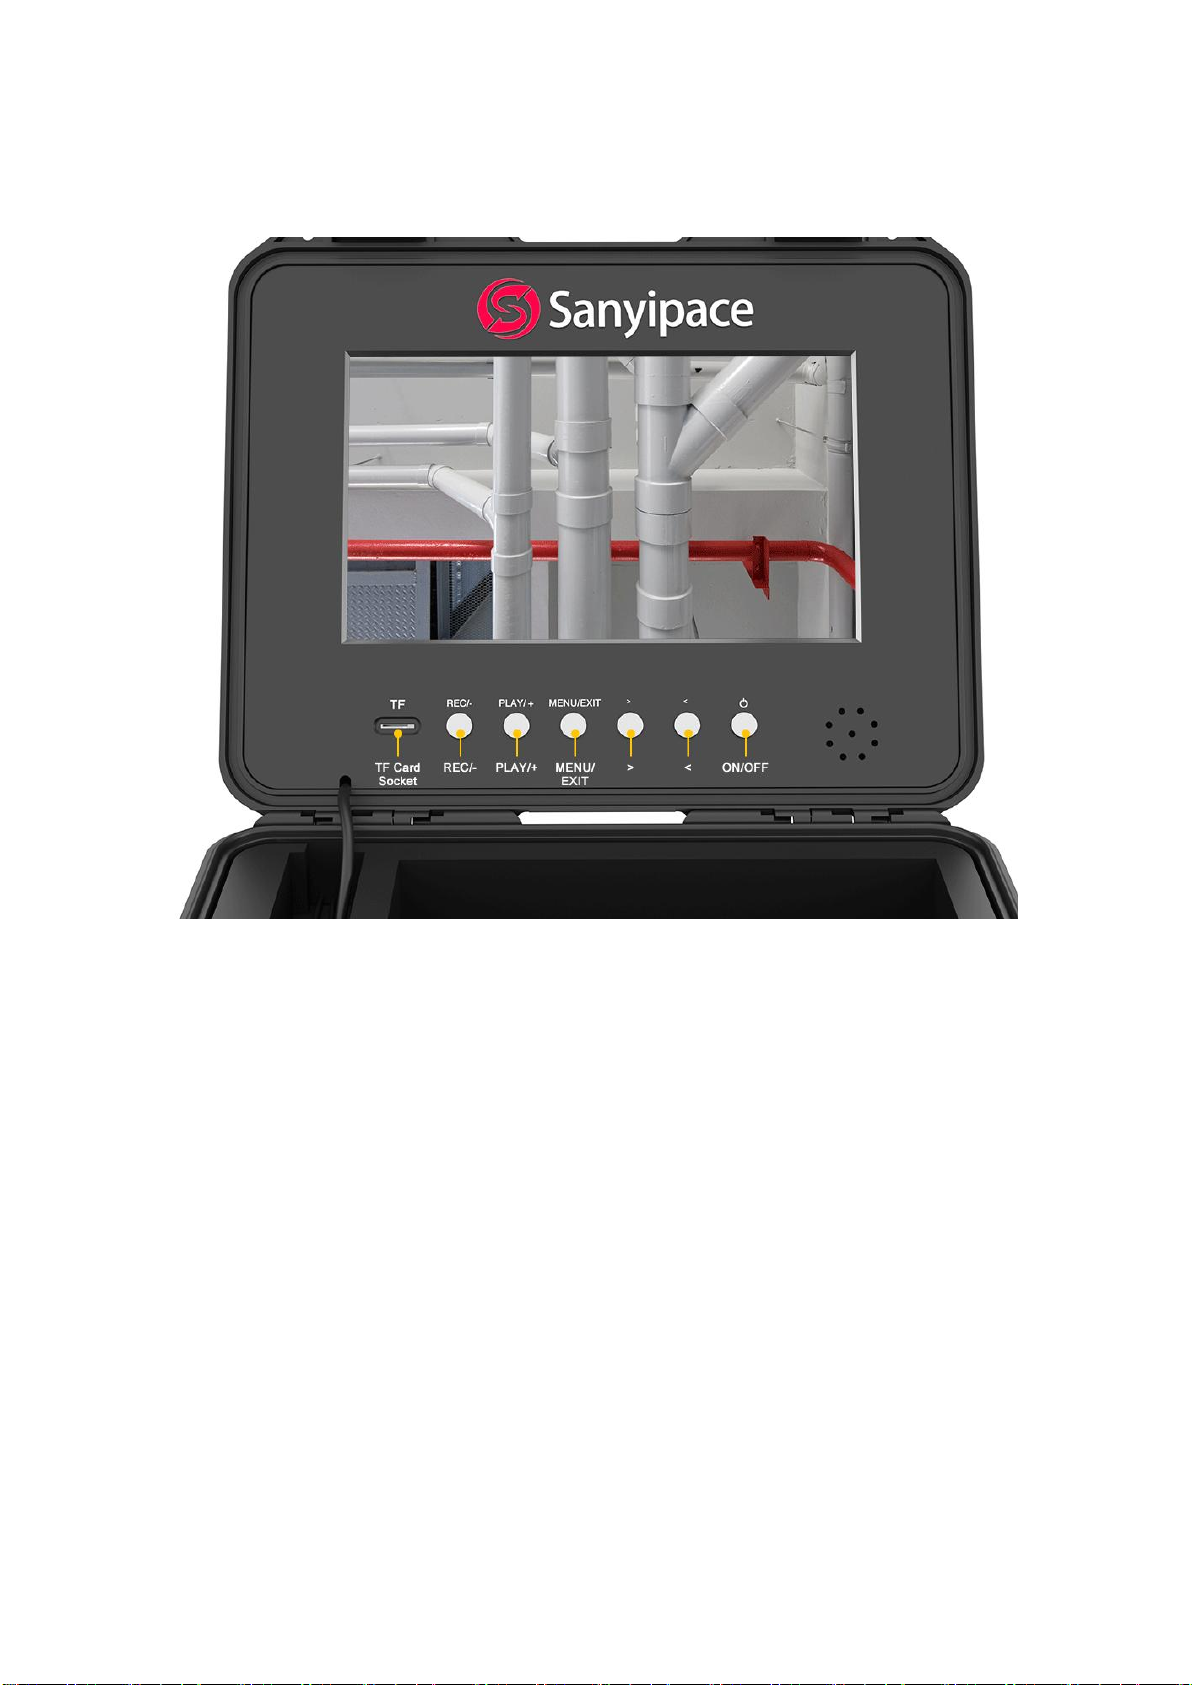
- How to Record Video:
Press "REC/-" to start recording (video with audio), press again to stop
recording.
- How to Playback Images/Videos:
Press "PLAY/+" to enter image browsing, press it again to enter video
playback, press "<" ">" button to select, press "REC/-" to play, press
"REC/-" again to exit.
- How to Take Photos:
Press ">/PHOTO" to capture a photo, press one at a time.
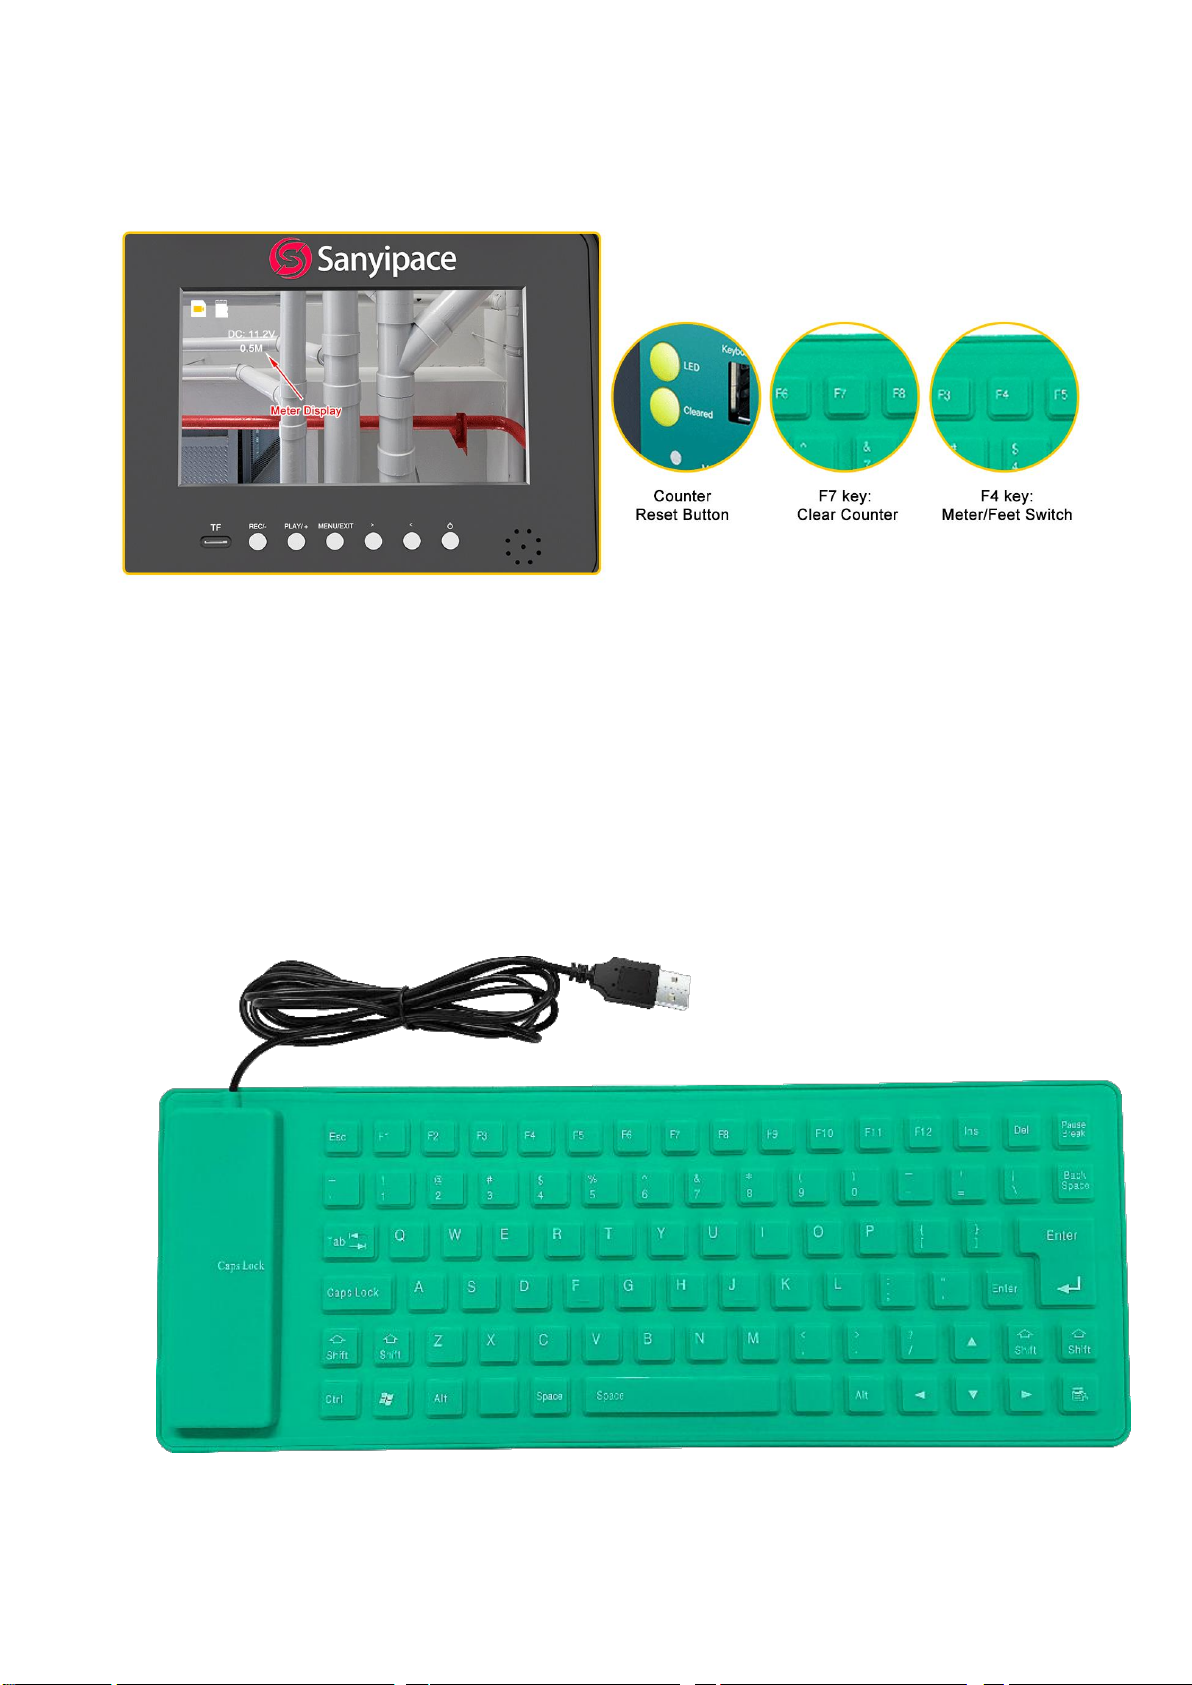
- How to Zoom the Image While Recording:
Press "<" to zoom in 0-5 times, press the 6th time to return to normal (0).
- How to Delete Pictures or Videos:
Press "PLAY/+" to enter photo/video viewing, press ">" to select one of the
pictures or videos, press "MENU/EXIT" and ">" to enter delete or all delete
options, press "REC/-" to confirm, press "PLAY/+" again to exit.
- How to Modify Video Length:
The recorded video will be divided into fixed-length videos and stored in the
memory card, and the default length is 3 minutes. You can adjust it up to 10
minutes. Press "MENU/EXIT" and ">/PHOTO" to select "Video Menu",
press "REC/-" to change it to 1mins, 3mins, 5mins, or 10mins, and press
"Menu" to exit after setting.
- How to Set Recording without Audio:
Press "MENU/EXIT" and ">" to select "System Settings", press "REC/-" to
enter sub-options, press ">" to find "Sound Settings", press "REC/-" to
adjust turn on or off, press "MENU/EXIT" to quit.

5
5. Counter Function
Before using this function, please press the CLEAR button or F7 key to
clear the counter information. You can toggle the display in feet or meters
by pressing the F4 key. It will start counting feet/meters when the coil
rotates, and display it on the screen in real time.
6. Keyboard Input
①Esc: Clear characters
②F4 key: Meter/Feet switch
③F5 key: OSD switch (on-screen display)

6
④F6 key: LED brightness adjustment (0-5 gear)
⑤F7 key: Clear counter
⑥F9 key: Factory setting (Press F9 then input password “3131” to enter
settings, press ⑦UP/Down to select cable's diameter and meters,
Left/Right to select model (5800 is the correct model), then press F9 to save
settings and exit)
The function of the keyboard: During working, you can input
text/symbols/numbers to mark events.
7. Battery & Adapter
The battery is built into the control panel with a capacity of 4500mAh, and
the screen displays the battery power status. When the screen shows
that the power is lower than 9V, please charge the battery.

7
Note: To ensure a longer battery life, please charge it in time; otherwise, the
battery may be damaged and cannot be recharged. The fully charging time
is about 5-6 hours.
8. Camera with Self-leveling Function & 512Hz
Transmitter
Camera probe size details:

8
The Camera probe has a built-in 512Hz transmitter, which transmits a
512Hz frequency signal through a built-in chip, compatible with any 512Hz
pipe locator.
Transmit Frequency: 512Hz
Output Waveform: sine wave
Transmit Distance: about 16.4ft/5m
Self-leveling can be defined as the ability of any instrument to level itself
regardless of the angle of inclination.
Camera probe is equipped with a self-leveling gravity bearing on the
camera probe that could automatically adjust direction and level when
taking videos/pictures to deliver upright pictures all time, helping users to
position.

9
12 adjustable LED lights on the camera probe
There are 5 modes to adjust the brightness, press the LED button on the
battery control box or the F6 key on the keyboard to adjust.
9. Cable Coil
New stable and strong coil structure with steel bearing inside, can easily
release or coil the cable with less time and force.
How to release the cable:
Take out the cable from the bracket, then pull the cable to release.
How to coil the cable:
Push the cable inward to coil the cable back while using your other hand to
hold and rotate the coil, then lock the cable in the holder.

10
10. Device Installation
<A> Connect the Y-type split video cable on the screen to the battery box
port as shown in the picture.
<B-C> Connect the video cable from the coil to the battery box as shown in
the picture below, and tighten it.
<D> Install the camera probe to the fiberglass cable end.
Finally, switch on the button on the battery box to turn on the battery and
then press the button on the screen to turn on the screen.

11
11. Structure & Accessories
①Plastic Box*1 ②10.1-inch IPS Screen*1 ③16GB SD Card*1
④Metal Bracket *1 ⑤Lithium Battery *1 ⑥Camera*1
⑦Fiberglass Cable*1 ⑧Keyboard*1 ⑨5in/130mm Pipe Pulley*1
⑩1.5in/38mm Protective Cover*1 ⑪DC Adapter*1 ⑫Screwdriver*1
⑬Instruction*1

12
12. Trouble & Troubleshooting
Trouble
Troubleshooting
No power
a. Check whether each interface is connected
correctly;
b. Check whether the battery is out of power, check
the power display.
Can’t be charged
a. Is the DC adapter plug-in correctly;
b. Check if the indicator light of the DC adapter is
on.
Indicator light is on but
no image
a. Check whether the connecting wires are well
connected and whether the camera is tightened;
b. Check whether the battery is fully charged, and
try again after fully charged.
Can't record videos
a. Whether the SD card is inserted correctly;
b. Insufficient SD card memory;
c. Check whether the power off during the recording
process.
Recording videos in
black and white color
Adjust the LED light button to the appropriate
brightness, observe the screen display, and select a
brightness that is clearer and more colorful.
No signal, screen
turns blue
a. Turn off the power and turn it on to confirm the
problem again;
b. Check that connections are well connected and
make sure all cables are properly connected;
c. Adjust the camera probe and turn it slowly to
confirm whether it is loose.
LED lights not working
a. Check whether the LED lights setting is turned
on, adjust the LED adjustment button on the battery
box or F6 to adjust the brightness;
b. Tighten or loosen the camera probe slowly to
check if it works;
c. Use a voltage tester to test all connectors, find
out the damaged part and contact Sanyipace to
deal with it.

13
13. Warranty
We provide a one-year product quality warranty from the date of purchase
and provide free lifetime product technical support. For normal faults or
quality problems within the warranty period, we provide free replacement or
repair services. For damage caused by manual operation, we will charge
the cost of product parts for repair. Our technical support team is at your
service 24 hours a day. If you encounter any problems during use, please
feel free to contact us.
----Contact Us----
Go to our website to download the user manual or view more products:
https://www.sanyipace.com
Website After-sale: service@sanyipace.com
Amazon After-sale: sanyimrchan@gmail.com
Facebook: Sanyipace
WhatsApp: +86 137 1399 910

This manual suits for next models
1
Table of contents
Other Sanyipace Digital Camera manuals