Sanyipace F927ADFB User manual

1
HD Sewer Pipe Inspection Camera
User Manual
-----------------------------------------------------------------------------------------------------------------------------------------
Please contact us at the first time if you got issues with the product
SanyiMrchan@gmail.com

2
Catalog
1. Note ...............................................................................Page 3
2. Range of Product Use .................................................Page 3
3. Product Specification ................................................. Page 3
4. Product Parts and Operation ..................................... Page 4
(1) Display .....................................................................Page 4
(2) Camera (IP68 waterproof) .......................................Page 6
(3) Cable Coil (20m/30m/50m length optional) .............Page 7
(4) 4500mah Battery ..................................................... Page 7
(5) Device Charger ........................................................Page 8
(6) Remote Controller ................................................... Page 8
5. Accessories list ........................................................... Page 9
6. Device Installation .......................................................Page 9
7. Failure and Diagnosis ............................................... Page 10

3
1. Note
1:Please read this user manual carefully before using this product .
2:Do not throwing or pressure with strength .
3:Do not dismantling the machine without permission.
4:Please copy your information before connection the memory card .
5:Do not suddenly cut off the power during recording and playing. This may
damage the product and video files.
2. Range of Product Use
1:Home pipe blocking inspection .
2:Pipeline Inspection Camera, pipeline tools .
3:Underground water pipe, HVAC system, oil and gas pipeline.
4:Rescue operations in a small space .
5:For underground expedition.
6:Underwater river bed scientific research.
7:Other positions which is hard to reach
3. Product Specification
---Camera and cable---
Sensor: 1/3 CMOS
Camera resolution: 1000TVL
Camera diameter: 22MM .
Camera line source: 12pcs 1W high white LED(adjustable ).
Camera angle: 145 degree.
Camera material: stainless steel /IP68 waterproof camera .
Camera protective cover size /material: 38mm*28mm/90MM*28MM.
Cable length/material: 20M 30M 50M (optional) high elastic cable
---Display---
Size:7inch
Camera /monitor picture : color TFT LCD
SD card: max support 32GB, factory standard 16GB .
Display resolution:7 inch ,16:9, 1024*600.
Menu Language:English/Germany/French optional .

4
Display port: power input /Video.
Display video format: AVI with Year,Month,Date,Time and Seconds
Display operate: button and remote control .
Working temperature: -20-60 ℃.
Storage temperature: -30-80 ℃.
---Charger---
Charger : 100VAC-240VAC DC 12.6V 1000MA.
Battery: lithium battery 4500mAH.
Battery continuous working time: about 6-8 hours.
4. Product Parts and Operation
(1) Display
Display Operation :
-Menu setting (need to exit the REC mode)
Press MENU enter, Press "<" ">" to select, press “Rec/- ” to confirm your
selection, Press EXIT to back. you can set display setting/playback/video
setting/storage/system setting.
-How to zoom in image during recording:
Press "<" to zoom in and 5 gears in total, press it 5 times to zoom in to the

5
limit, and at the 6th time press to return to normal
-How to record a video:
Pres “Rec/- ” to start recording , press “Rec/- ” again to stop.
-How to take a snapshot:
Pres “>” to take photo quickly
-Video Browsing:
press “PLAY/+” first time to enter photo viewing, press it second time to
enter video playback, press it again to exit. Press “>””<” to select, press
“REC/-” to play.
-How to delete the picture or video:
press “PLAY/+” to enter photo/video viewing, press “>” to choose one of the
pictures or videos, press “MENU” and “>” to enter selection of delete or
delete all, press “REC” to confirm the selection, press “PLAY” again to exit.
-How to revise the video length of recording:
The recorded video will be divided into fixed-length videos and stored on
the memory card, the default duration is 3mins, you can revise it to up to
10mins. press "Menu" and ">" to choose "Video Menu" and press "REC/-"
times to revise it to 5mins, 10mins, 1mins or 3mins, at last press "Menu" to
exit
-How to remove the screen and take out the memory card:
Press the buttons on both sides of the display at the same time to pop the
display out.

6
There is an SD card slot on the left side of the screen. press the card to pop
it out
(2) Camera (IP68 waterproof)
7
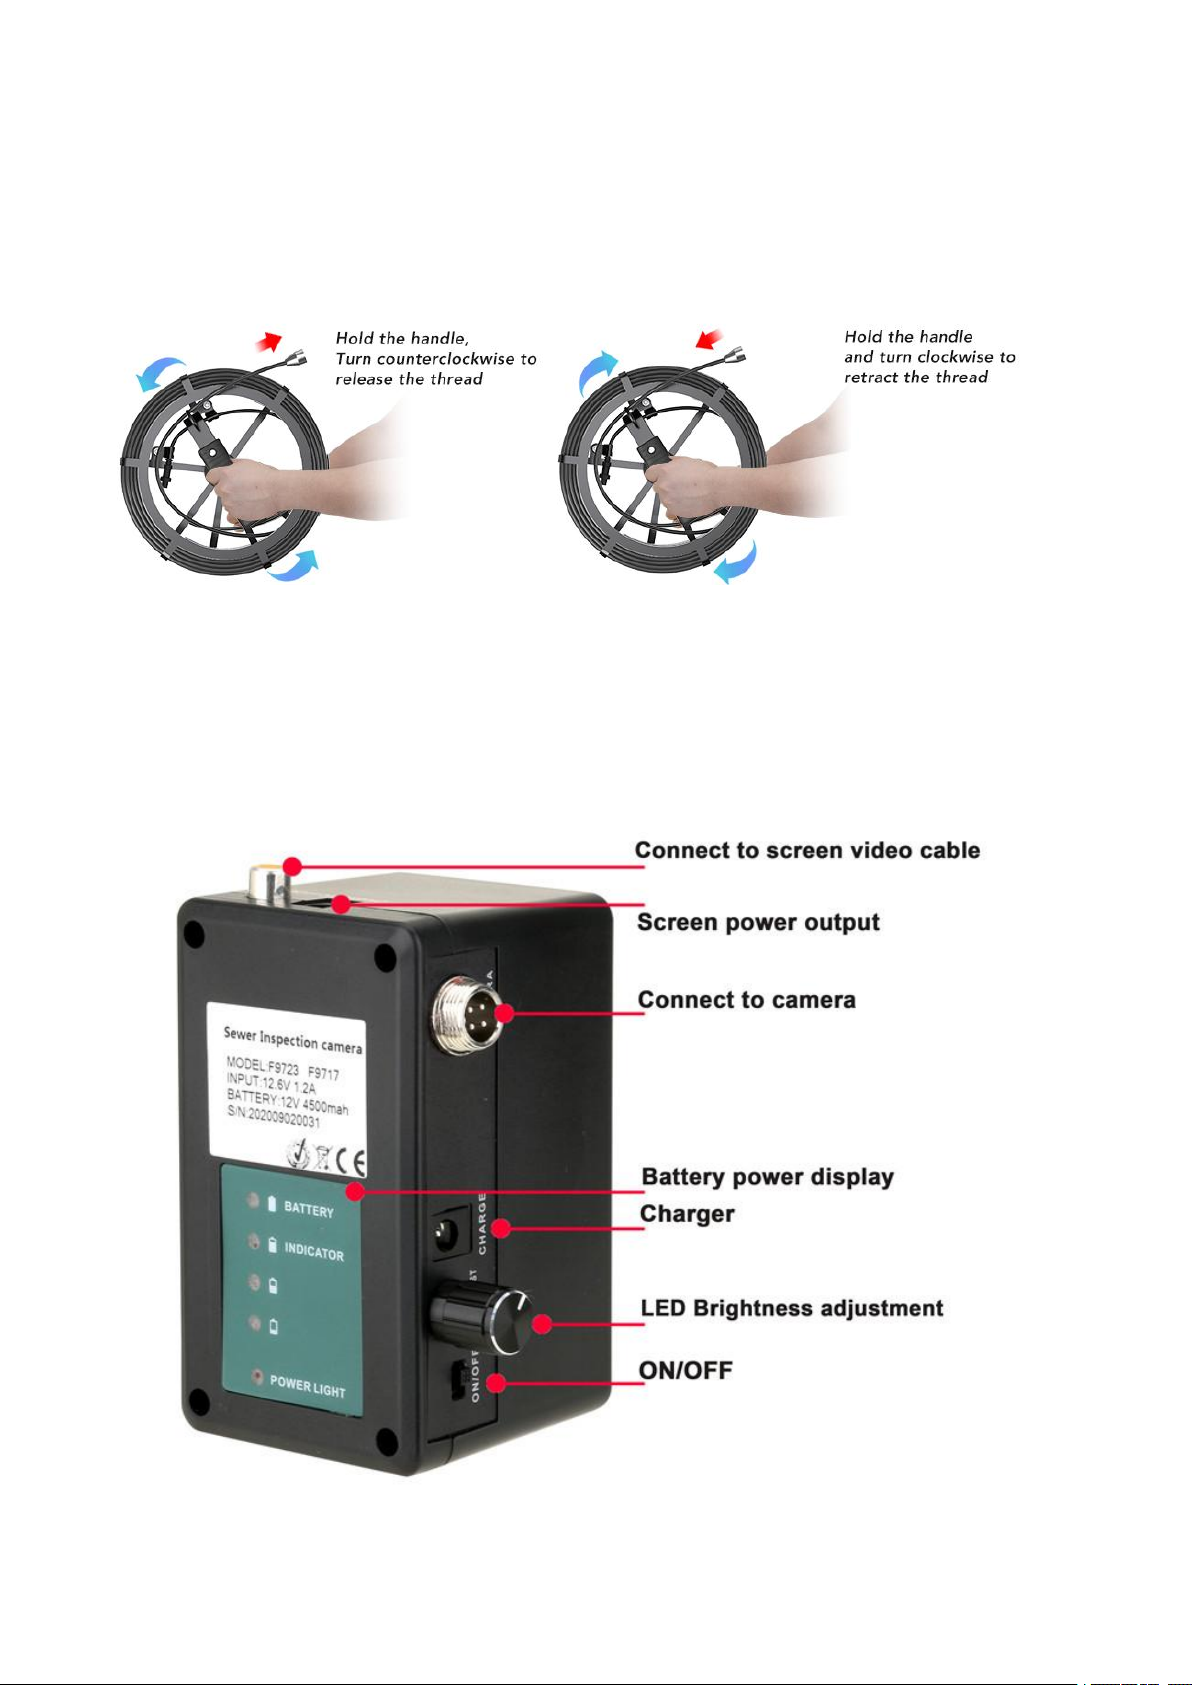
(3) Cable Coil (20m/30m/50m length optional)
put the cable on the hook of handle, pull out to release or push back to coil
the cable.
(4) 4500mah Battery

8
(5) Device Charger
When the battery power is low,please recharge it. Connect the charger to
the battery (CHARGER port) , and another end connects to the socket
Notes: To make sure the battery using age longer, please recharge it
timely; otherwise, maybe the battery can’t be recharged.
(6) Remote Control
Please be noted that the clear insulating card protects battery, need to
remove it before use
VIDEO SELECT: function same with the screen button “PLAY/+”
MODE SELECT: function same with the screen button “REC/-”
◀: function same with the screen button “<”
▶: function same with the screen button “>”

9
5. Accessories list
①aluminum box *1 ②display *1 ③battery*1 ④connection cable * 1
⑤cable coil *1 ⑥camera head * 1 ⑦camera protective cover * 1
⑧pipe pulley * 1 ⑨16G SD card ⑩charger*1 ⑪remote controller
⑫mini screwdriver
6. Device Installation

10
7. Failure and Diagnosis
Common problems /
faults
Solutions
indicator light on
No image
1, Check whether each connector is connected
and the camera needs to be tightened.
2, Check if the battery is fully charged and try again
after it is fully charged .
No power
1, Check whether each connector are connected
correct .
2, Battery is exhausted ? check the battery display
Other manuals for F927ADFB
1
Table of contents
Other Sanyipace Digital Camera manuals


