Sanyo EM-N200 User manual

s*O
INSTRUCTION MANUAL EM-N200
Microwave Oven
!
TABLE OF CONTENTS
Safetv Instructions
Operating Instructions
■Automatic Popcorn . . . . . . . . . . . . . . . . . . . . . . 8
■Quick-Reheat Cooking . . . . . . . . . . . . . . . . . . . . 8
■Automatic Defrost by Weight . . . . . . . . . . . . . . 9
■Direct Access Cooking . . . . . . . . . . . . . . . . . . . . 10
ETime Cooking ........................... 11
■Minute Timer . . . . . . . . . . . . . . . . . . . . . . . . . . . . 12
■Multistage Cooking . . . . . . . . . . . . . . . . . . . . . . 12
Care ofYour Microwave Oven
■Questions and Answers .................. 13
■Cleaning . . . . . . . . . . . . . . . . . . . . . . . . . . . . . 14
■Before Calling for Service ................. 14
Charts
9Quick-Reheat Cooking Chart.. . . . . . . . . . . . . 15
■Automatic Defrost Chart... . . . . . . . . . . . . . . . 16
Quick Reference . . . . . . . . . . . . . . . . . . . .. back cover
Read these instructions
carefully before using these ovens.
If you follow the instructions,
your microwave oven will
provide you with many years
of good service.
SAVE THESE INSTRUCTIONS

Model EM-N200
Power Consumption 1150W
Maximum Output 750W’
Oven Capacity 17.0 L
Turntable Diameter 275 mm
Dimensions (w xhxd) 461 mm x 250 mm x 346 mm
Weight (Approx. )12.5 kg
*According to IEC-705 test procedures.
Specifications subject to change without notice
.The oven must be level.
●The turntable and turntable roller rest must be
in the oven during cooking.
.Place the cookware gently on the turntable and
handle it carefully to avoid possible breakage.
.The oven has several built-in safety switches to
ensure that the power remains off when the
door is open, Do not tamper with these
switches.
●Do not operate the microwave oven empty.
●Do not overcook food. Asmall quantity of food
with low moisture content or high fat or sugar
content can burn.
●Do not cook bacon directlv on the turntable.
Excessive local heating of the turntable may
cause it to break.
●
●
✎
●
✎
Avoid heating baby bottles or baby food jars.
Transfer the foocj into asuitable container for
the microwave oven, The food temperature
should be tested before giving it to the baby.
Do not heat narrow-necked containers, such as
syrup bottles.
Do not attempt to dec~)-fry In your microwave
oven as the temperature of oil cannot be
controlled.
Do not heat cans. Transfer the contents into a
microwave-safe dish before heating.
Do not use this microwave oven for
commercial purposes. This nucrowave oven is
made for household use orly.
NOTE
.It is q~lite normal for steam to be emitted
around the door, for mistlncj to occur on the
Idoor, or even for water droplets to appear
below the door durinq The cookinq cycle. This is
merely condensation-from the he;t if the food.
PRECAUTIONS TO AVOID POSSIBLE EXPOSURE
TO EXCESSIVE MICROWAVE ENERGY
(a) Never interfere or tamper with safety interlocks.
(b) Do not place any object between the oven front face and the cloor or allow soil or cleaner
residue to accumulate on door sealing surfaces. Wipe the door sealing area frequently with
amild detergent, rinse and wipe dry. Never use abrasive powders or pads.
(c) When open, the door must not be subjected to strain; for example, achild hanging on the
opened door or any load on it could cause the oven to fall forward, ancl the weight could
also damage the door.
(d) Do not operate the oven if it is damaged. It is particularly important that the oven door
closes properly and that there is no damage to the:
(1) DOOR (bent)
(2) HINGES AND LATCHES (broken or loosened)
(3) DOOR SEALS AND SEALING SURFACES
1

When using electrical appliances, basic safety precautions
should be followed, including the following:
WARNING _To reduce the risk of burns, electr~c shock, fire, injury
to persons or exposure to excessive microwave energy:
1. Read all instructions before using,
2. As with most cooking appliances, close
supervision is necessary to reduce the risk of a
fire in the oven cavity.
If afire should start:
●Keep the oven door closed
●Turn the oven off, and
.Disconnect the power cord or shut off power at
the fuse or circuit breaker panel.
Keep in mind the following rules at all times:
Do not overcook food. Overcooked food can
cause fires in the oven. Carefully attend to the
oven’s activities, especially if paper, plastic, or
other combustibles are inside.
Do not store combustible items such as bread,
cookies, paper products, etc. inside the oven.
They may catch fire if turned on accidentally.
Do not use wire twist-ties in the oven. Be sure
to inspect purchased items for wire twist-ties
and remove before placing food in the oven,
IWARNING
3.
4
5
6.
7
8.
9
Some products such as eggs in the shell, water
with oil or fat, sealed containers and closed
glass jars may explode and therefore should
not be heated in this oven.
Use this oven only for its intended uses as
described in the manual. It is not designed for
industrial or laboratory use. Never use
corrosive chemicals or vapours in this oven.
As with any appliance, children should use the
oven only under adult supervision.
Do not store or use this appliance outdoors.
Keep the oven away from heat and water
sources. Exposure to heat and water can lower
efficiency and lead to malfunctioning.
When heating water or other liquids, use a
wide necked container to allow air bubbles to
escape freely. Using narrow-necked containers
may cause the liquid to boil over. This may
happen even after the cooking has stopped.
It is important to keep the door and the oven
interior clean.
(See “Cleaning” instructions on page 14. )
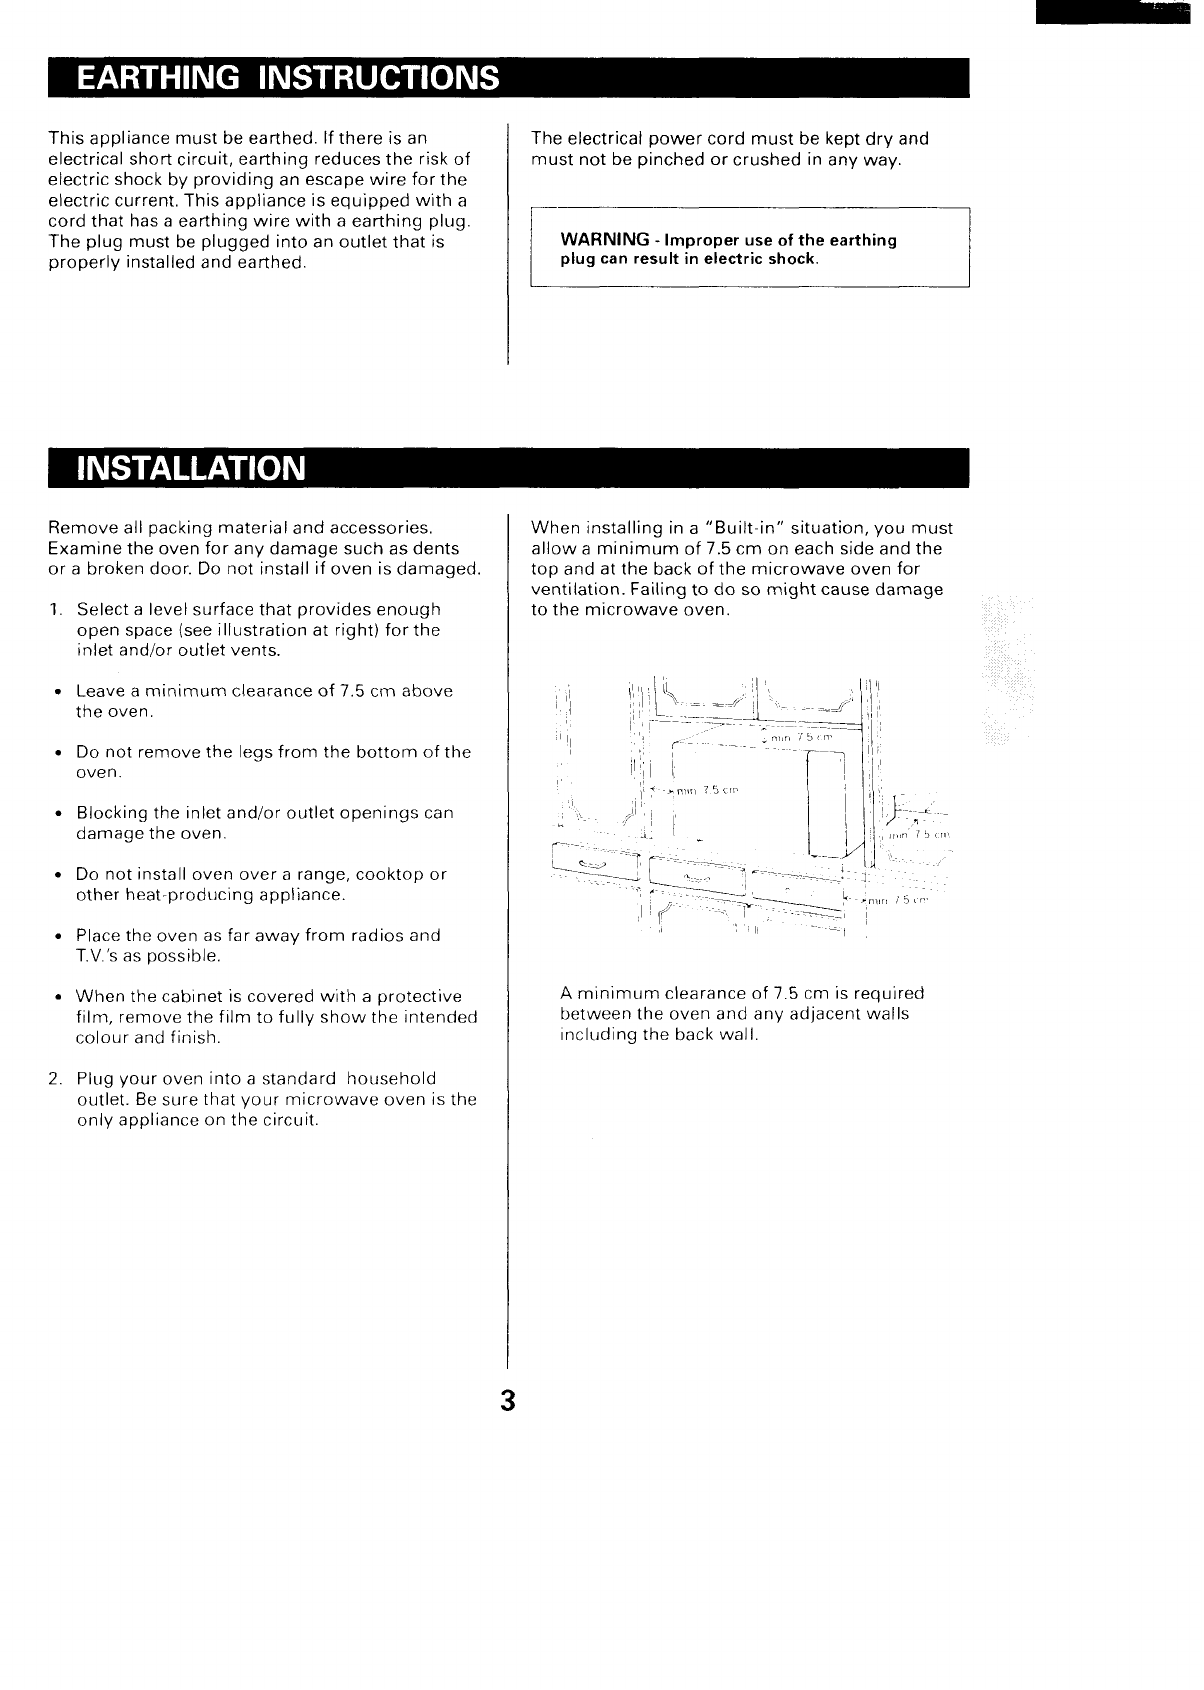
(a)
(b)
(c)
(d)
Do not adjustor repair microwave oven yourself. Do not operate the oven if it is damaged,
until it has been repaired by aservice engineer trained by the manufacturer.
It is dangerous for anyone other than aproperly qualified engineer trained by the
manufacturer to carry out adjustments or repairs.
If the power supply cord is damaged, it must be replaced by the manufacturer, as a specially
prepared cord is required.
On no account remove or interfere with any parts or screws.
THIS COULD PROVE VERY DANGEROUS.
I
SAVE THESE INSTRUCTIONS
2

This appliance must be earthed. If there is an
electrical short circuit, earthing reduces the risk of
electric shock by providing an escape wire for the
electric current, This appliance is equipped with a
cord that has aearthing wire with aearthing plug.
The plug must be plugged into an outlet that is
properly installed and earthed.
The electrical power cord must be kept dry and
must not be pinched or crushed in any way,
WARNING -Improper use of the ear-thing
plug can result in electric shock.
II
Remove all packing material and accessories,
Examine the oven for any damage such as dents
or abroken door. Do not install if oven is damaged.
1.
●
●
●
●
●
●
2.
Select alevel surface that provides enough
open space (see illustration at right) for the
inlet and/or outlet vents.
Leave aminimum clearance of 7.5 cm above
the oven.
Do not remove the legs from the bottom of the
oven.
Blocking the inlet and/or outlet openings can
damage the oven.
Do not install oven over arange, cooktop or
other heat-producing appliance.
Place the oven as far away from radios and
T,V.’S as possible.
When the cabinet is covered with aprotective
film, remove the film to fully show the intended
colour and finish.
Plug your oven into astandard household
outlet. Be sure that your microwave oven is the
only appliance on the circuit.
When installing in a“Built-in” situation, you must
allow aminimum of 7.5 cm on each side and the
top and at the back of the microwave oven for
ventilation. Failing to do so might cause damage
to the microwave oven.
Aminimum clearance of 7.5 cm is required
k~etween the oven and any adjacent walls
Including the back wall.
3

Remove the oven and all materials from the carton.
Your oven comes with the following accessories:
Turntable 1
Turntable roller rest 1
Instruction Manual 1
Cabinet
Safety interlock system
Shuts off oven power if Interior light
d
door is opened during
operation.
I
Door UP’-” Turntable
roller rest
., T
/
wDoor release button
●Press the button to open
●When you open the door
-Control panel
door.
during
Icooking process, the cooking
Turntable stops but the program will not be
cancelled. Touch START to
resume cooking.
TURNTABLE INSTALLATION
‘urn=1. Place the roller rest on the cavity bottom.
2Place the turntable on top of the roller rest as shown
Hub ●
Roller rest (underside)
kig+l!l
●
—.
●
00
Receptacle t●
at cavity bottom—f$
centre
in the diagram. Make sure the turntable hub is
securely locked in the receptacle. Never place the
turntable upside down. The turntable rotation should
never be restricted.
Both turntable and roller rest must always be used
during cooking.
All food and containers of food are always placed on
this turntable for cooking.
This turntable returns to its original starting position
when cooking is finished. The light and fan will remain
on but microwave power is turned off.
This turntable rotates clockwise or counterclockwise;
this is normal.

(2)
(3)
(6)
(7)
(9)
(1:
(14
TIME POWER SERV
SANYO
o1
c)
4
07
@3mxm
c)
2
(3 5o
(5
6
08
00
WI
PBIEATxw
o
&
OOOR RELEASE
-(1)
-(4)
-(5)
-(8)
-(11)
-(lo)
-(12)
(1)
(2)
Display Window
Counts down cooking time in seconds
during cooking. Shows clock time when
oven is not in use.
Indicators
ST1/ ST2/ ST3 :Cooking stage indicators
AUTO/ DEF/ PAUSE :Cooking mode
indicators
TIME/ POWER/ SERV./ Kg/ g:
Aflashing indicator prompts you to enter
desired cooking time, power setting, food
weight or number of servings.
Direct Access menu keypads (page 10)
(3) FROZEN VEGETABLE
(4) POTATO
(5) SOUP/BEVERAGE
Auto menu keypads
(6) POPCORN (page 8)
(7) AUTO DEFROST (page 9)
(8) QUICK REHEAT (page 8)
(9) TIME keypad (page 11)
(10) POWER LEVEL keypad (page 11)
(11) Number keypads
(12) Clock keypad (page 6)
(13) START keypad
(14) STOP/CLEAR keypad
Clears all previous setting if pressed before
cooking starts. During cooking: touch once
to stop oven; twice to stop and clear all
entries.
Beep Sound
Abeep tone sounds when akeypad on the
control panel is touched to indicate asetting
has been entered.
5

When your oven is plugged in
for the first time or when power
resumes after apower
interruption, the numbers in the
display reset to 0:00. Set the
clock.
Emm ‘ose’’:”:
1. e)
2“
CDm@
3. Q
Touch @
Touch number keypads 3, 1
and 5.
Touch ~
The clock starts counting.
●If the clock (or display) shows any abnormality, unplug the oven from
the AC outlet. Plug it in again and then reset the clock.
Your oven has asafety feature
which prevents children from
accidentally turning it on.
Even if the oven is accidentally
programmed to cook, no
cooking takes place when this
feature is set.
To set :
1.
2.
e)
o9
4times
3.
0START
To cancel :
1.
2.
e)
o7
4times
3.
0START
Touch 0.
Touch 9four times.
Touch START.
Indicator Llights and clock
display reappears.
Touch o
Touch 7four times.
Touch START.
Indicator Ldisappears and
clock display reappears,
6

Utensils Use Remarks
Aluminium foil Shielding Small smooth pieces can be used to cover thin parts of meat or
poultry to prevent overcooking. Arcing can occur if foil istoo close
to oven walls. The foil should be at least 2.5 cm away from oven
walls. Do not cover food completely with aluminium foil.
Browning dish Searing meats Follow manufacturer’s instructions. The bottom of browning dish
must be at least 5mm above the turntable, Incorrect usage may
cause the turntable to break.
Dinnerware Reheating and Microwave-safe only, Follow manufacturer’s instructions, Do not
.short-terrn cooking use cracked or chipped dishes.
Glass jars Warming Always remove lid. Use only to heat food until just warm. Most
glass jarsare_not heat resistant and may break.
Glassware Cooking Heat-resistant oven glassware only. Make sure there is no metallic
trim. Do not use cracked or chipped dishes.
Oven cooking Cooking Follow manufacturer’s instructions. Do not close with metal tie.
bags Make_sljts to allow steam to escape.
Paper plates Short-term warming Use for shoti-term cooking/warming only. Do not leave oven
and cups and cooking unattended while cookin~.
-— -—
Paper towels Reheating and Use to cover food for reheating and absorbing fat. Use with
short-term cooking supervision for ashort-term cookin~ only.
Parchment paper Cooking Usea5 acover to prevent spatterin~or awrap for>teamin_~.
Plastic Reheating and Microwave-safe only, Follow the manufacturer’s instructions.
short-term cooking Should be labeled “Microwave Safe. ”Some plastic containers
soften as the food inside~ets hot.
.—
Plastic wrap Cooking Microwave-safe only. Use to cover food during cooking to retain
moisture, Do not allow plastic wrap to touch food.
Thermometers __ Cooking_ Microwave-safe o_n!y:_rneat_and: a.ryJy:.~ermometers). _
Wax paper Cooking Use as a cover to prevent spattt~~n$and to retain moisture,
Utensils Remarks
Aluminium tray Aluminium tray may cause arcing. Transfer the food into a
microwave-safe dish before cooking,
Food carton with metal handle May cause arcing. Transfer food into microwave-safe dish.
Metal or metal-trimmed utensils Metal shields the food from microwave energy. Metal trim may
Metal twist ties
Paperbags
Plastic foam cups
Wood
UTENSIL TEST
cause arcing,
They may cause arcing and could cause afire in the oven.
May cause afire in the oven.
Plastic foam may melt or contaminate the liquid inside when
exposed to high temperature.
——
Wood will dry out when used in the microwave oven and may split
or crack.
Fill amicrowave-safe container with 1cup of cold water (250 mL) and place it in the oven
along with the utensil in question. Cook on HI power for 1minute. Carefully feel the utensil.
If the empty utensil is warm, it should not be used for microwave cooking. Do not exceed
1minute testing time. This test cannot be used for plastic containers.
Make sure that closed containers are opened and plastic pouches pierced before cooking.
Tghtly-closed utensils could explode.
7

This feature lets you pop a
100-g, 85-g or 50-g prepackaged
microwave popcorn quickly and
easily.
Popcorn Popping Tips:
●
●
●
Microwave popcorn bag
should be at room
temperature.
Place only one bag in the
oven at atime. Follow
package instructions. Do not
increase quantity.
Popcorn popping devices are
not recommended for use
with this feature.
-To pop one bag of ““” -–’----- ”---- -------”
1.
mPOPCORN
2.
mSTART
~
Iuu-y rIIItiruwiive fxrpmrrrl:
Touch POPCORN once.
Display shows bag size.
Select bag size as follows.
r—
IBag Size
[
Ioog
85 g
50 g
Touch START.
Touch POPCORN
once
twice
3times
The display shows the time
counting down.
.If popcorn bag size is not 100 g, 85 gor 50 g, do not use this feature.
Follow instructions on the package.
●Do not leave the oven unattended while the corn is being popped.
.Remember to supervise children closely,
.
.
●
After popping, open bag carefully. Popcorn and steam are extremely
hot.
Do not reheat unpopped kernels or reuse bag. Overcooking can result in
an oven fire.
Never use abrown paper bag for popping corn.
This simplified control lets you
set and start microwave cooking
for one of 10 predetermined
periods of time by just pressing
2keypads. The power level is
always set to HI (maximum
power) for Quick-Reheat cooking.
●Press the QUICK REHEAT
keypad and then the Okey to
cook for 30 seconds.
●Press the QUICK REHEAT
keypad and any other number
key (1 9) to select acooking
time in minute. (To cook for 9
minutes, for example, press
the 9key. )
-To set Quick-Reheat cooking 2minutes:
‘“ [=:.) Touch QUICK REHEAT
2. 02Touch 2.
The oven begins cooking and
display shows time counting
down.
I.You may open the door to stop cooking before the selected time is over.
To start again, close the door and touch START.
8

The Auto Defrost by Weig ht
feature is an accurate defrosting
method for frozen food up to
2.9 kg. The oven automatically
selects 1kg. If food weight is
more or less than 1kg, enter the
weight using the number
keypads.
Pause Reminder
For the best results, microwave
defrosting requires rearranging
the food about halfway through
the process. Apause reminder
mechanism is built into this
feature to alert you with five
beeps to open the door and
check, separate or turn the food.
The PAUSE indicator also
flashes for five seconds.
If you do not open the door at
the pause reminder, the oven
continues to complete the
defrosting.
Auto Defrosting chart appears
on page 16.
For manual defrosting using
Tme Cooking, see page 11.
Defrosting lips:
●
●
●
●
●
●
Check the food during
defrosting.
Remove frozen food from its
original paper or plastic wrap.
When it is difficult to remove
the wrap, defrost the food in
the wrap until the pause.
At the pause, remove the
wrap.
Place foods in aflat
microwave-safe baking dish
or roasting rack to catch
drippings.
Food should still be
somewhat icy in the centre
when removed from the oven.
The Auto Defrost menu
includes standing time.
Food can be defrosted in a
styrofoam package.
-To defrost 1.2 kg of chicken pieces:
1.
2.
3.
4.
5.
0
AUTO Touch AUTO DEFROST.
DEFROST
m
Enter the weight by touching 1
m (3 andthen2 ,~, / -) ‘g
/.~
\)
o
START Touch START.
The oven starts and the defrost
time counts down in the display.
When the five-beep Pause Reminder sounds, open the door
to separate, rearrange or turn food over.
(‘TART)
Touch START to resume
defrosting.
●To enter aweight of less than 1kg, always press Ofirst. For example,
to enter O.2 kg, press Oand then 2.
●Only one digit can be entered after adecimal ~oint. If in doubt, convert
to the lower-number.
Ibs -OZ
402
7Oz
100Z
140Z
1lb-2 02
1lb-5 OZ
1lb-9 02
1lb-12 02
2lb
2lb-4 02
2lb-7 02
2Ib-11 02
2lb-14 OZ
3lb-2 02
3lb-5 02
~s. 100
200
300
400
500
600
700
800
900
1000
1100
1200
1300
1400
1500
9
CONVERSION TABLE
—kg _= .J!bz=
0.1
0.2
0.3
0.4
0.5
0.6
0.7
0.8
0.9
1.0
1.1
1.2
1.3
1.4
1.5
3lb-9 OZ
3lb-12 OZ
4lb
4lb-3 OZ
4lb-7 OZ
41 b-10oz
41 b-140z
5lb-l OZ
5lb-5 OZ
5lb-8 OZ
5lb-12 02
51 b-150z
6lb-3 OZ
6lb-6 02
grams
1600
1700
1800
1900
2000
2100
2200
2300
2400
2500
2600
2700
2800
2900
:=.=!9=...
1.6
1.7
1.8
1.9
2.0
2.1
2.2
2.3
2.4
2.5
2.6
2.7
2,8
2.9

Each of the three Direct Access
Keypads is preprogrammed to
cook/reheat acertain food
group. You can indicate the
quantity of the food (number of
the servings) you want to cook
by the number of times you
press the designated key. The
oven determines cooking time
and power level accordingly.
/ \
fFROZEN )
VEGETABLE
\
Use this key to defrost and heat
1to 3servings (150 g-450 g) of
frozen precooked vegetables.
m
Use this key to cook 1to 3
potatoes (170 -510 g).
/ \
[SOUPI
BEVERAGE )
L/
Use this key to heat 1to 3
servings (230 mL -690 mL) of
beverage or soup.
Cooking Tips
Frozen Vegetable:
●Follow package directions for
venting cover, adding water,
piercing pouch, replacing foil,
covering with plastic wrap, etc.
●Stir during cooking time.
Potato:
●
●
●
Arrange in acircular pattern
with heavier ends pointing
toward the outer edge of the
turntable.
Potatoes must be room
temperature.
Turn over during cooking time,
Soup/Beverage:
.Liquids must be room or
refrigeration temperature.
●Stir after reheating.
-To cook 2servings of potato :
1.
0
Touch POTATO twice.
POTATO AUTO
m
Enter the number of servings by
touching adesired menu keypad :
2.
mSTART
1.‘“%zb::k
once 1serving
twice 2servings
3times 3servings
Touch START.
The display changes to cooking
time countdown.
Item
1. ]Amount
IFROZEN 1serving (150 g)
~VEGETABLE !2servings (300 g)
1- --- ,3servings (450 g)
POTATO ~
I1potato (170 g)
~2potatoes (340 g)
3potatoes[510g)
SOUP/BEVERAGE
Coffee/Tea ~1servlrrg (230 mL)
soup I2servings (460 mL]
Hot Chocolate I3servings (690 mL)
Directions I
Place in abowl or dish. Cover.
Let stand 2-3 minutes.
NOTE: Use microwave-safe dish, bowl or cup.
Pierce with fork.
Place on paper towel.
Touch menu keypad.
Let stand 3-5 minutes. I
No cover. St!r after reheating.
Cover. Stir after reheating. ~
No cover. Stir after reheating. J
10

This basic microwave cooking
method allows you to cook food
for adesired time. In addition to
the HI (maximum) power level,
you can select different
microwave power from 9levels,
1(107. of total power) to 9(90~0
power) for the foods that require
slower cooking. The oven also
provides power level O(no
power) so that the clock can be
utilized as a minute timer.
See page 12 for details.
Foods with high moisture
content should be cooked on
maximum power, as this is the
fastest cooking method and best
maintains the natural flavour
and texture of the foods.
To check the power level during
cooking, touch POWER LEVEL.
The power level appears in the
display window.
Manual Defrosting
For manual defrosting (without
using Auto Defrost features), use
power level 3. To speed up the
defrosting of dense foods over
450 g, you may start on HI for 3
minutes, then reduce to the
level 3.
mm To cook at power level 8for 40 seconds:
1.
2.
3.
4.
5.
D
TIME Touch TIME.
Enter 40 seconds by touching 4
@ @ andthen O.
c)
POWER
LEVEL
o
8
Gin
Touch POWER LEVEL.
ST 1
II_/I
Ill I
L)
FQWCR
Touch 8to select power level 8.
The display shows 8.
STI
Touch START. mPow.
~
.Cooking time can be set up to 99 minutes 99 seconds
.When you cook on HI power, skip steps 3and 4.
POWER LEVEL SETTING GUIDE
Power Cooking
Level Examples
●Keeplng”casseroles and main dishes warm
2
3
4
5
6
7
8
9
HI
●Softening chocolate and clarifying butter
●Heating breads, rolls, pancakes, tacos, tortillas and French toast
●Taking the chill out of fruit Heating small amounts of food
●Completing the cooking cycle of casseroles, stews and sauces
.
.
.
.
.
.
●
✎
✎
●
●
✎
✎
✎
Manual defrostlnrj
Iha~wr>g meat, poultry and seafood
Cooking less ter~der cuts of meat In hqu(d or slowzooklng
chsbes
Lor’pletlng the cooking cycle of less tender roasts
Reheatncj precooked or prepared food quickly Cookng fish
Cookng omons, celery and green peppers quickly
Reheatncj meat shces qutckly
Cookng poul!ry, vegetables and most casseroles
Preheatng abrowmrlg dsh Bolllng water
11

You can use the timer function
of your oven for purposes other
than cooking.
mTo set 3minutes for atelephone call:
‘mTouch TIME.
2-(XD(IC) ‘0uch3’0andO”
3.
m
Touch POWER LEVEL.
~f;:l
4. (T) Touch O(power level O).
‘“ (=7 Touch START.
●
●
●
You can program up to 3stages of cooking in sequence.
To program 2-stage or 3-stage cooking, repeat the Time Cooking
steps 1to 4on the previous page and touch START.
Using the Minute Timer feature for the first stage, you can delay
cooking start time by up to 99 minutes and 99 seconds.
Using the Auto Defrost by Weight feature for the first stage, you can
defrost first and can program up to 3stages of cooking.
12

OPERATION
Q.
A.
●
●
Q.
A.
Q.
A.
Q.
A.
Q.
A.
Q.
A.
Q.
What is wrong when the oven light will not
glow?
There may be several reasons why the oven
light will not glow.
The light bulb has burned out.
START has not been touched.
Why is steam coming out of the air exhaust
vent?
Steam is normally produced during cooking.
The microwave oven has been made to vent
this steam.
Can the microwave oven be damaged if it
operates empty?
Yes. Never operate while empty or without the
turntable positioned correctly on the roller rest.
When the oven is plugged into awall outlet for
the first time, it might not work properly. What
is wrong?
When the oven is plugged in for the first time
or when power resumes after apower
interruption, the microcomputer used in the
oven control may temporarily become
scrambled and fail to function as programmed.
Unplug the oven from the wall outlet and then
plug it back in. The microcomputer will then
reset for proper functioning.
Why do Isee light reflection around the outer
case?
This light is from the oven light located outside
the oven cavity.
Why is there noise coming from the turntable
when the oven is turned on?
This noise occurs when the turntable roller rest
and cavity bottom are dirty. Frequent cleaning
of these parts should eliminate or reduce the
noise.
Instructions for aluminium foil use are
confusing. When should Iuse foil?
A. It should be used to shield portions of food
from becoming overcooked or overdefrosted.
Use small flat pieces of foil for shielding.
(Refer to page 7).
FOODS
0.
A.
Q.
A.
Q.
A.
●
●
●
●
Q.
A.
Q.
A.
Q.
A.
Q.
A
What is wrong when baked foods have ahard,
dry, brown spot?
This is caused by overcooking. Shorten
cooking or reheating time.
Why do eggs sometimes pop?
The egg yolk may pop because of steam
build-up inside the membrane. To prevent this,
simply pierce the membrane with atoothpick
before cooking it.
CAUTION: Never microwave eggs in the shell
since they may explode.
Why are scrambled eggs sometimes alittle dry
after cooking?
Eggs dry out if they are overcooked. You may
need to vary the cooking time for one of these
reasons:
Eggs vary in size.
Eggs are at room temperature one time and at
refrigerator temperature another time.
The shapes of utensils vary, which makes it
necessary to vary cooking time.
Eggs continue cooking during standing time.
What is wrong when three potatoes bake
thoroughly and the fourth one is still not
cooked?
The fourth potato may be slightly heavier than
the others and should be cooked 30 to 60
seconds longer. Remember to allow one inch
(2.5 cm) around each potato when baking. For
more even cooking, place potatoes in acircle.
Why do baked apples sometimes burst during
cooking?
As in regular cooking methods, steam is
formed in the interior of the apple, causing it to
swell and expand during the cooking process.
How are boil-overs avoided?
Use alarger utensil than usual for cooking. If
you open the oven door or touch STOP/CLEAR,
the food will stop boiling.
Why does the dish become hot when I
microwave food in it?
As the food becomes hot it will conduct the
heat into the dish. Use oven mitts to remove
food after cooking.
13

Wipe the oven inside and outside with asoft cloth
and amild detergent solution. Then rinse and wipe
dry. This should be done on aweekly basis—
more often if needed. Never use cleaning powders
or rough pads. Excessive oil splatters on the
inside top will be difficult to remove if left for
many days. Wipe spatters with awet paper towel,
especially after cooking chicken or bacon.
REMOVABLE PARTS
The following parts may be removed as described.
They should be washed in warm (not hot) water
with amild detergent and asoft cloth. once they
are clean, rinse them well and dry with asoft cloth.
Never use cleaning powders, steel wool or rough
Dads.
.The turntable may be cleaned at the sink. Be
careful not to chip or scratch the edges as this
may cause the turntable to break during use.
●The turntable roller rest should be cleaned
regularly.
SPECIAL CARE
For best performance and safety, the inner door
panel and the oven front frame should be free of
food or grease buildup. Wipe them often with a
mild detergent, Then rinse and wipe dry. Never
use cleaning powders or rough pads.
After cleaning the control panel, touch
STOP/CLEAR to clear any entries that might have
been entered accidentally while cleaning the panel.
You can often correct operating problems yourself,
If your microwave oven fails to work properly,
Iocate the operating problem in the chart below
and try the solutions marked for each problem.
If the microwave oven still does not work properly,
contact the nearest authorized service centre.
C)venwill notstart~--~-X-
,..X:..J .... . . .. ------ _..r__ ..__l
+f-- \
. . . .+-F ‘
Err displays~l-— -‘X i‘“ ‘—- “-”-
.I ---
Arcing or sparking
.+... I_.~ ~
‘xi lx
—
r-
1- -+
Incorrect time
+, ,
Unevenly cooked foods ,—. -—
Overcooked foods :.:- .=[-X. :tx. ‘::
:’ -=.. ‘i. xi...... ~x+....{.__.
Undercooked foods I!x’xx~x [-’-’-l
L-— .-L ..+- 1
,,
Improper defrosting \II!lxl
L._.~L–— 1- .1 ;.1--
1
Is power cord plugged in?d
+
Is door closed.
Cooking time not set.
Touch STOP/CLEAR. I
Use microwave-safe cookware only.—
Completely defrost food. -1
14
IxjJ!x :
11Turn or stir food
Reset clock.
]~Do not operate with oven empty.
LUse correct time/cooking power level.
Check to see that oven ventilation ports
—are not restricted.

REHEATING Item Amount Time Special Notes
Beverage
Water-based 1cup (250 mL) 1-2 min. Heat uncovered.
2cups (500 mL) 3-4 min. Stir after heating.
Milk-based 1cup (250 mL) l-2 min.
2cups (500 mL) 3-4 min..-
Soups
Broth-based 300 mL can 3-4 min. Use microwave-safe casserole. Cover.
Cream-based 300 mL can 3-5 min. Stir after heating.
Cooked pizza
25 cm pizza cut into 2wedges 1-2 min. Place on paper towels or paper plate or
8portions 4wedges 2-3 min. leave in uncovered cardboard box.
whole 3-4 min. Arrange points toward centre.
Meat
Sliced thin 85-140 g1-2 min. Heat on microwave-safe plate, covered with
Sliced thick, 2.5 cm 85-140 g2-3 min. wax paper or plastic wrap.
Chili, stews 2cups (500 g) 3-5 min. Place in microwave-safe dish.
Cover. Stir halfway through cooking time.
Hamburgers, 1serving V2 -1min. Place on microwave-safe plate.
meat loaf slices, 2servings 1-2 min. Cover with paper towel. Turn over once.
sausage patties 4servings 2-4 min.
Poultry 11-2 min. Heat on microwave-safe plate. Cover with
Chicken pieces 22-3 min. wax paper or plastic wrap.
43-5 min. If fried, cover with paper towel.
64-6 min.
— —
Chicken, turkey, 85-140 g1-3 min. Heat on microwave-safe plate.
sliced Cover with wax paper or plastic wrap.
Seafood Slit pouch and place on microwave-safe
Prawns, crab, or scallops 185 g4-6 min. plate. Flex pouch to mix halfway through
in sauce, frozen cooking time.
Seafood or fish casserole, 450 g5-7 min. Remove from package to amicrowave-safe
frozen casserole. Cover. Stir once during cooking.
Cooked rice, pasta V4 cup (175 mL) 1-2 min. Heat in microwave-safe casserole, covered
1-2 CUPS (250 -500m L) 2-4 min. with plastic wrap.
Vegetable, Slit pouch. Place on microwave-safe plate.
frozen in pouch 280-340 g4-6min, Flex pouch to mix halfway through
cookina time.
Canned vegetable 230 g1-2 min. Use microwave-safe casserole, covered.
425 g2-4 min. Stir once.
500 g3-5 min.
COOKING Item Amount ~me Special Notes
Mashed potatoes, 4servings 4-6 min.
instant
Pudding and pie filling mix 90 g5-7 min.
Porridge
(Rolled oats) lid cup (50 mL) 1-3 min.
14cup(125m L) 3-5 min.
Wheat-bran cereal V4 cup (50 mL) 1-3 min.
VZ cup (125 mL) 3-5 min.
Follow package directions. Reduce liquid by
ltbsp(15m L).
Follow package directions. Stir once.
Add Vd cup (175 mL) of water. Cook
uncovered. Stir once. Let stand 1minute.
Add 11/2 cup (375 mL) of water. Cook
uncovered. Stir once. Let stand 1minute.
Add V4 cup (175 mL) of water. Cook
uncovered. Stir once. Let stand 1minute,
Add lV2 cup (375 mL) of water. Cook
uncovered ;Stir once. Let stand 1minute.
15

●
●
●
Set Auto Defrost by Weight according to ●
instructions on page 9,
●
Remove food from wrapper and place in a
microwave-safe dish or place on a●
microwave-safe roasting rack. ●
Cover thin parts with aluminium foil.
Item Special Notes
Large roasts should be still icy in centre. Allow
to stand.
Fish and seafood should also be slightly icy.
Food can be defrosted in astyrofoam package.
Some types of food will need to be rearranged
at the Dause.
Beef
Ground beef Turn over and remove defrosted porhon at pause.
—.
Liver Drain Ilquid as It defrosts. Separate pieces.
Roasts Turn over at pause. Cover ends with foil.
Sirloin steak Turn over at pause.
Rib or T-bone Turn over at pause. .—. —.
Flank steak Turn over at pause.
Stewing meat Break apart at pause
Pork
Bacon Defrost In onglnal wrapper. Turn over at pause. Centre should be sllghtly Icy.
ChopS Separate and turn over at pause.
Ribs Turn over at pause
Roasts Turn over at pause. Cover ends with foil.
Lamb
Chops Separate and turn over at pause.
Ribs Turn over at pause.
Roasts Turn over at pause Cover ends with foil.
—.
Poultry
Chicken, whole, Check for and remove any metal clamps or wires before defrosting.
Up to 1.4 kg Turn over at pause. Cover ends with foil. Rinse under cold water.
Pieces Separate and turn over at pause.
Cornish hens Check for and remove any metal clamps or wires before defrosting.
Turn over at pause. Rinse under cold water.
Fish and Seafood
Crabmeat, prawns Break apart at pause. .—
Fish fillets Turn over and rearrange at pause. Rinse under cold water to separate.
.—
Fish whole, ”steaks Turn over at pause. Cover head and tall with fo!l.
—.
Scallops Break apart at pause. Remove defrosted scallops,

1. Touch
FROZEN VEGETABLE,
POTATO or
SOUP/BEVERAGE
1-3 times until desired serving
number appears.
2. Touch START.
FROZEN VEGETABLE
Once 1servina
Twice 2servinqs
3times 3servings
POTATO
Once 1potato
Twice 2potatoes
3times 3potatoes
SOUP/BEVERAGE
Once 1serving
Twice 2servinas
3times 3servinqs
1. Touch QUICK REHEAT,
2, Touch anumber (O-9) for
cooking time.
Touch Oto cook 30 seconds.
Touch 1to cook 1minute.
Touch 2to cook 2minutes.
I
I
Touch 9to cook 9minutes.
NOTE: Quick-Reheat Cooking
uses HI (maximum) power only.
1. Touch POPCORN 1-3times
until desired bag size appears.
2. Touch START.
Once 100 g
Twice 85 g
3times 50 g
1, Touch TIME.
2. Touch numbers for cooking
time (in minutes and seconds).
3. Touch POWER LEVEL.
4. Touch numbers (1 -9) for power
level.
5. Touch START.
NOTE: To set HI POWER cooking,
skip steps 3and 4.
1. Touch AUTO DEFROST.
2. Enter the weight of food in kg.
3. Touch START.
4. At pause, rearrange food.
5, Touch START to restart.
1. Touch TIME.
2. Touch numbers for time.
3. Touch POWER LEVEL.
4. Touch O(power level 0),
5. Touch START.
1. Touch O
2. Touch numbers to set time
3. Touch ~
For your protection in the event of theft or loss of this product,
please fill in the information below :
Model No.
(Located on cavity front)
Serial No.
(Located on cavity front) —s*O
Date of Purchase
Purchased Price SANYO Electric Co. Ltd.
Where Purchased 6/97 Prtnted In Singapore
Code No. 432-6-41 4S-35800
Table of contents
Other Sanyo Microwave Oven manuals

Sanyo
Sanyo EM-S355AW/AS User manual

Sanyo
Sanyo EM-C2000 User manual

Sanyo
Sanyo EM-S2587W User manual

Sanyo
Sanyo EM-G4750EES User manual

Sanyo
Sanyo EM-V860 User manual

Sanyo
Sanyo EM-G450 User manual

Sanyo
Sanyo EM-N107AS User manual

Sanyo
Sanyo EM-P494WS User manual

Sanyo
Sanyo EM-S2585W User manual

Sanyo
Sanyo EM-S6786V User manual

Sanyo
Sanyo EM-C1800K User manual

Sanyo
Sanyo EM-S2588B User manual

Sanyo
Sanyo EM-M105 User manual

Sanyo
Sanyo Em-z2000s - 1000W 0.9 cu.ft. Mid-Size Microwave... User manual

Sanyo
Sanyo EM-D953 User manual

Sanyo
Sanyo EM-SL40S User manual

Sanyo
Sanyo EM-C1900 User manual

Sanyo
Sanyo EM-S105AW User manual

Sanyo
Sanyo EM-S889 User manual

Sanyo
Sanyo EM-X470S User manual