Saturn ESG-15 User manual

InstallationOperationMaintenance
ESG
-
24
ESG-15 MEDIUMDUTY15"GRIDDLE
ESG-24 MEDIUMDUTY24"GRIDDLE
ESG-36 MEDIUMDUTY36"GRIDDLE
ESG-48 MEDIUMDUTY48"GRIDDLE
PLEASERETAINTHIS MANUALFORFUTUREREFERENCE
SATURNEQUIPMENT
OWNER SMANUAL
GasGriddle MediumDuty
Gas equipment manufactured for Saturn Equipment arefor usewith thetype of gas specified ontherating plate
and forinstallation willbe inaccordance with NationalFuelGas Code ANSIZ223.1 (latestedition)
FORYOURSAFETY
Do not storeoruse gasoline or otherflammable vaporsor liquidsinthe vicinity of thisoranyotherappliance.
Instructions to be followed in theeventthe usersmellsgasfumesmust be posted inaprominentlocation inthe
installedkitchen area.The information shall beobtainedfrom a local gassupplier.
WARNING:
Improperinstallation,adjustment, alteration, serviceand maintenancecan cause property damage,
injury or death. Read theinstallation, operating and maintenanceinstructionsthoroughlybeforeinstalling or
servicingthis equipment.
SATURNEQUIPMENT
www.saturnequipment.com

SaturnEquipmentLimitedWarranty
Page1
SaturnTM EquipmentLimitedWarranty
Saturn warrants itsnew productto be freefromdefectsin
materialandworkmanshipfora period ofone(1)year from
the originaldate of installationnot toexceed 18monthsfrom
dateoforiginalshipment from factory. Equipmentsoldand
installedforresidential use, or outside the continental United
States is excluded from warranty. Thiswarrantyislimitedto
product(s) soldtotheoriginal commercial user. Theliability of
Saturn islimitedto, atSaturn option the repairor replacemen
t
ofany partfound bySaturntobe warranted herein.
Saturn shall bear thenormallaborchargesforrepairor
replacement totheextentthat such repair or replacement
is performedwithin35 miles oftheofficeof an authorized
service agency,within the
continental UnitedStates and dur-
ing regular (straighttime) hours.Travel outside of the35miles
andany workperformed atovertime or weekend rates isthe
responsibilityof the owner/user. Defective partsmust be
returnedto Saturn, freightprepaid,fo
r Warrantyinspection.
Saturnassumesnoresponsibilityforany product(s) notin
-
stalled properlyin accordancewith theinstructions supplied
with theequipment. Any equipmentwhich hasbeenmodi
-
fied byunauthorized personnelorchangedfrom our origina
l
designis not coveredunder this Warranty.
Saturnassumesnoobligation foranyproductwhichhasbeen
subjecttomisuse, abuseorharsh chemicals. Normalmainte
-
nanceasoutlinedin theinstructionssuppliedwiththeequip
-
ment istheresponsibility of
theowner-userandisnot part of
thiswarranty.
Light bulbs, porcelain,glass components, normal parts,wear
andmaintenanceareexcluded fromthiswarranty.
Saturn Fryerscarry oneyearpartsandlaborwarranty anda
limited, prorated 5 year warranty on
stainless steelfryvessels.
Thiswarranty is inlieuof any other agreement, expressed
or implied, andconstitutesthe onlywarranty of Saturn
with respectto the product(s).
Saturnshall not beliablewhetherincontractor intort or
underanyother legal theory,for lossof revenueorprofit,
or anysubstitute useor performance,orfor incidental, in-
direct,special orconsequential damages,or foranyother
lossor cost of similar type.
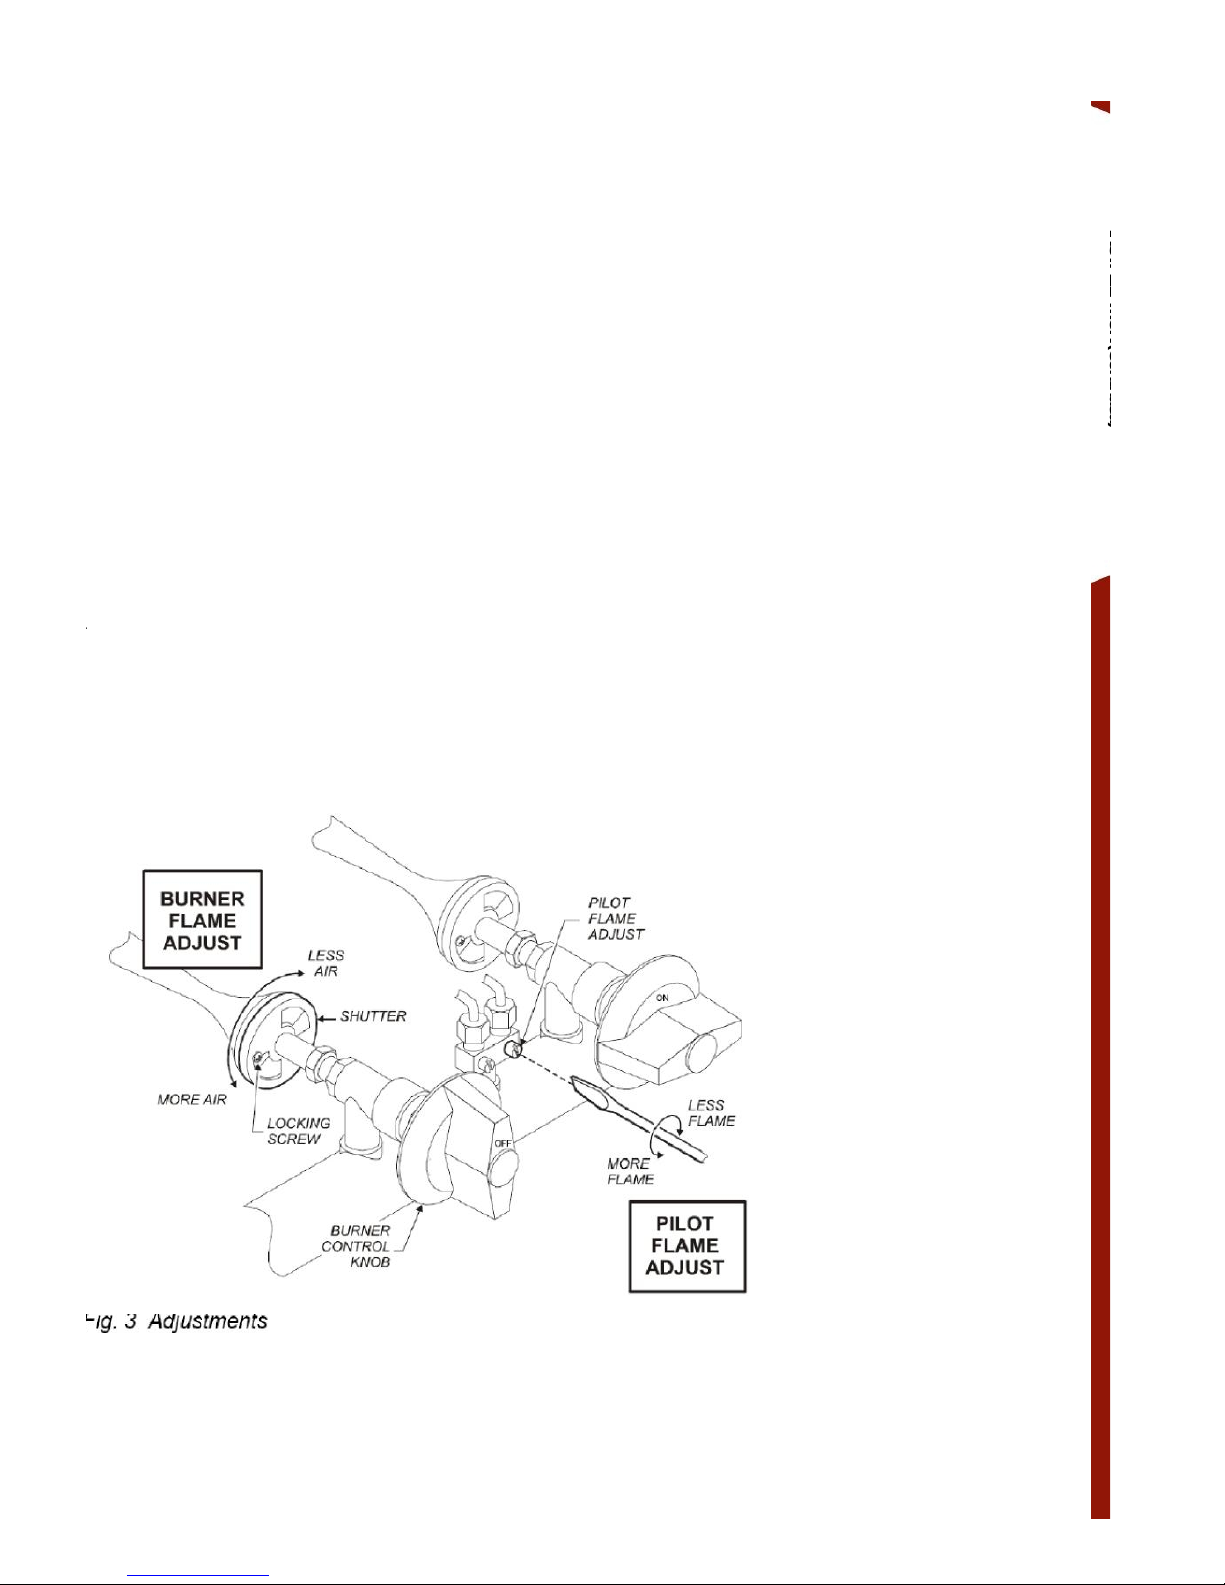
Proper installation,initial checkout, air shutteradjust-
ments,or normal maintenance such aslubrication, adjust-
ment orcalibration of controlsis theresponsibilityof
thedealer,owner-user orinstalling contractorandisnot
covered bythiswarranty.
TheCompany reservestheright,without priornotice,to
makechangesandrevisionsinthe productspecifications,
design, andmaterial.
Possessionofthis pricelist does not constitute an agree-
ment oroffertosell product to the possessor.
Prices aresubjecttochangewithout notice. Pricesdo not
include salestax.All pricesare in U.S. dollars.
Returnedgoods are subjectto a 20%restockingcharge
and thecostofreconditioningtheequipment for resale.
Prior toreturningthe goods, aReturnGoods Autho-
rization(RGA) number mustbe granted bySaturn. All
returned goodsmustbe shippedfreight prepaid. Ship-
mentsreceived withoutaRGAnumberwill be refused.
Customunitsbuilt to thebuyersspecificationsmay not
bereturnedorcancelled.
Saturn isnot responsibleforprinting errorsin pricingor
specification.
SERVICEPOLICY ANDPROCEDURE GUIDEand ADDITIONALWARRANTY EXCLUSIONS
1.
Resetting ofsafetythermostats, circuitbreakers,
over
load protectors, and/or fusereplacementsare not
coveredbythiswarranty unlesswarrantedconditions
are the cause.
2.
Allproblems due tooperationat voltagesor
phase
otherthan specifiedonequipment nameplates
are
not covered by this warranty.
Conversi
on to correct voltageand/or phasemustbe
the customers responsibility.
3.
Allproblems due to electricalconnectionsnot
made
in accordancewithelectricalcode requirements
and wiringdiagramssupplied with the equipment are
not covered by this warranty.
4.
Replacement ofitems subjectto normalwear,
to
include such itemsasknobs, light bulbs;and,normal
maintenancefunctions including adjustments of
thermostats, adjustmentof micro switchesand
replacementof fusesandindicatinglightsare not
covered
by warranty.
5.
Damagetoelectrical cords and/orplug dueto
exposure
to excessiveheatarenot coveredby this
warranty.
6.
Full use, care,and maintenanceinstructions
supplied
witheach machine. Notedmaintenanceand
preventativemaintenanceitems,such as
servicingand
cleaningschedules,are customer responsibility. Those
miscellaneous adjustments noted are customer
responsibility.Proper attention topreventative
maintenanceand scheduled maintenanceprocedures
willprolong thelifeof theappliance Travel mileageis
limited tosixty(60) milesfrom anAuthorizedService
Agency oroneof itssub-serviceagencies.
7. All laborshall beperformedduringregularworking
hours. Overtime premium willbe chargedtothebuyer.
8. All replacement parts are warrantedfor
ninety(90)days fromdate of purchaseon non warranty
equipment.Thispartswarrantyislimitedonly
to replacementof thedefectivepart(s).
9. Installation, labor, and job check-outsarenot
considered warrantyand are thusnotcoveredbythis
warranty.
10.Chargesincurred by delays, waiting timeoroperating
restrictions that hindertheservice technicians ability to
perform service are notcoveredbywarranty. This
includes institutional and correctional facilities.

TableofContents
Page 2
SHIPPING DAMAGECLAIM PROCEDURE
NOTE: For yourprotection,please note that equipmentin
thisshipmentwas carefully inspected andpackaged by
skilledpersonnelbeforeleavingthefactory.
Upon
acceptanceofthisshipment, thetransportation company
assumesfullresponsibility forits safe delivery.
IF SHIPMENTARRIVESDAMAGED:
1.
VISIBLELOSSORDAMAGE:Becertainthatany
visible lossor damage isnotedon the freightbill or
express receipt,
and thatthe noteof loss or damageis
signed by the delivery person.
2.
FILE CLAIMFORDAMAGE IMMEDIATELY:
Regardlessofthe extent of thedamage.
3. CONCEALED LOSSOR DAMAGE:ifdamage is
unnoticeduntil themerchandiseis unpacked, notify the
transportation companyor carrier immediately, and file
“CONCEALEDDAMAGE”claimwith them. This
shouldbedonewithinfifteen (15) days from thedate
thedeliverywasmade to you.Besure to retain the
container for inspection.
Manufacturer cannot assumeliability fordamageorloss
incurred intransit.Wewill,however, atyour request,supply
youwiththe necessarydocumentstosupport your claim.
TABLE OF CONTENTS
WARRANTY Page1
SPECIFICATIONS Page 2
FEATURES & OPERATING CONTROLS Page 3
PRECAUTIONS & GENERAL INFORMATION Page 4
AGENCY LISTING INFORMATION Page 4
INSTALLATION Pages5, 6,7,8
OPERATION Pages9, 10
CLEANING INSTRUCTIONS Page11, 12
TROUBLESHOOTINGSUGGESTIONS Page 13
PARTS & SERVICE Page 14
CUSTOMER SERVICEDATA Page 14
INTRODUCTION
ThankYou for purchasingthisappliance.
Properinstallation,professional operationandconsistentmaintenanceofthisappliance will ensure that it
givesyou the verybestperformance and a long,economicalservice life.
This manual containsthe information needed toproperlyinstallthisappliance, andto useand carefor the
applianceinamannerwhich willensure itsoptimum performance.
SPECIFICATIONS
MODEL STYLE GAS TYPE MANIFOLD
PRESSURE TotalB.T.U.
per Hour
ESG-15 15" GRIDDLE Natural Gas 5.0" W.C. 28,000
ESG-24 18" GRIDDLE Natural Gas 5.0" W.C. 56,000
ESG-36 36" GRIDDLE Natural Gas 5.0" W.C. 84,000
ESG-48 48" GRIDDLE Natural Gas 5.0" W.C. 112,000

Page 3
FEATURES & OPERATINGCONTROLS
ADJUSTABLE LEG
BURNER ASSEMBLIES
PILOTLIGHTS
PILOT ADJUSTMENT
CONTROLVALVE
(TYPICAL)
Fig. 1 MediumDuty Gas Griddle-Features& Operating Controls
FEATURESANDOPERATINGCONTROLS

PRECAUTIONSAND GENERALINFORMATION
WARNING:
FIREHAZARD
All servicing of the gas
supplyandcombustion
components of this appliance
mustbe performedby a
technician trained and
certified
in the maintenanceofgas
appliances.
Improperservicing of gas
equipment canresult infire.
and explosion.
PRECAUTIONSANDGENERAL
INFORMATION
CAUTION:
HOTSURFACE
Exposedsurfacescanbehot
to thetouchand maycause
burns.
Thisappliance isintended for usein commercialestablishments
only.
Thisappliance is intendedto prepare food for humanconsumption.No
other useis recommended or authorized bythemanufacturer orits agents.
This appliance mustbeinstalled byatechnician qualifiedand certified
orlicensed toinstallgas-firedequipment.Alicensedtechnician must
perform theinitial start-up andadjustment of theappliance.
Operatorsof this appliancemust be familiarwith theappliance use,
limitationsandassociated restrictions.Operating instructions must be
read and understood by all persons usingorinstallingthis appliance.
Cleanlinessofthisappliance isessentialto good sanitation. Readand
follow all included cleaninginstructionsand schedules toensure the
safety ofthe food product.
DO NOT submergeapplianceor burnersinwater. Thisappliance is
not jetstreamapproved.DONOT direct water jetorsteam jetat this
appliance,or at any control. DO NOTsplashor pour water on, inor
over anycontrols.DONOT wash counter around thisappliance with
water jet. Burners which havebecome wetmust bethoroughly dried
beforeuse.
Griddlesurface will be veryhot when inuse. Contactwill cause severe
injury.
This appliance must be operatedwith thesupplied 4”legsproperly
installed.
Do not operatethis applianceif thesmell of gasis present. Turn off
allgassupplyvalvesandmoveto a remote location tocallyour
manufacturer for service.
The technical content of this manual,includinganyparts breakdown
illustrationsand/or adjustment procedures,isintendedfor useby
qualifiedtechnical personnel only.
Anyprocedure which requiresthe use of toolsmust beperformed bya
qualifiedtechnician.
This manual isconsidered tobe a permanentpartof theappliance.
This manualand all suppliedinstructions, diagrams, schematics, parts
breakdownillustrations, noticesand labelsmust remain withthe
appliance ifitissold or movedto another location.
AGENCY LISTING INFORMATION
Thisappliance conformsto NSF Standard 4 for sanitationonly if
installed inaccordance withthesuppliedInstallation Instructionsand
maintained accordingto the instructions inthis manual.
This appliancemeets ANSI Z.83.11specificationsforgas-firedfood
serviceequipment.
Page4
INSTALLATION
UNPACKING& INSPECTION

SETUP
Setup the griddleonly on a firm, level, non
-combustible surface.
Verify local codes forrequirements. Concrete, tile,terrazzoormetal
surfacesarerecommended.Metal ortile over combustiblematerial
may not meetcode for non
-combustiblesurfaces.Install the
providedadjustable legs,one on each cornerof theappliance,
in the holesprovided.
Verify that theunit sitsfirmly ONALL FOURLEGS.
Withthe adjustablelegs,adjust asrequiredtolevelthe
appliance.
Allfourlegsmustbeadjustedto firmlycontact thecountertopin
orderto preventtipping.
Adequateclearancefor air openings inthecabinetmust beprovided.
Refer to theInstallation Instruction Sheet for required clearances.
Maintainrequi
redclearances between the appliance and adjacent
combustiblesurfaces.
Thegriddle mustbe installed
in anareawithsufficient
make
-upair forproper
combustion, and must be
installedsuch thatthe flow
ofcombustionand ventilation
air willnotbeobstr
ucted.
When used with an exhaustfan, specialprecautionsmustbe
observed to avoidinterferencewith theoperation of thegriddle, such
as draftsandairstarvation.
INSTALLATION ANDINSPECTION
Page5
Carefully removethe appliance from the
carton. Removeall
protective plastic film,packingmaterials and accessories from the
appliance before connectingperforming anyinstallationprocedure.
Carefully readall instructions inthis manual andthe Installation
InstructionSheet packed withthe
appliance before starting any
installation.
Readand understand alllabels anddiagramsattachedto the
appliance.
Carefully account forall components andaccessories before
discarding packing materials. Storeallaccessories inaconvenient
placefor
lateruse.
COMPONENTS
AdjustableLegs (set of4)
GreaseTray
NOTE:DONOT discard
the cartonorotherpacking
materials until you have
inspectedtheappliancefor
hidden damageand testedit
forproperoperation.
RefertoSHIPPING DAMAGE
CLAIMPROCEDURE on the
inside front coverofthis
manual.
DANGER:
HEALTH HAZARD
Thisappliance mustbe
properlyventilated. Failure to
provide and maintain proper
ventilation of exhaustgasses
can result in severe injury or
death.
WARNING:
FIREHAZARD
Donot store gasoline or
any other flammableor
combustiblematerial near this
appliance.The openflame
can causesuch materialsto
ignite.
The area wherethegriddle is
installedmust be kept clearof
combustibles andflammables.
Thisincludesmops,rags,
grease, wrapping paper and
electric cords.
NOTICE:Manufacturer s
warranty on thisgriddleisin
effect only when the griddle
is installed inaccordancewith
these instructions andlocal
codesand ordinancesor,in
the absence of localcodes,
the NationalFuel Gas Code,
ANSIZ223.1 (current edition).
The manufacturerof this
griddleassumesnoliability
forany damage or injury
resulting fromfailure to
comply withthisnotice.

INSTALLATION(Continued)
Page6
INSTALLATION (continued)
GASAPPLIANCE CODE COMPLIANCE
Theinstallationofgas pipingfrom theoutlet side
ofthe gas meter or
service regulator to the griddle must be performed by a technician
qualified andcertifiedorlicensed toinstallgas
-firedequipment.
A licensed and qualified technicianmustperform the initialstartupand
adjustment ofthisapplianc
e.
Theinstallation of thisgas
-fired appliancemust conform to localcodes,
or in the absence ofsuchcodes, with the current editionof
NationalFuel Gas Code ANSIZ223.1.
Forusein the State of Massachusetts, thisappliance must be installed
in
compliance withMassachusettsFuel Gasand Plumbing Code
CMR 248.
Theinstallation ofthis gas
-fired appliancemustcomply with
applicableportionsofNFPA96 forventilation. Thecurrent editionof
NFPA 96 (StandardfortheInstallation of Equipment for t
he Removal
of Smokeand Grease Laden Vapors from CommercialCooking
Equipment) specifies ventilation requirementsto ensure the removal
of exhaust gasses andproducts of combustion.
ITIS THERESPONSIBILITYOFTHE INSTALLER TO ENSURE
THAT THISGASGRIDDLE
INSTALLATIONCONFORMS TOALL
APPLICABLE CODESAND ORDINANCES.
Theventingofthisappliancemustnotbeobstructed,normaysuch
ventinginterferewiththeflowofcombustionairrequiredfor proper
operationofthe gasburners.
Additionally:
1.
The gas supply line used to connectthe griddleto the gas
supply system must beblackiron pipe,orothermaterialas
approvedby localordinance for gaspiping.
2.
Gas supply piping must be inside 3/4”diameter or greater.
3.
Use pipesealantmade specificallyfor gas pipingonallpipejoints.
Applysealantsparingly tothe male threadsonly.
Sealant must be resistant tothe action ofLPgas.
4.
Verify that allsupply piping iscleanand freeofobstructions,dirt,
chips andpipesealant compound priortoinstallation.
5.
All pipe joints mustbechecked forleaks beforelighting. Leak
checks should be performed withasoapand water solution.
NEVERCHECK FOR LEAKSWITH AN OPEN FLAME.
DANGER:
FIREAND EXPLOSION
HAZARD
NEVERuse anopenflameto
checkforgasleaks.Fireand
explosionmay result.
WARNING:
RISK OFINJURY
Installationproceduresmust
beperformed by a qualified
technicianwith full knowl-
edge
of allapplicablegas-fired
appliance codes.Failure can
result inpersonal injuryand
property damage.
IMPORTANT:
All pipejointsmust be
checked for leaks before
lighting.Leak checks should
beperformedwitha soap and
water solution.
IMPORTANT:
Informationonthe
construction andinstallation
of ventilatinghoods may be
obtained from the current
edition ofNFPA 96
Standardfor theInstallation
of Equipment for theRemoval
of Smokeand Grease Laden
Vapors from Commercial
Cooking Equipment.
Copiesofthisstandard are
available from the
Nation Fire Protection Assn.:
NFPA
1 BatterymarchPark
P.O. Box9101
Quincy, MA 02269-9101

DANGER:
FIRE AND EXPLOSION
HAZARD
NEVER useanopen flame to
check forgasleaks.Fireand
explosion mayresult.
IMPORTANT:
Allpipe joints must bechecked
for leaksbefore lighting.Leak
checksshouldbeperformed
withasoap and watersolution.
WARNING:
FIRE HAZARD
This griddle is supplied with a
gaspressureregulator.
Failureto properlyinstall the
supplied regulator will resultin
an extremely hazardous
condition.
Flowarrow stampedon body
ofregulatormust point toward
thegriddle.
Vent hole mustpointUP.
IMPORTANT:
Verify fuel gastype. Ifthe
availablefuel doesnot match
thenameplate specification,
exchange the griddle for the
correct type.
IMPORTANT:
The applianceand its
individualmanual shutoffvalve
must be disconnected from
supplysystempipingduring
anypressure testing of that
system at pressures inexcess
of1/2p.s.i. (3.5 kPa).
Also, theappliance must be
isolated from the gassupply
piping system by closing its
individualmanual shutoffvalve
during any pressure testing of
thegassupplypipingat test
pressures equal to or less than
1/2p.s.i. (3.5kPa).
INSTALLATION(Continued)
Page 7
INSTALLATION (continued)
INSTALLINGTHE GASGRIDDLE
Referto the nameplate. Verify the fuel type and pressure, which must
matchthenameplate specifications.Connectingthegriddle tothe
wrongfueltypeand/or pressure willcompromise the safetyand/or
performance of theappliance.
BESURETOMAINTAINREQUIREDCLEARANCES TO COMBUSTIBLE
SURFACES.
The griddlemust beplacedinits finaloperational position andleveled
front
-to-backandside-to-side,withaspiritlevel, prior to beginningthe
gas piping installation.Re
-checkthe level oftheunitattheconclusion
of the gaspipinginstallation.
Each gas griddle issuppliedwithaseparategas pressure regulator,
which must be installed on the manifold pipe protruding from the rear
of
the griddle. Ensurethatthe regulator isinst
alled such thatthe flowarrow
stampedon thebodyoftheregulatorpoints toward the griddle.
Failure to
properlyinstallthesuppliedregulatorwillresultin an ex
tremely
hazardous condition.
A moisture trap (dripleg) consistingof a tee, 4”nipple
pointing down,
and cap must be installed upstreamofthe gaspressureregulator.
A manualgas shut
-offvalve maybe required by local codes andis,in
any case, strongly recommended. The shut
-offvalvemust be
installedbetween the gas supply piping and
thegas pressure
regulator.
Shut
-offvalves,moisture trapand all associatedpiping mustbe
suppliedby thegas pipinginstaller.
Itisthe responsibilityofthe gaspiping installerto
identify the code requirementfora shut-off valve.

IMPORTANT:
Adjustmentsmust be performed
by a qualifiedtechnician only.
IMPORTANT:
This griddle isshipped from
the factoryequipped for either:
natural gasandadjusted for
sealevel to2000feetelevation;
or, propane (LP)gasand
adjusted forsea level to5000
feetelevation.
For operation other than listed
above, contact your manufacturer
INSTALLATION(Continued)
Page8
INSTALLATION (continued)
SET GAS PRESSURE:
Gas pressure regulatorisfactoryset.
SET PILOT FLAME:
Remove allburnercontrol knobs,then removethefront panel.
Thepilot adjustmentsarenear thecontrol valve for each set of
burners.
Usingasmall, flat
-bladescrewdriver, turnthe screwclockwiseto
decrease theflamesize, or counter
-clockwiseto increase the
flamesize.
Adjust the pilotflameto 1/4”high. Test for operation: allsections
ofthe burner must light without unduedelay.Draftyconditions
may requirea higherflameto allow thepilot toremainlit.
Replace the front panel and allknob
sbefore returning the unitto
service.
ADJUST BURNER FLAME:
Remove allburnercontrol knobs, thenremovethefrontpanel.
Turn an individualburneron.
Loosenthe locking screwontheshutter.
Turn the shutter to admitmoreorlessair asrequired. Adjust
the
air shutter until the flameis mostly blueincolor.
Tighten the locking screwwhen finished.Replacethefront panel
and all knobs before returningtheunit toservice.

WARNING:
FIRE HAZARD
IFYOU SMELL GAS:
DO NOT try to lightany appliance.
DO NOTtouchany electricalswitch
DO NOTuseany telephone inyour
building.
In the eventa gas odoris
detected, shut downthe
unitatthe maingasshutoff
valveand contact your
local gas supplier froma
neighboring location.
Follow theinstructions
receivedfrom thegas
supplierimmediately
andexactly.
GENERALOPERATION
Page9
GENERAL OPERATIONALNOTES
Carefully readthedescription of thegriddleoperation onthe
specification sheet.
DoNOTuse this
applianceif it has been submergedin water.
Call aqualified technician toexamine the appliance and toservice
or replaceany componentwhichhas been submerged. Burners
whichhave been allowed to become wet must be thoroughly dried
beforeuse.
For
initial startup,and anytime thegas supply has been shut-off, it
maytake several minutestolight thepilotwhileairinthepiping and
manifoldsispurged.
The burnercontrol knobsmust beturnedbyhandonly.Never use
toolsto turnthe control knob.
Ifthe knob will notturnby hand,DO
NOTattempttoforceorrepairit.Contactyourmanufacturerforre
-
pairs. Forced orimproperly repaired valves
posethe risk of fire and/orexplosion.
Make sureburners, pilot burnerand grease tray are properly
installed
beforeattempting tooperate.
LIGHTING THE PILOTFLAME
Beforelighting the pilotlight,smell allaround the appliancearea for
gas. Be sure tosmell near floorlevel becausesome gas isheavier
thanair and willsettle tothe floor.
Forinitial
startup,and anytime thegas supplyhas been shut-off, it
maytake several minutestolight thepilotwhileairinthepiping and
manifoldsispurged.
The pilotlight must belighted byhand:
Turnall controlknobs tothe full OFFposition.
The pilot is
locatedadjacenttooneleg ofthe burner, and is
accessible throughthefront panelopening.
Besure the gasshut
-off valveisONand the appliancehas had
timefortheair tobe purgedfromthelines. Attempt to light the
pilot every 15secondsafter the
gasvalve is turned on.
Lightthe pilotwithalong match or fireplacelighter.
DO NOTusea cigarette lighter.
SHUT DOWN INSTRUCTIONS
Turnall burner knobs to OFF.
TurnallpilotsOFF.
Turnthe main gas supply OFF.

WARNING:
FIREHAZARD
NEVERattempt to force
or repairastuckcontrol
valve.
Contact yourmanufacturer
for
repairs.
Forcedorimproperly
repairedvalves pose the
risk offireand/or
explosion.
WARNING:
FIREAND EXPLOSION
HAZARD
If thepilot light should be
extinguished,turn offthe
gas shut-off valveand
remove the grate anddrip
pan. Allow the appliance
to ventforfive minutes
beforeattempting tore-
light.
CAUTION:
HOTSURFACE
Exposed surfacescan be
hotto thetouchand may
cause burns.
Unitmustbe installed 18"
away from any combustable
material.
GENERALOPERATION(Continued)
OPERATION(Continued)
SEASONTHE GRIDDLE SURFACE
Asmanufactured,the steelsurfaceofyour griddle has
microscopicpores.It isimportanttofill thesepores withoil in
orderto
provide a hard, non-stick cookingsurface.
a.
Preheat thegriddlesurface to 375ºF(191ºC).
b.
Spreada lightfilm of cooking oilover theentiregriddle surface
c.
Allow the oilfilm tocookin forapproximately 2 minutes, or until
it smokes.
d.
Wipethe griddlesurface with a cleandampclothuntil all oil is
removed.
e.
Fornew griddles,repeatthis procedure2-3times until the
griddle has a slick, clean surface.
Inspectthe unit forcleanliness before use. Cleanas necessary:See
Cleaning Instructions, page 11.
Be
sure the pilotlight is litbefore operation. See Lighting thePilot
Light, page 8.
The burner control knobsmust be turned by hand only. Never use
toolsto turnthe controlknob.
The control used in thisgas griddleprovidesacontinuous range of
settings
from OFF to ON.
The right knob controls thefront burner
The left knobcontrols the rearburner
Lightthe burnerbyturning the control knob tothe ONpositionuntil fire
forms completelyaround the innerandoutersectionsof theburner.
Setthecontrol
knob to the desiredposition. The setting can be
readjusted at anytime.
Cooking Recommendations:
Saveenergybyturning the temperaturecontrolknob OFFany timethe
griddle is not in use. Gasburnersprovidefull heat instantly,making it
unnecessary
toleave the uniton during intermittent use.
Page 10

WARNING:
FIRE HAZARD
Shutoff thegas
supplyvalve before
cleaning.
CAUTION:
BURN HAZARD
Allowgriddleto
cool completelybefore
cleaning.
IMPORTANT:DONOTspill
or pour waterinto controls,
DO NOTsubmerge griddle
cabinet inwater.Damage to
internalcomponents will
occur.
Damage tointernal
components from water
damageis NOTcovered by
warranty.
DO NOT steelwool or
metalscouring padstoclean
cabinet,drip trayorcrumb
tray.
Good sanitationisvitalto the
qualityofthefinal food
product. Be sureto cleanin
all cornersand crevices
wheregrease and other
cooking debriscan
accumulate.
CLEANING INSTRUCTIONS
PREPARATION
Turn control valve toa low setting before cleaning.
Allowgriddle tocool tothis lowersettingbefore cleaning.
FREQUENCY: Daily
TOOLS
BristleBrush
CleanClothor Sponge
MildDetergent
Cleaner Formulated forStainless Steel
Warm Water
DAILYCLEANING
1. Pour a small amount ofwater on the griddle surface and letit
"sizzle".
2.Clean thegriddle surface.Useapumicestoneorgriddle brick to
scrapefoodwaste.Clean thegriddlesurfacedownto brightmetal.
Wipe offany remaining powder residue.
IMPORTANT: NEVERUSESTEELWOOLTO CLEAN THE GRIDDLE SURFACE!
DO NOT use detergentor oven cleanerto clean thegriddlesurface.
3. Useasoft-bristled fiberbrush inacircularmotionto remove any
remaining foodparticles.
4. Turn temperaturecontrol toOFF. Allow thegriddle surface to cool,
then wipe the surface witha clean cloth. Dry the griddlesurface
thoroughly.
IMPORTANT: SEASON THE COOKINGSURFACE AFTEREACH
CLEANING. Seepage9.
5. Atleastonceeachday, the grease trough must be thoroughly
cleaned.Using a scraper, removeall grease andfoodwaste from
the grease trough bypushing it down the waste holeand into the
grease tray.
6. Afterscraping all cooking waste fromgreasetroughinto thegrease
tray,takethe grease drawerto thekitchen cleaning areaand
properly dispose ofall waste.
a.Clean drawerwith hotwater and a milddetergent.
b.Dry drawer thoroughly andreinstall ingriddle.
7. Wipedownexterior of griddlecabinet withacleanclothand nonabrasive
cleanser. Rinsethoroughly withwater and acleancloth.
Dry with a soft cleancloth.
Procedure is complete. Page11

WARNING:
FIREHAZARD
Shut off thegas supply
valve before cleaning.
IMPORTANT:DONOTspill
or pour waterinto burnersor
controls,
DO NOTsubmergegriddle
cabinetinwater. Damage to
internalcomponentswill
occur.
Damagetointernal
components from water
damageisNOT covered by
warranty.
CLEANINGINSTRUCTIONS(Continued)
CLEANING INSTRUCTIONS (Continued)
PREPARATION
Turn gasshut
-off valveOFF.
Allowgriddle
to coolbefore cleaning.
FREQUENCYAs Needed
TOOLS
Bristle Brush
Clean Cloth or Sponge
Mild Detergent
CleanerFormulated for Stainless Steel
Warm Water
CLEANING BURNERS
Ifone or moreindividual flame openings does notlight, or if theflame
intermittent oruneven, the burnermayneedtobe cleaned.
Turn shut
-off valve OFF. Remove all control knobsand remove front
panel.
Note positionofburner assemblies in cabinet.Remove burners.
Examineburner assemblies. Note positionofairshutters
before
cleaning. Clean foodparticles fromburnerswithwarm water,mild
detergentandabristle brush. Rinseby wiping with asoftcloth
dampenedwithclean water. Wipeexteriorsurfaces drywithasoft
cleancloth.Allow burners to air dry sothat interi
orpassagesare
completelyfree of water.
Examine burnersto be suretheairshuttersare in theirproperposition.
Reinstall burnerswith flameopenings “up”. Theventuri / air shutter
slides over the nozzleofthe control valve.The pegson the rearof
the
burner set in corresponding notchesin the rear burner support bracket.
Thepegs on the frontof theburner seton thefrontsupport bracket.
Turn shut
-offvalve ONand light pilot light.
Reinstall front paneland allcontrolknobs.
Testallburnersfo
r proper operation.
Procedure iscomplete.
Page 12

TROUBLESHOOTING
SYMPTOM POSSIBLE CAUSE SUGGESTED REMEDY
Burners won tlight
Gas supply off
Checkmain/ unitgas valves
Airin lines
Turngas valve on.Attempt to
light pilot every15sec.
Pilot valvenotlit
Turn off gas - allow unit to
vent for 5 minutes.Turngas
back onand lightpilot
Front orrear burner
won tlight
Control not on
Turntemperaturecontrolto ON
Settodesired setting whenlit
Water in burner
Removeburneranddry
thoroughly
Damaged temperature control,
Burneror otherinternal
component
Contact manufacturer forrepairs
Pilotwillnot light
Gas supply off
Checkmain/ unitgas valves
Airin lines
Turnpilot valve on.Attemptto
light pilot every15sec.
Pilot valvenoton
Turn pilot valveon / adjust
Burner nothotenough
Temperature control notset
Adjust fordesired temperature
Shutteror nozzle out of
adjustment Contact qualified technicianfor
adjustment
Damaged temperature control,
burneror other internal
component
Contact manufacturer forrepairs
NOTE: There are nouser
serviceablecomponentsin the
burner assemblies orinthecontrol
valves.Inall cases ofdamage
or malfunction,
contactyour manufacturer for
repairs.
Page 13

PARTS&SERVICE
Page14
-
PARTS & SERVICE
IMPORTANT:Useonly
factoryauthorizedservice
partsand replacement
filters.
For factory authorized
service,or to order factory
authorizedreplacement parts,
contactyourmanufacturer.
DESCRIPTION PART NO.
LEGS, ADJUSTABLE4”METAL (SET of4)
CUSTOMERSERVICEDATA
please havethisinformation availableifcallingforservice
RESTAURANT____________________________LOCATION _______________
INSTALLATION DATE ________________________TECHNICIAN______________
SERVICECOMPANY_________________________________________________
ADDRESS STATE ZIP
TELEPHONE NUMBER ( _____)
EQUIPMENTMODEL NO.___________________________________
EQUIPMENT SERIAL NO.___________________________________
FUEL(check one)__________NATURALGAS_______________PROPANE/ LP
This manual suits for next models
3
Table of contents
Other Saturn Griddle manuals
Popular Griddle manuals by other brands

Cuisinart
Cuisinart Griddler Express GR-2 INSTRUCTION AND RECIPE BOOKLET

Lang
Lang 136SB-WB Installation, operation and maintenance instructions

Black Stone
Black Stone 1935 owner's manual

APW Wyott
APW Wyott GGT-18H Specifications

Star
Star Star-Max 536TGD-230V Installation and operation instructions

Omcan
Omcan GR-CN-0914 instruction manual