manuals.online logo
Brands
  1. Home
  2. •
  3. Brands
  4. •
  5. Savant
  6. •
  7. Intercom System
  8. •
  9. Savant ITP-E8000V2x User manual

Savant ITP-E8000V2x User manual

This manual suits for next models

2

Other Savant Intercom System manuals

Savant DOR-SMS-00 Quick reference guide

Savant

Savant DOR-SMS-00 Quick reference guide

Savant DOR-SMS-00 Quick reference guide

Savant

Savant DOR-SMS-00 Quick reference guide

Savant ITP-E8000V2 User manual

Savant

Savant ITP-E8000V2 User manual

Popular Intercom System manuals by other brands

Videx VRDK1 (25H) Technical manual

Videx

Videx VRDK1 (25H) Technical manual

Auta COMPACT VISUALTECH manual

Auta

Auta COMPACT VISUALTECH manual

Aiphone LC-10S instructions

Aiphone

Aiphone LC-10S instructions

Aiphone PD-1 instructions

Aiphone

Aiphone PD-1 instructions

Aiphone JF-DVF-HID-I instructions

Aiphone

Aiphone JF-DVF-HID-I instructions

Comelit 4893M Technical manual

Comelit

Comelit 4893M Technical manual

MGL Avionics V16 manual

MGL Avionics

MGL Avionics V16 manual

SSS Siedle BVI 750-0 Installation & programming

SSS Siedle

SSS Siedle BVI 750-0 Installation & programming

urmet domus AIKO 1716/1 quick start guide

urmet domus

urmet domus AIKO 1716/1 quick start guide

urmet domus IPerVoice 1039 Installation

urmet domus

urmet domus IPerVoice 1039 Installation

Alpha Communications STR QwikBus TT33-2 Installation, programming, and  user's manual

Alpha Communications

Alpha Communications STR QwikBus TT33-2 Installation, programming, and user's manual

Monacor ICM-20H instruction manual

Monacor

Monacor ICM-20H instruction manual

Logenex A202CR Installation & programming

Logenex

Logenex A202CR Installation & programming

Quantum QR5 Installation and programming manual

Quantum

Quantum QR5 Installation and programming manual

EVGA XR1 quick guide

EVGA

EVGA XR1 quick guide

CyberData 011211 series Installation quick reference

CyberData

CyberData 011211 series Installation quick reference

Vidos duo M1021 user manual

Vidos

Vidos duo M1021 user manual

SSS Siedle BTSV 850-03 operating instructions

SSS Siedle

SSS Siedle BTSV 850-03 operating instructions

manuals.online logo
manuals.online logoBrands
  • About & Mission
  • Contact us
  • Privacy Policy
  • Terms and Conditions

Copyright 2025 Manuals.Online. All Rights Reserved.

Touch 8 in Control Screen V2 QRG | 009-2065-01 45 Perseverance Way, Hyannis, MA 02601
Copyright © Savant Systems, Inc | 221228 1 of 2 Savant.com | 508.683.2500
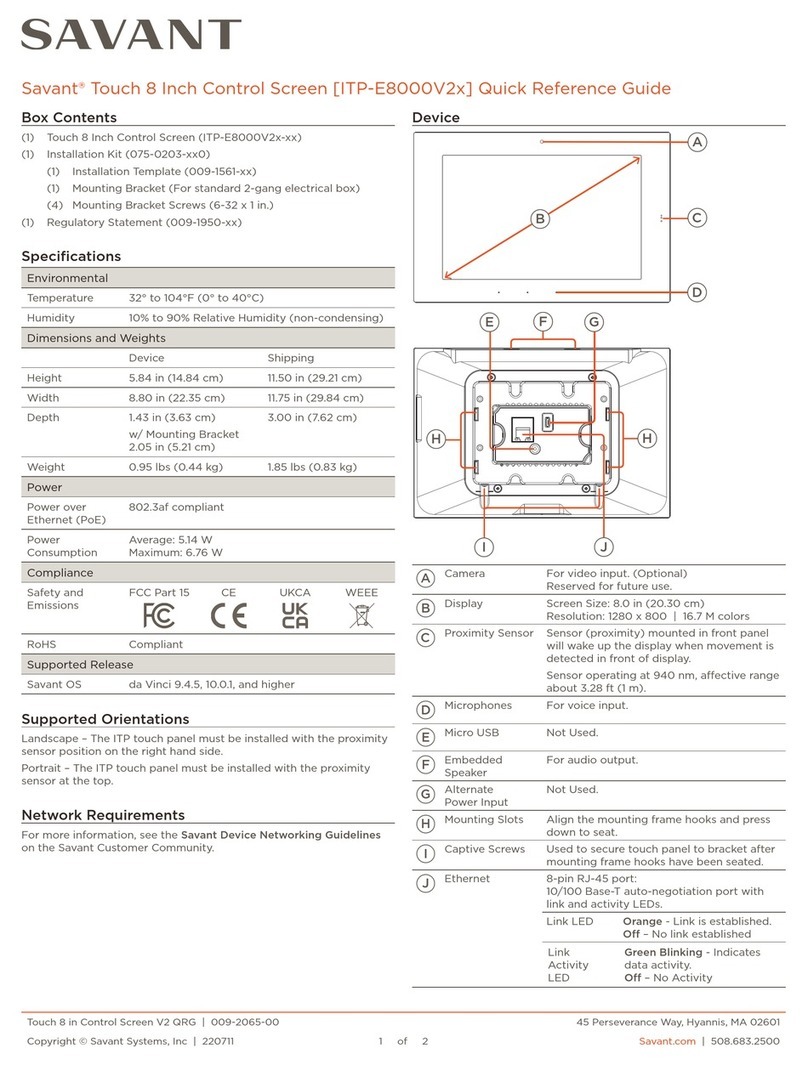
Savant® Touch 8 Inch Control Screen [ITP-E8000V2x] Quick Reference Guide
Box Contents
(1) Touch 8 Inch Control Screen (ITP-E8000V2x-xx)
(1) Installation Kit (075-0203-xx)
(1) Installation Template (009-1561-xx)
(1) Mounting Bracket (For standard 2-gang electrical box)
(4) Mounting Bracket Screws (6-32 x 1 in.)
(1) Regulatory Statement (009-1950-xx)
Specifications
Environmental
Temperature 32° to 104°F (0° to 40°C)
Humidity 10% to 90% Relative Humidity (non-condensing)
Dimensions and Weights
Device Shipping
Height 5.84 in (14.84 cm) 11.50 in (29.21 cm)
Width 8.80 in (22.35 cm) 11.75 in (29.84 cm)
Depth 1.43 in (3.63 cm)
w/ Mounting Bracket
2.05 in (5.21 cm)
3.00 in (7.62 cm)
Weight 0.95 lbs (0.44 kg) 1.85 lbs (0.83 kg)
Power
Power over
Ethernet (PoE)
802.3af compliant
Power
Consumption
Average: 5.14 W
Maximum: 6.76 W
Compliance
Safety and
Emissions
FCC Part 15 CE UKCA WEEE
RoHS Compliant
Supported Release
Savant OS da Vinci 9.4.5, 10.1.1, and higher
Supported Orientations
Landscape – The ITP touch panel must be installed with the proximity
sensor position on the right hand side.
Portrait – The ITP touch panel must be installed with the proximity
sensor at the top.
Network Requirements
For more information, see the Savant Device Networking Guidelines
on the Savant Customer Community.
Device
I
H
G
D
F
E
B
A
C
H
J
ACamera For video input. (Optional)
Reserved for future use.
BDisplay Screen Size: 8.0 in (20.30 cm)
Resolution: 1280 x 800 | 16.7 M colors
C
Proximity Sensor Sensor (proximity) mounted in front panel
will wake up the display when movement is
detected in front of display.
Sensor operating at 940 nm, aective range
about 3.28 ft (1 m).
DMicrophones For voice input.
EAlternate
Power Input
Not Used.
FEmbedded
Speaker
For audio output.
GMicro USB Not Used.
HMounting Slots Align the mounting frame hooks and press
down to seat.
ICaptive Screws Used to secure touch panel to bracket after
mounting frame hooks have been seated.
JEthernet 8-pin RJ-45 port:
10/100 Base-T auto-negotiation port with
link and activity LEDs.
Link LED Orange - Link is established.
O – No link established
Link
Activity
LED
Green Blinking - Indicates
data activity.
O – No Activity
Touch 8 in Control Screen V2 QRG | 009-2065-01 45 Perseverance Way, Hyannis, MA 02601
Copyright © Savant Systems, Inc | 221228 2 of 2 Savant.com | 508.683.2500
Mount the Bracket
The Savant In-Wall Touch Panel is designed to be mounted using either
a standard 2-gang electrical box or low voltage 2-gang bracket.
1. Mount a 2-gang standard electrical box or low voltage bracket to
an existing wall. Recommended height to center of box is between
57 and 65 inches (145 – 165 cm) above a finished floor.
2. Secure the mounting bracket to the electrical box/bracket using
the four 6-32 x 1 inch screws provided. Position the touch panel
with mounting tabs facing outward.
2-Gang Electrical Box 2-Gang Low Voltage
Bracket
NOTE: If the Touch Panel is going to be installed with a Portrait
orientation, the electrical box or bracket will need to be rotated
Mounting
Bracket
Tabs Face
Outward
Make Connections
Connect a Cat 5e/6/7 Ethernet cable (T568A, T568B) to the RJ-45
LAN/PoE port on rear of touch panel. See image below.
Local
Network
To LAN/PoE Port
(RJ-45)
To Router
(PoE)
IMPORTANT NOTE! If a PoE network router is not available, a
PoE network injector can be used.
Secure Panel to Bracket
Once cables are connected to the rear of touch panel, the panel can
be secured to the mounting bracket installed earlier.
1. Loosen the captive screws on the bottom of the touch panel a few
turns to allow the panel to slide into the mounting bracket.
2. Align the mounting frame hooks with the mounting slots.
3. Gently pull down the unit to seat the mounting frame hooks.
4. Tighten the two captive screws to secure the touch panel to the
mounting bracket.
1
2
Apply Power
The ITP-E8000V2 touch panel is powered using PoE via Cat 5e/6/7
Ethernet cable. Connect one end of the Ethernet cable to a PoE
enabled network switch or router, and the other end to the data
connection on the back of the ITP. Once the connection is made,
the ITP will be powered on, and an IP address will be automatically
assigned via DHCP.
Once the ITP is powered and an IP address has been assigned, the
touch panel can be added to a RacePoint Blueprint® configuration. For
details, refer to the Savant Touch Control Screen Deployment Guide
(009-1475-xx), available on the Savant Customer Community.