SAW D2L Valentine One Gen2 User manual

OWNER’S MANUAL
With exclusive Analyzer Modes:
N
All-Bogeys®
NLogic®
NAdvanced-Logic®
powered


Contents
Welcome to Full Coverage
Full Coverage .........................................................................................1-2
What’s Included .....................................................................................3
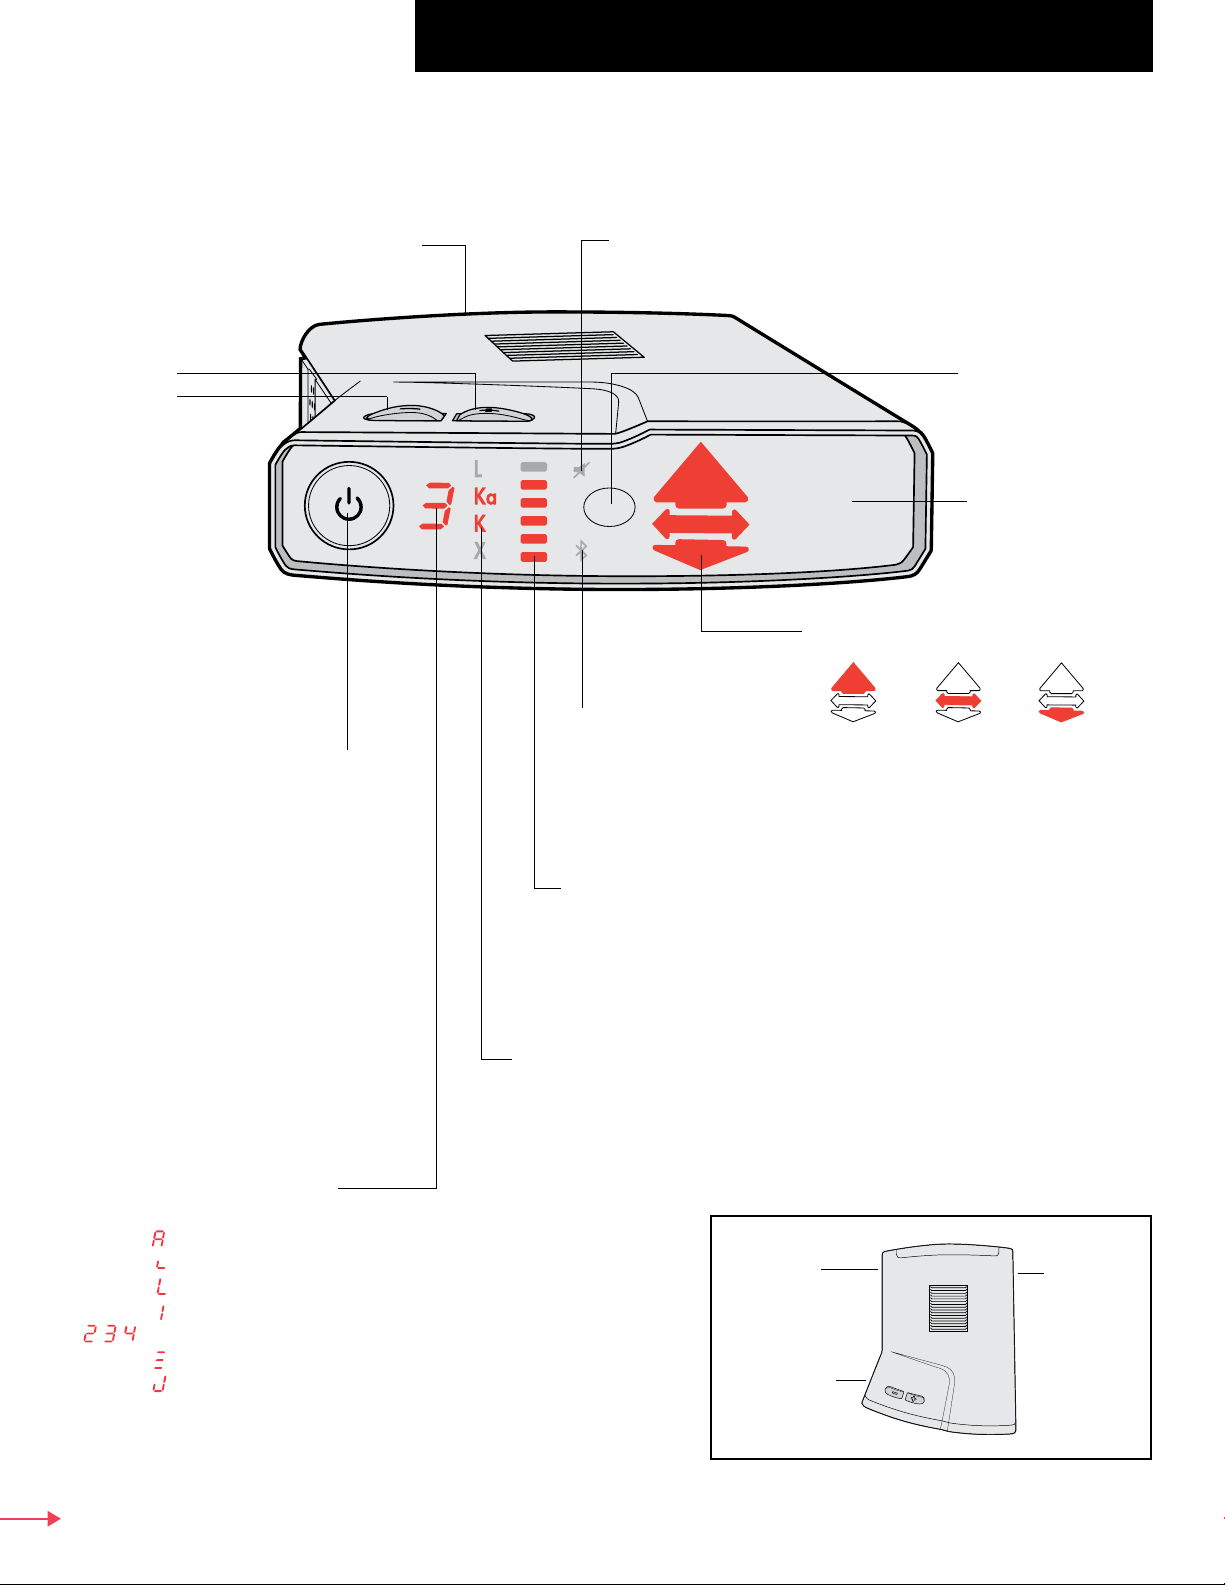
Controls and Functions...........................................................................4
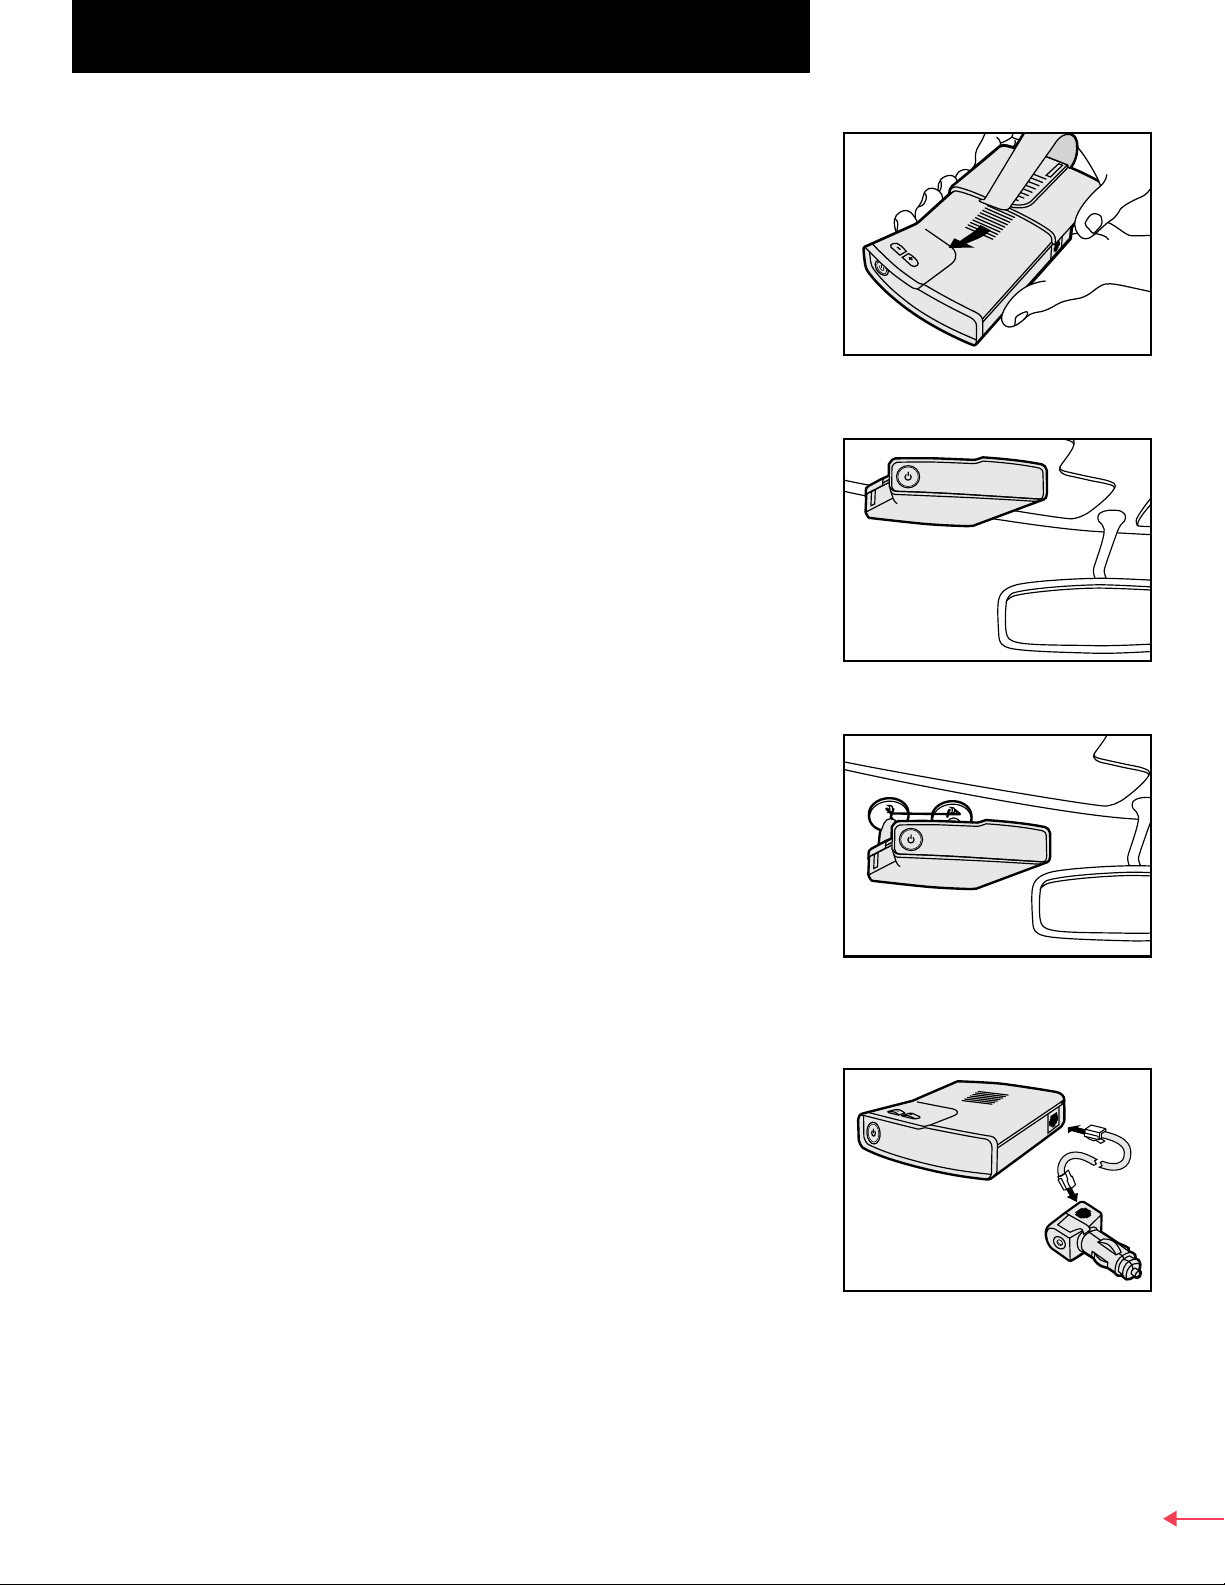
Mounting — Where and How. ...............................................................5
How to connect to 12V, USB jack...........................................................5
How to connect a headphone ................................................................6
How to set Muted Volume ......................................................................6
Display readings.....................................................................................6
How to set Analyzer Modes....................................................................7
How to get our free app..........................................................................7
How to connect to your phone...............................................................7
Lighter Adapter.......................................................................................8
Installation — Direct-wire Power Adapter ..............................................8
Changing the Fuse..................................................................................9
Concealed Display .................................................................................10
Installation — Concealed Display...........................................................11
SAVVY ...................................................................................................12-13
POP Mode..............................................................................................14
What you should know about radar........................................................15-18
Finding Radar — On-the-Road Situations ...............................................19-22
Laser Warning ........................................................................................23
What you should know about laser ........................................................24
Finding Laser..........................................................................................25
Troubleshooting .....................................................................................26-27
Doubts — Maybe it’s not working right ..................................................28
Service ...................................................................................................29
Upgrades................................................................................................30
Specifications .........................................................................................30
Parts and Accessories .............................................................................31
Limited Warranty....................................................................................32
FCC and CE Regulatory Information .......................................................33
A Few Things To Remember...................................................................34

Welcome to Full Coverage
Dear V1 Owner:
When an interest lasts for a year or two, that’s a hobby. When it goes on
more than half a lifetime, that’s an obsession.
I can’t help it. Designing black boxes to sniff out ever fainter radar and laser
signals is, to me, the most interesting game on the planet. This is a civilian
version of what the military calls Electronic Warfare Support Measures (ESM).
Think of it as cat-and-mouse out to ten decimal places.
The goal is always the same—Range Superiority.
At the beginning of the Valentine One Generation 2™project, I told my
engineers, “We want the best radar-finding engine this side of the military.”
In fact, we adapted a component from military CHIRP radars—used to find
fainter targets farther away with higher precision—a SAW Dispersive Delay
Line (SAW-D2L). For civilian users, V1 Gen2 is a breakthrough on range.
Since starting my own company back in the 1980s, we’ve always walked our
own path. We invented the Radar Locator and the Bogey Counter, two essen-
tial must-knows when sizing up radar threats.
We’re unique in another way, too. We don’t do annual model changes, and
we don’t offer an array of models to pick off every price point. Instead, we
offer only one model—the best detector we know how to build. And to keep
V1 Gen2 the best, we practice continuous improvement; that means every
performance enhancement the engineering department works up will be
available to you as a smartphone download.
Thanks for choosing us to be your radar-and-laser-detector company.
Sincerely,
Michael D. Valentine
President
G
Mike Valentine: Electronics engineer,
inventor of the radar-locating detector,
over four decades making and selling
high-performance detectors.

1
What Full Coverage means for you
Finds all radars
Valentine One Gen2 covers all four bands:
X band.....................moving and stationary; can be used in instant-on mode;
this frequency is shared with burglar alarms and door
openers.
K band.....................moving and stationary; can be used in instant-on mode;
this frequency is shared with burglar alarms and door
openers.
Ka band...................widest of the radar bands; moving and stationary; can
be used in instant-on mode; fewer false alarms than X
and K though some can be caused by poorly-made radar
detectors.
Photo radar..............K or Ka band; stationary only.
POP Protection........covers POP mode on two bands—specifically MPH
Industries models BEE III and Enforcer on both K and Ka;
moving or stationary.
Ku band...................Not used in the U.S.; standard equipment on all V1
Gen2s, but not activated at the factory. To activate, see
https://www.valentine1.com/programming/.
Euro Mode...............Not to be used in the U.S.; This widens K-band
reception to assure coverage of the new Multaradar
being used abroad. Standard equipment on all V1
Gen2s, but not activated at the factory. To activate, see
https://www.valentine1.com/programming/.
Finds all lasers
Valentine One Gen2 finds all traffic lasers. In the U.S., the operating
wavelength of traffic laser is 820-950 nanometers
◀ X band
10.500–10.550 GHz
◀ K band
24.050–24.250 GHz
◀ Ka band
33.4–36.0 GHz
◀ Ku band
13.400–13.500 GHz
◀ Euro Mode
23.900-24.250GHz
◀ Laser
820-950 nanometers

2
Tells Where
Valentine One Gen2 has an advanced version of the Radar Locator we
invented for Valentine One. A red arrow points to the radar source,
either ahead of you, beside you, or behind you. Please note: radar can’t get
you from the side.
Valentine One Gen2 also locates the laser source, either ahead or behind.
Like radar, laser can’t get you from the side.
Tells How Many
Valentine One Gen2 tracks all threats (bogeys). How many are out there?
Consider:
Example 1: Let’s say your detector is in full alert, then you see a radar unit.
Naturally you assume the radar you saw is the cause of the alert. But what if
there’s a second radar unit just up the road waiting for you?
Example 2: Let’s say you’re in an alert caused by a known X-band burglar
alarm. What if a radar operator, using instant-on, is simultaneously working
the same territory?
In both cases, an ordinary radar detector would have set you up for a big sur-
prise because it would lead you to believe that only one bogey was out there.
But the Bogey Counter on V1 Gen2 counts every signal being tracked at all
times. It’s your insurance against surprises.
Anything less is not Full Coverage!
Radar ahead Radar to the side Radar behind
Ordinary detectors scan ahead of
your car only.
Ordinary detectors give the same
warning for one or multiple radar
signals.
V1 Gen2 scans all around your car.
V1 Gen2 counts threats so you’ll never
be surprised.
BEEP
BEEP

3
What’s Included
With Valentine One Gen2 Radar Locator:
1. Valentine One Gen2 Radar Locator
2. Windshield mount
3. Visor mount
4. Lighter Adapter
5. Power cord, coiled
6. Power cord, straight
7. Spare suction cups
8. Direct-wire Power Adapter
9. Wiring-harness connector
10. Owner’s Manual
11. Spare fuse
With the Concealed Display:
(optional at extra cost)
1. Straight power cord, 8-foot
2. Straight power cord, 3-inch
3. Display-module backplate, for mounting
4. Dual Lock®Fasteners
With SAVVY:
(optional at extra cost)
1. Two wire clips
2. Beaded tie strap

4
Volume +
Volume –
Press-and-hold to
raise or lower Initial
Volume. Sound
level 0-9 indicated
in display during
adjustment.
Control Button
Power on - Tap Control Button
Power off - Press-and-hold Control
Button until display
goes dark (4.75
seconds)
Changing modes - Press-and-hold
Control Button for
1.5 seconds
Muting - Tap Control Button
during an alert
Band Identification
NOTE: In the case of multiple
bogeys on different bands, a
blinking icon will indicate the
most urgent threat.
Radar-strength
Indicator
More blocks glow as
radar gets stronger.
Bluetooth®
icon
Illuminated when
connected.
Radar Locator
Radar ahead Radar beside Radar behind
NOTE: In the case of multiple bogeys
from different directions, an arrow
will glow for each direction. The
strongest threat will be indicated by a
blinking arrow. The audio warning will
correspond to the blinking arrow.
Rear Radar
Antenna
Needs unobstructed
view behind.
Rear Laser Sensor
Needs unobstructed
view behind.
Mute icon
Illuminated when volume is muted.
Front Antenna, Radar and Laser
Needs unobstructed view ahead.
Power In
Speaker
Headphone
Jack
Bogey Counter
Blank - Power off
- Power on, All-Bogeys®mode
- Power on, Logic®mode
- Power on, Advanced-Logic®mode
- One bogey
etc. - Number of bogeys being tracked
- Laser warning
- Alert terminated; not radar
Controls and Functions

5
How to mount
Using one of the supplied mounts, starting from the front-antenna end of
the detector, slide it into the mounting grooves on each side of the detector.
Position the detector so the front antenna looks through the windshield and
the rear antenna has a clear view to the rear of your car. Stay clear of the
wipers and the dark mask at top of the glass.
When the detector is properly oriented, the driver will see this view. ▶
Safety Warning
Because a detector on a windshield mount or a visor mount is not
permanently attached to the car, it could come loose in a crash, possibly
causing injury. Also, a passenger may move forward on impact and contact
the detector. Keep these possibilities in mind when you mount your
Valentine One Gen2.
How to connect to 12V
Plug one end of the supplied power cords into the detector’s RJ11 jack.
Plug the other end into the Lighter Adapter jack marked “MAIN” and insert
the adapter into the car’s 12V socket. If your vehicle has only a USB socket,
you’ll need to purchase a USB-to-12V Convertor.
Visor mount slides on from the front.
Install near center of windshield.
Plug in one end of the power cord into
V1 Gen2’s RJ11 jack. Plug the other
end into the Lighter Adapter.
Driver’s view
Driver’s view

6
How to connect a headphone
Plug headphone jack into the detector’s 3.5mm socket. For Bluetooth
headphones, connect through your phone.
How to set Muted Volume
In addition to the Initial Volume, you can also set the sound level you will
hear after muting: Tap or to start the test tone. Tap the Control
Button (Mute icon will appear), then press or until you’ve reached
your preferred sound level. Sound level 0-9 indicated in display.
Display readings
1. If the display is dark:
a) Power is off, or;
b) A Concealed Display is connected, or;
c) Dark Mode has been enabled in the app.
2. With power on, in the absence of alerts, the current Mode will be
displayed.
3. During alerts:
a) The Mode indication will be replaced by the Bogey Count (number of
radar signals in range).
b) Signal strength indicated by a vertical bar graph.

7
How to set Analyzer Modes
With power on in the absence of an alert, press-and-hold the Control Button
repeatedly to step through the three available Analyzer Modes.
NIn All-Bogeys mode , all bogeys will be reported at the Initial Volume as
soon as they are detected. Use your judgment to decide whether or not
they are threats.
NIn Logic mode , X- and K-band bogeys assessed to be too weak to be
threats will be reported at the Muted Volume. If and when they become
threats, the audio warning will increase to the Initial Volume.
NIn Advanced Logic mode , X- and K-band bogeys the Analyzer
determines are not threatening will not be reported at all. Threats will be
reported at Initial Volume. This mode is particularly useful in metro areas.
One exception: to be failsafe, the Analyzer will always pass extremely
strong alerts along to you for your judgment.
NOTE: In Logic mode and Advanced Logic mode , you are deferring to
an algorithm that will assess the threat level and report accordingly.
Be assured that the Analyzer has years of radar experience. It always operates
the receiving circuitry at maximum sensitivity, and it knows that instant-on
radar is a greater threat than ordinary radar. Therefore it will always warn of
instant-on immediately at the Initial Volume whenever it is detected.
How to get our free app
Go to your app store and download V1connection, the app.
How to connect V1 Gen2 to your phone
The first time V1connection the app is run, it will automatically connect if it
finds only one V1 Gen2. Subsequently, it will connect to the first V1 Gen2 it
recognizes. If none of them are the last one used, it will automatically con-
nect to the first one found. If it finds more than one, you will be prompted to
select which to use. Select the V1 Gen2 with the highest (least negative) RSSI
value from the list. V1 Gen2’s blue will change to a constant glow when
connected.
NOTE: The V1 Gen2 will not be shown in the list of Bluetooth devices on
your iPhone, iPad or iPod touch.

8
INSTALLATION: Direct-wire Power Adapter
An adapter has been provided so that you can wire Valentine One Gen2
directly into your car’s electrical system. If you are unfamiliar with
automotive electrical systems, see a mechanic or car-stereo installer:
1. Valentine One Gen2 works only with negative ground electrical
systems. If your car is old, or is an unusual brand of import, make sure
it’s negative ground.
2. Select a “switched” wire, i.e., one that’s off when the ignition is switched
off, and has 12 volts when the ignition is switched on.
3. Position wiring-harness connector around “switched” wire and squeeze
with pliers to install.
4. Plug red wire from Direct-wire Power Adapter into wiring-harness
connector.
5. Make ground connection by clamping the end of the black wire under any
grounded screw.
6. Plug power cord from Valentine One Gen2 into the modular jack labeled
“Main” on the Direct-wire Power Adapter.
Pinch connector around power wire.
Connector plugs into red wire.
Acc: Plug cord to
Concealed Display
here.
Articulated mounting
bracket, included with the
Concealed Display, fits as
shown.
Main: Plug power
cord to V1 Gen2 here.
F Lighter Adapter
Articulated Bracket ▶
Lighter Adapter
Acc
Main
Power Cord
Valentine One
Generation 2
Direct-wire
Power Adapter Ground
(Black)
+12VDC
(Red)
Fig 15Fig 16
Fig 15Fig 16

9
In-line fuse holder. Lift cover. Unplug fuse.
Changing the Direct-wire Power Adapter Fuse
The fuse holder is in line with the power wire (red) to the Adapter. Lift the
fuse cover from the body of the fuse holder. A twisting motion may help, or
pry gently at the parting line with a thin tool, such as a small screwdriver.
Unplug the fuse. Replace with a 2-amp. Mini Blade fuse.
Changing the Lighter Adapter Fuse
Changing the Fuse
Press in and turn counter-clockwise
Press in and turn clockwise
Adapters using 2-amp Mini Blade Fuse
Adapters using 1-amp 5mm x 20mm fuse
Push to eject

10
Concealed Display
The Concealed Display (optional) makes Valentine One Gen2 less noticeable
to others outside your car. It allows you to operate Valentine One Gen2 with
its lights blacked out, yet have a fully operational display module down low
in the car where it’s not visible outside.
Concealed Display
H
Mute Button Radar Locator
Bogey Counter Band Indicators
Modular Jack Radar-strength Indicator
Dimensions: 1.0-in. H x 2.5-in. W x 1.2-in. D
25.6-mm H X 63.9-mm W X 31.0-mm D
NEW CONCEALED DISPLAY
ILLUSTRATION
TO COME

11
INSTALLATION: Using Lighter Adapter
1. Slide Lighter Adapter with Articulated Bracket into cavity on back of
Concealed Display.
2. Connect Acc on Lighter Adapter to Concealed Display with 3-inch cord.
3. Adjust angle on Lighter Adapter, then insert Lighter Adapter into
lighter socket.
4. Run the power cord from the Main jack on the Lighter Adapter to
Valentine One Gen2.
5. To operate, set volume and your choice of Analyzer Modes on Valentine
One Gen2 (see instructions on pages 4 and 6).
IMPORTANT NOTE:
Do not use Direct-wire Power Adapter with Lighter Adapter.
INSTALLATION: Using Mounting Plate
1. Slide Mounting Plate into cavity on back of Concealed Display.
2. If using Dual Lock®, adhere one square of Dual Lock to the recess on the
back of the Mounting Plate. Adhere mating Dual Lock square to desired
mounting location.
3. If using the Direct-wire Power Adapter, follow instructions on page 8.
4. Run a power cord from the Acc jack on the Lighter Adapter, or the
Accessory jack on the Direct-wire Power Adapter, to the Concealed
Display.
5. Run a power cord from Main jack on the Lighter Adapter, or the Main
Unit jack on the Direct-wire Power Adapter, to Valentine One Gen2.
6. To operate, set volume and your choice of Analyzer Modes on Valentine
One Gen2 (see instructions on pages 4 and 6).
IMPORTANT NOTE:
Do not use Lighter Adapter with Direct-wire Power Adapter.
Valentine One
Generation 2
Power Cord 3-in.
Concealed Display
Lighter Adapter
Power Cord
Acc
Main
Acc
Main
Concealed Display
Direct-Wire
Power Adapter
Power Cord
Power Cord
Ground
(Black)
+12VDC
(Red)
Valentine One
Generation 2
Lighter Adapter slides into place.
Mounting plate slides into place.
NEW CONCEALED DISPLAY
ILLUSTRATION
TO COME
NEW CONCEALED DISPLAY
ILLUSTRATION
TO COME

12
SAVVY®
This module (optional) lets you reduce the urgency of V1 Gen2’s audio
warnings at low speeds.
Installation
SAVVY serves as the power source for V1 Gen2, replacing the Lighter
Adapter or, in hard-wired installations, the Direct-wire Power Adapter.
Simply plug SAVVY into the OBD (on-board diagnostic) port. Look for it near
the steering column at the bottom of the dash or just behind the dash skirt,
sometimes under a dust cover. This port has been required on all new cars
built since January 1, 1996.
Plug V1 Gen2’s power cord into the RJ11 jack labeled “MAIN.” To use with
the Concealed Display, see the wiring diagram on this page.
Plug V1 Gen2’s
power cord here.
Plug this connector into
your car’s OBD port.
OBD port (actual size):
look for this connector
in your car.
Acc
Main
Concealed Display
SAVVY
Power Cord
Power Cord
Valentine One
Generation 2
To OBD
diagnostic port
NEW CONCEALED DISPLAY
ILLUSTRATION
TO COME

13
First SAVVY Boot-Up
When the engine is switched on for the first SAVVY boot-up, there will be
a “get acquainted” sequence with the car’s electronic system. Up to 30
seconds may be required before V1 Gen2 powers up. On subsequent
start-ups, V1 Gen2 will power up within a few seconds.
When the engine is shut off, V1 Gen2 will power down within 10 seconds
in most vehicles. Exceptions are rare, but a few vehicles may require up to 5
minutes to complete the shut off.
When SAVVY is removed from the OBD port, it will forget what it knows
about the car. This means that the “get acquainted” sequence will be
repeated after the next installation even if SAVVY is plugged back into the
same car.
Settings
Use the thumbwheel for all settings. The numbers 15 through 65 represent
threshold speeds in mph. At speeds below the threshold you’ve set, V1
Gen2’s audio warnings will briefly sound at the Initial Volume before
changing to the Muted Volume (see how to adjust on page 6). Above the
threshold, V1 Gen2 will sound at its Initial Volume.
On a radar alert that SAVVY muted because your speed was below the
threshold, or you muted by tapping the Control Button, volume will
automatically unmute when speed rises slightly above your setting.
The AUTO setting brings all alerts in at the Muted Volume regardless of
speed. The NONE setting disables SAVVY’s muting function.
Driving with SAVVY
We suggest 30 or 35 mph as an initial setting. After some experimentation,
we think most users will find a setting that works for all occasions. The
out-of-the-way location of the OBD port is inconvenient for adjusting the
thumbwheel, but very good as a starting place for hard-wire installations.
For your convenience, two wire clips and a beaded tie strap are included to
secure the wire in a safe location away from the pedals.
V1 Gen2 Is Still V1 Gen2
Whether SAVVY mutes a new signal or you do it manually, V1 Gen2’s
response is the same; a brief reminder of your current Mode will appear in
the Bogey Counter as the new alarm is being muted.
Interactions You Should Know About
NSAVVY draws a small current from the car battery even with the ignition
switched off. Use caution in vehicles with weak batteries, or that go for
long periods without being driven.
NSome vehicles may not be compatible with SAVVY. Refer to
http://www.valentine1.com/savvy/savvy_problem_cars.asp for a list of
cars with known issues.

14
POP Mode
How the POP Mode Works
The POP Mode is a feature of certain radars made by MPH Industries. Its
only purpose is to defeat radar detectors. It works by transmitting radar in a
short burst—only 67 milliseconds (that’s 0.067 seconds).
What You Should Know About POP Mode
It is inaccurate. In order to outfox detectors, MPH Industries has pushed the
technology outside the accepted principles of engineering. The company
admits as much when its Operation and Service Manual advises users as
follows:
“A note of caution: Information derived during the POP burst is non-
evidential…Citations should not be issued based solely on information
derived from the POP burst.”
Nonetheless, POP Mode is a reality and it will be used at the discretion of
individual enforcers.
Valentine One Gen2 Has Full-Time POP Protection
There is nothing you must do to activate POP coverage. It’s built in, and
it operates full time. It covers POP on two bands—specifically the MPH
Industries models Bee III and Enforcer on both K and Ka.
What the “Dee-Dah-Doo” Tone Means
Valentine One Gen2 is designed to recognize—and ignore—phony POP
signals transmitted by poorly-designed detectors. Occasionally an alarm
will be initiated before verification is certain. If it’s then determined that the
source is a junk detector, it will notify you it is retracting that alert with a
“Dee-Dah-Doo” sound. A flashing J ( ) indicating “junk” will appear briefly
in the Bogey Counter.

15
What you should know about radar
How Traffic Radar Works
Traffic radar uses a radar beam to measure speed. Think of the beam as a
searchlight. It’s invisible because it’s made of microwaves instead of light,
but otherwise it acts very much like a light beam. It travels in straight lines.
It’s easily reflected. It scatters as it is passed through dust and moisture in the
air. And—this is essential—it has to hit your car before it can determine your
speed.
Radar can’t see around corners or through hills. It can’t see you when you
are behind another vehicle. When in the clear, how strongly your vehicle
reflects determines how far the radar can read your speed. Generally, larger
vehicles reflect more strongly than smaller vehicles. Trucks are “visible” on
radar farther away than cars.
The principle on which radar operates is absolutely reliable. Radar
equipment, on the other hand, is only as good as the quality of its design and
manufacture. Traffic radars tend to be unreliable. They’re cheaply made and
therefore vulnerable to many interferences that cause false readings. And,
compared to the military and weather radar which have rotating antennas,
traffic radars are vastly simplified. This simplification means that traffic radar
cannot tell one car from another. The operator has to do that, and since the
operator can’t see an invisible beam any better than you can, he frequently
doesn’t know which vehicle’s speed is being read. This is a source of many
undeserved tickets.
How Radar Detectors Work
A radar detector works like a radio tuned to microwave frequencies.
Valentine One Gen2 is an extremely sensitive radio, and it’s tuned exactly to
the frequency bands used by all traffic radar in the U.S.: X band, K band and
Ka band which includes photo. Moreover, it has two antennas, one aimed
forward and one rearward, so that it can locate the radar.
Because Valentine One Gen2 is so sensitive, it can easily find radar from the
scattering of the beam, and it can find these scatters a long time before the
actual beam hits your car. The only exception is instant-on radar.

16
How Instant-on Radar Works
As a defense against detectors, many radar units can be operated in the
instant-on mode. This means the radar is in position, but it is not transmitting
a signal so it cannot be detected. When the target is within range, the radar
operator switches on the beam and the radar calculates the speed, usually in
less than a second. This calculation happens too quickly for the target (you)
to respond in time.
Still, you can defend against Instant-on by recognizing it when the operator
zaps traffic ahead of you. Valentine One Gen2’s great sensitivity—and your
attention to the nuances of its warnings—gives you at least a sporting chance.
The Difference Between X Band and the K Bands
X-band alerts (“Beep”) are often found at long distances. K and Ka bands are
usually detected at closer range, and alerts on Ka are much more likely to be
radar. So Valentine One Gen2 makes a different sound (“Brap”) to warn you
of these more urgent threats (bogeys).
What the Bogey Lock Tone Means
Valentine One Gen 2 is designed to track multiple threats. During an alert,
when Valentine One Gen 2 locks on to an additional bogey, it notifies you
with the Bogey Lock tone (“Dee-Deet”). This sound will never be heard at
any other time, not even during the power-on ritual. Whenever you hear this
sound, it means that another bogey has been detected and is being tracked.
The bogey counter shows the number of bogeys being tracked at that time.
Table of contents
Popular Radar manuals by other brands

Furuno
Furuno FCR-1030 Operator's manual

Endress+Hauser
Endress+Hauser Micropilot FMR63B PROFIBUS PA operating instructions

GSSI
GSSI StructureScan Mini XT quick start guide

JRC
JRC JMA-933B installation manual

Garmin
Garmin VARIA RVR315 Quick start manual

Houston Radar
Houston Radar PNL18 Installation and user manual