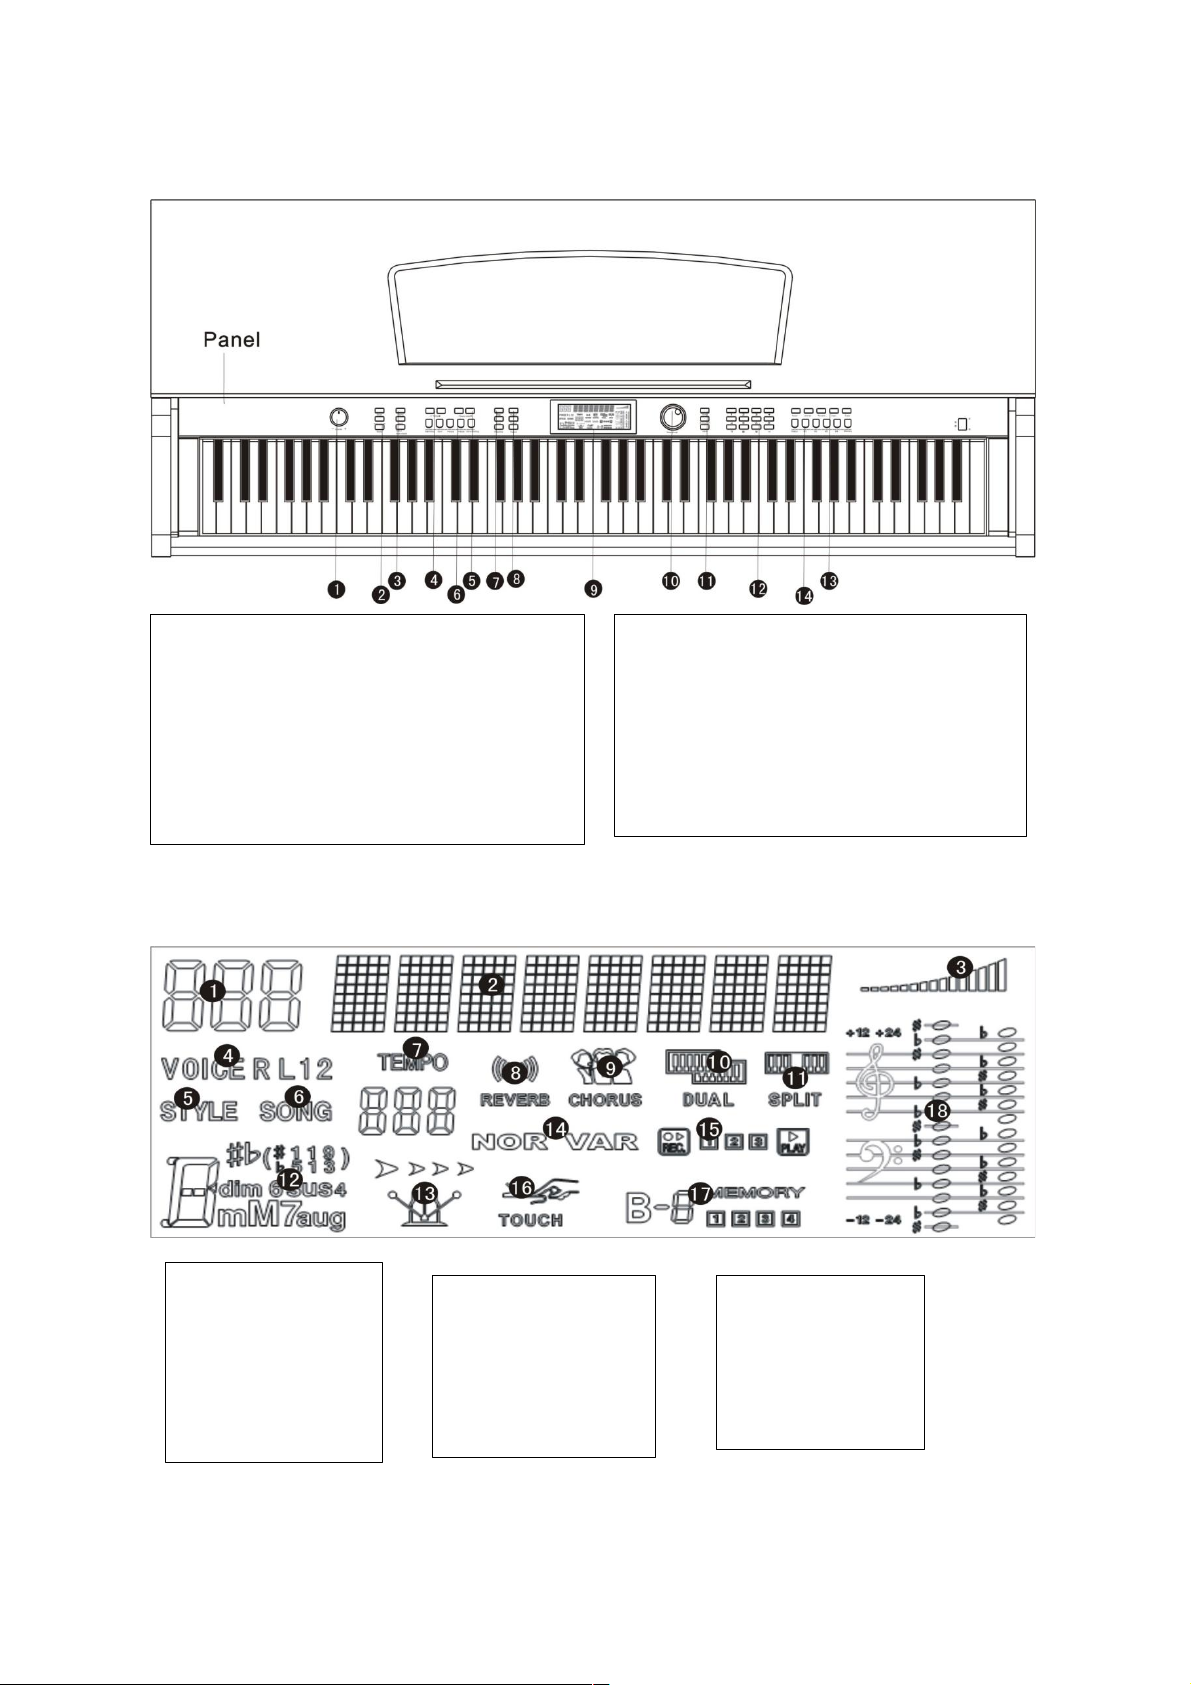
SAWTOOTH ST-DCP-88 User manual

OPERATION INSTRUCTIONS
ST-DCP-88
DIGITAL PIANO

Caution
Be sure to follow the below warnings to avoid hurting yourself or others and to avoid damage to
the equipment.
Warning
• Do not disassemble or modify this instrument. Otherwise, Electric shock, burns, or other
harm may be incurred. For all internal inspections and repair, be sure to take this unit to a
qualified professional.
• If any wear or damage occurs to the power cord or plug, or you experience any power
failures, or you smell an unusual odor, you should immediately turn off the power, remove
the plug, and contact your local technician.
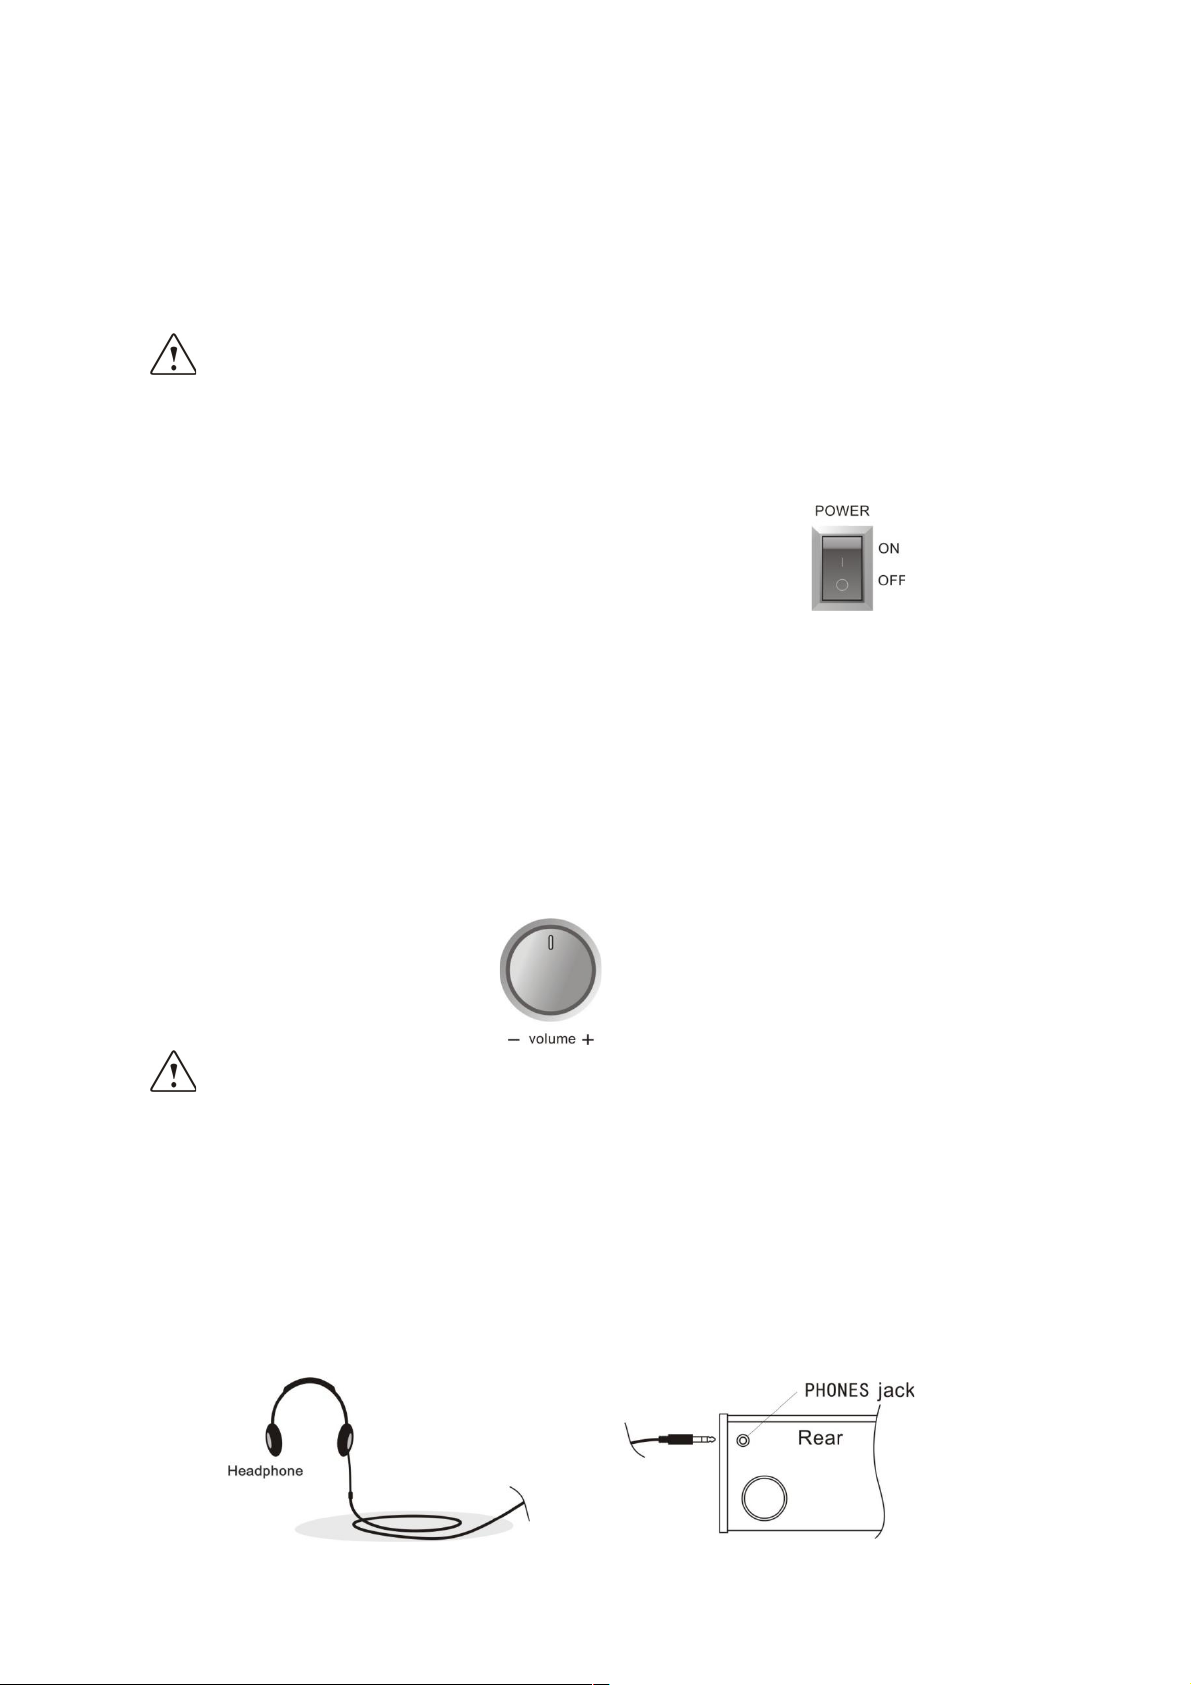
• Before cleaning your electric keyboard, be sure to power off and unplug the power cord.
Do not operate with wet hands and do not wipe and clean the piano with a corrosive
solvent.
• Do not mount the electrical piano on a mobile stand, slanted, or otherwise unstable
surface. Otherwise, the piano may fall causing damage to the piano or harm to the user.
Be sure to secure the electric piano to the stand with the provided screws.
• Keep the electric piano from rain, wet places, or areas of high humidity. Do not place the
following items on the electric piano:
o Containers full of water or other liquids.
o Small Metal Objects that can fall into the piano, such as hairpins, sewing needles,
coins.
o Open flames.
Caution
• Avoid placing the piano in the following places to prevent the surface and internal
components of the piano from damage:
o Places of high humidity and dust
o The kitchen or any other place with fumes.
o In places of direct sunlight or anywhere else that may cause the instrument to
become too hot.
o Near other electronic appliances, such as the TV, radio, speakers, etc. To avoid
electrical noise disturbances.
• Do not place heavy items on the piano and do not press any buttons or keys too hard.
• When not using the piano for long periods, please remove the plug. When removing the
plug, be sure to pull it out by the plug and not the wires.
• Be sure to follow all instructions when installing the rack. Make sure to fasten all screws
and fasteners.
• When moving the electric piano, lift with at least two people. If you try to move the piano
on your own, you may strain yourself or cause damage to the piano.

• Be sure to regularly check that screws remain fastened.
• Do not place power cord near high sources of heat. Avoid over wrapping the power cord.
Do not place anything heavy on power cord, and do not place the power cord where
people walk.
• Do not play music too loudly for extended periods of time. Be careful with headphones, as
loud music will hurt your ears.

Thank you for selecting our electric grand piano.It combines the advanced function and
exquisite voice in one. It will help you learn to grasp the traditional musical instrument and
bring the happiness of enjoying the technology. Before using this instrument, please read
this operation instruction carefully so that you can exert its function better.Be sure to
preserve all use files properly to future reference.
Table of Contents
Table of Contents
I. Panel Control----------------------------------------------------------------------------------------------------------------1
1. Panel--------------------------------------------------------------------------------------------------------------------------1
2. LCD display-----------------------------------------------------------------------------------------------------------------1
II. Preparation before use------------------------------------------------------------------------------------------------2
1. Connection of power supply---------------------------------------------------------------------------------------2
2. Keyboard lid---------------------------------------------------------------------------------------------------------------2
3. Music stand----------------------------------------------------------------------------------------------------------------2
4. Turn on power switch-------------------------------------------------------------------------------------------------3
5. Volume Adjustment----------------------------------------------------------------------------------------------------3
III. Auxiliary Jack--------------------------------------------------------------------------------------------------------------3
1. Use of Headphone-------------------------------------------------------------------------------------------------3
2. Use of audio input/output------------------------------------------------------------------------------------------3
3. Use of MIDI----------------------------------------------------------------------------------------------------------------4
IV. Quick Guide---------------------------------------------------------------------------------------------------------------4
1. Voice------------------------------------------------------------------------------------------------------------------------4
① Select Voice---------------------------------------------------------------------------------------------------------4
② Dual---------------------------------------------------------------------------------------------------------------------4
2. Effect Control------------------------------------------------------------------------------------------------------------5
① Keyboard split------------------------------------------------------------------------------------------------------5
② Tune--------------------------------------------------------------------------------------------------------------------6
③ Touch------------------------------------------------------------------------------------------------------------------6
④ Chorus-6

⑤ Metronome----------------------------------------------------------------------------------------------------------6
Transpose------------------------------------------------------------------------------------------------------------------------6
Sound Console-----------------------------------------------------------------------------------------------------------------6
3. Style and the relative function of the style-----------------------------------------------------------------6
① Select style-------------------------------------------------------------------------------------------------------------7
② Intro/Ending-----------------------------------------------------------------------------------------------------------7
Sync--------------------------------------------------------------------------------------------------------------------------------7
Fill-in 1/Fill-in 2----------------------------------------------------------------------------------------------------------------7
Start/Stop-----------------------------------------------------------------------------------------------------------------------7
Tempo Adjustment---------------------------------------------------------------------------------------------------------7
Accompaniment Volume Adjustment------------------------------------------------------------------------------7
4. Chord Function-------------------------------------------------------------------------------------------------------7
Single Finger-------------------------------------------------------------------------------------------------------------------7
Fingered-------------------------------------------------------------------------------------------------------------------------8
Full Range Chord-------------------------------------------------------------------------------------------------------------8
Chord Close--------------------------------------------------------------------------------------------------------------------8
Table of Chord----------------------------------------------------------------------------------------------------------------9
5. Recording Function----------------------------------------------------------------------------------------------10
Recording----------------------------------------------------------------------------------------------------------------------10
Audio Track 1/Audio Track 2-------------------------------------------------------------------------------------------10
Accompaniment Track Play---------------------------------------------------------------------------------------------10
6. Intelligent Teaching---------------------------------------------------------------------------------------------10
Song-----------------------------------------------------------------------------------------------------------------------------10
Teaching 1, Teaching 2, Teaching 3--------------------------------------------------------------------------------11
7. State Memory------------------------------------------------------------------------------------------------------12
V. The playback of the Demo Song---------------------------------------------------------------------13
VI. The Installation of the piano body-----------------------------------------------------------------13
Appendix I. Table of Voice--------------------------------------------------------------------------------14

Appendix II. Table of Style--------------------------------------------------------------------------------15
Appendix III. Table of Demo-----------------------------------------------------------------------------16
Appendix IV. Trouble Shooting-------------------------------------------------------------------------16
Appendix V. Technical Specifications-----------------------------------------------------------------17

1 Panel Control
LCD display screen.
1.Main volume
2.Tempo
3.Accompaniment volume
4.intro/ending,sync,Fill-In 1, Fill-In 2,Start/stop
5.Metronome,single finger,fingered,full range
chord,chord close
6.Recording,audio track 1,audio track
2,accompaniment track,transpose+/-
7.Function menu,sound console
8.LCD display screen
9.Demo,style,voice
10.Song,,teaching 1,teaching 2,teaching 3
11.Digit control
12.Keyboard split,dual,touch,reverb,chorus
13.Store,M1,M2,M3,memory bank
14.Power switch
1.Digit display area
2.Characters display
area
3.Volume
4.Voice Select
5.Style Select
6.Song
7.Tempo
8.Reverb
9.Chorus
10.Dual
11.Keyboard Split
12.Chord display area
13.Metronome
14.Fill- in 1/Fill- in 2
15.REC/Play
16.Touch
17.Memory state
18.Staff

2 Preparation before use
Connection of power supply
1.First make sure the power switch of electric grand piano is at OFF position. If not, poke
the switch to OFF position.
2.Connect power cord; insert one end of power cord in AC jack of the electric grand piano
and the other end in power socket.
Warning
Make sure the power voltage is AC 220 ±10%.Too high or low voltage will damage the
electric grand piano.
Do not pull out power cord from power socket in the charged situation.
Fuse replacement shall only be made by qualified personnel.
Keyboard lid
■Open keyboard lid
Hold up the keyboard lid of the piano gently and push it inside, it will slide inside as well,
the lid will be opened.
Warning
When you open or close keyboard lid, you should hold, you can unloosen it unless it
was opened or closed completely. Take care not to let your fingers be clamped between
keyboard and lid.
■Close keyboard lid
Slide the keyboard lid of the piano towards the direction of your body and put down the lid
over keyboard.
Caution
Do not place metal objects or paper on the piano keyboard lid, otherwise the small object
on keyboard lid may fall into the electric grand piano when the lid was opened, it will be
difficult to take it out, it may cause electric shock, short circuit, fire disaster or other
serious damage to piano.
Music stand
■Raise music stand
Pull the music stand up until it was upright. Now the spring bounce outside. Put the
spring bracket on the top wooden cover of the piano, the music stand will stand on the top
wooden cover of the piano in a slant way.

■Put down the music stand
1.Pull the music stand up until it was upright.
2.Fold spring bracket inwards.
3.Put down the music stand gently until it lies on the top wooden cover of the piano.
Caution
Do not use the piano when music stand is lifted to half height. When you lower the music
stand, do not release your hand until the music stand is completely put down.
Turn On power switch
Press [POWER] button to turn on the piano.
3 Preparation before use
Volume Adjustment
You can setup the high or low volume by rotating the volume rotary button.The volume
rotary button can control the keyboard volume and accompaniment volume at the same
time.
Caution
·Before turn on power switch, please adjust the volume to the minimum level by the
volume rotary button.
·Before you turn off power switch, please rotate volume knob to the minimum limit.
Auxiliary Jack
Use of Headphone
When you are practicing and do not want to disturb others, you can use the headphone
jack which lies in the rear of the electric grand piano. After you inserted the headphone in
PHONES jack, the speaker system inside the electric grand piano will cut off automatically.

Use of audio input/output
This electric grand piano is equipped with built in speakers. It can amplify an external
source such as a CD or MP3 player by plugging it into the “Line In” jack. You can also
connect the keyboard to an amplifier or other external speaker system via the “Line Out”
jack.
Caution
To avoid damaging speakers, external appliance should be turned off before connecting.
Please adjust the volume to the minimum level at the same time. You can raise the volume
until you are satisfied with it when you are playing.
4 Auxiliary Jack
Use of MIDI
1.MIDI input: connect MIDI input jack with MIDI output jack of another electronic
equipment which is compatible with MIDI through the MIDI connection line. the electric
grand piano can receive the data of external MIDI equipment through the MIDI input.
2.MIDI output: connet the MIDI output jack with MIDI input jack of another electronic
equipment which is compatible with MIDI through the MIDI connection line.When a note
was played,the corresponding MIDI signal will be transfered out,moreover,it can control
other MIDI equipment through the changed information of the transfer program (Note:
MIDI output can transfer keyboard data only.)
Notice: The above external item was not equipped with this piano, the consumer needs
to buy them seperately.
Quick Guide

Voice
The electric grand piano can provide 138 kinds of voices,including 128 kinds of GM voices,
10 kinds of Chinese folk music and 2 groups of keyboard percussion. Please refer the voice
list in the appendix.
■Select Voice
1. Press [VOICE] button to enter selection status.
2. You can select the voices you want by pressing +/- or digit
buttons.
3. Example of selecting No.59 voice press [5] firstly, then,
press[9] by the digit buttons, the voice [59] was selected.
Instructions
• The default setting is the 001 GrandPno with displays on the LCD.
• While selecting voice, LCD will display the name of selected voice.
■Dual
1. By pressing [DUAL] button, LCD will display the symbol. In this function, you
can choose one voice, and then choose another voice. After that, you can play the
two voices together.
2. In one voice layer, two different voices can be emitted simultaneously you can
select dual voices by pressing +/- buttons.
3. Press the [Sound Console] button to select VOICE1V or VOICE2V. It can adjust the
volume of the dual voice if you press the digit +/- buttons.
Instructions
·The default dual voices is the voice of the No.50 STRING.
5 Quick Guide
Effect Control
■
Keyboard split
In the keyboard split mode, you can play different voices on the left side and right side of
the“Split Point.” The setting of split point can be changed based on your requirement.
1. Press the [KEYBOARD SPLIT] button, LCD displays the symbol and the whole
keyboard is divided into left and right individual areas of performance.

2. Selecting split point. Pressing the [FUNCTION MENU] button, it enters the function
of keyboard split point, the LCD displays 25 Split point, select required keyboard
split point by pressing +/- buttons, this point will be the new keyboard split point.
3. Press [SOUND CONSOLE] button, select the volume of upper layer voice in left
hand, the LCD displays VOICELV, you can adjust the volume of the left hand voice
of the keyboard.
Instructions
Enter the function of keyboard split point and LCD does not display the current value of
keyboard split point temporarily. It display the default value is 025. The key at keyboard
split point belongs to left hand chord area.
■Touch
The touch response function, you can control the dynamic variation of volume with how
hard you press the keys..
Press [TOUCH] button to switch touch function of the keyboard. there are three touch
types for choice altogether.
1. Press [TOUCH] button to open touch response and LCD displays the symbol
2. Press [TOUCH] button ,do the loop operation in this four status: 001/002/003/OFF.
Instructions
When you start the electric grand piano, the touch keyboard will be set automatically and
the default touch level is 2.
■Reverb
Press [REVERB] button to open preset reverb effect and LCD displays the symbol .
REVERB Press [REVERB] button once again, the reverb symbol will fade from LCD and
close reverb function.

Instructions
After starting the electric grand piano, reverb status is automatically opened.
■Chorus
Press [CHORUS] button to open default chorus effect and LCD displays the symbol.
Press [CHORUS] button once again, the chord symbol fade from the LCD, the chord
function close.
6 Quick Guide
■Metronome
1. Press the [METRONOME] button to initiate the beat of the metronome.
2. Press the [FUNCTION MENU] button to select the number of beats per measure,
and then adjust with the +/- or buttons.
3. You can specify the number of beats in each bar in the range of 0, 2, 3...9.
Instructions
You can follow the metronome sound to perform when the metronome sound sounded;
the metronome tempo can be changed by the tempo.
■Transpose
Press TRANPOSE“+/-”button, the corresponding musical scale goes up or goes down one
half step, you can adjust the musical scale ±12 leave upwards and downwards. The
transpose effect will reset to default value if you press the transpose +/- buttons at the
same time.
■Function menu
Press [FUNCTION MENU] button, the piano enters the menu choice state. You can choose
the function items by pressing [digit +/-] buttons.

■Sound console
Press [SOUND CONSOLE] button, the piano enters the selection state of the sound console
menu. You can choose your required function by the loop choice or exit the sound console
status if you hold the [SOUND CONSOLE] button. You can adjust your required parameter
by the [DIGIT +/-] buttons after the piano has entered into one certain status of the sound
console. The adjustment parameter as follows
Style and the relative function of the style
This electric grand piano provides dynamic style and accompaniment models that are
suitable for many popular voices, there are 118 kinds of styles altogether.
(Please refer the table of style in the appendix.)
7 Quick Guide
■Select style
1.Press [STYLE] button to enter the status of selecting style.
2.Select the style you require by pressing +/- or digit buttons.
Instructions
When selecting a style, LCD will display the name of style.
■Intro/ending
Press [INTRO/ENDING] button and then [START/STOP] button, all kinds of style will lead
style to enter into the form of a suitable intro. Used together with auto accompaniment,
many “intro” passages can offer special chord variation and ornament to enrich your
performances. Press [INTRO/ENDING] button once again, all kinds of accompaniment will
lead rhythm to the end with an “ending.”

■Sync
The function of Sync start can start the rhythm and accompaniment when you play the
keyboard. Press [SYNC] button, the symbol of will flash, indicating the status of
Sync waiting. Then press any key on keyboard to start the function.
Use of Sync start with a prelude. If you want to add an intro before Sync start, you can
press [INTRO/ENDING] button before pressing [SYNC] button.
■Fill-in 1/Fill-in 2
Each accompaniment has its own variation to enhance performance effect. During the
process of the style playing, press [Fill-in 1]button, the LCD displays NOR flashing or press
[Fill-in 2] button, the LCD displays the VAR flashing, insert an interlude in playing style,
then return to original main section style to continue playing.
■Start/Stop
After selecting style, press [START/STOP] button to play style and press the button once
again to close the style.
■Tempo adjustment
Press [TEMPO +/-] buttons, it can adjust the accompaniment tempo; the adjustment range
is 30-280 bpm.
Instructions
Pressing the tempo button twice will recover the initial setting value of accompaniment
tempo.
■Accompaniment adjustment
Press [ACCOMPANMENT +/-] buttons to adjust the accompaniment volume, the
adjustment range is 0-31.
Instructions
Press the accompaniment volume button twice to turn on/off accompaniment volume.

8 Quick Guide
■
SINGLE FINGER:
In this mode, you can decide accompanying chord with one or two fingers, including
large/small chord and large/small 7 chord, to produce the accompaniment effect of a
whole band. The fingering is as follows (taking C chord for instance):
C large chord, play root sound.
Cm small chord, play root note and a black key on its left side at the same time.
C7 large 7 chord, play root sound and a white key on its left side at the same time.
Cm small 7 chord, play root round and a black and white key on its left side at the
same time.
■
Fingered:
In this mode, the notes you play at left hand area of keyboard (split point is No.25 key in
auto accompaniment) decide the chord that has different accompaniment style, and the
following kinds of chord can be identified (taking C for instance, the note inside
parentheses may be omitted). If you feel the left hand area is not large enough, you can
reset the left hand area through the [KEYBOARD SPLIT] function of [FUNCTION MENU] and
press+/- buttons. For detailed information, please see the function of [FUNCTION MENU].
■
FULL RANGE CHORD
Press the [FULL RANGE CHORD] button after the chord was started, you can play the chord
sound on the full keyboard, the fingering is the same as that of the fingered.
Instructions
Press [SOUND CONSOLE] button, select the drum volume, bass volume or chord volume,
press digit +/- button, it can adjust the style in the drum and the volume of the bass and
chord.

■
CHOED CLOSE
Press the [CHORD CLOSE] button after the chord was started, the chord accompaniment
sound stops, the style continues to play.
9 Quick Guide
■
table of chord
Original name
ab.
Normal pronunciation
MAJOR
M
1-3-5
MAJOR SIXTH
M6
1-3-5-6
MAJOR SEVENTH
M7
1-3-(5)-7
MAJOR SEVENTH SHARP ELEVENTH
M7#11
1-(2)3 4-(5)#-7
MAJOR ADD NINTH
Madd9
1-2-3-5
MAJOR NINTH
M9
1-2-3-(5)-7
MAJOR SIXTH ADD NINTH
69
1-2-3-(5)-6
AUGMENTED
aug
1-3-#5
MINOR
m
1b3-5
MINOR SIXTH
m6
1b3-5-6
MINOR SEVENTH
m7
1-b3-(5)-7
MINOR SEVENTH FLATTED FIFTH
m7b5
1-3-5-7
MINOR ADD NINTH
madd9
1-2-3-5
MINOR ADD NINTH
m9
1-2-3-5
MINOR MAJOR ELEVENTH
m11
1-3-(5)-7
MINOR MAJOR SEVENTH
mM7
1-b3-(5)-7
MINOR MAJOR NINTH
mM9
1-2-3-(5)-7
DIMINISHED
dim
1-3-5
DIMINISHED SEVENTH
dim7
1-3-5-6
SEVENTH
7
1-3(5)-7
SEVVENTH SUSLEND FOURTH
7sus4
1-4-5-7
SEVENTH NINTH
79
1-2-3-(5)-7
SEVENTH SHARP ELEVENTH
7#11
1-(2)3-#4-(5)-b7
SEVENTH THIRTEENTH
713
1-3-(5)-7&2-3-5-6-7
SEVENTH FLATTED NINTH
7b9
1-2-3-(5)-7
SEVENTH FLATTED THIRTEENTH
7b13
1-3-5-6-7
SEVENTH SHARP NINTH
7#9
(1)-#2-3-(5)-7
MAJOR SEVENTH AUGMENTED
M7aug
1-3#-5-7
SEVENTH AUGMENTED
7aug
(1)-3-#5-7
SUSPENED FOURTH
sus4
1-4-5
ONE PLUS TWO PLUS FIVE
1+2+5
1-2-5
Note:
• All above notes in the parentheses may be omitted.

• The accompaniment produced by the fifth chord, which based on the root sound
and the dominant that conducted the major triad and minor triad.
• The two notes have octave interval; the accompaniment only has the root sound
now.
• If you press any three neighboring keys (black and white keys) simultaneously.
Chord accompaniment will eliminate automatically, keep the rhythm
accompaniment.
• The chord fingering in the finger can be recognized at the root, it will be recognized
as the minor seventh chord if it was listed in another place.
• (Major sixth add ninth) can be recognized if it was in the place that root sound lied,
it will be recognized as the minor major eleventh chord of it was in other place.
• (Minor sixth) chord can only be recognized at the root. It will be recognized as
minor seventh flatted fifth chord if it was in another place.
• (1+2+5) chord can be recognized if it was in the place that root sound lied, it will be
recognized as the suspended fourth chord if it was in other place.
• When you play augmented triad and Diminished seventh chord, the lowest note
will be recognized as root sound.
• The lowest note that you played in the seventh sharp eleventh chord, it will be
recognized as the root sound or flat 7 note.
10 Quick Guide
Recording function
You can record your performance in the electric grand piano. The audio track 1 and track 2
of this electric grand piano are melody tracks. The performance of this electric grand piano
will be like the effect of a band performance through the many tracks recording in the
process of recording.
Instructions
• If you record data on a track with previous data, the previous data will be
overwritten and lost. To cancel recording of selected track, press the
corresponding track button once again.
The datas can be record:
●Notes of keyboard ●Accompaniment
●Vibrato ●Sustain
●Style ●Keyboard drum
●Auto chord ●Accomp Volume
●pianissimo ●Tempo
●Voice

■
AUDIO TRACK 1/AUDIO TRACK 2
Press the [RECORDING]button,LCD displays the symbol and the piano enters the status
of recording waiting. Select the [AUDIO TRACK 1] or [AUDIO TRACK 2], the LCD displays the
corresponding symbol, indicating this track enters recording standby. The tempo beat point
displays as per current tempo while the indicator light shines. Press any key of keyboard to
begin to recording.
■
ACCOMPANIMENT TRACK 2
Press the [RECORDING] button, LCD display the symbol of and the piano enters into
the status of recording standby. Then, press the [ACCOMPANIMENT TRACK] buttons, the
piano enters the record preparation. The beat point displays as per current tempo while
the indicator light shines. Press any key of keyboard to begin to record.
Instructions
If the recording of memory is full, recording will stop automatically.
■
PLAY
Press the [RECORDING] button firstly to exit the recording state, press the [PLAY] button, it
can play the recorded data.
INTELLIGENT TEACHING
■
SONG
Press the [SONG] button. Select the song using the digit buttons, then, press the [SONG]
button. The song plays, press the [STOP] button to exit the play function.
Instructions
When you play a demo, you should raise the volume from the lowest volume gradually
through the main volume button.
11 Quick Guide
■TEACHING 1
Press [TEACHING 1] button to enter the teaching 1 mode, then, press the [song] button.
The song plays, after that, press the [digit +/-] button to select the teaching song. The
melody will be the main melody if the player presses the keys gently. The background

sound will play this subsection repeatedly. It won’t stop until the song is over or if the main
melody hasn’t arrived to the next subsection. Press [START/STOP] button to exit the
teaching 1 mode.
■TEACHING 2
Press [teaching 2] button to enter the teaching 2 mode, then press [song] button. The song
plays, after that, press the [digit +/-] button to select the teaching song. The main melody
doesn’t play, and the players can play the main melody by themselves. The background
sound will play completely; it won’t stop until the song is over. Press [start/stop] button to
exit the teaching 2 mode.
■TEACHING 3
Press [teaching 3] button to enter the teaching 3 mode, then press [song] button, the song
plays, after that press the [digit +/-] button to select the teaching song. The main melody
doesn’t play, the player presses the corresponding keys depending on the notes that
display on the LCD, and then the next note can play. The background sound will play this
subsection repeatedly; it won’t stop until the song is over.
STATE MEMORY
This instrument has the registry memory function that can save your favorite setting and
tune it out easily if needed.
The stored setting in registry memory including the following
content:
·Accompaniment setting Style, chord, fill-in, metronome, accompaniment
volume, tempo
·Voice setting
Main voice, double voices, keyboard split
·Effect setting
Chorus, reverb, touch, tune, style volume
Table of contents
Other SAWTOOTH Musical Instrument manuals