Saxon AA 4A User manual

1
4A Intelligent
Battery Charger
Manual
AA0725
Suitable for 12.8V lithium and 6V and 12V lead-acid-batteries, e.g. WET, GEL-, VRLA-,
AGM-batteries between 1.2-120Ah capacity
Please read the following safety and operating instructions carefully

2
Introduction
The AA Intelligent Battery Chargers is an advanced battery charger that will increase
your battery’s performance and prolong its life.
We have taken numerous measures in quality control to ensure that your product arrives
in top condition and will perform to your satisfaction.
Please carefully read and follow the safety and operating instructions. Not following
these instructions may result in a serious accident, including damaged property, serious
or even fatal injuries. If the device is passed on to another person, this manual must also
be handed over with it.
Important Safety Instructions
CAUTION: Please read this instruction manual carefully before installing and starting
up the device. Do not operate the device unless you have fully read and understood all
the provided information. If you are not confident working with 6V/12V DC voltage or are
unsure of what you are doing, consider seeking professional help e.g. a garage or your
vehicle´s manufacturer. Failure to observe these instructions may cause an electrical
shock, fatal or serious injury, material damage or impair the function of the device.
Read your vehicle owner’s manual.
• Always read all instructions carefully before using the charger
• Must only be used by a responsible adult
• Keep away from and out of the reach of children
• This product is not a toy and should not be used as such
• This product is designed for domestic use and is not a commercial product
• AA/Saxon Brands disclaims any liability for damage arising from misuse of this product
• Some vehicle manufacturers may have special requirements before charging the
vehicle´s battery. (e.g. fuses that have to be removed or certain security restrictions)
• The AA/Saxon Brands accepts no liability for direct or indirect damage caused by
faulty connections, usage of damaged or altered products, usage for purposes other
than described and especially if caused by failure to follow these instructions
• NEVER CONNECT to unsuitable batteries (e.g. NiCd-batteries). Do not charge
batteries that are known to be broken. The battery charger is not designed as a jump
starter. Not following these instructions could cause serious personal injury or material
damage
• This unit has safeguards against overheating, reverse-polarity and short-circuiting.
Despite this, it is highly recommended not to touch or connect the red to the black
clamp or connect the charging cables in reverse polarity. This could cause dangerous
sparks and electric arcing. Only connect and disconnect the battery, when the mains
supply is disconnected
• For indoor use only

3
Type of Batteries
This charger is intended to be used only on 12.8V Lithium batteries and 6V & 12V Lead
Acid Batteries, e.g. WET, Gel, AGM, VRLA-Batteries. Do not try to charge unsupported
types of batteries like NiCd or non-rechargeable batteries. Follow the recommendations
of your battery´s manufacturer.
Warnings
• When not in use, store the charger in a dry area
• You should not attempt to open the battery charger
• Battery acid is corrosive and can cause burning. If skin comes into contact with any
acid, rinse and seek immediate medical advice
• Whilst charging, it’s possible that the battery may emit gasses. Ensure that there is no
potential of sparks or flames near the engine whilst in use
• Never use the charger if cables or the unit itself is damaged
• Never charge a damaged or frozen battery
• Be sure to turn off the power source before disconnecting clamps from the battery.
Likewise, only turn on power once clamps have been fitted
• Make sure that the cables and battery do not come into contact with water
• Do not place the charger on the battery whilst charging
• Always provide suitable ventilation when charging and do not cover the charger
• The charger may become slightly hot when in use which is normal
• Keep away from and out of the reach of children
• Do not leave the charger unattended for long periods
• Only use the product in environments 0-40°C
• Dispose of packaging responsibly
• Do not cover the device
• Use protecting gloves and eye-wear where necessary

4
A. Battery charger IBC4000(B)/AA0725
B. Charging cables (red (+ positive) and black (- negative) ring terminals
C. Charging cables (red (+ positive) and black (- negative) crocodile clips
D. Mains power cable 240V
E. Click & charge connector
F. MODE-button
G. Display
Technical Description
G
A
F
D

5
8 Stages of Charging
With the microprocessor-controlled charging steps of your AA Intelligent Battery
Charger, you are able to recharge your battery to almost 100 % of its original capacity. To
ensure that your battery is kept in an optimum condition, your Charger can be attached
permanently even for long periods. The correct charging step is selected automatically
by your Charger:
Step 1: Check
Checks the battery voltage to make sure battery connections are good and the battery is
in a stable condition before beginning the charging process.
Step 2: Recovery
Initialises a recovery process, if needed, for deeply discharged or sulphated batteries by
pulsing small amounts of current.
Step 3: Soft Start
A low charging rate protects deeply discharged or sulphated batteries.
Step 4-5: Bulk
The “Bulk” charging step uses both a high and medium charging rate until reaching
approximately 80% of the battery capacity.
Step 6: Absorption
The battery charger will deliver small amounts of current to provide a safe, efficient
charge and limit battery gassing.
Step 7 & 8: Maintenance 1 & Maintenance 2
The battery is fully charged and ready to use (the battery icon stops flashing). In this
step, the charger will only deliver enough current to keep the battery full. The battery
voltage is continuously monitored to check if a maintenance charge should be initiated:
If the terminal voltage falls below 6.4V (6V) or 12.8V (12V), the charger will start a main-
tenance cycle until voltage reaches 6.8V (6V) or 13.6V (12V). Switching between “trick-
le-charging” and “maintenance-charging” is repeated indefinitely to keep the battery
fully charged without the risk of overcharging. The battery charger can be left connected
to the battery for an unlimited amount of time.
Step
Current
Amps
Voltage
Volts
876
54
3
2
1

6
Operation
Please read carefully before using the device
This system is intended to be used only with 6V & 12V Lead Acid Batteries, e.g. Wet, Gel,
AGM and 12.8V 4-cells LiFePO4. This charger is suitable to charge…
• 6V batteries with a capacity of 12 - 120Ah
• 12.8V 4-cells LiFePO4 Lithium batteries with a capacity of 8 - 50Ah
Preparing The Battery
It is recommended to disconnect the battery from the car if possible. If you remove the
battery from the vehicle, always remove the grounded terminal from the battery at first.
To avoid sparks, make sure all vehicle electronics are turned off. A marine (boat) battery
must be removed and charged on shore (to charge on-board requires special devices
designed for marine use).
Follow your battery manufacturer´s precautions and preparatory measures, such as
removing or not removing cell caps while charging. Make sure the charging rate is not
over your battery manufacturer´s suggestion.
Do not try to open a sealed or maintenance-free battery.
Connecting The Charging Cables
Connect the clamps to the battery in the following order:
1. Connect the positive charging lead (RED)
to the positive terminal post of the battery
(marked +)
2. Connect the negative charging lead (BLACK)
to the negative post of the battery
(marked -) or to the chassis of the car.
3. Now you can connect the charger to the mains
supply and start charging by selecting the
proper charging mode as explained below
12

7
Charging
Your AA Intelligent Battery Charger can easily be configured to charge many different
types of batteries. The following recommendations should, however, only be seen as
guidelines.
Note: Depending on the condition of the
battery, the charger adapts the charging
currents to ensure optimum charging
of the battery. Only during the main
charging phase, is the battery charged
with the maximum charging current.
Shortly before the maximum charging
capacity has been reached the charging
current is reduced. This ensures a gentle
and best possible charging up to the
battery’s maximum capacity.
Item Description
MODE-Button: Press to select the operation mode:
12V battery: Standby, Motorcycle-Mode, Motorcycle-Mode +
Frost-Mode, Car-Mode, Car-Mode + Frost-Mode
6V battery: Standby, 6V-Mode, 6V-Mode + Frost-Mode
Long-press for 3 seconds: Standby, LITHIUM-Mode,
RECOVER-12V-Mode
After selecting the charging mode, the charging program begins
automatically, if no further action is taken.
12V-Motorcycle-Mode: Voltage: 14.5V
Charging current: up to 0.9A
Suitable for 12V batteries with a capacity less than 12Ah.
12V-Car-Mode: Voltage: 14.5V Charging current: up to 4.0A
Suitable for 12V batteries with a capacity higher than 12Ah.
6V-Mode: Voltage: 7.3V Charging current: up to 4.0A
If the battery voltage is between 2.0V and 7.0V, the battery is
identified as a 6V battery. By pressing the MODE-button the 6V
charging program is started.

8
FROST-Mode:
If ambient temperatures are very low, a higher voltage is recom-
mended to charge a battery. The FROST-Mode has to be selected
in combination with the above mentioned charging modes and will
increase the charging voltage as follows:
FROST-Mode + Motorcycle-Mode: increased charging voltage: 14.7V
FROST-Mode + Car-Mode: increased charging voltage: 14.7V
FROST-Mode + 6V-Mode:increased charging voltage: 7.4V
Do not use this setting for maintenance charging when tempera-
tures are above 5°C.
LITHIUM-Mode: Voltage: 12.8V Charging current: up to 3.0A
Suitable for 4-cell-LiFePO4 only
Note: If the voltage of the battery is not 11.6V - 13.8V, the LITHI-
UM-Mode is not available. A long press (3 sec.) of the Mode-button
is needed to be able to select this mode.
RECOVER-12V-Mode: Voltage: 14.7V
Charging current: up to 4.0A (mainly suitable for 12V lead-acid
batteries with a capacity greater than 12Ah)
Select this charging mode to recover and charge a deeply
discharged or sulphated 12V battery using pulse charging.
Note: A long press (3 sec.) of the Mode-button is needed to be able
to manually select this mode.
WARNING: Never use this mode with Lithium-batteries. Please read
the instructions of your battery manufacturer.
Digital Display: Shows voltage and current of the selected charging
mode and the connected battery.
Wrong Polarity: This symbol flashes if a battery was connected in
reversed polarity. Check the polarity and connection and reattach
the charging cables.
Defective-Battery:
As soon as the battery charger has been connected to the mains,
the charger analyses the connected battery: If the battery voltage
is lower than 2.0V or higher than 14V, the battery is not suitable or
defective and the “Defective-Battery”-symbol lights up.
If the connected battery is charging in “RECOVER-12V”-Mode and
after 3 hours the battery´s voltage is still not higher than 12V, the
battery is also considered as defective.

9
Memory Function
The charger will return to the last charging mode when disconnected and reconnected.
If this mode is not compatible with the connected battery, the charger will automatically
return to Standby-mode.
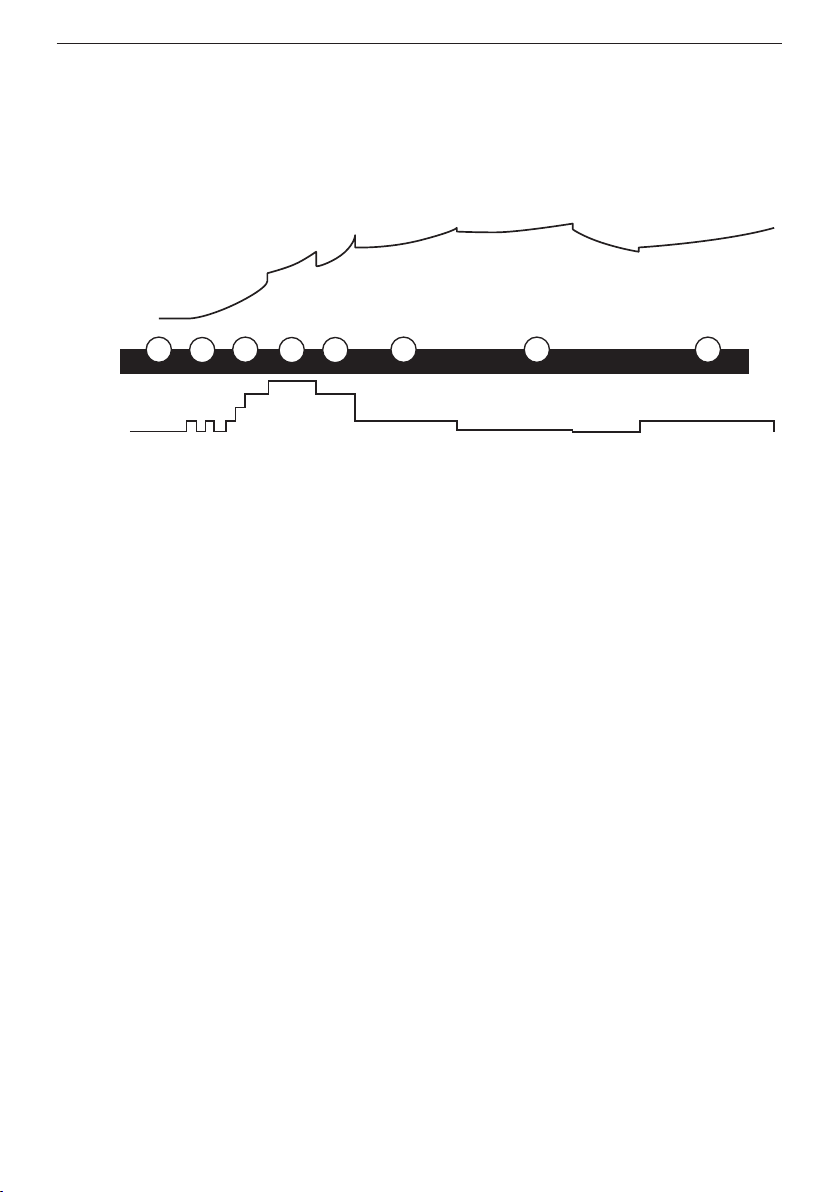
Defective Battery Detection and Recovery
Even if the battery voltage is very low, the charger tries to rescue the battery. If the
battery voltage is between 7V to 10.5V it is not clear whether a fully charged 6V battery
or a deep-discharged 12V battery is connected. The charging process automatically
commences with a gentle impulse charge, trying to reactivate a 12V battery until the
voltage rises. This way, even batteries believed dead can be made reusable. If voltage
doesn´t rise over 10.5V within 2 hours, the “Defective-Battery”-symbol lights up and the
connected battery is considered as defective..
Zero Volt Battery Charging
This function is used in lithium batteries. As lithium battery packs have Protection Circuit
Modules (PCM), the Output voltage is 0V when the PCM has activated. A very small
pulse current is used to sense the connection of the battery.
Maintenance / Trickle charging
After the battery has been fully charged, the charger automatically changes to trickle
charging. Depending on the measured voltage, the charging process is interrupted or the
battery is maintained in a fully charged condition with low charging currents. A battery
can remain permanently connected to the charger without damage or adverse effect on
its performance. The trickle charge can be used to maintain a battery.
The AA Intelligent Battery Charger will NOT start charging, without a charging mode
being selected.
1. Before charging the battery, connect the output terminals of the charger to the
battery. Make sure all connections are tight and clean
2. Ensure you choose the correct charging mode by pressing the Mode-button. A faulty
selection can cause problems and damage to your battery and car. Please see also
your car´s manual for determining the right mode
Not Connected: This symbol flashes if no battery is connected or
the connection is interrupted. Check the connection and reattach
the charging cables.
Battery-level:
This symbol will flash during the charging process. The bars indicate
the progress:
1 bar (20%), 2 bars (40%), 3 bars (60%), 4 bars (80%), 5 bars (90%)
If the symbol stops flashing, the battery is considered as fully
charged and the charger will switch automatically to “Maintenance /
Trickle charging” to keep the battery in a fully charged state.

10
3. Settings are made by pressing the “MODE-button” one step at a time. Releasing the
button when the required mode is reached will make your selection and start the
charging process
Stopping the Charging Process
Charging can be stopped at any time by disconnecting the power supply cord.
After Charging
1. Unplug charger from the mains supply
2. Disconnect the negative charging lead (BLACK) from the negative post of the battery
(marked -) or mass
3. Disconnect the positive charging lead (RED) from the positive terminal post of the
battery (marked +)
4. Clean and store battery charger

11
Technical Specifications
This model may be operated in EU countries.
Suitable Batteries
Voltages 6V & 12V & 12.8V
Suitable Battery
Types and Battery
Capacities
6V & 12V Lead Acid Batteries, e.g. Wet, Gel, AGM and 12.8V
4-cells LiFePO4.
6V : 12 - 120Ah capacity
12V : 1.2 - 12Ah capacity
12V : 12 - 120Ah capacity
12.8V : 8 - 50Ah capacity (4-cells LiFePO4 Lithium batteries)
Electrical Values
AC Input 220V - 240V ~ 50Hz: max. 0.6A
Power Consumption 65W
Charging Current 0.9A ± 10 %, 4.0A ± 10 %, 3.0A ± 10 %
Charging Voltage
7.3V / 7.4V for 6V battery
14.5V / 14.7V for 12V battery
14.5V for Lithium (12.8V 4-cells LiFePO4)
Back Drain Current
without AC Input < 5mA
Other
Protection Class IP65
Electrical Safeguards Protection against: overheating, short-circuiting,
reverse polarity
Operating ambient
temperature 0°C ~ 40°C
Ambient Storage
Temperature -30°C to 60°C
Environmental Protection
The product is classed as Electrical or Electronic Equipment and should not be disposed
of with other household or commercial waste at the end of its working life. Please recycle
where facilities exist. Ask your local authority or retailer for recycling advice.

12
T2A
theAA.com
MOTORING ACCESSORIES
Pictures are for illustration purpose only,
Please retain packaging for future reference.
The AA and the AA logo are registered
trademarks of the Automobile Association
Limited and are used under license. All
rights reserved.
Product no. AA0725
Produces and distributes this product
RG17 0DX | saxon-brands.com
This manual suits for next models
1
Table of contents
Popular Batteries Charger manuals by other brands

Linear Technology
Linear Technology LTC1760 manual

Intelligent Charging
Intelligent Charging TS25 MKII Operator's manual

BMZ
BMZ 24881-xx Series Operating instruction

Merlin
Merlin Flash Charger Wireless instruction manual

Associated
Associated 6010B Operator's manual

Avaya
Avaya Dual Battery Charger user guide