SBJ BM-257 User manual

1
BM-257 Digital Video Baby Monitor
2.4GHz DIGITAL BABY MONITOR WITH 2.4 INCH LCD
USER MANUAL
Congratulations
You have just purchased a qualified Wireless 2.4GHz Digital Baby Monitor. Please read this instruction
carefully before using the product. Keep these instructions for future reference.
Table of Contents
Parts and Quick Reference…………………………………………………………………………………………
Safety Precautions………………………………………………………………………………………………….
Charging the battery.................................................................. ..............................................................
Simple to Operate……………………………………………………………………………………………………
Reception Testing……………………………………………………………………………………………………
Functions Setup………………………………………………………………………………………………………
Location and Set Up…………………………………………………………………………………………………
Trouble Shooting…………………………………………………………………………………………………….
Technical Specification………………………………………………………………………………………………

2
Parts and Quick Reference
Baby Unit:
1- Antenna 2- light indicator 3- Mic
4- Camera 5- Camera adjusting knob 6- Power (On/Off) Key
7- Link Key 8- DC Adaptor Jack 9- Speaker
Parent Unit:
1 –PTT Key 2 –USB Jack 3 - Power Indicator
4 –LCD Screen 5 - Option key () 6 - Menu key(FUN)
7 - Option key () 8 –Mic 9 –Speaker
10 - Power (on/off) Key 11 –Stand 12 –Battery door

3
AC Adaptor: Model: PS06C050K1000UU
Input:100-240V,50/60Hz,0.25A
Output:5V,1A
Produce: Shenzhen Flypower Technology Co., Ltd
Model: PS06H055K0800ED
Input:100-240V,50/60Hz,0.25A
Output:5.5V,800mA
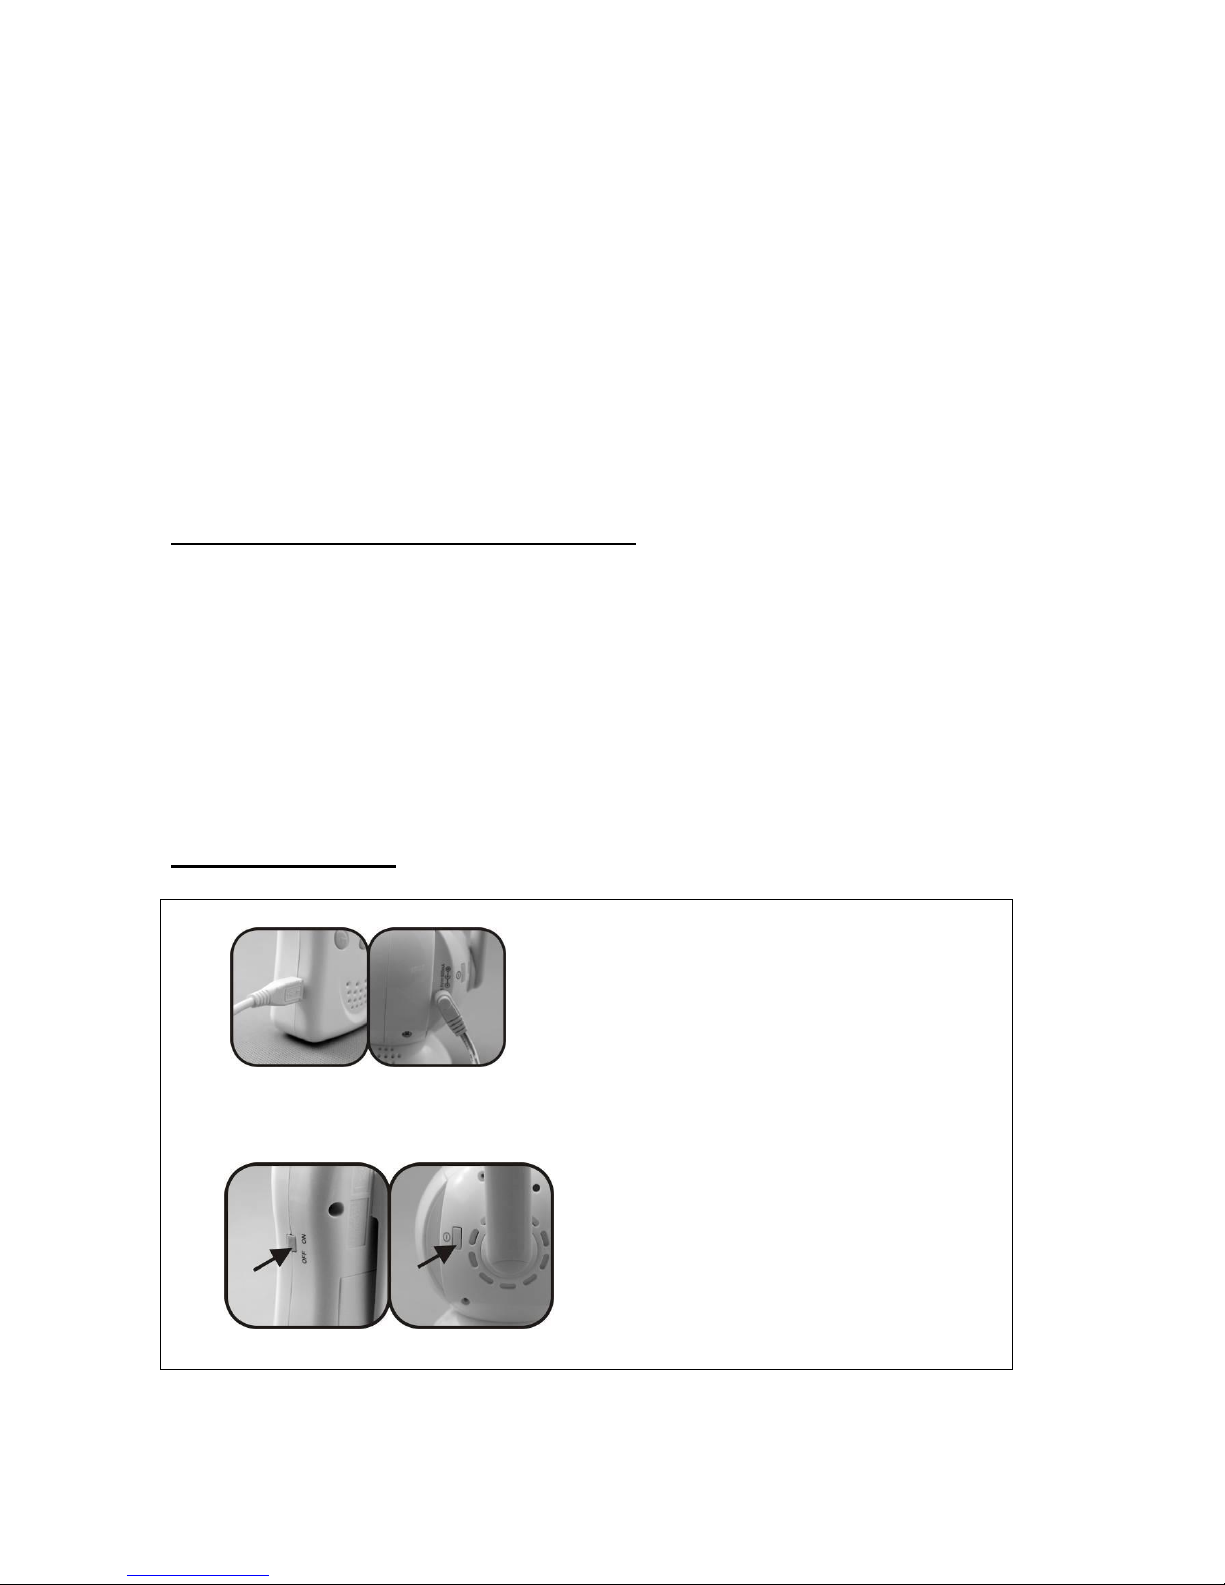
The AC Adaptor is device that allows you to power on the system with your household electricity. The
adaptor can be separately connected to DC IN connectors of Parent Unit and Baby Unit. Please be
reminded to switch off the system before plugging or unplugging the adaptors.
CAUTION: These adaptors are with exclusive design for this system. Please NEVER try to power
up the system with different adaptors or use them for any other appliances.
Safety Precautions
When using this unit, basic Safety Precautions should always be followed to reduce the risk of fire, electric
shock, or personal injury.
1. Read and understand all instructions.
2. Follow all warnings and instructions marked on this unit or mentioned in this operation instruction.
3. This product is not intended to replace adult supervision but assistant tool. It is important that users
should stay within the communication range of the system all the times when using it.
4. This product intended for indoor use only. Outdoor use may damage the system.
5. It is essential to check reception regularly. Please see the reception section for complete instructions.
6. Never put the system near water, such as bathtub, bathroom sink, laundry tub, kitchen sink or in a wet
basement, etc. Immersion of this unit in water could cause an electrical shock.
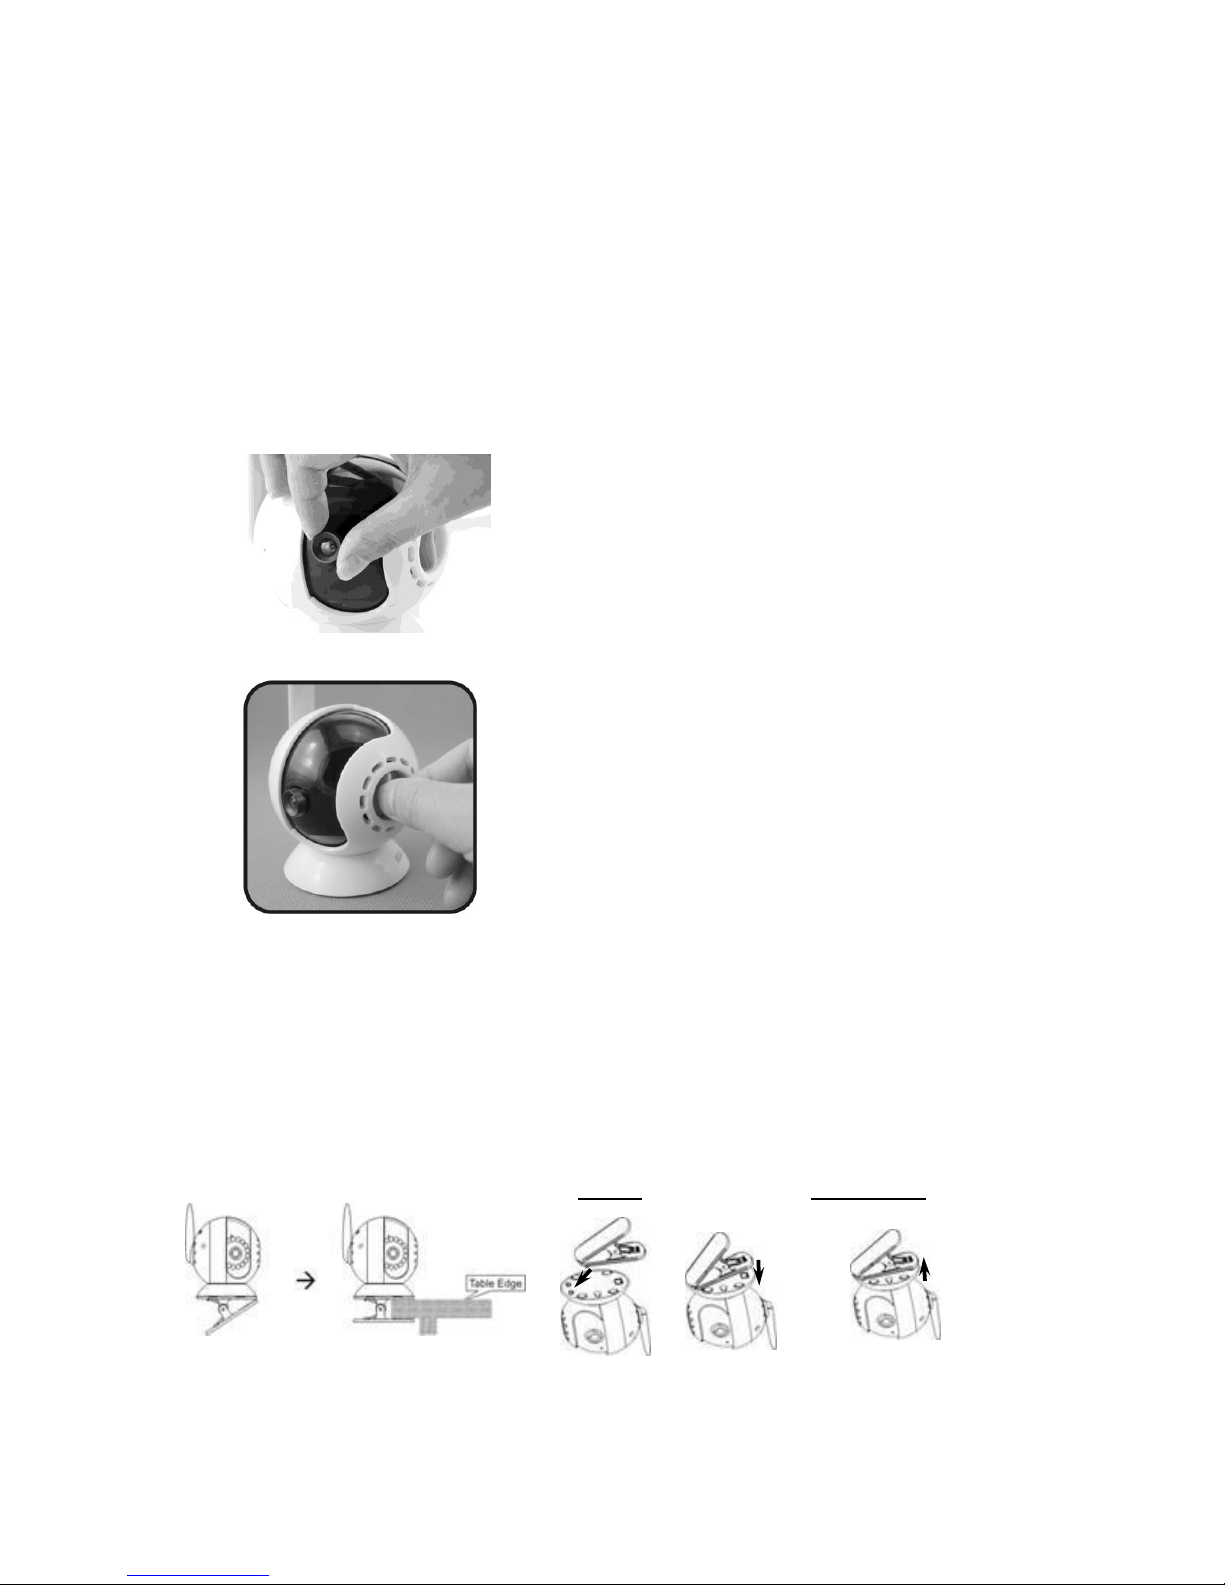
7. Place the unit securely on a stable surface. Serious damage and/or injury may result if the unit falls.
8. Do not cover slots and openings on the unit. They are provided for ventilation and protection against
overheating.
9. Install the unit where no one can step or trip on the cord.
10. Never push any objects through slots in this unit. This may result in the risk of fire or electric shock.
Never spill any liquid on the unit.
11. To reduce the risk of electric shock, do not disassemble this unit. Take the unit to authorized service
center or qualified technician when service or repair work is required. Opening or removing covers may
expose you to dangerous voltages or other risks. Incorrect reassembly can cause electric shock when
the unit is subsequently used.
12. Do keep the system away from heat sources such as radiators, heat registers, stoves or other
appliances producing heat. Also keep these components out of direct sunlight.
13. Always unplug the AC adaptors if not using the system for long periods of time.
14. The outer surface of the Baby Unit and Parent Unit can be cleaned with a cloth LIGHTLYdampened with
water or a mild cleaning solution.
WARNING:

4
To reduce the risk of fire or electrical shock, do not expose this unit to rain or any type of moisture.
Privacy Protection
Always remember that you are using public airwaves when you use the Wireless 2.4GHz Digital Baby
Monitor. Sound and video may be broadcasted to other receiving devices. Conversations, even from rooms
near the camera, may be broadcasted as well.
CAUTION: To protect your privacy, always turn the system off when not in use. It is possible that the Parent
Unit may be interfered from other devices in the 2.4GHz frequency range.
Charging the Battery (only for Parent Unit)
Parent unit is built in Li-ion rechargeable battery and baby unit is supposed to be powered by supplied
adaptor. Please charge Parent Unit for the first time usage or when low battery icon is showed on the screen.
1. Use only the supplied AC adaptor for charging the rechargeable battery.
2. Plug into any nearby standard electrical outlet at home and charging automatically begins. A charging
battery icon shows and red power indicator is on.
3. When fully charged, a full battery icon shows. The charging time for completely empty batteries is about 8
hours while the parent unit is turned off.
SIMPLE to OPERATE
Just press on the baby and parent units, and adjust the preferable sound level.
1
Connect with the AC Adaptor. If parent unit is with enough battery, press on directly.
With AC adaptor
2
Press on the Baby unit, then Parent unit.
Remarks: Default setting: Paring is auto-scanned.
* For more detailed operation, please go to “Functions setup”

5
Reception Testing
Before using the Parent Unit or changing the location of the system, it is very important to test the video and
sound reception:
To test the video reception
1. Place the Baby Unit in the most appropriate location. (e.g. on top of the table, mounting on the wall or
ceiling)
2. Focus and adjust the camera lens towards the baby.
3. Check the video reception on screen of the Parent Unit and adjust the appropriate brightness level. (To
adjust brightness, please see the “Functions Setup” section)
To test the sound quality
1. Speak in a whisper and with normal conversation sound level to Baby Unit.
2. Put the Parent Unit far away enough (at least 1m) from Baby Unit to prevent noise feedback.
3. Check the sound reception on speaker of the Parent Unit and adjust the appropriate volume. (To adjust
volume, please see the “Functions Setup” section )
Functions Setup
A. Baby Monitor Functions Setup
A1. Power ON/OFF
1> Mother unit is built in Li-ion rechargeable battery. If there is not enough power, connect the Parents unit
with the AC adaptor. Power ON by pressing Power Key until LCD is on.
2> Connect the Baby unit with AC adaptor. Power on by pressing the Power Key until Power Indicator is on.
Or insert 3 AA alkaline batteries into the Baby unit according to the polarity shown in the battery
compartment and power on by pressing the Power Key until Power Indicator is on.
3> Image will be displayed on LCD display if signal can be caught. Otherwise, below screen will be shown.
4> Power off parent unit and baby unit by pressing the On/Off Key until red light of the power indicator is off
and no display on LCD.

6
A2. Parent Unit Main Menu(FUN)
Press FUN key to enter into main menu. Use /key to select, and press again FUN key to confirm. Then,
press FUN key again or select EXIT, Parent unit will return to LCD display.
MAIN MENU
A2a. Brightness
1> Enter into main menu by pressing “FUN” key, press /key to select Brightness option, then press
“FUN” key to confirm.
2> Press /key to adjust the brightness level from the darkest to the brightest (totally 3 levels). Press FUN
key to confirm & return to live video automatically.
Darkest brightest
Remarks: ““ –minus the brightness “” –add the brightness
A2b. Volume
1> Enter into main menu by pressing ““FUN”” key, press /key to select Volume option, then press “FUN”
key to confirm.
2> Press /key to minus/add the volume level from 1 to 4. Press “FUN”key to confirm & return to live
video automatically.
lowest loudest

7
Remarks: ““ –minus the volume level “” –add the volume level
A2c. Pairing
1> For Parent Unit, enter into main menu by pressing “FUN” key, then press /key to select pairing
option and waiting. See below.
2> For Baby Unit, press “Link” key 4 seconds until power indicator flashing red light.
3> When pairing successfully, parent unit will return to live video on its own. Meanwhile, baby unit returns to
stable red light.
4> If not, no display on LCD screen of parent unit. Pls repeat above steps.
A2d. VOX
1> Enter into main menu by pressing “FUN” key, press /key to select VOX function option, then press
“FUN”key again to confirm.
2> Press /key to minus/add the VOX sensitivity from 1 to 4. Press Press “FUN”key to confirm & return
to live video automatically.
lowest sensitivity highest sensitivity
Remarks: Under VOX function, transmission will be activated ONLY if sound is detected by Baby unit. LCD
screen would be turned off if no sound is detected as per the VOX sensitivity level. Once the sound is
detected, it will automatically turn on the LCD screen. This is power saving feature.
A2e. Infrared Night Vision
1> Enter into main menu by pressing ““FUN”” key, press /key to select “Night Vision” function option,
then press “FUN”key again to confirm and enter into Night Vision menu.
2> Press /key to turn on/turn off night vision function. Press “FUN”key to confirm & return to live video
automatically.
Remark:

8
This is the “day”mode, night vision function is turned off.
This is the “night”mode, night vision function is turned on.
A2f. Exit
When return to the live video from main menu, user can also select “EXIT” function option by pressing /
key.
B1. Parent Unit Screen Display
1> On the main screen of parent unit, the top left corner is signal strength indicator , the top right corner is
the battery status and night vision icon.
2> Battery status: indicates the current battery status of parent unit.
Status can be: full charge, 3/4 charge, 2/4 charge, 1/4 charge, low battery.
Charging time: 8 hours with adaptor.
B2. Talking Function (Two Way Communication)
1> Under normal communicating, baby unit is transmitting sound and image to parent unit.
2> If mother unit need to talk back to parent unit, press PTT key of parent unit to talk.
3> Release PTT key to stop talking back to baby unit. The parent unit will be returned to receiving status.

9
B3. Out of Range Alert.
Under below conditions, out of range alert can be heard from parent unit.
a> Baby unit is turned off.
b> The units are detected out of communication range.
c> Baby unit is in low power.
B4. Lens & Camera Adjustment
1> If the video of parent unit is blurred, adjust the lens switch of the baby unit until the video reaches the
best image quality. (See picture below)
2> Adjust the Camera Rotation Handle to the desired viewing angle.
You can position and adjust the Baby Unit in a variety of ways to provide the best view of your baby. To
optimize the performance, position the monitor unit 3 ft (1m) away from the baby.
B5. Set up removable Mounting Clip
The Baby Unit can be clip on the table edge by setting up the removable mounting clip. After inserting the
mounting clip at the base bottom, user can easily fix the Baby Unit into different location. Setting and
disassembly method are shown in the figure below.
Setting Disassembly
B6. Wall Mount

10
User can mount the baby unit at wall or ceiling by the wall mount hole.
Trouble Shooting
Problem
Possible Cause
Solution
Power indicator
LED does not light
up
- Unit is not turned on.
- Power is switched off.
- Batteries may be used up.
- AC Adaptor not properly
connected.
- Press the Power Key to turn on it.
- Make sure that power outlet is turned on.
- Charge the battery/Replace new batteries.
- Check AC Adaptor jack-to-socket and
plug-to-outlet connections.
No image or
sound or image
blurred
- Wrong brightness level.
- Set the video VOX ON and
no sound is caught.
- Low volume level.
- Signal interference due to
other household appliance,
cordless or cellular
telephone and etc.
- Adjust the brightness to the desired level.
- Press any key on the Parent unit to activate parent unit/
Select VOX Off/ give a sound to baby unit.
- Adjust volume level to the desired level.
- Press the LINK key of baby unit and select pairing option in
main menu of parent unit to scan the channel.
Image flickers
- Object is too closed to the
Baby Unit.
- Baby or Parent Unit near
metal concentration.
- Signal interference due to
other monitors, cordless or
cellular telephones, etc.
- Remove objects from the Baby Unit
at about 1m.
- Test reception by moving the Baby Unit and / or Parent Unit
to different locations throughout the house.
- Press the LINK key of baby unit and select pairing option in
main menu of parent unit to scan the channel.
- Identify and eliminate the source of interference.

11
Audio feedback
(squealing)
- Distance between two units
are too closed.
- Volume is too high.
- Keep away two units at about 1m.
- Lower the volume.
Dark image at
Night
- Power is switched off.
- Batteries may be used up.
- Brightness level is too high /
low.
- Check the Baby Unit and/or Parent Unit power indicator.
- Check the connection of the adaptor
and the Parent unit.
- Charge the battery/Replace new batteries.
- Adjust the Exposure level.
Lose Link
(No signal)
- Baby unit is turned off.
- The units are detected out
of communication range.
- Baby unit is in low power.
- Turn on the Baby unit.
- Ensure both units are in the
communication range.
- Replace new batteries or operated by the supplied adaptor.
THIS PRODUCT COMPLIES WITH EU DIRECTIVE 2012/19/EC.
The crossed bin symbol on the appliance indicates that the product, at the end of its life, must be
disposed of separately from domestic waste, either by taking it to a separate waste disposal site for
electric and electronic appliances or by returning it to your dealer when you buy another similar
appliance. The user is responsible for taking the appliance to a special waste disposal site at the end of
its life. If the end-of-life product is collected correctly as separate waste , it can be recycled, processed
and disposed of ecologically ; this avoids a negative impact on both the environment and human health ,
and contributes towards the recycling of the product’s materials. For further information regarding the
waste disposal services available, contact your local waste disposal agency or the shop where you
bought the appliance.
Declaration of compliance
Hereby, declares that the radio equipment type is in compliance with Directive 2014/53/EU.
The full text of the EU declaration of conformity is available at the following internet address:
Symbols key
Complies with relevant EC directives as amended
Warning!

12
Technical Specification
Parent Unit
1. Operation voltage: DC 5V 1A or 3.7V Li-ion Battery(built-in).
2. Temperature Range : 0℃~40℃
3. Power consumption : ≤2W
Operation Frequency: 2.4GHz~2.4835GHz
4. Max Range (clear line of sight) : up to 250m (in open area)
5. Resolution : 320240 Pixel
6. Image Speed : > 12 films/second
7. LCD : 2.4”Color LCD
8. Size of Hand Held : 120 x 30 x 90 mm
Baby Unit
1. Operation voltage : DC 5.5V 800mA or 3 x “AA”alkaline batteries(not included)
2. Power Output < 3dBm
3. Temperature Range : 0℃~40℃
4. Power consumption : ≤3W
Operation Frequency : 2.4055GHz~2.4775GHz
5. Mic Sensitivity : 1 to 2 meter
6. Size of Baby Unit : 129 88 x 83mm
7. Object Distance : 1-2m

13
FCC Statement
This device complies with part 15 of the FCC rules. Operation is subject to the following two conditions: (1) this
device may not cause harmful interference, and (2) this device must accept any interference received, including
interference that may cause undesired operation.
Changes or modifications not expressly approved by the party responsible for compliance could void the user's
authority to operate the equipment.
NOTE: This equipment has been tested and found to comply with the limits for a Class B digital device, pursuant
to part 15 of the FCC Rules. These limits are designed to provide reasonable protection against harmful
interference in a residential installation. This equipment generates uses and can radiate radio frequency energy
and, if not installed and used in accordance with the instructions, may cause harmful interference to radio
communications. However, there is no guarantee that interference will not occur in a particular installation. If
this equipment does cause harmful interference to radio or television reception, which can be determined by
turning the equipment off and on, the user is encouraged to try to correct the interference by one or more of the
following measures:
•Reorient or relocate the receiving antenna.
•Increase the separation between the equipment and receiver.
•Connect the equipment into an outlet on a circuit different from that to which the receiver is connected.
•Consult the dealer or an experienced radio/TV technician for help.
The device has been evaluated to meet general RF exposure requirement. The device can be used in portable
exposure condition without restriction.
Table of contents