Scandium SCDW6EDSS Owner's manual

INSTALLATION · OPERATION · MAINTENANCE GUIDE
DISHWASHER
SCDW6EDSS/SCDW6EDWH

Page 2
Index
1. Welcome.......................................................................................................................................................................................3
2. Safety Information ........................................................................................................................................................................4
Earthing Instructions ..............................................................................................................................................................................................4
Disposal...................................................................................................................................................................................................................5
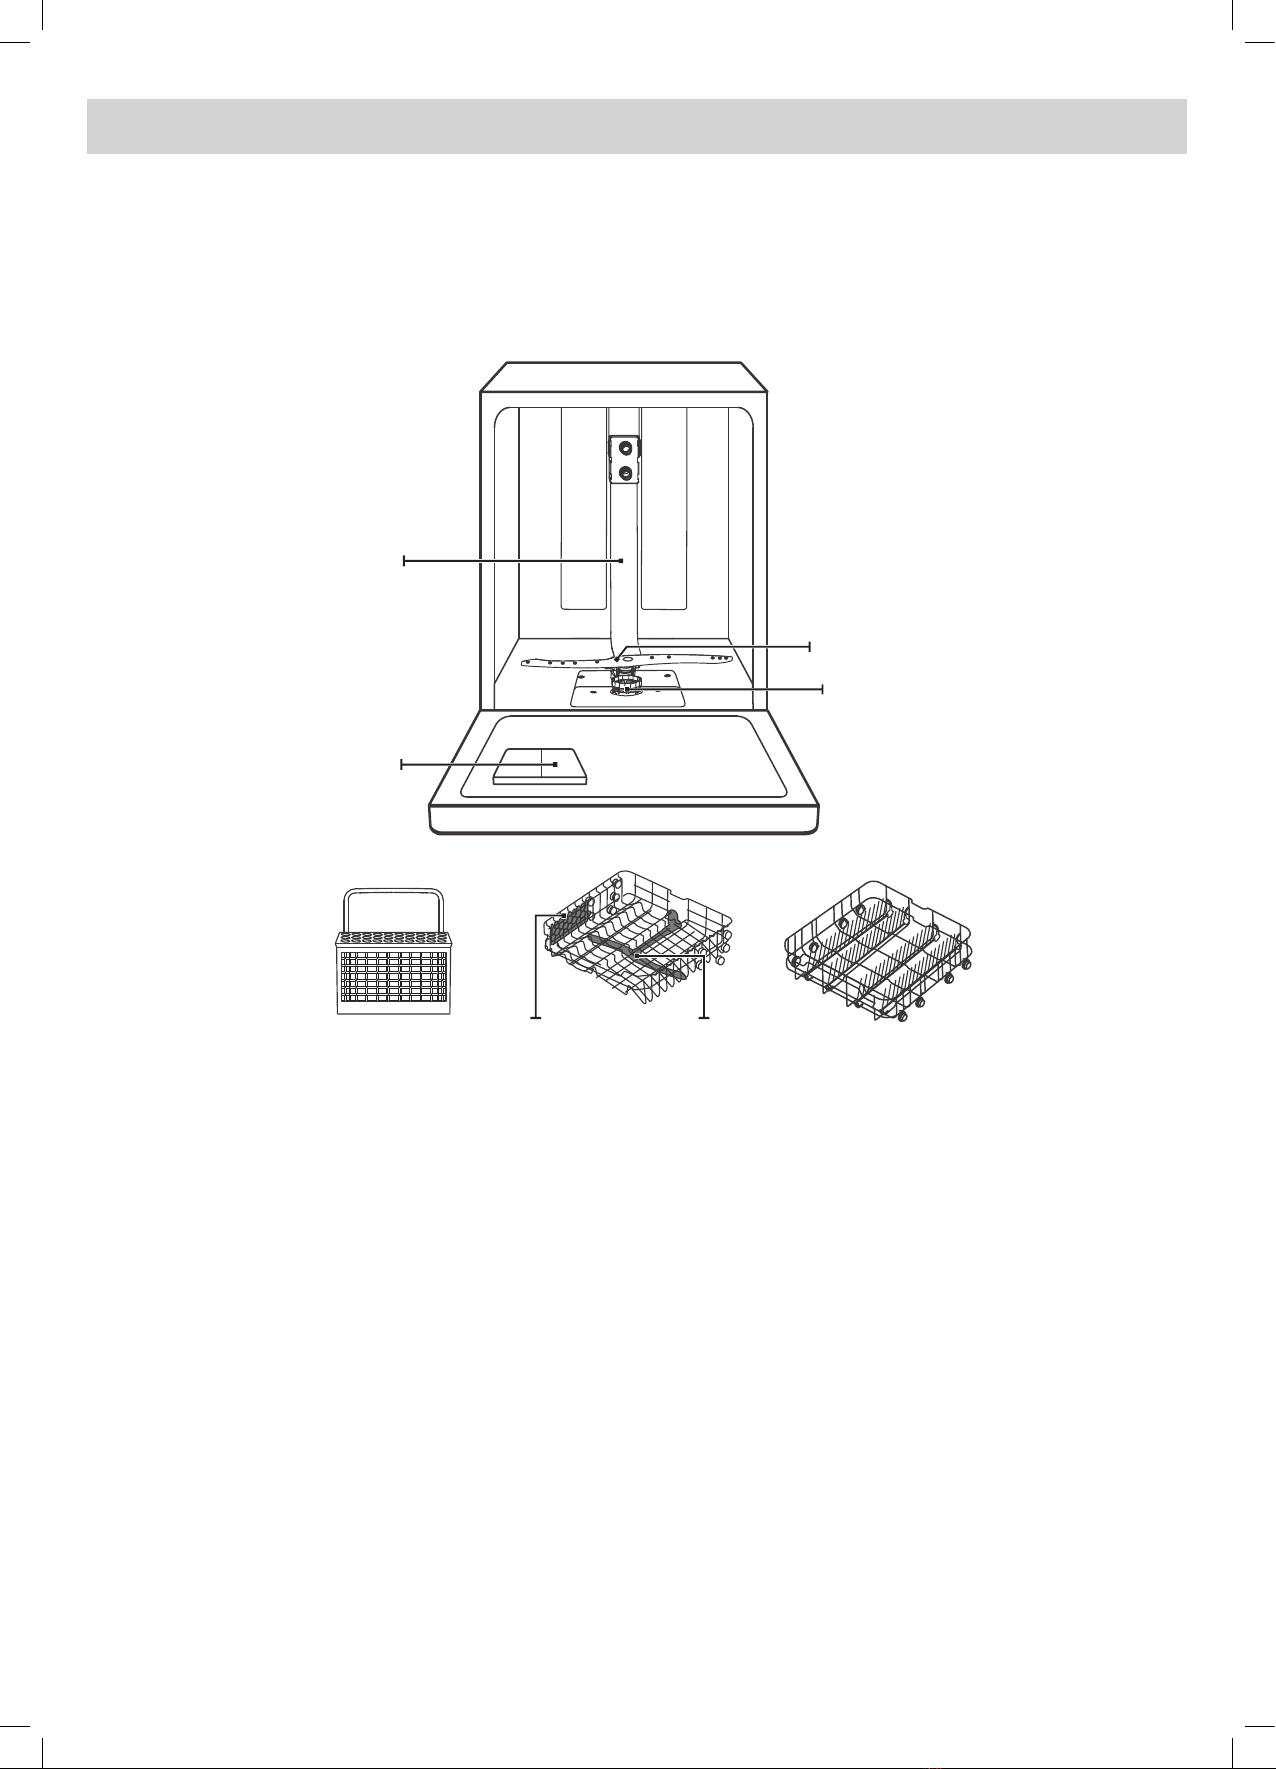
3. Product Overview .........................................................................................................................................................................6
Dishwasher Features ..............................................................................................................................................................................................6
4. Installation ....................................................................................................................................................................................7
About Power Connection ......................................................................................................................................................................................7
Electrical Requirements .........................................................................................................................................................................................7
Electrical Connection.............................................................................................................................................................................................7
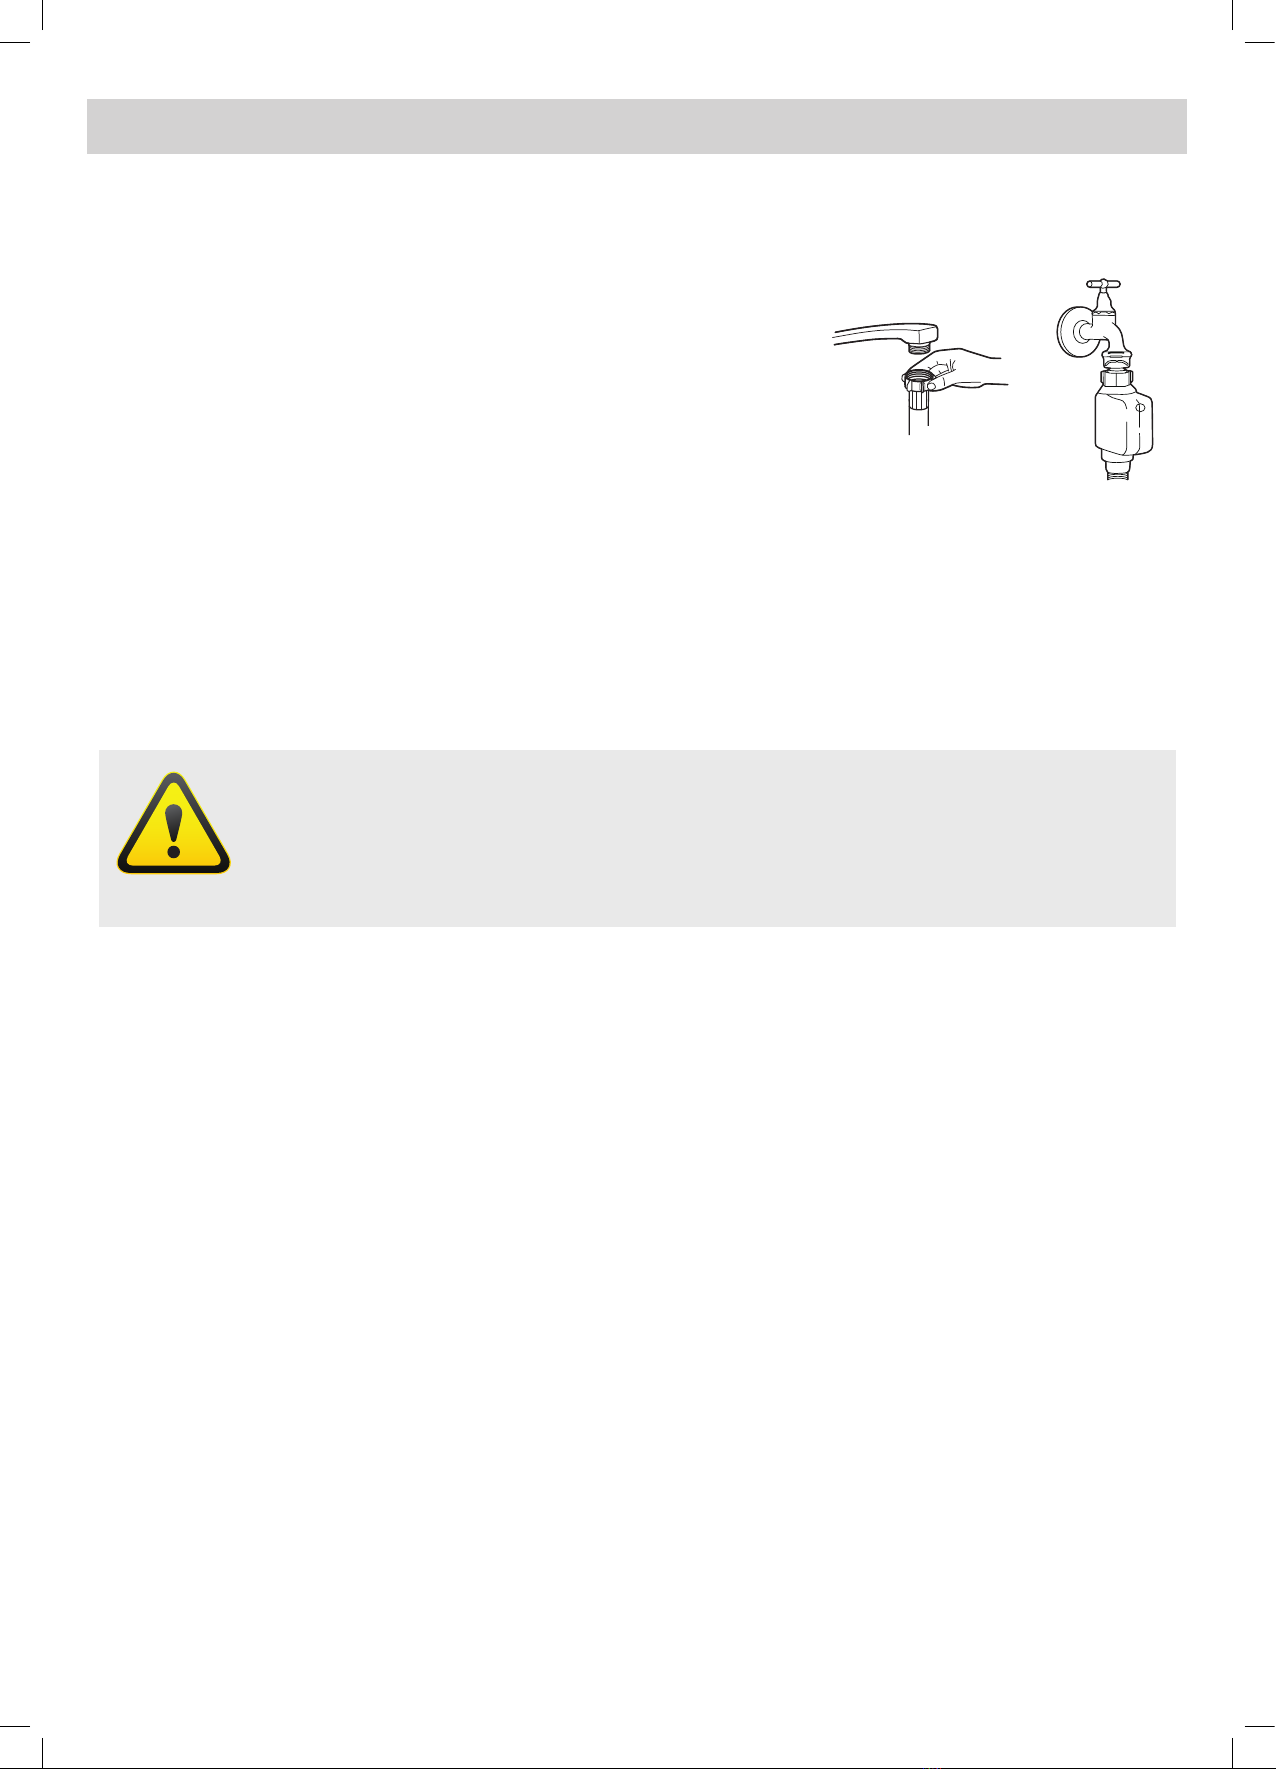
Water Supply and Drain.........................................................................................................................................................................................8
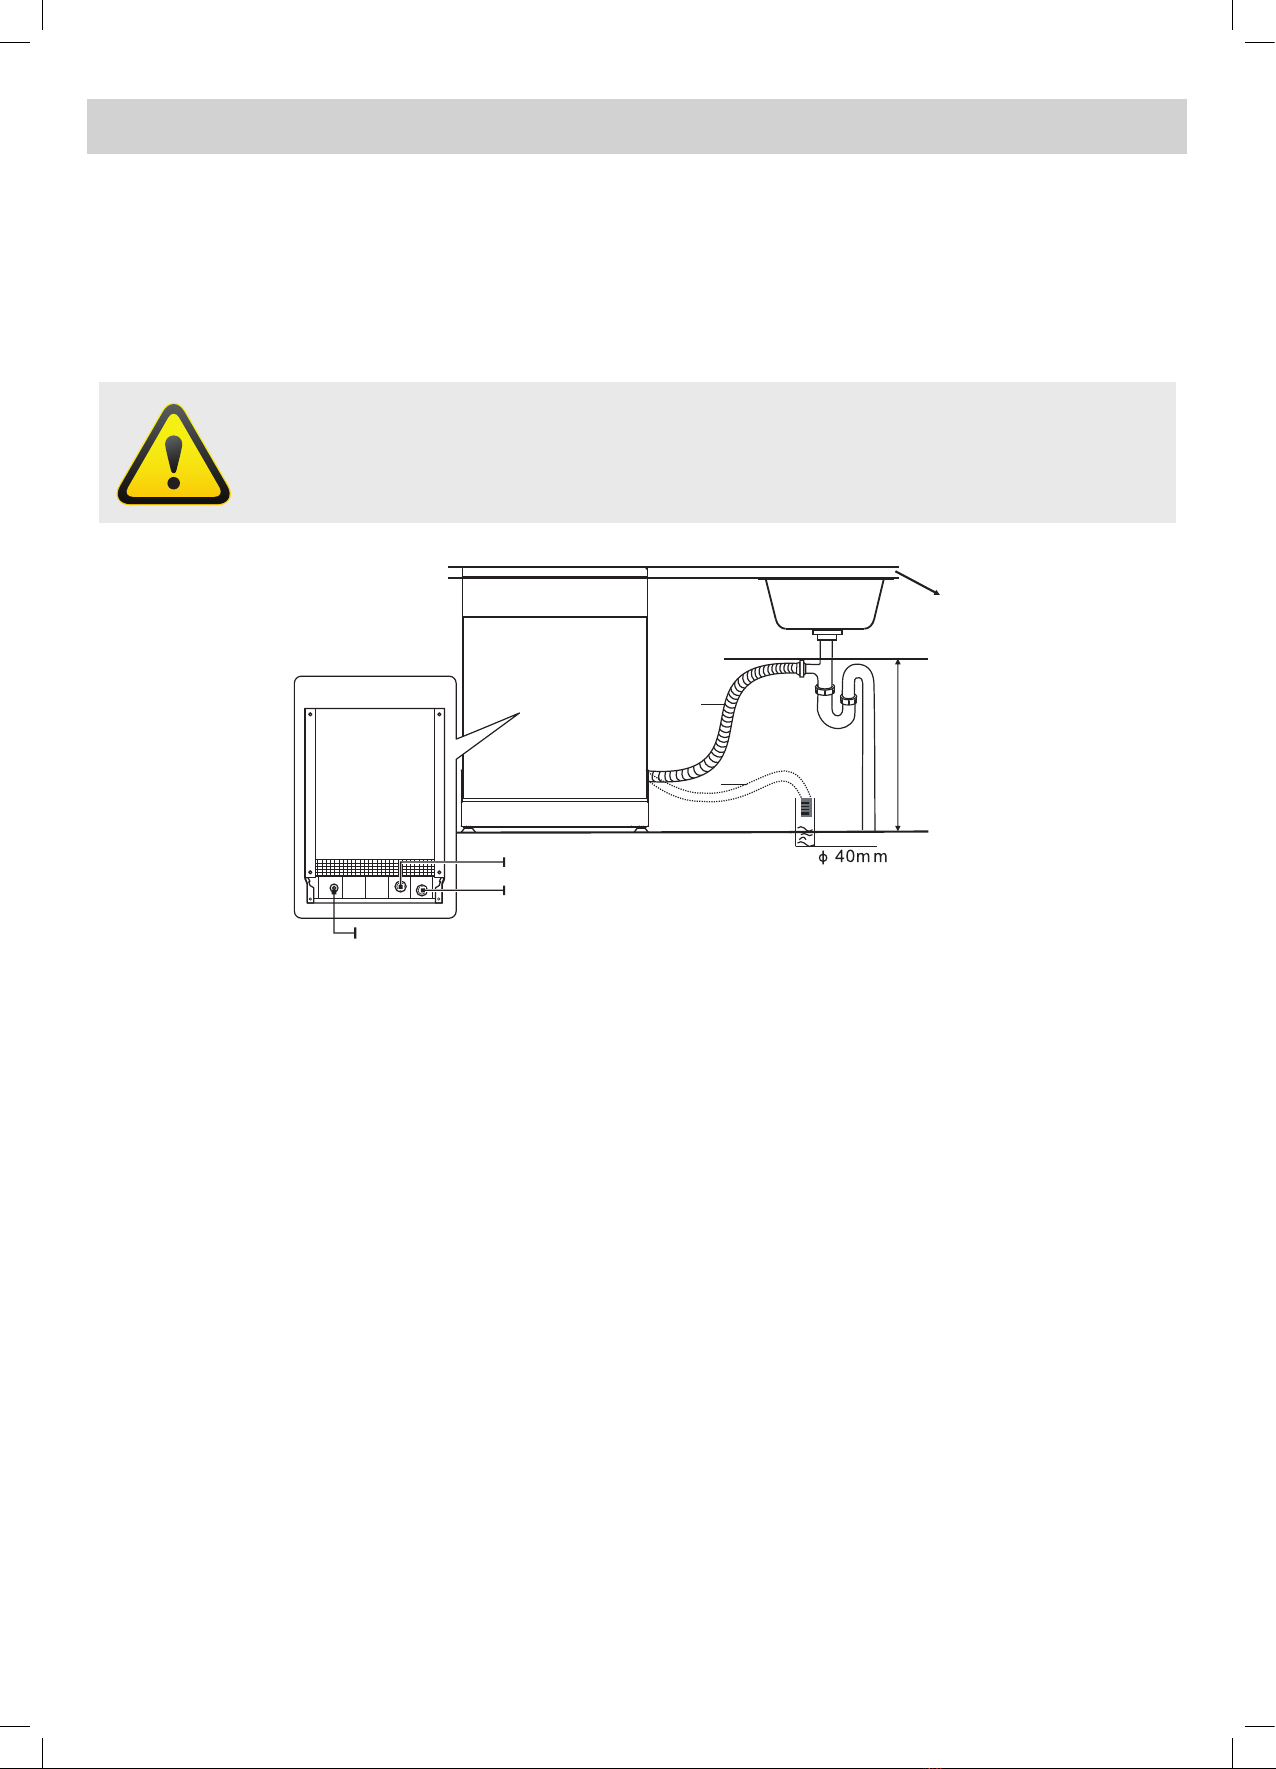
Connection of Drain Hoses ...................................................................................................................................................................................9
How to Drain Excess Water From Hoses..............................................................................................................................................................9
Water Outlet ...........................................................................................................................................................................................................9
Extension Hose.......................................................................................................................................................................................................9
Syphon Connection................................................................................................................................................................................................9
Position the Appliance...........................................................................................................................................................................................10
Free Standing Installation......................................................................................................................................................................................10
Built-In Installation..................................................................................................................................................................................................11
Semi-Integrated Model .........................................................................................................................................................................................12
Full-Integrated Model............................................................................................................................................................................................12
5. Using Your Dishwasher .................................................................................................................................................................15
Control Panel ..........................................................................................................................................................................................................15
Operation (Button) .................................................................................................................................................................................................15
Display.....................................................................................................................................................................................................................16
Wash Cycle Table ...................................................................................................................................................................................................17
Starting a Cycle Wash ............................................................................................................................................................................................18
Changing the Program Mid-Cycle........................................................................................................................................................................18
Error Codes.............................................................................................................................................................................................................19
Forget to Add a Dish?............................................................................................................................................................................................19
Cutlery Basket.........................................................................................................................................................................................................21
6. Using Your Dishwasher .................................................................................................................................................................17
Basket Used Tips ....................................................................................................................................................................................................20
Folding back the Cup Shelives..............................................................................................................................................................................21
Folding Back the Rack Shelives.............................................................................................................................................................................21
Preparing and Loading Dishes..............................................................................................................................................................................22
For Washing the Following Cutlery/Dishes..........................................................................................................................................................22
Recommendations for Loading the Dishwasher..................................................................................................................................................23
Removing the Dishes .............................................................................................................................................................................................23
Loading the Upper Basket.....................................................................................................................................................................................24
Loading the Lower Basket .....................................................................................................................................................................................24
Loading the Cutlery Basket ...................................................................................................................................................................................24
Function of the Rinse Aid and Detergent ............................................................................................................................................................25
When to Rell the Rinse Aid Dispenser................................................................................................................................................................25
Function of Detergent ...........................................................................................................................................................................................25
Filling the Rinse Aid Reservoir...............................................................................................................................................................................26
Adjusting the Rinse Aid Reservoir.........................................................................................................................................................................26
Filling the Detergent Dispenser............................................................................................................................................................................27
7. Loading The Baskets According To As/Nzs 2007.1: ......................................................................................................................28
Upper Basket ..........................................................................................................................................................................................................28
Lower Basket...........................................................................................................................................................................................................28
Cutlery Basket.........................................................................................................................................................................................................29
8. Maintenance and Cleaning............................................................................................................................................................30
External Care ..........................................................................................................................................................................................................30
Internal Care ...........................................................................................................................................................................................................30
Caring for the Dishwasher .....................................................................................................................................................................................33
After Every Wash ....................................................................................................................................................................................................33
Remove the Plug ....................................................................................................................................................................................................33
No Solvents or Abrasive Cleaning ........................................................................................................................................................................33
When Not in Use for a Longtime ..........................................................................................................................................................................33
Moving the Appliance............................................................................................................................................................................................33
9. Troubleshooting............................................................................................................................................................................34
Before Calling for Service......................................................................................................................................................................................34
10. Technical Information....................................................................................................................................................................37
Information..............................................................................................................................................................................................................38
11. Disclaimer .....................................................................................................................................................................................39

Page 3
1. Welcome
Welcome
Thank you for purchasing this Scandium appliance.
To achieve the optimal performance from your appliance, and to avoid the risk of accident or damage, it is
essential to read this manual before installation and rst time use.
This guide contains important information on the use and maintenance of the appliance, as well as important
safety notes.
Your appliance has been thoroughly checked for safety and functionality before being packaged and leaving
the manufacturer.
Please keep this instruction manual in a safe place so you can refer to it at any time.
ATTENTION
Installation, regulation or maintenance, of both gas and electric appliances, should
only be executed by qualied and authorised personnel who are aware of the
installation regulations in force.
Please make sure to read this booklet carefully, containing general instructions for the
Installation, Operation and Maintenance of your appliance, before installation and
operation.
It is extremely useful to know, in detail, the best way of operating and maintaining
this appliance so you can enjoy its benets and be assure of the best results.
Please keep this instruction booklet with the appliance in case you pass it on to
someone else.
IMPORTANT: Upon collection or delivery of the appliance, any damage or defects MUST be reported
within 48 hours to the retailer or the customer service centre, or no claim will be recognised.

Page 4
2. Safety Information
• This appliance is intended to be used in household and similar applications such as:
- staff kitchen areas in shops, ofces and other working environments;
- farm houses;
- by clients in hotels, motels and other residential type environments;
- bed and breakfast type environments.
• This appliance can be used by children aged from 8 years and above and persons with reduced physical,
sensory or mental capabilities or lack of experience and knowledge if they have been given supervision or
instruction concerning use of the appliance in a safe way and understand the hazards involved. Children
shall not play with the appliance. Cleaning and user maintenance shall not be done by children without
supervision. (For EN60335-1)
• This appliance is not intended for use by persons (including children ) with reduced physical, sensory or
mental capabilities, or lack of experience and knowledge, unless they have been given supervision or
instruction concerning use of the appliance by a person responsible for their safety. (For IEC60335-1)
• Packaging material could be dangerous for children!
• This appliance is for indoor household use only.
• To protect against the risk of electrical shock, do not immerse the unit, cord or plug in water or other liquid.
• Please unplug before cleaning and performing maintenance on the appliance.
• Use a soft cloth moistened with mild soap, and then use a dry cloth to wipe it again.
Earthing Instructions
• This appliance must be earthed. In the event of a malfunction or breakdown, earthing will reduce the risk of
an electric shock by providing a path of least resistance of electric current. This appliance is equipped with
an earthing conductor plug.
• The plug must be plugged into an appropriate outlet that i si nstalleda ndearthed in accordance with all
localcodes and ordinances.
• Improper connection of the equipment-earthing conductor can result in the risk of an electric shock.
• Check with a qualied electrician or service representative if you are in doubt whether the appliance is
properly grounded.
• Do not modify the plug provided with the appliance; If it does nott the outlet.
• Have a proper outlet installed by a qualied electrician.
• Do not abuse, sit on, or stand on the door or dish rack of the dishwasher.
• Do not operate your dishwasher unless all enclosure panels are properly in place.
WARNING
• When using your dishwasher, follow the precautions listed below:.

Page 5
2. Safety Information
• Open the door very carefully if the dishwasher is operating, there is a risk of water squirting out.
• Do not place any heavy objects on or stand on the door when it is open. The appliance could tip forward.
• When loading items to be washed:
1) Locate sharp items so that they are not likely to damage the door seal;
2) Warning: Knives and other utensils with sharp points must be loaded in the basket with their points facing
down or placed in a horizontal position.
• Some dishwasher detergents are strongly alkaline. They can be extremely dangerous if swallowed. Avoid
contact with the skin and eyes and keep children away from the dishwasher when the door is open.
• Check that the detergent powder is empty after completion of the wash cycle.
• Do not wash plastic items unless they are marked “dishwasher safe” or the equivalent.
• For unmarked plastic items not so marked, check the manufacturer’s recommendations.
• Use only detergent and rinse agents recommended for use in an automatic dishwasher.
• Never use soap, laundry detergent, or hand washing detergent in your dishwasher.
• The door should not be left open, since this could increase the risk of tripping.
If the supply cord is damaged, it must be replaced by the manufacturer or its service agent or a similarly
qualied person in order to avoid a hazard.
• During installation, the power supply must not be excessively or dangerously bent or attened.
• Do not tamper with controls.
• The appliance needs to be connected to the main water valve using new hose sets. Old sets should not
be reused.
• To save energy, in stand by mode , the appliance will switch off automatically while there is no any operation
in 30 minutes.
Disposal
• For disposing of package and the appliance please go to a recycling centre. Therefore cut off the power
supply cable and make the door closing device unusable.
• Cardboard packaging is manufactured from recycled paper and should be disposed in the waste paper
collection for recycling.
• By ensuring this product is disposed of correctly, you will help prevent potential negative consequences for
the environment and human health, which could otherwise be caused by inappropriate waste handling of
this product
• For more detailed information about recycling of this product, please contact your local city ofce and your
household waste disposal service.
• DISPOSAL: Do not dispose this product as unsorted municipal waste. Collection of such waste separately
for special treatment is necessary.

Page 6
3. Product Overview
IMPORTANT: To get the best performance from your dishwasher, read all operating instructions before using
it for the rst time.
NOTE: Pictures are only for reference, different models may be different. Please prevail in kind.
PRODUCT OVERVIEW
To get the best performance from your dishwasher, read all operating instructions
before using it for the first time.
Dispenser
Filter assembly
Lower spray arm
Inner pipe
IMPORTANT:
8
Cutlery basket
upper spray arm
Upper basket Lower basket
Cup rack
Pictures are only for reference, different models may be different. Please prevail
in kind.
NOTE:

Page 7
4. Installation Instruction
ATTENTION: The installation of the pipes and electrical equipments should be done by professionals.
About Power Connection
Check the rating label for the rating voltage and connect the dishwasher to the appropriate power supply.
Electrical Requirements
Please look at the rating label to know the rating voltage and connect the dishwasher to the appropriate
power supply.Use the required fuse 10A/13A/16A , time delay fuse or circuit breaker recommended and
provide separate circuit serving only this appliance.
Electrical Connection
Ensure the voltage and frequency of the power being corresponds to those on the rating plate. Only insert
the plug into an electrical socket which is earthed properly. If the electrical socket to which the appliance must
be connected is not appropriate for the plug , replace the socket, rather than using a adaptors or the like as
they could cause overheating and burns.
WARNING
For personal safety:
• Do not use an extension cord or an adapter plug with this appliance.
• Do not, under any circumstances, cut or remove the earthing connection from the power cord.
WARNING
ELECTRICAL SHOCK HAZARD: Disconnect electrical power before installing dishwasher.
Failure to do so could result in death or electrical shock.
WARNING
Ensure that proper earthing exists before use

Page 8
Water Supply and Drain
Cold Water Connection
Connect the cold water supply hose to a threaded 3/4(inch) connector
and make sure that it is fastened tightly in place.
If the water pipes are new or have not been used for an extended
period of time, let the water run to make sure that the water is clear.
This precaution is needed to avoid the risk of the water inlet to be
blocked and damage the appliance.
About the Safety Supply Hose
The safety supply hose consists of the double walls. The hose’s system guarantees its intervention by blocking
the ow of water in case of the supply hose breaking and when the air space between the supply hose itself
and the outer corrugated hose is full of water.
How to Connect the Safety Supply Hose
1. Pull The safety supply hoses completely out from storage compartment located at rear of dishwasher.
2. Tighter the screws of the safety supply hose to the faucet with thread 3/4inch.
3. Turn water fully on before starting the dishwasher.
How to Disconnect the Safety Supply Hose
1. Turn off the water.
2. Unscrew the safety supply hose from the faucet.
4. Installation Instruction
Water Supply And Drain
Cold water connection
Connect the cold water supply hose to
a threaded 3/4(inch) connector and
make sure that it is fastened tightly in
place.
If the water pipes are new or have not
been used for an extended period of
time, let the water run to make sure
that the water is clear. This precaution
is needed to avoid the risk of the
water inlet to be blocked and damage
the appliance.
safety supply hose
ordinary supply hose
About the safety supply hose
The safety supply hose consists of the double walls. The hose's system guarantees its
intervention by blocking the flow of water in case of the supply hose breaking and
when the air space between the supply hose itself and the outer corrugated hose is
full of water.
How to connect the safety supply hose
1. Pull The safety supply hoses completely out from storage compartment located at
rear of dishwasher.
2. Tighter the screws of the safety supply hose to the faucet with thread 3/4inch.
3. Turn water fully on before starting the dishwasher.
WARNING
A hose that attaches to a sink spray can burst if it is installed on the same
water line as the dishwasher. If your sink has one, it is recommended thet
the hose be disconnected and the hole plugged.
How to disconnect the safety supply hose
1. Turn off the water.
2. Unscrew the safety supply hose from the faucet.
16
WARNING
A hose that attaches to a sink spray can burst if it is installed on the same water line as the
dishwasher. If your sink has one, it is recommended thet the hose be disconnected and the hole
plugged.

Page 9
4. Installation Instruction
Connection of Drain Hoses
Insert the drain hose into a drain pipe with a minimum diameter of 4 cm, or let it run into the sink, making sure
to avoid bending or crimping it. The height of drain pipe must be less than 1000mm. The free end of the hose
must not be immersed in water to avoid the back ow of it.
How to Drain Excess Water From Hoses
If the sink is 1000 higher from the oor, the excess water in hoses cannot be drained directly into the sink. It will
be necessary to drain excess water from hoses into a bowl or suitable container that is held outside and lower
than the sink.
Water Outlet
Connect the water drain hose. The drain hose must be correctly tted to avoid water leaks. Ensure that the
water drain hose is not kinked or squashed.
Extension Hose
If you need a drain hose extension, make sure to use a similar drain hose. It must be no longer than 4 metres;
otherwise the cleaning effect of the dishwasher could be reduced.
Syphon Connection
The waste connection must be at a height less than 100 cm (maximum) from the bottom of the dish. The water
drain hose should be xed .
Water Supply And Drain
Cold water connection
Connect the cold water supply hose to
a threaded 3/4(inch) connector and
make sure that it is fastened tightly in
place.
If the water pipes are new or have not
been used for an extended period of
time, let the water run to make sure
that the water is clear. This precaution
is needed to avoid the risk of the
water inlet to be blocked and damage
the appliance.
safety supply hose
ordinary supply hose
About the safety supply hose
The safety supply hose consists of the double walls. The hose's system guarantees its
intervention by blocking the flow of water in case of the supply hose breaking and
when the air space between the supply hose itself and the outer corrugated hose is
full of water.
How to connect the safety supply hose
1. Pull The safety supply hoses completely out from storage compartment located at
rear of dishwasher.
2. Tighter the screws of the safety supply hose to the faucet with thread 3/4inch.
3. Turn water fully on before starting the dishwasher.
WARNING
A hose that attaches to a sink spray can burst if it is installed on the same
water line as the dishwasher. If your sink has one, it is recommended thet
the hose be disconnected and the hole plugged.
How to disconnect the safety supply hose
1. Turn off the water.
2. Unscrew the safety supply hose from the faucet.
16
WARNING
Please securely x the drain hose in either position A or position B
Connection Of Drain Hoses
Please securely fix the drain hose in either position A or position B
B
A
MAX 1000mm
Counter
Drain hose
Insert the drain hose into a drain pipe with a minimum diameter of 4 cm, or let it run
into the sink, making sure to avoid bending or crimping it. The height of drain pipe
must be less than 1000mm. The free end of the hose must not be immersed in water
to avoid the back flow of it.
Extension hose
Water outlet
How to drain excess water from hoses
Syphon connection
If the sink is 1000 higher from the floor, the excess water in hoses cannot be drained
directly into the sink. It will be necessary to drain excess water from hoses into a bowl
or suitable container that is held outside and lower than the sink.
Connect the water drain hose. The drain hose must be correctly fitted to avoid water
leaks. Ensure that the water drain hose is not kinked or squashed.
The waste connection must be at a height less than 100 cm (maximum) from the
bottom of the dish. The water drain hose should be fixed .
If you need a drain hose extension, make sure to use a similar drain hose.
It must be no longer than 4 metres; otherwise the cleaning effect of the dishwasher
could be reduced.
17
Back of dishwasher
Water Inlet
Drain Pipe
Mains Cable

Page 10
4. Installation Instruction
Position the Appliance
Position the appliance in the desired location. The back should rest against the wall behind it, and the sides,
along the adjacent cabinets or walls. The dishwasher is equipped with water supply and drain hoses that can
be positioned either to the right or the left sides to facilitate proper installation.
Levelling the appliance
Once the appliance is positioned for levelling, the height of the dishwasher
may be altered via adjustment of the screwing level of the feet.
NOTE: Only apply to the free standing dishwasher.
Free Standing Installation
Fitting between existing carbinets
The height of the dishwasher, 845 mm, has been designed in order to
allow the machine to be tted between existing cabinets of the same
height in modern tted kitchens. The feet can be adjusted so that
correct height is reached.
The laminated top of the machine does not require any particular care
since it is heatproof, scratchproof and stainproof.
Underneath existing work top
(when tting beneath a work top)
In most modern tted kitchens there is only one single work top under which
cabinets and electrical appliances are tted. In this case remove the work top
of the dishwasher by unscrewing the screws under the rear edge of the top (a).
ATTENTION: After removing the work top, the screws MUST BE screwed
again under the rear edge of the top (b).
The height will then be reduced to 815 mm, as scheduled by the International
Regulations (ISO) and the dishwasher will t perfectly under the kitchen
working top
Position The Appliance
Position the appliance in the desired location. The back should rest against the wall
behind it, and the sides, along the adjacent cabinets or walls. The dishwasher is
equipped with water supply and drain hoses that can be positioned either to the right
or the left sides to facilitate proper installation.
Levelling the appliance
Once the appliance is positioned for levelling,
the height of the dishwasher may be altered via
adjustment of the screwing level of the feet.
NOTE:
Only apply to the free standing dishwasher.
18
Free Standing Installation
Fitting between existing carbinets
The height of the dishwasher, 845 mm, has
been designed in order to allow the machine
to be fitted between existing cabinets of the
same height in modern fitted kitchens. The
feet can be adjusted so that correct height is
reached.
The laminated top of the machine does not
require any particular care since it is
heatproof, scratchproof and stainproof.
Underneath existing work top
(when fitting beneath a work top)
In most modern fitted kitchens there is only one
single work top under which cabinets and
electrical appliances are fitted. In this case remove
the work top of the dishwasher by unscrewing the
screws under the rear edge of the top (a).
aa
bb
Built-In Installation(for the integrated model)
Step 1. Selecting the best location for the dishwasher
The installation position of dishwasher should be near the existing inlet and drain hoses
and power cord.
Illustrations of cabinet dimensions and installation position of the dishwasher.
1. Less than 5 mm between the top of dishwasher and cabinet and the outer door
aligned to cabinet.
90 ° 90 °
580mm
820mm
100
Electrical, drain
and water supply
line entrances
Space between cabinet
bottom and floor
600 mm(for 60cm model)
450 mm(for 45cm model)
80
After removing the work top, the screws MUST BE screwed again under the rear edge
of the top (b).
Attention
The height will then be reduced to 815 mm, as scheduled by the International
Regulations (ISO) and the dishwasher will fit perfectly under the kitchen working top
19

Page 11
4. Installation Instruction
Built-In Installation (for the integrated model)
Step 1. Selecting the best location for the dishwasher
The installation position of dishwasher should be near the existing inlet and drain hoses and power cord.
Illustrations of cabinet dimensions and installation position of the dishwasher.
1. Less than 5 mm between the top of dishwasher and cabinet and the outer door aligned to cabinet.
2. If dishwasher is in stalled at the corner of the cabinet, thereshould be some
space when the door is opened.
NOTE: Depending on where your electrical outlet is, you may need to cut a
hole in the opposite cabinet side.
Underneath existing work top
(when fitting beneath a work top)
In most modern fitted kitchens there is only one
single work top under which cabinets and
electrical appliances are fitted. In this case remove
the work top of the dishwasher by unscrewing the
screws under the rear edge of the top (a).
aa
bb
Built-In Installation(for the integrated model)
Step 1. Selecting the best location for the dishwasher
The installation position of dishwasher should be near the existing inlet and drain hoses
and power cord.
Illustrations of cabinet dimensions and installation position of the dishwasher.
1. Less than 5 mm between the top of dishwasher and cabinet and the outer door
aligned to cabinet.
90 ° 90 °
580mm
820mm
100
Electrical, drain
and water supply
line entrances
Space between cabinet
bottom and floor
600 mm(for 60cm model)
450 mm(for 45cm model)
80
After removing the work top, the screws MUST BE screwed again under the rear edge
of the top (b).
Attention
The height will then be reduced to 815 mm, as scheduled by the International
Regulations (ISO) and the dishwasher will fit perfectly under the kitchen working top
19
Step 2. Aesthetic panel's dimensions and installation
2. If dishwasher is in stalled at the corner of the cabinet,
thereshould be some space when the door is opened.
CabinetDishwasher
Door of
dishwasher
Minimum space
of 50mm
NOTE:
Depending on where your electrical outlet is, you may need to cut a hole in the
opposite cabinet side.
20
The aesthetic wooden panel could be processed according to the
installation drawings.
A
Magical paster
Magical paster
Magical paster A and magical paster B be disjoinedon, magical paster A on the
aesthetic wooden panel and felted magical paster B of the outer door of dishwasher
(see figure A). After positioning of the panel, fix the panel onto the outer door by
screws and bolts (See figure B) .
Semi-integrated model
B
2.Pin up the four long screws
1.Take away the four short screws

Page 12
4. Installation Instruction
Step 2. Aesthetic panel’s dimensions and installation
The aesthetic wooden panel could be processed according to the installation drawings.
Semi-Integrated Model
Magical paster A and magical paster B be disjoinedon, magical paster A on the aesthetic wooden panel and
felted magical paster B of the outer door of dishwasher (see gure A). After positioning of the panel, x the
panel onto the outer door by screws and bolts (See gure B)
Full-Integrated Model
Install the hook on the aesthetic wooden panel and put the hook into the slot of the outer door of dishwasher
(see gure A). After positioning of the panel, x the panel onto the outer door by screws and bolts (See gure B).
Step 2. Aesthetic panel's dimensions and installation
2. If dishwasher is in stalled at the corner of the cabinet,
thereshould be some space when the door is opened.
CabinetDishwasher
Door of
dishwasher
Minimum space
of 50mm
NOTE:
Depending on where your electrical outlet is, you may need to cut a hole in the
opposite cabinet side.
20
The aesthetic wooden panel could be processed according to the
installation drawings.
A
Magical paster
Magical paster
Magical paster A and magical paster B be disjoinedon, magical paster A on the
aesthetic wooden panel and felted magical paster B of the outer door of dishwasher
(see figure A). After positioning of the panel, fix the panel onto the outer door by
screws and bolts (See figure B) .
Semi-integrated model
B
2.Pin up the four long screws
1.Take away the four short screws
Step 3. Tension adjustment of the door spring
1. The door springs are set at the factory to
the proper tension for the outer door. If
aesthetic wooden panel are installed, you
will have to adjust the door spring tension.
Rotate the adjusting screw to drive the
adjustor to strain or relax the steel cable.
2. Door spring tension is correct when the
door remains horizontal in the fully opened
position, yet rises to a close with the slight
lift of a finger.
Install the hook on the aesthetic wooden panel and put the hook into the slot of the
outer door of dishwasher (see figure A). After positioning of the panel, fix the panel
onto the outer door by screws and bolts (See figure B).
B
2.Pin up the four long screws
A1.Take away the four short screws
Full-integrated model
21

Page 13
Step 3. Tension adjustment of the door spring
1. The door springs are set at the factory to the proper tension for the
outer door. If aesthetic wooden panel are installed, you will have to
adjust the door spring tension. Rotate the adjusting screw to drive
the adjustor to strain or relax the steel cable.
2. Door spring tension is correct when the door remains horizontal in
the fully opened position, yet rises to a close with the slight lift of
a nger.
Step 4. Dishwasher installation steps
Please refer to the specied installation steps in the installation drawings.
1. Afx the condensation strip under the work surface of cabinet. Please ensure the condensation strip is
ush with edge of work surface. (Step 2)
2. Connect the inlet hose to the cold water supply.
3. Connect the drain hose.
4. Connect the power cord.
5. Place the dishwasher into position. (Step 4)
6. Level the dishwasher. The rear food can be adjusted from the front of the dishwasher by turning the
Philips screw in the middle of the base of dishwasher use an Philips screw. To adjust the front feet, use
a at screw driver and turn the front feet until the dishwasher is level. (Step 5 to Step 6)
7. Install the furniture door to the outer door of the dishwasher. (Step 7 to Step 10)
8. Adjust the tension of the door springs by using an Allen key turning in a clockwise motion to tighten the
left and right door springs. Failure to do this could cause damage to your dishwasher. (Step 11)
9. Connect the drain hose.
A. Normal work surface: Put the installation hook into the slot of the side plane and secure it to the
work surface with the wood screws.
B. Marble or granite work top: Fix the side with Screw.
4. Installation Instruction
Step 3. Tension adjustment of the door spring
1. The door springs are set at the factory to
the proper tension for the outer door. If
aesthetic wooden panel are installed, you
will have to adjust the door spring tension.
Rotate the adjusting screw to drive the
adjustor to strain or relax the steel cable.
2. Door spring tension is correct when the
door remains horizontal in the fully opened
position, yet rises to a close with the slight
lift of a finger.
Install the hook on the aesthetic wooden panel and put the hook into the slot of the
outer door of dishwasher (see figure A). After positioning of the panel, fix the panel
onto the outer door by screws and bolts (See figure B).
B
2.Pin up the four long screws
A1.Take away the four short screws
Full-integrated model
21
Step 4. Dishwasher installation steps
1. Affix the condensation strip under the work surface of cabinet. Please ensure the
condensation strip is flush with edge of work surface. (Step 2)
2. Connect the inlet hose to the cold water supply.
3. Connect the drain hose.
4. Connect the power cord.
5. Place the dishwasher into position. (Step 4)
6. Level the dishwasher. The rear food can be adjusted from the front of the
dishwasher by turning the Philips screw in the middle of the base of dishwasher
use an Philips screw. To adjust the front feet, use a flat screw driver and turn the
front feet until the dishwasher is level. (Step 5 to Step 6)
7. Install the furniture door to the outer door of the dishwasher. (Step 7 to Step 10)
8. Adjust the tension of the door springs by using an Allen key turning in a clockwise
motion to tighten the left and right door springs. Failure to do this could cause
damage to your dishwasher. (Step 11)
9. The dishwasher must be secured in place. There are two ways to do this:
A. Normal work surface: Put the installation hook into the slot of the side plane and
secure it to the work surface with the wood screws.
B. Marble or granite work top: Fix the side with Screw.
A
B
22
Please refer to the specified installation steps in the installation
drawings.

Page 14
Step 5. Levelling the dishwasher
Dishwasher must be level for proper dish rack operation and wash performance.
1. Place a spirit level on door and rack track inside the tub as shown to check that the dishwasher is level.
2. Level the dishwasher by adjusting the three levelling legs individually.
3. When level the dishwasher, please pay attention not to let the dishwasher tip over.
NOTE: The maximum adjustment height of the feet is 50 mm.
4. Installation Instruction
UP
DOWN
Check level
front to back
Check level
side to side
Step 5. Levelling the dishwasher
Dishwasher must be level for proper dish rack operation and wash performance.
Place a spirit level on door and rack track inside the tub as shown to check that the
dishwasher is level.
Level the dishwasher by adjusting the three levelling legs individually.
When level the dishwasher, please pay attention not to let the dishwasher tip over.
1.
2.
3.
The maximum adjustment height of the feet is 50 mm.
NOTE:
23

Page 15
5. Using Your Dishwasher
Control Panel
Operation (Button)
1. Switch on the
appliance Press this button to turn on your dishwasher, the screen lights up.
2. Delay
Press the Delay button to increase the delay start time. Delay a cycle for up
to 24 hours in one-hour increments. After setting the delay time, press the
Start/Pause button to start.
3. Program Press this button to select the appropriate washing program, the selected
program indicator will be lit.
4. Start /Pause Press the button to start the selected washing program or pause the working
program.
4
USING YOUR DISHWASHER
Control Panel
Operation (Button)
Power
Program
Press this button to turn on your dishwasher, the screen lights up.
1
4
Delay
3
Start /Pause Press the button to start the selected washing program or pause
the working program.
Press the Delay button to increase the delay start time. Delay a
cycle for up to 24 hours in one-hour increments. After setting the
delay time, press the Start/Pause button to start.
Press this button to select the appropriate washing program,
the selected program indicator will be lit..
2
7
3
1
6 4
28
5 3
Display
Intensive
For heaviest soiled crockery, such as pots, pans, casserole
dishes and dishes that have been sitting with dried food
on them for a while.
Program
indicator
5
1
2
3
4

Page 16
Display
5. Program indicator Intensive For heaviest soiled crockery, such as pots, pans, casserole dishes
and dishes that have been sitting with dried food on them for a while.
Heavy For heavily soiled loads, such as pots, plates, glasses and lightly
soiled pans.
ECO For normally soiled loads, such as pots, plates, glasses and lightly
soiled pans, standard daily cycle.
Glass For lightly soiled crockery and glass.
90 Min For lightly soiled plates and pans that need quick wash.
Rapid A shorter wash for lightly soiled loads that do not need drying.
6. Warning indicator Rinse Aid If the “ ” indicator is lit, it means the dishwasher is low on
dishwasher rinse aid and requires a rell.
7. Progress indicator Program end when the program is end, the indicator will be lit.
8. Screen To show the reminding time, delay time, error code etc.
5. Using Your Dishwasher
5
when the program is end, the indicator will be lit.
Program end
Rinse Aid
If the “ ” indicator is lit, it means the dishwasher is low
on dishwasher rinse aid and requires a refill.
Program
indicator
5
Warning
indicator
6
Progress
indicator
7
Glass
For lightly soiled crockery and glass.
Rapid
A shorter wash for lightly soiled loads that do not
need drying.
90 Min
For lightly soiled plates and pans that need quick wash.
Heavy
For heavily soiled loads, such as pots, plates, glasses
and lightly soiled pans.
ECO
For normally soiled loads, such as pots, plates, glasses
and lightly soiled pans, standard daily cycle.
screen To show the reminding time, delay time, error code etc.
8
5
6
7
8

Page 17
5. Programming The Dishwasher
Wash Cycle Table
The table below shows which programs are best for the levels of food residue on them and how much
detergent is needed. It also show various information about the programs.
( l ) Means: need to ll rinse into the Rinse-Aid Dispenser.
Program Description
Of Cycle
Detergent
Pre/Main
Running
Time(min)
Energy
(Kwh)
Water
(L)
Rinse
Aid
INTENSIVE Pre-wash (50ºC)
Wash (60ºC)
Rinse
Rinse
Rinse (65ºC)
Drying
5/27.5g
(Or All in 1 170 1.6 18.5
HEAVY Pre-wash (45ºC)
Wash (55ºC)
Rinse
Rinse (65ºC)
Drying
5/27.5g
(Or All in 1 160 1.4 15
ECO
(*AS/NZS 2007.1)
Pre-wash
Wash (45ºC)
Rinse (50ºC)
Drying
5/27.5g
(Or All in 1 170 0.69 10.2
GLASS Pre-wash
Wash (42ºC)
Rinse
Rinse (60ºC)
Drying
5/27.5g
(Or All in 1 125 0.9 14.5
90 min Wash (65ºC)
Rinse
Rinse (65ºC)
Drying
30g
(Or All in 1 90 1.2 11.5
RAPID Wash (40ºC)
Rinse
Rinse (45ºC) 25g 30 0.6 11.5
NOTE:
*AS/NZS 2007.1 The information for comparability
test in accordance with :*AS/NZS 2007.1.
90’

Page 18
5. Programming The Dishwasher
Before using your dishwasher:
1. Loading the basket (refer to page 24)
2. Fill the rinse aid dispenser (refer to page 26)
3. Fill in detergent (refer to page 27)
Starting a Cycle Wash
1. Draw out the lower and upper basket, load the dishes and push them back. It is commended to load
the lower basket rst, then the upper one.
2. Pour in the detergent. (Refer to page 27)
3. Insert the plug into the socket. The power supply refer to last page ”Product che”. Make sure that
the water supply is turned on to full pressure.
4. Close the door, press the Power button, to switch on the machine.
5. Choose a program, the response light will turn on. Then press the Start/Pause button, the dishwasher
will start its cycle.
Changing the Program Mid-Cycle
A wash cycle can only be changed if it has been running for a short time otherwise, the detergent may have
already been released and the dishwasher may have already drained the wash water. If this is the case, the
dishwasher needs to be reset and the detergent dispenser must be relled. To reset the dishwasher, follow the
instructions below:
1. Press the Start/Pause button to pause the washing.
2. Press program button for more than 3 seconds - the program will cancel.
3. Press the program button to select the desired program.
4. Press the Start/Pause button, after 10 seconds, the dishwasher will start.
Starting A Cycle Wash
1. Draw out the lower and upper basket, load the dishes and push them back.
It is commended to load the lower basket first, then the upper one.
2. Pour in the detergent.
3. Insert the plug into the socket. The power supply refer to last page ”Product fiche”.
Make sure that the water supply is turned on to full pressure.
4. Close the door, press the Power button, to switch on the machine.
5. Choose a program, the response light will turn on. Then press the Start/Pause
button, the dishwasher will start its cycle.
Changing The Program Mid-cycle
A wash cycle can only be changed if it has been running for a short time otherwise,
the detergent may have already been released and the dishwasher may have already
drained the wash water. If this is the case, the dishwasher needs to be reset and the
detergent dispenser must be refilled. To reset the dishwasher, follow the
instructions below:
1. Press the Start/Pause button to pause the washing.
2. Press program button for more than 3 seconds - the program will cancel.
3. Press the program button to select the desired program.
4. Press the Start/Pause button, after 10 seconds, the dishwasher will start.
3 sec
13
*AS/NZS 2007.1
test in accordance with
:
*AS/NZS 2007.1.
This program is the test cycle. The information for comparability
NOTE:
Forget To Add A Dish?
A forgotten dish can be added any time before the detergent dispenser opens. If
this is the case, follow the instructions below:
1. Press the Start/Pause button to pause the washing.
2. Wait 5 seconds then open the door.
3. Add the forgotten dishes.
4. Close the door.
5. Press the Start/Pause button after 10 seconds, the dishwasher will start.
After 5 sec
WARNING
It is dangerous to open the door
mid-cycle, as hot steam may
scald you.
14
USING YOUR DISHWASHER
1. Loading the basket
2. Fill the rinse aid dispenser (Please check the section 1 of PART Ⅱ: Special Version)
3. Fill in detergent (Please check the section 1 of PART Ⅱ: Special Version)
9
Adjusting the upper basket
The height of the upper basket can be easily adjusted to accommodate taller dishes
in either the upper or lower basket.
To adjust the height of the upper rack, follow these steps:
4
1Pull out upper basket. 2Remove upper basket.
3Re-attach upper basket to the upper
or lower rollers.
Push in upper basket.
lower position
upper position
Type 1:
Basket Used Tips
Before using your dishwasher :
Inside Outside

Page 19
5. Programming The Dishwasher
If there is a malfunction, the dishwasher will display error codes to identify these:
Codes Meanings Possible Causes
E1 Longer inlet time. Faucets is not opened, or water intake is restricted, or water
pressure is too low.
E3 Not reaching required
temperature.
Malfunction of heating element.
E4 Overow. Some elements of dishwasher leak.
*Please also refer to Troubleshooting Guide 34
WARNING
• If overow occurs, turn off the main water supply before calling a service.
• If there is water in the base pan because of an overll or small leak, the water should be
removed before restarting the dishwasher.
Error Codes
Forget to Add a Dish?
A forgotten dish can be added any time before the detergent dispenser opens. If this is the case, follow the
instructions below:
1. Press the Start/Pause button to pause the washing.
2. Wait 5 seconds then open the door.
3. Add the forgotten dishes.
4. Close the door.
5. Press the Start/Pause button after 10 seconds, the dishwasher will start.
Forget To Add A Dish?
A forgotten dish can be added any time before the detergent dispenser opens. If
this is the case, follow the instructions below:
1. Press the Start/Pause button to pause the washing.
2. Wait 5 seconds then open the door.
3. Add the forgotten dishes.
4. Close the door.
5. Press the Start/Pause button after 10 seconds, the dishwasher will start.
After 5 sec
WARNING
It is dangerous to open the door
mid-cycle, as hot steam may
scald you.
14
WARNING
It is dangerous to open the door mid-cycle, as hot steam may scald you.

Page 20
Basket Used Tips
Adjusting the upper basket
Type
The height of the upper basket can be easily adjusted to accommodate taller dishes in either the upper or
lower basket.To adjust the height of the upper rack, follow these steps:
6. Using Your Dishwasher
USING YOUR DISHWASHER
1. Loading the basket
2. Fill the rinse aid dispenser (Please check the section 1 of PART Ⅱ: Special Version)
3. Fill in detergent (Please check the section 1 of PART Ⅱ: Special Version)
9
Adjusting the upper basket
The height of the upper basket can be easily adjusted to accommodate taller dishes
in either the upper or lower basket.
To adjust the height of the upper rack, follow these steps:
4
1Pull out upper basket. 2Remove upper basket.
3Re-attach upper basket to the upper
or lower rollers.
Push in upper basket.
lower position
upper position
Type 1:
Basket Used Tips
Before using your dishwasher :
Inside Outside
This manual suits for next models
1
Table of contents
Other Scandium Dishwasher manuals