6
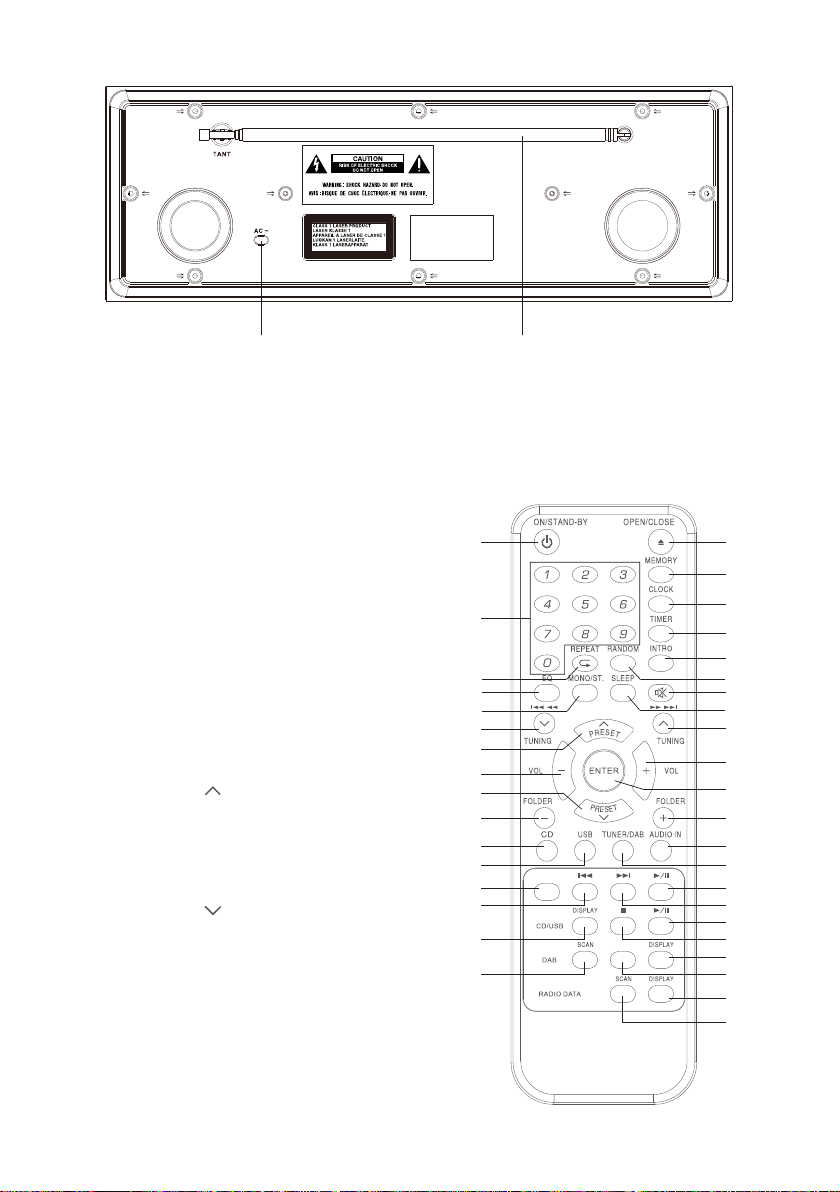
1. Mains Cable 2. FM Aerial
9
remote control
1. STANDBY Button
Switch the unit between the ON and
STANDBY modes.
2. Number buttons
3. REPEAT Button
Set repeat function.
4. EQ Button
Select the EQ (Equaliser) mode.
5. SELECT/MONO/ST. Button
Switch between mono or stereo in FM mode.
6. Button
t4LJQCBDLXBSETUPUIFCFHJOOJOHPGUIF
USBDLPSUPUIFQSFWJPVTUSBDL
t"MMPXGBTUSFWFSTJOHPGUIFDVSSFOUUSBDL
t4FBSDIGPSBSBEJPTUBUJPOHPJOHCBDLXBSET
UISPVHIBDDFTTJCMFSBEJPGSFRVFODJFT
7. PRESET Button
t4FMFDUBQSFTFUTUBUJPOVQJO%"#PS
FM mode.
8. VOLUME – Buttons
Decrease volum
9. PRESET Button
t4FMFDUBQSFTFUTUBUJPOEPXOJO%"#PS
FM mode.
10. FOLDER - Button
Select oder down in CD or USB mode.
B LU E TOOTH
ME NU
4
6
7
8
9
5
1
2
3
13
15
17
19
20
21
22
23
24
25
26
27
28
29
30
31
32
33
34
35
36
37
38
16
18
11
10
12
14
rear view
12
1. Mains Cable 2. FM Aerial
9
remote control
1. STANDBY Button
Switch the unit between the ON and
STANDBY modes.
2. Number buttons
3. REPEAT Button
Set repeat function.
4. EQ Button
Select the EQ (Equaliser) mode.
5. SELECT/MONO/ST. Button
Switch between mono or stereo in FM mode.
6. Button
t4LJQCBDLXBSETUPUIFCFHJOOJOHPGUIF
USBDLPSUPUIFQSFWJPVTUSBDL
t"MMPXGBTUSFWFSTJOHPGUIFDVSSFOUUSBDL
t4FBSDIGPSBSBEJPTUBUJPOHPJOHCBDLXBSET
UISPVHIBDDFTTJCMFSBEJPGSFRVFODJFT
7. PRESET Button
t4FMFDUBQSFTFUTUBUJPOVQJO%"#PS
FM mode.
8. VOLUME – Buttons
Decrease volum
9. PRESET Button
t4FMFDUBQSFTFUTUBUJPOEPXOJO%"#PS
FM mode.
10. FOLDER - Button
Select oder down in CD or USB mode.
B LU E TOOTH
ME N U
4
6
7
8
9
5
1
2
3
13
15
17
19
20
21
22
23
24
25
26
27
28
29
30
31
32
33
34
35
36
37
38
16
18
11
10
12
14
Remote control
1. STANDBY Button
Switch the unit between the ON
and STANDBY modes.
2. Number buttons
3. REPEAT Button
Set repeat function.
4. EQ Button
Select the EQ (Equaliser) mode.
5. SELECT/MONO/ST. Button
Switch between mono or stereo
in FM mode.
6.
7
12. USB Button
switch to USB operating mode.
13. BLUETOOTH Button
switch to Bluetooth operating mode.
14. I◄◄ Button
Skip backwards to the beginning of the track or to the previous
track in bluetooth mode.
15. Display Button
Display track information in CD or USB mode.
16. SCAN Button
Auto-scan in DAB mode.
17. OPEN/CLOSE Buttons
open and close disc compartment.
18. MEMORY Button
Press to show preset stations in DAB or FM mode.
Press to programme preset station in DAB or FM mode.
19. CLOCK Button
Press to show the clock.
Press and hold to enter clock setup in Standby mode.
20. TIMER Button
Setup an alarm timer.
21. INTRO Button
Play soundtrack for 10 seconds.
22. RANDOM Button
Set to random playback.
23. MUTE Button
Silence the unit or restore the sound.
24. SLEEP Button
Select a sleep timer.
25. I►► Button
skip forwards to the next track.
Allow fast forwarding of the current track.
Search for a radio station going forwards through accessible radio
frequecides.
26. VOLUME + Buttons
Increase the volume.
27. ENTER Button
conrmselection.
28. FOLDER + Button
SelectoderupinCDorUSBmode.
29. AUDIO IN Button
switch to AUDIO IN operating mode.
Button
7. PRESET
6
Remote control
1. STANDBY Button
Switch the unit between the
ON and STANDBY modes.
2. Number buttons
3. REPEAT Button
Set repeat function.
4. EQ Button
Select the EQ (Equaliser) mode.
5. SELECT/MONO/ST. Button
Switch between mono or
stereo in FM mode.
6. I◄◄ Button
7 PRESET Button
SelectoderdowninCD
or USB mode.
8. VOLUME Buttons
Decrease volum
9. PRESET Button
Select a preset station down
in DAM or FM mode.
10. FOLDER Button
SelectoderdowninCD
or USB mode.
11. CD Button
switch to CD operating mode.
1. Mains Cable 2. FM Aerial
9
remote control
1. STANDBY Button
Switch the unit between the ON and
STANDBY modes.
2. Number buttons
3. REPEAT Button
Set repeat function.
4. EQ Button
Select the EQ (Equaliser) mode.
5. SELECT/MONO/ST. Button
Switch between mono or stereo in FM mode.
6. Button
t4LJQCBDLXBSETUPUIFCFHJOOJOHPGUIF
USBDLPSUPUIFQSFWJPVTUSBDL
t"MMPXGBTUSFWFSTJOHPGUIFDVSSFOUUSBDL
t4FBSDIGPSBSBEJPTUBUJPOHPJOHCBDLXBSET
UISPVHIBDDFTTJCMFSBEJPGSFRVFODJFT
7. PRESET Button
t4FMFDUBQSFTFUTUBUJPOVQJO%"#PS
FM mode.
8. VOLUME – Buttons
Decrease volum
9. PRESET Button
t4FMFDUBQSFTFUTUBUJPOEPXOJO%"#PS
FM mode.
10. FOLDER - Button
Select oder down in CD or USB mode.
B LUE TOOTH
ME N U
4
6
7
8
9
5
1
2
3
13
15
17
19
20
21
22
23
24
25
26
27
28
29
30
31
32
33
34
35
36
37
38
16
18
11
10
12
14
rear view
12
1. Mains Cable 2. FM Aerial
9
remote control
1. STANDBY Button
Switch the unit between the ON and
STANDBY modes.
2. Number buttons
3. REPEAT Button
Set repeat function.
4. EQ Button
Select the EQ (Equaliser) mode.
5. SELECT/MONO/ST. Button
Switch between mono or stereo in FM mode.
6. Button
t4LJQCBDLXBSETUPUIFCFHJOOJOHPGUIF
USBDLPSUPUIFQSFWJPVTUSBDL
t"MMPXGBTUSFWFSTJOHPGUIFDVSSFOUUSBDL
t4FBSDIGPSBSBEJPTUBUJPOHPJOHCBDLXBSET
UISPVHIBDDFTTJCMFSBEJPGSFRVFODJFT
7. PRESET Button
t4FMFDUBQSFTFUTUBUJPOVQJO%"#PS
FM mode.
8. VOLUME – Buttons
Decrease volum
9. PRESET Button
t4FMFDUBQSFTFUTUBUJPOEPXOJO%"#PS
FM mode.
10. FOLDER - Button
Select oder down in CD or USB mode.
B LU E TOOTH
ME NU
4
6
7
8
9
5
1
2
3
13
15
17
19
20
21
22
23
24
25
26
27
28
29
30
31
32
33
34
35
36
37
38
16
18
11
10
12
14
Button
Select a preset station up in DAB
or FM mode.
8. VOLUME - Buttons
Decrease volume
9. PRESET
6
Remote control
1. STANDBY Button
Switch the unit between the
ON and STANDBY modes.
2. Number buttons
3. REPEAT Button
Set repeat function.
4. EQ Button
Select the EQ (Equaliser) mode.
5. SELECT/MONO/ST. Button
Switch between mono or
stereo in FM mode.
6. I◄◄ Button
7 PRESET Button
SelectoderdowninCD
or USB mode.
8. VOLUME Buttons
Decrease volum
9. PRESET Button
Select a preset station down
in DAM or FM mode.
10. FOLDER Button
SelectoderdowninCD
or USB mode.
11. CD Button
switch to CD operating mode.
1. Mains Cable 2. FM Aerial
9
remote control
1. STANDBY Button
Switch the unit between the ON and
STANDBY modes.
2. Number buttons
3. REPEAT Button
Set repeat function.
4. EQ Button
Select the EQ (Equaliser) mode.
5. SELECT/MONO/ST. Button
Switch between mono or stereo in FM mode.
6. Button
t4LJQCBDLXBSETUPUIFCFHJOOJOHPGUIF
USBDLPSUPUIFQSFWJPVTUSBDL
t"MMPXGBTUSFWFSTJOHPGUIFDVSSFOUUSBDL
t4FBSDIGPSBSBEJPTUBUJPOHPJOHCBDLXBSET
UISPVHIBDDFTTJCMFSBEJPGSFRVFODJFT
7. PRESET Button
t4FMFDUBQSFTFUTUBUJPOVQJO%"#PS
FM mode.
8. VOLUME – Buttons
Decrease volum
9. PRESET Button
t4FMFDUBQSFTFUTUBUJPOEPXOJO%"#PS
FM mode.
10. FOLDER - Button
Select oder down in CD or USB mode.
B LUE TOOTH
ME N U
4
6
7
8
9
5
1
2
3
13
15
17
19
20
21
22
23
24
25
26
27
28
29
30
31
32
33
34
35
36
37
38
16
18
11
10
12
14
rear view
12
1. Mains Cable 2. FM Aerial
9
remote control
1. STANDBY Button
Switch the unit between the ON and
STANDBY modes.
2. Number buttons
3. REPEAT Button
Set repeat function.
4. EQ Button
Select the EQ (Equaliser) mode.
5. SELECT/MONO/ST. Button
Switch between mono or stereo in FM mode.
6. Button
t4LJQCBDLXBSETUPUIFCFHJOOJOHPGUIF
USBDLPSUPUIFQSFWJPVTUSBDL
t"MMPXGBTUSFWFSTJOHPGUIFDVSSFOUUSBDL
t4FBSDIGPSBSBEJPTUBUJPOHPJOHCBDLXBSET
UISPVHIBDDFTTJCMFSBEJPGSFRVFODJFT
7. PRESET Button
t4FMFDUBQSFTFUTUBUJPOVQJO%"#PS
FM mode.
8. VOLUME – Buttons
Decrease volum
9. PRESET Button
t4FMFDUBQSFTFUTUBUJPOEPXOJO%"#PS
FM mode.
10. FOLDER - Button
Select oder down in CD or USB mode.
B LU E TOOTH
ME NU
4
6
7
8
9
5
1
2
3
13
15
17
19
20
21
22
23
24
25
26
27
28
29
30
31
32
33
34
35
36
37
38
16
18
11
10
12
14
Button
Select a preset station down in
DAB or FM mode.
10. FOLDER - Button
Select folder down in CD or USB
mode.
11. CD Button
switch to CD operating mode.
1. Mains Cable 2. FM Aerial