Schumacher SL1467 User manual

CONTENTS
IMPORTANT SAFETY INSTRUCTIONS – SAVE THESE INSTRUCTIONS..........................................................................................................3
PERSONAL SAFETY PRECAUTIONS...................................................................................................................................................................3
ASSEMBLY INSTRUCTIONS.................................................................................................................................................................................3
FEATURES.............................................................................................................................................................................................................3
LCD SCREEN.........................................................................................................................................................................................................4
OPERATING INSTRUCTIONS ...............................................................................................................................................................................4
MAINTENANCE AND CARE ..................................................................................................................................................................................5
WARNINGS ............................................................................................................................................................................................................6
TROUBLESHOOTING............................................................................................................................................................................................6
SPECIFICATIONS ..................................................................................................................................................................................................6
REPLACEMENT PARTS ........................................................................................................................................................................................6
BEFORE RETURNING FOR REPAIRS..................................................................................................................................................................6

• 3 •
1. IMPORTANT SAFETY INSTRUCTIONS – SAVE THESE INSTRUCTIONS
1.1 SAVE THESE INSTRUCTIONS – This manual contains important safety and operating instructions.
1.2 This product is not intended for use by children.
1.3 If someone else uses the unit, ensure they are well informed on how to use it safely, and have read and understood the operating instructions.
1.4 Do not use near ammable fumes or gases, such as in the bilge of a gasoline-powered boat or near propane tanks.
1.5 Do not use in an enclosure containing automotive-type lead-acid batteries.
1.6 Do not expose the unit to temperatures over 104 °F (40 °C).
1.7 Do not operate the unit with damaged cord or plug – replace the cord or plug immediately.
1.8 Do not recharge the unit with a damaged extension cord.
1.9 Do not operate the unit if it has received a sharp blow, been dropped, or otherwise damaged in any way; take it to a qualied service person.
1.10 Do not disassemble the unit. If repair is required, contact Customer Service for assistance.
1.11 To reduce risk of electric shock, unplug the unit from the outlet before attempting any maintenance or cleaning. Turning off controls will not reduce this risk.
1.12 The unit gets uncomfortably warm during use and must have proper ventilation. Ensure at least 3 in. (7.5 cm) air space is maintained on all sides of the unit.
1.13 Do not set the unit on ammable materials, such as carpeting, upholstery, paper, cardboard, etc. During operation, keep unit away from materials that can be affected by high
temperatures, such as blankets, pillows and sleeping bags.
2. PERSONAL SAFETY PRECAUTIONS
WARNING! Restrictions on Use.
2.1 This unit may not be used with life support devices or systems. Failure of this device can reasonably be expected to cause failure of that life support device or system,
or to affect the safety or effectiveness of that device or system.
2.2 When working on electrical equipment, always ensure someone is nearby to aid you in case of an emergency.
3. ASSEMBLY INSTRUCTIONS
3.1 Remove all cord wraps and uncoil the cables prior to using the unit.
4. FEATURES
1. Handle
2. AC charger input socket
3. LED Light
4. Light button
5. 2.4A USB ports (3)
6. 3A USB port
7. USB output button
8. 12V DC output ports (2)
9. 12V DC cigarette outlet output port
10. DC output button
11. 110V AC power outlets (2)
12. AC output button
13. Main Power button
14. LCD display
1
2
14
13
12
11
10
9
8
765
4
3
Portable Power Generator
OWNERS MANUAL
PLEASE SAVE THIS OWNERS MANUAL AND READ BEFORE EACH USE.
This manual will explain how to use the unit safely and effectively. Please read and follow these instructions and precautions carefully.
MODEL
SL1467

• 4 •
5. LCD SCREEN
WARNING
POWER OUTPUT
INDICATOR
AC OUTPUT
LIGHT
CHARGING
INDICATOR
USB
OUTPUT
3A USB
OUTPUT
12V DC
OUTPUT 12V DC
CIGARETTE
OUTLET
OUTPUT
BATTERY
CAPACITY
INDICATOR
6. OPERATING INSTRUCTIONS
IMPORTANT! Charge immediately after purchase and when battery level is below 40%, to keep the internal battery fully charged and prolong battery life.
POWERING ON
Press the ON/OFF power switch. The unit will initialize, and all icons on the LCD screen will activate. If normal function is detected, the screen will return to its normal display.
CHECKING THE LEVEL OF THE INTERNAL BATTERY
The Battery Capacity Indicator on the LCD display will show the battery’s charge level in 20-percent increments. For best performance, the battery capacity should be 20%
or greater.
CHARGING THE INTERNAL BATTERY
NOTE: Do not use the unit while charging its internal battery.
AC adaptor
1. If the AC Output LED is lit, press the AC button to turn off before charging.
2. Connect the provided AC charger to the AC input socket on the front of the unit. Plug the charger’s power cord directly into a live grounded 120V outlet. Charging will
start automatically, and the Charging and the Battery Capacity indicators will ash.
3. When the internal battery is fully charged, all ve bars of the Battery Capacity indicator on the display will show. After 10 seconds, the display will turn off. Complete
charging will take approximately 10.5 hours.
4. When the unit is fully charged, unplug the charger from the 120V outlet and then from the unit.
Solar Charging (120W panel not included)
1. If the 12V DC Output LED is lit, press the DC power button to turn off before charging.
2. Place the solar panel (not included) in direct sunlight. Do not expose the power station to direct sunlight or wet conditions.
3. Connect your 3.5mm solar panel output cable to the DC input port of the unit. Charging will start automatically, and the Charging and the Battery Capacity
indicators will ash.
4. When the internal battery is fully charged, all ve bars of the Battery Capacity indicator on the display will show. After 10 seconds, the display will turn off. Complete
charging will take approximately 10.5 hours.
5. When the unit is fully charged, unplug the solar panel from the unit.
POWERING A 12V DC DEVICE
NOTE: Do not power a 12V device while charging the internal battery.
12V DC Output
1. Make sure the device to be powered is OFF before inserting the 12V DC plug into one of the two 12V DC output ports.
2. Plug the 12V DC device into one of the 12V DC output ports and turn on the 12V DC device (if required). Press the DC button. The 12V DC output, 12V DC Cigarette
Outlet and Power Output indicators will show on the display.
3. When nished, press the DC button, turn off the DC device (if required) and unplug from the DC output port.
4. Recharge the unit when the battery level is below 40%.
12V DC Cigarette Outlet plug
1. Make sure the device to be powered is OFF before inserting the 12V DC cigarette outlet plug into the 12V DC cigarette outlet socket.
2. Plug the 12V DC device into the DC cigarette outlet socket and turn on the 12V DC device (if required). Press the DC button. The 12V DC output, 12V DC Cigarette
Outlet and Power Output indicators will show on the display.
3. When nished, press the DC button, turn off the DC device (if required) and unplug from the 12V DC Cigarette Outlet socket.
4. Recharge the unit when the battery level is below 40%.
USING THE USB PORTS
Three USB ports provide 2.4A at 5V DC and one USB port provides 3A.
1. Plug the device into one of the USB ports on the front panel.
2. Press the USB power button.
3. Turn on the USB device, if necessary. The USB, USB and Power Output indicators will show on the display.
4. When nished, press the USB power button, turn off the USB device (if required) and unplug from the USB port.
5. Recharge the unit when the battery level is below 40%.

• 5 •
USING THE LED LIGHT
Choose from Normal, SOS and Emergency Flash modes.
1. Press the button on the side of the unit for 2 seconds to turn on the LED light. The icon will show on the LCD screen.
2. Press the button again for SOS mode.
3. Press the button once more for emergency ashing.
4. Long press the button for 2 seconds to turn off the LED light.
USING THE AC POWER OUTLETS
The SL1467 is equipped with a 1000W pure sine wave inverter, which produces power for all electronic devices and appliances.
It is important to know the continuous wattage of the device you plan to use with the AC outlets. The unit must be used with devices drawing 1000 watts or less.
Devices such as fans or electric motors require additional power to start (commonly known as the “starting” or “peak” power). The generator can supply a momentary surge
in wattage of as high as 2000W for less than 1/10 of a second; however even devices rated less than the maximum 1000 watts can exceed the inverter’s surge capability
and cause an automatic overload shutdown.
Do not use the inverter with a product that draws a higher wattage than the inverter can provide, as this may cause erratic operation.
CAUTION: Always run a test to establish whether the inverter will operate a particular piece of equipment or device.
In the event of a power overload (noted with a ashing Warning icon), the inverter is designed to automatically shut down. This safety feature prevents damaging the
inverter while testing devices and equipment within the 1000-watt range.
If powering more than one device, start one device at a time to avoid a power surge and/or inverter overload. The surge load of each device should not exceed the
inverter’s Continuous Operation wattage rate.
You can use an extension cord from the inverter to the device without signicantly decreasing the power being generated by the inverter. For best operating results, the
extension cord should be 16 AWG (1.31 mm2)
or larger and no longer than 50 feet.
WARNING! RISK OF ELECTRIC SHOCK.
Incorrect operation of your inverter may result in damage and personal injury. The inverter output is 110V AC and can shock or electrocute the same as any ordinary
household AC wall outlet.
NOTE: The maximum continuous load is 1000 watts. Do not use the AC outlets with a product that draws more than 1000 watts, as this may cause erratic operation.
CAUTION:
•Do not connect an AC power source to the 110V AC outlets.
•Do not connect the unit’s AC power cord to its 110V AC outlets.
NOTE: Do not power an AC device while charging the internal battery.
1. Connect your AC-powered devices or small household appliances to one or more of the unit’s two AC outlets.
NOTE: Make sure the device to be powered is OFF before inserting the plug into the AC power outlet.
2. Press the AC Power button. The AC Output icon will show on the display, to conrm that the unit is on and ready to provide AC power. The Power Output indicator
will also show on the display.
NOTE: Extended operation of an AC device may result in excessive battery drain.
3. Recharge the unit when the battery level is below 40%.
ESTIMATED RUN-TIMES
APPLIANCE TYPE ESTIMATED RUN TIME CHARGES
Circular Saw 4 hours —
Sump Pump 7 hours —
Projector 11 hours —
Refrigerator 34 hours —
12V Heated blanket 22 hours —
12V Cooler 25 hours —
Television 35 hours —
Drone 35 hours 170
Fan 43 hours —
Router 89 hours —
Table lamp 97 hours —
Laptop 147 hours 19
LED lights 249 hours —
Camera 313 hours 164
Radio 365 hours —
Tablet 407 hours 25
Speaker 1120 hours 74
Smartphone 1258 hours 82
NOTE: Actual time may vary. Times are based on the internal battery being fully charged.
7. MAINTENANCE AND CARE
•Recharge the unit when the battery level is below 40%.
•Never completely discharge the internal battery.

8. WARNINGS
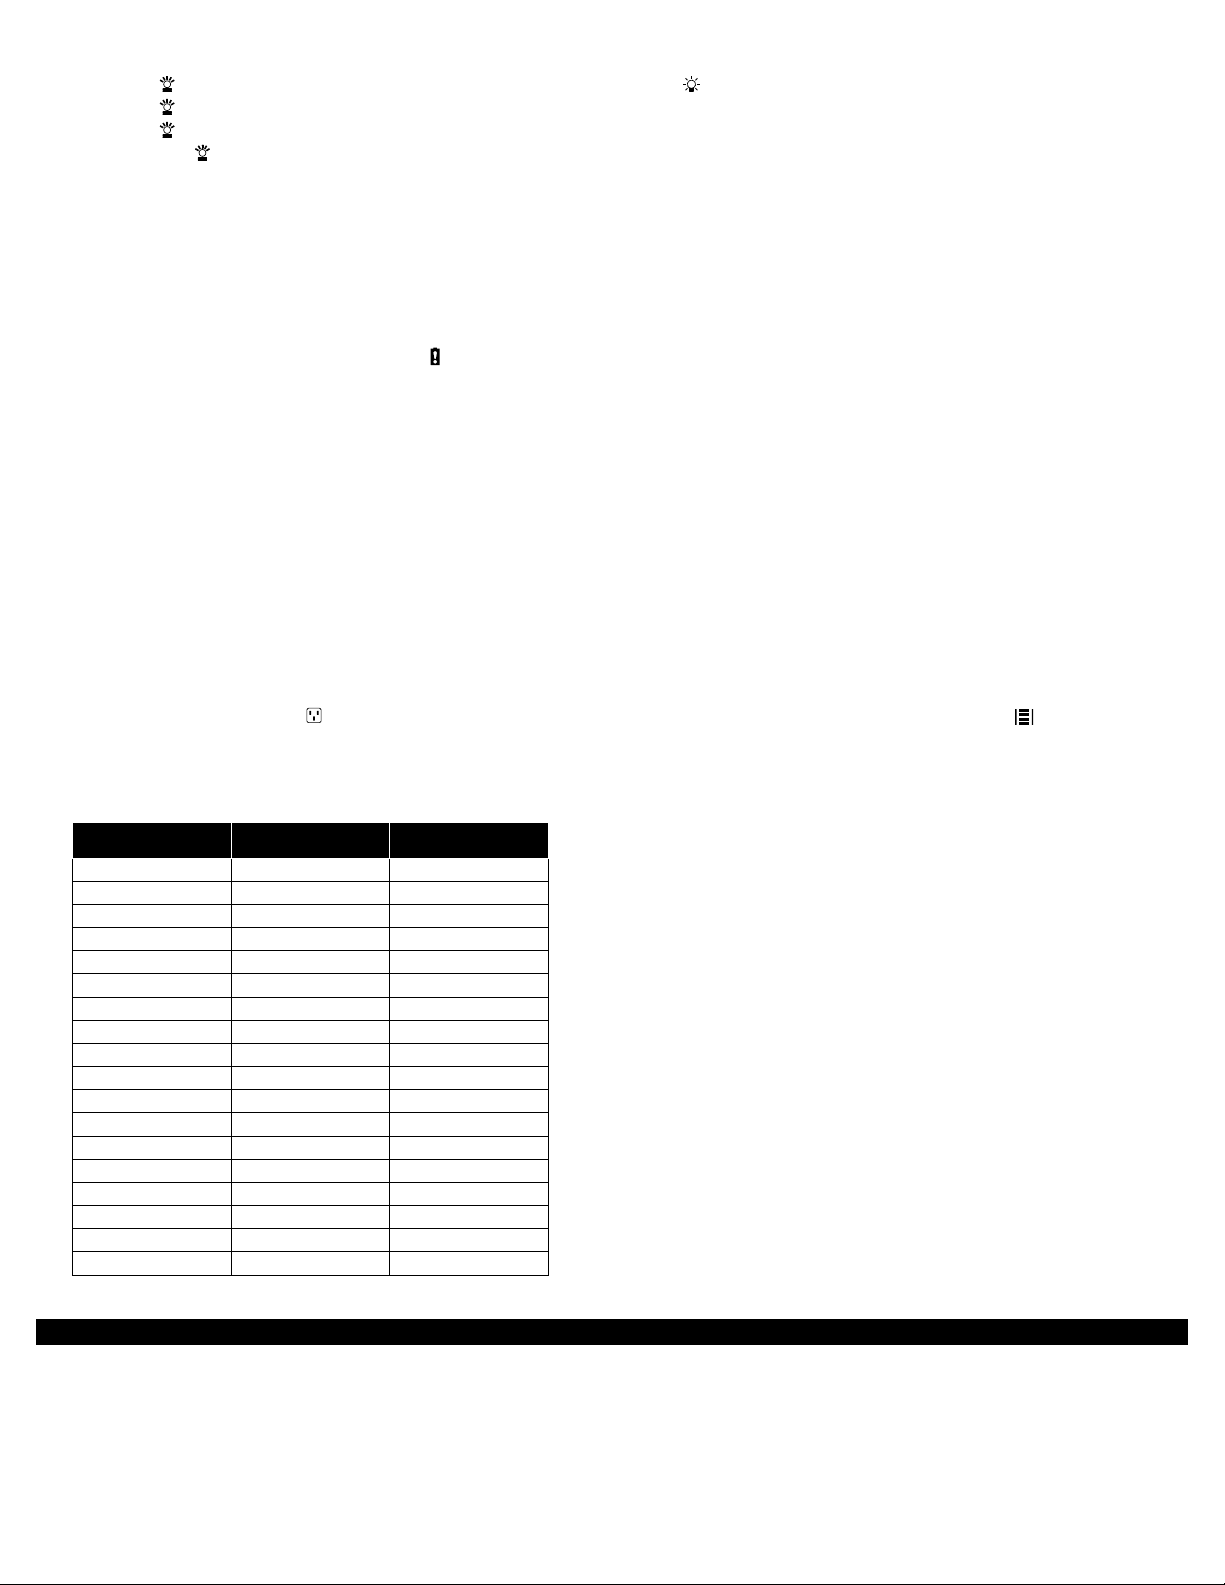
LCD DISPLAY SYMBOLS FLASHING WARNING MODE CAUSE SOLUTION
Keeps ashing 1 time per second Charging fault
(high or low temperature protection)
Wait until the battery pack temperature
is back to normal; reconnect the
charger to recharge.
Flashing 1 time per second
for 10 seconds, then off DC output fault
(over current or short-circuit protection) Press DC output button to reset.
Flashing 1 time per second
for 10 seconds, then off USB output fault
(over current or short-circuit protection) Press USB output button to reset.
Flashing 1 time per second
for 10 seconds, then off AC output fault (high temperature,
overload or short-circuit protection) Press AC output button to reset.
Flashing 1 time per second
for 10 seconds, then off Discharging high temperature
protection
Wait until the battery pack temperature
is back to normal, then press the
Main Power Button to reset.
9. TROUBLESHOOTING
PROBLEM POSSIBLE CAUSE SOLUTION
Power-up failure Under-voltage protection
Abnormal load protection
Damaged unit
Recharge unit.
Remove loads and recharge unit.
Contact customer service.
Charger fault Unmatched charger
Damaged charger
Abnormal power supply or connection
Use only the included charger.
Contact customer service for replacement.
Reconnect the charger. If problem persists, replace the charger.
Solar panel charging fault Over-current
Weak sunlight
Damaged solar panel
Abnormal wiring-harness connection
Use only the recommended solar panel.
Charge in a sunny place.
Replace the solar panel.
Reconnect the wiring-harness. If problem persists, replace the solar panel.
AC output fault Battery under-voltage protection
Discharge over-current protection
Over-temperature protection
Damaged unit
Charge the unit.
Make sure loads are within allowed range (total ≤1000W).
Turn unit off, allow to cool down and then restart.
Contact customer service.
Abnormal icon display Abnormal loads
Hardware fault
Damaged LCD screen
Remove loads.
Contact customer service.
LCD screen fault Damaged LCD screen Contact customer service.
10. SPECIFICATIONS
Internal battery type.............................................................................................................Lithium polymer
Capacity............................................................................................................................................880 Wh
AC charging input .............................................................................................................................20V, 6A
Inverter................................................................................................................. 1000W (Pure Sine Wave)
AC output........................................................................................................ 2 x 110V/60 Hz 1000W Max.
DC output...................................................................................................................3 x 12V DC, 10A Max.
USB Output............................................................................................3x 5V/2.4A Max.; 1 x 5V/3.0A Max.
Light.........................................................................................................................................................2W
11. REPLACEMENT PARTS
AC charger................................................................................................................................930261008Z
Learn more about generators we have.
Table of contents
Other Schumacher Portable Generator manuals
Popular Portable Generator manuals by other brands

Briggs & Stratton
Briggs & Stratton 040226-1 Illustrated parts list

VICI DBS
VICI DBS NM PLUS user manual

Pacific Scientific
Pacific Scientific Redi-Line DA12A Installation and service manual

DUROMAX
DUROMAX XP5500X user manual

Westinghouse
Westinghouse WGen20000 user manual

Generac Power Systems
Generac Power Systems 4451 & 4986 Repair manual