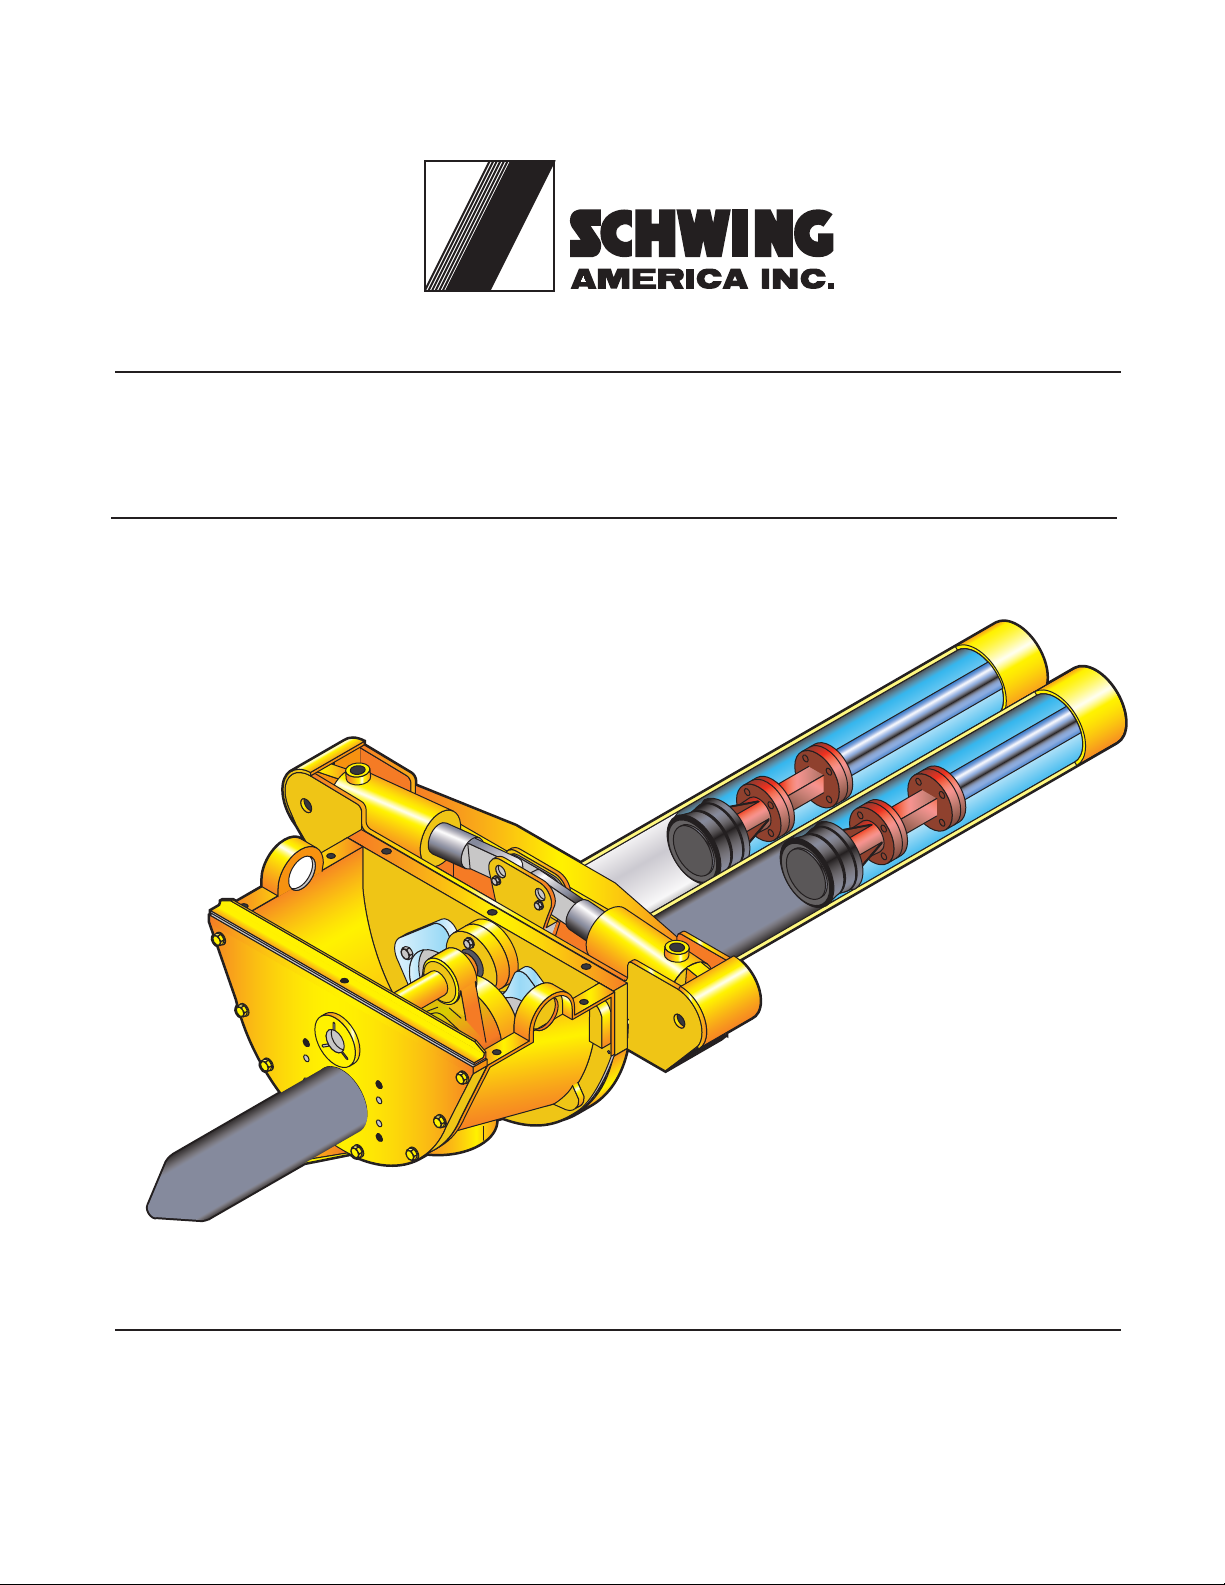
Schwing SP ROCK User manual

SERVICE REPAIR INSTRUCTIONS FOR
THE SP ROCK VALVE
DOCUMENT #98330783 5900 Centerville Road
St.Paul, MN 55127
Tel 651-429-0999
Fax 651-429-3464
www.schwing.com
REV. 10/25/14


Service Manual
Small Rock Valve
1
Small Rock Valve
Safety Instruction
When performing maintenance on Schwing Equipment, the safety regulations must be followed. The observation
of these regulations is the responsibility of the maintenance personnel. The following are some supplementary rec-
ommendations.
1. WARNING! Read and understand the operation manual of the machine before attempting any repairs. If in
doubt, call the manufacturer. Incorrectly done repairs endanger operational safety of the machine.
2. WARNING! Burning hazard! Never work on a hydraulic system with hot oil.
3. WARNING! Falling hazard! If you cannot work at ground level, you must use a suitable work platform.
4. WARNING! If maintenance work requires that you use a crane, hoist, fork truck, etc., you must read and
understand the safety regulations for that equipment.
5. WARNING! If working the machine requires that it be operated, and you are not qualified as an operator, you
must get someone who is qualified to assist you.
6. WARNING! If you will be working in a hidden area inside the machine, protect yourself by taking the key
from the ignition and putting a “DO NOT OPERATE” sign on the controls. In the case of electrically driven
units, disconnect the main circuit breaker and lock it in the disconnected position.
7. WARNING! Never activate the system hydraulics without checking if another workman is in a hidden posi-
tion. Always yell “CLEAR”, and allow time for response, before starting the prime mover.
8. WARNING! Never use gasoline or diesel fuel as a cleaning solvent. This is critical to remember when clean-
ing hydraulic oil reservoirs, because gas and diesel fuels are highly explosive, and gasoline or diesel fuel traces
left in the oil may ignite when compressed.
9. WARNING! Always use the correct tools for the job. Tools should be kept clean, and in good condition.
10. If you see a co-worker engaging in an unsafe practice, explain the dangers. Safety is always in the hands of
those on the job.
11. WARNING! Never work on a pressurized hydraulic system. Stop the prime mover and relieve the accumulator
circuit (if so equipped) before you open the hydraulic system.
WARNING
READ FIRST!

Service Manual
Small Rock Valve
2
Rock Valve Parts Identification and Clearance Specifications
Cording must be to
outside when installed
Lubrication grooves MUST face
out from Rock Valve
Kidney or Outlet Plate
Kidney Seal
Spectacle or Inlet Plate
Rock Housing
Cutting Ring
Rock Valve
Pressure Spring
Bushing
Seal Cover
Dimensions shown are
with all new wear parts.
Tension Nut
Locking
Bolt
Locking
Washer
Centering Screw
Outlet Flange
Setting Disc
1.5 - .2.0mm
(.060 - .080")
A

Service Manual
Small Rock Valve
3
Small Rock Valve Lubrication Points
Use a grease gun with the recommended grease listed in the chart below. Locate the grease points, clean the grease
fitting before filling it, and inject grease until you see old grease displaced by the new grease. Lubricate the grease
points at 8 hour intervals and whenever the machine work is completed for the day.
Minimum Specifications for grease.
Lithium base high-pressure grease KP 2 K per DIN 51502.
BP
MOBIL
SHELL
TEXACO
ARAL
ESSO
OPTIMAL
Energrease LS2
Mobilith AW 2
Alvania grease R2
Multifak 20
HLP 2
Beacon 2
Olitsa longtme 2EP
Grease Points
Grease Points

Service Manual
4
Small Rock Valve
Friction
Friction Friction and
stone crushing
Friction and
stone crushing
max 1.5mm
0.590"
Cutting Ring
max 1.5mm
0.590"
Cutting Ring
Housing Lining Housing Lining
Lengthening the Service Life of
the Spectacle Plate and Cutting
Ring
Conditioned by outside influences (material
variations), as well as by differing work strains
on partial sections, the cutting ring and the
housing lining wear out unequally.
The grooves resulting from operation are
irrelevant as long as the armouring is not worn
out completely.
Spectacle or Inlet Plate
Cutting Ring
To ensure uniform wear and, thus, considerably
longer service lives, we recommend the
following:
1. Move the Rock Valve to the left and right
end position once a week after thorough
cleaning, and check the condition of both the
Cutting Ring and the Housing Lining.
2. Turn the Cutting Ring 90 degrees when there
is a clearance greater than 1.5mm-2.0mm
(.0590”-.0590”) between the Cutting Ring
and the Housing Lining. The Cutting Ring
typically wears at the 3 and 9 o’clock posi-
tion. Turning the Cutting Ring 90° will
ensure uniform wear and lengthen the ser-
vice life.

Service Manual 5
Small Rock Valve
Rotate the Cutting Ring 90˚ clockwise
Securing Bolts
B
Inlet Housing Lining
Cutting Ring
Rock Valve
Pressure Spring
Check for the gap at several points along the
Cutting Ring circumference, and always turn the
Cutting Ring in the same direction.
It is only necessary to loosen the Securing Bolts
of the Housing Cover approximately 10mm
(.3937”) in order to release the Pressure Spring
and turn the Cutting Ring.
3. Check the distance between the Cutting Ring
and the Rock after each turn of the Cutting
Ring. If it exceeds 8mm (.315”), the preten-
sion of the Pressure Spring is not enough to
correctly press the worn cutting ring up
against the Spectacle Plate. In this case, the
Cutting Ring has to be replaced

Service Manual
6
Small Rock Valve
Locking Bolt
Tension Nut
Tension Nut
Setting Disc
Rebuilding the Rock Valve
1. Remove the Locking Bolt from the Tension
Nut.
2. Loosen the Tension Nut.
NOTE: It’s ok to remove the Tension Nut with
a wrench, but it must never be tightened more
than hand tight
3. Remove the Tension Nut.
4. Remove the Setting Disc

Service Manual 7
Small Rock Valve
Alignment Rod
C
L
Locking Bolt
Stop Washer
5. Install the alignment rods
• SAI Part #30309007
6. Slide the rear housing cover back slightly.
7. Center Rock Valve using a pry bar, so the
lever is straight up.
8. Remove the Locking Bolt for the Cylinder
Pin on the Slewing Yoke
9. Using a drift punch, drive pin out of the hole.
10. Pull yoke up and out of the slew lever. Move
out of the way and tie up.

Service Manual
8
Small Rock Valve
Slew Lever
Disk
12 x 30 Bolt
Pressure Spring
Kidney Seal
11. Remove 12mm bolt and lever disk from
Rock shaft
12. Remove slew lever.
13. Using a lifting device, slide Rock Valve out
of bushing and place on a work surface.
14. Remove Kidney Seal and Pressure Spring.
Clean both ends of the Rock Valve, remov-
ing all concrete debris.

Service Manual 9
Small Rock Valve
Seal Cover
O-Ring
70x8
O-ring
65x8
Bushing Driver
Bushing Driver
Hammer
Rear Cover Housing
15. Remove the Seal Cover from the Rock Slew-
ing Shaft and remove the O-ring.
16. Remove the O-ring from the groove of the
Rock shaft bushing on the Rear Cover Hous-
ing.
17. Clean the O-ring groove removing all con-
crete debris, paying special attention to the
grease journals are clean.
NOTE: Check that grease will come through
from the zerk.
18. Using the correct size bushing driver, drive
the old Rock shaft bushing out of the front
cover of the Rock housing.
19. Using the correct size bushing driver, drive
the old Rock Shaft Bushing out of the Rear
Cover Housing.

Service Manual
10
Small Rock Valve
Counter Sunk Bolts
Spectacle Plate
20. Remove the two bolts attaching the Specta-
cle Plate to the Front Cover.
21. Carefully remove the Spectacle Plate from
the Rock Housing.
22. Remove the four, 20 mm bolts from the out-
lect delivery pipe.
23. Remove the four bolts from the rear cover
that attach the Kidney Plate to the rear cover.
24. Remove the Kidney Plate.
NOTE: The Kidney Plate should have a
smooth, mirror-like finish, free of any
scratches, gouges, or wear grooves.
NOTE: Before reassembly, make sure that all
components are thoroughly cleaned.

Service Manual 11
Small Rock Valve
Locking Bolt
25. Reassemble the Rock Valve assembly in the
reverse order that it was disassembled. Slide
the cover back in place.
NOTE: Upon reassembly, generously grease
the Kidney Seal, Kidney Plate, Cutting Ring
and the Spectacle Plate. This is important,
because after you have assembled the Rock
and done some necessary adjustment, you are
going to have to shift the Rock several times
before making the final adjustments.
26. Adjust the Tension Nut, which is tightened
only hand tight. If the Locking Bolt shown
can be installed in the Setting Disc freely,
then do so. If the hole in the Tension Nut
does not align with the thread hole in the Set-
ting Disc, loosen the Tension Nut to the pre-
vious hole, and install the Locking Bolt.
NOTE: Check to make sure that the proper
clearance is obtained between the Rock Valve
and the Cutting Ring and between the Rock
Valve and the Kidney Plate. If the Rock com-
ponents are worn, the dimensions may be
larger that specified.
If the dimensions are too small, loosen the
Adjusting Nut and pry the Rock Valve in the
direction needed. Stroke the unit several
times, and recheck the dimensions. If the
dimensions are correct, reinstall the Tension
Nut and re-adjust.
IMPORTANT! At no time should you operate
the Rock Valve without first lubricating the
outlet wear plate. Spraying the plate with water
or oil will usually be adequate prior to start-up
for pumping. Moving the kidney seal against a
dry plate will cause excessive wear and
premature failure.

Service Manual
12
Small Rock Valve
B
Inlet Housing Lining
Cutting Ring
Rock Valve
Pressure Spring
Cording MUST be to
outside when installed
Put seam on top
Mounting a New Pressure Spring
If the Pressure Spring has to be replaced, remove
the old spring and clean the vacant area
thoroughly to clear it of concrete residue. If dust
and residue is ignored, the new spring cannot be
installed correctly, and the flow of concrete could
pull it out of the groove. Furthermore, the high
pretension resulting from reassembling with
concrete residue in the area of the spring leads to
premature wear of the Cutting Ring and Housing
Lining.
NOTE: Slightly grease the new Pressure
Spring when installing it. The same applies to
the Kidney Seal. Do not use too much grease,
because grease accumulating in the spring
chamber operates as a spacer, increasing the
spring pretension.
Although these components will withstand a
great deal of hard usage, the Pressure Spring
and Kidney Seal should be inspected when-
ever the Cutting Ring is replaced.

Service Manual 13
Small Rock Valve
2
1
2
Spring installed
d
mm
M
Figure 1
Figure 2
Figure 3
Determining Wear on the Kidney
Seal & Housing Lining - Outlet
Side
Replace the kidney seal if any of the following
conditions exist:
• A considerable formation of cracks are found
in the areas marked by arrows. This problem
is very rare.
• The lip is completely worn to the point that
the pressure relief grooves are no longer
recognizable.
• The distance indicated by “M” of the
released kidney seal does not exceed 30mm
(1.1875").
Replace the outlet housing lining (kidney plate)
only if scores deeper than 1.5mm are found in the
area that contacts the kidney seal. You can
measure this by placing a steel ruler across the
kidney plate in several places and using a depth
gauge to determine the gap.
NOTE: Outside of the area that contacts the
Kidney Seal, you may detect scores that are
due to aggregate particles stuck between the
Rock Valve and the Kidney Plate. (See fig. 2
and fig. 3) THESE SCORES DO NOT MAT-
TER IN THE LEAST!

Service Manual
14
Small Rock Valve
Locking Bolt
Tension Nut
Tension Nut
Setting Disc
Replacement of Cutting ring and
Kidney seal
CAUTION! Under no circumstances should you
allow the kidney seal to be run with a dry hopper.
This will destroy the kidney seal and is the
primary cause of premature wear encountered at
the outlet side of the Rock Valve. If you will be
repairing the Rock or troubleshooting a problem,
always fill the hopper with water to the top of the
Rock Valve before switching.
1. Remove the Locking Bolt from the Tension
Nut.
2. Loosen the Tension Nut.
NOTE: It’s ok to remove the Tension Nut with
a wrench, but it must never be tightened more
than hand tight.
3. Remove the Tension Nut.
4. Remove the Setting Disc.
•

Service Manual 15
Small Rock Valve
Alignment Rod
Kidney Seal
5. Install the Alignment Rods
• SAI Part #30309007.
6. Slide the rear housing cover back slightly.
7. Remove the Kidney Seal for inspection, and
replace it if necessary. See the previous sec-
tion of this manual entitled Determining
Wear on the Kidney Seal and Housing Lin-
ing--Outlet Side for reference.
8. Loosen the bolt that holds the slew lever on
the Rock shaft, but do not remove

Service Manual
16
Small Rock Valve
Cutting ring
e
ing removed
Locking Bolt
9. Slide the Rock Valve back about 1.5 inches,
and carefully remove the cutting ring.
NOTE: If you are going to turn the Cutting
Ring, you only have to move the Rock back
far enough to allow you to loosen the ring and
turn it 90 degrees. To determine if your Cut-
ting Ring needs to be turned, refer to the pre-
vious section of this manual entitled
Lengthening the Service Life of the Spectacle
Plate & Cutting Ring.
10. Make sure that all parts are thoroughly
cleaned, and reassemble in reverse order.
Slide the Rock cover back into place, and
secure it with bolts.
11. Adjust the Tension Nut, which is tightened
only hand tight. If the Locking Bolt shown
can be installed in the Setting Disc freely,
then do so. If the hole in the Tension Nut
does not align with the thread hole in the Set-
ting Disc, loosen the Tension Nut to the pre-
vious hole, and install the Locking Bolt.

Service Manual 17
Small Rock Valve
1.5 - .2.0mm
(.060 - .080")
A
Dimensions shown are with all new wear parts.
NOTE: Check to make sure that the proper
clearance is obtained between the Rock Valve
and the Cutting Ring and between the Rock
Valve and the Kidney Plate. If the Rock com-
ponents are worn, the dimensions may be
larger that specified.
If the dimensions are too small, loosen the
Adjusting Nut and pry the Rock Valve in the
direction needed. Stroke the unit several
times, and recheck the dimensions. If the
dimensions are correct, reinstall the Tension
Nut and re-adjust.
IMPORTANT! At no time should you operate
the Rock Valve without first lubricating the
outlet wear plate. Spraying the plate with water
or oil will usually be adequate prior to start-up
for pumping. Moving the kidney seal against a
dry plate will cause excessive wear and
premature failure.

Service Manual
18
Small Rock Valve
C
L
C
L
Leve
l
These units were designed to have no
adjustment. Before assembling slew lever, use a
wire brush to clean splines on shaft and lever.
Use grease or anti-seize to lubricate splines
during assembly. If you do notice that the Rock is
missing the material cylinder openings, you must
check to see where the problem may be (i.e.,
articulated bearings, shifting cylinder (internal),
or Rock slewing lever may need adjustment).
Please call the Schwing Service Department at
(651) 429-0999 with any questions regarding this
matter.
Slewing Yoke Timing
(Viewed From Cylinder End)
The slewing yoke is installed properly when the
center line of the hydraulic cylinder rod is in line
with the center line of both the slewing shaft and
the inlet or cutting ring. Rock is hanging freely
and the lever is flat on top. A torpedo level will
be centered.
Table of contents
Other Schwing Control Unit manuals
Popular Control Unit manuals by other brands

Allen-Bradley
Allen-Bradley FLEX I/O ControlNet 1794-ACN15 installation instructions

Panasonic
Panasonic FP0R Series user manual

Dynamic Engineering
Dynamic Engineering IP-429-II user manual

powersoft
powersoft M-Drive Series user guide

Commell
Commell ADP-3460 user manual

Chattanooga
Chattanooga Intelect Advanced Series user manual