Science & Motion SAM BalanceLab User manual

System Installation
Quick Start Guide
General information:
This Quick Start Guide describes the software and hardware installation process and the
"Measurement" feature in a simple way. Follow the sequence of the steps to avoid
problems during installation.
Science&Motion Sports will provide further documentation on the website as video clips.
After opening the case in which SAM BalanceLab was shipped, compare the
package contents with the illustration on picture 1 on the next page.
Important Security Note:
The surface of the system is designed for indoor usage with sports shoes.
never use the system if damp or humidity is on the surface or on a
player's shoes –there is a danger of slipping or falling for the player in
this case !
never step on the plate with golf shoes equipped with hard spikes !
Science&Motion is currently working on a solution with a covering mat for usage with
spikes or outdoor usage. Please contact us for availability.
1

SAM BalanceLab System installation Quick Start Guide page 1
Step 1: Hardware Installation
1
2
1: Turn the force plate upside down carefully
2: Unscrew the screws* of the connection port
cover with the delivered screw driver
3: Remove the cover plate
* depending on your model the number of
screws can be 2 or 4.
Check if all components are available:
1: USB connection cable
2: Screw driver
3: Power supply
4: BalanceLab force plate
3
On the connection port 2 cables have to be
connected:
Connect the USB cable to connector 1and the
power supply cable to connector 2.
Press the cables carefully into the slits to fix
them
4
After connecting of all plugs please be sure
that all cables are pushed completely into the
sockets and the plugs are still in place.
Then place the cover plate on the connection
port and fasten the screws.
5
Do not connect the USB cable to your
computer now!
First execute the software installation
like described on the next pages.

SAM BalanceLab System installation Quick Start Guide page 2
Step 2: Software Installation
1. If you install the software from a CD:
Insert the SAM BalanceLab CD into your CD-drive.
The installation procedure should start automatically. If auto-start is disabled
on your system, please run SETUP.EXE manually from your CD drive.
If you install the software from a download file:
If the file is a ZIP file then unzip it to your local disk. Then start the setup executable
file.
2. In the first setup screen click the "Next" button to continue.
3. Accept the license agreement by checking the box
below the agreement and click the "Next" button.
4. Choose a destination folder and click the "Install"
button.
It is recommended to leave the installation
folder as given by the installer.
5. Depending on software already installed
on your system Microsoft XNA Graphics
software needs to be installed.
If so, you will see the window on the right.
Please press OK and do not interrupt or
cancel this process!

SAM BalanceLab System installation Quick Start Guide page 3
6. Next step is the USB driver installation
for the SAM BalanceLab hardware will be
installed. Click "Yes" to continue
installing the drivers.
If you are sure you have installed the drivers
before and the system worked you can
skip the driver install by pressing "No".
7. For driver installation Windows will open a
"Device Driver Installation" window.
Click the button "Continue".
(Depending on the operating system and service
pack this screen may vary or will not appear.)
Be sure to always select "Continue" or allow
processing, never press "Cancel"!
8. If you see warnings like on the
right be sure to ALWAYS continue
the driver installation.
Click on “Install this driver software
anyway”.
After the driver installation is
finished you may see a message
like displayed on the right.
This message may vary depending
on the Windows version you use.

SAM BalanceLab System installation Quick Start Guide page 4
9. After installation is finished you will be prompted
to attach the SAM BalanceLab to your PC / Laptop.
Now you can connect the SAM
BalanceLab via USB cable to a free
USB port on your PC / Laptop.
10.Your computer will notice a newly attached
device and the Windows “Found new Hardware”
process will start.
Depending on your windows version the process
will run silently or display messages like
displayed on the right.
Under no circumstances cancel the
Hardware-Wizard while Windows
configures your system!
11.If the "Found New Hardware Wizard" asks you
how to install the Software, choose to install
the software automatically and click the "Next"
button to continue.
12.Windows may inform you, that the device
has not passed the Windows Logo test.
Click "Continue Anyway" to continue with
the installation.

SAM BalanceLab System installation Quick Start Guide page 5
13.Click "Finish" and the Windows Hardware
Wizard will close.
On Windows 7 systems the final
message will look like follows:
14.The installation window is still open. Click
the "Close" button to complete the software
installation of SAM BalanceLab.
15.Remove the SAM BalanceLab CD from your CD drive.

SAM BalanceLab System installation Quick Start Guide page 6
Step 3: Start the software, create
Project and Player
1. Start SAM BalanceLab software
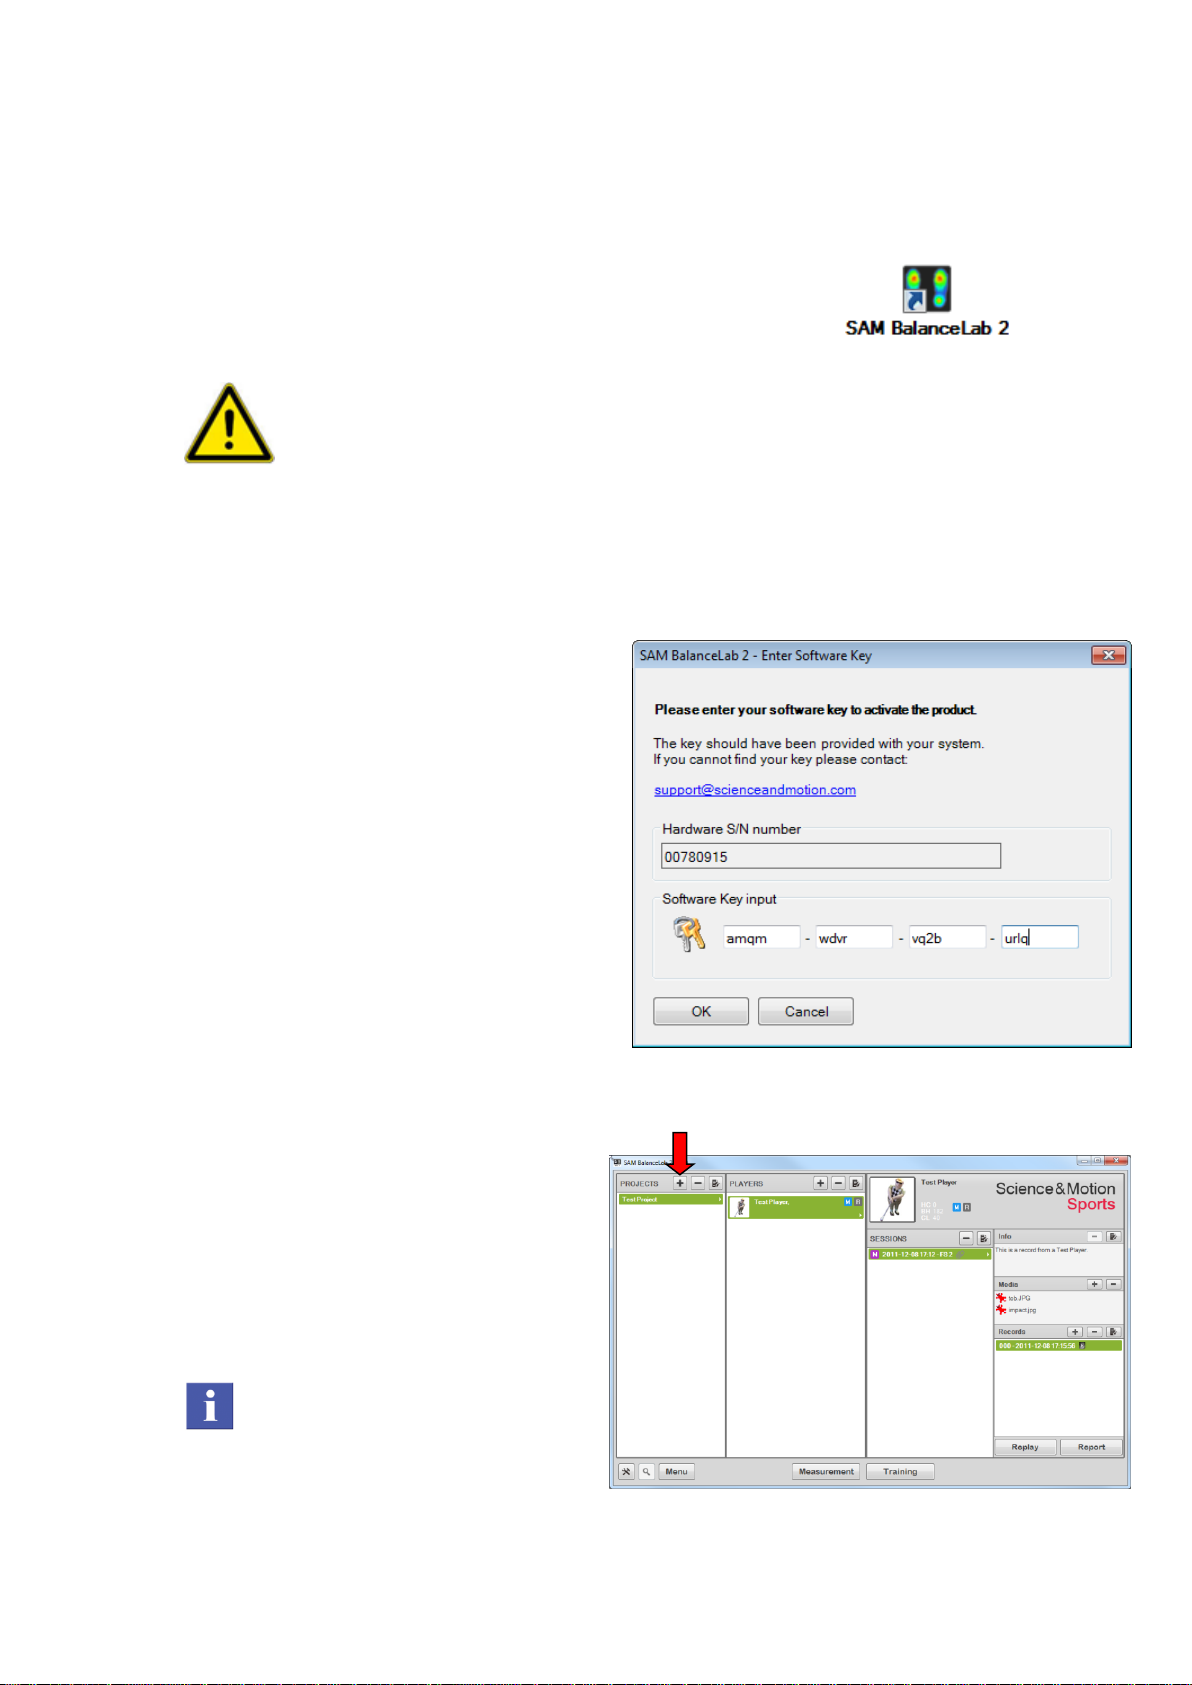
Start "SAM BalanceLab 2" via the desktop icon which
was created during the software installation. You can
also start the software through the Windows start menu
under "Programs" and "SAM BalanceLab 2"
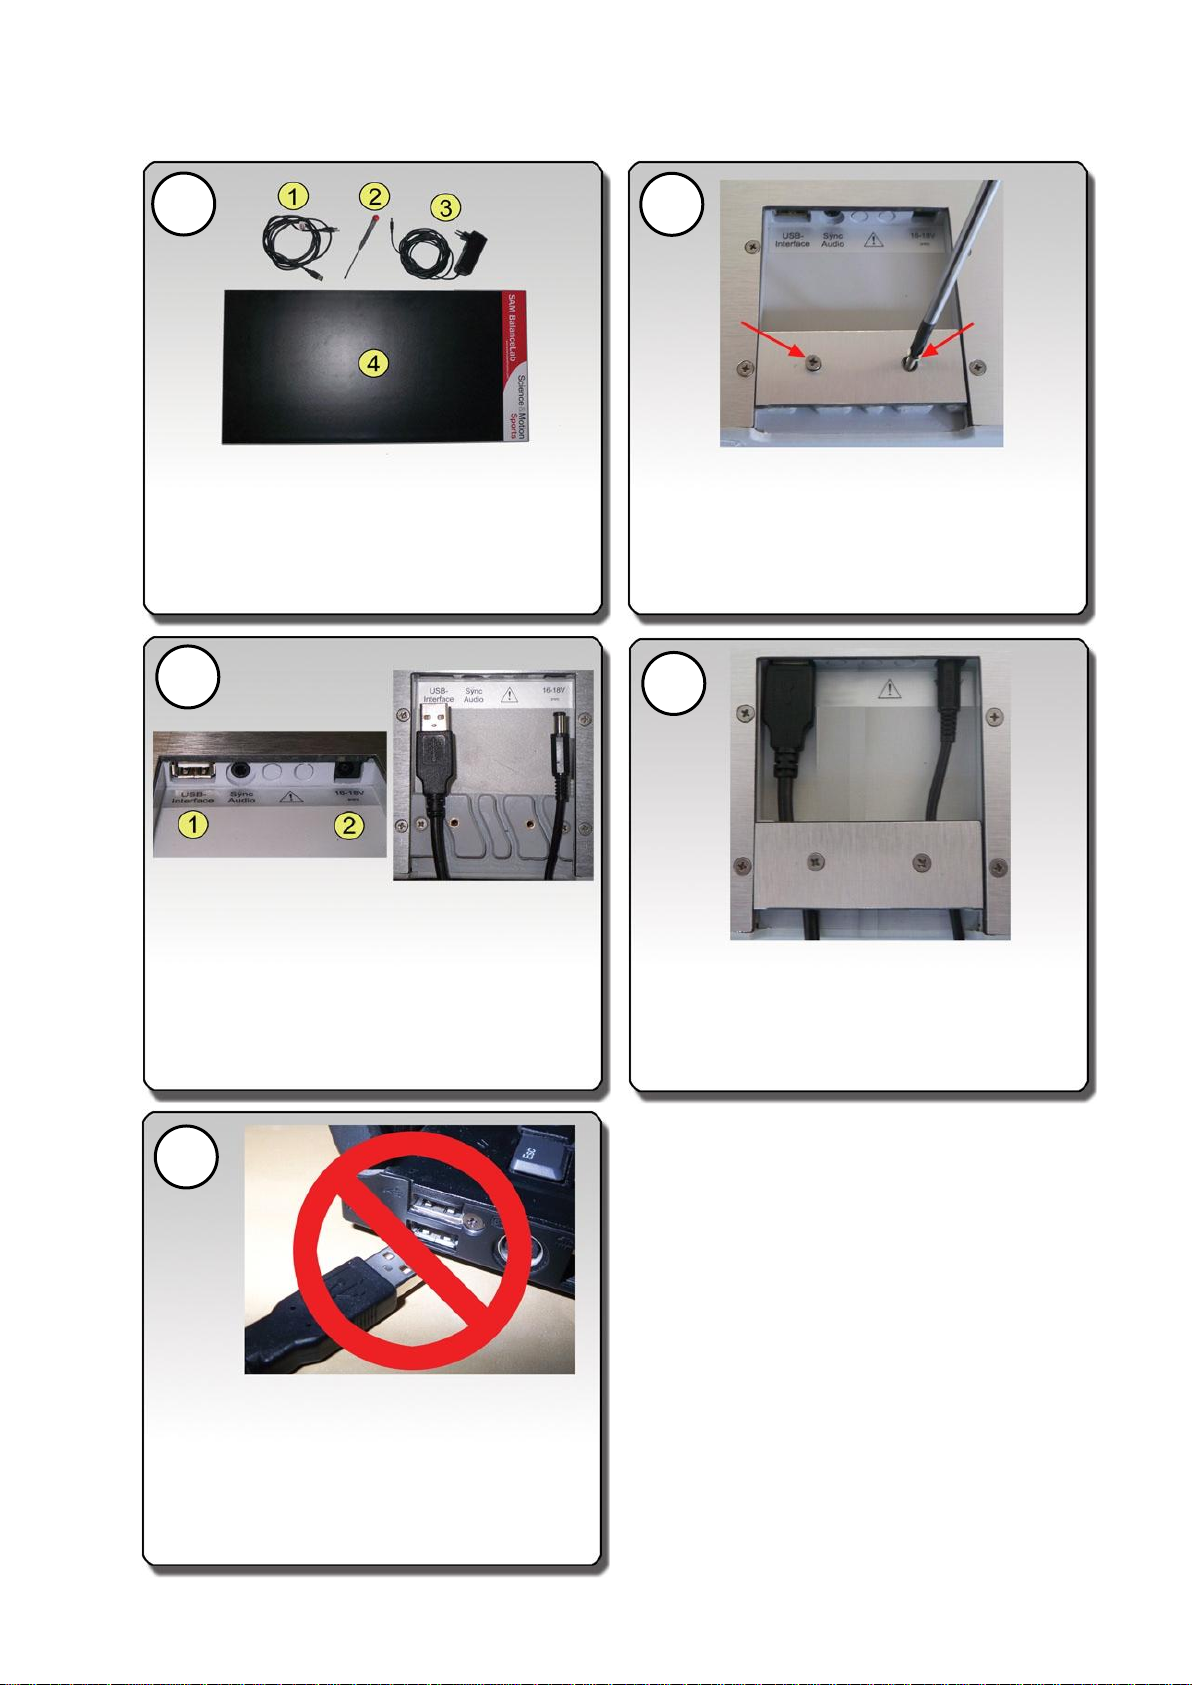
IMPORTANT
Be sure to have the BalanceLab connected to a USB port on your
computer before you start the software. Also the power plug must be
connected.
If all connections are fine the LED light on the forceplate is permanently
green.
If the LED is off then probably the system is not powered. If USB
connection is not established or USB drivers are not installed the LED will
be blinking green.
2. Activation of the software
You will be prompted to enter the
software key printed on the software key
document or provided to you by email.
Type in the key and press the “Ok”
button.
The key which is provided to you is a
unique key for your product. Keep it in a
secure place.
3. You should now see the main
program screen.
Click the "add" button in the upper
middle part of the "Projects" window to
create a new Project (after installation
there is only the Examples Project
available which should not be changed).
Projects can hold an unlimited
number of Players and help keeping
the data organisation concise.

SAM BalanceLab System installation Quick Start Guide page 7
4. A window "New Project" will pop up.
Enter a name for your project. Optionally
you can add a short description text.
Then click the "OK" button.
5. Add a new Player
Now click the "add" button in the
Players section to create a new Player.
The "Add Player" dialog will open.
Please enter all desired data.
At least the last name has to be entered.
If you want to send reports by email it makes
sense to enter the email address into the player
data when creating a player.
Press "Save" button after data input is finished.

SAM BalanceLab System installation Quick Start Guide page 8
Step 4: Do a first recording
Important Security Note:
The surface of the system is designed for indoor usage with sports shoes.
never use the system if damp or humidity is on the surface or on
a player's shoes –there is a danger of slipping or falling for the
player in this case !
never step on the plate with golf shoes equipped with hard
spikes !
Science&Motion is currently working on a solution with a covering mat for
usage with spikes or outdoor usage. Please contact us for availability date.
1 . Start a Measurement
Click the "Measurement" button at the
bottom of the "Main" window.
In the "Calibrate" window leave the
"activate video recording" checkbox
Unchecked for now.
Be sure nobody stands on the
forceplate and press the "Calibrate"
button.
Calibration will take some seconds
and then the Recording window will
open.

SAM BalanceLab System installation Quick Start Guide page 9
2. The Recording window (Measurement/Training)
When the software enters the "Measurement" window the live pressure
distribution is shown in the force plate view window.
You can switch between 3D and 2D mode by clicking the "2D" button in the upper
right corner of this window.
The window on the right shows the "Balance view".
This graphic shows the weight distribution of the person in percent.
The red dot is the actual pressure center, the values around the box are showing
the percentage of pressure on the left/right foot and to the front or back.
Inside the feet on the left and right the black line marks the actual pressure
distribution for this foot (to heel or toe).
To get right values here it is very important to have the separation lines set
properly. The lines are displayed in red on the force plate view and separate the
left and right foot and also the front / back.
The vertical line has to be positioned in the center between the two feet. The
horizontal line should be set between the toe and the heel area of the feet (center
of feet).
To set the separation lines press the "SP" button in the force plate view or press
the "F3" function key. Click with the mouse into the view to set the lines –the
mouse position will define the center point of the cross.
To go back to the normal view press "F3" key or button again.
The window below the force plate view shows the actual pressure values as a
curve. You will see a history of some seconds into the past.
With a right-mouse click into this window the curves can be displayed for total
pressure or pressure separated for feet or front / back.
1
1
1
2
2
3
3

SAM BalanceLab System installation Quick Start Guide page 10
Starting the recording:
The Recording button on the bottom area of the window will start a recording.
Recording time is 8 seconds by default –the progress is displayed in the progress bar.
If you want to stop the recording manually this can be done by clicking again on the
recording button.
Start/stop of a recording can also be done by pressing the spacebar.
Start a recording, do a swing type movement and stop the recording.
After stopping a recording you will be asked if you want to save the record:
If "Auto generate name" is checked the name of the record will be the current date/time.
You can add text after this or even delete the default name and enter your own text.
"Save" will save the record temporarily. "Cancel" will delete the recording.
Please press "Save"
It is possible to do multiple recordings just by clicking again on the recording button.
All recordings done in one row will be added to one data session.
If you are finished with recordings press the button.
If Records are available you will be asked if you want to save the Session.
The Session will include all your recorded data.
You can add a Name for the Session and also a comment which will be displayed in the
Main Window to better identify or remember your recordings.
!If you press "Cancel" all recorded data will be rejected !

SAM BalanceLab System installation Quick Start Guide page 11
Step 5: Browse and replay data
1. Select data for replay
Click on the Project "Example Data" in the Projects section on the left.
Then click on the Player "Common Swing Faults" in the Players section:
In the Sessions section you will see the available sessions for this player:
Click on the first session "Chicken Wing". This will select this session and show the
content on the right.
There are 3 sections in the right column, Info, Media and Records.
In the Info field you will see the comment information for this session. This can be
entered directly after recording or at any time later.
The Media field will contain additional files that can be attached to a session. This could
be documents (like PDF) or pictures or any other files.
In this example a Report PDF file and pictures for the swing positions are attached:
A double click on one file will open it.
You can add files by "drag and drop" them to this box.
Files can be added by copying them, moving them or linking them.

SAM BalanceLab System installation Quick Start Guide page 12
In the Records field the recordings for this session are listed.
All records with this symbol contain videos.
A double-click on the record or click on the "Replay" button will open the selected record
in the replay window.
Please click the "Replay" button to proceed to the replay now.
2. The data replay window
The Replay window is segmented into different functional areas.
On the left side you find the data selection section.
On the right the 4 data views are visible:
1. Force data view
2. COP (center of pressure) curves for body / feet
3. Video view
4. Balance view with current force distribution and COP position

SAM BalanceLab System installation Quick Start Guide page 13
On the bottom area of the window you find the control elements for the replay:
Press the play button to start the replay.
All data views will show synchronized data in the replay.
Navigation through the data is also possible with the keyboard or mouse:
Mouse:
Place the mouse cursor into the replay bar and press the left mouse button. The position
in the data views will be updated to this position. You can also hold the button pressed
and move the mouse cursor inside the bar and live display will follow the mouse position.
Keyboard:
The left/right arrow keys will move the position back or forth one data frame (10ms).
This allows very precise positioning.
If shift and arrow keys are pressed together position will move 10 data frames (100ms).
The navigation bar also contains the marker positions for the swing phases.
The software supports markers for the following positions:
Swing start (green)
Top of backswing (blue)
Delivery (cyan)
Impact (red)
End of swing (violet)
The marker positions can be moved by gripping on the yellow arrows on top of each
marker.
Pressing the TAB key will move the position to the next marker.
The marker positions are important to compare different swings and also for the data
display in the report.
To change the replay speed click on the following slider control:
Speed can be set to 0.1x, 0.25x, 0.5x, 1x, 2x of the
original speed.

SAM BalanceLab System installation Quick Start Guide page 14
Description of the data views:
a) Force data view
In the force data view the actual force distribution is displayed in 2D or 3D.
In 3D higher force will generate higher "mountains". Also the color changes
depending on the force applied to the sensors of the plate.
The color bar on the left shows that low pressure starts with blue color and higher
pressure values are indicated by green, yellow or red color.
The white line on the surface shows the COP position of the body throughout the
swing.
For the current sample the body moves to the right in the backswing, but then a
lot to the front in the forward swing. So the weight shift is not applied in direction
of the ball –which takes away a part of the potential power when hitting the ball.
The colored dots on the COP curve mark the swing events –the colors are the
same as in the navigation bar.
The white cross on the COP curve marks the current data position:
To zoom in and out the force plate in the view use the mouse scroll or the
plus/minus buttons on the keyboard.
To change the view angle click and move the mouse inside the force view.
To switch between 2D and 3D view click on the topmost button in upper right
corner of the force view window.

SAM BalanceLab System installation Quick Start Guide page 15
b) Force curves view
By default this view shows the force curve of the whole body. The vertical lines
mark the swing events. The black line shows the current position in the replay.
Typical for a golf swing is the increase in the downswing coming from Top to
Impact. The amount of downforce is an indication how good the player can
transfer weight into direction of the ball.
c) Balance view
The balance view shows the balance of the player.
Following information is provided here:
- current COP position for the body (position of the red dot in the circle)
- total percentage values of weight on front / back / left / right
- the heel/toe balance for both feet separated (black lines and percentage values)
The balance view is great to check weight distribution of a player against
reference values given for certain positions (see report section of this document
for more details).

SAM BalanceLab System installation Quick Start Guide page 16
d) Video view
Beside the standard display of the video this
view offers some overlay drawing functions.
Click on the "Overlay options" bar to open the
options pane:
A click on a button with the drawing symbols will
add a drawing object to the video.
The active object is marked with gripping
rectangles.
The white rectangle will allow to move the whole
object. The yellow rectangles allow resizing and
adjusting of the object.
Line color and width also can be changed.
If you press the "Save overlay" button the
current overlays will be saved to this record
permanently.

SAM BalanceLab System installation Quick Start Guide page 17
Step 6: Open a result report
A report can be opened from the main screen for the current selected record or from the
replay view.
Both screens contain the "Report" button.
After pressing the button a selection window will pop up with a selection of available
reports:
The "Standard" report shows only the results for the current record, the "Standard (with
descriptions)" contains one description for every data page.
Please click on Standard (with descriptions)" and "OK" to open the report.
After some seconds the report window will open:

SAM BalanceLab System installation Quick Start Guide page 18
The report is a multi-page document and contains the following informations:
Logo area on top of each page, the left logo can be easily exchanged by a custom logo.
Following on page 1 a data information section with information about Player and
recording.
Following on page 1 a force view overview and the force data curve:
All the swing phases (events) are displayed in the graphics as dots or lines.
The red ellipse indicates the direction and flatness of the force distribution during the
swing.
Ideally the ellipse should be quite flat (that means not much weight shift to front or
back). And the direction should be straight into ball direction.
In this example the ellipse is much too high and also tilted to the outside.

SAM BalanceLab System installation Quick Start Guide page 19
Following the front page there will be one additional page per swing event.
Example here for the "Top of backswing" event:
For each of the events the current data will be displayed for:
Force distribution
Player balance
Over all force curve and current position
Picture from the video for this position
If the report with descriptions has been selected each page will be followed by a page
with descriptions for this swing event.
Please try this and compare the actual player data with the reference data given on the
description page.
Table of contents
Popular Accessories manuals by other brands

Generac Power Systems
Generac Power Systems Air-Cooled Generator Sets 5621 specification

Rejeee
Rejeee SL200 Series manual

Comfee
Comfee CRV115TAST user manual

PCB Piezotronics
PCB Piezotronics 4106-01A Installation and operating manual

ARENDO
ARENDO 303578 user manual

Logitech
Logitech Harmony Link user manual

Rak Ceramics
Rak Ceramics RA-FS10 Installation instructions manual

Crestron
Crestron GLS-LCL Installation and operation guide

Yamaha
Yamaha FC7 owner's manual

Conceptronic
Conceptronic CPOWERBK12500 quick guide

Johnson Hardware
Johnson Hardware 200FD Series installation instructions

Shimmer
Shimmer Shimmer3 user guide