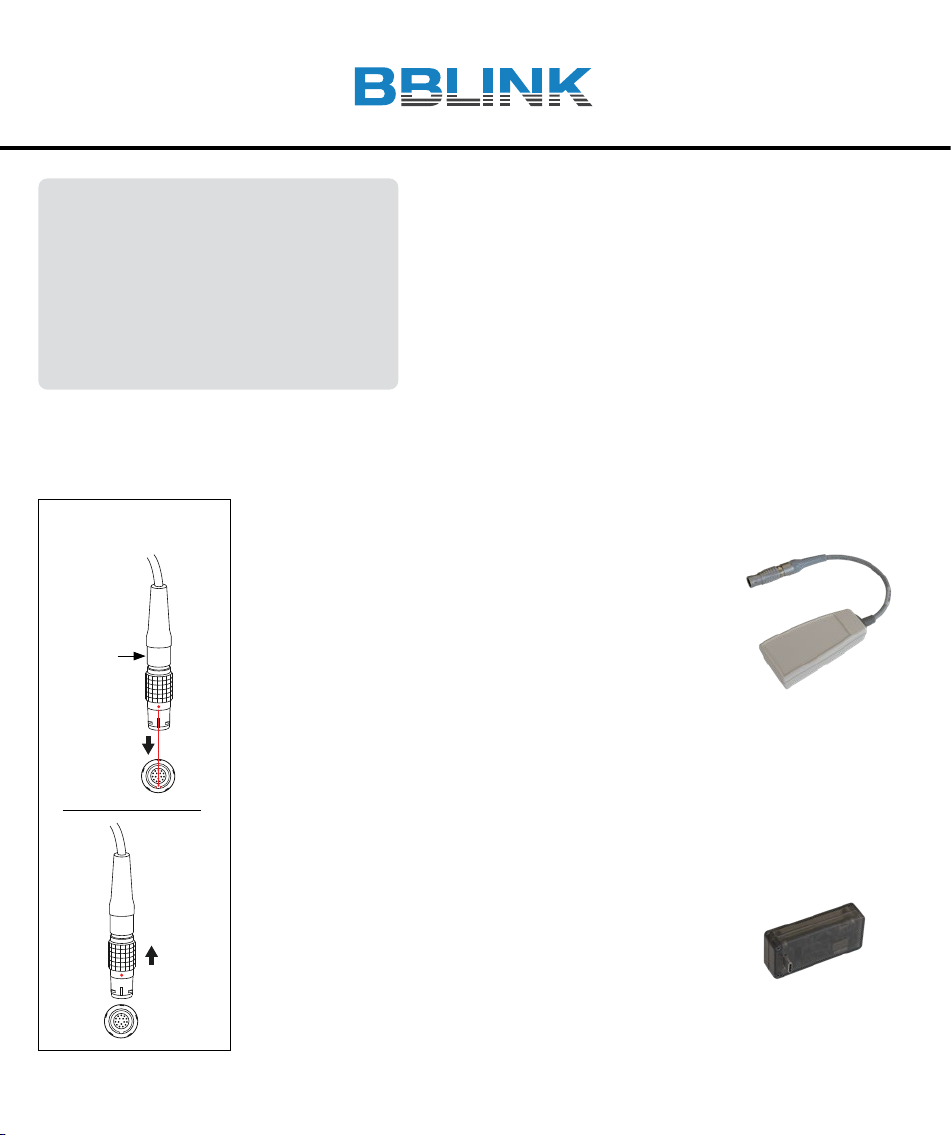
BBLINK SETUP
Restart the JOULE®or mJOULE™
System
Note: If Goggles have already been
activated, see section titled PAIRING
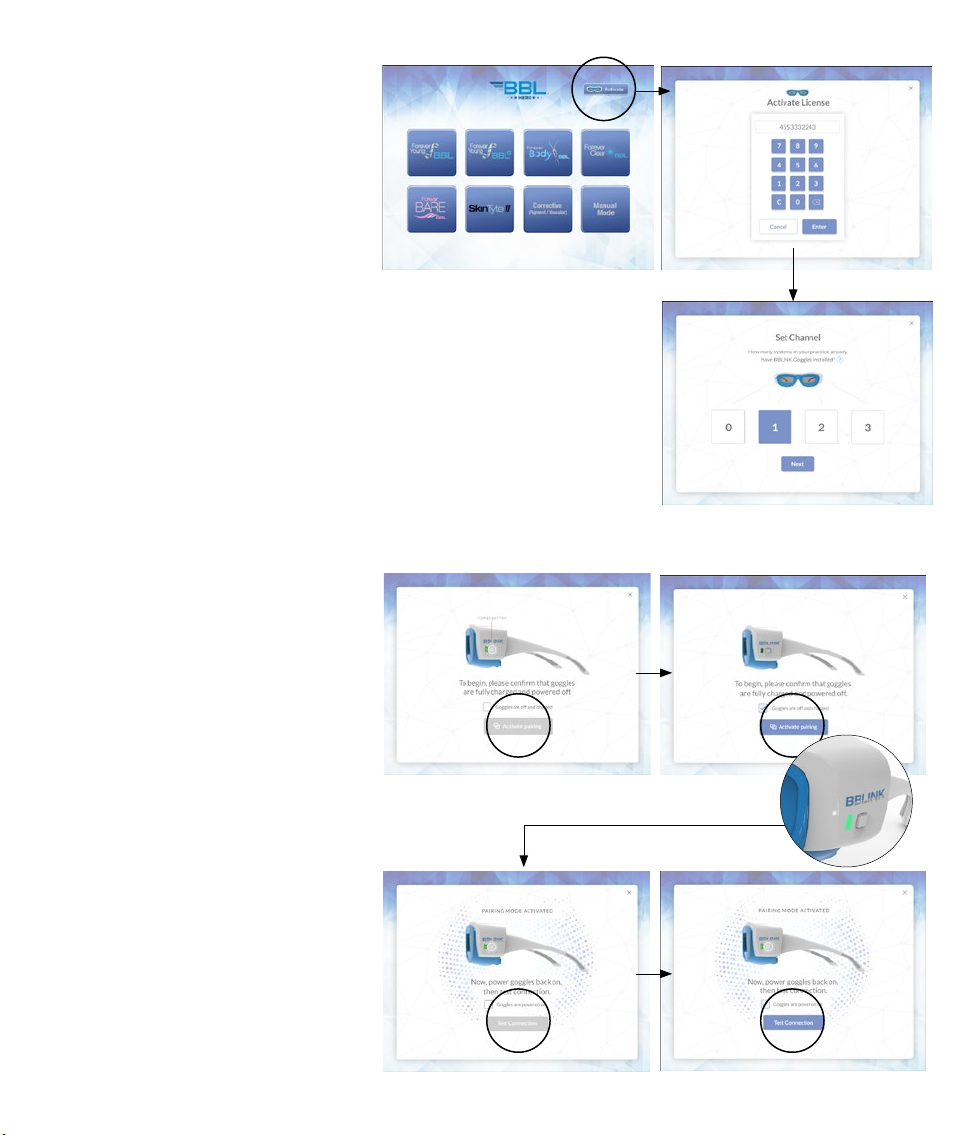
1a. Navigate to the BBL home screen
1b. Click on the “Activate” button in the
top right hand corner of screen
• Enter License code, click
“Enter”
2. The License key code is located on
the back of the box
3. To set the communication channel,
enter the number of Sciton systems
in your practice that are using
BBLINK Goggles already. If this is
your first pair, select 0
4. Turn system Off, then On
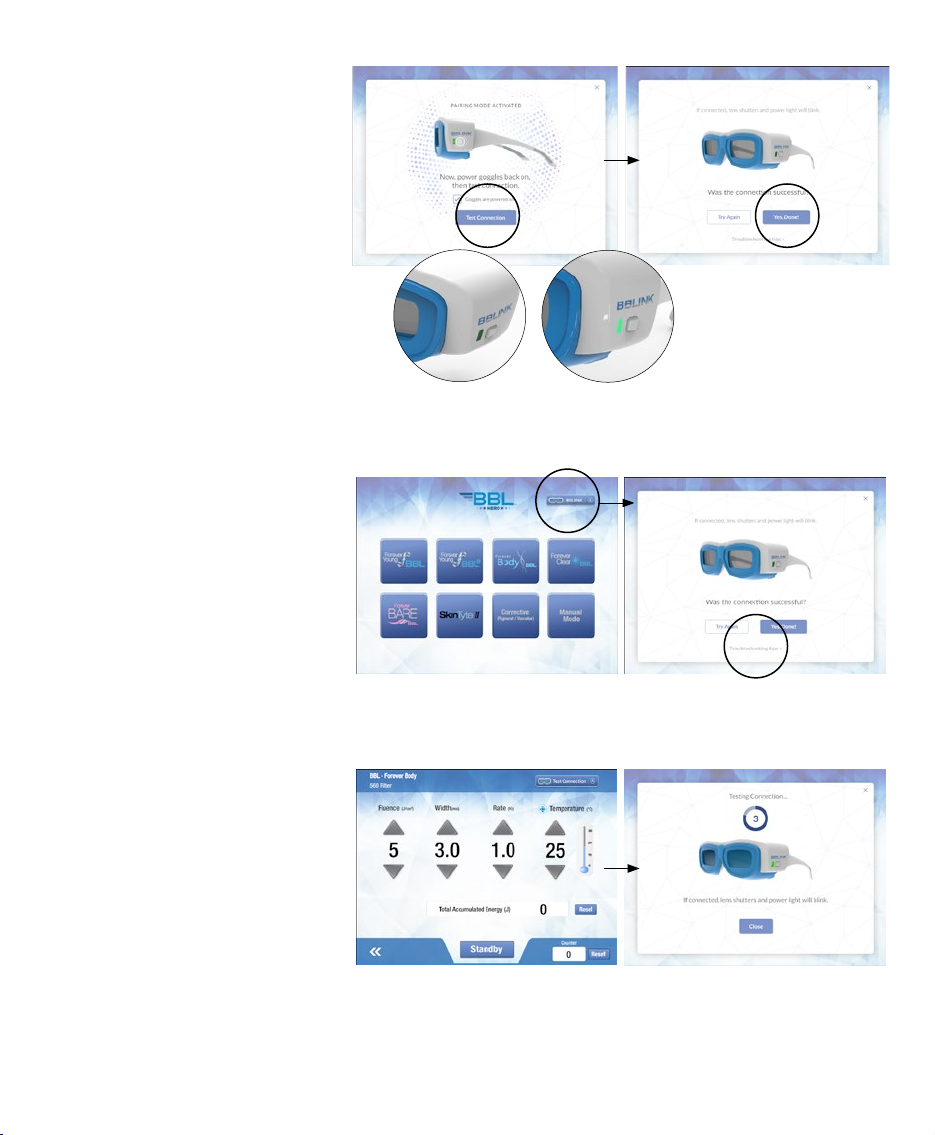
PAIRING
• Navigate to the BBL home screen
• Turn Goggles off and ensure they have
been charged for at least 1 hour
1. Check box to confirm “Googles are
off and charged”
2. Click “Activate Pairing” button
3. Power Goggles back on
4. Check box to confirm “Goggles are
powered on”
5. Click “Test Connection”
• The system will immediately broadcast
the signal and connect with the
BBLINK goggles
TEST CONNECTION
1. Click “Test Connection” button
• The BBLINK lenses will blink several
times, and the Power and Pairing
light will illuminate
2. If successful, click “Yes, Done!”
3. If not successful, click “Try Again”
and repeat the Pairing steps
Note: Pairing only needs to happen once
per set of Goggles. Once paired with a
system, the goggles will operate with that
system.
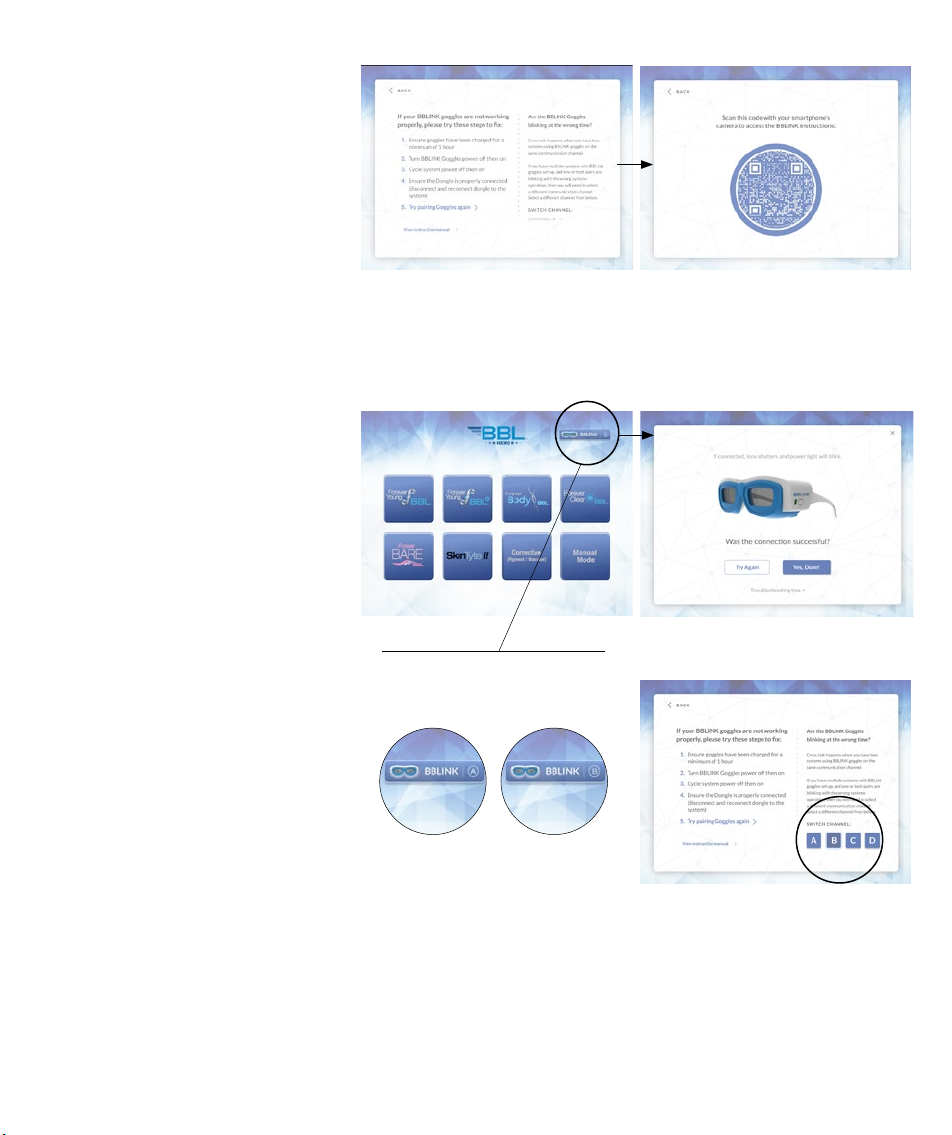
Pairing a second pair of BBLINK goggles
1. If you are pairing a second pair of
Goggles and have already activated
your system, use the “BBLINK”
button located in the upper righthand
corner of the BBL home Screen. And
complete steps in the PAIRING section
2. If not successful after multiple
attempts, click on “Troubleshooting
tips” at the bottom of the confirmation
page
Pairing second pair of Goggles
TEST CONNECTION FROM
TREATMENT SCREEN
When in a treatment, if your goggles
aren’t working you can test the
connection
1. Click on “Test Connection” button in
upper right-hand corner of the screen
2. Click “Close” if successful
If they still aren’t working, Please refer to
the Troubleshooting section for help
SWITCH CHANNEL
Crosstalk happens when you have two
systems using BBLINK Goggles on the
same communication channel.
If you have multiple systems with BBLINK
Goggles setup, and one or both pairs
are blinking with the wrong systems
operation, then you will need to ensure
each system is on a different channel.
1a. Navigate to the BBL home screen
1b. Click on “BBLINK” button in upper
right-hand corner of screen
2. Confirm which channel the other
device is on by looking at the BBL
Home Screen of that system, the
channel number is displayed on the
BBLINK button in the upper right
hand corner, refer to example to the
right
3. In order to access trouble
shooting tips, please repeat the
PAIRING section, then if pairing
is still not successful, click the
“Troubleshooting tips” link at the
bottom of the window
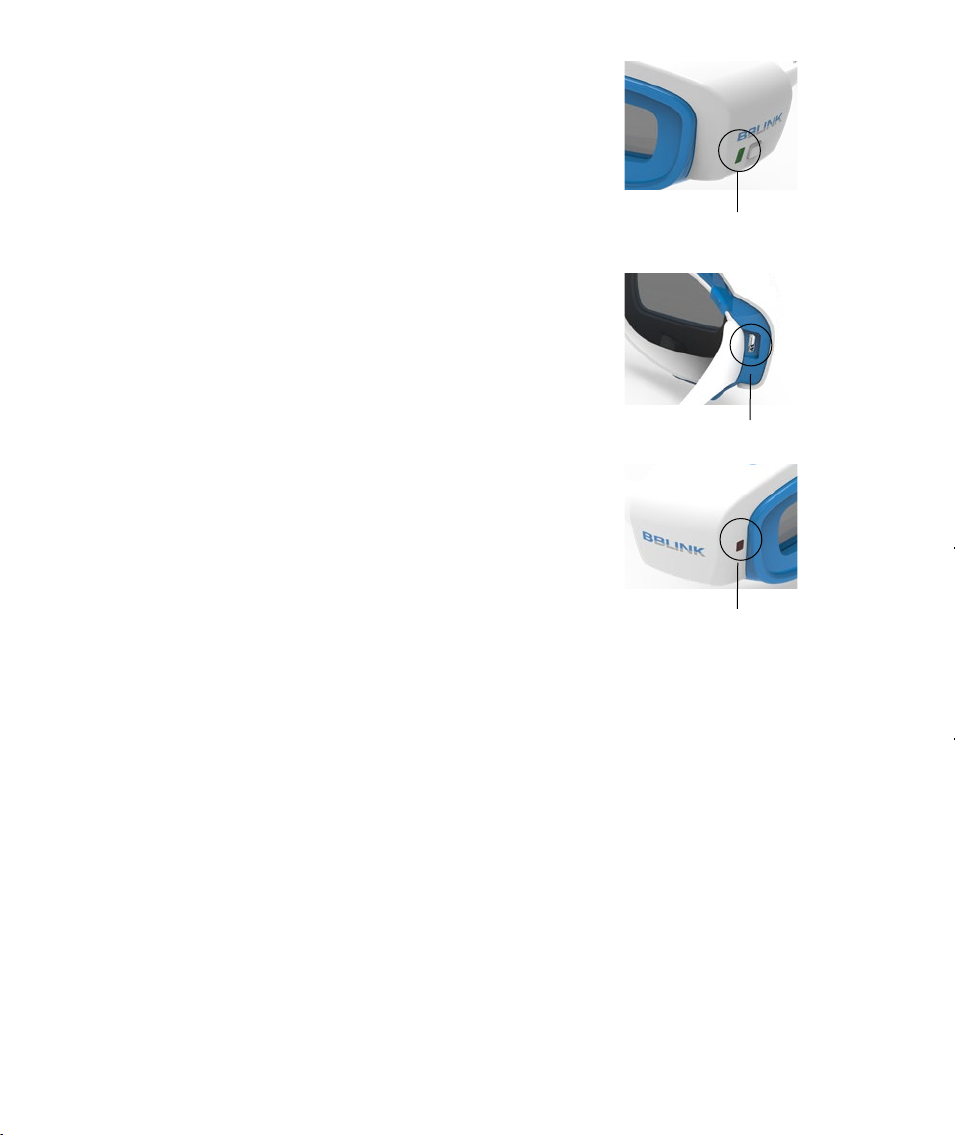
Watch Pairing light briefly luminates
Note: You will only need to do the
Activation set up once
Power on Goggles
1) 1)
1)
1)
1)
1)
4)
2) 2)
2)
4)
2)
2)
2)
5)
3)
3)
Note: To confirm the pairing was
successful, please click “Test
Connection” looking closely at the
lenses you will be able to see the lenses
blinking (please look closely as the
shutter is very fast!)
Correct set up of two systems
with BBLINK Goggles will
indicate different Channels
System 1 System 2
4. Select a different channel by clicking
any of the available (blue) channel
buttons located on the right hand
side of the Troubleshooting window
3) How to check which channel
your system is set to:
TROUBLESHOOTING
For basic Troubleshooting tips, navigate
to the BBL home screen.
• Select the “BBLINK” button in the
upper right hand corner and then try
to pair them again. Refer to PAIRING
section for complete instructions
• On the last screen of the pairing
process, if still unsuccessful, click
“Troubleshooting tips” on the
bottom of the pairing window
• Try Steps 1-5
• Click the “View Instruction manual”
for a QR code link to download PDF
of the instructions
Still having problems?
• If you are still having trouble with your goggles,
please give us a call or contact your Sciton
representative for help
• Call your Sciton service team @ (650) 543-8371