Scolaro Galileo Retractable 3x3 User manual

GALILEO
RETRATTILE 3x3 · 3,5x3,5 · 3x4
ISTRUZIONI DI MONTAGGIO
ASSEMBLING INSTRUCTION
MONTAGEANLEITUNG
INSTRUCTION D’ASSEMBLAGE
INSTRUCCIONES DE MONTAJE
OPBOUWINSTRUCTIE
12 13
5
14

GALILEO RETRATTILE
1I
Vi ringraziamo per aver scelto i nostri prodotti. Avete acquistato un articolo
frutto di un’esperienza di oltre 40 anni nella produzione di ombrelloni e di un
processo produttivo 100% Made in Italy e interamente interno alla ditta Scolaro.
I nostri prodotti sono venduti in più di 70 Paesi in tutto il mondo e sono adat-
ti a resistere nelle più diverse condizioni atmosferiche e climatiche come,
pioggia, umidità, vento, sole, ecc.
Di seguito Vi comunichiamo le istruzioni per un corretto assemblaggio e al-
cuni consigli per un utilizzo e una manutenzione corretta per assicurare una
lunga durata e una migliore funzionalità dell’ombrellone.
1u k
Many thanks for your choice and trust.
You have bought an item fruit of an experience gathered in 40 years parasol pro
-
duction and of a 100% Made in Italy, inside Scolaro’s factory, production process.
Our items are sold in over 70 countries and are suitable to resist and long
last in different climatic and atmospheric condition like rain, moisture, wind,
sun and so on.
Hereinafter the instruction for a correct assembling and some advices for the
correct employ and maintenance that will grant long lasting and a better func-
tionality of the parasol.
1D
Vielen Dank fuer Ihre Wahl und Ihr Vertrauen.
Unser Schirm ist Ergebnis einer 40 jaehrigen Erfahrung und eines 100% Made
in Italy Produktionsprozesses.
Fig. 1
Fig. 4
Fig. 2
Fig. 5
Fig. 3
Fig. 6
1
3
5
2
1
3
12
2
13
4
14

Unsere Artikel werden in ueber 70 Laendern verkauft,
sind widerstandsfaehig und koennen in verschiedenen
klimatischen und atmosphaerischen Konditionen wie
Regen, Feuchtigkeit, Wind, Sonne, eingesetzt werden.
Nachstehend unterbreiten wir Montageanleitungen und
Hinweise fuer eine korrekte Verwendung und Wartung
um eine lange Dauer und eine bessere Zweckdienlichkeit
zu gewaehrleisten.
1F
Merci pour avoir acheté nos produits.
Vous avez acheté un produit, fruit d’une expérience de
40 ans dans la production de parasols et d’un procédé
de fabrication «100% Made in Italy» entièrement réalisé
dans l’usine de la societé Scolaro.
Nos produits sont vendu dans plus de 70 pays et sont
aptes pour résister aux différentes conditions climatiques
et atmosphériques comme pluie, humidité, vent, soleil, etc.
Nous vous transmettons ci-joint les instructions de mon-
tage correct ainsi que des conseils sur le mode d’utilisa-
tion et d’entretien pour assurer une durée plus longue
et un meilleur fonctionnement du parasol.
1E
Le agradecemos por haber elegido nuestros productos.
Han adquirido un artículo fruto de la experiencia de más
de 40 años en la fabricación de parasoles, con una fabri-
cación 100% italiana y totalmente producidos en nuestras
instalaciones de Scolaro.
Nuestros productos se venden en más de 70 paises en
todo el mundo, adaptándose a las diferentes condiciones
atmosféricas y climatológicas como la lluvia, la humedad,
el viento, el sol, ect.
A continuación le informamos de las instrucciones para
un correcto montaje y algunos consejos para la correcta
utilización y mantenimiento, asegurando de esta manera
una larga duración y mejor funcionamiento del parasol.
1n l
Hartelijk dank voor uw keuze voor een parasol uit het
SCOLARO assortiment.
U heeft hiermee een parasol gekocht die het resultaat
is van meer dan 40-jaar ervaring en die volledig in onze
eigen fabriek in Italië is geproduceerd.
Onze parasols worden wereldwijd in meer dan 70 landen
verkocht. Zij zijn zeer stabiel en bestand tegen verschil-
lende weersomstandigheden zoals regen, vocht, wind
en zonneschijn.
Voor een juist gebruik en om gedurende lange tijd plezier
van uw parasol te hebben verwijzen wij u naar de hierbij
ingesloten gebruiks- en onderhoudsvoorschriften.
ISTRUZIONI DI MONTAGGIO 1I
A Aprire tutti i cartoni, posizionare la base (1) a terra e
fissare con le apposite viti (5) il tubo (2). Posizionare
la zavorra o mattonelle in cemento (3) negli appositi
alloggiamenti della base (1).
B
Inserire il sostegno (4), già assemblato con l’ombrel-
lone, nel tubo rotondo (2).
C Avvitare e stringere forte le viti nere (12).
(Vedi figura 1 e 2)
MANUALE D’USO
1 Prima di aprire l’ombrellone togliere il legaccio (cin-
turino) e muovere le stecche per facilitare l’apertu-
ra. (Vedi figura 3)
2 Inserire la manovella (13) nell’apposita feritoia del
meccanismo e ruotare lentamente per aprire facendo
attenzione a non forzare in caso di attrito.
3 Una volta aperto completamente l’ombrellone im-
pugnare la maniglia del carrello e modificare l’incli-
nazione dell’ombrellone più gradita, scorrendo su e
giù. (Vedi figura 4)
4 Per fissare l’ombrellone all’inclinazione più gradita
tenere premuto bottone frontale e far scorrere il
carrello fino a che scatta il bloccaggio.
(Vedi figura 5)
5 Per modificare l’inclinazione dell’ombrellone, sbloc-
care la maniglia premendo il pulsante laterale, far
scorrere il carrello e bloccarlo nella nuova posizio-
ne. (Vedi figura 6)
6
Per la chiusura, procedere allo stesso modo per sbloc
-
care la maniglia del carrello; lasciare libera la maniglia
del carrello E iniziare a girare la manovella verificando
che non vi siano impedimenti alla chiusura. Fare atten-
zione che la manovella venga ruotata molto lentamen-
te, affinché il filo in acciaio resti in tensione. Questa
operazione va eseguita con la massima attenzione
onde evitare di rompere il meccanismo manovella.
7
Per l’ombrellone è necessaria una zavorra minima di
200 kg composta da mattonelle in cemento facilmente
reperibili o eventualmente dai ns articoli:
BC5050
BC5151 – BC5151G
BV5050G – BV5050B.
In caso di particolari ambienti o situazioni atmosferi-
che potrebbe essere necessario aggiungere maggior
peso. ULTERIORI INFORMAZIONI NELLA SEZIONE
DEDICATA DEL CATALOGO. L’azienda Scolaro, i no-
stri collaboratori e rivenditori sono a disposizione
per consigli ed eventuale supporto tecnico.
8 L’ombrellone da Voi acquistato è girevole 360° sia
da chiuso che da aperto. Per effettuare tale opera-
zione svitare le viti nere (12) alla base del sostegno
e agire su di esso per farlo ruotare.
AVVERTENZE
• Leggere attentamente e conservare le istruzioni di
montaggio e il manuale d’uso.
• La base va zavorrata con il peso indicato. L’insuffi-
cienza di peso sulla base compromette seriamente
la stabilità dell’ombrellone.
• Rimuovere sempre la manovella quando non utiliz-
zata. Tenere lontana dalla portata dei bambini.
• In caso di vento chiudere sempre l’ombrellone. Non
lasciare mai l’ombrellone incustodito aperto. Improv
-
visi colpi di vento possono danneggiare o rovesciare
l’ombrellone. Ricordare sempre che l’ombrellone non
è una struttura fissa.
La ditta Scolaro non potrà essere ritenuta responsabile
per danni ai prodotti forniti, cose o persone derivanti
da un utilizzo scorretto e dal mancato rispetto delle
istruzioni e direttive su riportate.
MANUTENZIONE
TESSUTO
• Il tessuto impiegato è trattato antimuffa ed imper-
meabilizzato per respingere al massimo l’acqua e le

macchie mantenendone la traspirabilità. Si raccoman-
da di seguire le istruzioni seguenti di manutenzione
per rendere ottimale la durata del tessuto:
– Togliere periodicamente depositi di polvere, macchie
e altro tipo di sporco per evitare che anche dopo la
pulizia rimangano tracce visibili.
– È importantissimo assicurarsi che la copertura sia
perfettamente asciutta prima di chiudere l’ombrello-
ne. Durante i mesi di non utilizzo l’ombrellone deve
essere riposto in un ambiente asciutto.
COMPONENTI
•
Le parti in acciaio, la viteria e gli accessori sono zincati
antiruggine. Per garantire e assicurare una maggiore
durata del prodotto è consigliabile comunque porre
l’ombrellone e la base al riparo durante i mesi invernali
o durante i periodi di non utilizzo.
•
Durante ogni stagione verificare periodicamente lo stato
e la funzionalità dei componenti soprattutto dopo un
periodo lungo dove l’ombrellone non sia stato utilizzato.
MECCANISMO MANOVELLA
• Periodicamente e comunque almeno una volta all’an-
no, è opportuno applicare olio lubrificante negli ingra-
naggi del meccanismo manovella. Tale operazione è
particolarmente consigliata dopo un periodo lungo
di non utilizzo o comunque all’inizio di ogni stagione
dopo il ricovero invernale.
Per ogni eventualità ribadiamo che la ditta Scolaro è a
vostra disposizione per ogni supporto tecnico.
ASSISTENZA + GARANZIA
• Durante il periodo di garanzia, in caso di danno de-
rivante da difetto di fabbricazione, la ditta Scolaro
fornisce assistenza, fornitura pezzi di ricambio gra-
tuitamente oppure, dove necessario, la sostituzione
dell’ombrellone completo.
• Trascorso il periodo di garanzia, la ditta Scolaro può
fornire un servizio di assistenza attraverso i nostri
rivenditori di zona o direttamente per molti anni suc-
cessivamente alla vendita, quale fornitura prezzi di
ricambio e possibilità di eseguire riparazioni.
• Per maggiori informazioni su garanzia o ma-
teriali vi preghiamo di vistare il nostro sito web
(www.scolaro-parasol.it) oppure consultare il catalogo.
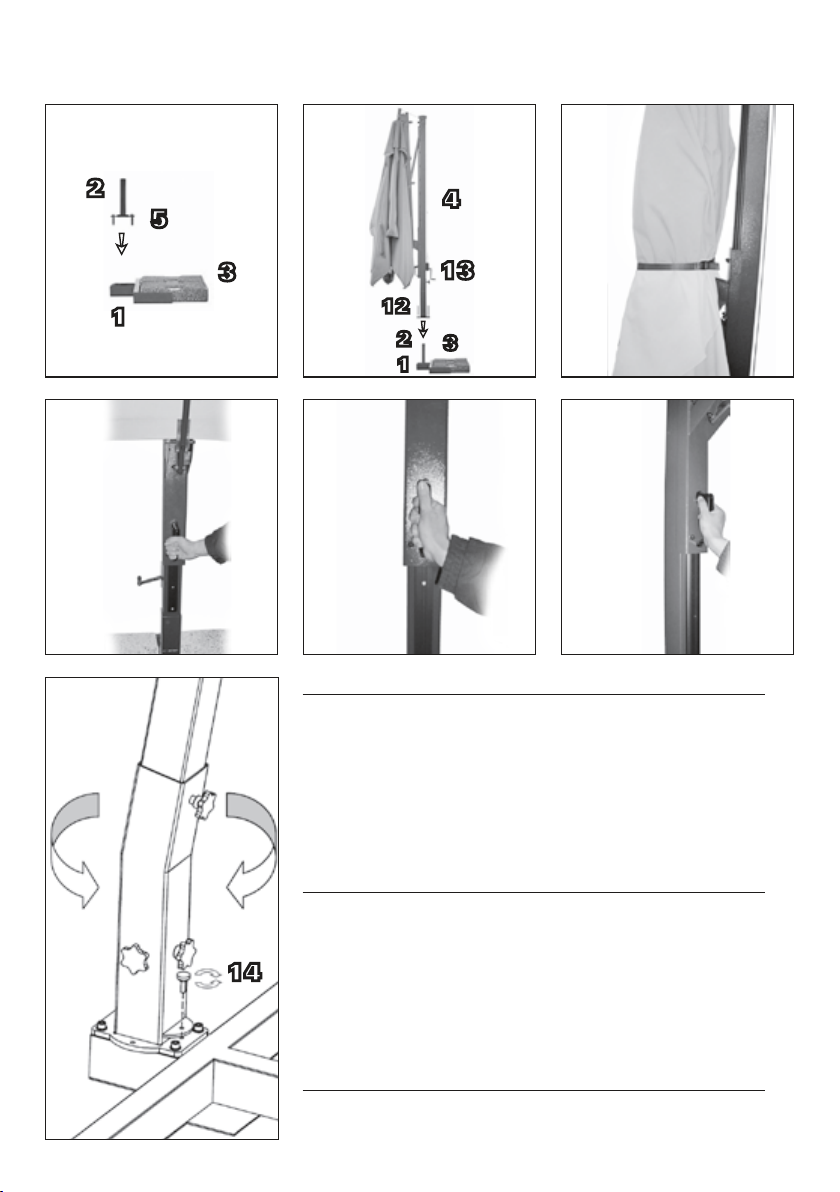
ASSEMBLING INSTRUCTION 1u k
A Open all carton boxes, position the base (1) on the
floor and fix the tube (2) with its screws (3). Put into
the spaces (3) the cement plates (1).
B Put the parasol (4) into the metallic tube (2).
C Screw and fasten strongly the black screws (12).
(Fig. 1 - 2)
DIRECTIONS FOR USE
1 Take the parasol string away, move the ribs to make
easier the opening. (Fig. 3)
2 Put the crank (13) into the proper loophole of the
mechanism and turn slowly to open paying attention
that there are no obstacles for the closing.
3 When the parasol will be completely opened hold
the carriage handle and change the inclination of
the parasol by going up and down. (Fig. 4)
4 When you have found the inclination you prefer keep
the button pressed and let the carriage run until the
locking springs up. (Fig. 5)
5 If you want to change the inclination release the han-
dle pressing the side button. Let the carriage slide
and find the new position. (Fig. 6)
6 For the closing release the handle and let it free.
Now begin to turn the crank paying attention that
there aren’t obstacles. Attention!!! The crank has
to be turned slowly, as the iron wire has always to
be strained. This step has to be done with the ut-
most attention in order to avoid to break the winding
mechanism.
7
For this parasol a ballast of 200 kg is required. The
cement plates or pots can be found easily or are
available in our range of optional items. See Art
BC5050
BC5151 – BC5151G
BV5050G – BV5050B.
In case of particular environments or special atmos-
pheric condition it could be necessary to increase
the ballast. ADDITIONAL INFORMATION IN THE DEDI-
CATED BROCHURE SECTION
.
The company Scolaro,
its staff and all retailers are at your disposal for any
further information and technical assistance.
8 The parasols you have bought is revolving 360°
whether closed or opened. Revolving is possible by
unscrewing the black screws (12) at the end of the
side post and by turning it.
ATTENTION
• Before use, directions and assembling instructions,
which are inside the package, have to be kept and
read carefully.
•
The base has to be ballasted. An insufficient weight will
seriously compromise the stability of the parasol.
• Always remove crank when not in use and keep out
of reach of children.
•
To avoid damage or personal injury, parasol must be
closed and removed from the support when unat-
tended and/or in windy conditions. Remember always
that the parasol is not a fixed construction.
The company Scolaro cannot be held responsible for
damage to goods supplied, persons or property result-
ing from misuse and failure to follow instructions and
guidelines on indications.
MAINTENANCE
FABRIC
• The fabric is waterproof and anti mould treated to
reject water, spots and grant transpiration. Please
follow our maintenance instruction to grant the long
lasting of the fabric:
– Remove often dust deposits, spots and any type of
dirt in order to avoid trails after cleaning.
–
It’s very important to close the parasol only when it is
perfectly dry. During the winter and when the parasol is
not employed, it has to be stored in dry environment.
COMPONENTS
•
The steel components, screws and accessories are
anti rust treated. Anyway for a long lasting of the para-
sol, during the winter and when the it is not employed,
the parasol has to be stored in dry environment.
• During every season it is necessary to check the
functionality of all components, especially after a
long period of non-employ.
WINDING MECHANISMUS
•
Periodically and at least once a year, you should apply
lubricating oil in the crank gear mechanism. This is es-

pecially recommended after a long period of inactivity at
the beginning of each season after the winter shelter.
The company Scolaro is at your disposal for technical
assistance.
ASSISTANCE + WARRANTY
• During the warranty period, in case of damages caused
by production faults, the company Scolaro grants as-
sistance, supplies spare parts without any charge,
or, if necessary, replaces the complete parasol.
• After the warranty period, the company Scolaro can
grant assistance through its resellers or also directly
for many years after the sale, by supplying spare
parts or repairing the parasol.
• For further information about warranty or materials,
please visit our website (www.scolaro-parasol.it) or
consult our catalog.
MONTAGEANLEITUNG 1D
A Zunaechst alle Kartons oeffnen. Staender (1) auf den
Boden legen und das Rohr (2) mit den Schrauben (5)
befestigen. Kiesbetonplatten (3) in den Staender (1)
einlegen.
B Schirm (4) in das Metallrohr (2) einfuegen.
C Schwarze Schrauben (12) werden nun fest ange-
schraubt.
(Fig. 1-2)
GEBRAUCHSANWEISUNGEN
1 Schirmbaendel abnehmen und Streben bewegen um
die Oeffnung zu erleichtern. (Fig. 3)
2 Kurbel (13) in den Schlitz einfuegen, langsam drehen
und den Schirm oeffnen. Vermeiden, dass Hinder-
nisse die Schliessung nicht ermoeglichen.
3
Nachdem der Schirm ganz geoeffnet worden ist, wird
die Neigung des Schirmes bestimmt. Handgriff des
Wagens hoch und runter gleiten. (Fig. 4)
4 Vorderen Knopf druecken, den Wagen gleiten lassen
bis die Blockierung schnappt. (Fig. 5)
5 Um die Neigung zu verstellen muss der seitliche
Knopf gedrueckt werden um den Handgriff freizuge-
ben. Den Wagen gleiten lassen und neue Position
bestimmen. (Fig. 6)
6 Um den Schirm zu schliessen muss der Handgriff
wieder freigegeben werden. Danach langsam die
Kurbel drehen und vermeiden, dass Hindernisse
die Schliessung verhindern. Achtung!!! die Kurbel
sehr langsam drehen. Der Stahldraht muss immer
gespannt bleiben.
7 Fuer die Schirm eist ein Ballast con 200 Kg erfor-
derlich. Es koennen Kiesbetonplatten oder Beton-
toepfe eingesetzt werden, die leicht auffindbar sind
oder, die auch wir als Optional anbieten. Siehe Art
BC5050
BC5151 – BC5151G
BV5050G – BV5050B.
Bei besonderen Einsaetzen oder klimatischen Fak-
toren koennte es notwendig sein den Ballast zu
verstaerken. ZUSAETLICHE INFORMATIONEN IM
PROSPEKTABSCHNITT. Die Firma Scolaro, Mitarbei-
ter und Fachhaendler stehen jederzeit fuer weitere
Informationen und technische Hilfe zur Verfuegung.
8 Dieser Schirm ist 360° schwenkbar. Um den Schirm
zu schwenken muss man die schwarzen Schrauben
(12), die am unteren Ende des Mastes befestigt sind
abschrauben und dann den Mast drehen.
ANWEISUNGEN
•
Vor dem Gebrauch, Gebrauchsanweisungen und
Montageanleitungen, die in der Verpackung ent-
halten sind, aufmerksam lesen und danach auf-
bewahren.
•
Der Staender muss mit dem empfohlenen Ballast be-
schwert werden. Falls unzureichend beschwert, wird
die Stabilitaet des Schirmes ernsthaft gefaehrdet.
• Nach Gebrauch Kurbel immer entfernen und von
Kindern fernhalten.
• Um Schaden und Verletzungen zu vermeiden, muss
der Schirm bei starkem Wind immer geschlossen
und vom Gestell abgenommen werden. Schirm nie
unbeaufsichtigt geoeffnet lassen. Immer bedenken,
dass der Schirm keine feste Konstruktion ist.
Die Firma Scolaro ist bei Missbrauch und Nichtbefolgung
der Anleitungen und Anweisungen nicht fuer Schaeden
an Eigentum und Personen verantwortlich.
WARTUNG
STOFF
• Der Stoff ist wasser- und schimmelfest behandelt,
ist schmutzabweisend und luftdurchlaessig. Bitte
nachstehend aufgefuehrte Hinweise befolgen:
– Entfernen Sie oefters Staub, Flecken und jeglichen
Schmutz damit keine Spuren nach der Reinigung
uebrigbleiben.
– Bitte schliessen Sie den Schirm nur wenn der Stoff
vollkommen trocken ist. Waehrend der Wintermonate
und wenn nicht eingesetzt, muss der Schirm trocken
aufbewahrt werden.
BESTANDTEILE
• Stahlbestandteile, Schrauben und Zubehoer sind
rostfrei behandelt. Um eine lange Dauer des Pro-
duktes zu gewaehrleisten empfehlen wir allerdings
den Schirm waehrend der Wintermonaten und wenn
nicht eingesetzt trocken aufzubewahren.
• In jeder Saison und vor allem wenn der Schirm seit
langem nicht verwendet wird, muessen alle Bestand-
teile vor dem Einsatz kontrolliert werden.
KURBELMECHANISMUS
• Regelmaessig und mindestens einmal im Jahr ist es
notwendig das Getriebe mit Schmieroel einzuoelen.
Dies ist besonders empfohlen wenn der Schirm fuer
einen langen Zeitraum nicht eingesetzt worden ist
und nach der Winterunterbringung.
Die Firma Scolaro steht fuer technische Informationen
zur Verfuegung.
KUNDENDIENST+GARANTIEN
•
Waehrend der Garantiefrist und im Falle von Bes-
chaedigungen, die von Herstellungsfehlern abha-
engen, liefert die die Firma Scolaro kostenlos Er-
satzteile oder, falls noetig, ersetzt den kompletten
Schirm.
• Nach Ablauf der Garantiefrist kann die Firma Scolaro
direkt oder durch Fachhaendler Kundendienst anbie-
ten. Ersatzteile koennen auch nach vielen Jahren
geliefert werden. Es besteht auch die Moeglichkeit
die Schirme zu reparieren.
•
Für weitere Informationen zu Garantie oder Material besu-
chen Sie bitte unsere Website (www.scolaro-parasol.it)
oder befragen Sie unseren Katalog.

INSTRUCTION D’ASSEMBLAGE 1F
A
Ouvrir tous les cartons. positionner le pietement (1)
par terre et fixer le tube (2) avec les vis (5). Inserer
les dalles en ciment (3) sur le pietement (1).
B Inserer le parasol (4) dans le tube metallique (2).
C Reviser les vis noires fortement (12). (Fig. 1-2)
MODE D’EMPLOI
1 Oter le cordon du parasol et mouvoir les baleines
pour faciliter l’ouverture du parasol. (Fig. 3)
2 Inserer la manivelle (13) dans la fente speciale du
mechanisme, tourner lentement pour ouvrir et preter
attention que la fermeture n’ait pas des obstacles.
3 Quand le parasol sera ouvert complètement, saisir la
poignée du chariot et modifier l’inclination du parasol.
Faire glisser le chariot en haut et en bas. (Fig. 4)
4 Pour bloquer le parasol dans l’inclination choisi tenir
bloqué le bouton et laisser glisser le chariot jusq’au
déclenchement du blocage. (Fig. 5)
5 Pour modifier l’inclination débloquer la poignée du
chariot et laisser la libre. Tourner la manivelle len-
tement. Preter attention que la fermeture n’ait pas
des obstacles. Attention!!! tourner la manivelle
lentement, le fil d’acier doit rester toujours tendu.
Preter particulaire attention pour éviter la rupture du
mechanisme. (Fig. 6)
6 Pour fermer le parasol débloquer la poignée du cha-
riot. Tourner la manivelle lentement. Preter attention
que la fermeture n’ait pas des obstacles. Attention!!!
tourner la manivelle lentement, le fil d’acier doit
rester toujours tendu. Preter particulaire attention
pour eviter la rupture du mechanisme.
7 Pour ce parasol il faut un ballast de 200 Kg. Il s’agit
de dalles en ciment ou vases qu on peut trouver
facilement ou aussi acheter chez nous. Voire Art
BC5050
BC5151 – BC5151G
BV5050G – BV5050B.
En cas de milieux ou conditions atmospheriques
particulaires il faut augmenter le ballast. INFOR-
MATIONS SUPPLÉMENTAIRES DANS LA SECTION
DU CATALOGUE DÉDIÉ. La maison Scolaro, nos
collaborateurs et revendeurs sont à votre dispo-
sition pour tous renseignements et assistance
technique.
8 Le parasol peut tourner 360°. Il faut dévisser les vis
noires (12) et agir sur le mat.
INSTRUCTIONS
• Lire attentivement les instructions et le mode d’em-
ploi et les conserver.
• Le pietement doit etre lesté comme par nos instruc-
tions. L’insuffisance de poids peut compromettre
sévèrement la stabilité du parasol.
• La manivelle doit etre toujours enlevé quand le para-
sol n’est pas utilisé. Tenir lointain de la portée des
enfants.
• En cas de vent fort le parasol doit etre fermé et
enlevé. Le parasol doit jamais etre laissé sans sur-
veillance. Coup de vent pouvons endommager ou se
renverser. Se rappeler que le parasol n’est pas une
construction fixe.
La societé Scolaro ne peut pas etre responsable pour
dommages à personnes ou choses en cas de incorrect
emploi ou inobservation des instructions.
ENTRETIEN
TISSU
•
Le tissu est traité anti-tâches et imperméabilisé.
Nous vous recommandons de suivre les instruc-
tions d’entretien pour garantir la durée optimale
du tissu:
– Enlever périodiquement poussières, tâches et autres
types de salissures pour éviter toutes traces après
le nettoyage.
– Il est tres important de fermer le parasol seulement
quand il est sec. Pour garantir et assurer une plus
longue durée d’utilisation, il est conseillé de mettre
le parasol à l’abri dans un endroit sec pendant l’hiver
ou quand il n’est pas utilisé.
COMPOSANTS
• Les composants en acier, la visserie et les acces-
soires sont zingués antirouille. Pour garantir et assu-
rer une plus longue durée d’utilisation, il est conseillé
de mettre le parasol à l’abri dans un endroit sec
pendant l’hiver ou quand il n’est pas utilisé.
• A chaque saison il faut contrôler tous les composants
surtout si le parasol n’a été pas utilisé pendant long-
temps.
MECANISME MANIVELLE
• Périodiquement et au moins une fois par an, vous
devez appliquer de l’huile de graissage dans le méca-
nisme. Ceci est particulièrement recommandé après
une longue période d’inactivité ou tous au moins au
début de la saison, après le refuge d’hiver.
La societé Scolaro reste à votre disposition pour rensei-
gnements techniques
ASSISTANCE+GARANTIE
• Pendant la période de garantie la societé SCOLARO
peut fournir des pièces détachées ou remplacer le
parasol si le dommage dépend uniquement d’un
défaut de fabrication.
• Après la période de garantie le service d’assistance
est donné par nos revendeurs ou directement par la
societé Scolaro. Les pièces détachées sont dispo-
nibles plusieurs années après la vente du parasol et
la Société SCOLARO peut également effectuer des
réparations avec refacturation du coût.
• Pour plus d’informations sur la garantie ou les
matériaux, s’il vous plaît visitez notre site Web
(www.scolaro-parasol.it) ou consultez notre catalogue.
INSTRUCCIONES DE MONTAJE 1E
A Abra todas las cajas. Posicione la base (1) en el sue-
lo y fije con los tornillos (5) el tubo (2) con la base.
Coloque las losas de cemento (3) en el alojamiento
de la base (1).
B Inserte el soporte (4) que ya está en el parasol, en
el tubo redondo (2).
C Atornille y apriete fuertemente los tornillos negros
(12). (Ver figuras 1 y 2)
INSTRUCCIONES DE USO
1 Antes de abrir el parasol, quite la cinta y mueva las
varillas para facilitar la apertura. (Ver figura 3)
2 Inserte la manivela (6) en el orificio del mecanismo
y gire lentamente para abrir el parasol, prestando
atención de no forzar en caso de roce.
3 Cuando el parasol está abierto, empuñe la manija

de la guía y incline el parasol como le agradeces,
moviendo abajo y arriba. (Ver figura 4)
4 Para fijar el parasol en la posición agardable, tienes
che apretar el botón frontal y deslizar la guía hasta
che se bloque. (Ver figura 5)
5 Para modificar la inclinación del parasol hay que
desbloquear la manija apretando el botón lateral,
deslizar la guía y bloquearla en la posición que más
agradece. (Ver figura 6)
6 Para cerrar el parasol tienes que seguir las instruc-
ciones para desbloquear la manija de la guía y girar
la manivela verificando que no haya impedimentos
para el cierre. Prestar atención y girar muy lenta-
mente la manivela, para que el cable de acero vaya
destensándose. Esta operación debe de ser realizada
con la máxima precaución para evitar que se rompa
el mecanismo de la manivela.
7 Es necesario el uso de losas de cemento con un
mínimo peso de 200 kg, que tenemos disponibles
y sirven para nuestros articulos.
BC 5050
BC 5151 – BC 5151G
BV5050G – BV5050B
En algunos casos por situaciones atmosféricas será
necesario poner más peso. INFORMACIÓN ADICIO-
NAL EN LA SECCIÓN DE CATÁLOGO DEDICADA. La
firma Scolaro así como sus colaboradores y distri-
buidores, está a su disposición para aconsejarle y
darle soporte técnico.
8 El parasol se puede girar hasta 360º, tanto cerrado
como abierto. Para hacer esta operación tienes que
desatornillar los tornillos negros (12) en la base del
soporte y hacerlo girar.
ADVERTENCIAS
• Leer con cuidado y conservar las instrucciones de
montaje y el manual de uso.
• La insuficiencia de peso en la base compromete
seriamente la estabilidad del parasol.
• Quite la manivela del mecanismo si no va a ser uti-
lizada y no dejarla al alcance de los niños.
• En caso de viento cierre siempre el parasol y quítelo
de la base o estructura. No deje nunca el parasol
abierto sin presencia de alguien. Fuertes golpes de
viento pueden dañar o derribar el parasol. Recuerde
que el parasol no es una estructura fija.
La firma Scolaro no se hace responsable por daños al
producto, cosas o personas, derivadas de un mal uso
o por no seguir las instrucciones indicadas.
MANTENIMIENTO
TEJIDO
• El tejido está tratado contra la humedad e imper
-
meabilizado para repeler el agua y las manchas y
mantener la transpiración. Se recomienda seguir
las siguiente sintruciones de mantenimiento para
obtener una mayor durabilidad del tejido.
– Quitar periodicamente el polvo depositado o cual-
quier tipo de suciedad para que después de llover
no deje rastros visibles.
– Es importantísimo asegurarse que la lona esté per-
fectamente seca antes de cerrar el parasol. Durante
los meses de no utilización guardar el parasol en un
lugar seco.
COMPONENTES
• Las partes de acero, la tornilleria y los accesorios,
están zincados para que no se oxiden. Para garan-
tizar y asegurar una mayor durabilidad del producto,
se aconseja que durante el tiempo de no utilización,
revisen el parasol y la base para evitar roturas y lo
depositen en un lugar seco.
• Además de comprobar periódicamente el funciona-
miento de todos los componentes, sobre todo des-
pués de largos periodos de no utilización.
MECANISMO DE LA MANIVELA
• Periodicamente o por lo mismo una vez al año es
indispensable aplicar el acite de lubricación en los
engranajes de la manovela. Se aconseja hacer esta
operación antes de un perÍodo de no utilzación o por
lo menos al comienzo de cada estación despues del
invierno.
Para cualquier eventualidad le recordamos que la firma
Scolaro esta a su disposición para cualquier consulta
técnica.
ASISTENCIA Y GARANTÍA
• Durante el período de garantía, en caso de daños
derivados por defecto de fabricación, la firma Scolaro
le ofrece asistencia, así como piezas de recambio
de forma gratuita, o si es necesario el cambio del
parasol completo.
• Tras el período de garantía, la firma Scolaro le ofrece
asistencia tanto a través de nuestros distribuidores
como directamente de fabrica, para el suministro de
piezas o reparaciones.
• Para obtener más información sobre la garan-
tía o los materiales, visite nuestro sitio web
(www.scolaro-parasol.it) o consulte el catálogo.
OPBOUWINSTRUCTIE 1n l
A Open alle dozen, zet de voet (1) op de vloer en mon-
teer de buis daarop met behulp van de schroeven
(2). Leg in de daarvoor bestemde ruimten (1) de
(optioneel leverbare) betonnen tegels (3).
B Plaats de parasol (4) in de metalen buis (2) en draai
de schroeven vast (5).
C Draai de zwarte schroeven (7) nu goed vast.
(Fig. 1-2)
GEBRUIKSAANWIJZING
1 Maak de band rond de parasol los en beweeg
de baleinen waardoor het openen gemakkelijker
wordt. (Fig. 3)
2 Steek de slinger in het daarvoor bestemde gat van
het opwindmechanisme en draai de parasol rustig
open. Let er op dat er niets in de weg staat dat het
opendraaien kan hinderen.
3 Als de parasol volledig geopend is kunt u de hoek
van de parasol instellen door de handgreep omhoog
of omlaag te schuiven. (Fig. 4)
4 Houdt de knop ingedrukt tot u de gewenste hoek
bereikt hebt en laat die dan los tot de vergrendeling
ingesteld is. (Fig. 5)
5 Als u de hoek van de parasol wilt wijzigen druk dan
de knop aan de zijkant van de handgreep in. Beweeg
de handgreep omhoog of omlaag tot de gewenste
stand bereikt is. Om de parasol te sluiten ontgren-
delt u de handgreep. Draai nu met de slinger de
parasol in. Let er op dat er niets in de weg staat bij
het indraaien. ATTENTIE!!!! De slinger altijd rustig

draaien omdat de staaldraad altijd strak gespannen
moet blijven. Deze handeling dient altijd zorgvuldig
uitgevoerd te worden om beschadigingen aan en in
het opwindmechanisme te voorkomen. (Fig. 6)
6 Voor deze parasol is een tegengewicht van mini-
maal 200 kilo noodzakelijk. De betonnen tegels of
bloempotten zijn optioneel door ons leverbaar. Art.
BC5151- 4 stuks of Art. VA5050G-2 stuks.
7 In een winderige omgeving (b.v. aan de kust) kan een
zwaarder tegengewicht noodzakelijk zijn.
In een winderige omgeving (b.v. aan de kust) kan
aan zwaarder contragewicht noodzakelijk zijn. AAN-
VULLENDE INFORMATIE IN HET HOOFDSTUK SPE-
CIFICATIES.
8 De parasol Galileo is zowel in open als gesloten toe-
stand 360º draaibaar. Draaien is mogelijk door de
zwarte schroeven (7) aan de voet los te draaien. Na
het vaststellen van de nieuwe positie dient u deze
weer vast te draaien.
SPECIALE AANDACHT
• Voor het gebruik dient u de opbouwinstructie en de
gebruiksaanwijzingen, die in deze verpakking zitten,
zorgvuldig door te lezen en op te volgen. Bewaar deze
instructies.
• De voet dient altijd verzwaard te worden met de
daarvoor bestemde tegels o.i.d. Een ontoereikend
contragewicht gaat ten koste van de stabiliteit van
uw parasol.
• Verwijder te allen tijde de slinger uit het opwindme-
chanisme als de parasol in- of uitgedraaid is en houdt
deze buiten bereik van kinderen.
• Om schade en persoonlijk letsel te voorkomen moet,
bij slechte weersomstandigheden of als de parasol
gedurende langere tijd niet in gebruik is, de parasol
altijd gesloten zijn en opgeborgen worden. Houdt u
er rekening mee dat een parasol altijd een mobiel
object is.
OPBOUW EN ONDERHOUDSADVIES
• Lees voor het gebruik altijd eerst de gebruiksaan-
wijzing en opbouwinstructies die in de verpakking
ingesloten zijn en bewaar deze daarna zorgvuldig.
• De staander moet met het aangegeven gewicht
verzwaard worden. Indien onvoldoende verzwaard
wordt de stabiliteit van de parasol ernstig in gevaar
gebracht.
• Verwijder na het opendraaien of sluiten van de para-
sol altijd de slinger en bewaar deze buiten het bereik
van kinderen.
• Om schade aan materiaal en personen te voorko-
men moet de parasol bij harde wind altijd gesloten
worden en uit de voet gehaald worden. Onverwachte
windstoten kunnen een parasol beschadigen of om
laten vallen. Laat een parasol nooit onbeheerd ach-
ter. Hou er rekening mee dat een parasol altijd een
mobiele constructie is.
De firma SCOLARO is niet aansprakelijk voor schade
aan goederen of personen ten gevolge van oneigenlijk
gebruik en/of het niet opvolgen van de instructies.
HET DOEK
• Het doek is rot- en schimmelwerend behandeld. Is
waterafstotend en luchtdoorlatend. Voor een langdu-
rig gebruik adviseren wij u de volgende onderhouds-
voorschriften nauwkeurig op te volgen:
– Regelmatig dienen stof, vlekken, waaronder voge-
luitwerpselen, etc. verwijderd te worden zodat deze
bij het nat worden geen sporen meer achter kunnen
laten.
– De parasol mag nooit nat ingevouwen worden en
dient bij langere afwezigheid en buiten het sei-
zoen schoon en droog opgeborgen te worden.
Alle metalen delen zijn roestvrij. Voor een lange
levensduur adviseren wij u te allen tijde om uw pa-
rasol buiten het zomerseizoen en als u uw parasol
gedurende langere tijd niet gebruikt schoon en droog
te bewaren.
– Aan het begin van het zomerseizoen en als uw para-
sol gedurende langere tijd niet gebruikt is, adviseren
wij u altijd om voor het gebruik alle bewegende delen
te controleren op een goed functioneren.
OPWINDMECHANISME
• Regelmatig, maar minstens eenmaal per jaar, na het
winterseizoen of als de parasol gedurende langere
tijd niet gebruikt is, is het noodzakelijk om het op-
windmechanisme met een smeerolie te behandelen.
SERVICE EN GARANTIE
• Tijdens de garantieperiode en in geval van beschadi-
gingen, die door productiefouten ontstaan zijn, levert
SCOLARO gratis vervangende onderdelen. Indien
noodzakelijk, ter beoordeling door SCOLARO, wordt
de hele parasol vervangen.
• Onderdelen zijn ook na vele jaren nog leverbaar.
Voor technische informatie is SCOLARO altijd be-
reikbaar.
• Uitgebreide informatie over garantie en materialen
vindt u op onze website: www.scolaro-parasol.it.
This manual suits for next models
5
Table of contents
Other Scolaro Patio Furniture manuals
Popular Patio Furniture manuals by other brands

Seasons Sentry
Seasons Sentry UMB-633130I Assembly, care & use manual

Atleisure
Atleisure UMB-922115 Assembly and user's manual

Treasure Garden
Treasure Garden AG25T Assembly and operation guide

PURPLE LEAF
PURPLE LEAF CLASSIC Assembly and operation manual

Bambrella
Bambrella HURRICANE SIDE WIND Assembly instructions

Hartman
Hartman 69019012 Assembly instructions