SCUDO 006 User manual

MIRROR 006
INSTRUCTION MANUAL

Mirror 500x700mm
Front View
Side View Back View
MIRROR 006
500mm
R40mm
ON/OFF BUTTON
700mm
35mm
HOOKS
WIRE OUTLET

MIRROR 006
Technical Details
Heated Demister Pad
This mirror comes with a demister pad,which heats the surface of the mirror
above room temperature removing the mist on surface .It turns ON/OFF along
with the led light once you touch the power button
Touch Sensor On/Off Switch
The touch sensor switch can be used to Turn Led Lights and Demister On/Off
.It can be operated easily with a simple touch of finger.
Increase/Decrease the Brightness of Led Light
You can increase/decrease the brightness of led light by long pressing the
touch sensor.
Portrait Mounting
You can hang this mirror in Vertical/Portrait position using the hooks provided
on the back of mirror.
Electrical Safety Information
We recommend that all electrical bathroom products should only be fitted by a
qualified -Part P registered electrician in accordance with the current IEE
Regulations.
Please ensure the Mains supply is switched off before attempting installation.
Before drilling ensure there are no hidden cables or pipes in the wall.
Installation Information
We recommend that you receive the product before commencing with
installation is as all sizes and measurements are approximate.
We try to ensure all measurements are as accurate as possible.
In the interest of continued product development, we reserve the right to alter
specifications as necessary.E & OE.

MIRROR 006
Safety & Installation Notes
Installation
1. Position the Mirror in a suitable location according
to the Zonal diagram above ensuring that the
domestic electrical mains supply is within reach of
the electrical entry point of the product.
2. Carefully mark the position of the mirror using a soft
pencil ensuring its level. Remove the mirror and
mark the mounting points, Please ensure that all the
mounting points accurately match up with the fixing
points on the mirror .
3. Using a suitable drill bit, drill holes in the marked
positions to suitable depth.If drilling through tile,
use a ceramic drill bit.
4. Insert wall plugs level with the surface of the wall, If
fitting to a tiled surface. wall plugs should be
inserted below the tiled surface to avoid cracking.
For plasterboard walls, special fixings should be
purchased, available from any DIY or hardware
store.
5. Ensure the domestic electrical mains supply to
which the mirrors being connected is turned off.
Connect the domestic mains supply to terminal box
according to the wiring diagram.
6. Hang the mirror in portrait position .
7. Switch on the domestic electrical mains supply for
the mirror
Operating Instructions
To turn on the light touch the sensor
button. Long press the sensor to
increase/decrease brightness
The Heated Pad is Only on when the
mirror is illuminated.
Care Instructions
Do not use
abrasives or
solvents when
cleaning this
product.Wipe off
all water spillages
as soon as possible
using a soft, damp
cloth.
Aftercare Service
In the unlikely
event that this
product should fail
,please contact our
customer service
Thankyou for purchasing this Product
Please read these instructions thoroughly and
refer back to them during installation to
ensure product safety.
Retain this leaflet for future reference
Before installation ,ensure the domestic
electrical mains supply is switched off.Before
drilling ,ensure there are no hidden cables or
pipes in the wall.
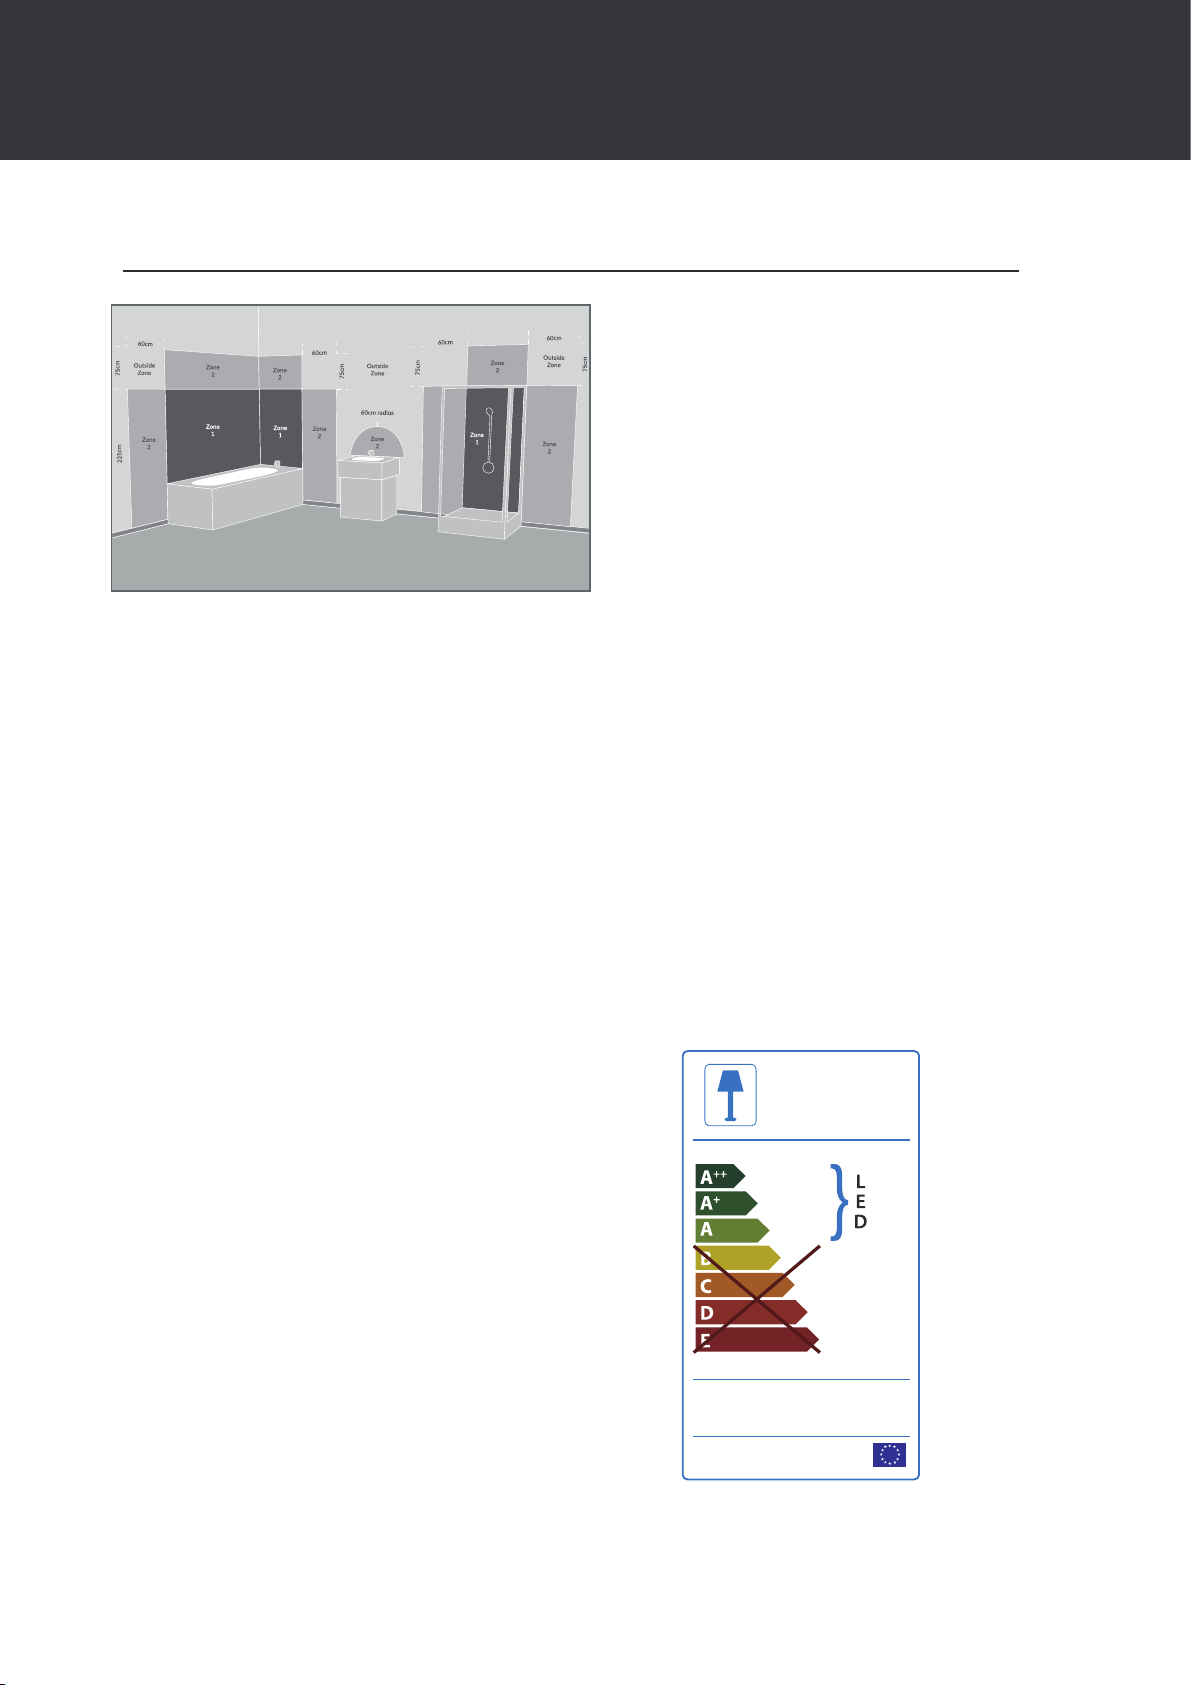
These products are suitable for installation in zones: 2 & Outside Zone
All installations must comply with guidelines which are based on azonal concept.The diagram
above illustrates this concept and must be followed to ensure the safe installation of Electrical
appliances in the bathroom .These regulations apply to domestic installations only. Installations
must be made in accordance with the current IEE wiring regulations and relevant building
regulations.We recommend that all electrical bathroom products shouldonly be fitted by a
suitably qualified, Part P registered electrician.
874/2012
This mirror contains
built-in LED lamps
The lamps cannot be changed
in the luminaire

MIRROR 006
Installation Instructions
General Information
This product conforms to U.K. safety standards and must be installed in accordance with the
current IEE Wiring and Building regulations(Part P).
This product must be earthed and should not be connected to an unearthed circuit.If there
are only two wires coming from your power supply it means that this fitting can be wired to
an unearthed circuit.
Ensure that connections are turned off at the consumer unit or fuse board before installing
or carrying out any maintenance.
This product is for indoor use only.
This product is IP44 rated and can be installed in bathroom zone 2(Defined by the IEE wiring
regulations) and beyond.
Important
When working at heights, please use a suitable platform to work from.
Please Note: For the new installations, check for any electrical cables or pipe work(gas/water)
in the vicinity of the intended mounting point before proceeding with the installation.
Ensure that the fixing location is able to take the weight of the complete fitting.
Wear suitable eye protection when drilling.
Be careful when using power tools near water.
Do not strike the mirror glass with hard or pointed items.It is recommended that the product
is cleaned with a soft and non abrasive cleaning cloth.
Donot use abrasive materials on any type of finished surface .
Do not allow moisture to come in contact with the working electrical components.
Compliance
This product complies with the following safety standards:
BS EN 60598-2-1:1989 USED IN CONJUNCTION WITH EN 60598-1:2015+A1:2018| EN 60598-
1:2015+A1:2018 |EN 55015:2013+2015 | EN 61547:2009 |EN 61000-3-2:2014 | EN
61000-3-3:2013 |IEC62321 2011/65 2015/863 |EN 62493:2015 | EN 55015:2013+2015 | EN
62471:2008 |EN IEC 55015:2019 |EN IEC 61000-3-2:2019 | EN 61000-3-3:2013+A1:2019
IP44 EN60529:1991+A1:2000+A2:2013 | BS EN ISO 9227:2017

MIRROR 006
Installation Procedure
Installation Tools
Flexible rule Spirit level Drill Hammer
Notes: To ensure the normal use of products, it is required you set out wires as per the
regulations of IEE at the installation places. The Products are only applicable to being
installed on the indoor solid wall.The installation must be carried out by a professional
electrician and wrong installation may lead to product damage and personal injury.
1. Make certain the wall is solid, and use the flexible rule to measure the distance
between two hardy holes on the mirror frame ("a” and “b” in fig 2).
2. Use the flexible rule to measure the centre distance between two hardy holes on the
wall ("a” and "b’ in fig 2) and mark them out with a pencil.
3. Choose the churn drill with an appropriate drill bit to make two holes at the marked
places, and use a special ceramic drill if the wall surface is made of ceramic tiles.
4. Use the hammer to strike an expansion rubber plug into the holes on the wall, and
then use the screwdriver to tighten the screws into the holes (Exposure for 8 - 12mm)
5. Switch off the power, and then use a terminal block to connect the three-core exposed
wires with those reserved on the wall (see details in Fig 3)
6. Hang the product on the screw crossing two hardy holes to fix it.
7. Finally switch on the power, and then touch the switch sign (Fig 1) with a finger on the
sensor to test the products.
Operation Instruction: To turn the mirror light and heating pad ON, touch the On/Off
sensor.
Fig. 1 Fig. 2
HOOKS
WIRE OUTLET
500mm
R40
ON/OFF BUTTON
700mm

MIRROR 006
Brown
Yellow green
Blue
Brown
Yellow green
Blue
Wiring Diagram for Input
Schematic Diagram
LUMINAIRE MAINS SUPPLY
Waste Electrical & Electronic Equipment Regulations (WEEE) requires that any
of our products showing this mark (left) must not be disposed off with other
household or commercial waste. We do not levy any WEEE disposal charges to
its customers for affected WEEE related products. To prevent possible harm to
the environment or human health from uncontrolled waste disposal, please
separate any such product from other waste types and recycle it responsibly at
your local facilities. Check with your Local Authority, Recycling Center or retailer
for recycling advice.
Fig. 3

MIRROR 006
Electrical Safety Information
LED Mirror FAQ's
We recommend that all electrical bathroom products should only be fitted by a suitably
qualified, Part P registered electrician in accordance with the current IEE regulations.
Ensure mains power supply is turned off before starting installations.Before drilling ensure
their are no hidden pipes or cables in the wall.
We recommend you receive the product before commencing installation as all the
measurements and sizes are approximate.We try to ensure that all measurements
are as accurate as possible.In the interest of continuous product development,we
reserve the right to alter specification as necessary.E & OE.
Mirror Weight (kg)
Mlrror+Box Weight (kg)
Light Source
Light source average span
Total Rated Wattage (W)
Lumens(Lm)
Kelvins(K)
Is the mirror Dimmable?
Energy Rating
What orientation can the mirror be hung in ?
Is the heated pad on when the mirror is illuminated ?
Does the mirror require an earth connection?
Can i bypass the sensor so the mirror comes on with the main room light?
Is it cool white or warm Illumination ?
4.30kg
5.50kg
LED
5K HOURS
32.16w
1450
5000
YES
A
PORTRAIT
YES
YES
NO
COOL WHITE
Table of contents
Other SCUDO Indoor Furnishing manuals
Popular Indoor Furnishing manuals by other brands

Woodard
Woodard SAVOY SECTIONAL WDC-SAV-SEC-1 Assembly instructions

Forte
Forte TXCB02 Assembling Instruction

sweeek.
sweeek. BRAGA IBRAGCHEST3D manual

noken
noken SMART LINE 100251797-N806718583 manual

DREAMS
DREAMS Bond Oak-High Foot End-Linen Assembly instructions

Better Homes and Gardens
Better Homes and Gardens BH47-084-899-05 Assembly instructions

Northbeam
Northbeam 6 TIER WOODEN SHOE DRESSER Assembly instructions

Safavieh Furniture
Safavieh Furniture Sabrina AMH5704B quick start guide

HABYS
HABYS ERGO Standard 047/2022 user manual

Bob's Discount Furniture
Bob's Discount Furniture JOANNA manual

PAIDI
PAIDI FIONA 131 0321 instructions

Uplift Desk
Uplift Desk UPL127 quick start guide