manuals.online logo
Brands
  1. Home
  2. •
  3. Brands
  4. •
  5. SD
  6. •
  7. Bathroom Fixture
  8. •
  9. SD SS-3 User manual

SD SS-3 User manual

Product Features
• A new design for Sliding Frameless Showers both

functional, flexible in its design options and space
saving
Options of two standard door sizes and a rail that •
attaches to the sidepanel means ease of installation
and flexibility for the opening size.
The side panel can be made smaller or larger to •

accommodate most installation requirements
including side panel attachment.
Safety Glass and Anti Jump guides provides a safe •

environment for all the family.
For specific glass detail refer to our website•
151
WWW.SD-PLUS.COM
150
S l i d i n g S h o w e r
Sliding Shower SS-3
Installation Instruction
SS-301
• Sliding Shower roller
SS-302
• Sliding Shower Brace
SS-303
• Sliding Shower
Wall End Stop
SS-304R/L
• Sliding Shower
Door Stop
SS-305
• Sliding Shower
Anti Jump
SS-306
• Sliding Shower
Floor Guide
SS-307
• Sliding Shower
Glass end Cap
SS-308
• Sliding Shower
Corner Brace
SS-309
• Sliding Shower Track
10×30×1.7mm
1165mm/1300mm/1420mm
SS-303
SS-304
SS-302
SS-301
SS-305
SS-306
SH-101
SS-308
SS-309
1
Design Options
152 153
WWW.SD-PLUS.COM
S l i d i n g S h o w e r
Assembly and Component Instructions
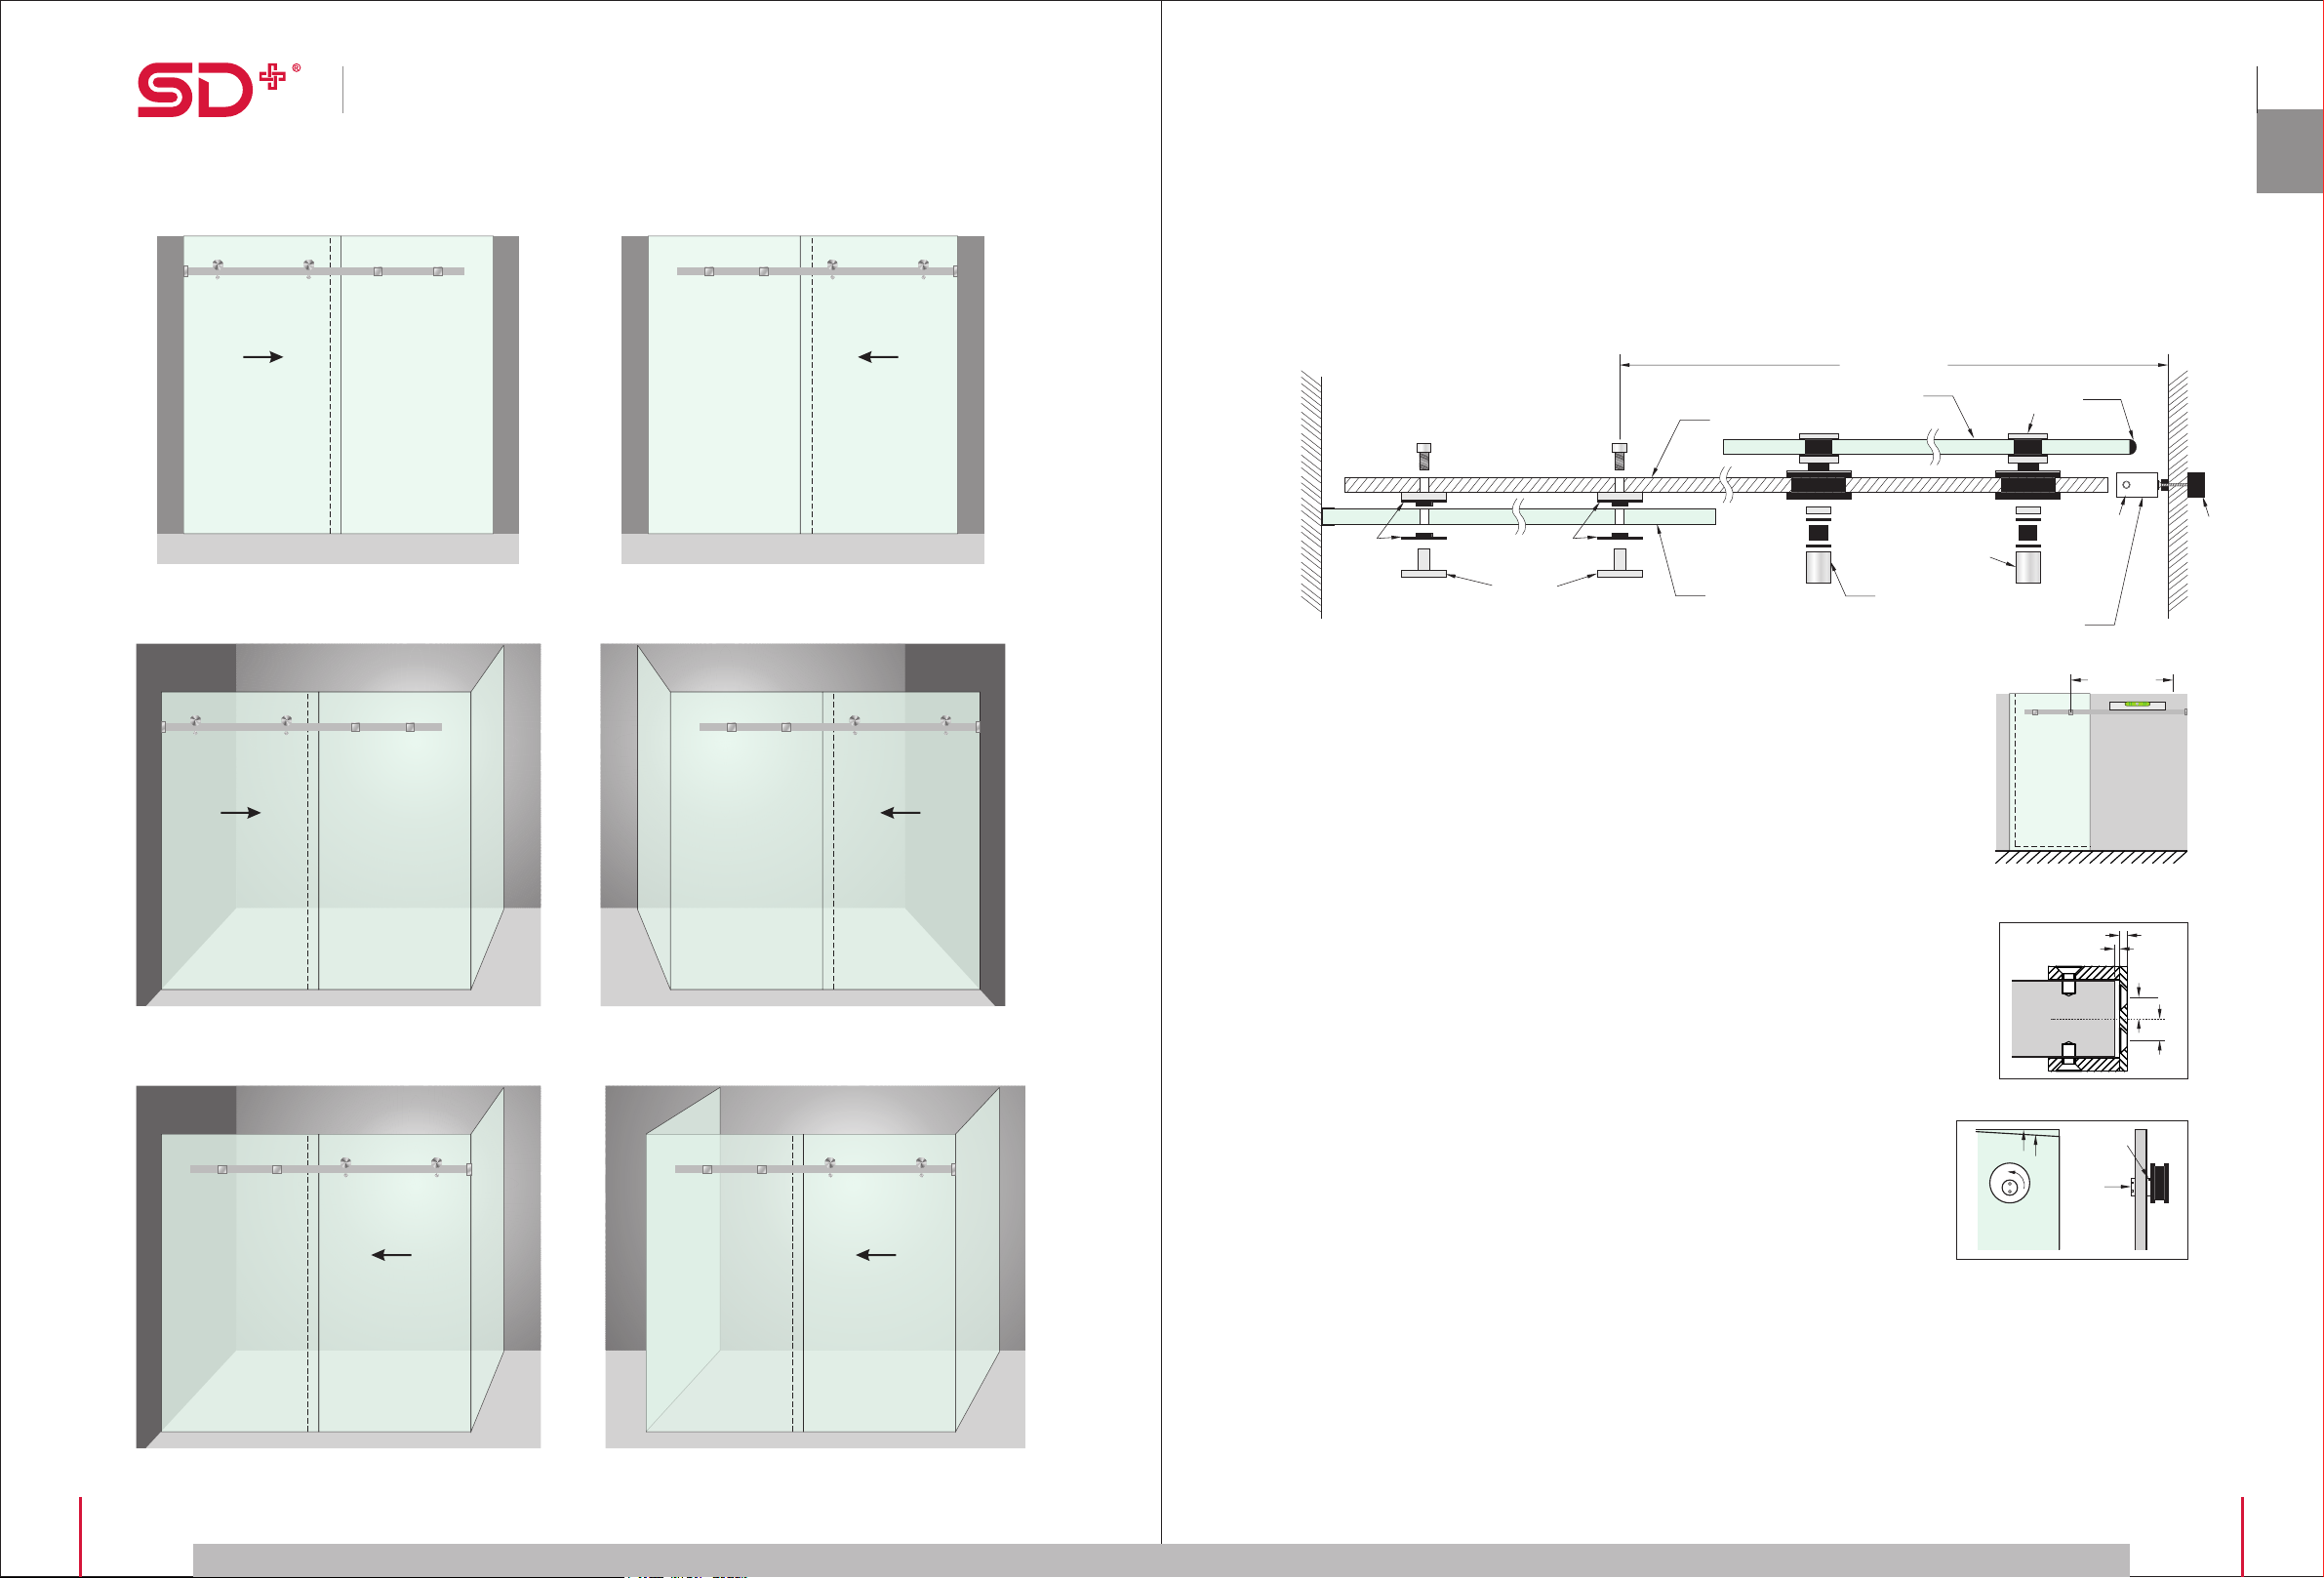
Door Rail
Anti jump guide
Fixed panel Support Bracket
Glass Door seal
690/790*
Inside Shower
Gaskets
SS-302
Gaskets
SS-301
SS-303
SS-305
Assembly Instructions
1) Place the side panel or sidelites into the prepared aluminium channel and
pack as required into position, so that the panel is level and square.
2) Check that the first hole in the side panel to the wall / return panel is 690*
for 625 Door, or 790* for 725 Door, or 855 for the 3 panel shower.
3) Place a level in line with the holes in the side panel and mark the centre
position on the wall, or line up with the centre of the fixing holes in a return
panel.
4) Mark the position on the wall for “Support Bracket” fixing holes as per (5).
5) Fix the “Support Bracket” in place with the Screws supplied, and seal with
silicone. Attach the door rail into place.
Check the level of the door rail and adjust the fixed panels as required.
6) Silicone panels into place checking for levels.
7) Attach the wheels to the door, and place the door on the door rail.
8) To adjust the vertical plane of the door to line up with the wall / return panel you can rotate and fix in
position the roller by holding (B) with an allen key inserted into the hole and tightening the front disc (A)
(with the supplied wrench) onto the glass in the desired position. This needs to be tight to ensure the
door doesn’t drop.
9) Fix Anti jump guides to door and the doorstops as required.
Adjust the floor guide to the correct glass thickness. Glue the floor guide in place to ensure no
penetration
of the water proof membrane.
Fix seal into place on the leading edge of the doors as required.
690/790*
B
A
10)
11)
23
8.58.5
The Principle
A) The duet slider rail is in 3×pre set sizes, with holes drilled for the through fixings.
B) The door sizes and fixing hole positions are set to match the rails.
C) Different widths of showers can be accommodated by making the side panel wider.
SS-307
1
Note:
·Door is always 725.
·Hole positions for the Side Panel are
measured from the edge closest to Door Handle.
·Door should be on the same side as taps.
·Shower design should allow for water to flow over
door gap.
A = Minimum opening size 1340
B = Door = 725
C = Side panel = A - 725 + 35mm - 7mm
(For glazing channel)
D = Critical installation measurement
E = Desired height - 7mm (for door guide
or glazing channel) suggest 2000mm.
A725
( B )
( C )
4040 5858
100
7373
400
2×19mmØ
2×12mmØ
100
2×12mmØ
30
250
35
Door
Side panel
(C)
alu
alu
2×10mmØ
100
790
( D )
Return
E
Duet Sliding Shower - Door Size 725mm, (690 Opening)
- Min Width 1340mm
73
25
88
2×10mmØ
Side panel
25
725 Door
690 Opening
Alu line
Rail
* width of side panel
can vary to suit
opening
*
wall or return panel
Side panel Door Return
Note:
·Door is always 625.
·Hole positions for the Side Panel are
measured from the edge closest to Door Handle.
·Door should be on the same side as taps.
·Shower design should allow for water to flow over
door gap.
A = Minimum opening size 1180
B = Door = 625
C = Side panel = A - 625 + 35mm - 7mm
(For glazing channel)
D = Critical installation measurement
E = Desired height - 7mm (for door guide
or glazing channel) suggest 2000mm.
Duet Sliding Shower - Door Size 625mm, (590 Opening)
- Min Width 1180mm
A625
( B )
( C )
4040 5858
100
7373
400
2×19mmØ
2×12mmØ
100
2×12mmØ
30
250
35
Door
Side panel
(C)
alu
alu
2×10mmØ
100
690
( D )
Return
73
25
E
88
2×10mmØ
Side panel Door Return
Side panel
25
625 Door
590 Opening
Alu line
Rail
* width of side panel
can vary to suit
opening
*
wall or return panel
154 155
WWW.SD-PLUS.COM
S l i d i n g S h o w e r
1
A = Minimum opening size 1480
B = Door = 725
C = Critical installation dimension
E = Desired height - 7mm (for door guide
or glazing channel) suggest 2000mm.
Duet Sliding Shower - Two Side panels, door in middle
- Door Width 725mm, (655 Opening)
- Min Width 1480mm
E
4040 5858
100
7373
100
400
73
100
100
1×12mmØ
35 35
725
A
(B)
50
250
2×12mmØ
2×12mmØ
2×10mmØ
(C)855
2×19mmØ
Side panel Door Return
Side panel
Side panel Side panel
725 Door
*
*
655 opening
* width of side panel
can vary to suit
opening
156
S l i d i n g S h o w e r
157

Popular Bathroom Fixture manuals by other brands

Akuaplus TECH SP M9960 user manual

Akuaplus

Akuaplus TECH SP M9960 user manual

Sanela SLP 68RZ manual

Sanela

Sanela SLP 68RZ manual

Luxier SP24-SS quick start guide

Luxier

Luxier SP24-SS quick start guide

Pressalit R8212 Mounting instruction

Pressalit

Pressalit R8212 Mounting instruction

Pfister L0W8-01 Quick installation guide

Pfister

Pfister L0W8-01 Quick installation guide

Omnires FR7144CR Installation and Maintenance

Omnires

Omnires FR7144CR Installation and Maintenance

Gessi INGRANAGGIO 63801 manual

Gessi

Gessi INGRANAGGIO 63801 manual

LOOOX BATH SHELF RAW user manual

LOOOX

LOOOX BATH SHELF RAW user manual

Symmons Dia Series Installation & operation instructions

Symmons

Symmons Dia Series Installation & operation instructions

Coastal Paragon quick start guide

Coastal

Coastal Paragon quick start guide

Fleurco B-REC3260 RD/LSEAT installation manual

Fleurco

Fleurco B-REC3260 RD/LSEAT installation manual

Stingray S3000 Series Installation & maintenance manual

Stingray

Stingray S3000 Series Installation & maintenance manual

Delabie SPORTING Installation

Delabie

Delabie SPORTING Installation

Fleurco Apollo STC32-11-40 instruction manual

Fleurco

Fleurco Apollo STC32-11-40 instruction manual

Mora Tronic WMS Installation and maintenance  instruction

Mora

Mora Tronic WMS Installation and maintenance instruction

Bradley Verge LVA Series Installation

Bradley

Bradley Verge LVA Series Installation

Hans Grohe Rainfinity 250 3jet EcoSmart 26233 Series Instructions for use/assembly instructions

Hans Grohe

Hans Grohe Rainfinity 250 3jet EcoSmart 26233 Series Instructions for use/assembly instructions

Bradley OmniDeck 3000 Series Installation

Bradley

Bradley OmniDeck 3000 Series Installation

manuals.online logo
manuals.online logoBrands
  • About & Mission
  • Contact us
  • Privacy Policy
  • Terms and Conditions

Copyright 2025 Manuals.Online. All Rights Reserved.