SE Electronics Reflexion Filter User manual

Electronics
The Reexion Filter
Manual
Reexion Filter Technical Manual
SE Electronics Instrument Reexion Filter Manual
Thank you for purchasing one of the Reexion Filter ‘Portable Mic Booth’products
The main idea behind this product is to facilitate‘dry’ vocal/instrument recordings, in other
words to achieve a recording which has greatly reduced room ambience.
Of course, the Reexion Filter products can also be used to achieve similar results whilst
recording various live instruments, for isolating vocals in rehearsal studios and probably a
host of things we haven’t thought of yet too! We’d be very interested to hear about novel
applications from you, so please do contact us with your ideas, we are always glad to listen
as it helps us improve and develop the product, and the information we can supply to
other sE users.
Your Reexion Filter product carries a 2 year manufacturing warranty, with free
replacement of parts in case of mechanical failure due to faulty components. This warranty
does not cover failures deemed to be as a result of misuse or abuse of the Reexion Filter.
If properly used and looked after, it should last a lifetime of recording use. You can extend
this warranty to 3 years simply by registering your purchase on the sE web site at
www.seelectronics.com/sereg.html
One last thing; please read this assembly manual to get the best results from your
Reexion Filter. Mic positioning, and the stand clamp assembly are critical to getting best
results.
Thank you again, and we look forward to hearing from you,
James Ishmaev-Young
sE Electronics International

Reexion Filter Technical Manual
About Your Reexion Filter
What is the Reexion Filter?
The Reexion Filter is basically a portable device for recording live sound sources with reduced
room ambience. It is an advanced composite wall which is positioned behind any microphone
by means of a variable position stand clamp assembly which ships with the product. The main
function is to help obtain a ’dry’vocal or instrument recording.This is especially useful in studios
without proper acoustic treatment, but can also be used to help record takes in control rooms
where the performer also has to operate the recording device, in rehearsal studios to reduce
ambient noise’ or in pro studios wanting to achieve a less ‘room coloured’ sound.
The Technical Bit:
The Reexion Filter Pro has 6 main layers. Firstly, a strong layer of punched Aluminium which
allows sound waves to pass through it, diused, to a layer of absorptive wool. The sound waves
then hit a layer of Aluminium foil which helps dissipate energy and break up the lower frequency
wave-forms, and from here they hit an air space kept open by rods passing through the various
layers. The air gap acts as an acoustic barrier. The sound waves then pass to a further layer of
wool, a further layer of Aluminium foil, and then through an outer, punched, Aluminium wall
which further serve to absorb then diuse the remaining acoustic energy.
The main absorber has 4 formed pieces of patented‘Polyester Acoustiboard’, a specialist acoustic
absorptive material, attached to its face via the extended separation rods, which further serve
to absorb and then diuse the sound waves as they pass to the main lter. This Acoustiboard
is extremely ecient, much more so than foam, and so performs amazingly well even in a
relatively small area and depth.
The Project Studio RF (Baby RF) and the Instrument RF (IRF) use the same Acoustiboard,
but simpler layering structure. This makes them more cost eective, without reducing their
usefulness. The same is NOT true of cheap copies using simple foam baes as foam is a highly
inecient absorber at low and mid frequencies, and in most cases actually makes mixing more
dicult, and the end product is often a worse recording.
Reexion Filter Technical Manual
Clamp Assemblies
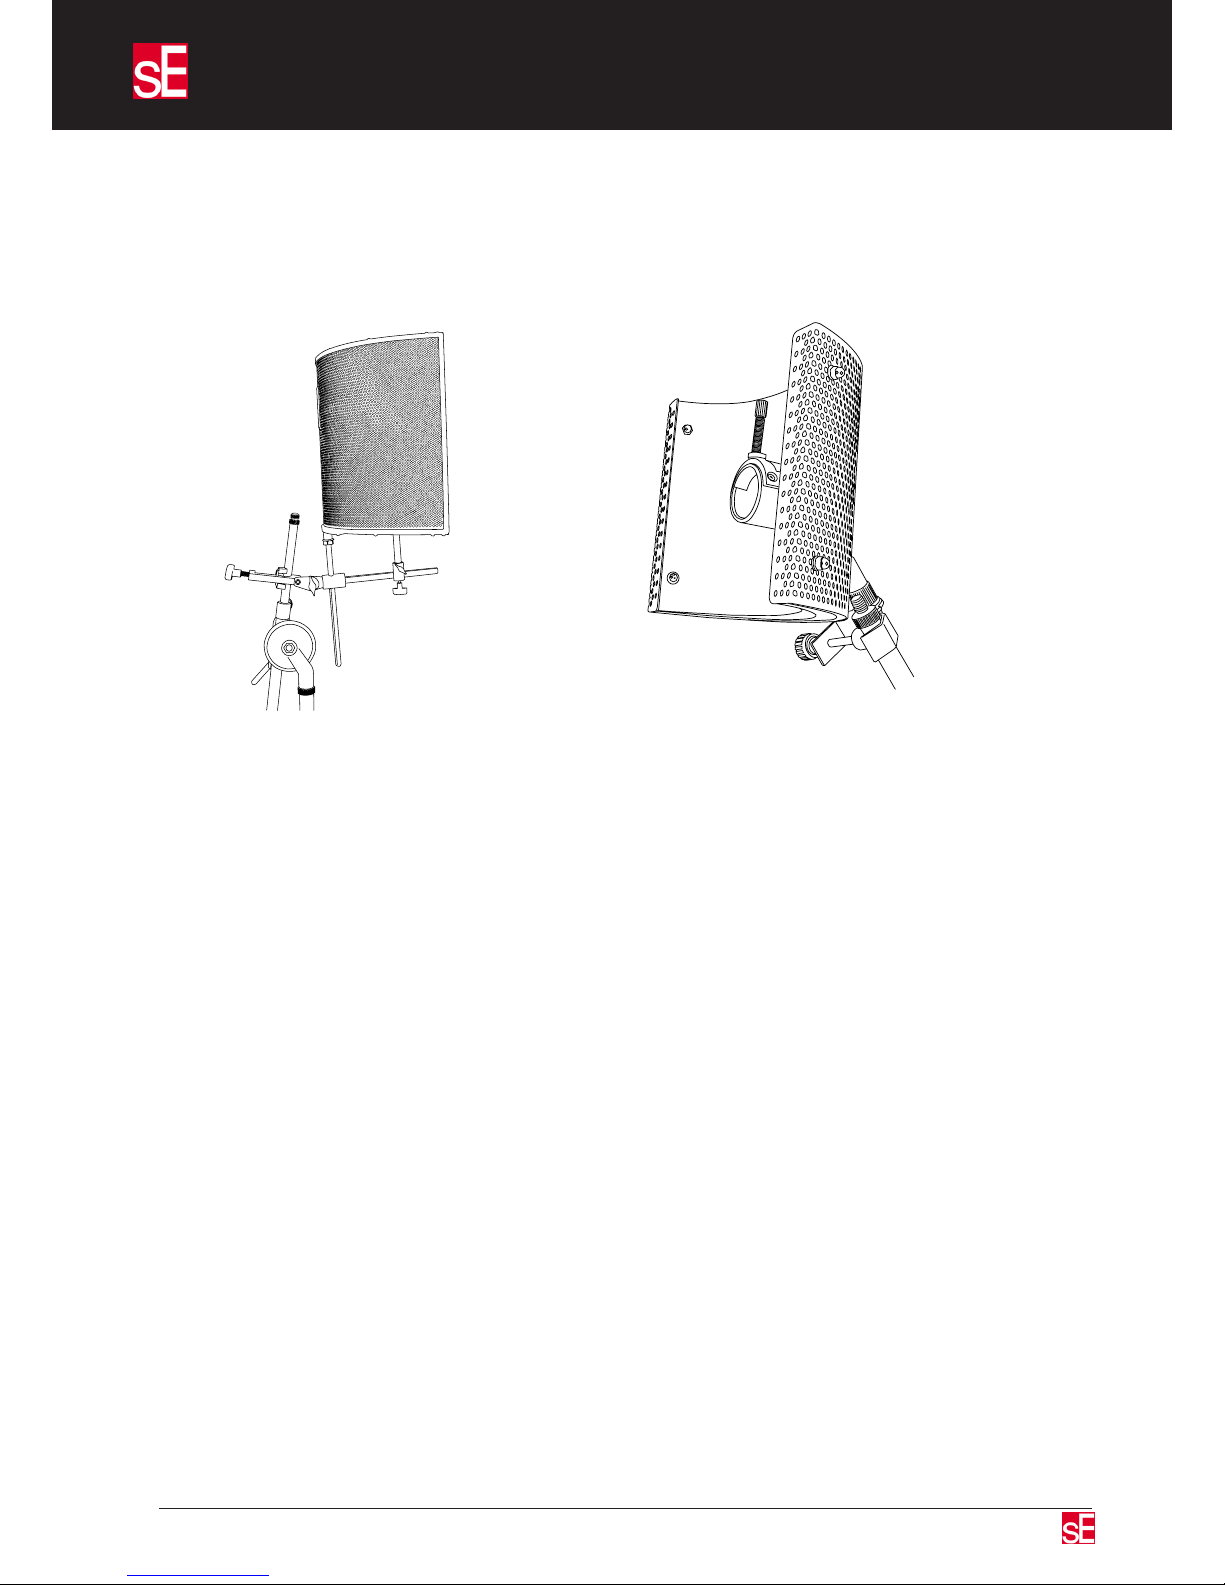
This varies between our products. The IRF has a simple stand clamp which can be xed to a mic
stand, drum hardware etc.
The Baby RF (PSRF) clamp operates much like the RF clamp, but is simpler as the Baby RF
is a lighter product. The stand assembly for the RF Pro comprises a mic stand clamp tting,
which attaches by means of a vertical joint to the horizontal bar assembly onto which both
the Reexion Filter, and any standard tting shock mount can be xed. The microphone (in
its shock mount) can then be moved both vertically and horizontally along the bar, and the
Reexion Filter itself can be moved vertically to obtain the optimum working position.
How do they work?
The various layers both absorb and diuse the sound waves hitting them, so progressively less
of the original source acoustic energy passes through each layer. This reduces the amount of
energy hitting untreated walls and other surfaces so there is less of the original source reected
back as unwanted room ambience to the mic. The Reexion Filter also helps prevent any
reected sound reaching the back and sides of the mic. Its shape and size have been carefully
tested to maximize absorption while keeping‘coloration’down to only around 1dB, and leaving
the microphone’s polar pattern unaected.
In summary:
All in all, these are very clever and desirable pieces of kit. They allow you to record vocals, guitars
etc with a ‘drier’ sound without having to have an acoustically treated room. They are portable,
use state of the art materials; they work and are only a fraction of the price of acoustically
treating your studio environment!
About Your Reexion Filter
PSRF IRF

Reexion Filter Technical Manual
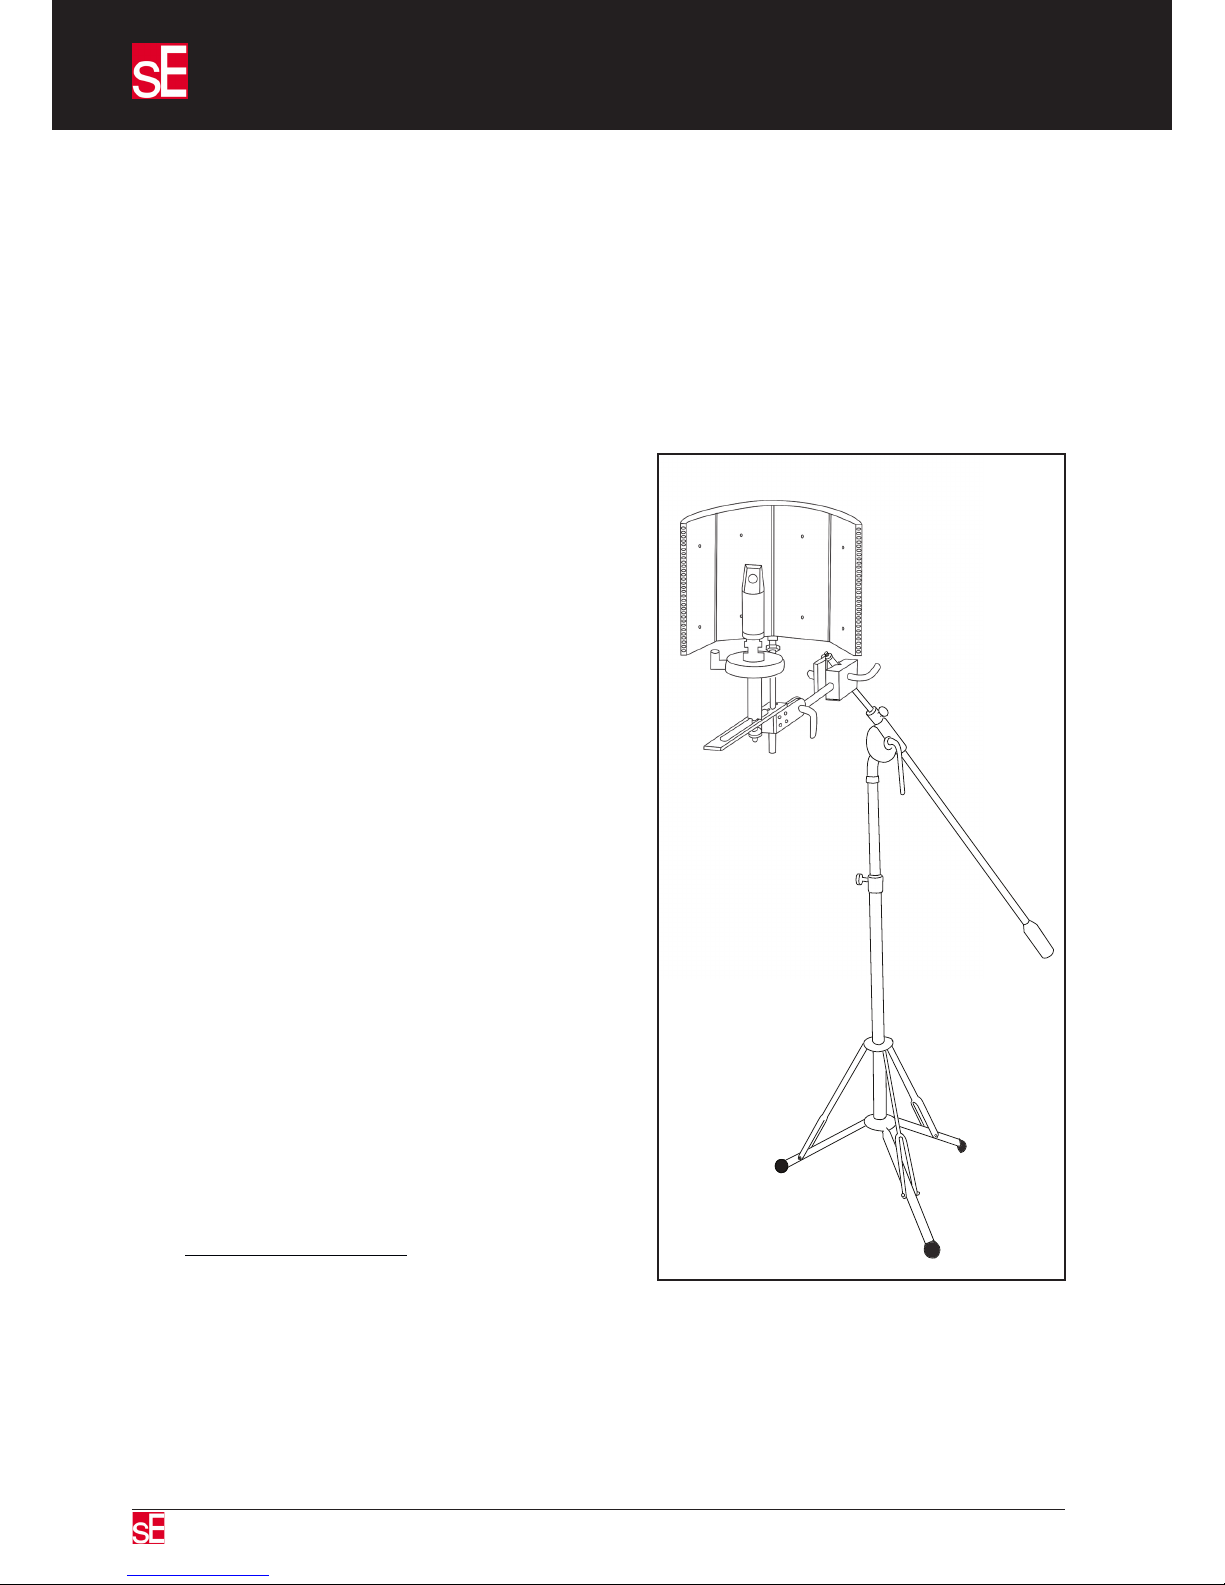
Assembling Your Reexion Filter
1. Remove the Reexion Filter and stand assembly
unit from the packaging. Please keep the packaging
safe to store the Reexion Filter when not in use, or for
transportation. It is robust, but parts may get damaged
or lost in transit if not packaged properly.
You should have the following parts – Reexion Filter
(curved wall), stand assembly, support rod and spanner
to t support rod.
2. Fix the stand clamp assembly in place on the neck of
your microphone stand a few inches below the point where
the shock mount is usually xed, or on the main vertical
support strut of the stand.
You’ll see the assembly has a metal block with two large
screws and a handle on it (one of the screws has a spring to
help lock the assembly rmly onto the mic stand).
Mic stand booms vary in diameter so you’ll need to
experiment to get the clamp just right, but basically you
need to set the screw with the spring so the two parts of the
clamp sit parallel to each other, and then tighten the clamp
using the larger screw.

Reexion Filter Technical Manual
3. Fix the support rod to the
Reexion Filter by screwing
it into the socket on the bottom
edge. Tighten the nut using the
spanner supplied in the box.
4. Fix the support rod, with the
attached Reexion Filter, by
pushing the support rod down
into the socket on the stand clamp
and tighten it in place with the metal
handle on the block.
5. You can now play with the positioning
of the mic (both vertically and horizontally),
and the height of the Reexion Filter to
get the optimum position for recording.
Assembling Your Reexion Filter
Reexion Filter Technical Manual
www.seelectronics.com
Electronics
The Perfect Position
The ‘perfect position’ to achieve a‘dry’ recording is to place the microphone so that the mic
capsule sits centrally (both vertically and horizontally) in relation to the face of the Reexion
Filter (the face is the convex side with coloured panels). It is also important to have the mic
capsule of the correct distance from the face of the Reexion Filter. The mic capsule should sit
roughly level with the front edges of the lter where the curved wall ends.
Having said all that, you CAN use the
Reexion Filter to achieve dierent eects by
experimenting with positioning. Moving the
mic into the face of the Reexion Filter will give
a ‘darker’ and more ‘dead’ sounding recording,
but it will also aect the polar pattern response
of the mic, so the mic will perform slightly
dierently. Again, in most cases this would be
undesirable, but this method of use can create
some cool results… try micing an electric guitar
cab this way, it can sound great!
Moving the mic further away will mean there
is more room ambience recorded with the
dry source. Again, this is not usually desirable
but can be used to get a specic ‘room sound’
without the room taking over completely!
The Reexion Filter can be used not only for
recording vocals and acoustic guitars etc, but
as outlined above, you can experiment to nd
new applications like the guitar cab micing we
suggested above. We’d love to hear from you
with your own novel applications, so please
contact us via the main web site,
www.seelectronics.com, to let us know what
you think of the product, and how you are
using it.
Thanks again, and we hope you enjoy the results of your new toy!
The Perfect Position For Your Reexion Filter

www.seelectronics.com
Electronics
Table of contents
Other SE Electronics Music Equipment manuals

Popular Music Equipment manuals by other brands

QRS Music Technologies
QRS Music Technologies PMII installation manual

Fishman
Fishman C-100 user guide

homenoise
homenoise Deep Space owner's manual

thomann
thomann Harley Benton D-SEED user manual

Lithium Grim
Lithium Grim Klon-ed Buffer Building instructions

Yamaha
Yamaha disklavier Mark IV Series operating manual


Suzuki
Suzuki DKP-115 Assembly & instruction manual

Aalberg Audio
Aalberg Audio Aero AE-1 user manual

Kurzweil
Kurzweil K2600 BEST OF VAST - REV A user guide

Extron electronics
Extron electronics PowerCage FOX AEX 104 Setup guide

HEADRUSH
HEADRUSH MX5 user manual

Behringer
Behringer DUALFEX EX2200 Technical specifications