QRS Music Technologies PMII User manual

QRS MUSIC TECHNOLOGIES, INC.
PMII Installaon Manual
(51074)
QRSPNOmaon
Manual Revision: July, 2013
www.qrsmusic.com
QRSMusicTechnologies,Inc.
269QuakerDrive
Seneca,PA16346
(814)676‐6683

Table of Contents
Introducon 3
Parts List 4
GrandKit‐PNOmaonII(815002)WithoutRecord
UprightKit‐PNOmaonII(815022)WithoutRecord 5
Preparaon
6
MakeCertainthattheKitwillFit!
ToolsNeeded
Regulaon 7
PianoAconRegulaon
Installaon Procedure
8‐9 UprightPianoInstallaon‐Recommendaons
UprightSlotDiagram/TwinSpeakersforUprightInstallaon#76047
PreparingtheKeySolenoidRail 10
KeySolenoidPlungerThrow 11
KeySolenoidRailAssembly‐SolenoidtoKeyAlignment 12
ModifyingtheKeyframe‐Grand[Perform a PNOscan II Record Installaon Here] 13‐15
CungtheKeybedSlot 16‐17
InstallingtheSo‐ShiLever 18
InstallingtheSustainPedalTrapwork 19‐20
InstallingtheSustainPedalSolenoid‐Grand 21‐22
InstallingtheSustainPedalSolenoid‐Upright 22
InstallingtheUniversalSostenutoAssembly 23‐25
InstallingtheSteinwaySostenutoAssembly[Special Order Part # 70897] 26‐27
Mounng and Connecng the Electronic Components
28‐29
ElectronicComponents‐Descripon
PowerSupply/DriverBoard
PMIIProcessor/Pin‐LightExtension(PLx)/Wi‐FiDevice/PoweredSpeaker
ComponentLocaon‐GrandandUpright 30
Mount&Connect:PowerSupply/Processor/Wi‐Fi/Speaker/PNOscanII(Record) 31
Mount&ConnectthePLx 32
MounttheKeySolenoidRail/Mount&ConnecttheDriverBoards 33
Adjustment Procedures 34
LostMoonAdjustment:Plunger‐PlungerTiptoKeytailHeight
VerifyOperaon
35
ConnecttoPowerandTurnONtoStandbyMode
EstablishWirelessConneconandPowerON
KeyAdjust 36
PedalAdjust 37
PedalTest[TestFiles]
PNOscanAdjust[PNOscanIImustbeinstalled] 38
InstallRailCover,LyreBracesandDressCables 39
InstallaonisComplete
User Guide ‐Introducon
PowerONtothePMIIUserInterface
WelcometoQRSPNO
PlayPiano 41
PlaybackSengs
Wi‐Fi Setup 42
ConfiguraonsforPNOmaonII
HowtochangeModes:StandAlone&Network 43‐45
Other Kits 46
Technician’sServiceKit
PMIIUpgradeKit(81525)&PMIIMIDIUpgradeKit(81529) 47
QRS Remote Control 48
Troubleshoong 49
Warranty Informaon 50‐51
5YearWarrantyInformaon[CerfiedInstallerInstallaonsOnly]
40

Introducon
3
July 2013
QRSispleasedthatyouhavechosentheQRSPNOmaonII™RetrofitKit,thesuperbretrofitkit
forautomangacouscpianos.Thisproductbringsalevelofexcellenceinreproducinglive
performancesonthepiano.Itismadepossiblebymanyremarkabletechnicalinnovaons.
However,inspiteofitshighlevelofsophiscaon,thisretrofitkitiseasytoinstallandservice.
Beforebeginningtheinstallaon,takemetoread“MakeCertaintheKitFits,”toensurethat
thepianowillindeedacceptthekit.This kit will NOT fit into a spinet piano. Familiarizeyour‐
selfwiththepartsinthekitbeforeproceedingandthenlettheinstruconsguideyou.
Allpianokeyshaveatendencytoreactdifferently.Thekeysolenoidsprovidethreeadjust‐
ments:thefirstadjuststheamountofplungerthrowtomatchthatofthekey‐tailli,thesec‐
ondsetsthelostmoonbetweenthekeytailandtheplungerpandthethirdadjuststhe
forceofeachkeysolenoid.
Althoughthekithasbeenprovidedwithenoughsolenoidstoplay80notes,theinstrument
hasbeendesignedtosupporttheenre88‐noterangeofthemodernpiano.Theaddional
partsrequiredmaybepurchasedseparatelyifan88‐noteinstallaonisdesired.
ThestandardPianomaonkitcomeswithapedalsolenoidbutwillalsoruninmagicpedal
modeifthePedalSolenoidisnotpresent.Thepedalsolenoidisconnectedtothepowersupply
bya4posionplug.ThePedalSolenoidwillacvatethetrapwork,thereforeliingthedamp‐
ersoffofthestringsasarealpianistwould.In“MagicPedalMode”thekeysolenoidscontrol
thesustaineventsbyextendingnoteduraonstothecorrespondingpedalONevent.
Theinstrumentusesrelavelylowvoltagessuppliedbyanisolaontransformer.Lowvoltages
eliminatethedangerofelectricalshocktotheinstaller(BelowULlimitof41V).Theelectronics
arefullyshieldedtopreventelectromagnecinterference.
Youwillneedsomematerialsnotprovidedwiththekittocompletetheinstallaon.
SteinwaygrandpianosrequirespecialSostenutotrapworknotsuppliedwiththestandardkit.
OrderQRSpartnumber70897

Parts List
Grand Kit ‐Item #815002 [WithoutRecordOpon]
4
July 2013
Item #2 Item #3 Item #4 QTY Descripon
76040 1QRSAmplifiedSpeaker
81500 1PMIIKit‐Grand
8012480124061PMIIPLPxPinLightExtension(PLx)
501282Cable:1/8”Maleto1/8”Male‐6.5’
501262Cable:USBAMaleto5‐PinUSBMiniBMale
501411Cable:USBAMaletoUSBBMale
790185B1Cable:PNOscanextensionribbon,black‐72”
56064334Screw
80108 1PMIIProcessorAssembly
80108A1PMIIProcessor
9900261Cable:1/8”MaletoTwinRCA‐8’
70120 516‐NoteDriverBoardMountedonchassis
701165Screw,6x1/4”SheetMetal
70120C5ChassisREVC
701225DriverCircuitBoards
75210 PowerSupplyRev2
79226 1QRS32GBSDCardw/Music
79232 1Wi‐FiDevicew/PowerAdapterandEthernetCable
82797 1OwnersPackOut
703884AAABaeries
733981PMIIBigBuonRemote
71009 1SplitLoomTubing
71010 3Clamp,RCable(7/8”Black)
70253 1OwnersWarrantyRegistraonCard
60205 1CablePackage:
8114331ProcessortoNoteDriverSignalRibbonCable
8114371PowerSupplytoNoteDriverPowerCable
8114391ProcessortoPowerSupplyRibbonCable48”
81159021UserControlBoxCable(ProcessortoFE6’)
702631PowerCord3’
703481ExtensionCord8’Black
71500B 1Rail&ComponentsAssembly
70050A1NoteRailAssembly‐Grand(2Rails&80Solenoids)
700651SolenoidRailCover
701301PedalSolenoidAssembly
707431UniversalSostenutoAssembly(SteinwaySostenuto70897‐SpecialOrder)
74270D1SustainTrapworkAssemblyREVD
70083F80KeySolenoidPlungers4.5”[FeltTip]“Nokey‐tailfeltrequired”
70400A 1SmallPartsBag:
700582DualSolenoidMounngPlate
700544RailMounngPlateBolt
700564RailMounngPlateNut
700628RailMounngBracket
700788RailBracketMounngScrew10/32x5/16”
700798#10FlatWasher
700758#10ExternalStarLockWasher
7008038#10x1”Screw
702221LeSoShiBracket
702241RightSoShiBracket
702261AxelRod
702281AxelRodlockNut
702362NylonWasher
701135NoteDriverMounngBracket
7013856/32x1/8”TrussHeadScrews
7020410CableTie
702084RibbonCableClamp
702188PowerCordClamp
70129161”CableClampScrew
7007688/32x1/4”Bolt
701904FenderWasher
70178210/32x1/2”Screw

Parts List
Upright Kit ‐Item #815022 [WithoutRecordOpon]
5
July 2013
Item #2 Item #3 Item #4 QTY Descripon
76040 1QRSAmplifiedSpeaker
81502 1 PMII Kit ‐Upright
8012480124061PMIIPLPxPinLightExtension(PLx)
501282Cable:1/8”Maleto1/8”Male‐6.5’
501262Cable:USBAMaleto5‐PinUSBMiniBMale
501411Cable:USBAMaletoUSBBMale
790185B1Cable:PNOscanextensionribbon,black‐72”
56064334Screw
80108 1PMIIProcessorAssembly
80108A1PMIIProcessor
9900261Cable:1/8”MaletoTwinRCA‐8’
70120 516‐NoteDriverBoardMountedonchassis
701165Screw,6x1/4”SheetMetal
70120C5ChassisREVC
701225DriverCircuitBoards
75210 PowerSupplyRev2
79226 1QRS32GBSDCardw/Music
79232 1Wi‐FiDevicew/PowerAdapterandEthernetCable
82797 1OwnersPackOut
703884AAABaeries
733981PMIIBigBuonRemote
71009 1SplitLoomTubing
71010 3Clamp,RCable(7/8”Black)
70253 1OwnersWarrantyRegistraonCard
60205 1CablePackage:
8114331ProcessortoNoteDriverSignalRibbonCable
8114371PowerSupplytoNoteDriverPowerCable
8114391ProcessortoPowerSupplyRibbonCable48”
81159021UserControlBoxCable(ProcessortoFE6’)
702631PowerCord3’
703481ExtensionCord8’Black
70051 1 Rail & Components Assembly ‐Upright
70050A1NoteRailAssembly‐Grand(2Rails&80Solenoids)
70074 80 Foam ‐Lost Moon
701301PedalSolenoidAssembly[OponalVercalPedalSolenoidLier#51045]
70083R 80 Key Solenoid Plungers 4.5” [Rubber Tip]
70400A 1SmallPartsBag:
70061 80 Felt ‐Lost Moon ‐Upright
700582DualSolenoidMounngPlate
700544RailMounngPlateBolt
700564RailMounngPlateNut
70123 8 Rail Mounng Bracket ‐Upright
700788RailBracketMounngScrew10/32x5/16”
700798#10FlatWasher
700758#10ExternalStarLockWasher
7008038#10x1”Screw
702221LeSoShiBracket
702241RightSoShiBracket
702261AxelRod
702281AxelRodlockNut
702362NylonWasher
70115 5 Note Driver Mounng Bracket ‐Upright
7013856/32x1/8”TrussHeadScrews
7020410CableTie
702084RibbonCableClamp
702188PowerCordClamp
70129161”CableClampScrew
7007688/32x1/4”Bolt
701904FenderWasher
70178210/32x1/2”Screw
70084 1 Key Tail Felt 1’‐1/16”

Introducon
6
July 2013
Make Certain that the Kit will Fit!
Allkitsplay80notes,excludingthefirstandlast4keysofthestandardpianokeyboard.Thefollowingquesons
shouldbeaskedbeforebeginninganinstallaon:
1.Isitagrandoruprightpiano?Thekitwillnotfitintoaspinetpiano.
2.Isthekeybedmadeofwoodorawood‐veneeredlaminate?
3.Doesthepianohavearangeof88notes,extendingfromlowAtohighC?
4.Isthekeyframemadeofwood?
5.Isthepianowell‐regulatedandingoodmechanicalcondion?.
6.Doesthepianohavesufficientspacebeneaththesoundboardorinsideanuprighttomountthepedalsolenoid&
powersupply(5.25"x5.25"x12.5")?
7. Canthebackofthekeyframebecutaway13/16"?
Tools Needed
PaperWoodChisel
PencilAwl
MeasuringTapeWoodGlue
LongStraightedgeSprayPaint(Black)
AdjustableFrameSquareSandpaper(Assortment)
Screwdriver(Assortment)PalmSander(Oponal)
PowerScrewdriver(Oponal)JigSaw
Socket(Assortment)JigSawBlades(Assortment)
11/32”NutDriverPowerDrill(RightAngleOponal)
5/16”NutDriverDrillBits(Assortment)
Hammer 1‐3/4”ForstnerBitorFlat(paddle)Bit
HacksawCenterPunch
MetalFileCircularSaw‐71/2”blade(Oponal)
RaspRouter(Oponal)
UlityKnifeVacuumCleaner
PlascCungBoard

Introducon
7
July 2013
Piano Acon Regulaon
Thisdiscussionisnotintendedtobeacompletecourseongrandaconregulaon,butrathermayprovehelpfulinrestoringtheacontoproperperformance.Proper
alignmentofaconparts,andkeyeasingareallveryimportantstepsintheregulaonprocedure.Thefollowingprocedureassumesthatthispreliminaryworkhasbeen
checkedandperformedasnecessary.Beforeremovingtheaconfromtheaconcavity,evaluateaconregulaon.Iftheaconisnotwellregulated,properperfor‐
manceofthesystemcannotbeexpected.
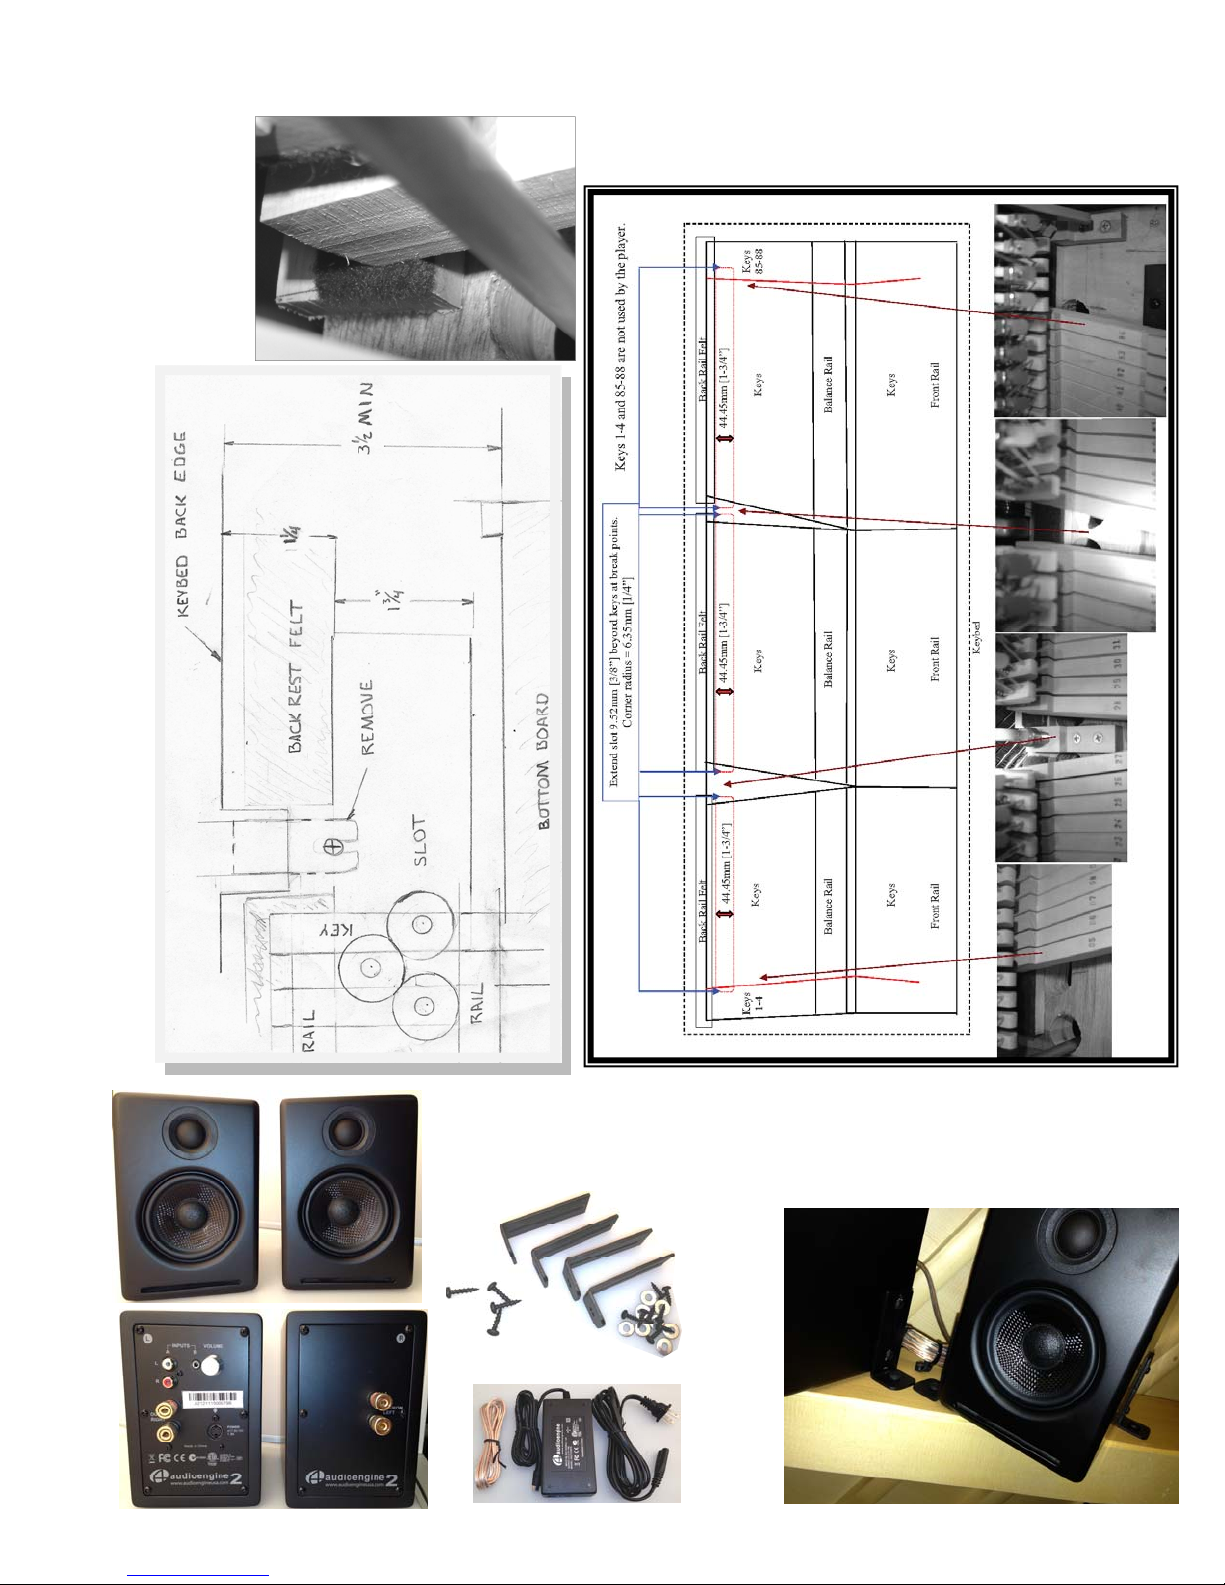
DuringtheinstallaonprocessofthePNOmaonIIPlayerSystem,itisquitepossiblethataconregulaonwillbedirectlyaffected.Aporonofthekeyframeandback
railclothwillberemovedsothatthenotesolenoidplungerscancontactthekeytails.Thisoperaonmaycausethekeytailstobelowerthantheiroriginalposion.The
resultoflowerkeytailsisanincreaseinbothkeyheight,andhammerstrikedistance.Restoringthestrikedistancetospecificaonsbyturningoutthecapstanscrewsis
nottheproperremedy.Alwaysre‐workthebackrailheightsothatthekeyheightisatitsoriginalposion.
‐Arethekeyslevel?
‐Dothehammersletoff1/8inthebass,taperingto1/16inthehightreble?
‐Isthedrop1/16belowthepointoflet‐off?
‐Isthehammerlinestraight?
‐Arethehammershanksapproximatelyoneshankthicknessabovethehammerrestrail?
‐Isthereadequateaer‐touch?
Withtheacononaflat,cleanworkbench,measureandrecordthefollowing:
Naturalkeyheightatbassandtrebleends.
Sharpheightabovenaturals.
Keydip;bothnaturalsandsharps.
Theheightofthefirstandlasthammersineachseconoftheacon.
Replacethekeysandaconstackontheaconframe.Refertotheregulaonmeasurementsrecordedearliertoseeifregulaonhasbeenaffectedbythemodificaons
totheaconframe.Ifkeyheight,keylevel,orstrikedistancearedifferentthanpreviouslyrecorded,stepsmustbetakentorestoreproperregulaon.
Torestorekeyheight,replacethebackrailclothwithoneofathickerdimension.Removetheaconstackandkeys.Aerremovingtheoldbackrailcloth,besurethat
alltracesofgluehavebeenremovedfromthebackrail.Replaceafewoftheendkeysandtryvariousthicknessofbackrailcloth,withoutglue,toballparkthecorrect
keyheight.Lightfingerpressureonthecapstanscrewwillapproximatetheforcethatisnormallyonthecapstan.Setkeyheightwiththebackrailclothat,orslightly
belowthedesiredkeyheight.
Whenyouaresasfiedthatyouhavethebestchoiceofbackrailcloth,gluethematerialtothebackrail,leavingtherearedgeunglued.Nameboardfeltisavailableina
fewdifferentthicknesses,andcanbeusedforfineadjustmentswhengluedunderthebackrailcloth.
Althoughkeyheightcanbereestablishedquiteaccuratelyusingtheaboveprocedure,somekeylevelingistobeexpectedwhenreplacingbackrailcloth.
Rememberthatsubsequentaconregulaonadjustmentswillaffectthosealreadyperformed.Topreparetheaconforfineregulaon,dothefollowingquickly:
Checkorsetrepeonleverheightsoitisslightlyhigherthanthejack.Duringyourfinalregulaon,tripthejacktenderwithyourfingerandreleaseitslowly.Ifregulat‐
edproperly,youwillbeabletofeelthejackbrushingtheknuckleasitisreleased.Thejackmustreturncompletelyundertheknuckle.
Setstrikedistanceto13/4.Besurethathammershanksareabovetherestrail.
Checkorsetjackposionsothatthebackedgeofthejackisalignedwiththebackedgeoftheknucklecore.
Setlet‐off1/8fromstringinthebass,taperingto1/16inthehightreble.Makesurethatyouhavesomedropaerescapement.
Setdropto1/16belowlet‐off.
Withtheabovepreliminarystepscompleted,levelkeysasnecessarytotheirfinalspecificaon.Notethatwithkeyheightatthesamespecificaonasitwasbeforeac‐
onframemodificaon,keydipshouldbecorrect(assumingthatthedipwascorrectpriortotheinstallaonprocedure).Also,damperlimingisreestablished.
Checkorsetrepeonspring.Thespringshouldcarrythehammerupwardwithasteadymoon,withoutkicking.
Withthepreliminaryaconregulaondone,youarereadytoestablishthestrikedistanceandkeydipmeasurementsthatwillresultinproperaer‐touch.Sincethekey
height/keydiprelaonshiphasbeenreestablished,considervaryingonlythestrikedistancetogettheproperaer‐touch.Ifyouareworkingonanolderinstrument,
considervaryingbothstrikedistanceanddiptoarriveatanacceptablecompromise.Selectsamplekeyswithwhichtowork,likethefirstandlasttwokeysineachsec‐
on.
Depressyourfirstsamplekeyveryslowly,stoppingitsmovementjustaerletoff.Looktoseeifthereisaddionalkeytravelle.Ifthereisnoaddionalkeytravel
aertheletoffpoint,thereisnoaer‐touch.Keydipwillhavetobeincreased,orstrikedistancewillhavetobedecreased.Ifthereistoomuchaddionalkeytravel
aertheletoffpoint,thehammermayblockagainstthestringswhenthekeyisplayedfullyintoitsdip.Keydipwillhavetobedecreased,orstrikedistancewillhaveto
beincreased.Besurethatthesharpshavethesameaertouchasthenaturals.Asasecondcheck,seethatwiththekeyfullydepressed,thereissllsometravelleat
thejacktender.
Whenyouhavethekeydip/strikedistanceestablishedonyoursamples,setyourkeydiptoyourestablishedspecificaonuniformlythroughouttheacon.Youarenow
readyforthefinalregulaon.
Usingyournewstrikedistancemeasurements,carefullyrepeattheaboveoutlinedstepsforthefinalme.

Installaon Procedure
8
July 2013
Upright Piano Installaon ‐Recommendaons...
ThisseconoutlinesthedifferencesbetweentheinstallaonoftheQRSPNOmaonIIretrofitkitinagrandpianover‐
susanuprightorvercalpiano.Thedifferencesarerelavelysmall,andaninstallerfamiliarwiththeprocedurefor
installaoninagrandpianoshouldhavenodifficultycomplengthistypeofinstallaon.
Thedifferencesareasfollows:
1.Inavercalpiano,theenremechanismishiddenfromviewwithinthecabinetryofthepianoitself,andconse‐
quentlytheinstallercanplacethecomponentsanywhereitmakessensetodoso.
2.Sincethemechanismishiddenfromview,nosolenoidrailcoverisrequired.
3.Thetrapworkisverydifferentfromthatofagrandpiano,andrequirestheinstallertouseaspecialpedalsolenoid
bracketmadespecificallyfortheupright.Thisisaspecialorderitem!
4.Inavercalpiano,theenrekitisinstalledbelowthekeybed.Inmostcases,thebackrailandbackrailcloth
shouldberelocatedtowardthebackedgeofthepianokeys.IMPORTANT********caremustbetakentofirstmeasure
thekeydipatthebackendofthekeysbeforeanyworkbegins.Secondly,aerthebackrailhasbeenrelocated,you
mustensurethatthekeydipisexactlythesameasitwasbeforestarng.Ifitisnot,youmusteithertrimthebackrail
orshimituptoitsoriginalmeasurement.
5.Specialuprightdriverboardmounngbracketsarerequiredformounngthedriverboardstothesolenoidrail.
Thesebracketsare3”longandwillallowthedriverboardandchassistohangbelowthesolenoidrailwhencompleted.
6.SPECIALNOTE****Ifthedriverboardsaremountedupsidedown,youcanreversetheplayingorderofthenotesby
selecng“InvertKeybed”inthe“PlaybackParameters”seconofPMII.
7.Thepowersupplyandtheprocessorboardaremountedinsidethecabinetofthepianoinanyplaceconvenientto
theinstaller.Makesuretheelectricalcablesdonotinterferewithanyofthemechanicalleverswithinthepiano.
8.Itisnecessarytocuta1”holedirectlythroughthesoundboardofthepianotowardstheboomofthepianoatthe
endwherethepowersupplyismounted.Thiswillallowthemainpowerplugtoeasilybepluggedintoawalloutlet.
Thisholewillnotaffectthesoundofthepianoinanyway.
9.Alignmentofthesolenoidrailismadebylayingawoodensckatthetopbackedgeofthekeysandcarefullytrans‐
ferringthecenterlineofeachkeyontothewoodensck.Thissckwillbecomeyouralignmentsck,andthesemarks
willbeusedtolocatetheproperposionforyousolenoids.Rememberthatastandardinstallaonis80notesandthe
pianos88notes.Startwithnote#5andendwithnote#84andslideeachpairofsolenoidsindirectalignmentwith
yourmarksonthealignmentsckandghtenthe11/32”nuts.
10.Smallerspeakersaresuppliedwiththeuprightkit.
GeneralRecommendaons

Installaon Procedure
9
July 2013
...Upright Piano Installaon ‐Recommendaons
Mount two brackets. One on each side of each speaker . Use two screws per bracket.
Attach brackets to piano.
Twin Speakers for Upright Installaon # 76047

Installaon Procedure
10
July 2013
Preparing the Key Solenoid Rail
Inthischapter,wedeterminethethrowofthekeysolenoidplungerinrelaontothepianoacon’skey‐tailtravel.
Wealsowalkthroughtheprocessofkeysolenoidalignmentwithrespecttothepianoaconskeytails.Whenthis
chapter’sworkhasbeendone,thesolenoidrailwillhavetheproperrailheightandplungerthrow.Themounng
bracketswillbeinplaceandreadyformounngtothepiano.
Toolsneededincludethe2oponalrailsupportbracketsa11/32"nutdriver,
tworailbracketmounngscrews,screwdriver,hacksaw,metalfile,rulerandapencil.Thepianoaconisonyour
workbenchandthekeysarefacingawayfromyou.
ThePianomaonKeySolenoidRailisshippedassembled.
Itscomponentpartsareasfollows:
Key Solenoid Plunger Throw...
Step 1.TotakeadvantageofPNOmaon'sbestreproducingcapabilies,itisessenalthattheplung‐
erthrowisslightlygreaterthanthekeytailli.
Notethefollowingmeasurements:
B.MeasuretheboomofthekeytailtothekeybedattheKEYTAILUPposion.
A.MeasuretheboomofthekeytailtothekeybedattheKEYTAILDOWNposion.
A
B
Keybed
Keyframe
Step 2. Takethekeylimeasurement“C”aboveandadd1/16"tocompensateforthefeltplung‐
erp.Thisisthemeasurementusedtofindtherestposionoftheplunger.
B=___________
A=___________
B‐A(C)=__________
Plunger Throw = C + 1/16” ______________

Installaon Procedure
11
July 2013
...Key Solenoid Plunger Throw
Step 3.Holdtheplungerinits"ON‐HOLD"posion.
ThisOn‐HoldposioniswheretheTOPofthePlungerBodyisflushwiththe
topofthesolenoid.
Posionagauge,apieceofwoodorcardboard,andmarkthelocaonoftop
ofthePlungerTip.
Releasetheplunger.
Step 5.TurntheKeySolenoidCaptomovethePlungerTiptoyourmark.
NOTE:Ifthecapwon’traisetheplungerhighenoughbecauseitisght
againstthesolenoidhousing,nomorethreads,removetheplungersand
insertLost‐Moonfeltwashers.
Step ‐Final.Adjustalllostmooncapstothesameposion.
Step 4.Fromtheposionmarkedinstep3,usearulertomeasurethe
Plunger Throw distance(step2)andmarkyourgauge.
Plunger Tip-Felt
Plunger Stem
Plunger Body
Key Solenoid
Solenoid Cap
Used to adjust Plunger Throw

Installaon Procedure
12
July 2013
Key Solenoid Rail Assembly ‐Solenoid to Key Alignment
Withthepianoacononyourworkbenchandthefrontsofthekeysfacingawayfromyou.Placethesolenoidrailon
theworkbenchinfrontofthekeytailsandputtheplungersinsidethesolenoids.Turnthesolenoidrailassemblyonits
side,sothattheplungersarenowparalleltotheworkbenchsurfaceandthefeltplungerpsaretouchingtheback
endsofthepianokeys.Thefirstplungershouldstartallthewaytothelesideoftherail.Securetherailandacon
withthetwoclampssotheywillnotmoveduringthealignmentprocess.Markwhichsideisbassandtreble.Make
sureallthesolenoidplatesarefreemoving.Iftheyarenot,usean11/32”nutdrivertoloosenthem.
Thespacingbetweenseconshasbeenheldincheckbytheintroduconofsolenoidassemblypairsadjacenttothe
breaks.Becausenotallseconsonapianowillhaveanevennumberofnotesplayedinthem,thosewhichhavean
oddnumberwillrequireamodifiedsolenoidassemblytoprovidetheaddionalnoterequired,andthismodifiednote
willbeplacedadjacenttoaseconbreakorateitherend.
Countthenumberofkeystobeplayedineachsecon.Ifthereisanevennumber,alignthesolenoidswithplungers
alreadyontherailwiththecentersoftheirrespecvekeytails.Ifthenumberofkeystobeplayedisodd,simplyre‐
moveoneofthesolenoidsfromthedoublemounngbracketandconnuetothealignmentofthenextsecon.
Ifnecessary,cutawaytheunusedporonoftherailendswithahacksawandfileoffallburrswithametalfile.Be
carefulnottocutawaytherailbracketmounngholes,orcutanysolenoidwires.
Mountall8railsupportbracketstotherailwiththe10‐32X7/16"screwsand#10externalstarwashers.
Note: The distance from the boom of the keybed to the boom of the keytail felt should be equal to the distance
from the top of the solenoid plunger to the top of the rail mounng brackets.
Atthisstage,thekeysolenoidshavebeenmatchedupwiththeircorrespondingkeytails.Therailhasbeencutto
length,andtherailbracketsaachedinplace.Puttherailasideforfutureinstallaoninthepiano.

Installaon Procedure
13
July 2013
Modifying the Keyframe ‐Grand...
If you are installing a QRS PNOscan II record system you should incorporate it’s installaon while modifying the pi‐
ano acon. The PNOscan II has it’s own installaon manual.
TheKeyframewillprobablyrequiremodificaontoaccommodatetheKeySolenoidRailAssembly.Thekeytailsmust
protrudeoverthebackoftheaconframe,sotherearofthekeyframemustbecutaway.
Toolsneededforthischapter:pencil,paper,woodchisel,straightedge,jigsaw,palmsander&sandpaper,ulityknife,
woodglueandanassortmentofscrewdrivers.
Atthispointintheinstallaon,thepianoisonitslegs,thefallboard,keyslip,andcheekblockshavebeenremoved,
andthelyreissllinplace.ThepianohasbeenmeasuredtoverifythattheNoteRailAssemblywillfit.
Measurethedistancetheaconshiswhenthele (unacorda)pedalispressed.(Ifahammerli railisinstalled,
measurethedistancethehammersliforagivenmovementofthesopedallyrelirod.)Measurethedistancethe
so shi (unacorda)pedalli rodtravelswhenthepedalisdepressed.Writethesemeasurementsdownforlater
trapworkinstallaon.
Removetheenregrandoruprightpianoaconfromthepianoandplaceitonaclean,levelworkbench.Donotde‐
pressthekeyswhileslidingtheaconinoroutofthepiano,orbrokenhammerswillresult.
Examinetherelaonshipsofthekeytailstotherearedgeofthekeyframe.Eachkeytailmusthaveatleast1‐1/4"ex‐
posedbeyondtherearedgeofthekeyframe.Ifthisisnotthecase,thenthekeyframemustbemodified.Ifmodifica‐
onsarerequired,followthesesteps:
IMPORTANT:Before removing the hammer acon from the key frame acon you must first measure the distance
from the boom of the key frame acon to the boom of the piano key. Next, depress the key and measure once
again, from the boom of the key frame acon to the boom of the key. Write these measurements down for later
use.
Withascrewdriverremovethewoodenkeystoprailfromthekeyframe.
Withascrewdriverremovethehammeraconfromthekeyframe,beingcertaintonoteanyscrewlengthdifferences
inthe8or10woodscrewsusedtosecuretheacontothekeyframe.Itisalwaysadvisabletoputthesamescrewinto
thesamehole.
Verifythatthekeysareproperlynumberedbeforeremovingthem.Removeallkeysexceptkeynumbers5,84,andthe
breakkeys.Withapencil,mark1‐1/4"infromtheendsofthekeytailsontothekeyframe.Allowanaddional1/4"at
eitherendofeachsecon.Withastraightedgetoguideyou,connectthemarksineachsecon.Removaloftheback
railfeltmayberequiredbeforethisstep.(Figure1)
Thebackrailfeltrestsbeneaththekeytails,andcanberemovedbyusingasharpulityknifeorinsomecasesawood
chisel.Placetheremovedbackrailfelttothesideforfutureusewhenrelocangandre‐gluinginitsnewposion.

Installaon Procedure
14
July 2013
...Modifying the Keyframe ‐Grand...
Thekeyframemustnowbecut.Removeallkeys.Withajigsaw,followthepencillineandcutawaytheframeineach
seconbetweenthebreaks.
Withthepalmsander,cleanupalltheroughedges.
Theaconisnowreadytobeusedtolocatetheposionsoftheslotsthroughthepiano'skeybed.
Placethekeyframeintothegrandpianocaseandsecureitwiththerightandlecheekblocks.Withashort,sharp
pencil,reachintothekeyboardcompartmentandmarkthenotchedrearmostlimitsofthekeyframe,includingthe
rightandleextremesofeachnotch.Theselineswillbeusedtoidenfytheexactlocaonsofthekeybedslotsonthe
undersideofthekeybed,sobecertaintomakewell‐definedpencillines.
Removethekeyframeandregluethekeytailfeltflushwiththebackofthekeyframe.Measuringthekeydipbefore
andaerreposioningthefeltisrecommended.Ifitisthesame,lessregulaonwillberequired.Ifithaschanged,
simplyshimthebackedgewithathinpieceofcardboardtomaintaintheoriginalkeydip.
Newerkitsincludekeysolenoidplungerswithfeltps.Thereforewenolongerprovidethefeltstripbelow.
Note:Thisisagoodmetoinstalltheoponal88noterecordstrip(70014).SeethePNOScanrecordstripinstallaon
manual.
Placeallofthekeysbackonthekeyframe.
Re‐installthehammeracononthekeyframe,usingthesame8‐10screwsyouremovedearlier.
Re‐installtheKeyStopRail.
Atthispoint,thegrandaconmodificaonsarecomplete.
For best player performance it is important that the acon be regulated properly.

Installaon Procedure
15
July 2013
...Modifying the Keyframe ‐Grand
1-3/4” to 2” slot
1/4”
Back edge of the
keyframe drawn on
the top of the keybed.
Ends of the sot.
Lines transferred from the
top of the keybed.
Lyre
Treb
Leg
Bass
Leg

Installaon Procedure
16
July 2013
Cung the Keybed Slot...
Toolsneededforthischapterincludeacircularsaw(sabresawwithasufficientlylongblade/routermaybeused),a
powerdrillwithasharp1‐3/4"Forstnerbit(orwoodboringbit),variousscrewdrivers,aframesquare,apencil,atape
measure,andpaintthatmatchestheundersideofthepiano.
Atthispointthepianoisonitslegs,theaconisoutsideofthepianocaseandhasbeenmodifiedtoallowthekeytails
toprotrudeovertherearofthekeyframeby1‐1/4".Feltsareaachedtotheundersidesofeachkeytail,andthe
originaltrapworkissllinplace.
Next,haveanassistantpressthesustainpedal.Whilehedepressesit,measurethedistancethepedallyreli rod
movesandwriteitdown.Likewise,measurethedistancethedamperli railriseswhenthepedalispressed.This
measurementcanbetakenfrominsidethecase.Next,marktheexactlocaonoftheupwardextensionofthepedal
lyre'svercalrodsontothekeybedboom.Setthesemeasurementsasideforlatertrapworkinstallaon.
RepeattheabovestepwiththeSostenutopedal(ifitexists).
Theremaybetwoormoreaconstopblocksinsidethecase.Theseblocksstoptheinseronofthegrandpianokey‐
boardattheproperlocaonandpreventitfromliingupoffthekeybed.Intheeventthattheseinterferewiththe
slottobecut,removebyforceappliedbyasharpchiselandhammer.
Removethelyrefromthepiano.
Turnthepianoonitsflatorbasssideandsecureit.Makeavisiblepencilmarkoutliningthebassandthetreblelegs.
Next,removeeachlegmarkingthemaccordingly(bass,treble,tail)andplaceinasafeareatopreventdamage.
Useapencilandmarkthelyrerodstrikepoints(wherethelyrerodshittheoriginaltrapwork)ontheboomofthe
keybed.Removealltrapwork,andotherpartsthatmayinterferewiththekeybedmodificaonsfromtheundersideof
thepiano.
Usingatapemeasure,recordthedistancefromthefrontofthepianocasetothemarksyoupreviouslymadeinside
thecase.Dothisonboththebassandtrebleend.Callthisthedepthmeasurement.
Transfertheslotmarksmadeontheinsideofthepianocasetotheundersideofthekeybed.
For Upright installations, See Page 9.

Installaon Procedure
17
July 2013
...Cung the Keybed Slot
Takingintoaccountanyvariaonsinthecontourofthefrontofthepianoandusingtheframesquarealignedwiththe
markjustmadeonthefrontundersideofthekeybed,measureandmarkthedepthmeasurementontheundersideof
thekeybed.Next,measure1/4"towardthefrontofthepianoscribingastraightlinebetweenthebassandtreble
notes.Thenmeasure1‐3/4"towardtherearofthepianofromthenewlyscribedline.Wheneverpossiblewerecom‐
mendkeepinginthebreaks.
Eachslotshouldbeatleast1‐3/4"wide(2”Maximum).Thelongitudinalcenterofeachslotmustcorrespondtothe
centerlineofthefeltpaddedkeytails,whichis1/2"infromtheendofeachkey.
Verifythemarksjustmade.Drillasmallexploratoryholewithineachslotandcomparetheposionoftheslotwiththe
marksmadeinsidethecase.Correcteachslotposionasrequired.
Usinga1‐3/4"Forstnerbit,drillholescenteredattheendsofeachslot.
Cutthelengthsofeachslotwithasabresaw,circularsaworrouter(beingextremelycarefulwithallpowertools),con‐
necngtheendholesjustmade.Avoidcungawaythebreaksbetweentheslotsifpossible.
Rasporsandtheslotssmoothandsquarewiththesurfaceofthekeybed.Bevelthetopmostslotedgeswithcoarse
sandpaper.Theslotsshouldbesealedwithpaintmatchingtheboomofthepiano,oraclearsealanttoretarddrying
ofthewood.
Atthispointtheslotshavebeenposionedandcut.NowisthemetoremounttheSoShiLever.
SideViewofModifiedKeyframeandKeybed

Installaon Procedure
18
July 2013
TheSoShi(unacorda)pedalmechanismusuallyincludesalong,cast‐ironbellcrankleverwhoseshortarmpro‐
trudesthoughthekeybedtoengageagroovecutintheboomofthekeyframesomewherebeneaththetreblesec‐
on.Theshipedalinthisconfiguraondoesnothavetopassthroughthesolenoidrailand,therefore,mayoenbe
leuntouched.However,onsomepianosyoumayhavetomovethesoshitowardthefrontofthepianotoaccom‐
modateforthewidthoftherail.Forthepianosthatneedmodificaon,bracketshavebeenincludedinthekitforeasy
readjustment.It is a good idea to leave one of the original wooden blocks aaching the soshilever to the key
bed, and only use one of the brackets supplied. This will make adjusng the SoShilever much easier.Thebrack‐
etscanbeaachedtothekeybedwithfour#10x1”mounngscrews.Thepedalmustshitheaconthesamedis‐
tanceasbeforewiththesamepedalmovement.Refertothemeasurementstakenwhenthetrapworkwasremovedto
verifythatthisbehaviorhasbeenretained(See“ModifythePianoAcon”secon).
Measuringfromthefrontedgeoftheslotthereshouldbe2‐1/4inchestothefrontedgeoftheso‐shihole.
Installing the So‐ShiLever
Slot
2-1/4”
Lyre Brace

Installaon Procedure
19
July 2013
Installing the Sustain Pedal Trapwork...
Whenyouareatthepointwhereyouarereadytostartremovingtheoriginaltrapworksystemfromthepianowerec‐
ommendthatyoutracearoundthetrapcomponentsbeforeyouactuallyremovethem.Thisisjustagoodreference
shouldyouhavequesonsaboutleverage,strokeorplacementaeryouhaveremovedeverything.Youshouldalso
tracearoundanythingelseyouwillberemovingsuchasthepianolegs.
Itisnormallyagoodideatoinstallthenewtrapcomponents(exceptfortheSostenuto)aeryouinstallthesolenoid
railbecausethereisonlyonecorrectplacetherailcanbeinstalled,whereasthetrapcomponentsaresomewhatflexi‐
bleintheirplacement.Thefirstisdecidingifyouneedtomillanyareasofthekeybedbesidestherailslotitself.The
mostlikelyplacesthatwouldrequirespecialmillingwouldbetomillarecessfortheSostenutoactuatorassemblysoit
canbemountedabovethesolenoidrail.Anothercasewouldbetomillapocketinthekeybedtoaccommodatetheup
mostposionofthesoshileversuchasonaSteinway.Youmightbemillingaslotperpendiculartothesolenoidslot
tofitabridgesupportifyoucan’tleaveonewhenyoucutthemainslot.Dependingonthesituaonyoumayneedto
drillanewholeforthesustaindowel.Itisimportanttorealizethesepossibiliesbeforeyoucuttheslot.Youdon’t
wanttocuttheslot,cleanupthemessandinstallthesolenoidrailjusttofindoutyouneedtocutmorematerialto
accommodateapieceofthetraphardware!
Onceyouhavetheslotlaidoutontheboomofthekeybed(werecommendusingasoapstoneormedpgrease
pencil),itwillbemucheasiertoconceptualizehowyouwillconfigurethetrapsystem.Withthelinesdrawnexactly
wheretheslotwillbecut,youwillbeabletotellwhatobstacleswillneedtobemoves,modifiedorworkedaround.
Forinstanceifyouareinstallinga88noterail,youwillimmediatelyseewhatneedstobedonetothepianolegs.(you
shouldhavetracedaroundthelegsbeforeyouremovethem.)Youcanmeasurethetotalwidthofthesolenoidrailand
soshileverassembly,referencethismeasurementoffthefrontoftheslotlineyoudrewanddecideifyouneedto
movethelyreassemblyforwards.
Thechaptersthatfollowthisoverviewwillprovideexplanaonsandgraphicdetailsthatwillhelpyourealizetheideas
behindthehardwaredesign.Forthemostpart,youwillfindthatthehardwarewesupplywilladapteasilytoatypical
installaonbitkeepinmindthatthehardwarewehavedesignedcanbeeasilymodifiedtoadapttouniqueapplica‐
ons.Ifbendingalevertofityourparcularinstallaonfitsthebill,thenbendasneeded.It’syouringenuitythatfinal‐
izesthehardware’sconformity.
GeneralRecommendaons

Installaon Procedure
20
July 2013
1DrawaStraightlinebetweenthesustainholeinthekeybed,lyresustainpushrodandthePedalSolenoid.
11NotchtheSolenoidRailcoverwheretheTrapworkStraightBarenters
2Placethetrapworkonthekeybedsothatitfollowsthatline
3Fastenthetrapworktothekeybedwiththe4,31/2”screwsprovided.
4Screwthelockingnylonnutsontothe#8DamperTrayPushRodsothatitsupportsthedampertray.Screwthe2#8
nutswithawasherontheotherend.
5Insertthe#8DamperTrayPushrodontotheDamperTray.
6Alignthe#8DamperTrayPushRodwiththepredrilledholeintheTrapworkStraightBar.PuttheNylonCollarinthat
hole.
7PlacefeltorleatherontheAdjustableLyreRodLeverwherethesustainpushrodmakescontactwiththeAdjustable
LyreRodLever.
8AdjusttheLyreRodLeverunlitreachesoverthelyressustainpushrod.
9Adjustthe2#8Nutssothatthedampersfalltoafullrestonthestrings
10Tightenthenutsaerallthelostmoonisout.
12AdjustthePedalsothatthereis1/4”lionthedampertray
...Installing the Sustain Pedal Trapwork
1LyreRod 5NylonCollar9CarriageBolt13NylonMounngBlock
2AdjustableLyreRodLever6Nut10CarriageBoltNut14TrapworkStraightBar
3AdjustableLeverBolt7LockWasher11TrapworkBar“S”Shaped
4SolenoidRailCover8DamperTrayPushRod12NylonWasher
This manual suits for next models
1
Table of contents
Other QRS Music Technologies Music Equipment manuals