Sea-doo SEASCOOTER ZS08 User manual

English Version
CAUTION
ELECTRICALLY OPERATED PRODUCT
Not recommended for children under 16 years of age. As with all
electrical products, precautions should be observed during handling
and used to reduce the risk of electric shock.
User Manual
SDP95003
Distributors in the United States and Canada provide a standard Limited
Warranty for 6 months from the date of purchase for new products. If
you're not located in the United States or Canada, please contact your
local distributor for warranty arrangements in your territory.
Please visit
www.seadooseascooter.com for distributor / Service Centre details.
Distributors ONLY warrant Stallion products purchased from an
authorized dealer.
Ask your local Distributor for the warranty period in your region by calling their
Service Center. Any part of the product supplied by the Distributor and found in the
reasonable judgment of the Distributor to be defective in material or workmanship
will be repaired or replaced by the Distributor without charge for parts or labor. The
product including any defective part must be sent to the Distributor within the
warranty period. The customer will pay for the expense of delivering the product to
the Distributor. The Distributor will pay for the expense of returning the product to
the customer.
ALWAYS ACTIVATE YOUR WARRANTY IMMEDIATELY ON
http://www.seadooseascooter.com/warranty.html
SEE NEXT PAGE
www.seadooseascooter.com
Model no. ZS08 / SD75001
W A R R A N T Y & C U S TO M E R
S E RV I C E I N F O R M AT I O N
Distributors ONLY warrant products with an active
Warranty Registration

Contents Instruction
Introduction 1
Parts diagram 2
WARNINGS 3
Getting started 5
Battery use 9
Care & Maintenance 19
Trouble Shooting 21
Technical Specifications 26
Thank you for having chosen the SEA-DOO®
SEASCOOTER™- with the SEASCOOTER™swimming,
snorkeling and diving is effortless and fun.
Years of design and engineering have resulted in a personal
water propeller that gives you power - up to 2 mph/3km/h for
up to 40 minutes of use with a standard battery - but at the
same time is compact and light.
There are many features incorporated in this sophisticated
design, please take a little time to study the manual to learn
about them all to get the most out of your SEASCOOTER™.
1

Parts Diagram WARNINGS
1 Latch
2 Nose Cone
3 Inner Nose Cone
4 Vent Plug
5 Trigger
6 Handle
7 Nozzle
8 Propeller
9 Protective Grilles
10 Battery Housing
11 Master Switch
12 Battery
13 Vent Hole
14 Buoyancy Control
Chamber
15 Silicone Ring
16 Pump
17 Lubricant
18 Charger
19 Charger Jack
• Read the user's manual carefully.
• Never remove the grilles except for maintenance.
• Never stick body parts, clothing or other objects in the
vicinity of the Propeller. Do not wear loose or flowing
clothing or equipment that could be drawn into the
Propeller.
•
Particular care should be exercised when using the
SEASCOOTER™ near anybody with long hair. Users with
long hair should tie it up or wear a swimming cap when
using the SEASCOOTER™.
•
Always inspect the swimming area to ensure it is free of
hazards or obstacles such as boats and swimmers before
using the SEASCOOTER™.
•
Always charge battery to its fullest before using the
SEASCOOTER™. After charging is complete the battery
will continue to off gas. Wait at least 30 minutes after
charging before removing the battery from the charger or
placing the battery into the battery housing. Failure to do
so could result in an explosion.
•
Ensure sufficient battery charge remains for return to
shore or surface.
• The Seascooter™ is not a personal floatation device -
always wear a Approved Personal Flotation Device /
Approved Life-Preserver when using the Seascooter™ for
snorkeling.
•
Be aware of appropriate water levels, tidal changes,
dangerous currents, weather changes and strong offshore
winds. Always scout unfamiliar water.
2 3
1
23
11 10
12
13
14
7
68
9
5
4
15 16 17
Fig.1
18
19

Getting Started
•
Do not use alcohol or mind-altering drugs prior to using
this product.
• ALWAYS keep the SEA-DOO®SEASCOOTER™out of
direct sunlight when not in use. HEAT KILLS BATTERIES.
• When using the SEA-DOO®SEASCOOTER™for SCUBA,
ascents and descents should be made in accordance with
recognized diving practices.
• The SEA-DOO®SEASCOOTER™should only be used for
SCUBA by qualified divers.
•
Always follow this age recommendation: a child under 16
years old should never operate this SEA-DOO®
SEASCOOTER™.
• Never open the Cover of the SEA-DOO®SEASCOOTER™
in the water.
• When not in use, always turn the Master Switch to the off
position.
•
Do not use the SEASCOOTER™below the recommended
maximum depth of 20m/65ft.
• ALWAYS remove the battery from the unit when not in use.
• DO NOT store the battery in the unit
When you buy the
SEA-DOO®SEASCOOTER™
the battery
is disconnected and needs to be charged. Follow the safety
cautions on pages 9 to 12 and charging instructions on
pages 13 to 16.
Using the SEASCOOTER™for swimming and snorkeling.
When swimming or snorkelling the
SEA-DOO®
SEASCOOTER™
should be kept positively buoyant - this is
done by simply making sure the Buoyancy Chamber is
empty and fitted inside the Nose Cone.
To use the SEASCOOTER™for swimming or snorkeling
follow these instructions.
1.Charge the battery and install just before use.
2.Make sure that Vent Plug is closed.
3.Place the SEA-DOO®SEASCOOTER™into the water so
the Handle, Outer Nose Cone and Nozzle fill with water.
4.When ready to set off, switch the Master Switch to the On
position shown in figure 2.
5.Pull and hold both Triggers to start the Propeller.
(There is a short delay before the Propeller begins to
rotate).
6.To stop the Propeller, simply release the Trigger.
7.Always turn the Master Switch off when out of the water.
4 5

Using the SEA-DOO® SEASCOOTER™ for diving -
adjusting the buoyancy.
Your SEASCOOTER™can be used for diving up to 20m/65ft
but will need to be adjusted for neutral buoyancy. The
SEASCOOTER™must never be adjusted for negative
buoyancy to avoid it sinking if accidentally released.
To adjust for neutral buoyancy follow these instructions
1.Make sure the SEA-DOO®SEASCOOTER™ is in the Off
position.
2.Remove the SEASCOOTER™from the water, give a half
turn to the Latches, remove them (see figure 4) and
remove the Buoyancy Control Chamber.
3.Replace the Outer Nose Cone and Latches.
4.Place the SEA-DOO®SEASCOOTER™in the water to fill
the nozzle, handle and Outer Nose Cone with water.
8.
Proper posture when using the SEA-DOO®
SEASCOOTER™ is important to achieve the maximum
speed - see figure 3 for the correct position of the
SEA-DOO®SEASCOOTER™when using it.
Fig.2
Fig.3
CAUTION
Do not dive deeper than you would normally when snorkeling,
to ensure you can get back to the surface safely.
Rotate 180oand remove to open
Fig.4
76
Shown in "ON"
position Rotate to turn
"OFF"

Battery Use
5.Remove the lid from the Buoyancy Control Chamber and
place the upturned chamber on the Handle as show in
figure 5.
6.Adjust the buoyancy by adding weight and replace the lid
of the Buoyancy Chamber making sure the seal is free
from sand.
7.Remove the SEASCOOTER™ from the water, remove
the Outer Nose Cone again, replace the Buoyancy
Chamber, replace the Outer Nose Cone and close with
the Latches.
8 9
CAUTION
If the SEASCOOTER™is later used for swimming or
snorkeling be sure to remove the weight from the Buoyancy
Chamber so the
SEA-DOO®SEASCOOTER™
has positive
buoyancy.
Fig.5
RE-CHARGE THE BATTERY
3
3
AT LEAST
www.seadooseascooter.com
• Must remove and store
the battery separately from
the unit when not in use!
• Must re-charge the battery
after use WITHIN 24 HOURS.
• Must re-charge the battery
at least EVERY THREE MONTHS
when not in use.
User Manual must be read
and understood before use.
No warranty for the battery,
Please read and follow the
Battery Safety Instruction
Incorrect battery maintenance
may reduce the battery life
and influence its function.
MONTHS
EVERY
MONTHS

Battery Use
CAUTION
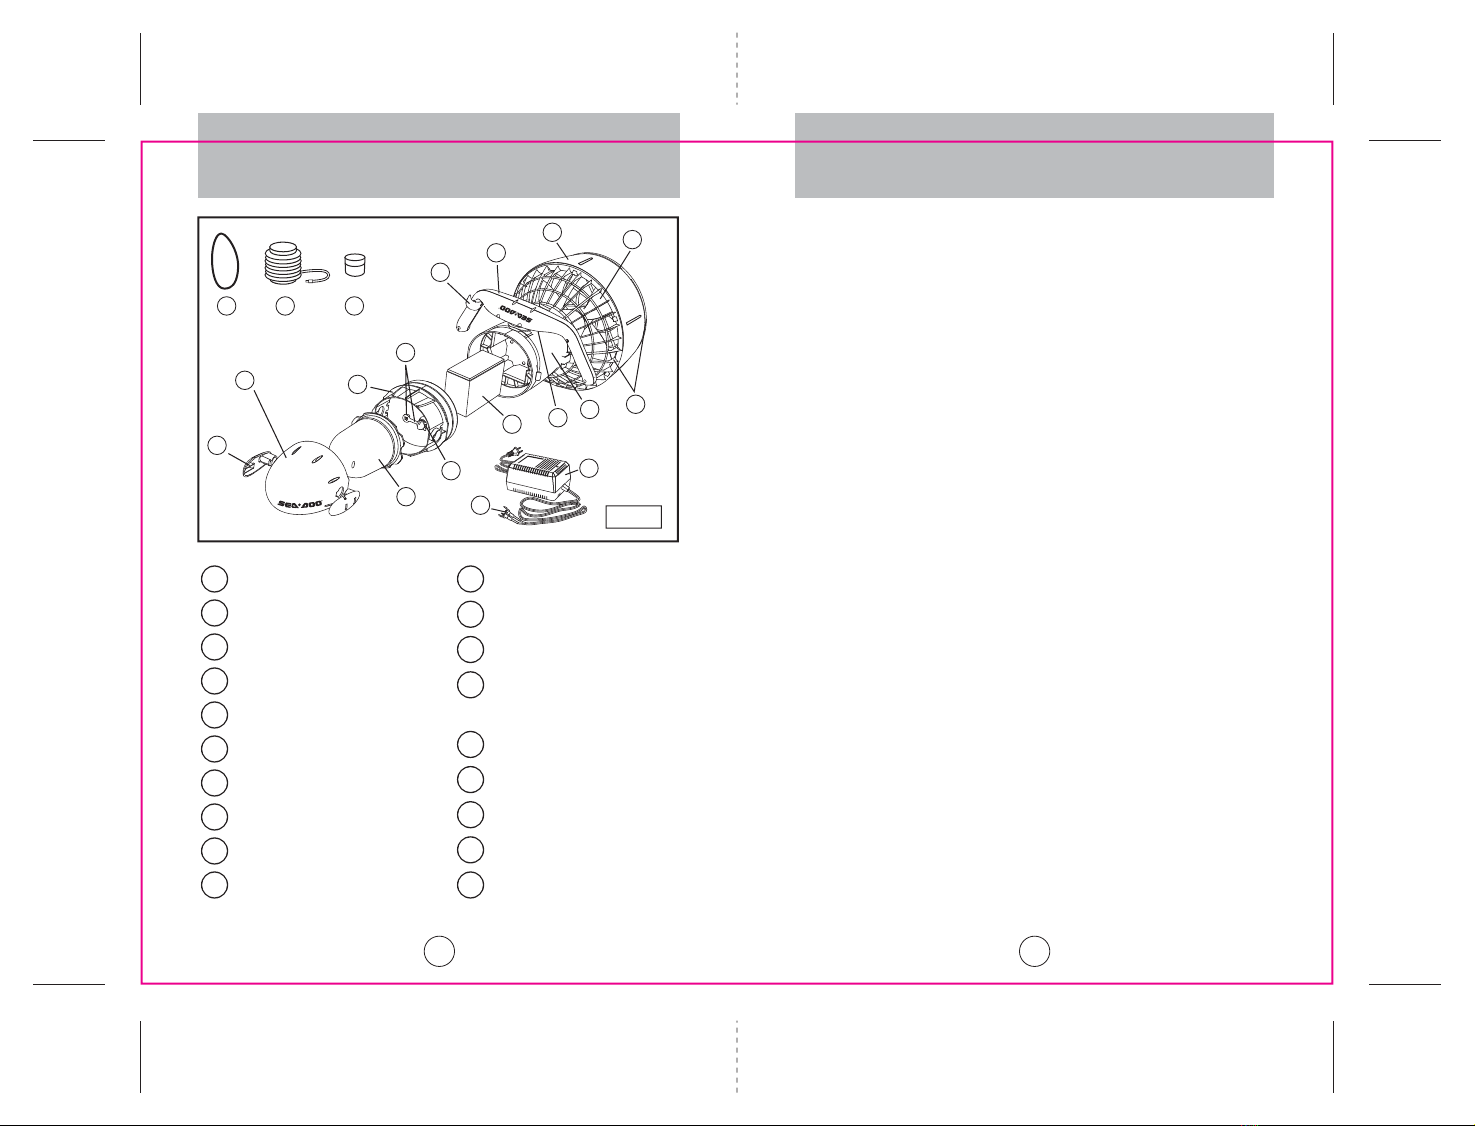
• Your SEA-DOO®SEASCOOTER™is supplied with a
battery that needs to be treated carefully as it will
release potentially explosive gases during its normal
cycle of use (off gassing). Please read the entire
manual thoroughly and follow all instructions. Failure
to do so can result in an explosion occurring.
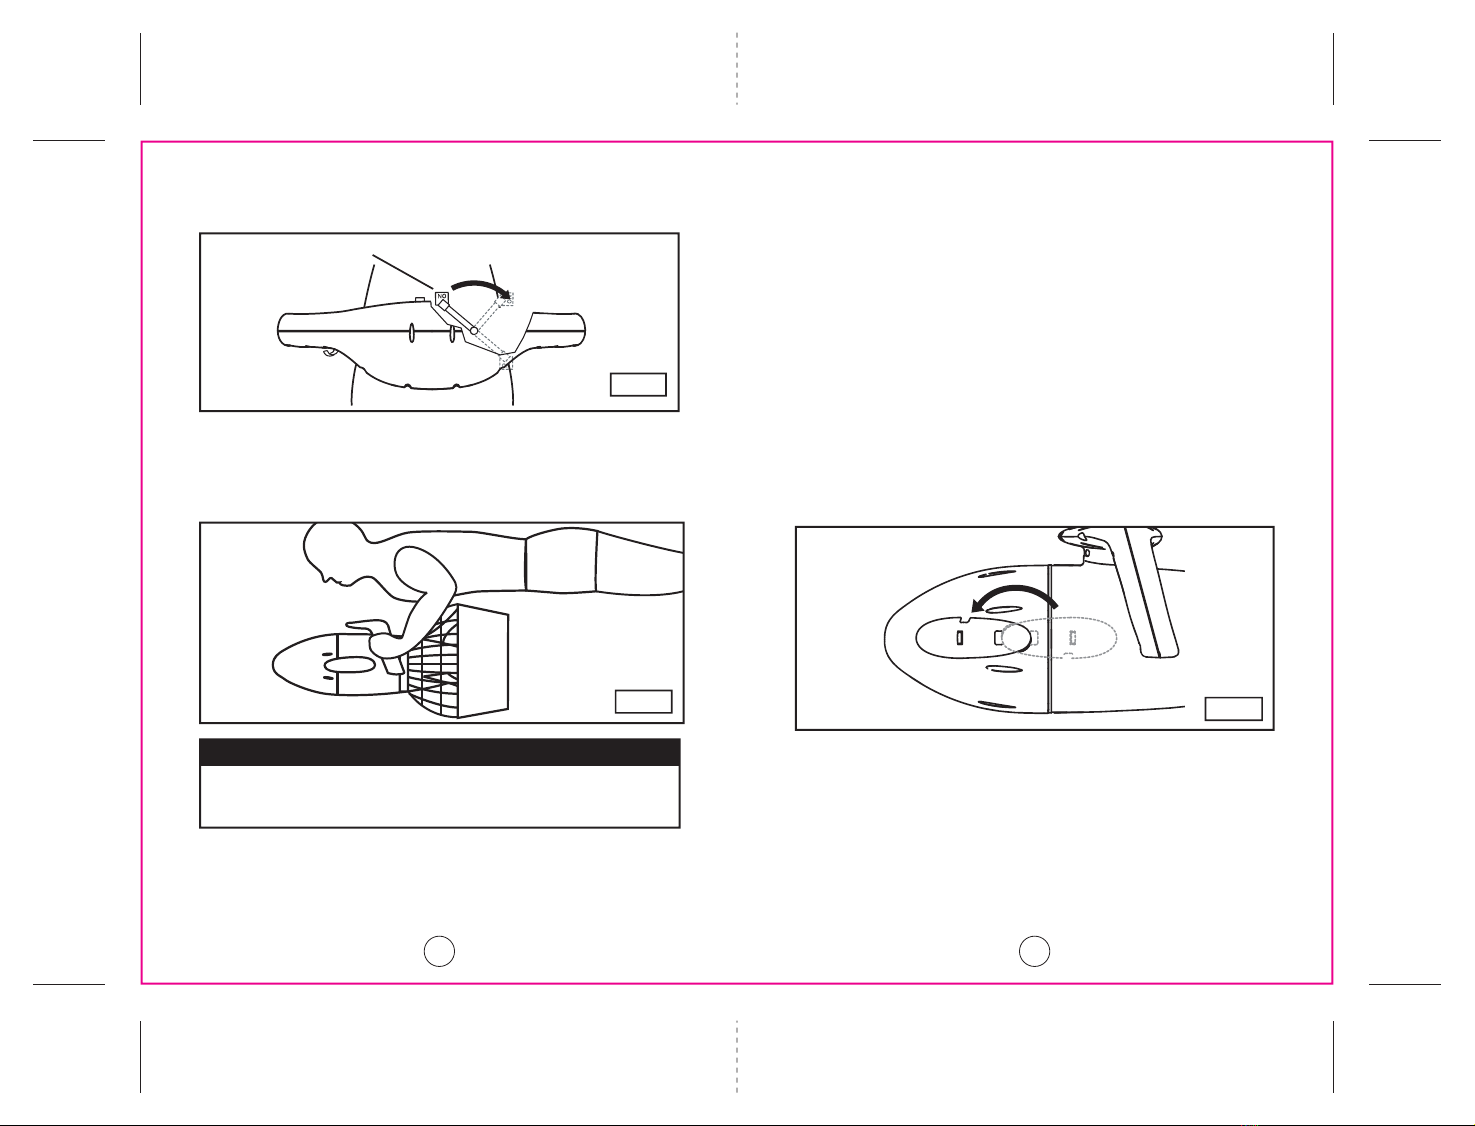
• Always remove the battery from your SEA-DOO®
SEASCOOTER™when it is not in use and store
separately in a well ventilated area where it is out of
the reach of children and away from heat and ignition
sources.
• Do not install the battery in your SEA-DOO®
SEASCOOTER™ until immediately prior to using it.
• Before disconnecting/connecting any cables, open the
nose cone and allow two minutes for any explosive
gases to dissipate.
• Do not use/store/charge the battery in temperatures
above 40ºC (104ºF) as excessive off gassing may
occur. Keep the battery and SEA-DOO®
SEASCOOTER™in the shade when not in use.
• Always ensure the unit is dried thoroughly before
opening the Nose Cone.
• Only use the charger supplied with the SEA-DOO®
SEASCOOTER™.
Battery Use
CAUTION
• The battery supplied with your SEA-DOO®
SEASCOOTER™releases a potentially explosive gas
during charging. Charging should only take place in a
well ventilated area, away from children and naked
flames or other ignition sources (cigarettes, sparks).
Never charge the battery whilst still in the SEA-DOO®
SEASCOOTER™.
• Charge the battery as soon as possible after use within
24 hours.
• Always charge the battery to the fullest before using
the SEA-DOO®SEASCOOTER™.
• Always remove the battery from the battery housing
before charging.
• Always connect charger jack to the battery first and
then plug charger into the mains.
• After charging, disconnect from the mains first and then
disconnect the battery from the charger.
• After charging is complete the battery will continue to
off gas. Wait at least 30 minutes after charging before
removing the battery from the charger or placing the
battery into the battery housing. Failure to do so could
result in an explosion.
•
Remove battery from charge once fully charged.
10 11

Battery Use
CAUTION
• Never charge the battery in sealed container.
• Never charge the battery near water.
• Never short circuit the battery or battery connectors.
• Always ensure the charger is dry before use.
• The charger gets quite warm in use - this is normal.
• If in doubt of the state of the battery, recharge it until
the indicator on the battery charger indicates a full charge.
• If the battery is not to be used for an extended period,
store it in a well ventilated area away from children,
heat and ignition sources and recharge it every three
months to maintain charge and avoid excess of
gassing. DO NOT store the battery inside the
SEA-DOO®SEASCOOTER™.
• If the battery appears damaged or will not charge fully,
the battery must be replaced. If battery life is noticeably
reduced, the battery should be replaced.
Charging the battery
For battery charging follow these instructions.
1.
Always ensure that the Master Switch is Off - see figure 2.
2. Always ensure that the SEA-DOO®SEASCOOTER™is
out of the water, dry and placed in a dry area.
3. Give a half turn to the Latches and remove them from
the Nose Cone as shown in figure 4.
4. Remove the Outer Nose Cone and Buoyancy Control
Chamber.
5. Open the Vent by unscrewing the Vent Plug.
6.
Remove the Inner Nose Cone. To do this, first feed the
silicone ring (provided with this manual) through the latch
holes in the Inner Nose Cone and hook over the hooks
on the Battery Housing (see figure 6). Then screw the
Pump Nozzle onto the Vent Hole and pump air into the
Battery Chamber until the Inner Nose Cone pops off and
then remove the silicone ring.
7. Allow two minutes for any gasses to dissipate.
8. Disconnect the battery cable from the housing cable (if
not already disconnected - the cable will be
disconnected when you buy your SEASCOOTER™) by
pressing the locking feature, as shown in figure 7.
12 13

17.Make sure the seals and sealing surfaces are clean
and lubricated before replacing the Inner Nose Cone.
See fig.8
18.Replace the Inner Nose Cone making sure the key is
aligned correctly. See fig. 9.
19.Ensure the Vent O Ring is fitted correctly. See fig. 10.
20.Screw in the Vent Plug to seal the vent.
9.
Remove the battery and place on a level surface.
10.Connect the battery cable to the charger cable.
11.Plug charger into mains, and turn on the supply.
12.Charging will take 14 to 16 hours for a fully discharged
battery. Flashing light indicates battery is fully charged.
13.Unplug the adapter from the mains.
14.Allow battery to stand for 30 minutes before using it.
15.Unplug the battery cable from the Charger cable.
16.When ready for use, install the battery and reconnect to
the housing cable.
14 15
Fig.6
Press here to release and pull to disconnect
Fig.7
Fig.8
Ensure sealing surface is clean
Ensure the seals are
clean and lubricated
Seals
Close up view
of seals

21.Replace the Buoyancy Control Chamber.
22.Replace the Outer Nose Cone making sure the key is
aligned correctly and insert the Latches and lock the
Nose Cone by giving them a half turn. See fig.11.
To replace a flat battery with a fully charged battery.
1.
Follow the steps 1 to 7 on page 13, to open the
SEASCOOTER™.
2. Unplug the battery at the socket by pressing the locking
feature shown in figure 7.
3. Remove the flat battery. remove the cables from the flat
battery and fix them to the charged battery.
4. Install and connect the charged battery in the correct
position - the leads of the battery must be oriented as
shown on the sticker on the battery, see figure 12.
5. Follow steps 17 to 22 on page 15 and 16, to close the
SEASCOOTER™.
1716
Fig.9
Close up view
O Ring correctly fitted into
groove and lubricated
Fig.10
Rotate 180oto close
Fig.11
Standard battery
Fig.12

Care And Maintenance
Using the Optional Extended Life Battery.
An optional extended life battery is available through your
your local customer service centre/distributor. This battery
fits into the Battery Housing in a slightly different position
to the normal battery, follow sticker on battery for correct
orientation, see figure 13.
The extended battery can be charged in the same way as
a standard battery.
Battery Care
• Please read and understand important Battery Use
safety information on pages 9 to 12.
• The battery supplied with your SEASCOOTER
™
should
last about 200 cycles or two years before it should be
replaced. Please contact your local customer service
centre/distributor. Using a battery in excess of these
recommendations can result in excessive of gassing of
explosive gas.
• ALWAYS remove the battery from the SEASCOOTER
™
immediately after use.
• DO NOT STORE BATTERY IN SEASCOOTER
™
Care after using the SEASCOOTER™
• Always rinse the SEASCOOTER™in fresh water and
allow it to dry before storage.
• Whenever possible rinse the SEASCOOTER™in fresh
water immediately after use.
• To clean the SEASCOOTER™do not use detergents,
only use a damp cloth to wipe the unit clean.
• The Battery Housing interior should be kept dry at all
times.
• If the Battery Housing interior ever gets wet, see page
25, Accidental Flooding for procedure.
Buying batteries
Additional standard or extended batteries can be
purchased separately. Contact your local customer service
centre/distributor to purchase them.
18 19
CAUTION
Because this battery is heavier than a standard battery
the Buoyancy Chamber must be added and empty to
ensure the SEASCOOTER™floats.
Extended life battery
Fig.13

Trouble Shooting
• When storing the SEASCOOTER™for extended periods
of time, open the Vent Plug in the Inner Nose Cone.
• DO NOT store battery in SEASCOOTER™.
• ALWAYS store your SEASCOOTER™vertically when not
in use to prevent deformation of the Propeller Nozzle.
Unit does not function
If the motor does not start when both triggers are pressed,
make sure
1. The battery is properly connected
2. The battery is fully charged
(see page 13, charging the battery)
3. The master switch is in the "On" position
(see fig 2, page 6)
4. There is no water in the battery compartment
(see page 25, accidental flooding)
Blocked Propeller
If the Propeller becomes blocked first try and remove the
obstruction by removing the front grille. If this is not
possible the back grille and Propeller can be removed.
Under normal use the grilles must not be removed.
Removing the front grille to remove an obstruction.
1. Remove the SEASCOOTER™from the water.
2. Make sure the master switch is in the Off position.
3. Insert a screw driver as shown in figure 14 to remove
the two grille pins.
4. Unclip grille as shown in figure 15.
5. Remove obstruction.
6. Reassemble grille and insert clips.
2120

Removing rear grille and Propeller to remove obstruction
1. Remove the SEASCOOTER™from the water.
2. Make sure the master switch is off.
3. Remove the battery - see page 13, step 1-9.
4. Unscrew the six rear grille screws as shown in figure 16.
2322
Fig.15
Fig.14
1 2
Fig.16
Fig.17
5. Whilst holding the Propeller, use an M6 socket to
remove the nut from the Propeller shaft (See figure 17).
6. Slide the Propeller off the shaft, taking care not to loose
the drive pin or washers.
7. Remove the blockage from the Propeller.
8. Replace the drive pin (if removed), see figure 18, and
Propeller. Turn the Propeller slowly until you locate the
pin and push the Propeller fully on.

9. Replace the washer(s) and nut and tighten with the
socket whilst holding the Propeller making sure it is
securely fastened (See figure 19).
10. Replace the grille.
11. Replace the battery.
Sand or Grit on Seals
Sand or grit is the enemy of seals. Correct maintenance
and care is essential. To remove sand or grit from the seals,
rinse the seals in fresh water and apply fresh lubricant. If
there is sand inside the Battery Housing, gently brush the
sand from the unit taking care not to scratch the sealing
surfaces.
24 25
Drive Pin In Position
Fig.18
Nut
Washers
Drive pin
Propeller hub
Fig.19
Accidental Flooding
Be sure to keep the seals sand and grit free to ensure they
keep water out and to close the vent plug after accessing
the battery chamber. However, should the seals not be
clean or the vent plug left open and water enter the battery
chamber, your Seascooter will not be damaged as it is
designed for protection against accidental flooding.
If water enters the battery chamber:
1.
Remove the SEASCOOTER™from the water if it is safe
to do so. Always observe safe diving practice.
2. Remove nose cone and tip out excess water.
3.
Wait two minutes for any gases to dissipate, then remove
the battery.
4.
If salt water has entered, rinse battery and battery
housing with fresh water.
5. Dry housing and battery thoroughly.

26
For more information on
Sea-Doo®Seascooter™Products
(Warranty, Customer Care / Maintenance,
Parts & Battery Purchase)
PLEASE VISIT
www.seadooseascooter.com
SEA-DOO®and the BRP logo are trademarks
of Bombardier Recreational Products Inc. or its affiliates,
used under licence to Stallion (asia) Ltd.
For more information on SEA-DOO®products visit www.sea-doo.com
Technical Specifications
Unit Dimensions 24 x 15.2 x 12.3” (612 x 385 x 312 mm)
Unit Weight 13 lbs
(6 kg)
(with rechargeable battery)
Battery Type 1 x rechargeable battery
Battery Life Approximately 1 hour
Depth rating 20m/65ft
Speed Up to 2.0 mph (3.2 km/
h)

This warranty does not cover any product that has been subject to misuse
negligence or accident, or that has been operated in any way contrary to the
operating instructions as specified in the User Manual. This warranty does not
apply to any damage to the product that is the result of improper maintenance
or to any product that has been altered or modified so as to change its
intended use. This warranty does not extend to repairs made necessary by
normal wear or by the use of parts or accessories which are either
incompatible with the product or adversely affects its operation, performance
or durability.
In addition, this warranty does not cover items that
experience normal wear and tear.
ALL IMPLIED WARRANTIES ARE LIMITED IN THE DURATION TO THE
WARRANTY PERIOD. AND SUCH IMPLIED WARRANTIES INCLUDING
MERCHANTABILITY, FITNESS FOR A PARTICULAR PURPOSE, OR
OTHERWISE, ARE DISCLAIMED IN THEIR ENTIRETY AFTER THE
EXPIRATION OF THE APPROPRIATE WARRANTY PERIOD.
THE DISTRIBUTOR’S OBLIGATION UNDER THE WARRANTY IS
STRICTLY AND EXCLUSIVELY LIMITED TO THE REPAIR OR
REPLACEMENT OF DEFECTIVE PARTS AND RETURN OF THE
PRODUCT TO THE CUSTOMER. THE DISTRIBUTOR DOES NOTASSUME
OR AUTHORIZE ANYONE TO ASSUME FOR THEM ANY OTHER
OBLIGATION.
THE DISTRIBUTOR ASSUMES NO RESPONSIBILITY FOR INCIDENTAL,
CONSEQUENTIAL OR OTHER DAMAGES INCLUDING, BUT NOT LIMITED
TO EXPENSE OF RETURNING THE PRODUCT TO THE DISTRIBUTOR,
LOSS OF USE OF PRODUCTAND LOSS OF TIME OR INCONVENIENCE.
EXCLUSIONS
BATTERY. This warranty does not include the battery.
CUSTOMER ENQUIRIES
If your unit is not operating, please refer to your User Manual before
contacting our Customer Service Centre. For any damage or repair work
required, please do not return your product to the store where it was
purchased.
RETURN / REPAIR POLICY
Customers must call our Customer Service Centre and ask for a Return /
Repair Authorization Number before sending the product to the Service
Centre. Returned products must be shipped with original packaging including
the polystyrene packing material and all defective parts. Please contact our
Customer Service Centre for assistance in handling your case.
For any questions or queries you may have regarding your
SEA-DOO®SEASCOOTER™, please follow the below steps for
easy and fast resolution:
- STEP 1-
Please read your User Manual. For a copy of the User Manuals, please visit
www.seadooseascooter.com
- STEP 2-
Go to www.seadooseascooter.com and see our FAQ section to find instant
answers.
- STEP 3-
Contact one of our Customer Service representatives at the Customer Service
Centre in your region.
RETURN / REPAIR PROCEDURE
1.Call the Customer Service Centre for your Return / Repair Authorization
Number.
2.Make a copy of your Proof of Purchase (receipt).
3.Pack the defective unit in its original packaging including the polystyrene
foam and include the unit and all defective parts.
4.Attach the copy of your Proof of Purchase (receipt) to the outside of the box
(clearly visible), together with the Return / Repair Authorization Number.
5.Ship the package to the Service Centre.
PLEASE NOTE: Deliveries that do not have the Proof of Purchase (receipt)
and Return / Repair Authorization Number attached clearly to the outside of
the box, will not be accepted by the Service Centre.
UNITED STATES SEA-DOO®SEASCOOTER™ CUSTOMER SERVICE CENTRE
Phone No.: +1-800-361-2781 Email: warranty-usa@seadooseascooter.com
CANADA SEA-DOO®SEASCOOTER™ CUSTOMER SERVICE CENTRE
Phone No.: +1-888-388-8837 Email: warranty-can@seadooseascooter.com
WESTERN EUROPE SEA-DOO®SEASCOOTER™ CUSTOMER SERVICE CENTRE
EASTERN, SOUTHERN AND CENTRAL EUROPE
SEA-DOO®SEASCOOTER™ CUSTOMER SERVICE CENTRE
HONG KONG SEA-DOO®SEASCOOTER™ CUSTOMER SERVICE CENTRE
(For other territories, please visit www.seadooseascooter.com
and contact your local distributor)
This manual suits for next models
1
Table of contents
Other Sea-doo Diving Instrument manuals