Seada MS-HV51B User manual

4K 5x1 Multi-format
Presentation Switcher
MS-HV51B
VER 1.0
SEADA

Thank you for purchasing this product
Surge protection device recommended
Table of Contents
For optimum performance and safety, please read these instructions
carefully before connecting, operating or adjusting this product. Please
keep this manual for future reference.
This product contains sensitive electrical components that may be
damaged by electrical spikes, surges, electric shock, lighting strikes, etc.
Use of surge protection systems is highly recommended in order to protect
and extend the life of your equipment.
1. Introduction.......................................................................................... 1
2. Features................................................................................................ 1
3. Package Contents................................................................................ 2
4. Specications....................................................................................... 2
5. Operation Controls and Functions..................................................... 4
5.1 Transmitter Panel............................................................................... 4
5.2 Receiver Panel................................................................................. 5
5.3 OSD MENU.......................................................................................... 6
5.4 Remote Control................................................................................ 10
5.5 Auto-Switching Fuction................................................................... 11
5.6 VGA/YPbPr/CVBS Input................................................................... 12
5.7 Operations of RS-232 Control......................................................... 12
6. Connection Diagram.......................................................................... 14
7. API Control Command....................................................................... 15

1. Introduction
2. Features
MS-MV51B is 4K Multi inputs & Multi formats presentation switcher with
scaler built-in. It supports 5 inputs of 4×HDMI and 1×VGA (YPbPr, CVBS)
and 1 HDMI output. The input source is capable of switching and scaling
to adopt resolution then transmit over HDMI output. The HDTV resolution
is achievable. The system could be controlled and congure easily by the
panel button, IR remote and RS-232. This switcher is a suitable solution
for presentation purpose in the classroom or conference room.
☆ Compliant with HDMI 2.0/1.4b, HDCP 2.2/1.4
☆ Support multi inputs: 4×HDMI, 1×VGA(YPbPr, CVBS)
☆ Support HDMI inputresolutions up to 4K UHD 4:4:4 @50/60
☆ Support output resolutions up to 4K UHD 4:4:4 @60
☆ Support two input switching modes: auto or manual
☆ Support EDID management
☆ Support pass-through of PCM 2CH
☆ Device could be controlled via panel button, IR remote and RS-232
☆ Support USB online software upgrading

3. Package Contents
4. Specications
① 1 × MS-MV51B Switcher
② 2 × Mounting Ears
③ 1 × Remote Control
④ 1 × IR Receiver Cable
⑤ 1 × 12V/1APower Adapter
⑥ 1 × 3RCA (Female) to D-SUB (Male) Cable
⑦ 1 × 3.5m Jack (Male) to 2RCA (Female) Cable
⑧ 1 × User Manual
Technical
HDMI Compliance HDMI 2.0/1.4b
HDCP Compliance HDCP 2.2 and HDCP 1.4
Video Input
Resolutions
HDMI: up to 4K2K@50/60Hz (4:4:4)
C-Video: PAL/NTSC3.58/NTSC4.43/SECAM/PAL M/PAL N
YPBPR: 480i to1080p
VGA: 640×480 to1920×1200
HDMI Output
Resolutions
4K2K60, 4K2K30, 1920×1080p/50, 1920×1080p/60,
1280×720p/50, 1280×720p/60, 1024×768/60, 1280×800/60,
1360×768/60, 1400×1050/60, 1680×1050/60, 1920×1200/60
Audio Formats LPCM 2.0CH
ESD Protection Human-body Model:
±8kV (Air-gap discharge), ±4kV (Contact discharge)

Connection
Input
4×HDMI Type A [19-pin female]
1×VGA [female]
1×Micro USB [5-pin female], optional for Power Supply
Output 1×HDMI Type A [19-pin female]
1×3.5m Mini Jack
Control
1×IR IN
1×RS-232
1×USB Service (Update)
Mechanical
Housing Metal Enclosure
Color Black
Dimensions 110mm(W)×288mm(D)×32mm(H)
Weight 880g
Power Supply DC 12V/1A Adapter
(US/EU standards, CE/FCC/UL certied)
Power Consumption 9W (Max)
Operating Temperature 0°C~40°C/32°F~104°F
Storage Temperature -20°C~60°C/-4°F~140°F
Relative Humidity 20%~90% RH (non-condensing)

5. Operation Controls and Functions
5.1 Front Panel
Power button and indicator
Output Resolution buttons
Input Source & Auto buttons
IR Window
Switch between standby and working mode. Switch to the standby
mode, and the indicator turns red. Switch to the working mode, and the
indicator turns blue.
Press these buttons to select output resolutions: 4K60, 4K30, 1080P60,
720P60. For more resolution options, please use the remote control or
RS-232 control tools.
Press these buttons to select input sources. The corresponding
indicator will be on when the source device is selected. AUTO button
is used to switch the auto switching mode (the indicator is in blue) and
manual switching mode (the indicator is o) for input sources.
Receive IR signal from remote control which come with this device.
1
2
3
4

5.2 Rear Panel
Output
Power
ON/OFF
Control
Input
Connect to an HDMI display device through the HDMI OUTPUT port to
output video. Connect to an AV Receiver through the AUDIO OUTPUT
port to output audio.
Plug the 12V DC power supply into the unit and connect the adaptor
to an AC outlet.
Power ON/OFF switch.
USB: Used to update the system rmware.
RS-232: Serial control port (3-pin Phoenix connector). Connects to a
control device to control this device, with the remote control or RS-232
control tools.
IR: Connect with the IR receiver cable to receive IR signals sent by the
IR remote or remote controller of other devices.
4 HDMI and 1 VGA input ports. The VGA port supports YPbPr, C-video
and VGA input format.
1
2
3
4
5

5.3 OSD MENU
5.3.1 Main MENU
5.3.2 Picture
This switcher provides a powerful OSD operation menu. Press MENU
button on the IR remote to enter the OSD menu. You can change the
settings through the OSD menu.
The Main MENU includes Picture, Aspect Ratio, Screen, EDID Switch and
Software Update options.
You can adjust picture contrast (default: 50), brightness (default: 50), color
(default: 30), sharpness (default: 10), etc.

5.3.3 Aspect Ratio
5.3.4 Screen
You can adjust a picture's output aspect ratio between 4:3 and 16:9.
The screen MENU is for VGA input adjustment only. You can adjust
horizontal, vertical position, size and phase in this section.

5.3.5 EDID
5.3.6 Software Update
EDID 1.4 corresponds to the HDMI 1.4 standard, EDID 2.0 corresponds to
the HDMI 2.0 standard, and EDID AUTO indicates copying the EDID mode
of the connected display device.
This switcher supports software update via USB ash disk. The procedure
is as follows:
1) Copy the le “MERGE.bin” to the root directory of a USB ash disk. (Make
sure the le is copied to the root directory. The “MERGE.bin” le is provided/
authorized by our engineer or from our website)
2) Plug the USB ash disk into the switcher's USB port on the rear panel.
3) Click "MENU -->software update-->YES" to start updating. The OSD will
display the update process.

5.3.7 Resolutions
This switcher supports multiple HDMI output resolutions. Press the “RES”
button on the IR remote, the resolution menu will be displayed. You can
select a suitable resolution for your display device.
Auto means that the HDMI output resolution will be based on the EDID
information copied from the display device.

5.4 Remote Control
Press this button to power on the switcher
or set it to standby mode.
Press this button to mute or unmute the
audio output.
Press this button to select the input source.
Press this buttont to select the HDMI
output resolution.
(Note: Press and hold for 5 seconds or
more, the HDMI output resolution will
be reset to 720p60Hz.)
VOL-/+: Decrease or increase the audio
volume.
Menu operation buttons:
Menu: Press to enter into the OSD menu.
Exit: Press to exit OSD menu.
OK: Press to conrm.
UP/DWON/LEFT/RIGHT arrow: Used to
set OSD values.
Press this button to operate VGA input
auto adjustment function.
1
2
3
4
5
6
7

5.5 Auto-Switching Function
This switcher has auto-switching and manual-switching modes. When you
select auto-switching mode, it will follow these rules:
5.5.1 New Input principle
5.5.2 Power rebooting principle
5.5.3 Signal removing principle
Once a new input signal is detected, the switcher will switch to this new
signal automatically.
This switcher offers the function to remember the signal last used after
rebooting. Once rebooted, it will automatically enter auto-switching mode,
and then detect all inputs and memorize their connection status for future
reboots. If the last used input signal is still available, then it will choose and
display that signal. If that signal is not available, it will detect all input signals
with priority on HDMI1->HDMI2->HDMI3->HDMI4->VGA(YPbPr/CVBS).
Once the current signal is removed, the switcher will detect all input signals
with priority on HDMI1->HDMI2->HDMI3->HDMI4->VGA(YPbPr/CVBS). It
will transfer the rst signal detected to the output.
Note: Auto-switching function works only when there is a new input signal
or when the current input signal is removed.
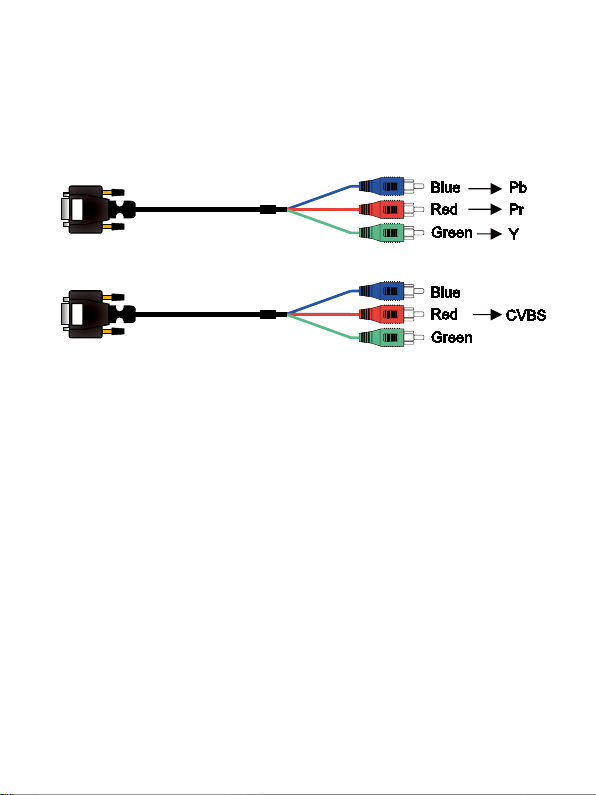
5.6 VGA/YPbPr/CVBS Input
The VGA input port supports multiple signal formats, such as VGA/YPbPr/
CVBS. The switcher will auto-detect the input signal type and format. You
can use the convert cable for YPbPr or CVBS signal input.
5.7 Operations of RS-232 Control
Please connect the switcher to input devices and output devices needed,
and then connect it to a computer installed RS-232 control software which
can be downloaded from SEADA website (www.seada.co.uk/downloads)
using a RS232 cable. Double-click the software icon to run this software on
your computer. The interface of the control software is showed as below:


6. Connection Diagram
1.Connect HDMI source devices (such as Blu-ray DVD) to HDMI input ports
with HDMI cables. Connect a VGA source device (such as PC/Laptop) to
VGA input port with a VGA cable.
2. Connect the HDMI display to the HDMI output port with a HDMI cable.
4. Connect control device (e.g. PC) to RS-232 port.
5. Connect the DC12V power adapter to the power port.
3.
Connect a speaker, headphone,or specialized amplier to AUDIO output port.

7. API Control Command
This switcher can be controlled by 3rd party controller via RS-232 commands.
Baudrate: 9600 Data width: 8bit Parity: none Stop: 1bit
Item Command Description
1 s factory reset! Return to factory reset setting
2 r version! Read current FW version
3 xyz! Upgrade the switcher FW
4 r power! Read the switcher power on/o status
5 s power on! Power on the switcher
6s power o! Power o the switcher
7 r lock! Read the switcher panel lock status
8 s lock on! Lock on the panel control
9s lock o! Lock o the panel control
10 s beep on! Enable the switcher Beep
11 s beep o! Disable the switcher Beep
12 r source! Read current input source
13 s source 1! Switch HDMI1 input(1:HDMI1,2:HDMI2,3:HDMI3,
4:DisplayPort,5:VGA/YPBPR/C-VIDEO)
14 r auto switch! Read auto switch function status
15 s auto switch on! Enable auto switch function
16 s auto switch o! Disable auto switch function
17 r output! Read output resolution

Item Command Description
18 s output 1!
Setup output resolution at 3840x2160@30Hz
(1:3840x2160@30Hz,2:3840x2160@25Hz,
3:1920x1080@60Hz,4:1920x1080@50Hz,
5:1280x720@60Hz,6:1280x720@50Hz,
7:1920x1200@60Hz,8:1680x1050@60Hz,
9.1400x1050@60Hz,10.1360x768@60Hz,
11.1280x800@60Hz,12.1024x768@60Hz,
13.Out display EDID native resolution
19 r contrast! Read picture contrast status
20 s contrast 0! Setup picture contrast 0(range:0-100)
21 r brightness! Read picture brightness status
22 s brightness 0! Setup picture brightness 0(range:0-100)
23 r color! Read picture color status
24 s color 0! Setup picture color 0(range:0-60)
25 r sharpness! Read picture sharpness status
26 s sharpness 0! Setup picture sharpness 0(range:0-20)
27 r tint! Read picture tint status
28 s tint! Setup picture tint 0(range:0-100,for CVBS NTSC format
only)
29 r aspect ratio! Read current input source output picture aspect ratio
30 s aspect ratio 1! Setup current input source output picture aspect ratio at
16:9 (1:16:9 , 2:4:3 )
31 r h size! Read current input source output horizontal overscan value
32 s h size X!
Set output horizontal overscan to (100+X)%(the default
X value is 0 and the range is -10~10,the value is set for
current input source. )
33 r v size! Read current input source output vertical overscan value
34 s v size X!
Set output vertical overscan to (100+X)%(the default
X value is 0 and the range is -10~10,the value is set for
current input source.)

Item Command Description
35 r edid! Read switcher input port EDID status
36 s edid 1! Setup input port EDID at HDMI1.4 standard
(1: EDID1.4,2:EDID2.0,3:EDID AUTO)
37 s vga auto! Enable VGA auto adjust function
38 r vga hpos! Read VGA horizonal position
39 s vga hpos up! Setup VGA horizonal position up
40 s vga hpos down! Setup VGA horizonal position down
41 r vga vpos! Read VGA vertical position
42 s vga vpos up! Setup VGA vertical position up
43 s vga vpos down! Setup VGA vertical position down
44 r vga clock! Read VGA input ADC sampling clock value
45 s vga clock up! Increase VGA input ADC sampling clock value
46 s vga clock down! Decrease VGA input ADC sampling clock value
47 r vga phase! Read VGA picture phase
48 s vga phase up! Setup VGA picture phase up
49 s vga phase down! Setup VGA picture phase down
50 r out vol! Read output audio volume
51 s out vol 0! Setup output audio volume 0
52 s out vol up 1! Increase output audio volume 1 level
53 s out vol down 1! Decrease output audio volume 1 level
54 s audio mute on! Mute source input audio
55 s audio mute o! Un-mute source input audio
Table of contents
Other Seada Switch manuals


Popular Switch manuals by other brands

Monacor
Monacor HIFI SPS-80S operating instructions

SMC Networks
SMC Networks SMCGS26C-SMART - FICHE TECHNIQUE Product overview

TRENDnet
TRENDnet TPE-224WS - Web Smart PoE Switch Quick installation guide

Equip
Equip Desktop KVM Switch manual

IDK
IDK FDX-S Series user guide

Trust
Trust START-LINE AGST-8802 user manual


