Sears 257.797010 User manual

OWNER'S
"1...........MANUAL........
MODEL NO.
257.797010
CAUTION:
Read and Follow
all SafetyRules
and Instructions
Before Operating
This Equipment
£RRFTSMRNo
115HORSEPOWER
10" CUTTING WIDTH
DOUBLE INSULATED
ELECTRIC WEEDWACKE_
• Assembly
•Operation •
Service and Adjustment
• Repair Parts
Sold by SEARS, ROEBUCK AND.CO, Chicago, IL. 60684 U_S;A. "
R£Y. 8 1189

RULES FOR SAFE OPERATION
1. Risk of eye injury--ahvays use safety g!esses orsimilar protection.
2. Keep heeds, face and feel dear of rotating line. Do notoperate
without guard in place,
3. Dress Properly--Do not wear loose clothing orjewelry. They can
be caught in moving parts. Use of rubber gloves and substantial
footwear is recommended when workingoutdoors. Wear long
pants to protect your legs.
9. Avoid Unintentional Sta rli=lg--_Don'tcarry plugged-in tool with
finger on switch_ Be sure switch isoff when plugging in.
t 0. Don't abuse cord-_never carry tool by cord or yank it from
receptacle. Keep (_ordaway from heat, oil and sharp edges.
Replace damaged cord immediately.
11. Don't force tool--ii w_lldo the job better and with less likelihood of
a risk of"injury atthe rate for which it was designed.
4. Keep children away--a vietots should be kept at a distance from ...... . . _ .,.=_ _, j .... .: ..; _., _.__
.......... work aFen. ................................ ],_,t_on'r overreacn--_:eep proper _oo[mg anu u_lanvu z===, l.=tu_.
5- Avoid dangerous environment--don't use tool in damp or wet
Iocations, or in the vieinity of flammabfe fumes. Ddn't Use ln Ra!n.
6. Use F{ightAppliance--Do not use appliance for anyjob except
"that for which it is intended.
7. WARNING.* Toreduce riskof electric shock, use onlywith an
extension cord intended for outdoor use. A two-wire cor_l without a
ground connection may be used since the toot isdouble insulated.
Cord Sets--Make sure your cord set is in good condition, When
using a cord sol be sure to use one heavy enough to ea_'rythe
current your product wil!draw,An undersized cord set w Ifcause
a drop in line voltage resulting in lossof power and over-heating.
Cor_ should be 16gage orfleavier and should notexceed t00 fL
Toreduce the likelihood ot disconnection of cord set from t0ol
during operation, secure cords as shown in Figu re A. U.L. t_sted
extension cords suitable for outdoor t_seare available atyour
nearest Sears store.
FIG.A
13. Disconnect tool from power supply when not in use, and when
making any repairs, inspections, and changing accessories and
the like.
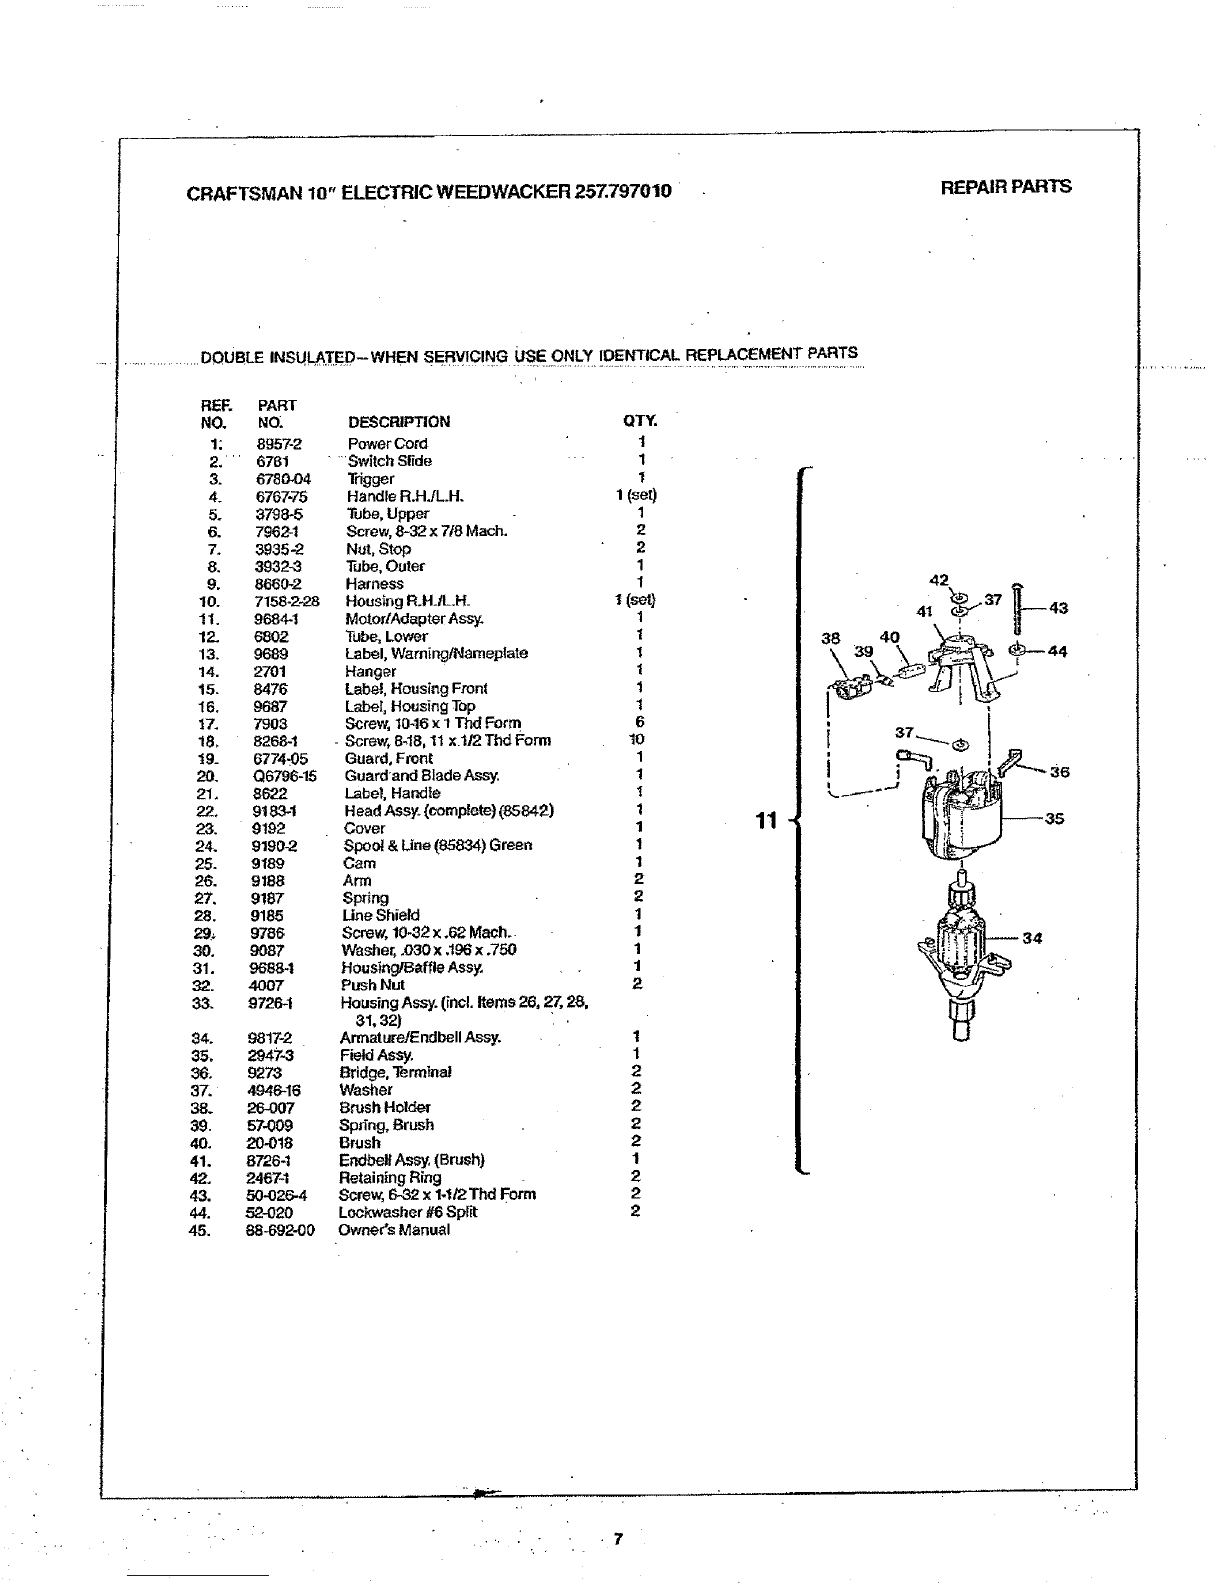
14. Double Insulated--When servicing use only identical
replacement parts• Do not use any type ofwire or metal cutting
line.
15. Maintain trimmer with care--to reduce risk el injuryloltow
instructions for replacing or rewinding spool, Keep trimmer clean.
Keep air vents clear of debris.
16. Store trlr_ mer indoors--when net in use, tool should he stored
indoorsin ahigh, dry or locked-up place out of reach ofchildren.
17. The line cutter iSextremely sharp and care should be exercised
when handling or operating to avoid contact with the cuttec
SERVICING OF A TOOL WITH DOUBLE INSULATION
REQUIRES EXTREME CARE AND KNOWLEDGE OF THE SYS-
TEM AND SHOULD BE PERFORMED ONLY BY A QUAUFED
SERVICE TECHNICIAN. FOR SERVICE WE SUGGEST YOU
RETURN THE TOOL TO. YOUR NEAREST SEARS STORE OR
AUTHORIZED DEALER FOR REPAIR WHICH WILL BE DONE
WITH ORIGINAL FACTORYREPLACEMENT PARTS.
This tool will operate on 1i01t20 Volt AC, 60 Hertz electrical current only.
.... ""- . ,t ........
II iiiiiiiiii iiIIll i ii ii iiiiiii I II IIIIII II IIIIIIII
FULL ONE-YEAR WARRANTY ON CRAFTSMAN ELECTRIC TRIMMER
If this Craftsman Electric Weedwacker Trimmer fails to give complete satisfaction within one
year from the date of purchase RETURN IT TO THE NEAREST SEARS STORE IN THE.
UN1TED STATES, and Sears will repair Orreplace it, free of cb_,rge.
"Ifthis Craftsman Electric Weedwacke_ Trimmer is used forcommercial or renta| pop, bees,
thiswarranty applies foronly 90 days from th_.date of purchase. This warrant_'appHes 0nty
while this product is in use in the United States.
Warranty service is avaBable by simply contacting the nearest Sears store or Service Center
throughout the United States.
This warranty givesyou specific legal-rights, andyou may also have olherrlghts which vaq/from "
state to state.
SEARS, ROEBUCK AND CO., Dept. 731CR-W, Sears Tower, Chicago, IL 60684

ASSEMBLY
BOX CONTENTS
1257.797010WeedandGrassTrimmer
1LoosePartsKitContaining
...................2ea. 7962MachineScrews(ForTubes)
2ea.3935StopNuts
2ea.8268-tPointedScrews(ForGuards)
Iea. 6774-05FrontGuard
Iea, Q6796-15Guard&BladeAssy.
1ea.88-692-00Owner'sManual
Remove TRIMMER from carton and examine it thoroughly to
make sure it is not damaged.
Remove and discard protective plastic clips inserted in
handle tubes before assembly of trimmer.
TOOLS NEEDED FOR ASSEMBLY
• Medium Phillips screwdriver
•Adjustable wrench or pliers
FIG,1
H/,J_G_R
"_'_ TRIGGER
UBE
OUTERTU8_
'_._ LOWER 'fUeE
. _lrRIMME_ HOUSING
GUARD & eLAOE ASSY. _FRONT GUARD
CUTTING HEAD
ASSEMBLY INSTRUCTIONS
.ATTACHING THE TUBES
•Slide outer tube up lower tube and overupper tube (Fig, 1)
until the assembly holes are aligned, being careful not to pinch
or cut harness wire.
NOTE: Shouid the outer tube be difficult to slide, grasp outer
tube sleeve firmly end twist slowly back and forth while
.pushing upward.
•,, insert screws carefullyto avoiddamage to harness wire;attach
lock nuts and tighten.
ATTACHING THE GUARD
•Turn"l_immerupside down. Slide Guardand Blade Assy. and
Front Guard into grooves on Trimmer housing(Fig. 3).
•Insert 2screws supp!ied and tighten firmly.
•DO NOT OPERATE TRIMMER WITHOUT GUARDS. IN
PLACE.
CAUTION-" THE CUTTING BLADE MOUNTED IN THE
GUARD ASSEMBLY IS EXTREMELY SHARP AND CARE
SHOULD BE EXERCISED WHEN HANDLIN_ OR
OPERATING TRIMMER TO AVOID CONTACT WITH
CUTTER.
IMPORTANT:
Remove protective cover from the cutting blade before
operating trimmer.
RG.2
FIG. 3
Y
UPP_ _ SCREW
TUBE "_,,_ f
OUTERTUBE "" _ "_U_
LOC_UT$
GUARD & BLADE ASSY.
CUT_NG et.A_
TRIMMERI_OL_NG
TRIMMER HOUSING
_" KE_:P AIR VENTS

OPERATION
THE OPERATION OF ANY POWER TOOL CAN RESULT I_NFOREIGN OBJECTS BEING
THROWN INTO THE EYES, WHICH CAN RESULT IN SEVERE INJURY. ALWAYS WEAR
SAFETY GLASSES OR EYE SHIELDS BEFORE COMMENCING POWER TOOL OPERATION.
WE RECOMMEND USING STANDARD SAFETY GLASSES OR USING A WIDE VISION
SAFETY MASK IF YOU ALREADY WEAR GLASSES. BOTH ARE AVAILABLE AT SEARS
RETAIL OR CATALOG STORES.
OPERATING INSTRUCTIONS
..... KNOW Your TRIMMER
RETAINING EXTENSION CORD
To prevent extension cord from disconnecting from
appliance cord, tie cords as shown in Figure 4, Devices for
retaining extension cords are also available from your
nearest Sears store.
Extension cord should be 16gauge or heavier and shouldnot
exceed 100feet,
TOOL CORD EXTENSION CORD
FIG. 4
HOW TO ACTUATE SELF FEEDING CU'rTING LINE
YourtrimmerIs equipped with an Automatic LineFeed head,
Whenever switch isdepressed, the head willadvance the
cutting line. Allow trimmer to stop before restarting to advance
more line.Avoid frequent starting and stopping oftrimmer, This
may cause unnecessary use of the line.
. The line cutter mounted in the guard will automatically cut the.
lineto the correct length..
JDO NOT BUMP AUTO HEAD ON GRouND TO ADVANCE LINE t
IMPORTANT:
.Removeprotective cover from the cutting blade before
operating trimmer.
CAUTION: The cutting blade mounted in the guard assembly is
extremely sharp and care should be exercised when handling or
,operating trimmer to avoid contact with cutter,
BEFORE OPERATING
Befm'e operating your trimmer, read and understand the
RULES FOR SAFE OPERATION. .
•Always wear safety goggles or as.afetymask
•Cut to the left side.
• Keep people away from you.
• Inspect the area yo.uare going to t.fimfor any string-like
matterwhich may become tangleo.inthe cutting h_.
HOW TO OPERATE
Hold trimmer in a comfortable upright position and depress
trigger switch. Swing trimmer slowly from right toleft using a
sweeping motion, keeping the cutting head off the ground.
For most tritnming, the Trimmer Head should be tilted to the left
side approximately 10to 30 degrees. (Fig. 5)
NOTE: The tip ofthe nylonline does the cutting. Do not force
more of the line into the material being cut. Best results are
obtained with proper length line and maintaining full motor
speed.
FIG. 5
:
OPERATING TIPS "" "
The trimmer will stir up dust particles which may get into your
eyes. Wear safety goggles or safety mask to prevent this. When
you cut to the LEFT SIDE, yourtrimmer wi]l sling particles
FORWARD, away from yoU.'When you cut tothe RIGHT SIDE, it
willsling particles BACK toward you. ALWAYS CUT TO THE
LEFT SIDE ONLY.
Your trimmer can slingobjects with adequate velocityto cause
harm to others. ItwillALWAYS sling small particles of dirt. Wear
pants to protect your legs and KEEP PEOPLE AWAY FF_.M
YOU when using yourtrimmer]ustto be safe.
•.• ,4

SERVICE and ADJUSTMENT
SPOOL REPLACEMENT
-Stop motorand unplug power cord,
- Push in button (marked "PUSH"} located onhead and remove
cover.Do not force. No toolsneeded, Use finger pressure only.
..... • Lift out spool(Fig. 6) andmplacewith new spootand line_
See RECOMMENDED REPLACEMENT PARTS & CAUTION
below.
- Keeping line tightly woundonspool, set spool into head
,, housing, guiding approx.3 to 4 inches ofline through the
opening.
•Replace cover,
IF LINE DOES NOT FEED
°Stop meter and unplug powercord.
•Push inbuttorl (marked "PUSH") located or=head and remove
cove[ and spool. Donotforce, notools needed. Use finger
pressure only.
•Check to make sure llne iswound in direction indicated on
spool and that the spool isnot overfilledor jammed.
*Separate strands oftangled lineor install new line if
necessary.
•Replace spool and cover.
REWINDING SPOOL
•Stop motor and unplugpowercord.
•Push in button (marked "PUSH") located on head and remove
cover. Do not force. No tools are necessary. Use finger
pressure only.
,* Uft outspool to rewind with new line. Remove anyold line from
spool.
See RECOMMENDED, REPLACEMENT PARTS & CAUTION .
below.
Do not wind more than,a total of 25 feet of Iine onto spool,
° Secure new line tQspool by slipping it into the tapered slot
(located in top of line spoot)'and slidingline towards the
narrowpart of the sloL .
•• Wind the llne side by side (donot crossover or crisscross) in
the direction indicated onthe spool. (Fig. 7)
IMPORTANT: If you wind in the opposite direction, the line wilt
not feed. -.....
-Keeping iine.t!ghtty WOUndonspool, set spoolinto head
housing, guiding approx_ 3 to 4 inches of line through the
. opening.. ,
•Replacecover, - :
NOTE; After rewinding, line may be held inposition by
inserting the end,bf (he iin_ into the r'_taining sloL
RECOMMENDED REPLACEMENT PARTS
AND ACCESSORIES
Your SEARS Tdmmer useeSPECIALLY TF_EATED.051DIAMETER
MONOFiLAMENT NYLON cutting line. which is available at
SEARS STORES AND CATALOG STORES. You may purchase a
fu lywound spool (Part No. 85834) oryou may purchase a 100 foot
coilof line (Part No. 85771) or a large bulk_spoo! of ling and rewind
your present spool.
CAUTION: The use of heavier line."different types of line and
•accessories or attachments other tl]an _ecommended may be
,hazardous or cause unit failure...
FIG. 6
F,G..Zi
TOOPENPUSHIN BUTTON
AND UFTOFFCOVER
COVER
SPOOL & LINE
iLINE OPENING
HEAD HOUSING
"'PUSH"
'----BUTTON
TAPEREDSLOT
.%
RETAININGSLOT

CRAFTSMAN 10" ELECTRIC WEEDWACKER 25Z797010
18
20
19
22 _
r • •
17
16
REPAIR PARTS
...........
32 _'
10

CRAFTSMAN10"ELECTRICWEEDWACKER257.797010
................... DOUBLE INSUL_,ITED--WHEN SERVICING USE ONLY IDENTICAL REPLACEMENT PARTS
REF. PART
NO. Na,
1; 8957-2
2." 6781
3. 6780-04
4. 6767*75
5. 37985
6. 7962-1
7. 3935-2
8, 3932-3
9. 8660-2
10. 7158-2-28
11. 9684-1
12. 6802
13. 9689
14. 2701
t5. 8476
16. 9687
17. 7903
18, 82681
t9_ 6774:05
20. Q6796-15
2% 8622
22. 9183_1
23. 9192
24. 9190-2
25. 9189
26. 9188
27. 9187
28. 9185
29_ 9786
30. 9087
31. 9688-t
32. 4007
33. 9726-1
34. 9817-2
35, 2947-3
36. 9273
37. 4946-16
38. 26-007
39. 57-O09
4O. 29-018
41. 8726-1
42. 2467-1
43. 50-026-4
44, 52-O20
45.
DESCRIPTION
Power Co_d
....Switch Slide
Trigger
Handle R.HJLH.
Tube,Upper
Screw, 8-32 x 7/8 Mach.
Nut, Stop
Tube,Outer
Harness
Housing R.HJL.H_
MotorfAdapter Ass;y.
Tube,Lower
Label, Warning/Nameplate
Hanger
Label, Housing Front
Label= Housing Top
Screw, 10-16x I Thd Form
-Screw, 8-18,11 x.I/2 ThdForm
Guard, Front
Guard'and Blade Assy,
Label, Handle
Head Assy. (complete) (85842)
Cover
Spool & Line (85834) Green
Cam
Arm
Spring
Line Shield
Screw, 10-32 x.62 Mach..
Washer, .030 x,t96 x .750
Housing/B_ffle Assy..
Push Nut
Housing Assy. (incl. Items 26, 27, 28,
31, 32)
Armature/Endbell Assy.
Field Ass,/.
Bridge, Terminal
Washer
Brush Holder
Sp_ing_Brush
Brush
Endbelf Assy;,(Brush)
Retainlng Ring
Screw, 6-32 x 1.1/2 Thd Form
Lockwasher #6Sprit
88-692-00 Owner's Manual
QTY.
1
1
I
1{set)
1
2
2
1
1
(set}
1
1
1
1
1
1
6
10
1
1
I
1
1
1
1
2
2
1
1
1
1
2
1
1
2
2
2
2
2
1
2
2
2
11
REPAIRPARTS

OWNER'S
MANUAL.........t
MODEL NO.
25Z797010
How to Order
Repair Parts
CRRFTSMRN
115HORSEPOWER
10,CUTTING WIDTH
DOUBLEINSULATED
ELECTRIC WEEDWACKER ®
The Model Number willbe found on a plate attached to your Weedwacker
handle tube. Always mention the Model Number when requestingservice
or repair parts for your Craftsman Weedwacker.
All parts listed herein may be ordered from any SEARS SERVICE CEN-
TER located in most retail stores. - '-
WHEN ORDERING REPAIR PARTS, ALWAYS GIVE THE:FOLLOWING
INFORMATION.
t. PART NUMBER
2. PART DESCRIPTION
3. MODEL NUMBER- 257..797010
4. NAME OF ITEM -- WEEDANDGRASS TRIMMER
USE ONLY SEARS REPLACEMENT PARTS.
F"
If the parts you need are not stocked tocatly, your order will be elec:
Ironically transmitted to a Sears Repair Parts Distribution Center for
handling.
Sold by SEARS, ROEBUCK AND CO., Chicago, IL. 60684 U.S.A.
Printed(n U,S.A_
This manual suits for next models
1
Table of contents
Other Sears Trimmer manuals
Popular Trimmer manuals by other brands

SNOWJOE
SNOWJOE SUNJOE 24V-HT22-LTE Operator's manual

Echo
Echo SRM-260 - 12-03 Operator's manual

Raider
Raider RD-GT21 Original instruction manual

Gardeo
Gardeo GCBE18VCR-LI10L Original instructions

Bosch
Bosch ART 23-18 LI+ instructions

Little Wonder
Little Wonder SINGLE EDGED 2412 Owner's manual and safety instructions