SeaSucker SX6150 User manual
Indicator band exposed: time to
re-pump! Full power!
Designed and manufactured by:
SeaSucker, LLC
Bradenton, Florida
www.SeaSucker.com
Assemble Your Monkey Bars
S 6150
4/22
Monkey
Bars
What’s in the Box
2) Front bar mounts with 2) 6″ SeaSucker
vacuum mounts attached
2) Rear bar mounts with 1) 6″ SeaSucker
vacuum mounts attached
4) Cross bar clamps and hardware
2) Aluminum cross bar assemblies 48”)
1) 5g Lube Tube for vacuum pump
maintenance)
1) spare SeaSucker vacuum pump for
maintenance)
1) 5/32” hex wrench for assembly)
1) 7/16” box wrench for assembly)

The SeaSucker Monkey Bars require simple assembly to be ready for use. Ideally, you will assemble your rack
near your vehicle so you can custom fit the rack to your roof.
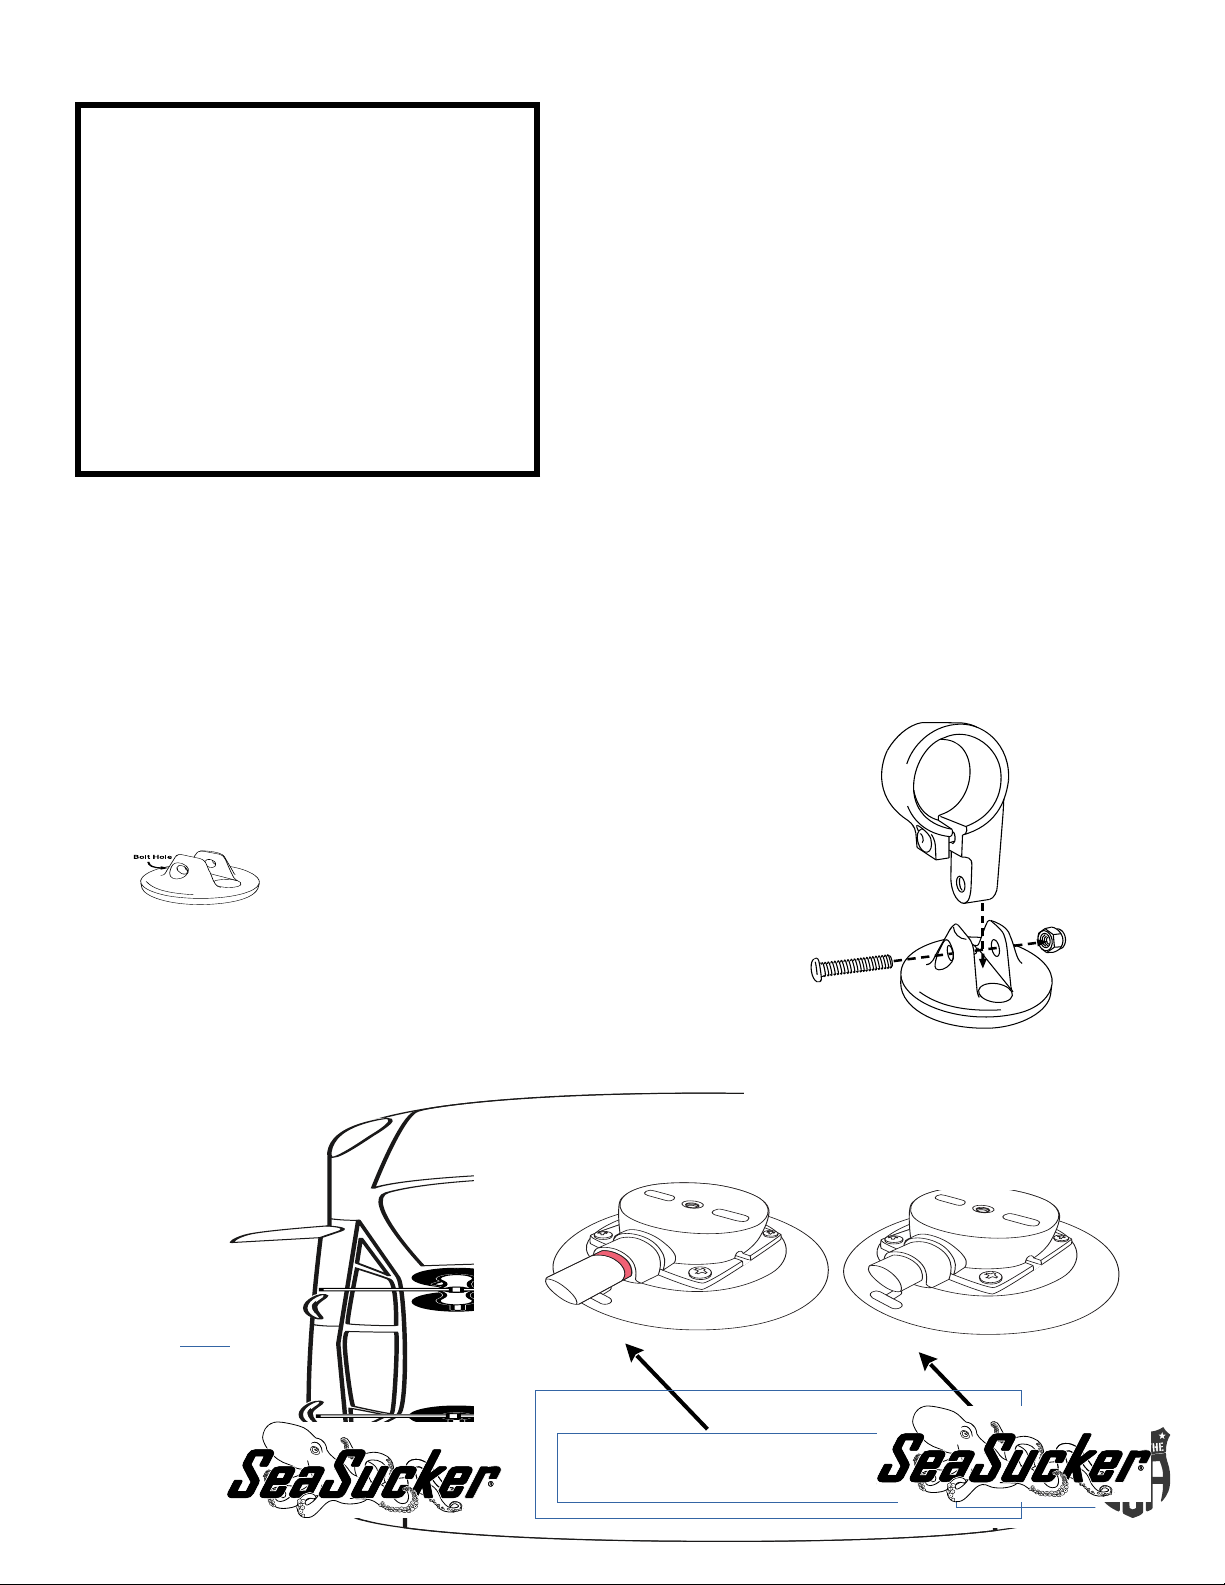
The cross bar clamps attach to the front and rear bar mounts with a nut and bolt. Drop a clamp into the pivot slot
of one of the mounts; orient the clamp so that the clamp-tightening bolt is facing the same direction as the bolt
hole. Insert a bolt into the bolt hole, through the clamp, and out the nut hole. See the diagram to the left for a
graphic description of the difference between the bolt hole and the nut hole. Thread the nut onto the end of the
nut as tightly as you can by hand and press and hold the nut against the nut hole. Using the 5/32” hex wrench to
turn the bolt and the 7/16” wrench to hold the nut, tighten the bolt until the end of the bolt is just even with the
outside end of the white nylon locking insert on the inside of the nut. If you tighten the clamp beyond that, it might
interfere with the clamps ability to pivot in the slot. Repeat for the other three bar mounts.
Assemble your cross bars next. First remove the protective plastic cap on the end of the threaded connector.
Find the Lube Tube that came with your rack and put a drop or two on your fingertip. Spread the lube onto the
exposed threads to create a thin film of lube. This will prevent the threads from seizing together once assembled
so that you can unscrew the bars for easier storage or transport.
Now line up the threaded connector with the open bar end and thread the two pieces together. Continue until the
threaded connector is fully seated in the bar it should look like the other side that came preassembled from the
factory). Give the bars a firm twist to complete the assembly -
nothing more than hand pressure should be
needed to make a secure connection. Repeat for the second bar.


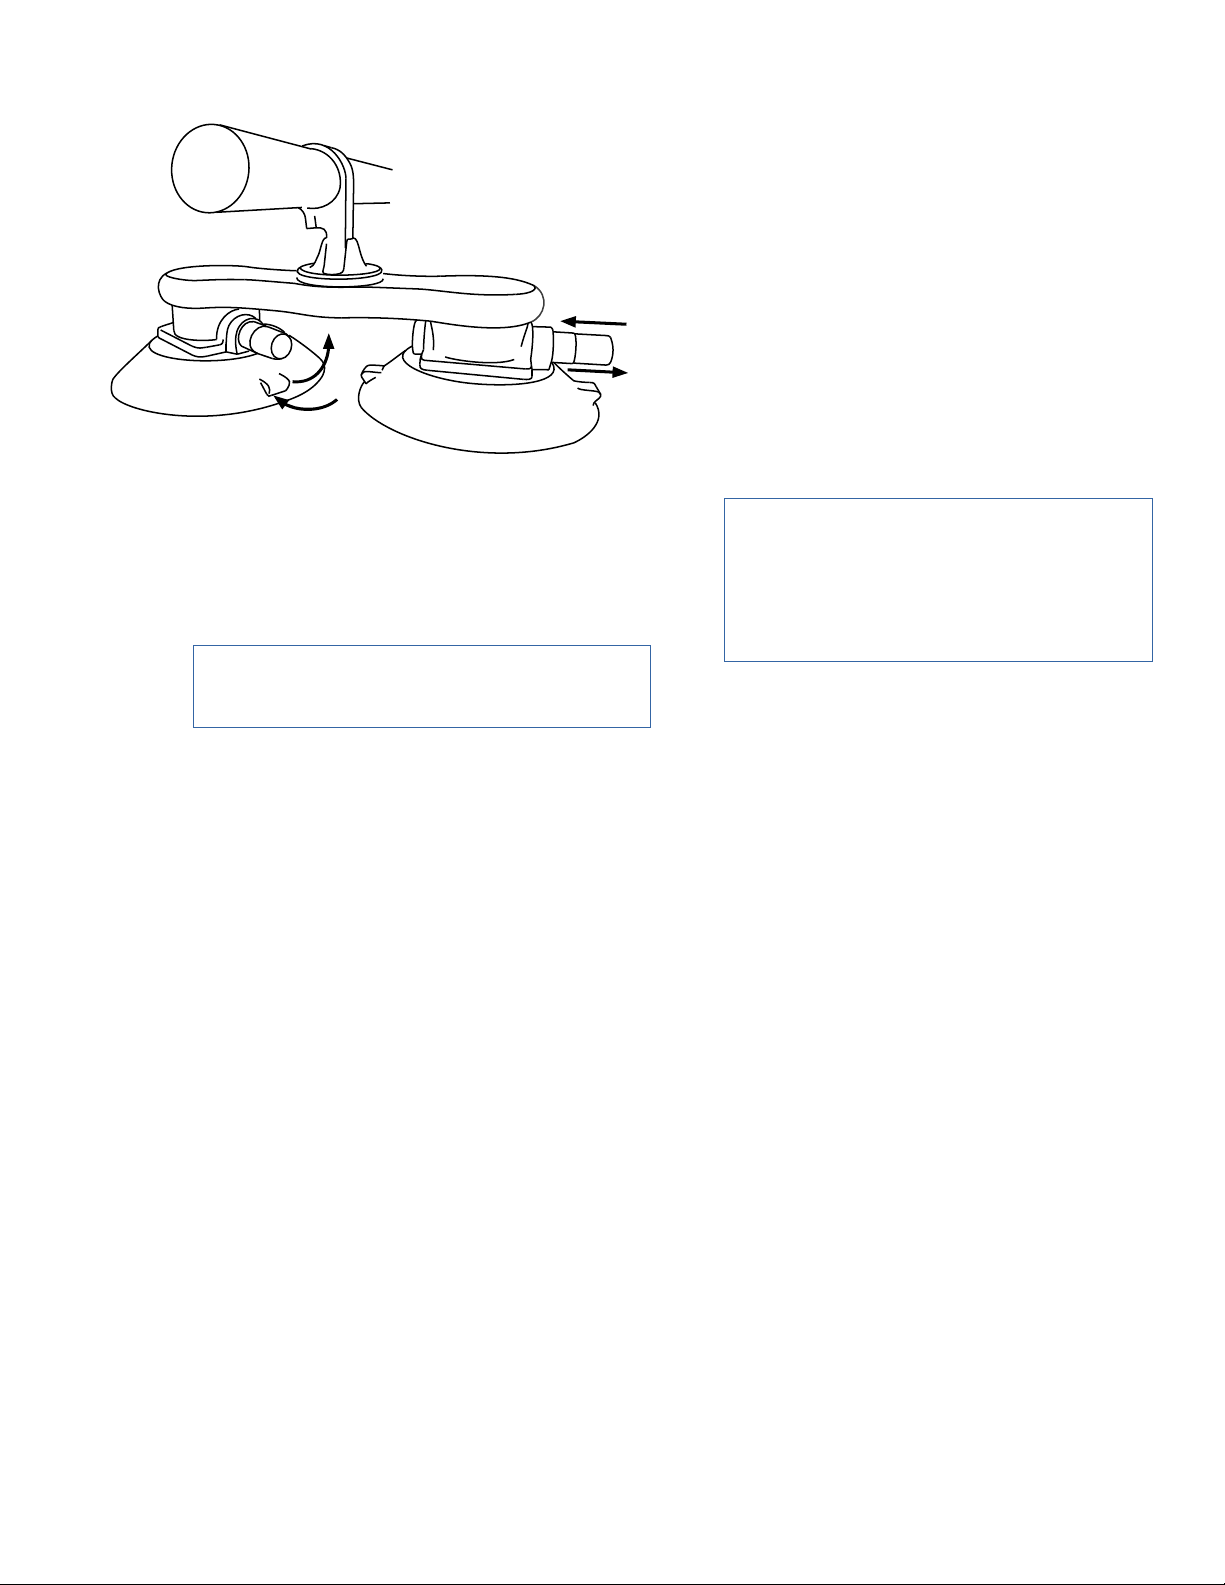
Next, slide one of the front bar mounts onto one of the cross bars. Slide the other front bar mount onto the other
side of the same bar; make sure the vacuum pumps
on the mounts are pointing in the same direction.
Remove the protective covers from the mounts and
place the bar and mounts onto the roof of your
vehicle just behind the front windshield; the vacuum
pumps should be pointing towards the rear of the
vehicle. Position each of the front bar mounts as
near to the front corners of the roof as you can see
“Where to Attach” below). Attach the vacuum
mounts see “Attaching Your Rack” below) and
center the cross bar between the front bar mounts.
If you purchased the folding bars, rotate the bar so
that the center oval opening is facing downwards
towards the roof of the vehicle. Using the 5/16” hex
wrench, tighten the clamp bolt on each front bar
mount. Your front cross bar should now be custom-
fit to your vehicle; you can use it or remove it from
the car see “Removing your Rack” below).
Repeat this process for the rear bar mounts and
cross bar, mounting them just in front of the rear
window.
Where to Attach
Monkey Bars are specifically designed to attach to
a car’s roof top. Ideally, the vacuum mounts on your rack should be attached in the front and back corners of
your car’s roof, where the roof is most solid. The metal in the middle of some car roofs may not be sturdy enough
to support the weight of your rack and whatever you may be transporting.
Each vacuum mount on your SeaSucker rack should attach to clean, unobstructed metal or glass surface. The
vacuum pads will not attach over a seam or other surface incongruity.
To Remove:
Lift edge of vacuum pad using either rubber tab.
Put protective cover on vacuum pad.
To Attach:
Remove protective cover.
Place SeaSucker on a clean, smooth surface.
Press pump repeatedly until orange indicator band is
no longer visible.
Attaching Your Rack: Clean and Pump
Clean the surface you’re going to mount the rack to. Dust and dirt will affect your SeaSuckers’ ability to create
and hold vacuum. Remove the protective cover from each SeaSucker and inspect the rubber vacuum pad for
damage or dirt. Do not use your rack if there is any visible damage to the vacuum pad. If the vacuum pad is dirty,
clean it with a mild soap and water solution and a soft cloth or sponge.
It may help to moisten the bottom edge of each vacuum pad or the mounting surface with water - do not use
cleaners, lubricants, or other liquids. Press the vacuum mount against the mounting surface to make a full seal;
you may need to press firmly down on the body of the rack to ensure that the vacuum pad is fully connecting with
the mounting surface when pumping.
Pump the SeaSucker repeatedly until the plunger doesn’t spring back and the indicator band is hidden inside the
pump cylinder. Repeat this for all SeaSuckers on the rack. If the plunger won’t stay seated in the pump cylinder
or continues to extend out immediately after pumping, you may need to clean the mounting surface or the
vacuum pad or pump, perform basic maintenance on the vacuum pad or pump, or move the rack to a more
suitable mounting position. Do not use your rack without correcting the problem!
Removing Your Rack: Lift and Cover
Remove the cargo from the rack. With your fingertip, use one of the tabs on the SeaSucker’s vacuum pad to lift
the edge of the pad up from the mounting surface and break the vacuum seal.
Always put the protective covers back on when the rack is not attached to your car to protect the vacuum pad’s
rubber. Make sure the pad is fully seated in the protective cover before storing it. The edge of the vacuum pad
could be damaged or deformed if the vacuum pad isn’t fully seated in the protective cover.
Check for the Indicator Band During Use
SeaSucker vacuum mounts are not intended to be permanent fixtures on your car - they will lose vacuum over
time. When your vacuum mount loses vacuum, it will warn you by extending the pump’s plunger, exposing an
orange band. You are required to monitor your vacuum mounts during use. When getting in or out of your car,
check to see if the indicator band is visible on any of the rack’s vacuum mounts. If you see the band, simply
pump the SeaSucker as described above.
If the indicator band appears less than four hours after being pumped to full strength, either cleaning,
maintenance or repositioning may be required. If your rack is mounted on a scratched surface, move the rack to
a more suitable position. If the mounting surface or vacuum mount is dirty, clean it. If these steps don’t stop the
vacuum mount from losing vacuum prematurely, discontinue use until the problem is resolved. Replace the pump
on the suspect vacuum mount with the spare that came with your rack if necessary - additional replacement parts
can be purchased in the Replacement Parts section of our on-line store.
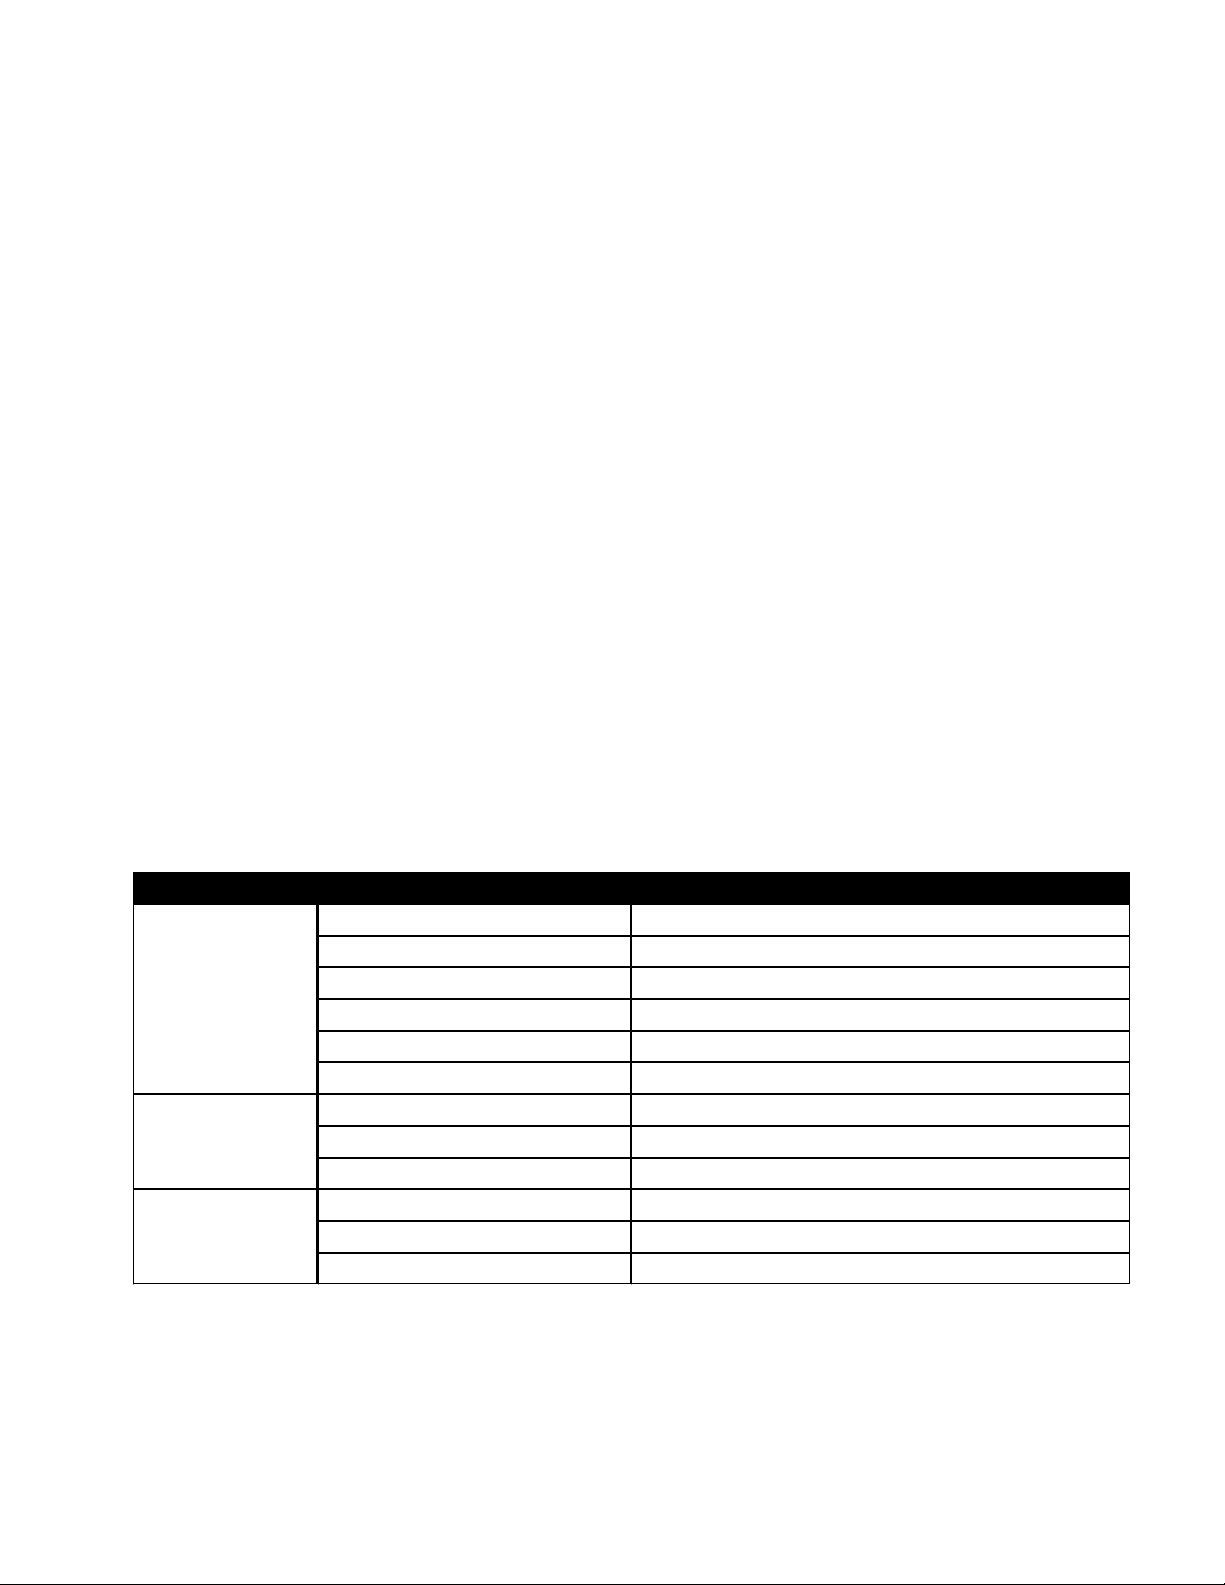
Problem
What Might Be Wrong
How To Fix It
Slow Leakage
Dry mounting surface or vacuum
Moisten the mounting surface or the vacuum pad
Nicks or cuts on vacuum pad
Replace the vacuum pad
Dirt in pump
Clean and re-lube the plunger and pump cylinder
Dry pump
Re-lube the plunger seal
Dirt on vacuum pad
Clean the vacuum pad
Dirty or uneven mounting surface
Clean the mounting surface or move to a more suitable
Severe Leakage
Nicks or cuts on vacuum pad
Replace the vacuum pad
Damaged pump
Replace the vacuum pump
Dirty or uneven mounting surface
Clean the mounting surface or move to a more suitable
Jammed or
Dry pump
Re-lube the plunger seal
Obstructed valve stem
Remove the obstruction; clean and re-lube the pump
Dirt in pump
Clean and re-lube the plunger and pump cylinder

Strapping Cargo to You Monkey Bars
One of the great things about owning Monkey Bars is that you can carrying almost anything you can strap to the
bars. To secure cargo, such as surfboards, paddle boards, ladders, lumber, PVC pipes, or taxidermied alligators,
remember this simple mantra: OVER the cargo, UNDER the bars.
Weather Conditions
SeaSucker products can be used in cold weather. The vacuum pads will stiffen in colder temperatures. Because
the vacuum pads need to conform to the mounting surface when you attach them, it is highly recommended that
you store your rack at room temperature 60ºF+) prior to use. You will not be able to properly attach the vacuum
mounts if they are too cold. Mounting surfaces must be free of ice, snow, dirt and any else that might prevent the
vacuum pad from making a full seal. In freezing temperatures, we recommend not moistening the edge of your
vacuum pads with water as discussed in “Attaching Your Rack” above.
Rain and wet weather should not affect the performance of your SeaSucker rack. If rain or water gets inside any
of your vacuum pumps, pull the plunger out and dry the inside of the pump cylinder with a clean paper towel. Re-
lube the plunger seal if necessary and reinsert the plunger in the pump cylinder. Screws or other metal parts that
show signs of rusting or corrosion should be replaced.
Care and Maintenance
To get the most out of your SeaSucker rack, inspect it regularly and store it with the vacuum mounts’ protective
covers on. Check that all screws are securely tightened, including the screws attaching the vacuum pads to the
SeaSucker housing and the screws attaching the SeaSuckers to the rack deck.
Clean the vacuum pads before each use with a sponge or soft cloth, mild dish soap and water. Do not use harsh
solvents or abrasive cleaning pads. Make sure there is no dirt or debris on the sealing edge the bottom outside
edge) of the vacuum pad. Inspect the sealing edge for stiffness, cracks, roughness, or cuts – a cut will allow air
to leak under the vacuum pad and will prevent your SeaSucker from holding vacuum. A damaged vacuum pad
should be replaced.
The vacuum pump should be cleaned regularly. To clean the pump, pull the plunger straight out of the pump
cylinder. Clean the inside of the cylinder with dish soap and a soft cloth or paper towel. Make sure to dry out the
cylinder – water left in the cylinder can cause the pump to make a popping noise when pumped and may
interfere with the check-valve function of the pump.
The plunger should be wiped clean and the black rubber seal at the tip of the plunger should be re-lubed with a
thin layer of silicone-based gel lubricant, such as the Lube Tube that came with your rack. After cleaning, push
the plunger back into the cylinder and pump it several times to seat it properly and distribute the lubricant.
One replacement SeaSucker vacuum pump comes with your rack. Additional replacement SeaSucker vacuum
mounts, vacuum pads, vacuum pumps, and additional tubes of Lube Tube can be purchased on-line
at www.seasucker.com in the Replacement Parts section of our on-line store.
The Lube Tube supplied with your rack is for vacuum pump maintenance only -
DO NOT apply lube to the vacuum pad.

Warranty
SeaSucker offers a lifetime, non-transferable warranty to the original purchaser covering defects in materials and
workmanship. Defective products can be returned to SeaSucker for replacement or repair at SeaSucker’s
option). Warranty claims must be accompanied by a sales receipt or other proof of purchase document. The cost
of transportation to and from SeaSucker for the repair or replacement of any defective part or accessory is not
covered by this warranty and is to be paid by the owner.
This warranty does not apply to damage or failure resulting from routine wear and tear expected in the normal
use of this product, or to lack of maintenance, user error, alteration or modification of the product, accidents,
misuse, abuse, or neglect.
This warranty is given in lieu of all other written or oral warranties, express or implied, including without limitation
implied warranties of merchantability and fitness for a particular purpose, and are limited to the duration and
specifications of this warranty.
Purchaser’s exclusive remedy under this warranty is the repair or replacement of a defective product or, at
SeaSucker’s option, the issuance of a refund or credit for the purchase price of the product. SeaSucker’s liability
for any damages relating to any allegedly defective product, whether arising from the use or the inability to use
the product and whether claimed under tort, contract or any other legal theory, shall be limited to the actual price
paid for such product and shall in no event include loss of use, loss of time, incidental, consequential, special, or
indirect damages of any kind, even if SeaSucker is aware of the possibility of such damages, to the full extent as
such may be disclaimed by law.
It is the user’s responsibility to ensure that the use of this product is not prohibited by any applicable local or state
law.
Warranty claims can be initiated by:
Submitting this form: https://seasucker.formstack.com/forms/rma_request
Calling this number: 1-941-900-1850
Emailing this address: info@seasucker.com
Repair and Replacement
Products with non-warrantable damage may still be repaired or replaced at your expense. Discounted
replacement parts, including vacuum pads, pumps, and hardware, can be found on-line in the Replacement
Parts section of SeaSucker’s on-line store at www.seasucker.com.
Returns
If you purchased this product directly from SeaSucker and have not used it yet, you can return it for exchange or
refund within 30 days of purchase. To request a Return Authorization for a return, exchange, or repair, visit
https://seasucker.formstack.com/forms/rma_request.
IMPORTANT WARNINGS
Do not exceed the posted speed limit.
Do not carry more than the maximum recommended load 165 pounds).
Do not use if the indicator band is exposed on any of your SeaSucker’s pumps.
Do not use if all of the rack’s mounts cannot maintain a full vacuum seal for at least 4 hours.
Clean the mounting surface before attaching.
Clean SeaSuckers before attaching.
Clean and lube your SeaSuckers’ pumps regularly.
Inspect screws, nuts, and bolts regularly and retighten if necessary.
Make sure the vacuum pads are fully seated in the protective covers when not in use.
Do not attempt to park you car in a garage with a cargo mounted on the roof without ensuring you have
enough clearance.

YOUR RESPONSIBILITIES
You must read and follow the instructions in this user manual. You must attach the rack correctly to your
vehicle, check it before each use, and perform any necessary maintenance. The correct attachment of the
rack to your vehicle is critical and is in your exclusive control.
You must attach your cargo correctly to the rack. The correct attachment of cargo to your rack is critical and
is in your exclusive control.
You must inspect the indicator bands on all SeaSuckers when entering and exiting your vehicle. A quick
glance will tell you if the rack is at full power. If the indicator band is visible, you must re-pump the
SeaSucker before the rack can be used.
You must clean, repair, or replace any of your SeaSucker vacuum mounts that do not hold vacuum for at
least 4 hours. Your rack comes with an extra SeaSucker vacuum pump; keep it with your rack in case you
accidentally damage one.
You must not overload your rack. The maximum recommended load is 165 pounds 74.8 kilograms).
Carrying loads above 165 pounds may damage both your rack and the roof of your vehicle.
You must obey all posted speed limits and traffic conditions; if there is no posted speed limit, we
recommend not driving above 85 miles per hour. You must adapt your driving style and speed to road
conditions, weather conditions, and the load on your SeaSucker rack.
Table of contents
Other SeaSucker Automobile Accessories manuals


Popular Automobile Accessories manuals by other brands


ARB
ARB 3432050 Fitting instructions

Shoreline 4x4
Shoreline 4x4 Extreme Series Fitting instructions

Utemaster
Utemaster Sports Bar Load-Lid manual

Mid America Motorworks
Mid America Motorworks 609-640 instruction sheet

Prime Design
Prime Design AAL-8003 quick start guide

STO N SHO
STO N SHO SNS 125 Installation procedures

Whispbar
Whispbar K584W Fitting instructions

Federal Signal Corporation
Federal Signal Corporation VSLR1-IPX Series Installation and maintenance instructions

Safe Fleet
Safe Fleet Prime Design VRR-GM31-ST manual

Directed
Directed FORD12 installation guide

Cruz
Cruz Alu-Rack L 13-120 Assembly instructions

CP Autosport
CP Autosport SetupWizzard operating manual