SeaSucker HUSKE User manual
READ THIS BEFORE USING
YOUR SEASUCKER RACK!
WARNINGS
•Do not mount bicycles backwards, sideways or
at an angle.
•Do not exceed the posted speed limit.
•Do not use if the indicator band is exposed on any
of your SeaSucker’s pumps.
•Do not use if all of the rack’s mounts cannot
maintain a full vacuum seal for at least 4 hours.
•Check the indicator band during use.
•Clean the mounting surface before attaching.
•Clean SeaSuckers before attaching.
•Clean and lube your SeaSuckers’ pumps regularly.
•Inspect screws, nuts, and bolts regularly and
retighten if necessary.
•Do not use for bicycles over 45 pounds.
•Make sure the fork mount is fully clamped and
secure before you transport your bicycle.
•Make sure the vacuum pads are fully seated in the
protective covers when not in use.
•The Falcon rack can not be used on roof top - it is
for pickup truck back window use only.
The Rack’s Responsibility
With all SeaSucker vacuum mounts fully
engaged, the rack will securely hold
bicycles up to 45 pounds each at speeds up
to 75 mph. The rack will indicate if the
SeaSuckers are not maintaining vacuum:
each SeaSucker has a power indicator
band in the pump that will extend out and
become visible upon loss of vacuum. If you
see the indicator band, you must re-pump
the SeaSucker before the rack can be
safely used again.
Your Responsibility
You must inspect the indicator bands on all
SeaSuckers when entering and exiting your
vehicle. A quick glance will tell you if the
rack is at full power. If the indicator band is
visible, you must re-pump the SeaSucker
before the rack can be used. If any of your
SeaSuckers do not hold vacuum for at least
4 hours, they may need to be cleaned,
repaired, or replaced. Your rack comes with
an extra SeaSucker vacuum pump; keep it
with your rack in case you accidentally
damage one.
SeaSucker, LLC
Bradenton, Florida
www.SeaSucker.com
Talon
• Talon deck with three
vacuum mounts attached
• (1) standard 9mm fork mount
• (2) 1.25x1/4-20 hex head
bolts
• (2) 1/4-20 nyloc nuts
• (2) flat washers
• (1) Rear Wheel Strap
• (1) Crank Arm Strap
• (1) Spare vacuum pump
•5g Lube Tube
• 7/16 box wrench
• 5/32 Allen wrench
Mini Bomber
• Mini Bomber deck with four
vacuum mounts attached
• (2) standard 9mm fork
mounts
• (4) 1.5x1/4-20 hex head bolts
• (4) 1/4-20 nyloc nuts
• (4) flat washers
• (2) Rear Wheel Straps
• (2) Crank Arm Straps
• (1) Spare vacuum pump
•5g Lube Tube
• 7/16 box wrench
• 5/32 Allen wrench
Bomber
• Bomber deck with five
vacuum mounts attached
• (3) standard 9mm fork
mounts
• (1) 3/4” Riser Block
• (4) 1.5x1/4-20 hex head bolts
• (2) 2.25x1/4-20 hex head
bolts
• (6) 1/4-20 nyloc nuts
• (6) flat washers
• (3) Rear Wheel Straps
• (3) Crank Arm Straps
• (1) Spare vacuum pump
•5g Lube Tube
• 7/16 box wrench
• 5/32 Allen wrench
Falcon
• Falcon deck with two vacuum
mounts attached
• (1) standard 9mm fork mount
• (2) 1.25x1/4-20 hex head
bolts
• (2) 1/4-20 nyloc nuts
• (2) flat washers
• (1) Spare vacuum pump
•5g Lube Tube
• 7/16 box wrench
• 5/32 Allen wrench
What’s in the Box:

Assembly
Place the HUSKE fork mount over the mounting holes in
the rack deck and push the two mounting bolts through
the fork mount and the deck. Place a flat washer over the
end of each bolt and then thread a locking nut onto the
end of the bolt. Using the supplied wrenches, tighten the
locking nuts until secure - the fork mount should be held
firmly in place and should not rock or move when
pressure is applied. See the included HUSKE Fork Mount
Manual for more information.
NOTE - The multiple mounting holes on the Mini Bomber
and Bomber decks allow some flexibility in positioning the
fork mounts. The angle of the fork mounts can be
changed to prevent
wider handle bars from
touching.
Special Instructions for the Bomber
Bomber racks are assembled in the same way as Mini Bomber racks
except that Bomber racks come with a Riser Block that should be
installed under the center fork mount. The Riser Block raises the
height of the handlebars on the bike in the middle position to provide
additional clearance for wider handlebars.
Talon
Mini Bomber
Bomber
Falcon
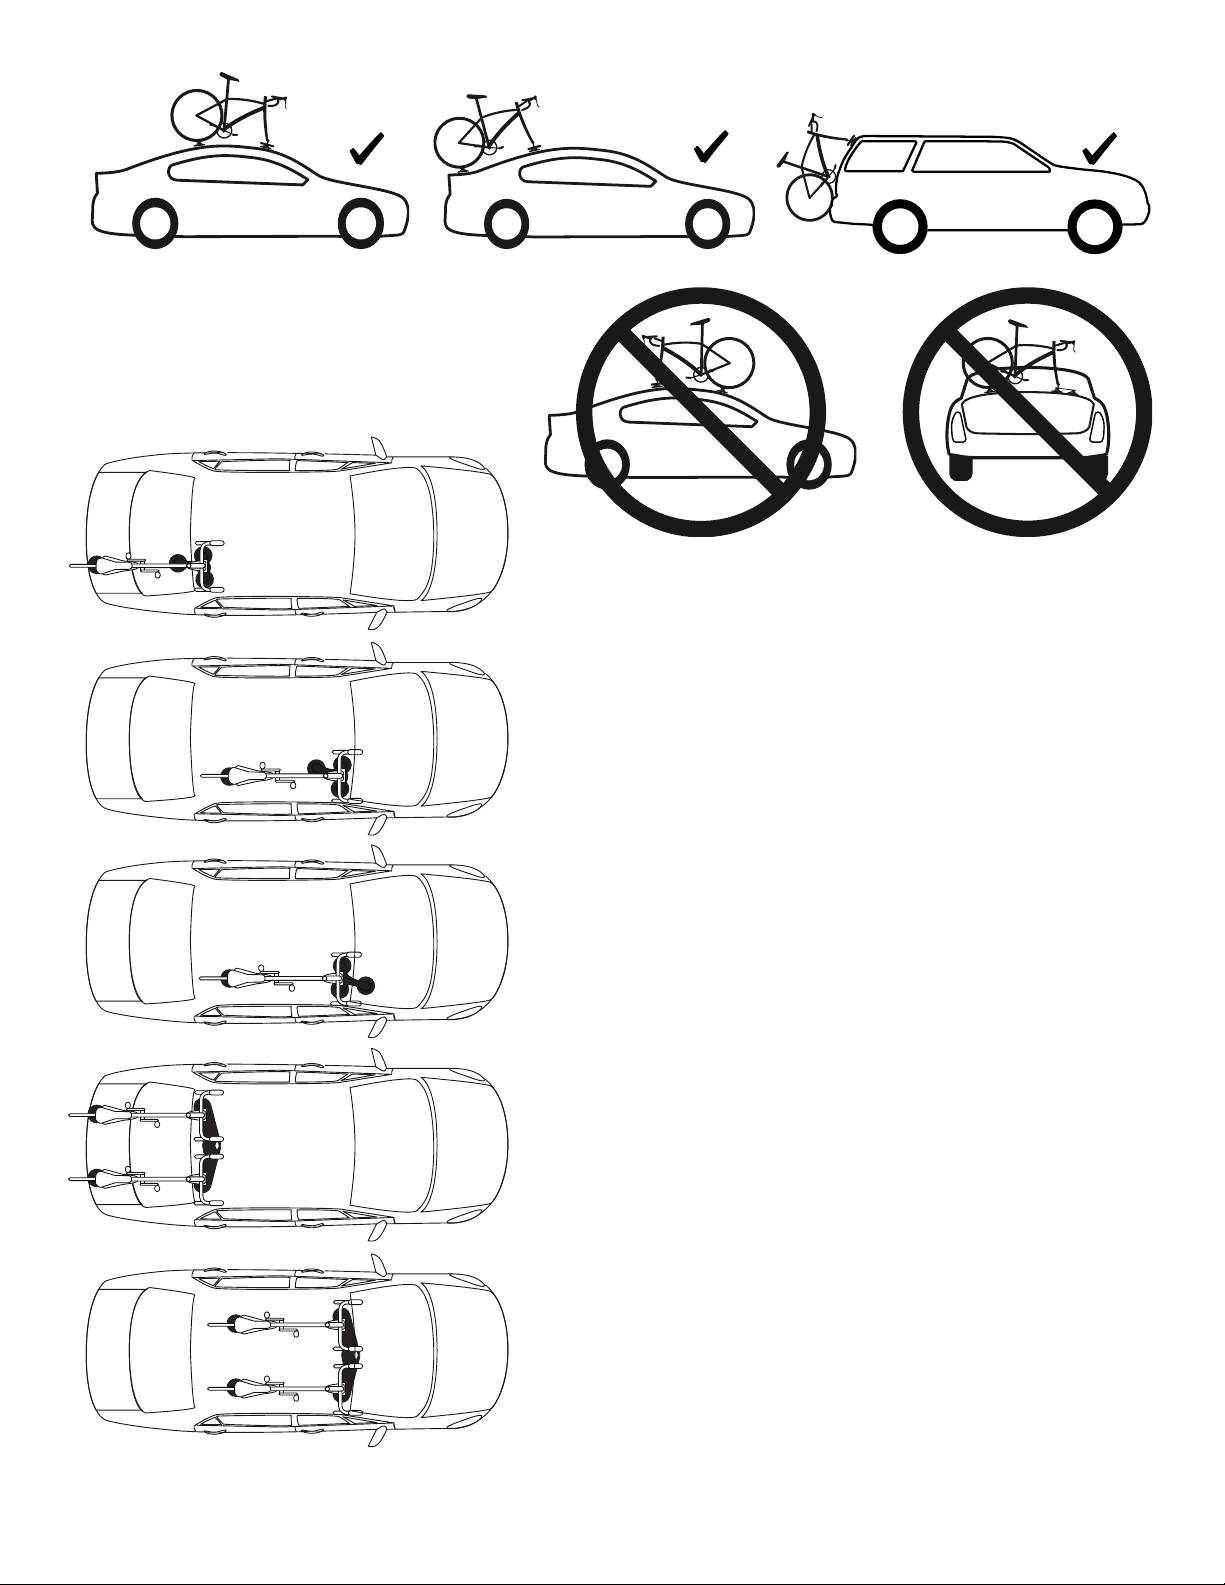
Where to Attach
The Talon, Mini Bomber, and Bomber racks are designed to attach to
a car’s roof top or the back glass of a hatchback, van, or or SUV.
Falcon racks are designed only for use on the rear windows of pickup
trucks - do not use a Falcon rack on the roof of your car.
•DO NOT mount bicycles backwards, sideways, or at an angle.
•DO NOT attach your rack to a part of your car that flexes easily.
Position the rack near the front or back windshield where the roof has
more internal support. The metal in the middle of some car roofs may
not be sturdy enough to support the weight of your bicycle and rack.
•DO NOT let your bike’s rear wheel hang lower than the bottom of
your car’s bumper when mounting the to rear window of a hatchback,
van, or SUV.
•DO NOT attach your rack over decals or on a wrapped vehicle.
Each vacuum mount on your rack should attach to a clean,
unobstructed metal, glass, or carbon fiber surface. The vacuum
mounts will not attach over a seam or other surface incongruity.
Attaching your rack to a glass panoramic roof or sunroof
is done at your own risk and we strongly recommend that
you test the strength and suitability of your glass
panoramic roof or sunroof first.
If you are attaching your rack to the rear window of your hatchback or
SUV try to position the rack so that you can attach you rear wheel
strap in an appropriate place if you choose to use the a Rear Wheel
Strap. You are not required to use the Rear Wheel Strap when
hanging your bicycle from the back glass. Try to position the rack so
that it will not obstruct your view through the rear window.
Avoid mounting your rack in the
middle of your roof where it’s more
flexible. Attach just behind the front
windshield or just in front of the
rear window.
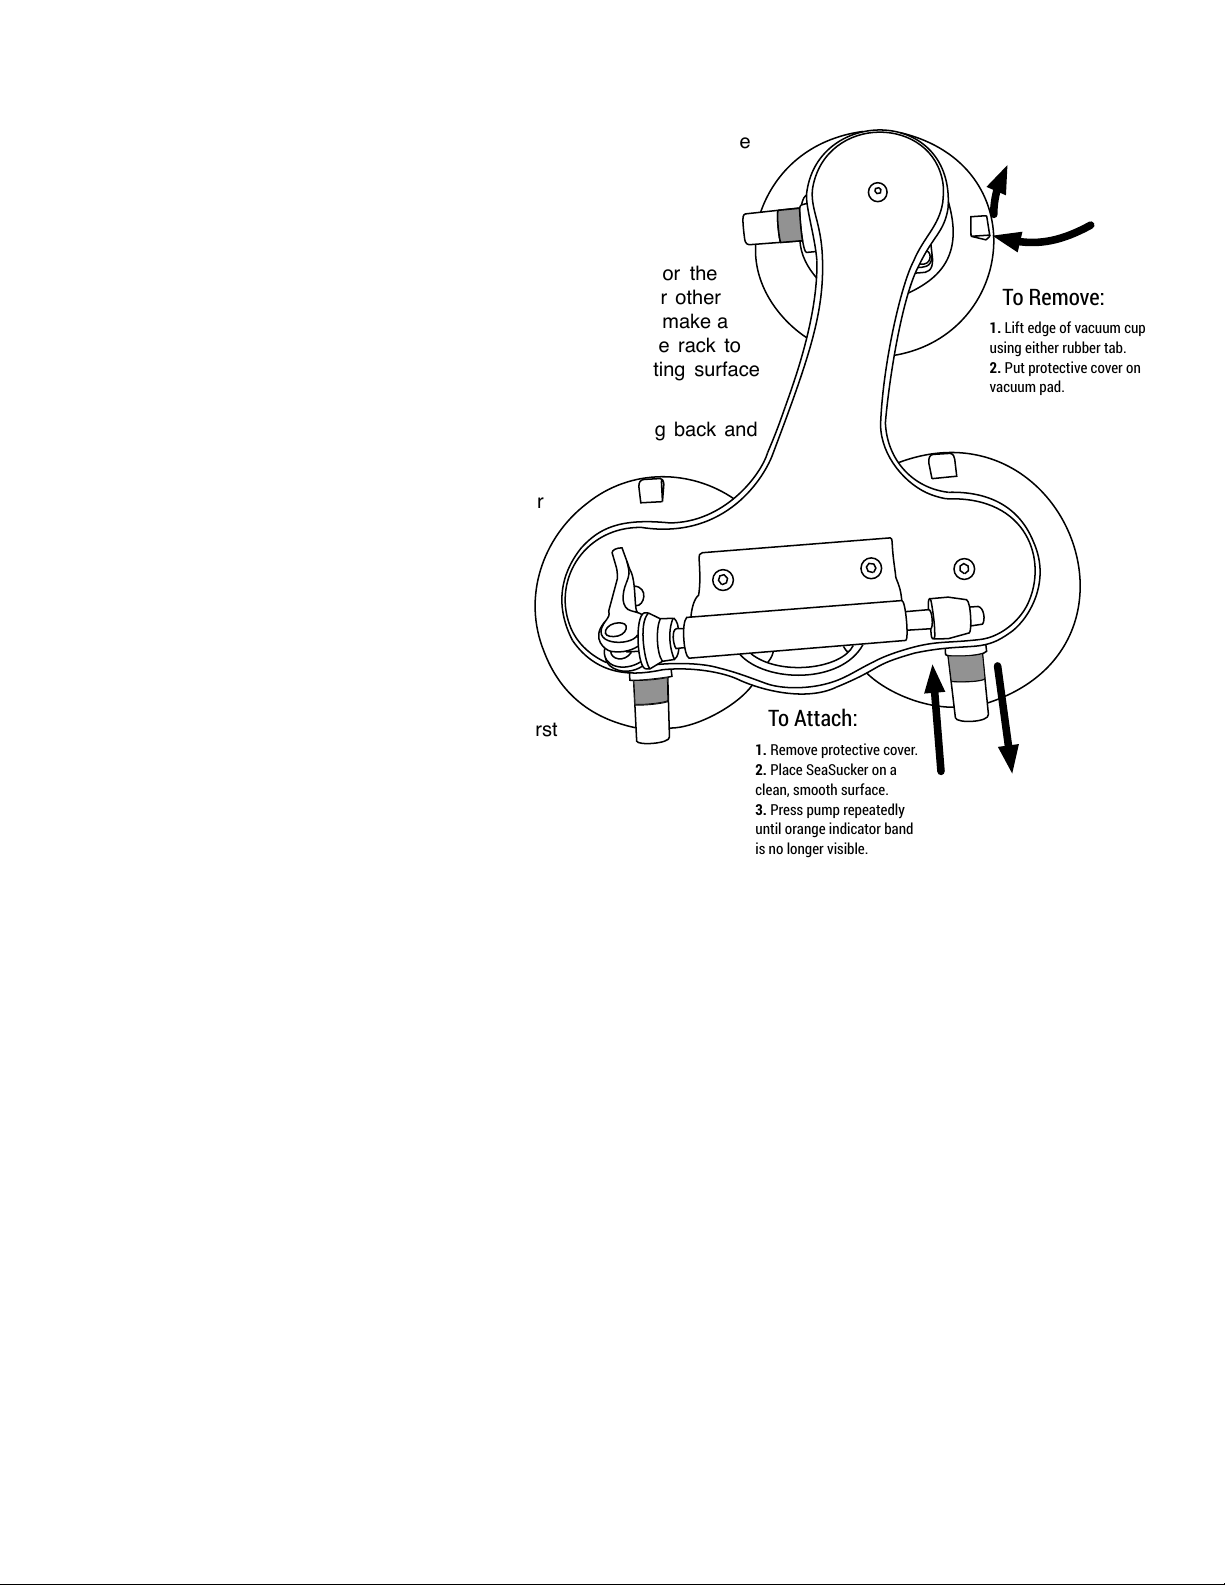
To Attach Your Rack: Clean and Pump
Clean the surface you’re going to mount the rack to. Dust and dirt will affect
your SeaSuckers’ ability to create and hold vacuum. Remove the protective
cover from each SeaSucker and inspect the rubber vacuum pad for
damage or dirt. Do not use your rack if there is any visible damage to the
vacuum pad. If the vacuum pad is dirty, clean it with a mild soap and
water solution and a soft cloth or sponge.
It may help to moisten the bottom edge of each vacuum pad or the
mounting surface with water - do not use cleaners, lubricants or other
liquids. Press the vacuum mount against the mounting surface to make a
full seal; you may need to press firmly down on the body of the rack to
ensure that the vacuum pad is fully connecting with the mounting surface
when pumping.
Pump the SeaSucker repeatedly until the plunger doesn’t spring back and
the indicator band is hidden inside the pump cylinder.
Repeat this for all SeaSuckers on the rack. If the
plunger won’t stay seated in the pump cylinder or
continues to extend out immediately after
pumping, you may need to clean the mounting
surface or the vacuum pad or pump, perform
basic maintenance on the vacuum pad or pump,
or move the rack to a more suitable mounting
position. Do not use your rack without correcting
the problem!
Most car roofs have a slight curve. When using the
Mini Bomber or Bomber, we recommend that you first
attach one of the vacuum mounts near the center of the
rack and attach the other vacuum mounts in sequence moving toward
the outer edge of the rack. The plastic body of the rack will bend to
conform to the curve in your roof.
To Remove Your Rack: Lift and Cover
Remove your bike from the rack by unclamping the fork mount and
unstrapping the Velcro from the back wheel. With your fingertip, use one of the tabs on the SeaSucker’s vacuum pad to
lift the edge of the pad up from the mounting surface and break the vacuum seal.
Always put the protective covers back on when the rack is not attached to your car to protect the rubber of the vacuum
pad. Make sure the pad is fully seated in the protective cover before storing it. The edge of the vacuum pad could be
damaged or deformed if the vacuum pad isn’t fully seated in the protective cover.
Using the HUSKE Fork Mount
The set-up and use of the HUSKE fork mount(s) supplied with your rack are described in the attached HUSKE Usage
Guide.
Using the Crank Arm Strap
Wrap the orange Velcro strap around one of your crank arms and chain stays to prevent your pedals from coming into
contact with the roof of your car.
Using the Rear Wheel Strap
Talon, Mini Bomber and Bomber racks come with a Rear Wheel Strap. The Rear Wheel Strap holds your bike’s rear
wheel in place when using a SeaSucker rack. Place the Rear Wheel Strap under your bike’s rear tire after you mount
the bike in your rack. Attach the SeaSucker as described above (To Attach Your Rack), then firmly pull one side of the
Velcro strap through your spokes and over the rim and then smooth the second Velcro strap over the first. The Velcro
strap may allow the rear wheel to move slightly.
Locking Your Bike and Rack
Because SeaSucker bike racks cannot be permanently attached to you car, you should exercise caution when leaving
you bike or rack unattended. When not using your rack, we recommend that you remove and properly store the rack in
your home or car. You can lock your bike and rack to your car using one of SeaSucker’s Cable Anchors. Cable Anchors
provide a sturdy steel attachment point for a cable-type lock.
1. Remove protective cover.
2. Place SeaSucker on a
clean, smooth surface.
3. Press pump repeatedly
until orange indicator band
is no longer visible.
To Attach:
1. Lift edge of vacuum cup
using either rubber tab.
2. Put protective cover on
vacuum pad.
To Remove:

Check for the Indicator Band During Use
SeaSucker vacuum mounts are not intended to be permanent fixtures on your car - they will lose vacuum over time. When
your vacuum mount loses vacuum, it will warn you by extending the pump’s plunger, exposing an orange band. You are
required to monitor your vacuum mounts during use. When getting in or out of your car, check to see if the indicator band
is visible on any of the rack’s vacuum mounts. If you see the band, simply pump the SeaSucker as described above.
If the indicator band appears less than four hours after
being pumped to full strength, either cleaning,
maintenance or repositioning may be required. If your
rack is mounted on a scratched surface, move the rack to
a more suitable position. If the mounting surface or
vacuum mount is dirty, clean it. If these steps don’t stop
the vacuum mount from losing vacuum prematurely,
discontinue use until the problem is resolved. Replace the
pump on the suspect vacuum mount with the spare that
came with your rack if necessary - additional replacement
parts can be purchased in the Replacement Parts section
of our on-line store.
Weather Conditions
SeaSuckers can be used in cold weather. The vacuum pads will stiffen in colder temperatures. Because the vacuum pads
need to conform the the mounting surface when you attach them, it is highly recommended that you store your rack at
room temperature (60ºF+) prior to use. You will not be able to properly attach the vacuum mounts if they are too cold.
Mounting surfaces must be free of ice, snow, dirt and any else that might prevent the vacuum pad from making a full seal.
Rain and wet weather should not affect the performance of your SeaSucker rack. If rain or water gets inside any of your
vacuum pumps, pull the plunger out and dry the inside of the pump cylinder with a paper towel. Re-lube the plunger seal if
necessary and reinsert the plunger in the pump cylinder. Screws or other metal parts that show signs of rusting or
corrosion should be replaced.
Care and Maintenance
To get the most out of your SeaSucker rack, inspect it regularly and store it with the vacuum mounts’ protective covers on.
Check that all screws are securely tightened, including the screws attaching the vacuum pads to the SeaSucker housing
and the screws attaching the SeaSuckers to the rack deck or bars.
Clean the vacuum pads before each use with a sponge or soft cloth, mild dish soap and water. Do not use harsh solvents
or abrasive cleaning pads. Make sure there is no dirt or debris on the sealing edge (the bottom outside edge) of the
vacuum pad. Inspect the sealing edge for stiffness, cracks, roughness, or cuts – a cut will allow air to leak under the
vacuum pad and will prevent your SeaSucker from holding vacuum. A damaged vacuum pad should be replaced. One
replacement SeaSucker comes with your rack. Additional replacement SeaSuckers, vacuum pads, and vacuum pumps
can be purchased on-line at!www.seasucker.com!in the Replacement Parts section of our on-line store.
The vacuum pump should be cleaned regularly. To clean the pump, pull the plunger straight out of the pump cylinder.
Clean the inside of the cylinder with dish soap and a soft cloth or paper towel. Make sure to dry out the cylinder – water
left in the cylinder can cause the pump to make a popping noise when pumped and may interfere with the check-valve
function of the pump.
The plunger should be wiped clean and the black rubber seal at the tip of the plunger should be re-lubed with a thin layer
of silicone-based gel lubricant, such as the Lube Tube that came with your rack. Additional tubes of Lube Tube can be
found on-line in the Replacement Parts section at!www.seasucker.com. After cleaning, push the plunger back into the
cylinder and pump it several times to seat it properly and distribute the lubricant.
The Lube Tube supplied with your rack is for vacuum pump maintenance only - DO NOT apply lube to
the vacuum pad.
Full power!
Orange indicator band
exposed: time to re-pump!

Warranty
SeaSucker offers a lifetime, non-transferable warranty covering defects in materials and workmanship. Defective products
can be returned to SeaSucker for replacement or repair (at SeaSucker’s option). Warranty claims must be accompanied
by a sales receipt or other proof of purchase document. The cost of transportation to and from SeaSucker for the repair or
replacement of any defective part or accessory is not covered by this warranty and is to be paid by the owner. This
warranty does not apply to damage or failure resulting from normal use, routine wear and tear, lack of maintenance, user
error, alteration of the product, accidents, abuse, or neglect. This warranty is given in lieu of all other written or oral
warranties, express or implied, including without limitation implied warranties of merchantability and fitness for a particular
purpose, and are limited to the duration and specifications of this warranty. SeaSucker’s liability for any damages relating
to any allegedly defective product, whether arising from the use or the inability to use the product and whether claimed
under tort, contract or any other legal theory, shall be limited to the actual price paid for such product and shall in no event
include loss of use, loss of time, incidental, consequential, special, or indirect damages of any kind, even if SeaSucker is
aware of the possibility of such damages, to the full extent as such may be disclaimed by law.
Repair and Replacement
Products with non-warrantable damage or products that are no longer within the warranty period may still be repaired or
replaced at your expense. Discounted replacement parts, including vacuum pads, pumps, fork mounts and hardware, can
be found on-line in the Replacement Parts section of SeaSucker’s on-line store at www.seasucker.com.
Returns
If you purchased this product directly from SeaSucker and have not used it yet, you can return it for exchange or refund
within 30 days of purchase. To request a Return Authorization for a return, exchange, or repair, visit https://
seasucker.formstack.com/forms/rma_request.
Patent Information
SeaSucker’s Talon, Mini Bomber, Bomber, and Falcon bike racks, among others, are covered by the following patents
(so don’t go starting a Kickstarter campaign for rip-off racks like that one knucklehead tried to):
United States: 9,821,721 B2 European Patent Commission: 2480430
Australia: 2010298318 Mexico: 324704 Korea: 10-1860954
Problem
What Might Be Wrong
How To Fix It
Slow Leakage
Dry mounting surface or vacuum pad
Moisten the mounting surface or the vacuum pad
Nicks or cuts on vacuum pad
Replace the vacuum pad
Dirt in pump
Clean and re-lube the plunger and pump cylinder
Dry pump
Re-lube the plunger seal
Dirt on vacuum pad
Clean the vacuum pad
Dirty or uneven mounting surface
Clean the mounting surface or move to a more suitable spot
Severe Leakage
Nicks or cuts on vacuum pad
Replace the vacuum pad
Damaged pump
Replace the vacuum pump
Dirty or uneven mounting surface
Clean the mounting surface or move to a more suitable spot
Jammed or Sluggish Pump
Dry pump
Re-lube the plunger seal
Obstructed valve stem
Remove the obstruction; clean and re-lube the pump
Dirt in pump
Clean and re-lube the plunger and pump cylinder
TROUBLESHOOTING GUIDE
INSTRUCTIONS FOR USE
Installation
Tools needed: 7/16” box wrench
5/32” Allen wrench
Remove any existing fork mount from your rack. Save the
hardware (bolts, washers, and nuts) for attaching your
HUSKE fork mount. Place the fork mount over the mounting
holes in the rack deck and push the two mounting bolts
through the mounting holes from the top and then through
the deck. Place a flat washer over the end of each bolt and then thread a locking
nut onto the end of the bolt. Tighten the locking nuts until secure - the fork mount
should be held firmly in place and should not rock or move when pressure is
applied.
NOTE - The multiple mounting holes on the Mini Bomber and Bomber decks allow
some flexibility in positioning the fork mounts. The angle of the fork mounts can
be changed to prevent wider handle bars from touching.
Inserting and Removing Plugs
The HUSKE fork mount uses plugs to adapt to different hub sizes.
Acquire the plugs you need for you bike’s hub and press them
into the HUSKE base. Make sure the plugs are seated
completely in the base by simultaneously pressing them in
and turning them. The
rubber O-ring on the plugs
will keep them in place. A
small drop of Lube Tube
(which came with your
SeaSucker bike rack) or chain
oil will help the plugs slide in and
out more smoothly.
20x100mm and 20x110mm plugs fit over the
HUSKE base rather than in. Slide the plugs over
the top tube, matching the slots to the sides of the base. Once fully seated, tighten the
set screw on each plug with an Allen wrench.
If you are using the 9x100m QR Plugs, insert the skewer through the plugs after
installing the plugs. Screw the QR nut onto the skewer. See below for instructions on
how to adjust the it to fit your bike. The skewer can be placed through the plugs from
either side.
Universal Fork Mount
HUSKE
(HUb Standards Keep Evolving)
SeaSucker, LLC
Bradenton, Florida
www.SeaSucker.com
9mm, 12mm,
& 15mm plugs
20mm plugs
20mm plugs
Mounting Your Bike on a HUSKE QR Fork Mount
It is easier to set the tightness of the cam lever for the first time before
mounting your rack to your vehicle.
1. Place your SeaSucker rack on the floor. Leave the protective covers on the
vacuum pads to avoid accidental damage to the pads.
2. Open the fork mount’s quick release - place the cam lever in the open
position and turn the adjustment nut counterclockwise to loosen it until it is
almost at the end of the skewer.
3. Remove the front wheel from your bicycle.
4. Place your bicycle’s fork dropouts onto the skewer. Make sure the QR
washer is next to the cam lever. If your bicycle won’t balance on its own, have
a helper hold on to it.
5. Push the skewer as far through the body of the fork mount as possible by
pressing the cam lever towards your fork (while still in the open position).
IMPORTANT: the cam lever, QR washer and the leg of your fork should be
pressed tightly together against the body of the fork mount with no gaps in
between them. Strike the cam lever with the heel of your palm if necessary to
ensure full penetration. Then turn the adjustment nut clockwise until it is
finger-tight against the other side of the fork.
6. Unscrew the adjustment nut six full turns. It is helpful to mark the nut in
some way to keep track of the position and number of turns.
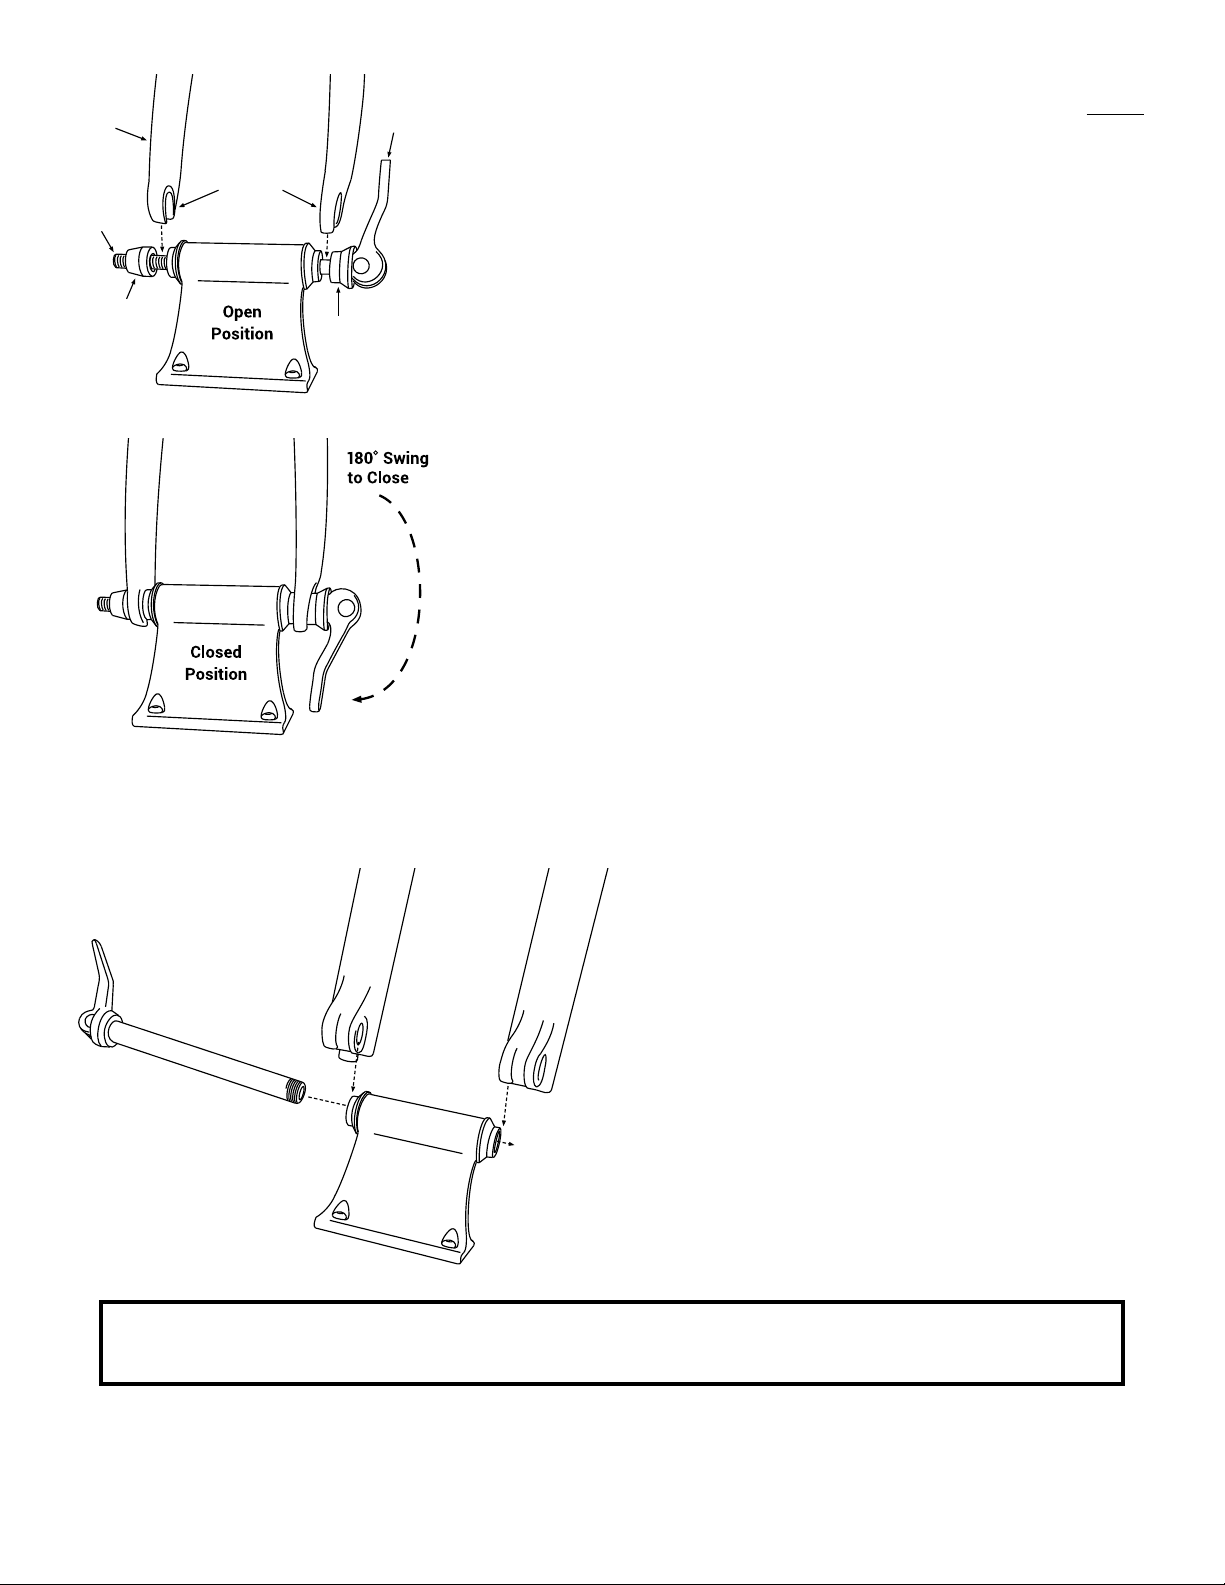
7. Flip the cam lever into the closed position. The cam lever should swing
approximately 180 degrees. You should feel the cam lever starting to tighten
just past 90 degrees of swing. It should take firm pressure to fully close the
cam lever, but not so much pressure that it won’t close fully. If you are not
closing it 180 degrees, or the cam lever or forks feel loose, you are doing it
wrong! Go back to step 5 and try again.
The 9mm QR fork mount has a large cam, which means that you probably won’t have to loosen or tighten the
adjustment nut every time you mount or remove your bicycle from the rack.
Test the tightness of the fork mount by gripping your
fork and firmly pulling and pushing. If the fork moves in
the mount in any way, you should adjust the adjustment
nut and re-clamp your fork to tighten the fork mount.
Mounting Your Bike on a HUSKE Thru-Axle Fork Mount
1. Remove the front wheel from your bicycle.!
2. Place your bike’s forks on the HUSKE, lining up the
axle holes on the fork and the fork mount.!
3. Push your wheel’s axle through the holes, turn it to
screw into the opposite side of the fork, and close the
lever. Installing your axle should be the same as when
you reattach your front wheel. Consult your wheel or hub
maker’s instructions for more information.
We love it when people share pics and videos of their SeaSucker racks on social media.
Tag us on Instagram and Facebook: @seasucker
Dropouts
Skewer
Fork
Adjustment
Nut QR Washer
Cam
Lever
Plugs for different hub sizes can be purchased on-line at www.SeaSucker.com.
Table of contents
Other SeaSucker Automobile Accessories manuals


Popular Automobile Accessories manuals by other brands

Rola
Rola PMX169 Fitting instructions

Edelbrock
Edelbrock 15013 installation instructions

Offroad Animal
Offroad Animal PR-JGC-WK2-11-ASM0 FITTING INSTRUCTION

Racepak
Racepak 250-DS-IQ3SL installation manual

Truma
Truma S 3004 P operating instructions

Virtual Reality
Virtual Reality Hands Free Bluetooth Car Kit MP3/WMA player & FM modulator... Installation and operation

BEST BUY essentials
BEST BUY essentials BE-MVQ3AC1B23 quick start guide

Brodit
Brodit ProClip 804400 installation instructions

Sprout
Sprout SWLCHG300BSR product manual

Whispbar
Whispbar K390W Fitting instructions

Kuda
Kuda 041375 Installation instruction

OPS Public Safety
OPS Public Safety OPS-US-GM-1500 user guide


