SeaSucker SX6150-SS-MonkeyBars User manual
WARNINGS
•Do not exceed the posted speed limit.
•Do not use if the indicator band is exposed on any of your
SeaSucker’s pumps.
•Do not use if all of your rack’s vacuum mounts cannot
maintain a full vacuum seal for at least 4 hours at a time.
•Check the indicator band during use.
•Clean the mounting surface before attaching.
•Clean SeaSuckers before attaching.
•Clean and lubricate your SeaSuckers’ pumps regularly.
•Remove racks when not in use.
•Attach protective covers when not in use.
•Inspect housing screws regularly and retighten if
necessary.
•Inspect clamp screws regularly and retighten if necessary.
The Rack’s Responsibility
With all SeaSuckers fully engaged, the rack will securely hold
at speeds of up to 70 mph. The rack will indicate if the
SeaSuckers are not maintaining vacuum: the indicator band in
the pump of each SeaSucker will extend out and become
visible upon loss of vacuum. If you see the indicator band, you
must re-pump the SeaSucker before the rack can be safely
used again.
Your Responsibility
You must inspect the indicator bands on all SeaSuckers when
entering and exiting your vehicle. A quick glance will tell you if
the rack is at full power. If the indicator band is visible, you must
re-pump the SeaSucker before the rack can be used. If any of
your SeaSuckers do not hold vacuum for at least 4 hours, they
may need to be cleaned, repaired, or replaced. Your rack
comes with an extra SeaSucker vacuum pump; keep it with
your rack in case you accidentally damage one.
What’s in the Box
•(2) Front bar mounts with (2) 6″SeaSucker vacuum cups
attached
•(2) Rear bar mounts with (1) 6″SeaSucker vacuum cup
attached
•(2) Aluminum cross bars
•(1) 5g Lube Tube (for vacuum pump maintenance)
•(1) spare SeaSucker vacuum pump (for maintenance)
•(1) 5/32 hex wrench (for assembly)
Please contact SeaSucker directly if any of these
components are missing or damaged.
READ THIS
BEFORE
USING YOUR
MONKEY BARS!
SeaSucker, LLC
Bradenton, Florida
www.SeaSucker.com
Assemble Your Monkey Bars
The SeaSucker Monkey Bars require simple assembly to be ready
for use. Ideally, you will assemble your rack near your vehicle so you
can custom fit the rack to your roof.
Separate the front bar mounts (the ones with the round clamp on a
platform in between two SeaSucker vacuum mounts) and the rear
bar mounts (the ones with the round clamp mounted directly on top of
one SeaSucker vacuum mount). If you purchased the folding bars,
unfold them and push them together to form a solid bar. Slide one of
the front bar mounts onto one of the cross bars. Slide the other front
bar mount onto the other side of the same bar; make sure the
vacuum pumps on the mounts are pointing in the same direction.
Remove the protective covers from the mounts and place the bar and
mounts onto the roof of your vehicle just behind the front windshield;
the vacuum pumps should be pointing towards the rear of the
vehicle. Position each of the front bar mounts as near to the front
corners of the roof as you can (see “Where to Attach” below). Attach
the vacuum mounts (see “To Attach Your Rack” below) and center the
cross bar between the front bar mounts. If you purchased the folding
bars, rotate the bar so that the center oval opening is facing
downwards towards the roof of the vehicle. Using the hex wrench
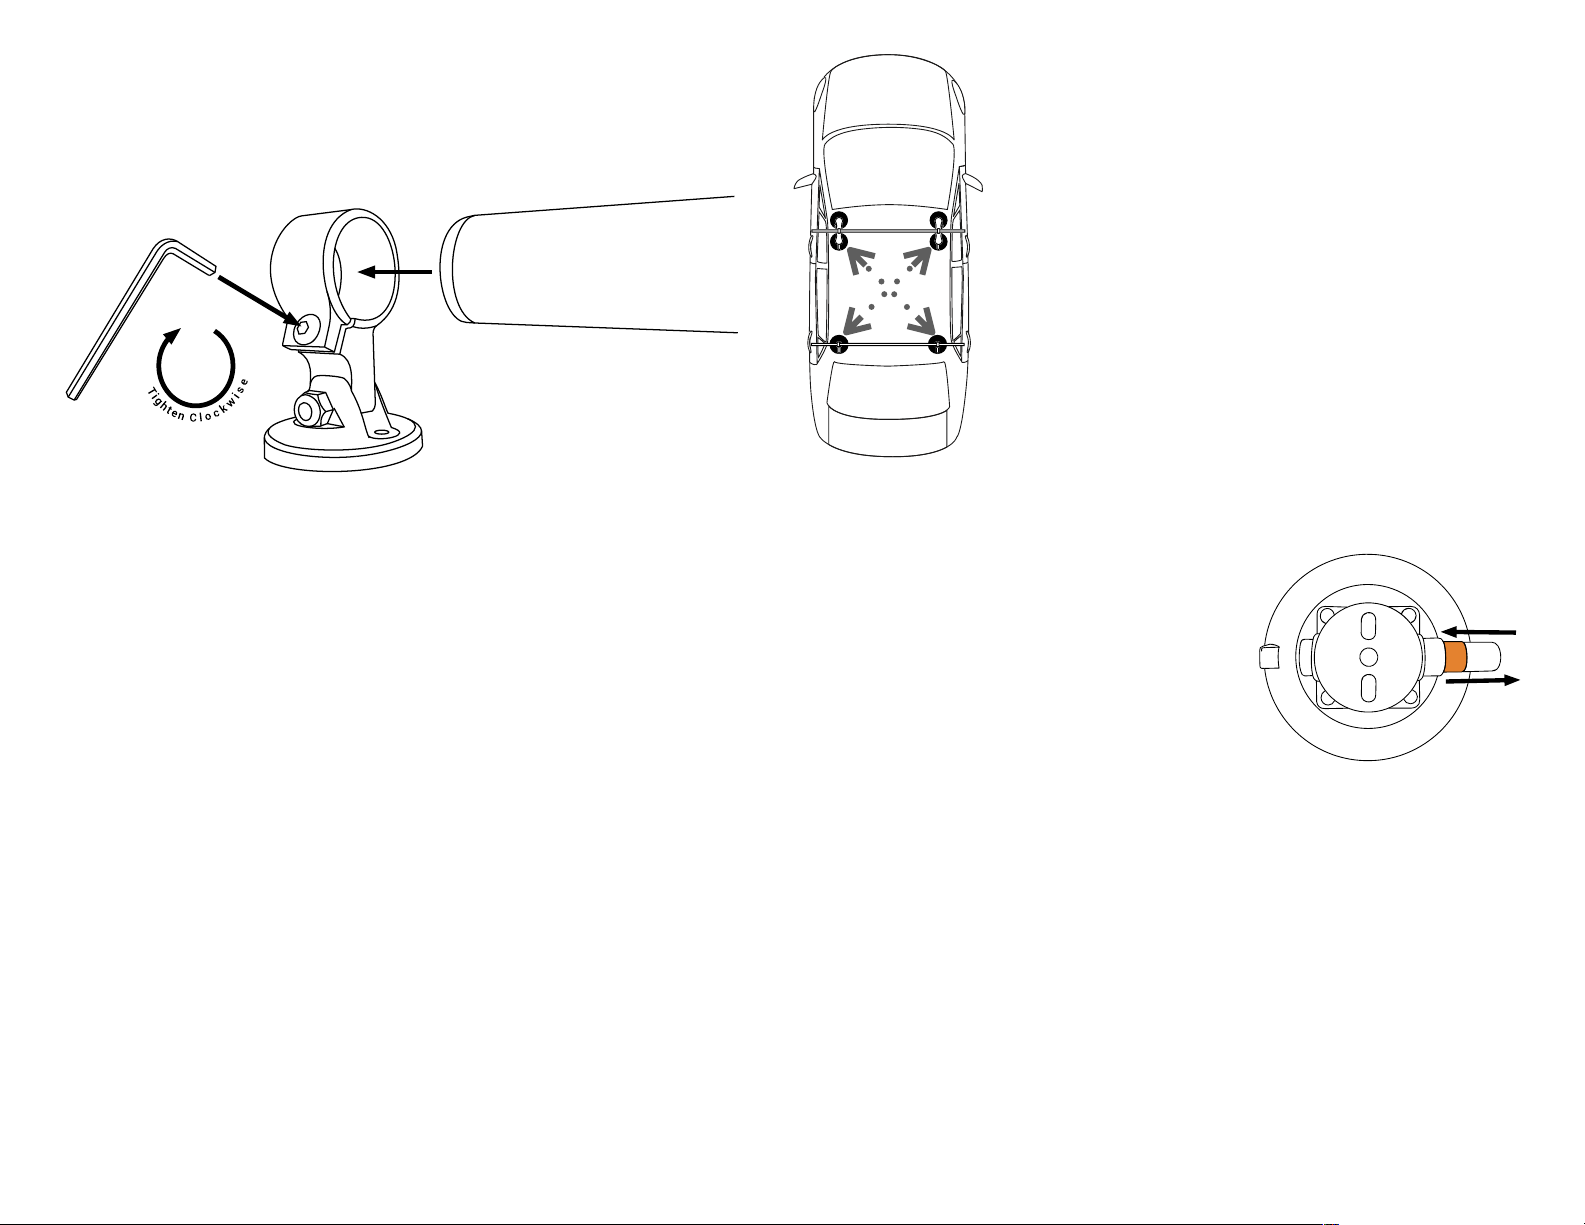
supplied with the rack, tighten the clamp screw on each front bar
mount. Your front cross bar should now be custom-fit to your vehicle;
you can use it or remove it from the car (see “To Remove your Rack”
below).
Repeat this process for the rear bar mounts and cross bar, mounting
them just in front of the rear window.
Where to Attach
Monkey Bars are specifically designed to attach to a
car’s roof top. Ideally, the vacuum mounts on your
rack should be attached in the front and back corners
of your car’s roof, where the roof is most solid. The
metal in the middle of some car roofs may not be
sturdy enough to support the weight of your rack and
whatever you may be transporting.
Each vacuum mount on your SeaSucker rack should
attach to clean, unobstructed metal or glass surface.
The vacuum pads will not attach over a seam or
other surface incongruity. Attaching your rack to a
sunroof is done at your own risk and we recommend
that you test the strength and suitability of your
sunroof first.
To Attach Your Monkey Bars (Clean, Wet, and Pump!)
Clean the surface you’re going to mount the rack to. Dust and dirt
will affect your SeaSuckers’ ability to
create and hold vacuum. Remove the
protective cover from each SeaSucker
and inspect the rubber vacuum cup for
damage or dirt. Do not use your rack if
there is any visible damage to the
vacuum cup. If the vacuum cup is dirty,
clean it with a mild soap and water
solution and a soft cloth or sponge.
Moisten the bottom edge of each vacuum pad or the mounting
surface with water - do not use cleaners, lubricants or other liquids;
just water. Press the vacuum pad against the mounting surface to
make a full seal; you may need to press firmly down on the body of
the rack to ensure that the vacuum pad is fully connecting with the
mounting surface when pumping. Pump the SeaSucker repeatedly
until the plunger does not spring back and the indicator band is
hidden inside the pump cylinder.
Repeat this for all SeaSuckers on the rack. If the plunger won’t stay
seated in the pump cylinder or continues to extend out immediately
after pumping, you may need to clean the mounting surface or the
vacuum pad or pump, perform basic maintenance on the vacuum
pad or pump, or move the vacuum cup to a more suitable mounting
position. Do not use your rack without correcting the problem!
Weather Conditions
SeaSuckers can be used in cold weather. The vacuum pads will
stiffen in colder temperatures. Because the vacuum pads need to
conform the the mounting surface when you attach them, it is highly
recommended that you store your rack at room temperature (60F+)
prior to use. You will not be able to properly attach the vacuum
mounts if they are too cold. Mounting surfaces must be free of ice,
snow, dirt and any other potential obstruction to making a full
vacuum seal.
Rain and wet weather should not affect the performance of your
SeaSucker rack. If rain or water gets inside any of your vacuum
pumps, pull the plunger out and dry the inside of the pump cylinder
with a paper towel. Re-lube the plunger gasket if necessary and
reinsert the plunger in the pump cylinder. Screws or other metal
parts that show signs of rusting or corrosion should be replaced.
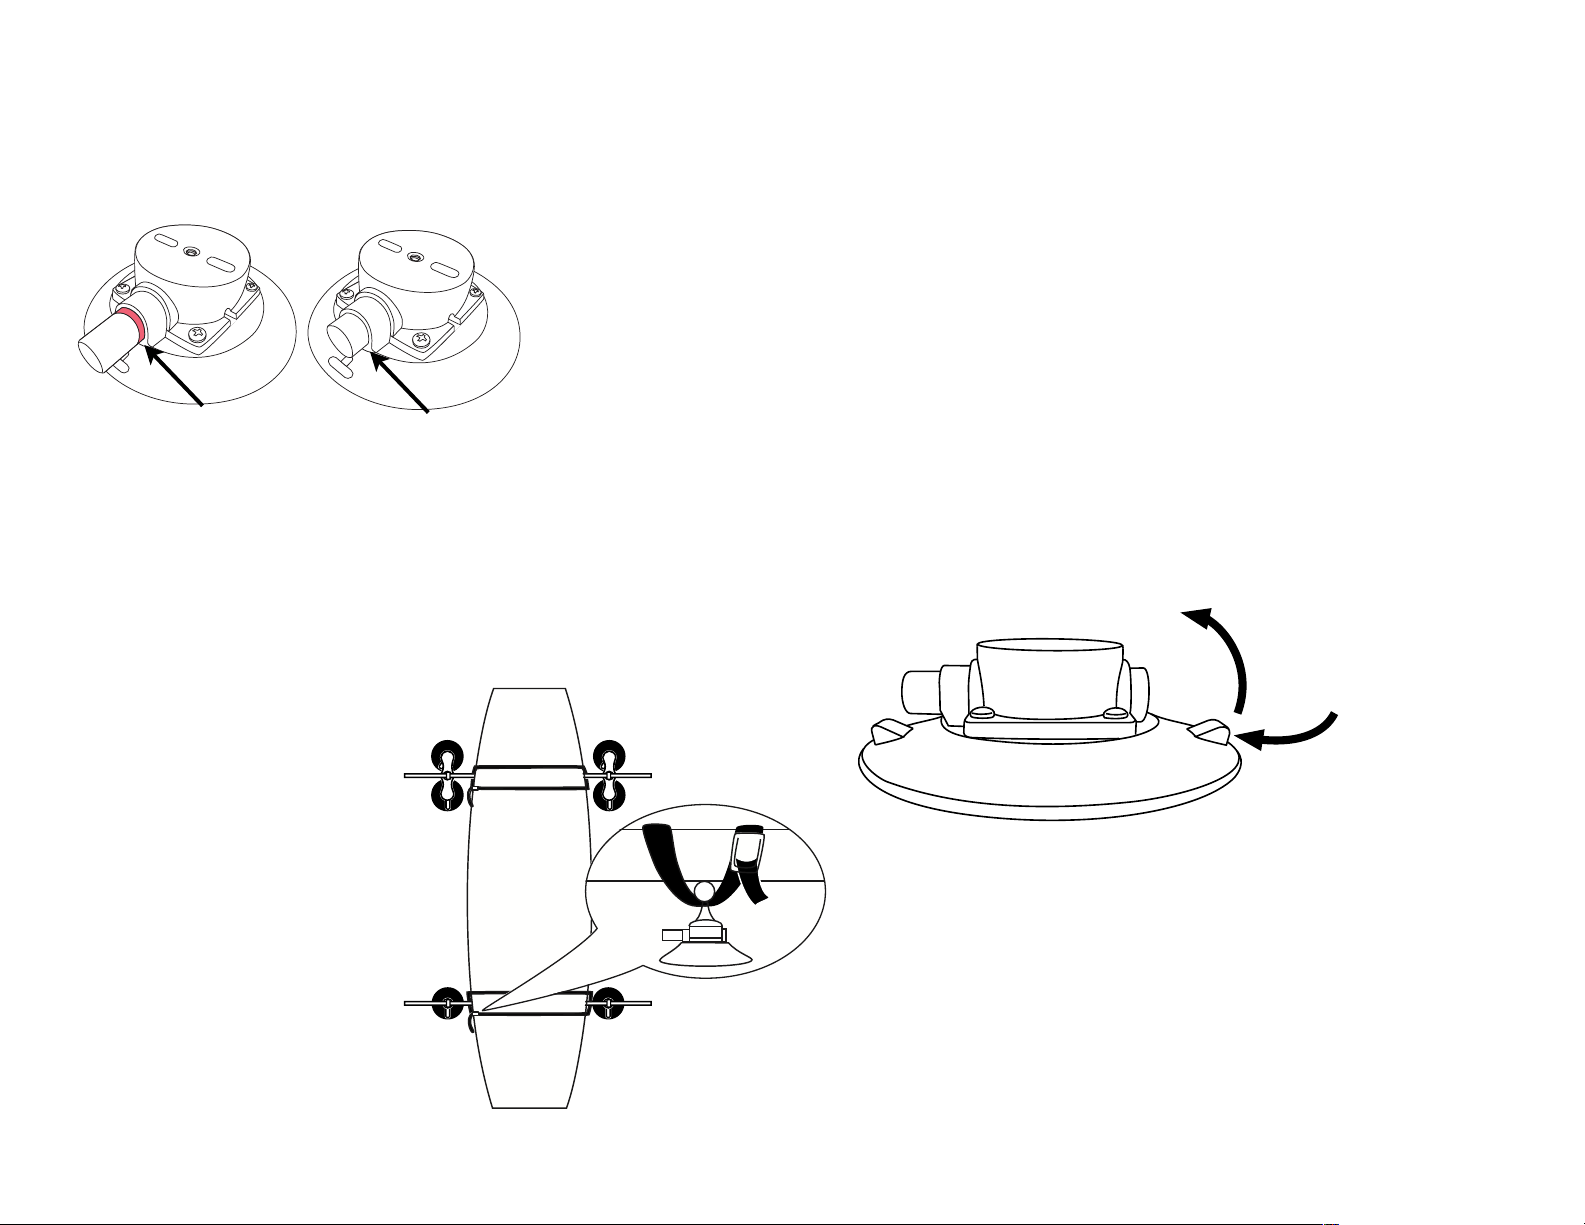
To Remove Your Rack: Lift and Cover!
With your fingertip, use one of the tabs on the SeaSucker’s vacuum
pad to lift the edge of each pad up from the mounting surface. This
will break the vacuum seal.
Always put the
protective
covers back on
y o u r
S e a S u c k e r s
when the rack is
not attached to
y o u r c a r t o
protect the
rubber of the
vacuum pad from getting nicked or cut and to help the vacuum pad
maintain its original shape. Make sure the vacuum pad is fully
seated in the protective cover before storing it. The edge of the
vacuum pad could be damaged or deformed if the protective cover
isn’t isn’t properly installed. If you lose or damage your protective
covers, store your rack so that the vacuum cups do not come into
contact with any object or surface.
Always check your straps after removing your rack. If you see signs
of wear, fraying, or tearing, replace them before using your rack
again.
Check for the Indicator Band During Use
SeaSucker vacuum mounts are not intended to be permanent
fixtures on your car - they will lose vacuum over time. When your
vacuum cup loses vacuum, it will warn you by extending the pump’s
plunger, exposing an orange band. You are required to monitor your
v a c u u m m o u n t s
during use. When
getting in or out of
your car, check to
see if the indicator
band is visible on any
of the rack’s vacuum
cups. If you see the
band, simply pump
the SeaSucker as
described above.
If the indicator band appears less than four (4) hours after being
pumped to full strength, either cleaning, maintenance or repositioning
may be required. If your rack is mounted on a scratched surface,
move the rack to a more suitable position. If the mounting surface or
vacuum cup is dirty, clean it. If these steps don’t stop the vacuum
mount from losing vacuum prematurely, discontinue use until the
problem is resolved. Replace the suspect vacuum cup with the spare
that came with your rack if
necessary - additional
replacement parts can b e
purchased in the Replacement
Parts section of our on-line
store.
Strapping Cargo to You
Monkey Bars
One of the great things about
owning Monkey Bars is that you
can carrying almost anything you
can strap to the bars. To secure
cargo, such as surfboards,
paddle boards, ladders, lumber,
PVC pipes, or taxidermied
alligators, remember this simple
mantra: OVER the cargo,
UNDER the bars.
Indicator band exposed:
time to re-pump!
Full power!

Care and Maintenance
To get the most out of your SeaSucker rack, inspect it regularly and
store it with the vacuum mounts’ protective covers on. Check that all
screws are securely tightened, including the screws attaching the
vacuum pads to the SeaSucker housing, the screws attaching the
SeaSuckers to the rack platform or bars.
Clean the vacuum cups before each use with a sponge or soft cloth,
mild dish soap and water. Do not use harsh solvents or abrasive
cleaning pads. Make sure there is no dirt or debris on the sealing
edge (the bottom outside edge) of the vacuum pad. Inspect the
sealing edge for stiffness, cracks, roughness, or cuts – a cut will
allow air to leak under the cup and will prevent your SeaSucker from
holding vacuum. A damaged vacuum pad should be replaced. One
replacement SeaSucker comes with your rack. Additional
replacement SeaSuckers, vacuum pads, and vacuum pumps can be
purchased on-line at"www.seasucker.com"in the Replacement Parts
section of our on-line store.
The vacuum pump should be cleaned regularly. To clean the pump,
pull the plunger straight out of the pump cylinder. Clean the inside of
the cylinder with dish soap and a soft cloth or paper towel. Make sure
to dry out the cylinder – water left in the cylinder can cause the pump
to make a popping noise when pumped and may interfere with the
check-valve function of the pump.
The plunger should be wiped clean and the black rubber gasket at
the tip of the plunger should be re-lubed with a thin layer of silicone-
based gel lubricant, such as the Lube Tube that came with your rack.
Additional tubes of Lube Tube can be found on-line in the
Replacement Parts section at"www.seasucker.com. After cleaning,
push the plunger back into the cylinder and pump it several times to
seat it properly and distribute the lubricant.
Repair and Replacement
Products with non-warrantable damage or products that are no
longer within the warranty period may still be repaired or replaced at
your expense. Discounted replacement parts, including vacuum
pads, pumps, fork mounts and hardware, can be found on-line in the
Replacement Parts section of SeaSucker’s on-line store at
www.seasucker.com.
Warranty
SeaSucker offers a lifetime, non-transferable warranty covering
defects in materials and workmanship. Defective products can be
returned to SeaSucker for replacement or repair (at SeaSucker’s
option). Warranty claims must be accompanied by a sales receipt or
other proof of purchase document. The cost of transportation to and
from SeaSucker for the repair or replacement of any defective part or
accessory is not covered by this warranty and is to be paid by the
owner. This warranty does not apply to damage or failure resulting
from normal use, routine wear and tear, lack of maintenance, user
error, alteration of the product, accidents, abuse, or neglect. This
warranty is given in lieu of all other written or oral warranties,
express or implied, including without limitation implied warranties of
merchantability and fitness for a particular purpose, and are limited
to the duration and specifications of this warranty. SeaSucker’s
liability for any damages relating to any allegedly defective product,
whether arising from the use or the inability to use the product and
whether claimed under tort, contract or any other legal theory, shall
be limited to the actual price paid for such product and shall in no
event include loss of use, loss of time, incidental, consequential,
special, or indirect damages of any kind, even if SeaSucker is aware
of the possibility of such damages, to the full extent as such may be
disclaimed by law.
Problem
What Might Be Wrong
How To Fix It
Slow
Leakage
Dry mounting surface
or vacuum pad
Moisten the mounting surface
or the vacuum pad
Nicks or cuts on vacuum pad
Replace the vacuum pad
Dirt in pump
Clean and re-lube the plunger
and pump cylinder
Dry pump
Re-lube the plunger seal
Dirt on vacuum pad
Clean the vacuum pad
Dirty or uneven
mounting surface
Clean the mounting surface or
move to a more suitable spot
Severe
Leakage
Dirty or uneven
mounting surface
Clean the mounting surface or
move to a more suitable spot
Damaged pump
Replace the vacuum pump
Nicks or cuts on vacuum pad
Replace the vacuum pad
Jammed or
Sluggish Pump
Obstructed valve stem
Remove the obstruction; clean
and re-lube the pump
Dry pump
Re-lube the plunger seal
Dirt in pump
Clean and re-lube the plunger
and pump cylinder
TROUBLESHOOTING GUIDE
Other SeaSucker Automobile Accessories manuals


Popular Automobile Accessories manuals by other brands


ULTIMATE SPEED
ULTIMATE SPEED 279746 Assembly and Safety Advice

SSV Works
SSV Works DF-F65 manual

ULTIMATE SPEED
ULTIMATE SPEED CARBON Assembly and Safety Advice

Witter
Witter F174 Fitting instructions

WeatherTech
WeatherTech No-Drill installation instructions

TAUBENREUTHER
TAUBENREUTHER 1-336050 Installation instruction