Seat Sound System 1.1 User manual

Inglés 1SL012095J (01.12)
Sound System 1.1
Owner’s manual
Portada SoundSystem_1.1.indd 3 22/02/12 16:19

Foreword
This Instruction Manual and its corresponding supplements should be read carefully to familiarise yourself
with your vehicle.
Besides the regular care and maintenance of the vehicle, its correct handling will help preserve its value.
For safety reasons, note the information concerning accessories, modifications and part replacements.
If selling the vehicle, give all of the on-board documentation to the new owner, as it should be kept with the
vehicle.


Table of Contents
General information . . . . . . . . . . . . . . . . 4
Important Information . . . . . . . . . . . . . . 5
Introduction . . . . . . . . . . . . . . . . . . . . . . . . . . 6
Before using the unit for the first time . . . . . . 6
Safety notes . . . . . . . . . . . . . . . . . . . . . . . . . . . . . . 6
Unit overview . . . . . . . . . . . . . . . . . . . . . . . . . . . . . 8
General operating information . . . . . . . . . . . . . 10
Audio mode . . . . . . . . . . . . . . . . . . . . . . . . . . . 12
Radio mode . . . . . . . . . . . . . . . . . . . . . . . . . . . . . . . 12
TP (Traffic Program) function . . . . . . . . . . . . . . . 17
Media mode . . . . . . . . . . . . . . . . . . . . . . . . . . . . . . 19
Connecting a portable navigator . . . . . . . . . . . 27
Settings menu . . . . . . . . . . . . . . . . . . . . . . . . 29
Sound settings (SOUND) . . . . . . . . . . . . . . . . . . . 29
System and function settings (SETUP) . . . . . . 30
Abbreviations . . . . . . . . . . . . . . . . . . . . . . . . 32
Abbreviations . . . . . . . . . . . . . . . . . . . . . . . . . . . . . 32
Index . . . . . . . . . . . . . . . . . . . . . . . . . . . . . . . . . . . 33
3Table of Contents

4General information
General information
This manual contains information, recommendations, advice and warnings
related to your radio system. The other publications in the vehicle documen-
tation contain further information of which you should be aware for your
own safety and for that of your passengers.
Ensure that the onboard documentation is kept in the vehicle at all times.
This is especially important when lending or selling the vehicle to another
person.
This manual contains a description of the equipment supplied with the ve-
hicle at the time of press. Some of the units described herein will not be
available until a later date or is only available in certain markets.
The illustrations are intended as a general guide and may vary from the
equipment fitted in your vehicle in some details.
Directions and positions of components (e.g. right, left, front, rear) are al-
ways relative to the direction of travel of the vehicle unless otherwise sta-
ted.
The equipment marked with an asterisk* is only supplied as standard in
certain model versions, is optional in others or is only available in specific
countries.
Registered trademarks are marked ®. The absence of this symbol does
not constitute a waiver of the rights concerning any proprietary name.
Indicates that the section is continued on the following page.
Indicates the end of a section.
WARNING
Texts preceded by this symbol contain information on safety. They warn
you about possible dangers of accident or injury.
®
CAUTION
Texts with this symbol draw your attention to potential sources of damage
to your vehicle.
For the sake of the environment
Texts preceded by this symbol contain relevant information concerning envi-
ronmental protection.
Note
Texts preceded by this symbol contain additional information.

5Important Information
Important Information
Important Information. Traffic safety
Travelling on today's roads requires the driver's full attention at all times.
Only operate the radio and its various functions when the traffic situation
really permits this.
WARNING
●Before starting the trip, you should familiarise yourself with the dif-
ferent radio functions.
●High audio volume may represent a danger to you and to others.
●Adjust the volume in a way that you can distinguish surrounding
noise, for example, horns and sirens, etc.
●Radio settings should be made when the vehicle is stopped or by a
passenger.
Note
If the radio is lost with the code, go to a SEAT Dealer, who will help you.

6Introduction
Introduction
Before using the unit for the first time
Before using the unit for the first time, carry out the following steps. This
will enable you to use the unit safely and make full use of the functions it
provides:
¥Take the basic safety notes into account ⇒ page 6.
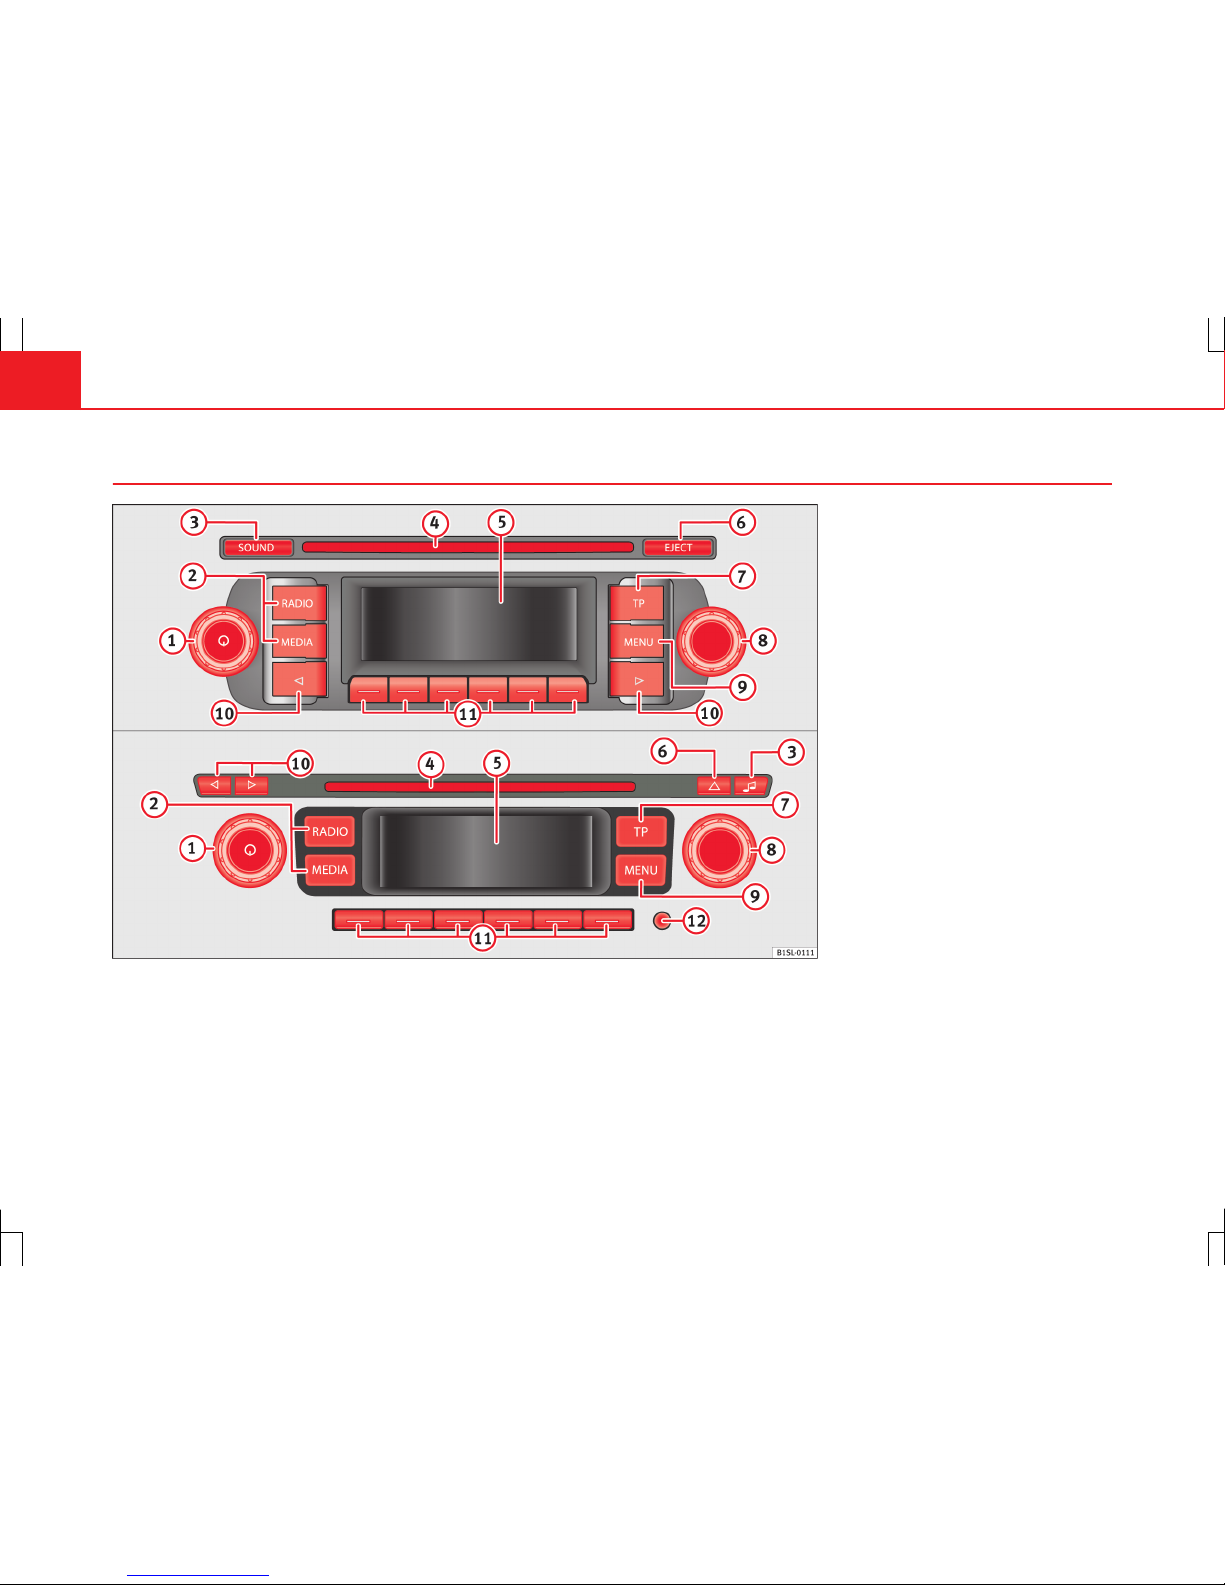
¥Familiarise yourself with the unit overview ⇒ page 8.
¥Use suitable data media for Media mode ⇒ page 19.
Safety notes
WARNING
Any distraction can lead to an accident, with the subsequent risk of in-
jury. Operating the radio system could distract you from the traffic.
●You should always drive with due care and attention.
●Select volume settings that allow you to easily hear signals from out-
side the vehicle at all times (e.g. emergency service sirens).
●If you set the volume too high, you may suffer damage to your ears.
This also applies if your ears are made to undergo loud noises during a
short period of time.
WARNING
The volume level may suddenly change when you switch audio source or
connect a new audio source.
●Reduce the base volume before switching audio source or connecting
a new audio source.
WARNING
The connection, introduction or removal of data media whilst driving may
distract you from the traffic, causing an accident.
WARNING
Connecting leads for external devices may obstruct the driver.
●Arrange the connecting leads so that they do not obstruct the driver.
WARNING
External devices that are placed loose in the vehicle or not properly se-
cured could be flung through the interior of the vehicle during a sudden
driving or braking manoeuvre, or in the event of an accident and cause
damage or injury.
●Never fit external units on the doors, windscreen, on or near the area
marked with the word “AIRBAG” on the steering wheel, the dash panel,
seat backrests or between these areas and the vehicle occupants. In the
case of an accident, external units can cause serious injury, particularly
when the airbags inflate.

7Introduction
WARNING
Opening a CD player's housing may lead to injuries from invisible laser
radiation.
●Only have CD players repaired by a Specialised workshop.
CAUTION
●When inserting and removing CDs, always hold them at right angles to
the front of the unit.
●Inserting a second CD while a CD is already inserted or being ejected
may damage the CD player. Always wait until the data medium has been
fully ejected!
CAUTION
Any foreign objects attached to a data medium and non-round data media
can damage the CD player.
●Only use standard 12 cm CDs!
–Do not stick stickers or other items to the data media. Stickers may
peel off and damage the drive.
–Do not use printable data media. Covers and stickers may peel off
and damage the drive.
–Do not insert 8 cm "single" CDs or non-round CDs or DVDs (shaped
CDs).
–Do not insert DVD-Plus discs, Dual Discs or Flip Discs, as these are
thicker than normal CDs.
CAUTION
If the volume is too high or the sound is distorted, the vehicle speakers may
be damaged.

8Introduction
Unit overview
Fig. 1 Overview of the controls.

9Introduction
Rotary/push knob
–Press ⇒ page 10 to switch on or off.
–Turn ⇒ page 10 to adjust the volume.
Unit buttons: Press to activate a range of functions.
–RADIO : Switch to radio mode. In radio mode, select the frequency
band and change the station display ⇒ page 12.
–MEDIA : change to Media mode. Select another media source in Me-
dia mode ⇒ page 19.
SOUND or : Press ⇒ page 29 to open the sound settings.
CD slot: To insert or extract CDs ⇒ page 19.
Screen: the brightness can be adjusted ⇒ page 29.
EJECT or : Press ⇒ page 19 to eject the CD.
TP : Press to switch the traffic news function (Traffic Programme) on or
off ⇒ page 17.
Setting knob: its function depends on the particular mode it is in at the
time (rotary/push knob ⇒ page 10).
–Radio mode: Turn to tune to a station manually and press to start or
stop the scan function (Scan) ⇒ page 12.
–Media mode: Turn to tune to a station manually and press to start or
stop the scan function (Scan) ⇒ page 19.
–Setting menus: turn ⇒ page 29 to modify a setting.
MENU : Press to display additional functions in the present functional
area (Radio, Media etc.). In the additional functions view press the
function key SET to view the system and function settings (SETUP)
⇒ page 29.
and Arrows:
–Radio mode: press briefly to change station ⇒ page 12.
–Media mode: Press briefly to change track or press and hold for fast
reverse or fast forward ⇒ page 19.
1
2
3
4
5
6
7
8
9
10
Function buttons: to activate push them briefly On the lower line of the
screen, the function assigned to each function button is shown in the
corresponding position ⇒ page 10.
AUX IN multimedia socket: to connect an external audio source
⇒ page 19.
11
12

10 Introduction
General operating information
Introduction
Additional displays
Depending on the vehicle specification, changes to air conditioner settings
or information on factory-fitted driver assistance systems may be temporari-
ly displayed on the screen. These displays disappear automatically when
they are no longer required.
All displays appear only after a complete restart of the radio system.
Additional information and warnings:
●Safety notes ⇒ page 6
●Unit overview ⇒ page 8
Note
In order to operate the unit you only need to push the button lightly.
Note
Due to legal requirements specific to each country, when certain speeds are
exceeded some functions are no longer available.
Note
Using a mobile telephone inside the vehicle can result in noise in the
speakers.
Note
In some vehicles equipped with a parking distance warning system, the vol-
ume of the audio source is automatically lowered when reverse gear is en-
gaged.
Rotary/push knobs, unit and function buttons
Overview
●Rotary/push knobs.
●Labelled unit buttons (hard keys).
●Function buttons (soft keys).
Rotary/push knobs
The left-hand rotary/push knob ⇒ fig. 1 1 is referred to as the volume
control or the on/off switch.
The right-hand rotary/push knob 8 is referred to as the setting knob.
Unit buttons and function buttons
The labelled buttons on the unit are referred to as “unit buttons” and are
pictured as a button symbol with blue content, e.g. the MEDIA unit button
⇒ fig. 1 2.
There are six unlabelled unit buttons below the screen ⇒ fig. 1 11 . These
unit buttons are referred to as “function buttons” as their functions change
depending on the current operating state.
In the bottom line of the screen, the function assigned to each function but-
ton is shown in the corresponding position (for example ⇒ fig. 6).
Switch on or off
●Push the rotary/push knob ⇒ fig. 1 1 briefly to manually switch the
unit on or off.
When the unit is switched on the system starts up. The last audio source
used is played at the last selected volume setting, provided this does not
exceed the preselected “switch-on volume” ( VOL ⇒ page 30).

11Introduction
Depending on the unit and the country, on turning the engine off or remov-
ing the vehicle key the unit will switch itself off automatically. In turning the
unit back on, it will turn off automatically for approximately 30 minutes
(timeout).
Energy management
If, when the ignition is switched off and the unit switched on, the battery
voltage falls below the minimum onboard power supply voltage, there is an
audible warning and LOW BATTERY appears. The unit should be switched
off.
If the battery voltage level continues to fall, RADIO OFF is briefly displayed
and the radio will switch itself off automatically.
Anti-theft code
The numerical code of the anti-theft coding system is stored once it has
been entered in the vehicle for the first time (radio convenience coding).
When it is necessary to manually deactivate the anti-theft code, for example
when installing the unit in another vehicle, please visit an official SEAT deal-
er.
If it is just the battery that has been disconnected from the vehicle, the vehi-
cle must be started before turning the unit back on.
Adjusting the base volume
Function Action
Increase the vol-
ume.
Turn the volume control ⇒ fig. 1 1 clockwise or press
the button on the multifunction steering wheel ⇒ Book-
let Instruction manual, chapter Vehicle diagram.
Lower the vol-
ume.
Turn the volume control anti-clockwise or press the
button on the multifunction steering wheel.
Changes to the volume are indicated by a “bar” on the screen.
At “0” the unit is muted (display: ) and any media source currently being
played will be stopped.
It is possible to preset certain volume settings and adjustments
⇒ page 30.
Note
If the basic playback volume of an audio source has been increased sub-
stantially, lower the volume before changing to another audio source.

12 Audio mode
Audio mode
Radio mode
Introduction
The various versions of the radio system will be distributed depending on
the country and the unit. In the unit overview the possible variations of the
unit are described ⇒ page 8.
Additional information and warnings:
●Safety notes ⇒ page 6
●Unit overview ⇒ page 8
●Basic information on use ⇒ page 10
Note
Please bear in mind that in car parks, tunnels, areas with high buildings or
mountains the radio signal can be impaired.
Note
Foil or metal-coated stickers attached to the windows may affect reception
on vehicles with a window aerial.
RADIO main menu
Fig. 2 RADIO main
menu: Selecting a
memory level and fre-
quency band.
Fig. 3 RADIO main
menu: Station buttons
displayed.
●Press the RADIO button ⇒ fig. 1 in order to start Radio mode.
After you switch to Radio mode, the available frequency bands (FM, AM) are
initially displayed in the bottom line of the screen ⇒ fig. 2. After roughly 5
seconds, they are replaced by the “station buttons” ⇒ fig. 3. Stations can
be stored to the station buttons ⇒ page 15.
The station that is playing will appear in the centre of the screen. For sta-
tions with RDS, the name of the station will appear instead of its frequency
if reception is good enough, for example RADIO 1.

13Audio mode
RDS and automatic station tracking
RDS is a radio data service which makes it possible to receive additional
services such as the display of station names, automatic station tracking
and the TP function (Traffic Program ⇒ page 17).
With automatic station tracking, when the vehicle is in motion the station
always changes to the frequency with the best reception in that moment. If
the reception is poor, the unit may be muted for a short time as it searches
for alternative frequencies (AF).
RDS does not exist everywhere nor is it available for all stations.
Depending on the country and the unit, it is possible that the RDS and the
alternative frequencies (AF) are deactivated ⇒ page 30.
Changing frequency band
The currently selected frequency band (FM or AM) is indicated above the
station display.
●In Radio mode, briefly press the RADIO unit button to display the func-
tion buttons ⇒ fig. 1 FM1 , FM2 , AM1 and AM2 ⇒ fig. 2.
●Press one of the FM or AM function buttons to switch to the FM or AM
frequency band.
●ALTERNATIVELY: Press the unit button several times RADIO in order to
switch between the various function buttons at the bottom of the screen.
Changing stations
Fig. 4 Changing sta-
tions with the arrow
buttons to the next
available station.
Fig. 5 Changing sta-
tions with the arrow
buttons with selection
of stored stations only.
Depending on the setting selected for the search mode (SEEK MODE), the
unit either switches between all available stations or stored stations only
⇒ page 30.
●Briefly press ⇒ fig. 1 10 or .

14 Audio mode
Status Result
Radio mode with ... displayed in
the centre line of the screen
⇒ fig. 4.
Switches to the next available station
on the current frequency band.
Radio mode with ... displayed in
the bottom line of the screen
⇒ fig. 5.
Switches to the next stored station
⇒ page 15.
Radio mode with ... displayed in
the centre line of the screen and TP
indication.
Switches to the next available TP traf-
fic news station ⇒ page 17.
Tuning to a station frequency manually
●Select the desired frequency band ⇒ page 12.
●Turn the setting knob ⇒ fig. 1 8 until the desired station frequency
(e.g. 89.9 MHz) is displayed on the screen.
Scan function (SCN)
Fig. 6 MENU display
with additional func-
tions in Radio mode:
Scan function (SCN),
Autostore (AS) and
Setup (SET).
Starting and stopping the scan function
●Select the desired frequency band in Radio mode ⇒ page 12.
●Press the setting knob ⇒ fig. 1 8 to start the scan function.
●ALTERNATIVELY: press the MENU unit button and start the scan function
with the SCN function button ⇒ fig. 6.
The scan function commences with the following available station. All avail-
able stations in the selected frequency band will play for approximately 10
seconds. The screen displays the additional functions for Radio mode and
the SCN button is underlined.
●Press the setting knob 8 or the underlined SCN function button to stop
the scan function of the tuned station.
Special case: SEEK MODE PRESET after the scan function has finished
Even if the setting for changing stations is the selection of stored stations
only (SEEK MODE PRESET ⇒ fig. 26), after the scan function stops, initially
all available stations will play by ⇒ fig. 4 pressing the arrow buttons.
Activation of the stored stations only with the arrow buttons is only possi-
ble after switching to a station using a station button ⇒ fig. 5.

15Audio mode
Memory levels and displaying of station buttons
Fig. 7 Select the fre-
quency band and
memory level.
Fig. 8 Stations but-
tons for the FM1 mem-
ory level.
Each frequency band (FM and AM) has two memory levels (FM1, FM2 and
AM1, AM2) each with six station buttons.
Changing memory level
●In Radio mode briefly press the RADIO ⇒ fig. 1 unit button and it will
show the frequency bands and memory levels available for approximately
five seconds ⇒ fig. 7.
●Press the RADIO unit button once again to change to the next memory
level, for example FM2 ⇒ fig. 7.
●ALTERNATIVELY: Activate the frequency band and the memory level by
pressing a function button ( FM2 , AM1 or AM2 ).
After roughly five seconds the station buttons will be visible ⇒ fig. 8.
Station buttons 1 to 6
Station buttons 7 to 12
Station buttons 1 to 6
Station buttons 7 to 12
You can assign stations to each station button of a memory level either
manually or automatically ⇒ page 15.
Storing stations on the station buttons
Fig. 9 Station stored
to station button 2 in
the FM1 memory level.
Fig. 10 MENU display
with additional func-
tions in Radio mode:
Scan function (SCN),
Autostore (AS) and
Setup (SET).
FM1:
FM2:
AM1:
AM2:

16 Audio mode
When storing a station to a station button, any station already stored to the
same station button in the same memory level will be overwritten.
Manually assigning station buttons individually
●Select the frequency band and memory level.
●Select the station.
●Press and hold the desired station button until you hear a tone.
●The station currently playing (RADIO 1) will then be stored to that station
button.
The station button to which the station currently playing is assigned is dis-
played underlined on the screen ⇒ fig. 9.
Storing stations automatically with Autostore (AS)
The Autostore function automatically stores the stations with the strongest
reception at the current moment to the six station buttons in the currently
selected memory level.
●Select the frequency band and memory level.
●Press the MENU ⇒ fig. 1 unit button to open the additional functions
⇒ fig. 10.
●Press and hold the AS function button until STORE appears.
●This procedure can take some seconds. When the stations have been
stored, STORE disappears from the display.
Activating stored stations
Fig. 11 Radio mode
display: changing sta-
tions with the arrow
buttons with selection
of stored stations only.
●Select the frequency band and memory level in which the desired sta-
tion is stored.
●Briefly press the station button to which the desired station is stored.
Depending on the settings, it is possible to switch between stored stations
of a frequency band with the arrow buttons ⇒ fig. 1 10 and (SEEK
MODE PRESET ⇒ fig. 26).
It is only possible to play a stored station if it can be received at your current
location.

17Audio mode
TP (Traffic Program) function
Introduction
The TP function is an RDS radio data service.
RDS is not available in all areas, and depending on the country and equip-
ment, it may be deactivated ⇒ page 30.
While traffic news monitoring is on (display: TP), traffic announcements will
interrupt the current Audio mode.
On the AM frequency band, traffic news monitoring is not possible.
Additional information and warnings:
●Safety notes ⇒ page 6
●Unit overview ⇒ page 8
●Basic information on use ⇒ page 10
●Radio mode ⇒ page 12
Monitoring traffic news stations using the TP function
Fig. 12 TP function
active.
Traffic news monitoring with the TP function is only possible if the TP station
is available.
Some stations that do not have their own traffic news support the TP func-
tion by broadcasting traffic announcements from other stations (EON). Traf-
fic announcements broadcast by the linked traffic stations interrupt the cur-
rent audio mode.
Switching the TP function on and off
●Press the unit button TP ⇒ fig. 1 7.
If the station that is currently selected in FM mode does not support the TP
function, the unit will automatically search for a TP station (display: TP
SEEK).
●Press the TP unit button to switch the TP function off again.
When in areas without TP coverage the TP function is activated, and search
is begun for a traffic news station, ending in the failure to find a station. The
search then returns to the station to which it was originally tuned. The TP
function will remain on (display: No TP). It is necessary to deactivate the TP
function, otherwise no stations will be found in the subsequent search us-
ing the arrow buttons.
TP function activated
While traffic news monitoring is switched on and enabled, TP is displayed
⇒ fig. 12.
In radio mode, the selected station must support the TP function. If a sta-
tion selected via the station buttons or manual tuning does not support the
TP function, traffic news monitoring is not possible (display: NO TP).
If the currently selected traffic news station can no longer be received,
NO TP is also displayed and you will need to start a manual station search
using the arrow buttons ⇒ fig. 1 10 and ⇒ page 12.
During a station search with the arrow buttons or the scan function (SCN),
the unit will only tune to stations that support the TP function.

18 Audio mode
In Media mode or while the unit is muted, the unit will automatically tune to
a traffic news station in the background, provided the TP station available
has a good signal. This operation may take some time depending on the sit-
uation.
Incoming traffic announcement (INFO)
An incoming traffic announcement (display: INFO) will interrupt the active
audio mode.
●If required, the radio is switched to the traffic news station (EON) for the
duration of the traffic announcement.
●The Media mode will be paused and the volume will be adjusted to the
preset level.
●During the announcement, the announcement volume can be adjusted
with the volume control ⇒ fig. 1 1. The adjusted setting will be applied
to subsequent announcements.
●Interruption by a traffic announcement can be stopped by pressing the
TP unit button. The TP function remains active and the next traffic an-
nouncement will again interrupt the current audio mode.

19Audio mode
Media mode
Introduction
“Media sources” are audio sources containing audio files on various differ-
ent data media (e.g. CD, external MP3 player). These audio files can be
played by the respective data media or by the radio input sockets.
Additional information and warnings:
●Safety notes ⇒ page 6
●Unit overview ⇒ page 8
●Basic information on use ⇒ page 10
Requirements for media sources and audio files
Factory-fitted CD players conform to safety class 1 according to
DIN IEC 76 (CO) 6/ VDE 0837.
The unit only accepts 12 cm standard CDs.
Media source Requirements for playing in the unit
Audio CDs (up to 80 min). – CD Digital Audio specification .
CD-ROM, CD-R, CD-RW up
to max. 700 MB (megabyte)
according to ISO 9660 or on
the Joliet data system.
MP3 files (.mp3) with bitrates of between
48 and 320 kbit/s or with variable bitrates
– Playlists in formats PLS and M3U
– Playlists no larger than 20 KB and con-
taining no more than 250 links.
– Max. 32 playlists on a data medium.
– File names no longer than 64 characters.
– Folder structures with a maximum of ten
levels.
– Max.120 folders and max. 500 files on a
data medium.
AUX: External audio source. – A 3.5 mm jack plug can be used for audio
output ⇒ page 25.
Restrictions and notes
Contamination, exposure to high temperatures and mechanical damage
may render a data medium unusable. Observe the manufacturer's instruc-
tions on the data medium.
Variations in the quality of data media produced by different manufacturers
may lead to problems during playback.
Observe copyright laws!
CDs recorded in UDF or Direct CD format cannot be played. Under Windows
Vista® ensure that the correct format is selected.
The unit may be unable to read individual tracks or the entire data medium
due to the data medium configuration or the devices and programs used for
recording. Information can be found on the internet regarding the best ways
to create audio files and data media (compression rate, ID3 tag etc.).
Due to the larger quantity of data, the unit takes longer to read a data medi-
um containing compressed audio files (MP3) than a “normal” audio CD.
Table of contents
Other Seat Car Stereo System manuals
Popular Car Stereo System manuals by other brands

Pioneer
Pioneer CDX-FM1287 - CD Changer Operation manual

AudioBahn
AudioBahn ABD39T operating instructions

Blaupunkt
Blaupunkt John Deere MP36 Operating and installation instructions

Ground Zero
Ground Zero GZCM 6.5SPL owner's manual

OWC
OWC PLATINUM Series installation guide

Pioneer
Pioneer DXT-2266UB owner's manual