Secufirst CAM214W User manual

CAM214W / CAM214Z
Outdoor Pan/Tilt Security Camera
Big Manual

This big manual would help you through all the possible questions
you might have during the use of the camera.
Below is the overview of the topics within:
1. Product overview P03~P04
2. How to install P05~P06
3. Preparation before setup P07~P11
4. Camera setup on smart device P12~P23
5. Add second phone or tablet P24~P26
6. Notification setting P27~P30
7. Advance settings of the camera P31~P56
8. Connect wired Internet P57~P59
9. Record motion detection P60~P66
10.Playback recording P67~P72

Product Overview
3

Product Overview – Camera
4

How to install
5

How to install
1. Drill the mounting holes by using the
alignment paper.
2. Insert 4 screw anchors into the wall.
3. Insert 2 screws into the screw anchors,
reserved space 8 to 10 mm. Then Hang the
camera on 2 screws.
4. Fasten 4 screws by with cross screwdriver.
6

Preparation before setup
7

Preparation before setup To install this camera you need to prepare the following information:
1. Your own Wi-Fi name, and your own Wi-Fi password.
•The camera must be registered on your own Wi-Fi
network during this installation.
•Please note, it is our help desk number 1 problem that
customers enter their own Wi-Fi network password
incorrectly during this installation. The result is that the
camera cannot connect and will not display an image.
Check your Wi-Fi password carefully (on the back of the
router / own documentation).
2. Think of a new security password and document it carefully.
3. Security password: Provides access to live video images from
your Wi-Fi camera. During the installation with the app you will be
asked to change this password. Make up this passwords in
advance to move faster through the installation.
The new password need to contain:
A) At least 12 characters.
B) At least one capital letter (Example: A)
C) At least one lowercase letter (Example: a).
D) At least one digit (Example: 1).
E) At least one reading sign (Example:!).
* During the installation, keep your phone or tablet close to the
camera (max. 1 meter)
8

Preparation before setup
1. Connect the power adaptor to the IP camera and a 230V socket. DO NOT connect a Lan cable during installation.
2. Set the camera into the installation mode. Use a paperclip to go inside the reset hole. You will feel a button inside. Press and
hold the button for 5 seconds while the power adaptor is connected to the camera and socket.
You will hear a voice to confirm the camera will be set into default mode.
3. Wait for 1 minute, a voice will be heard again. You can proceed to the next step.
4. Download the app "SecuFirst HD Professional Edition" from the Google Play Store (Android) or Apple Store (iOS)
9
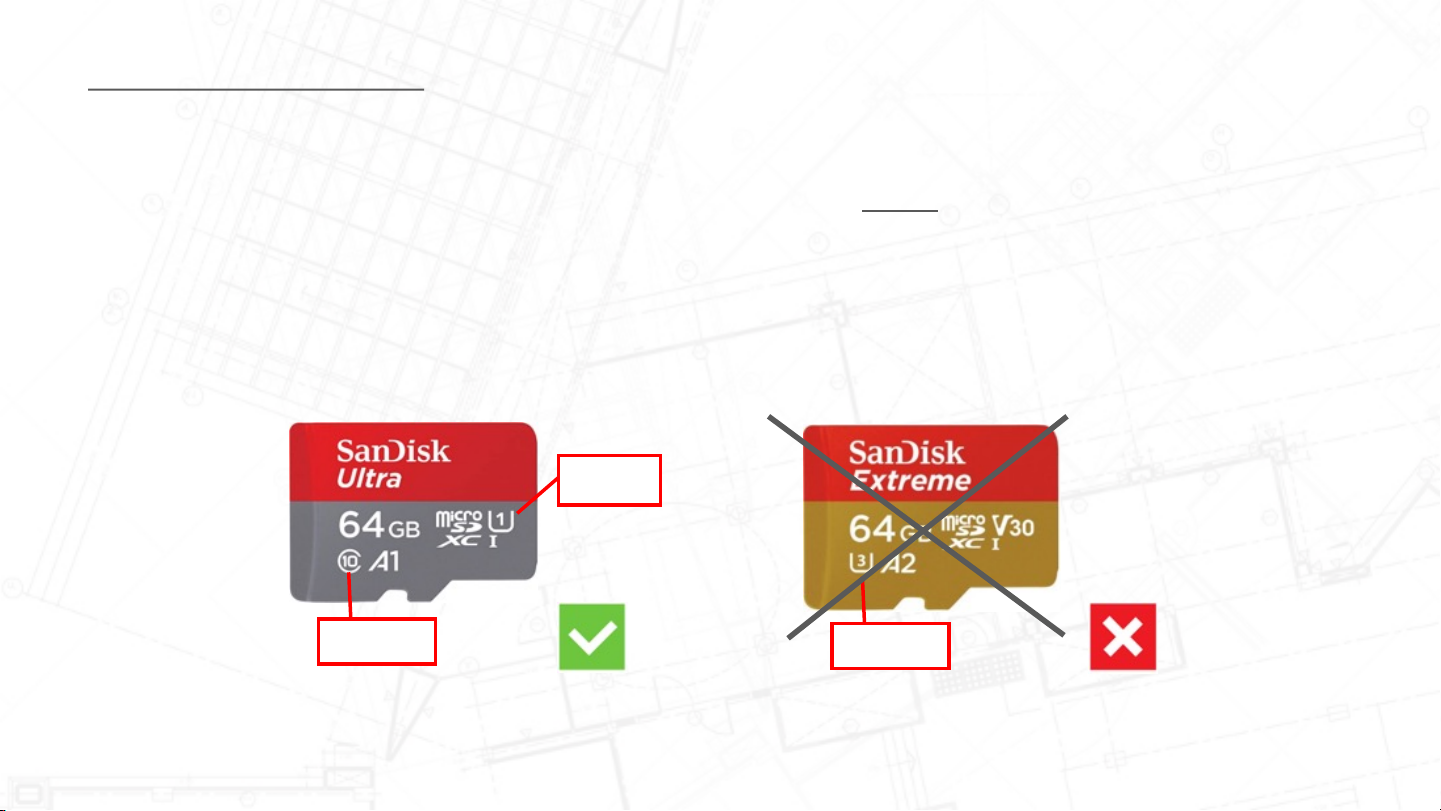
Insert Micro SD Card
1. Micro SD card requirements:
You can record videos only to a micro SD card. This micro SD card must comply with:
•Class 10
•UHS1
•Maximum 128GB
We prefer to use an A brand micro SD card (higher quality)
Class 10
UHS 1
UHS 3
10

Insert Micro SD Card
Follow the below procedure to insert a micro SD card in the camera:
1. Unplug the power adapter from the camera.
2. Insert the micro SD card into the camera.
3. Put the camera adapter back in the power
4. Wait 1 minute, the camera will start up.
5. During the installation of the camera, you changed the security and admin password. Keep these close by. You need
this to log in to the advanced settings.
6. After format the micro SD card, it is suitable to record videos.
11
Micro SD Card Slot
Camera Setup on Smart Device
12

Camera Setup on Smart Device – APP
13
The camera comes with free to download app called
“SecuFirst HD Professional Edition”
You could scan below QR code to download the app.
Android Phone
Scan Here
iOS Phone
Scan Here
Camera Setup on Smart Device – APP
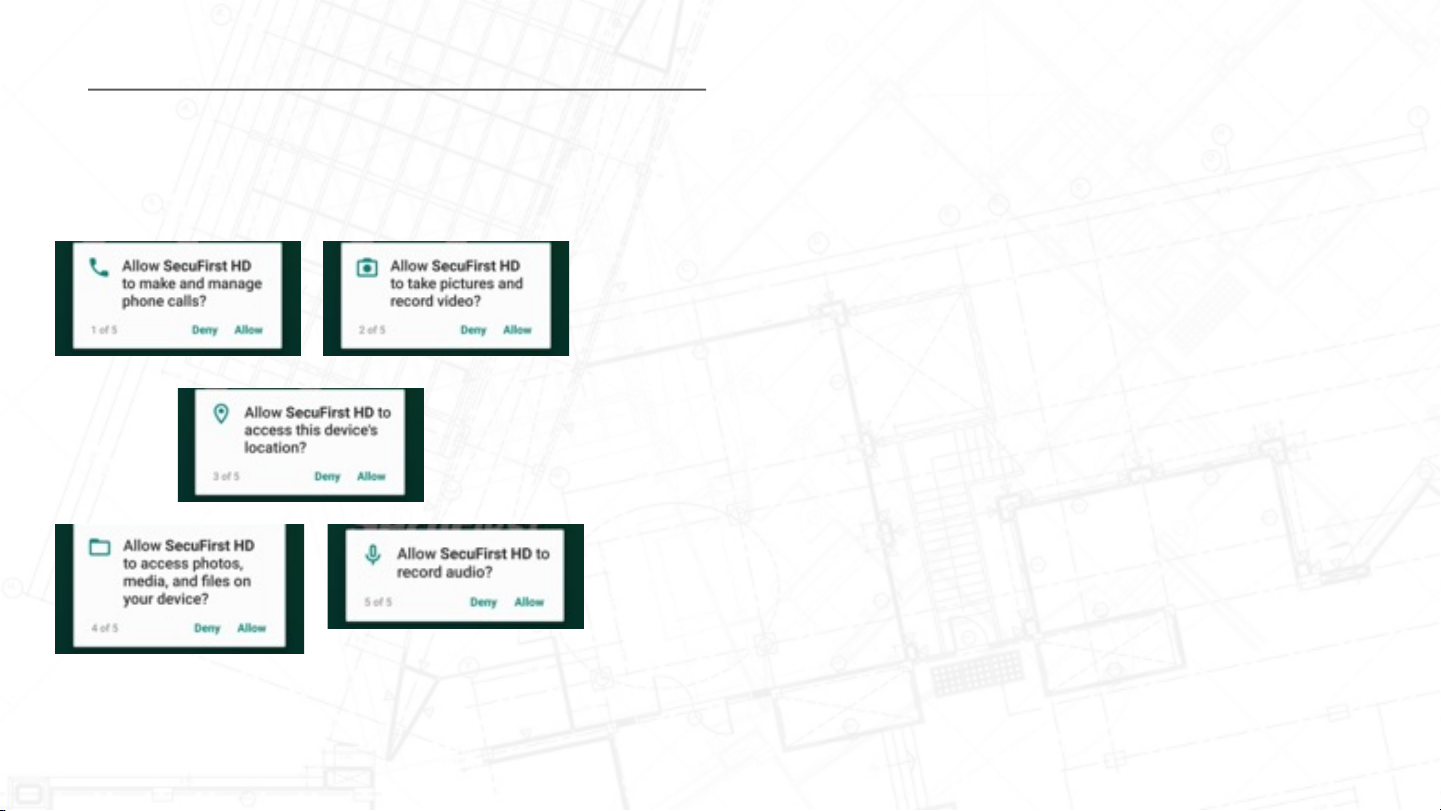
When first time open up the app, it will ask for multiple permissions to
ensure the function could properly be activated.
1. Allow SecuFirst HD to make and manage phone calls
•This is to enable the two way communication of phone and
cameras
2. Allow SecuFirst HD to take pictures and record video
•This is to enable phone camera to scan DID label for device
setup. Also to record the video to the phone directly.
3. Allow SecuFirst HD to access this device’s location
•This is to enable the GPS of the phone so the Wi-Fi could be
activated for some of Samsung’s mobile phones.
4. Allow SecuFirst HD to access photos, media, and files on your
device
•This is to save the snapshots, videos download from SD card
directly to phone memory.
5. Allow SecuFirst HD to record audio
•This is to use the phone’s microphone to start the two way
communication.
It is really important to allow all permissions to make sure the camera
could work properly with phone and SecuFirst HD app.
14
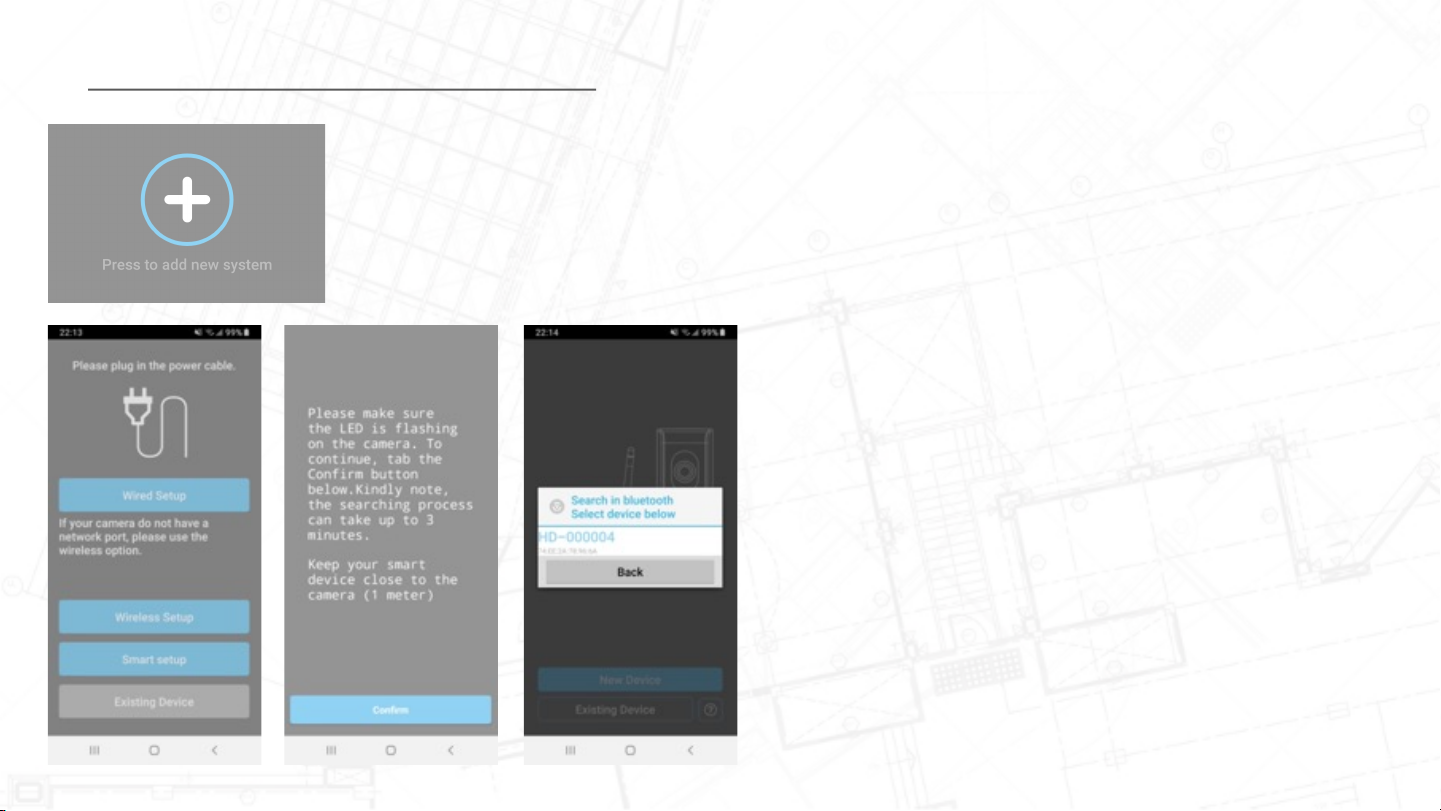
Camera Setup on Smart Device
1. Open the app "SecuFirst HD Professional Edition"
and tab "Press to add new system".
2. The app will request you to turn on and off some
connections, depending on the current settings of
your phone.
•Location: On (Only needed during the installation
for better searching performance of the Wi-Fi
networks).
•Wi-Fi: On
•Mobile data: Off
Note, make sure you turn OFF your Bluetooth. The app
must ask you to turn it on during the steps below.
1. Tab "Smar t Setup”
2. Tab "Confirm" if the LED below the camera lens is
flashing.
3. Tab "Allow" to enable Bluetooth on your smart
device.
4. The app will show the founded camera. Tab on the
"HD-0....."number to select.
15

Camera Setup on Smart Device
1. The app will show you the Wi-Fi networks which the
camera can see. Select your own Wi-Fi network
(2.4Ghz)
2. Insert your own Wi-Fi password.
Please note, it is our help desk number 1 problem that
customers enter their own Wi-Fi network password
incorrectly during this installation. The result is that the
camera cannot connect and will not display an image.
We advice you to tab the box "Show password" to avoid
any typing mistakes.
If you did insert a wrong Wi-Fi password, please
remove the camera from your app and start from point 6
in this Quick Start Guide.
16

Camera Setup on Smart Device
1. Adjust the Security password.
During this installation the default password of the
camera is 123456. We don't think this is save
enough and force to change this password during
the installation.
2. The new password need to contain:
A. At least 12 characters.
B. At least one capital letter (Example: A)
C. At least one lowercase letter (Example: a).
D. At least one digit (Example: 1).
E. At least one reading sign (Example:!).
3. Fill in a new security password. Below the password
it must show 3 green bars, then the password meets
up to our demands. Tab the eye on the right side of
the password to also see the filled in password. This
avoids typing mistakes.
4. Re-confirm the password in the second line.
5. Tab "Done" on your keyboard and press "Save" in
the app.
Do not forget to turn on your mobile data.
17
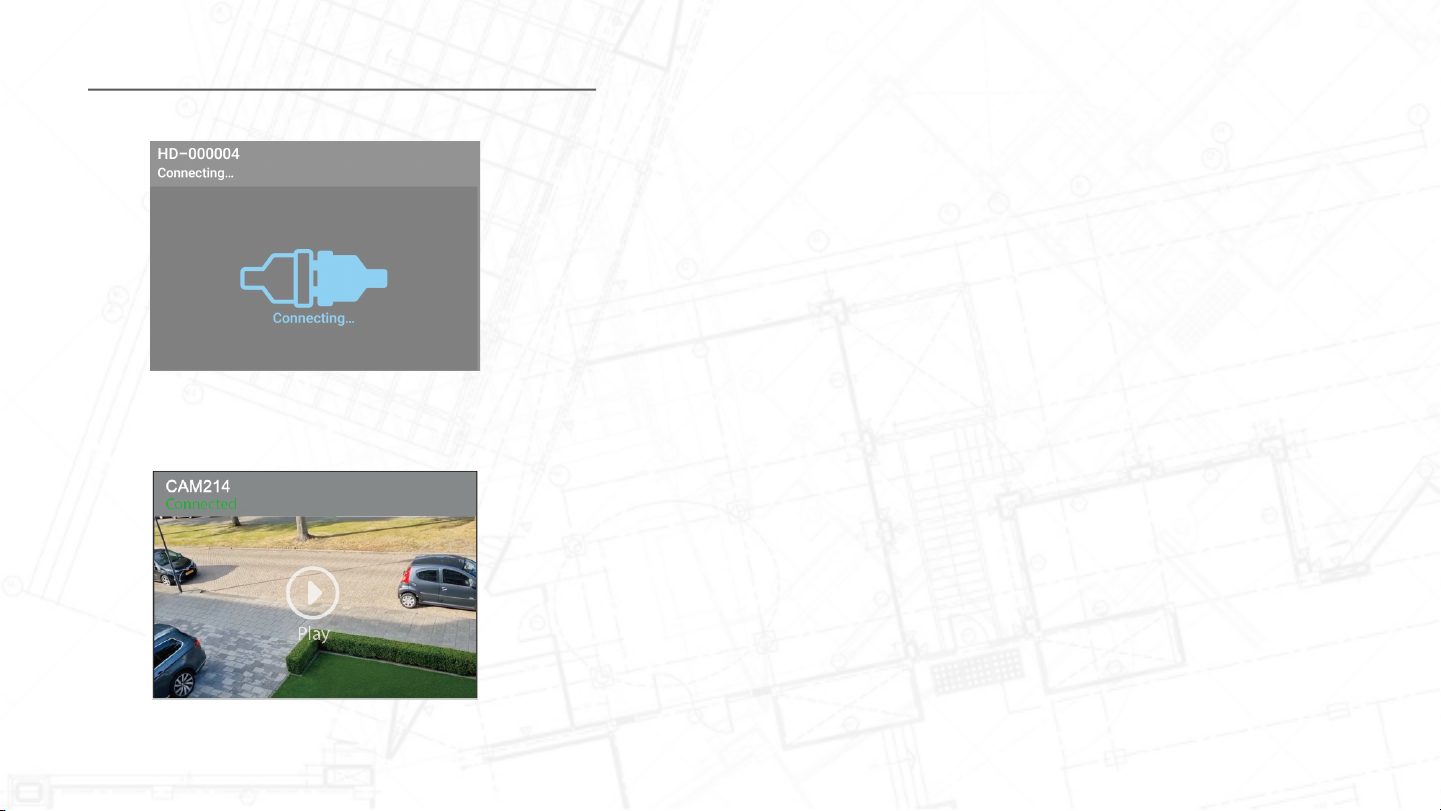
Camera Setup on Smart Device
6. The camera will restart in 30 seconds.
7. The camera will try to connect with your own Wi-Fi
network and password which you have filled in. The
camera will show in green "Connected". Press Play
to go to the live image of the camera.
18

Camera Setup on Smart Device
19
A. Add a new device. Only needed when you buy another
SecuFirst branded item like: IP camera, Door Entry, Alarm,
Home automation and Lighting.
B. Edit settings. When you tab on this button then 3 buttons
will appear in the screenshot.
C. Reconnect button. If the camera doesn't show "Connected",
D. Quad view setting. If you have more than one camera or
doorbell, you could press it to select the camera you wish to
see the live view at once.
E. Info button.
Once press “Edit settings” the three functions will display on the
screen:
1. Setting: You could edit the setting of the camera from this
button.
2. Delete: Delete the camera to setup new one or to reset it.
3. Event: Check on the playback of the device.
A B C D E
1 2 3

Camera Setup on Smart Device Drag your finger over the live image from the camera in the
app. The camera will start to rotate.
When you go to the live image for the first time, you can
change the viewing angle to the desired position to be
secured. Then press the "PTZ" button (D) to save the “Home
position” (point 1). In addition, you can save 2 other points.
You can then choose “Go to point 1 or point 2 or point 3” at
the bottom of the PTZ menu. The advantage of saving fixed
points is that you do not have to drag your finger over the live
image every time.
20
ABC D E F
This manual suits for next models
1
Table of contents
Other Secufirst Security Camera manuals


