Seculine ZIGView S2 User manual

Please read the instructions thoroughly
before using the Zigview S2.
Please use accessories recommended
in this user’s manual.
Digital View Finder
User’s Manual
http://www.secu-line.com

Thank You For Purchasing Zigview S2.
The Zigview S2 is a digital view finder that has a CCD image sensor and a color TFT
LCD attached. It allows users to take a variety of pictures easily by providing real-time
images of view finder information of SLR(Single Lens Reflex) camera.
Before using Zigview S2, please read carefully the instructions so as to be fully aware
of features of the product.
Testing Zigview
You can test this product before installing it on a camera. You can check whether
images are properly displayed on the LCD screen, and whether the product can be
operated as instructed in this manual.
Copyrights
Except for those privately owned, imaes of people and certain objects cannot be used.
They cannot be displayed in public places.
○Zigview is a trademark belongs to Seculine.
○Canon and EOS are trademarks of Canon Inc..
○Nikon is a trademark belongs to Nikon.
○Pentax and istD are trademarks of Pentax.
○Sony is a trademark belongs to Sony.
○Minolta is a trademark belongs to Minolta.
○Windows is a trademark or registered trademark of Microsoft Corporation of
the United States in the United States and other countries.
○Adobe is a trademark belongs to Adobe Systems.
2

Safety Precautions
■
■
■
■
■
■
■
■
■
■
■
■
■
■
■
Do not use any accessories such as power adapters other than those recommended
in this user's manual.
Connect the power cord thoroughly, and do not touch the power cord with wet hands.
When pulling out the cord, do not hold the cord, but hold and pull out the plug part.
Do not damage, bend or twist the cord. It may cause electric shock or a fire.
Do not let dirt in the connected parts or cable connections.
Charge the battery at the temperature of 0 to 40 °C.
When excessive heat, smoke or smell is generated while charging a battery , remove
the battery from the power outlet immediately.
Place the battery-charging devices out of the reach of children. The cord may strangle
or electrically shock a child.
Do not place the cord near a heat-generating object. It may deform the cord or cause
a fire or electric shock by melting the insulated parts.
If the product is dropped to the ground and the case is damaged, do not touch the
built-in parts. It may cause electric shock. Call the nearest Customer Service Center.
Do not disassemble or rebuild the product. It may cause permanent damage
to the product and malfunctioning that can harm people.
Place the product out of the reach of children. Damaged product may result in injury.
Before using the product on an airplane or in a hospital, you must check whether
such usage is allowed. Electronic waves produced from the product may cause
malfunctioning of devices.
Do not keep the equipment in a place where dirt and moist accumulate easily.
It can cause a fire or electric shock, or damage the product.
Do not hold the product alone when the product is installed in the camera. Due to the
weight of the camera, it may damage the connected part between the product and
the camera or the product.
Do not clean the device with paint thinner, benzene or other volatile solution. It may
cause a fire or harm the human body.
Follow these safeguards and use the equipment properly to prevent
injury, death, and material damage.
3
Table of Contents
4
Safety Precautions
Packge Contents
Name of Each Part
Before Using This Product
Installing the Battery
Charging the Battery
Attaching Eyepiece Adapter
Adjusting angle of Zigview S2
Basic Operations
Installing and Removing Zigview on Camera
Power ON and OFF
Adjusting Diopter of Camera
Swiveling Zigview LCD
Rotating Image of LCD
Using the menus
Connecting the shutter release cable
Mode Selection
General Setup and Size Adjustment
Screen Size Adjustment
Adjusting Backlight Brightness
Screen Color
Battery and Logo display
Selection of Video Standard
Camera Ready Time
AE/AF Time
Language Selection
Saving setup parameter values
Loading setup parameter values

5
........................................... 21
................................................................ 21
................................................... 21
............................................................. 22
........................... 23
...................................................... 23
................................................ 24
.................... 24
................................................................... 24
................................................. 25
............................................. 27
.................. 28
..................................................... 28
............................................... 28
.............. 29
.................................... 32
....................................................... 32
.................................. 32
..................... 33
............................ 36
.................................................... 36
............................................... 37
........................................................... 38
................................................................... 40
....................................................................... 41
Digital View Finder
Selecting Digital View Finder
Zooming Screen
Adjusting LCD backlight
Using Style Mode
Interval Shot (Simple)
Selection of Simple Interval Shot Mode
Meaning of Each Item
Execution of Interval Shot
Parameter setting of Interval Shot (Simple)
Sound ON/OFF
Long Exposure (Bulb Shot)
Long Exposure (Time Shutter)
Interval Shot (Advanced)
Selection of Interval Shot (Advanced) mode
Meaning of Each Item
Execution of Interval Shot
Parameter Setting of Interval Shot (Advanced)
Motion Sensing Shot
Selection of Motion Sensing shot
Meaing of Each Item
Execution of Motion Sensing Shot
Parameter Setting of Motion Sensing Shot
Remote monitoring
Connection of video transceiver cable
Remote Shutter Control
Connecting External Monitor
Optional accessories
Troubleshooting
Specifications
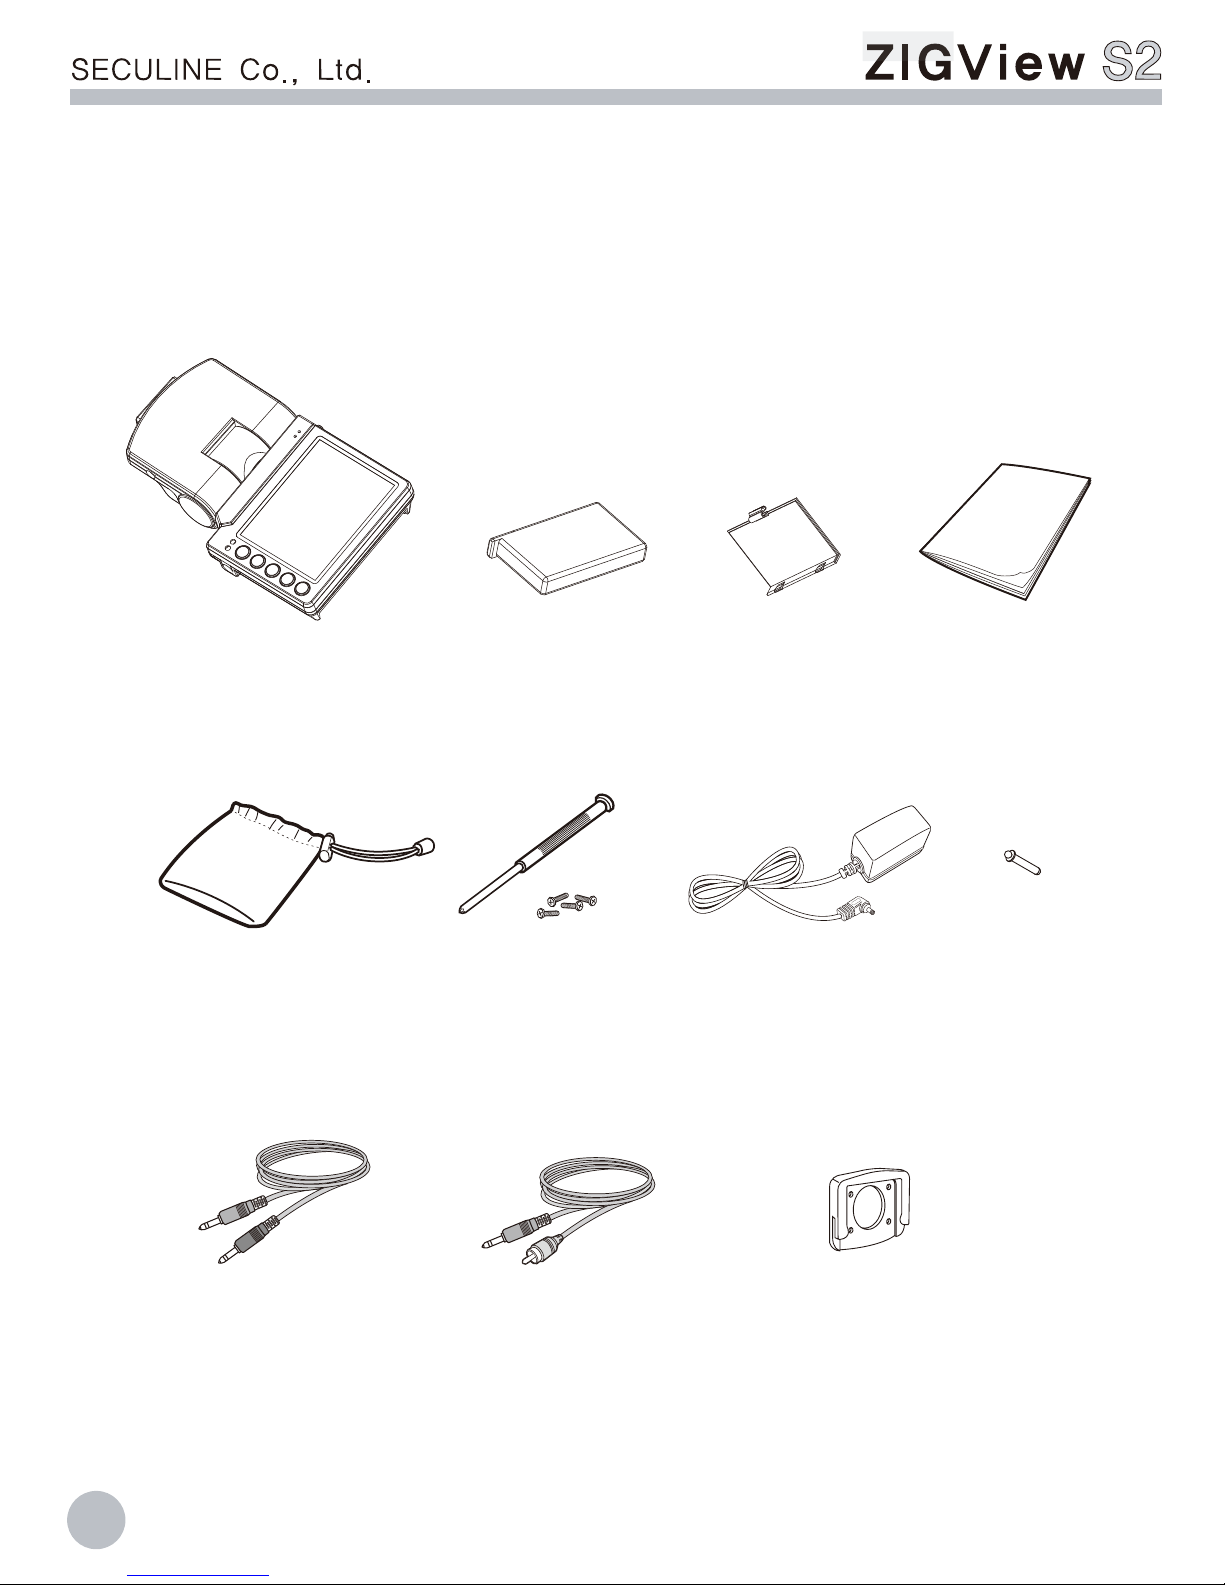
Package Contents
Zigview S2 Battery Battery cover Manual
Carrying case
This product package contains following components.
※Package contents can be changed without notice.
6
AC AdapterDriver/Screws
Eyepiece adapter
Shutter release cable Video cable
Latch

7
Name of Each Part
VIDEO OUT
DC 5V
CAMERA
ESC
↑
↑
Eyepiece adapter
mount
Shutter release port
Video port
DC power input port
Battery cover
Swivel unit
Operation lamp
Charging lamp
Decoupling button
Latch hole
Operating buttons
Power switch
Display unit
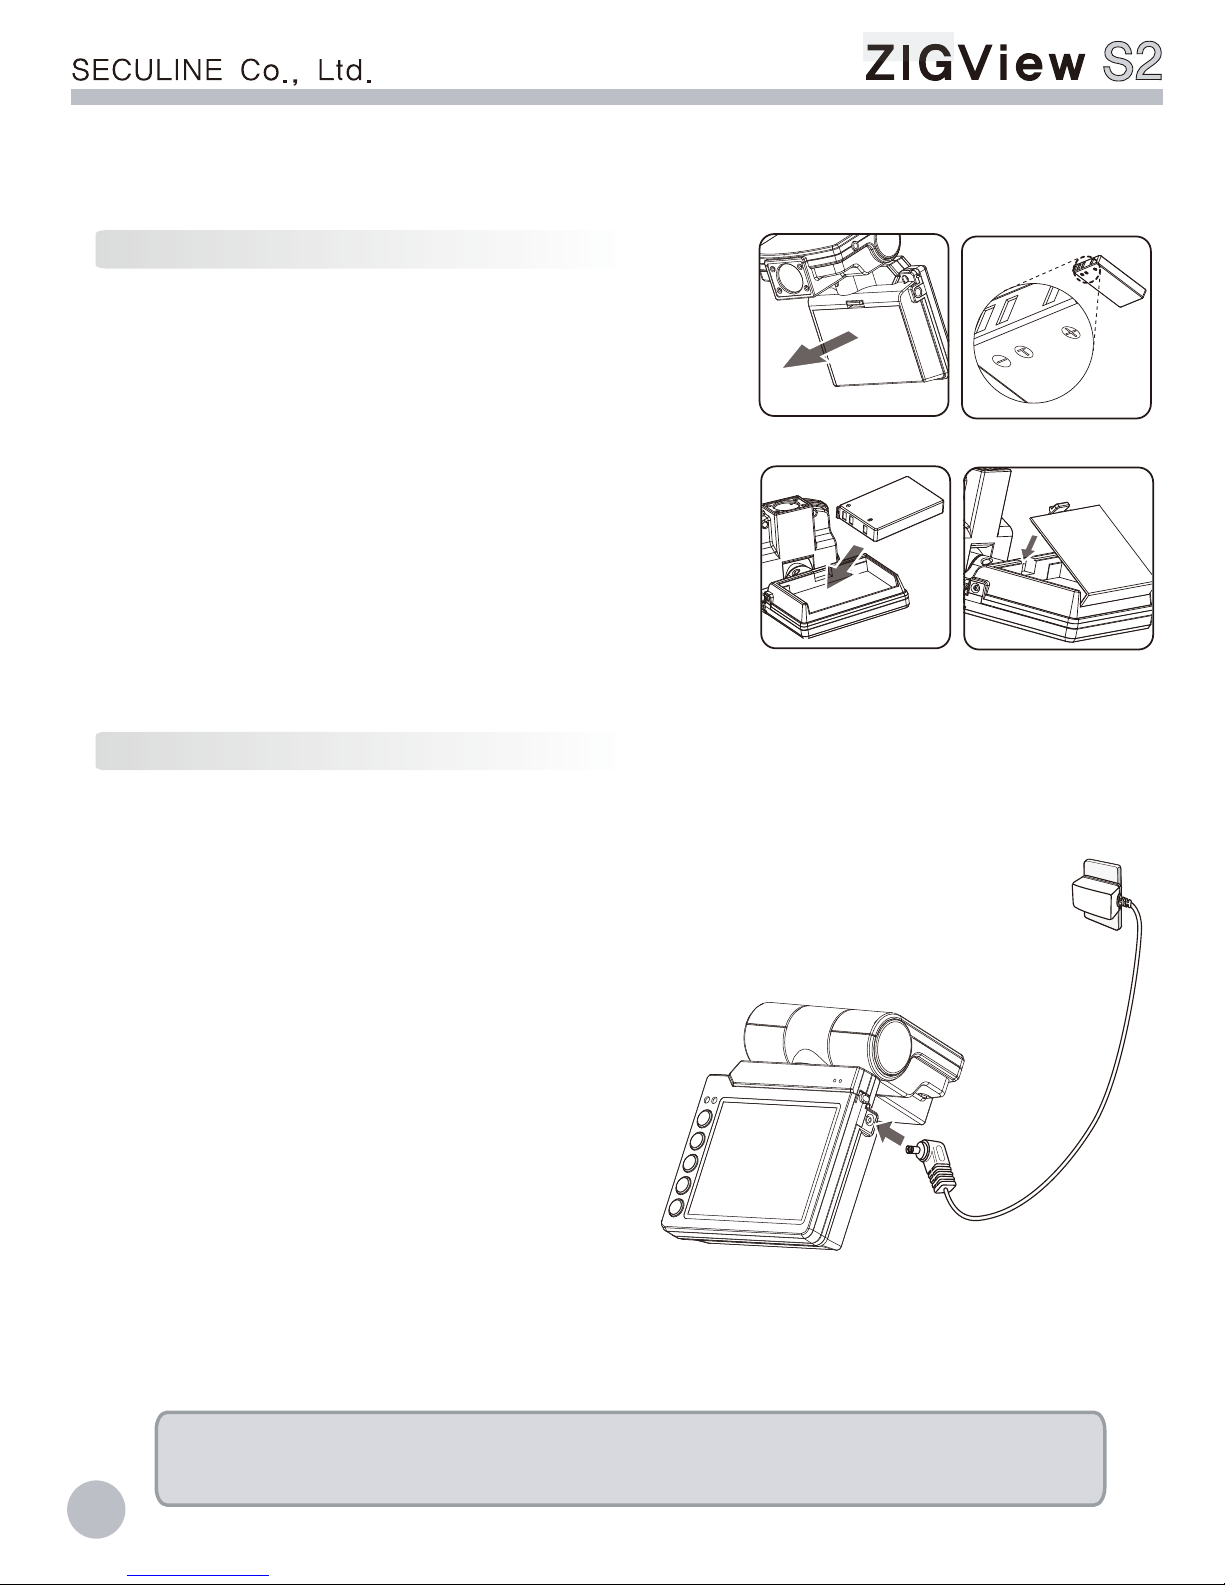
Before Using This Product
Load a battery pack into the camera
to fully charge it.
8
1. Detach the battery cover.
2. Pay attention to the plus and minus sides
before installing battery on the product.
3. Attach carefully the battery cover on the product.
4. Wrong installing may cause permanent
damage on the product.
Charge the battery fully with the provided battery charger after opening
the package.
1. After inserting the battery, connect the AC adapter
tightly to the main body.
2. It takes about 2 hours to fully charge the battery,
this may vary depending on charging
conditions. Time is increased if the product
is turned on during charging.
3. The charging lamp lights red
during charging, a full charge
the light is green.
4. Remember to connect the adapter
to the main body tightly.
Incomplete connection may disturb the charging process.
5. Disconnect the adapter from the main body after changing battery.
□Repetitive charging/discharging may degrade the battery performance
over time.
<Open the cover> <Check Polarity>
<Install battery> <Close the cover>

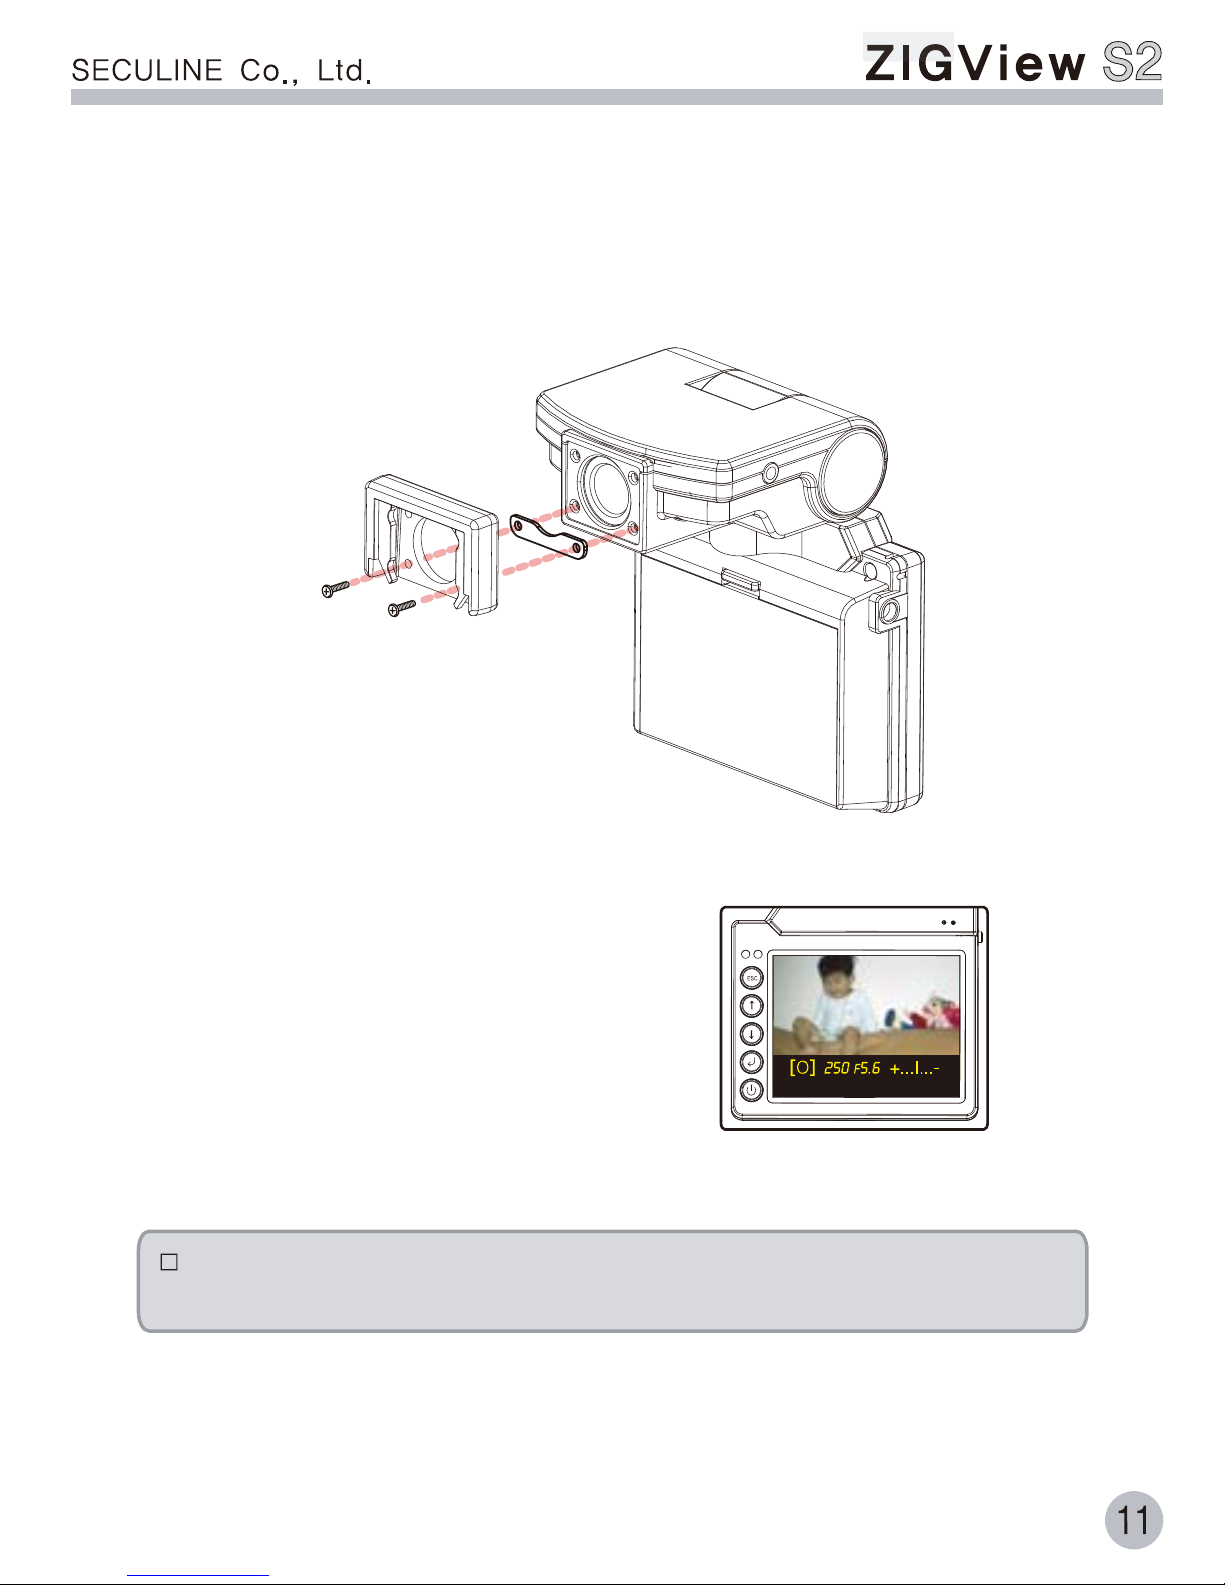
Install an eyepiece adapter that fits the camera before using this product.
9
1. Attach the eyepiece adapter to the main body of ZIGVIEW by using
the supplied screw driver and four screws.
2. Not fully tightening the screws may cause damage to the product if there is a loose
connection between the main body and the camera. Fastening screws too tightly
may damage threads of screws.
3. Apply appropriate force to fasten 4 screws evenly, just enough to secure the adapter.
□Extra screws are provided. If you lose the extra screws, please contact
your local distributor or sales representative.
□After attaching eyepiece adapter and installing the ZIGVIEW
to the camera, focus the image on ZIGVIEW by controlling diopter dial
or lever of the camera.
Before Using This Product

Before Using This Product
1. There are three different S2 models in order to provide optimum condition
for image quality and sensitivity.
2. Even if proper S2 model is used for your SLR camera, the S2 LCD display
image is not exactly aligned to camera viewfinder image information.
3. If S2 LCD displays well aligned image as picture ①, angle adjustment is not necessary.
4. If S2 LCD cannot display well aligned image as picture ②and ③, angle adjustment
is required for proper image display.
5. There are three kinds of metal insertion for angle adjustment. The thickness of
No.1 metal insertion is the smallest. The thickness of No.3 metal insertion is
the largest. The number of white dot represents metal insertion number as following
picture.
6. Inserting metal insertion between S2 and eyepiece adapter prevents lower part
image display cut off.
7. Adjusting metal insertion is not required after proper initial installation.
<No.1 Insertion> <No.2 Insertion> <No.3 Insertion>
8. Attach the eyepiece adapter to S2 main body after inserting proper metal insertio
as following picture.
10. If upper image is cut off after installing
metal insertion, metal insertion thickness is
larger than proper size. Then, please use lower
number of metal insertion.
9. Please fasten all 4 screws when metal
insertion is used.
If all three metal insertions cannot prevent lower image cut off,
please contact customer service center for proper S2 model selection.
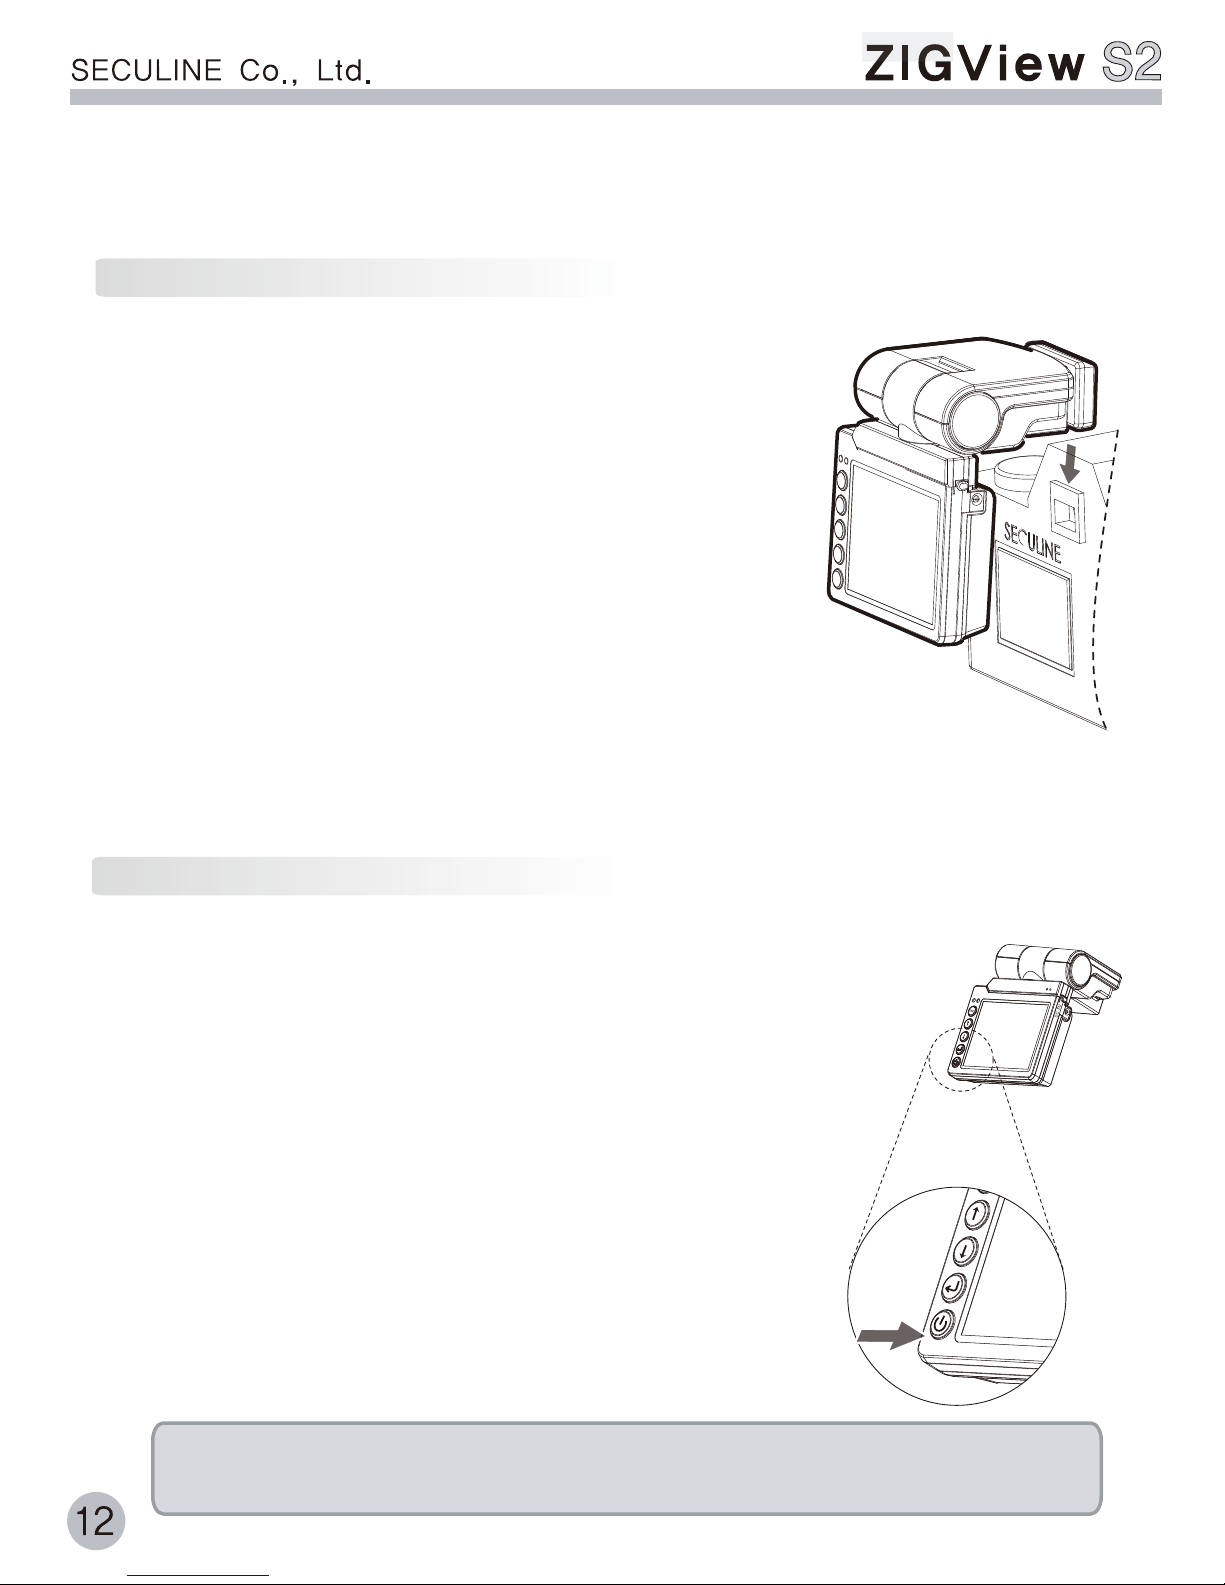
Basic Operations
1. Attach eyepiece adapter to ZIGVIEW properly
before installing ZIGVIEW to camera.
2. Remove an eyepiece or eyecup
on the camera viewfinder.
3. Push Zigview downward carefully
onto the eyepiece adapter of the camera.
4. When installing or removing,
hold the front part of Zigview.
5. Pull the eyepiece adapter attached to
Zigview upward from the camera viewfinder for removal.
1. Press the power button for 1 second to power on.
Some images will be appeared on ZIGVIEW LCD.
2. When you turn on the Zigview first time after purchasing
the product, all parameters and displays are set
at factory values. If you turn off the ZIGVIEW
and turn it on again while using the product,
the previously set parameters are restored.
3. Press power button for 2 seconds to power off.
4. When not using for a long period of time,
turn the power off and remove battery.
□ Install the battery in Zigview for proper use. Zigview
does not operate with AC adapter alone.
Basic Operations
13
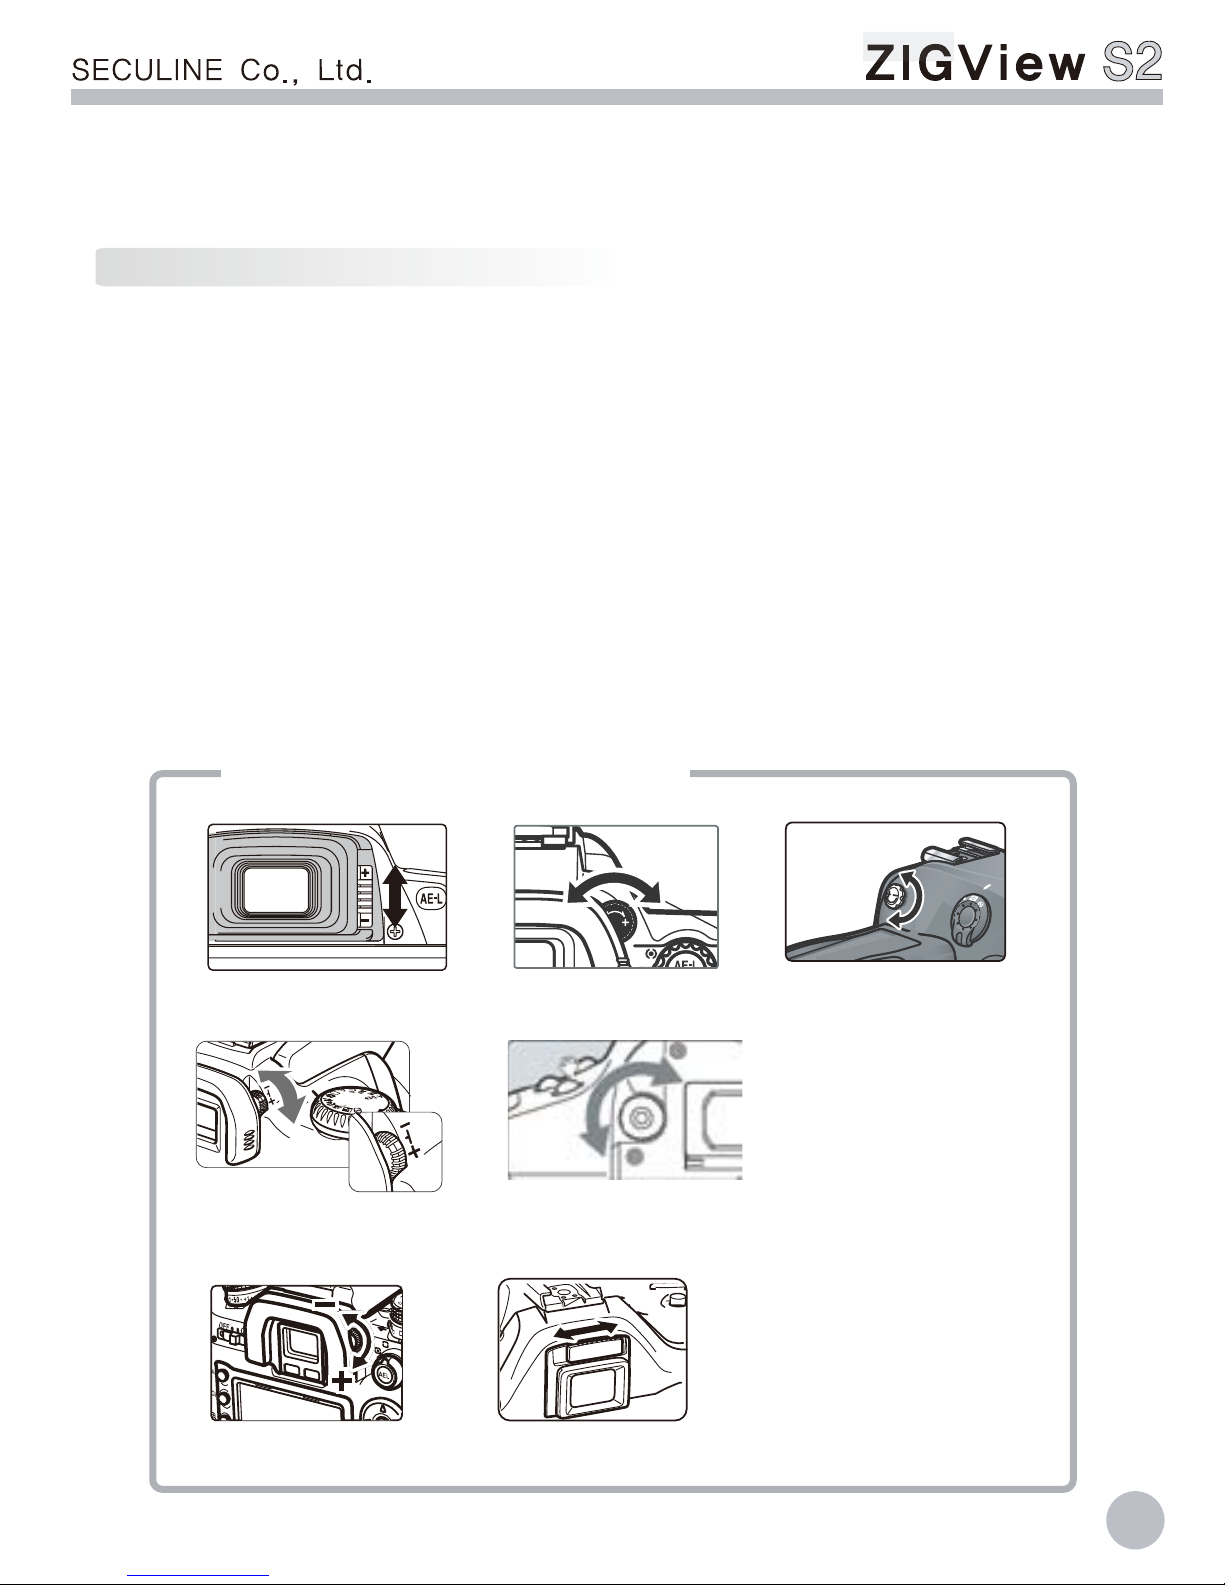
1. Attach ZIGVIEW to the camera. Power on and confirm sharply out-lined image
on the LCD.
2. If you cannot see sharply out-lined image on the LCD, adjust camera diopter lever
or dial until a sharp out-lined image appears on the LCD.
3. You can refer to the camera user’s manual about the operation of camera diopter
lever or dial .
4. Some cameras may not have diopter lever or dial.
If you cannot see the sharply out-lined image on the LCD after installing of
ZIGVIEW, you can focus the image by adjusting camera diopter lever or dial.
<Nikon D70, D50> <Nikon D200>
<Canon 300D, 350D> <Canon EOS 1Ds>
<Minolta 7D> <Pentax *istDs>
<Nikon D2H, D2X>
Examples of diopter lever or dial

Basic Operations
1. Zigview LCD can be swiveled left, right
and tilted up and down.
2. Use swiveling and tilting function
according to shooting angle and position.
3. Do not exert too string force or exceed swiveling
and tilting boundaries. This causes damage
to the product.
The image on the LCD can be rotated 180
degree for various shooting angles.
1. Press power button for short period when
turned-on.
2. Image on the LCD will be displayed upside down.
3. Press power button again for short duration,
then image on the LCD will be rotated 180
degrees.
14

ESC
↑
↑
Use the buttons on the front panel for using menus or operating the product.
15
1. Pressing the Esc button makes the cursor return to the previous position
or menu item, and makes the operating mode escape from the setup menu.
2. Pressing the Enter button makes a specified function execute and makes cursor
move to value position.
3. Pressing the Up and Down button makes cursor move up and down or changes
setup value . Also, zooming, sound on/off, and LCD brightness can be controlled
by pressing the up and down button.
Shutter release cable is connected to camera for ZIGVIEW
to control camera shutter.
1. Please use proper shutter release cable
that fits to your camera because there are
many kinds of shutter release cables.
2. Please power off the camera for the connection.
If power is on, the camera can fire
unintentionally.
3. Confirm the operation of camera shutter
using proper methods, for example,
Time Shutter Mode of ZIGVIEW.
Return/escape/previous button
Move upward/Increasing Value/Sound on and off/Zooming
Move downward/Decreasing Value/LCD brightness
Execution/Next/Confirm button
Power on and off/Image rotation
□ Some cameras do not have a connector for remote shutter
release. Please confirm that before use
Basic Operations

Mode Selection
16
1. Pressing the Esc button on each operating mode
makes the mode move to mode selection screen.
2. Select the mode that you want by pressing
up and down buttons.
3. Press the Enter button for the execution of the mode.
4. If you press the Esc button not the Enter button,
a previously operating mode will be executed.
1. Digital View Finder : Basic function of ZIGVIEW that makes shootings
at various angles easy. Also you can use style functions for assisting
various shooting compositions.
2. Interval Shot (Simple) : Camera shutter is released according
to the number of total shot and interval time.
3. Bulb Shot : Long exposure for assigned time.
4. Time Shot : Long exposure for arbitrary time.
5. Interval Shot (Advanced) : It is possible to set the details of interval
parameters. Various interval setting methods are provided.
6. Motion Sensing Shot : A shutter release is performed when small
variations in the brightness level in the 9 areas of the LCD screen
are detected.
7. Environment Setup : Set basic parameters of Zigview.
- Adjusting screen size : adjust image size on LCD according
to the screen in the camera viewfinder.
- LCD brightness : adjust LCD brightness
- Video effect : select color or B/W image.
- Battery and logo display : decide the display of battery level
and initial logo.
- Language selection : select a language for display of information
and menu.
ZIGVIEW S2 has 6 operation modes and 1 setup mode
☞ About modes
Operation Mode selection (1.1)
□ Digital View Finder
□ Interval Shot(Simple)
□ Long Exposure(Bulb)
□ Long Exposure(Time)
□ Interval Shot(Advanced)
□ Motion Sensing Shot
□ General Setup
1

General Setup and Size Adjustment
17
When ZIGVIEW is installed, screen sizes may vary in right, left, up, and
down depending on cameras. Adjust the screen size to fit your camera.
Adjust backlight brightness of Zigview LCD
1. Select the General Setup Mode on the operation
mode selection screen.
2. Select the Size Adjustment and press the Enter button.
Arrow marks to the left side will be appeared.
3. Adjust left side by pressing the Up and Down button.
4. Press the Enter button, then arrow marks indicate
upper side. Adjust upper side pressing the up and
down button.
5. You can adjust left, upper, right, lower side
for every Enter button.
6. After completion of size adjustment, press the Esc
button for return to the General Setup mode.
1. Select the General Setup mode on the mode
selection screen.
2. Select the Back-Light Brightness and press
the Enter button.
3. Adjust the brightness value by pressing Up
and Down button
4. Values in the range of 1 to 5 can be selected. Value 1 is the darkest
and value 5 is the brightest.
5. After the completion of the value adjustment, press the Esc button
for return to the menu item.
+ -
+ -
+ -
+ -
2
2
2 4
5 6
General Setup
□ Screen Adjustment
□ Brightness
□ Battery/Logo
□ Screen Color
□ Video output
□ Camera Ready
□ AE/AF Time
□ Load/Save
□ Language
☞
1
Both
Color
NTSC
10
0.5
Save1
English
General Setup
□ Screen Adjustment
□ Brightness
□ Battery/Logo
□ Screen Color
□ Video output
□ Camera Ready
□ AE/AF Time
□ Load/Save
□ Language
☞
1
Both
Color
NTSC
10
0.5
Save1
Bglish
General Setup and Size Adjustment
18
Selects the color of displayed images.
1. Select General Setup mode on mode selection screen.
2. Select the Screen Color and press the Enter button.
3. Select the color of display. If color is selected, color
images will be displayed on the LCD. If B/W is selected,
black and white images will be displayed.
4. After the completion of the selection, press Esc button
for return to the menu item.
2
decides the display of battery level and initial logo
1. Select the General Setup mode on the mode selection
screen.
2. Select the Battery/Logo and press the Enter button.
3. Select a desired item using Up and Down button
- All : display both battery level and initial logotype.
- Battery : display only battery level.
- Logo : display only initial logotype.
- Neither : do not display anything.
4. After the completion of the selection, press the Esc button for return
to the menu item.
2
Select video standard for the connection of external video monitor.
1. Select the General Setup mode on the mode
selection screen.
2. Select the Video Standard and press the Enter button.
3. Select a proper NTSC or PAL standard using the Up
and Down button.
4. After the completion of the selection, press the Esc
button for return to the menu item.
2
General Setup
□ Screen Adjustment
□ Brightness
□ Battery/Logo
□ Screen Color
□ Video output
□ Camera Ready
□ AE/AF Time
□ Load/Save
□ Language
☞
1
Both
Color
NTSC
10
0.5
Save1
English
General Setup
□ Screen Adjustment
□ Brightness
□ Battery/Logo
□ Screen Color
□ Video output
□ Camera Ready
□ AE/AF Time
□ Load/Save
□ Language
☞
1
Both
Color
NTSC
10
0.5
Save1
English
General Setup
□ Screen Adjustment
□ Brightness
□ Battery/Logo
□ Screen Color
□ Video output
□ Camera Ready
□ AE/AF Time
□ Load/Save
□ Language
☞
1
Both
Color
NTSC
10
0.5
Save1
English

General Setup and Size Adjustment
19
Set the time from the camera power-on to ready taking pictures. In interval shot
or motion sensing shot, camera must be waked up before shooting if the camera
is in the auto power-off state. Because this is varied
with each camera, proper time must be set
for exact operation.
Select language for information and menu.
1. Select the General Setup mode on the mode selection screen.
2. Select the Camera Ready Time and press the Enter button.
3. Camera ready time can be selected among off, 1 ~ 99 seconds.
4. After the completion of the selection, press Esc button
for return to the menu item.
1. Select the General Setup mode on the mode selection screen.
2. Select Language Selection and press the Enter button.
3. After the completion of the selection, press the Esc button
for return to the menu item.
2
Set the time for auto-focus in interval shot or motion sensing shot. Because
the focusing time is varied with each camera, proper time must be set
for each camera.
1. Select the General Setup mode on the mode selection screen.
2. Select the AE/AF Time and press the Enter button.
3. AE/AF time can be selected among 0.1~ 9.9 seconds
with the spacing of 0.1 second.
4. After the completion of the selection, press the Esc button
for return to the menu item.
2
2
General Setup
□ Screen Adjustment
□ Brightness
□ Battery/Logo
□ Screen Color
□ Video output
□ Camera Ready
□ AE/AF Time
□ Load/Save
□ Language
☞
1
Both
Color
NTSC
10
0.5
Save1
English
General Setup
□ Screen Adjustment
□ Brightness
□ Battery/Logo
□ Screen Color
□ Video output
□ Camera Ready
□ AE/AF Time
□ Load/Save
□ Language
☞
1
Both
Color
NTSC
10
0.5
Save1
English
General Setup
□ Screen Adjustment
□ Brightness
□ Battery/Logo
□ Screen Color
□ Video output
□ Camera Ready
□ AE/AF Time
□ Load/Save
□ Language
☞
1
Both
Color
NTSC
10
0.5
Save1
English
□ If the Camera Ready Time is bigger than the shot interval, it will be reduced
to proper value during the operation automatically
□ If the AE/AF Time is bigger than the shot interval, it is reduced to proper
value during the operation automatically.

General Setup and Size Adjustment
20
The setup parameter values are stored.
1. Select the General Setup mode on the mode
selection screen.
2. Select Save/Load and press the Enter button.
3. Save address can be selected among save1, save2,
and save3 using Up and Down button.
4. Press the Enter button on the selected save address.
5. After the completion of the save, press the Esc button
for return to the menu item.
2
General Setup
□ Screen Adjustment
□ Brightness
□ Battery/Logo
□ Screen Color
□ Video output
□ Camera Ready
□ AE/AF Time
□ Load/Save
□ Language
☞
1
Both
Color
NTSC
10
0.5
Save1
English
The setup parameter values are loaded
1. Select the General Setup mode on thde
selection screen.
2. Select Save/Load and press the Enter button.
3. Load address can be selected among load1, load2,
and load3 using the Up and Down button.
4. Press the Enter button on the selected load address.
5. After the completion of the load, press the Esc button
for return to the menu item
6. Load address Load1, Load2, Load3 corresponding to Save1, Save2, Save3
respectively.
2
General Setup
□ Screen Adjustment
□ Brightness
□ Battery/Logo
□ Screen Color
□ Video output
□ Camera Ready
□ AE/AF Time
□ Load/Save
□ Language
☞
1
Both
Color
NTSC
10
0.5
Save1
English
Table of contents
Other Seculine Camera Accessories manuals


