Seedmax ECO Series User manual

OWNER’S MANUAL
Commercial
Dehumidifier
ECO Series
Specially Designed for Growing Industry
Maximum Capacity at over 210 Pints Per Day
Product Category : H50, H60, H70, H70B, H90 &H100
IMPORTANT: After unpacking (or accidental tip-over) allow
dehumidifier to stand upright for 20 minutes before starting
READ THIS MANUAL CAREFULLY BEFORE OPERATING


- 1 -
DO NOT
use this unit outdoor!
Before installing and using your dehumidifier, please read this owner’s manual carefully.
Store this manual in a safe place for future reference.
The user of electrical products may create hazards that include, but are not limited to injury,
fire, electrical shock. Failure to follow these instructions may damage and/or impair its
operation and void the warranty.
•
Before operating, remove all packaging material and check for any damage that may have occurred
during shipping or any missing items.
•
Check household power supply to ensure it matches the specification of appliance.
•
Always place the unit on a level surface.
•
NEVER use or store gasoline or other flammable vapor or liquid near this unit unless instructed by this
manual.
•
DO NOT lay power cord under carpeting. DO NOT cover cord with throw rugs, runners, or similar
coverings. DO NOT route cord under furniture or appliances. Arrange cord away from traffic area and
where it will not be tripped over.
•
To reduce the risk of fire or electric shock, DO NOT use this appliance with any solid-state speed
control devices.
•
DO NOT touch this appliance or the plug with wet hands or while standing in water.
•
Maintain a 12-18-inch clearance space around this unit. Do NOT block or cover air inlet or outlet grilles.
•
The unit must be connected to a correctly grounded power supply.
•
DO NOT start or stop the unit by inserting or pulling out the power plug.
•
DO NOT use an adapter plug or extension cord.
•
DO NOT use the unit in the immediate surroundings of a bath, a shower or a swimming pool.
•
DO NOT insert anything into the air outlet. DO NOT obstruct air inlet or outlet grills unless instructed
by this manual.
•
DO NOT direct the air flow at human faces or bodies.
•
DO NOT let children play near this unit.
•
Always inspect the cord for signs of damage before use. If the power cord is damaged, it must be
replaced by the manufacturer or a qualified service technician.
•
DO NOT attempt to repair or adjust any electrical or mechanical functions of this appliance, as this
may cause danger and void the warranty.
•
If the appliance is damaged or it malfunctions, DO NOT continue to use it. Unplug the product and
refer to troubleshooting guide or contact the seller.
•
Make sure the unit is turned off and unplugged before cleaning or servicing this unit.
Important Instructions
2
Latest technology and efficient extraction process ensure a frequent change of location from one
building site to another or the application in rough surroundings and on difficult terrain does not
pose a problem for this condenser dryer.
The robust steel construction in carriage design with transport handle and big wheels can
withstand a fair bit and can easily be transported to any operating site.
Owing to an external condensate drain and optionally available condensate pump, ECO series
product is further ideally suited for longer unattended dry keeping applications, the duration of
which can be determined precisely by means of the integrated operating hours counter – perfect
for commercial applications.
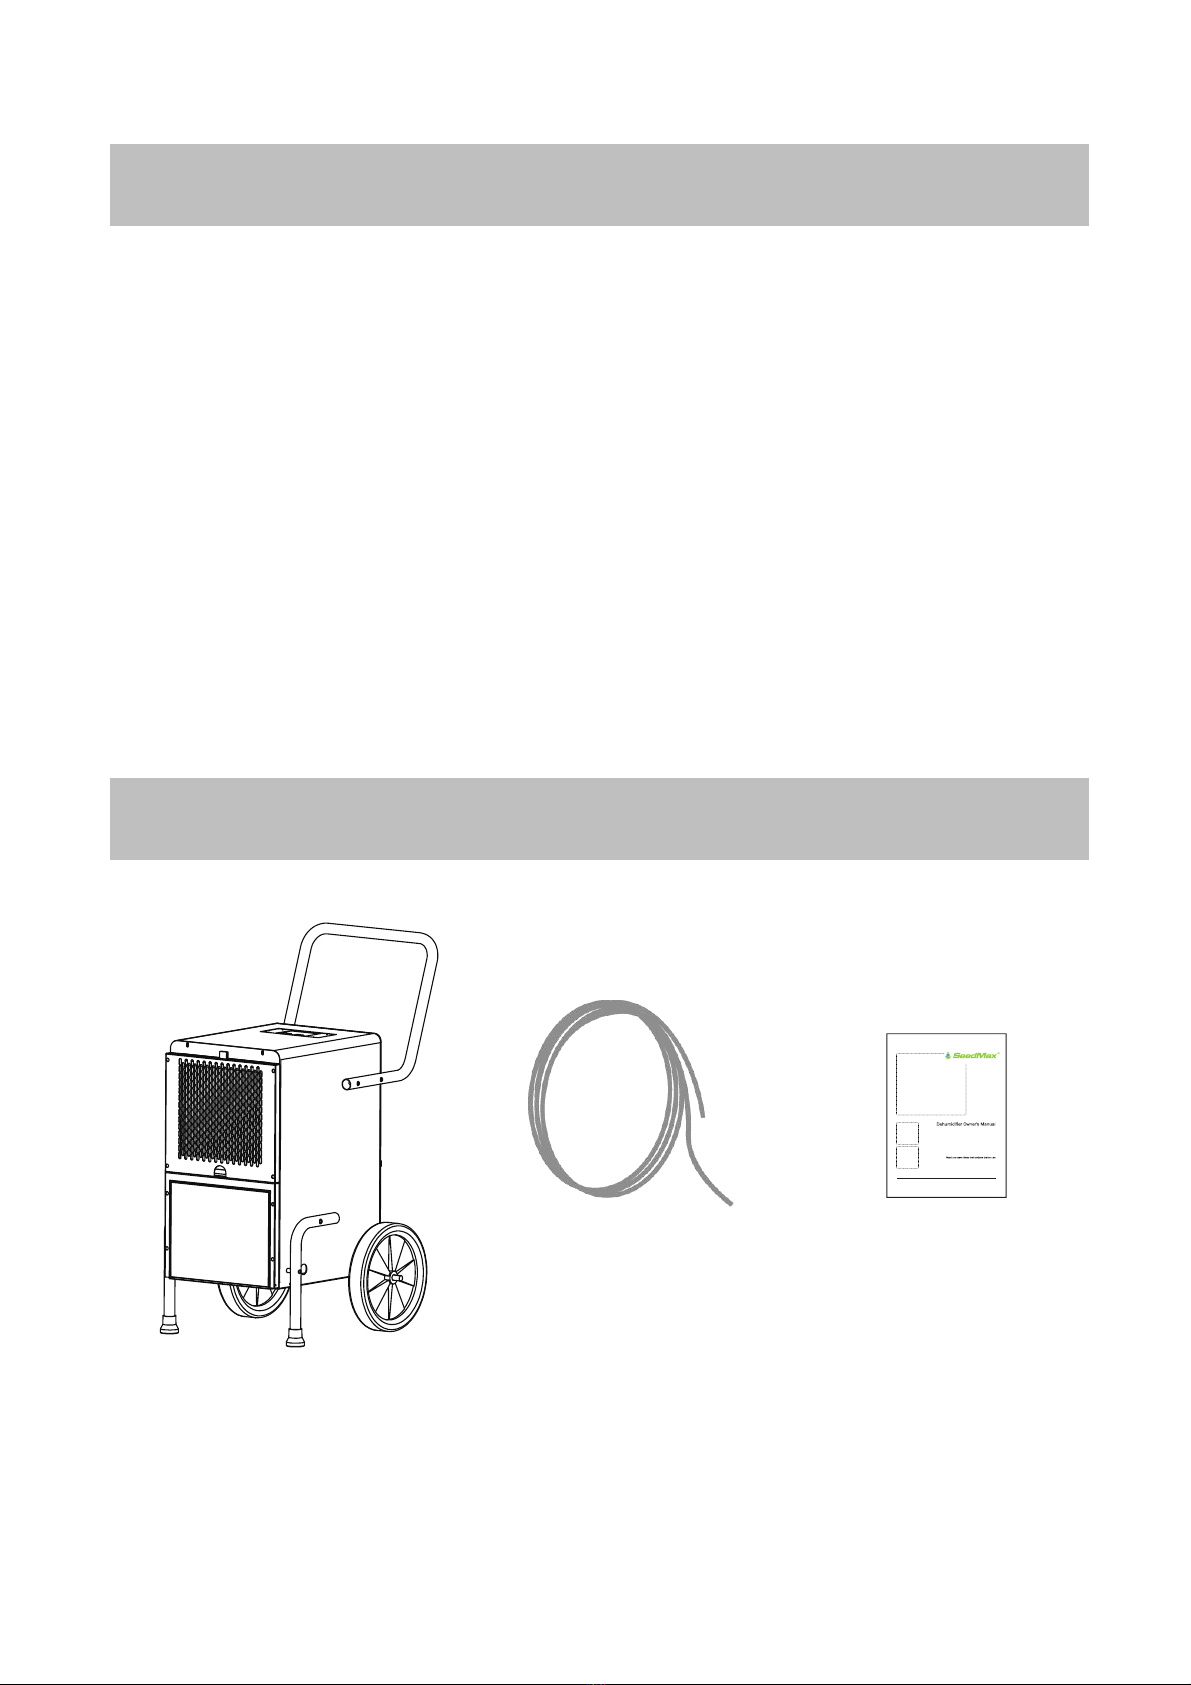
Drain hose x1 User’s Manual x1
ECO-H Dehumidifier x1
*ECO-H90 & H100 have water-pump pre-installed.
Growing Eco-H Series Dehumidifier Introduction
Items Included (ECO-H50)

3
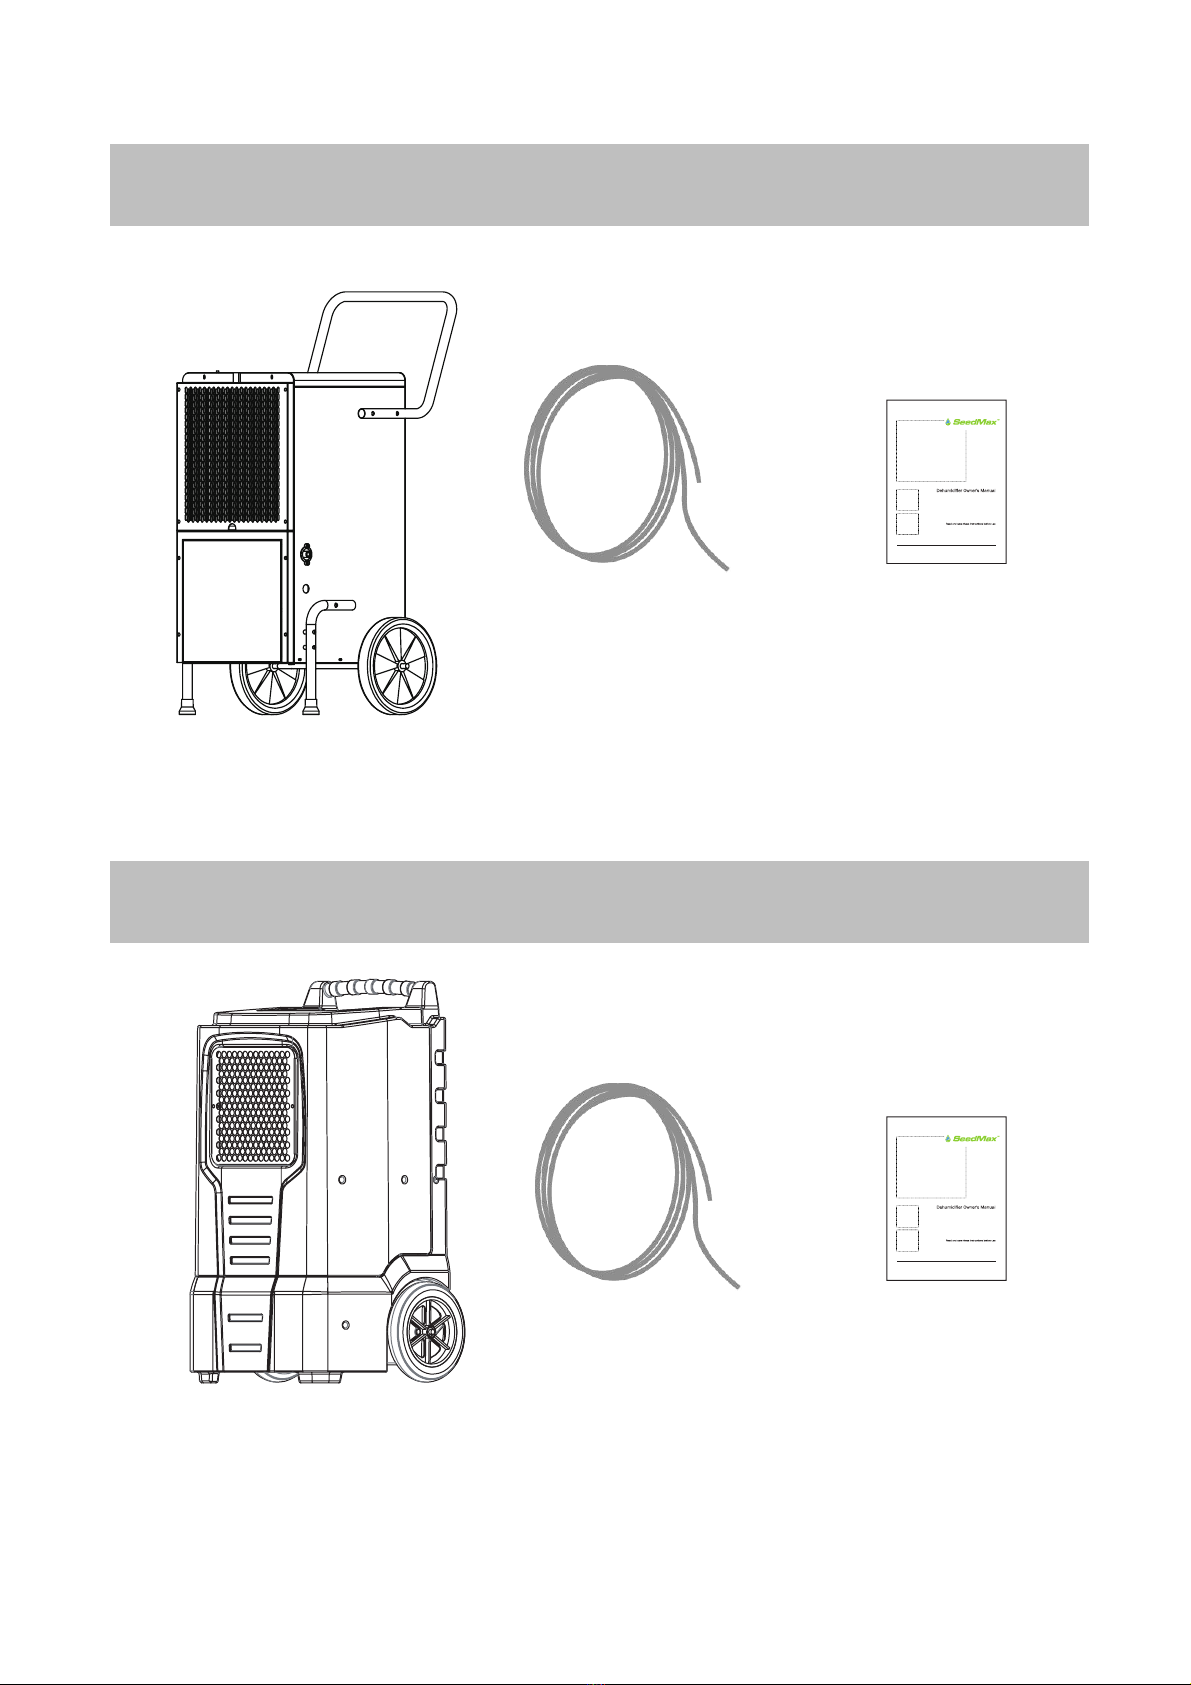
Drain hose x1 User’s Manual x1
*ECO-H Dehumidifier x1
Drain hose x1 User’s Manual x1
*ECO-H Dehumidifier x1
*ECO-H90 & H100 have water-pump pre-installed.
Items Included (ECO-H70B)
Items Included (ECO-H60)
4
Drain hose x1 User’s Manual x1
*ECO-H Dehumidifier x1
Drain hose x1 User’s Manual x1
*ECO-H Dehumidifier x1
*ECO-H90 & H100 has water-pump pre-installed.
Items Included (ECO-H100)
Items Included (ECO-H70, ECO-H90)
5
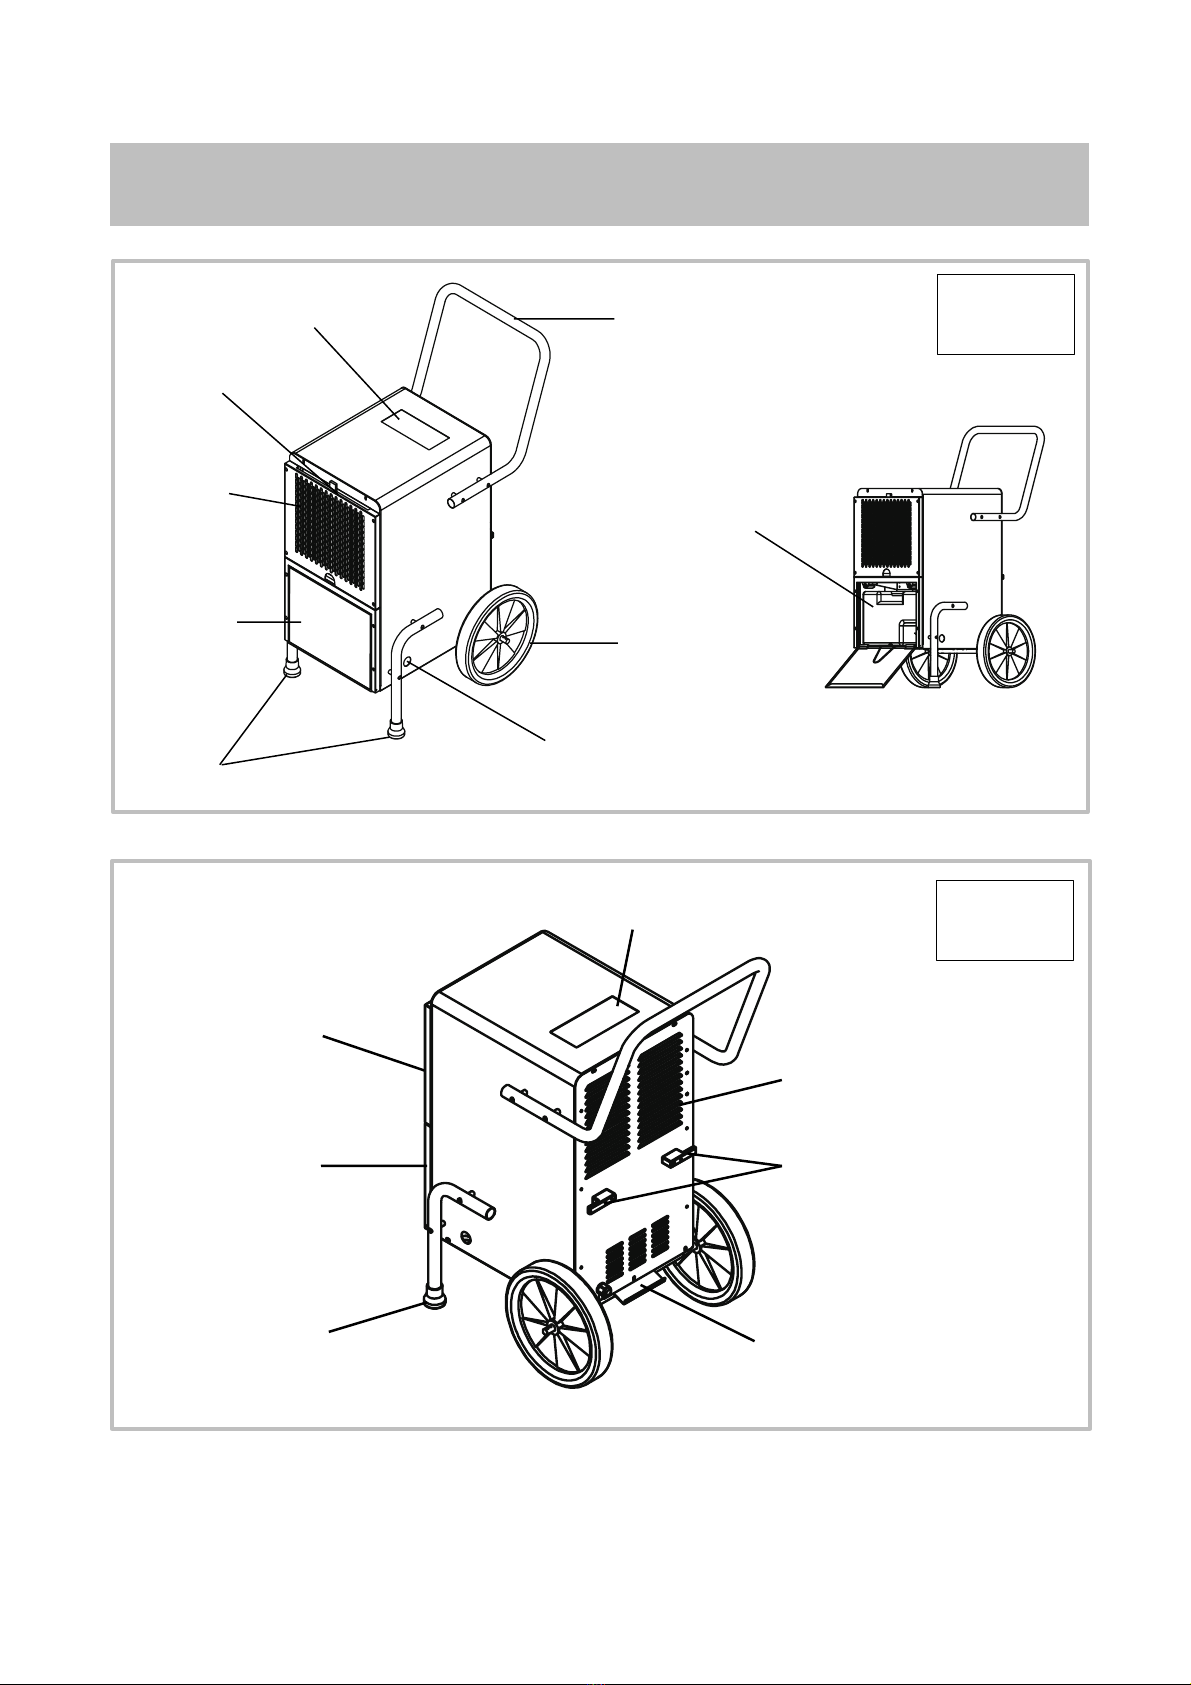
Front Door
Air-intake
(Grille)
Product Description (ECO-H50)
Control
Panel
Handle
Drainage
Outlet
FRONT
VIEW
Filter
Wheel(s)
Front Feet
Water-tank
(9.5Pints)
Control Panel
Power cord
holder
Air
Outlet
Pedal
Grille
(filter)
Front Door
(Water-tank)
Front foot
REAR
VIEW

6
Control
Panel
Air Outlet
Cable
Holder
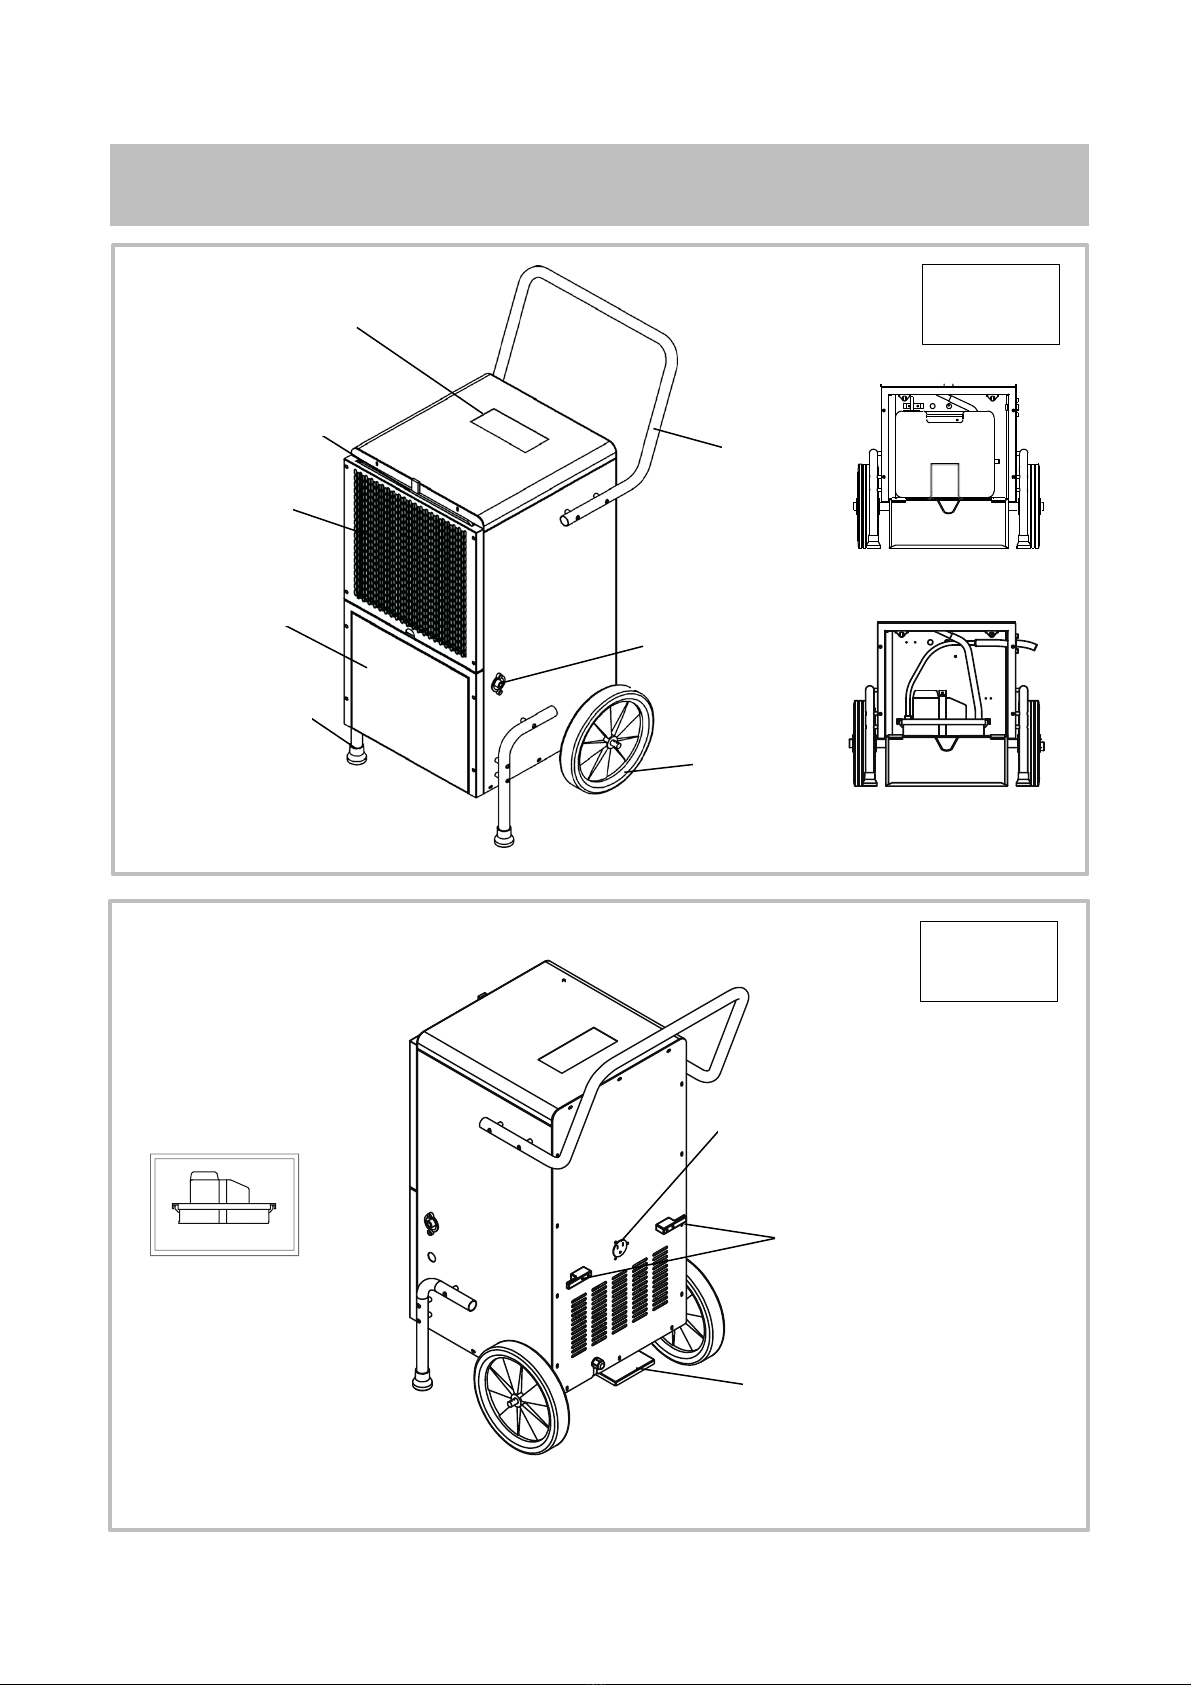
Product Description (ECO-H60)
Control
Panel
Handle
Air-intake
(Grille)
FRONT
VIEW
Filter
Wheel(s)
Front Door
Direct Drainage
Plug Holder
(NO ELECTRICITY
SUPPLY)
Pedal
REAR
VIEW
Water-tank
(15.2 Pints)
Front Feet

7
Front Feet
Front Door
Product Description (ECO-H70B)
Air-intake
(Grille)
Control
Panel
Handle
Side
Handle(s)
Filter
FRONT
VIEW
Water-tank
(9.5 Pints)
Wheel(s)
Drainage
Outlet
Side Air Outlet
Cable Holder
Side Handle(s)
Pedal
REAR
VIEW
8
Pump Inside
Product Description (ECO-H70, ECO-H90)
Power
Cord
Holder
FRONT
VIEW
Pedal
Plug Holder
(NO Electricity)
REAR
VIEW
Control
Panel
Handle
Air-intake
(Grille)
Filter
Drainage
Outlet
Wheel(s)
Front Door
Front Feet
H70 – Water tank
(22.2 Pints)
H90 – Water-pump
H90

9
Pump Inside
Pump Inside
Drainage
Outlet
Cable Holder
Air-intake
Filter
Product Description (ECO-H100)
Control
Panel
Handle
FRONT
VIEW
Wheel(s)
Roto-mold
Housing
VIEW
Roto-mold
Housing
VIEW
Air Outlet
Control
Panel
REAR
VIEW

10
•
3-button Panel – for ECO Model: H50, H60, H70 & H70B
Product Description
Control Panel
Dehumidify
(Indicator)
Tank Full
(Indicator)
Defrost
(Indicator)
Humidity %
(Indicator)
ON/OFF
(Button)
Humidity
Up
(Button)
Humidity
Down
(Button)
Fan
(Indicator)
Total Running Time
(Indicator)
Buttons
Power
Press ON/OFF button switch the
dehumidifier ON or OFF.
Humidity Setting
Tap “+” / “—” to increase/decrease the desired
humidity level by 1% increments. Touch and
hold to increase/decrease the setting humidity
level by 5% per second. The adjustable range is
30% to 90%
Information
Unit makes a “BEEP” sound when powered on.
The default setting for humidity is 60% and use
the Humidity Up and Down buttons to adjust
the humidity setting.
Keep pressing the Humidity Down button to
30% to activate continuous
dehumidify mode, which will show as “CO”
(Continuous Operation)
on the screen. The humidity % will flash when
setting the
humidity, then display current humidity after 5
seconds.

11
•
4-button Panel – for ECO Model: H90 & H100 (pump control)
Installation and Operation Guide
Control Panel
Dehumidify
(Indicator)
Tank Full
(Indicator)
Defrost
(Indicator)
Humidity %
(Indicator)
ON/OFF
(Button)
Humidity Control
(Button)
Pump Control
(Button)
Fan
(Indicator)
Total Running
Time
(Indicator)
Buttons
Power
Press ON/OFF button switch the
dehumidifier ON or OFF.
Humidity Setting
Tap “+” / “—” to increase/decrease the desired
humidity level by 1% increments. Touch and
hold to increase/decrease the setting humidity
level by 5% per second. The adjustable range is
30% to 90%
Pump Control
Press DRAIN button to allow pump
automatically empty the water inside.
Humidity Setting
Tap “+” / “—” to increase/decrease the desired
humidity level by 1% increments. Touch and
hold to increase/decrease the setting humidity
level by 5% per second. The adjustable range is
30% to 90%

12
•
Remove the packaging.
•
Your dehumidifier is designed for easy use and maintenance. Make sure that the filter is properly
installed before use.
•
Keep the unit’s air inlet and outlet at least 24 inches away from any wall/obstruction.
•
Select a flat, stable surface to place the unit. Do not place on or near heat sources such as stoves,
radiators, heaters and avoid placement in direct sunlight.
•
Do not operate the unit in areas where chemicals are stored. Volatile chemicals might damage the unit
and may cause the water bucket to leak.
Installation and Operation Guide
Installation
Must not use the dehumidifier in potentially dangerous locations.
Before operating the unit, place the unit
UPRIGHT for at least 1hour to allow
refrigerant to stabilize. If the unit was titled
on its side or upside-down during
transportation, set the unit UPRIGHT for at
least 4 hours before use. The dehumidifier
must be positioned UPRIGHT on a level
surface during operation.
Environment Temperature and Humidity: the
dehumidifier is designed to work in an
environment with a temperature of 41ºF - 95
ºF (5 ºC - 35 ºC) and relative humidity level of
10% and higher. The dehumidifier may not
function normally or efficiently if the room
temperature and humidity level exceed this
range.
Step on pedal of the rear housing plate to help tilt the
unit for better convenient moving.
NOTE: DO NOT tilt the unit over 45º to avoid
compressor damaging.

13
PLEASE READ ALL INSTRUCTIONS CAREFULLY
BEFORE OPERATING THE PRODUCT
•
Power – plug the power into a standard 115V power supply outlet.
•
Press “ON/OFF” button on control panel to start the unit.
•
The screen will display the current humidity setting value and press “+” or “—” to adjust desired
humidity increments of 1%. Press and hold the button to make faster adjustments. Setting the
humidity value below 30% will allow the unit enter into “continuous dehumidifying” mode and “CO”
will briefly appear on the screen.
•
Press “ON/OFF” again to shut down the dehumidifier and do not forget to unplug the power when not
in use.
•
Tips – the best humidity range for human health, furniture and other goods protection is 45%
- 65%. We suggest you keep the humidity in this range
Installation and Operation Guide
Operation
Do not handle the plug
with wet hands.
Electric shock may
occur, resulting in
injury or death.
•
When the humidity setting is higher than
the current room humidity, the
compressor will not run and fan motor
continues running.
•
Maintaining the humidity between 45-65%
is suggested for best results.
NOTE: NEVER attempt to start, stop and
restart the unit without waiting at least 3
minutes. Failure to do so may cause
damage to the compressor and/ or cause
unit failure.
•
The unit will automatically sense when it
needs to enter the Defrost mode,
especially in low-temperature
environments. During defrosting, the
Defrost Indicator will illuminate on the
display, the compressor will turn off, and
the fan motor will run until the cycle is
complete.
•
Accumulated run time on the display
indicates the total number of hours that
the unit has been operated.
NOTE: ALWAYS unplug the unit, properly
wrap the power cord and utilize the plug
storage receptacle before moving or
servicing. Use only the ON/OFF button to
turn the unit on and off.
DO NOT block the grids when the unit is in
use. Keep metal objects away from the
unit. Bodily injury or property damage may
occur.
14
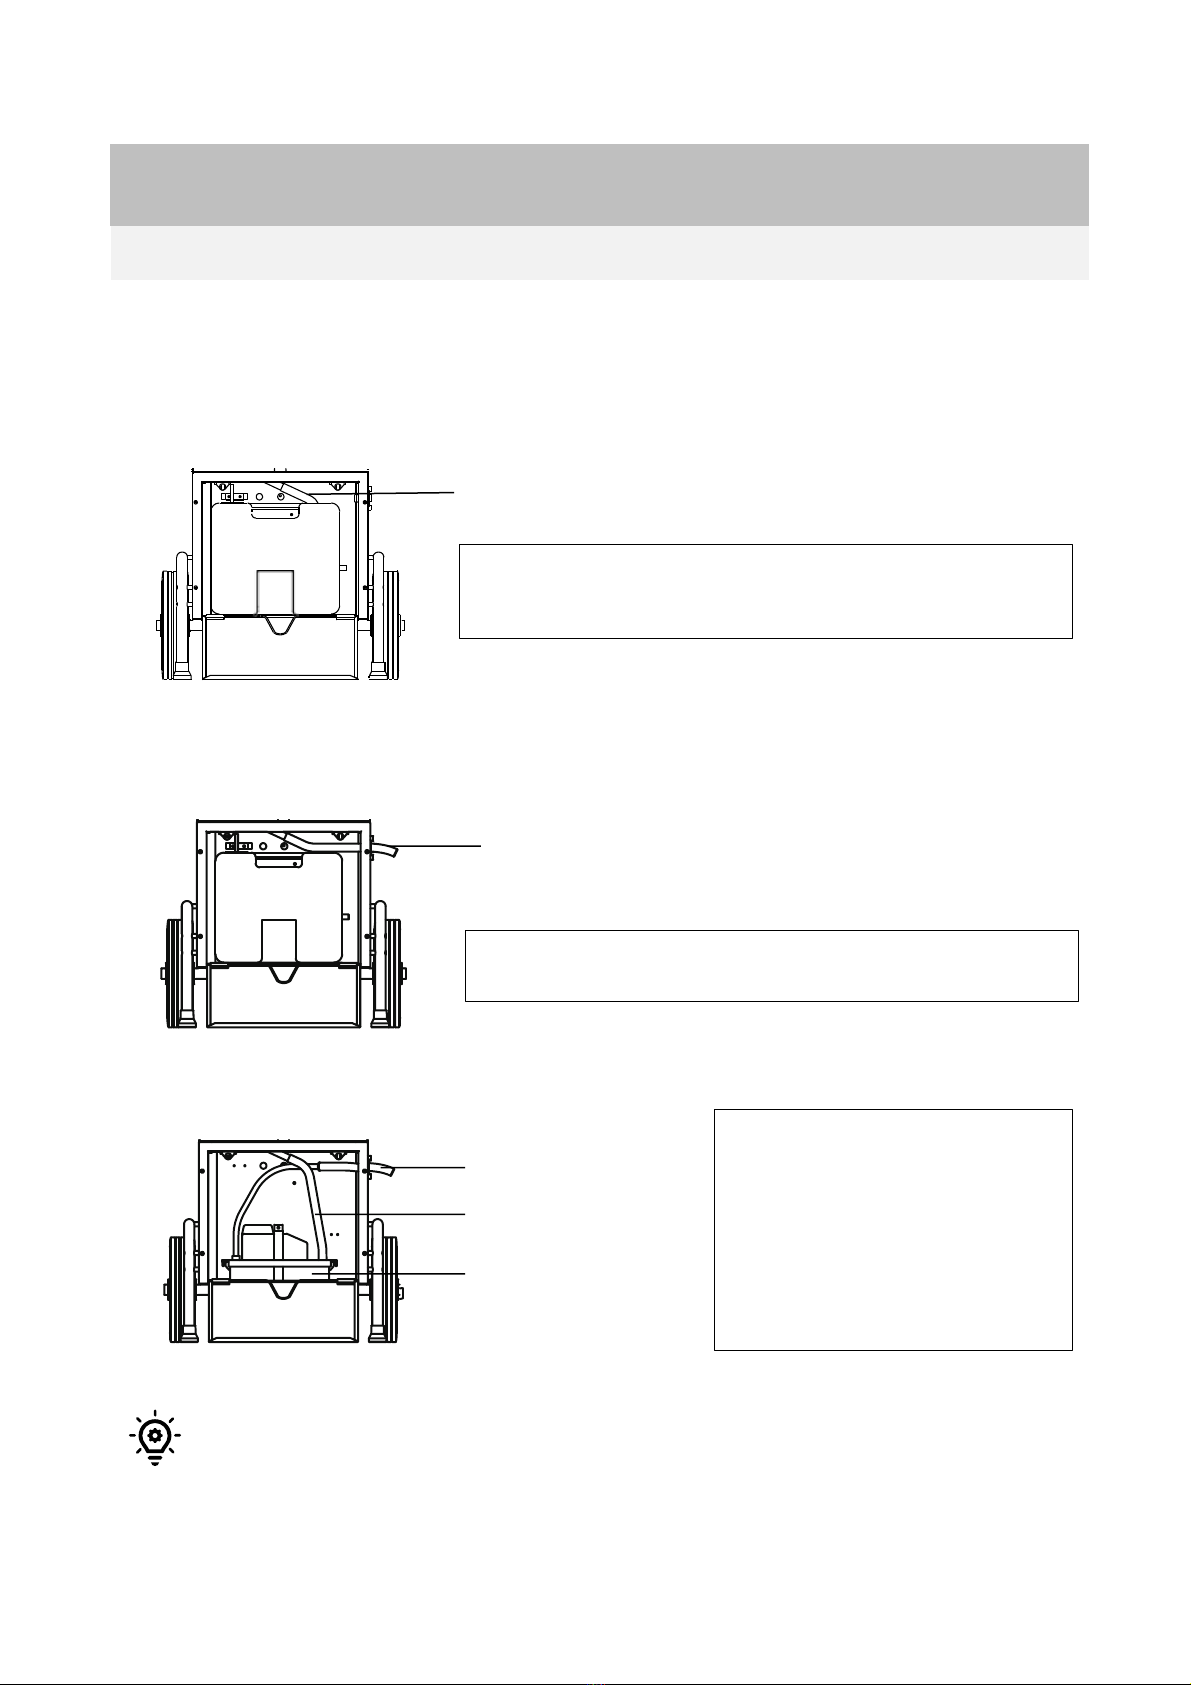
Drainage instruction - (tank drainage, continuous drainage & *water-pump drainage
*water-pump is PREINSTALLED on ECO-H90 & ECO-H100 and is optional available of interchange with tank for
other models
.
A. Water-tank connection (for ECO model: H50, H60, H70 & H70B)
B. Direct (Continuous) Connection (for all models)
C. Water-pump Connection (for ECO model: H90 & H100)
Tips – There might be a small amount of water present in the tank before using the dehumidifier for
the first time, which is normal. This is caused by the preliminary testing done by the factory.
Normally the condensate water on evaporator will be collected
on the dip tray and then runs into water tank through drain
hose.
Drain hose (into water-tank)
Drain hose through the hole on the side cover
NOTE: the hole is on the opposite side of the cover of model ECO-H60
The dehumidifier is designed to allow using direct drain hose
for removing the water.
External drain hose
(20 ft.)
Internal drain hose
Water-pump
Water-pump helps to drain out
condensate water automatically to
avoid unit stopping running by
tank-full.
Pump kit is available as option on
ECO-H series for tank
interchange.
Installation and Operation Guide
Operation – Drainage
15
Clean the surface
•
Use a damp cloth to wipe the surface of the housing. DO NOT clean the unit with water directly.
•
DO NOT clean the fins of the evaporator and condenser by yourself.
Store the machine
•
Store this unit in a dry and cool indoor area, away from direct sunlight as well as chemicals and out of
reach of children.
•
IMPORTANT: make sure the unit is levelly positioned.
•
DO NOT stack the units directly to avoid damaging.
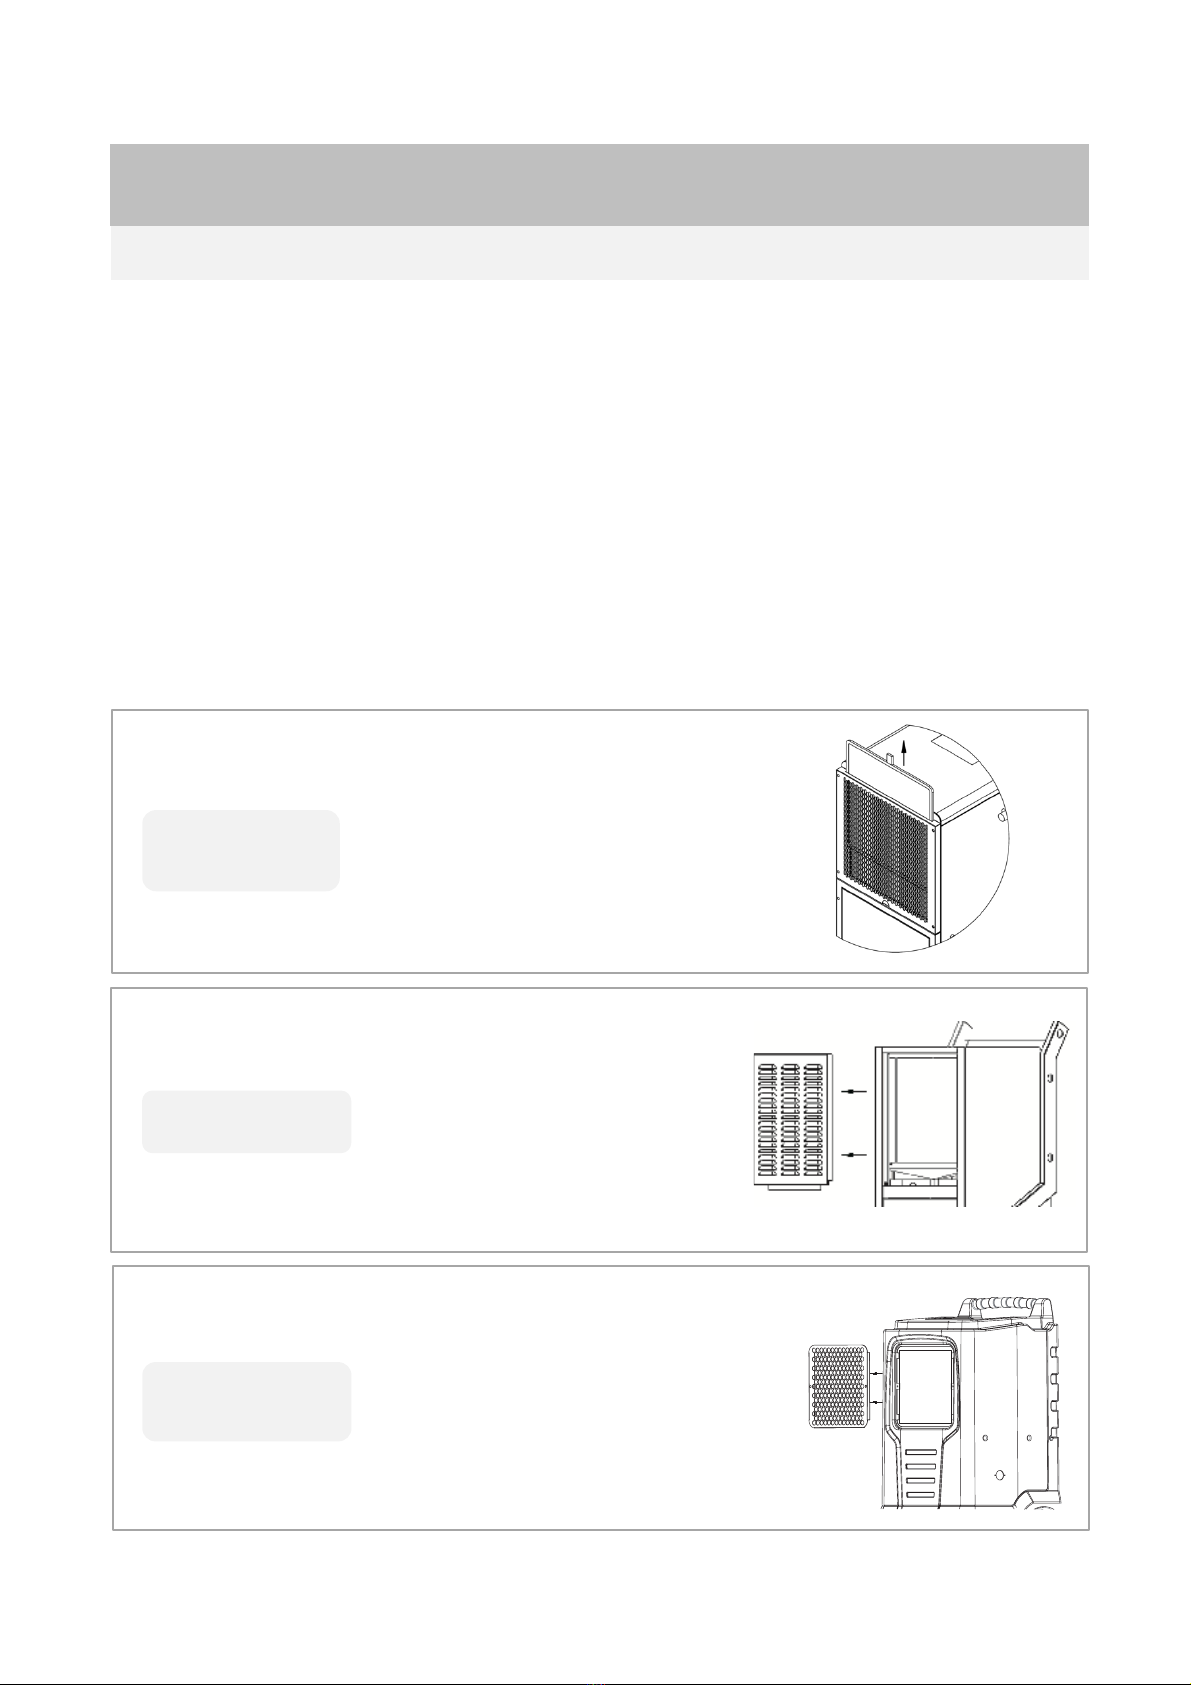
Filter
•
CLEAN the filter periodically to keep unit running efficiently. It is suggested to clean the filter monthly
or even more often while under very dusty condition.
•
DO NOT place the filter in the dishwater.
Installation and Operation Guide
Maintenance
To remove the filter, gently
pull upwards on the fabric
tab near the top side of the
unit
Model H50, H70,
H70B & H90
Model H60
To remove the filter, pull
out and lift the air-intake
grill, then remove the filter
on the back of the grill
Model H50, H70,
H70B & H90
To remove the filter,
remove the air-inlet grill by
loosing two screws on the
edges, then take out the
filter behind it

16
For ECO H-series codes:
Call service for changing defrost
sensor
Installation and Operation Guide
Error Codes
CODE
E3
E4
E5
CAUSE
Humidity Sensor Failure
Water-tank is Full
SOLUTION
Defrost Sensor Failure
Change humidity sensor
Empty the water inside the tank

17
PROBLEM
POSSIBLE CAUSE(S)
SOLUTION
Dehumidifier does
not turn on
No electricity.
Check power supply.
The power cord is not
properly plugged in.
Reconnect the power cord.
Dehumidifier runs
but humidity level
will not decrease
The system is still
starting up
wait for 3 minutes (180 seconds) until the
compressor starts running (protection).
Humidity setting is too
high
Reduce setting value
Air-flow is restricted
Make sure there is no obstacles blocking air-
intake or air-outlet side.
The room temperature is
too low/high
make sure the room temperature exceeds its
allowed range.
Water leakage
drain hose is loose
reconnect the drain hose
water-pump failure
(only H90 & H100)
Change water-pump
Noise
Drainage process
(only H90 & H100)
Water-pump may create certain sounds
during operation and this is normal.
Fan noise
Air is moving through the
unit
This is normal.
Installation and Operation Guide
Troubleshooting
18
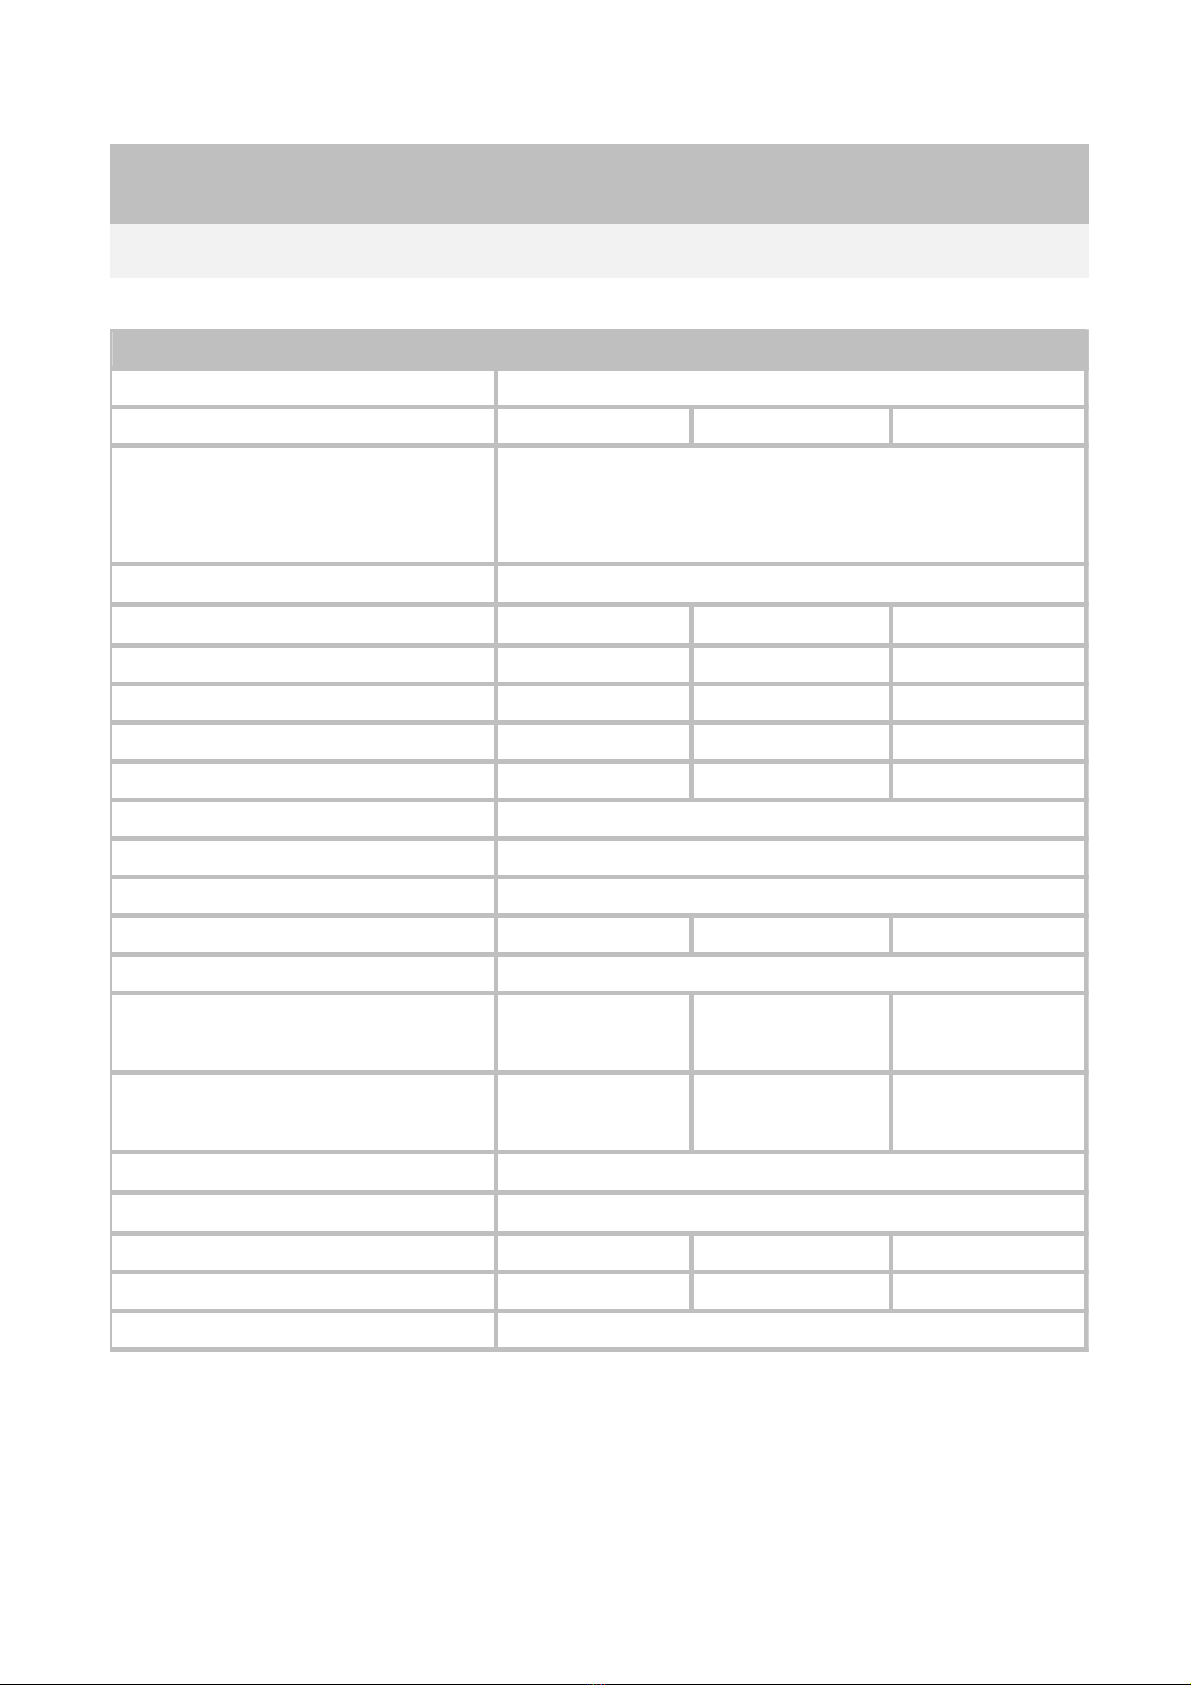
MODEL H50 H60
H70B
Power Supply
Current (A) 5.0 5.2 5.5
Operation Condition
(Temperature and Relative
Humidity)
Refrigerant
Charge Vol. (Oz) 14.1 11.3 20.5
Air-flow Volume (CFM) 135 220 220
Capacity (90°F, 90%RH)/ 24hrs 102 Pints 125 Pints 138 Pints
Capacity (86°F, 80%RH)/ 24hrs 88 Pints 110 Pints 122 Pints
Capacity (80°F, 60%RH)/ 24hrs 50 Pints 60 Pints 70 Pints
Handle & Wheel
Power Cord Length
Drain Hose Length
Water-tank
9.5 Pints
15.2 Pints
9.5 Pints
Water-pump
Unit Dimension
(L*W*H)in. 23.8*18.2*36.0 18.1*20*37.9
24.9*21.5*38.2
Packaging Dimension
(L*W*H)in. 24.0*20.4*30.1 22.8*20.9*41.1
26.3*23.3*37.1
Packaging
Qty per package
Net Weight (lbs) 73 119
102
Gross Weight (lbs) 82 137
115
Certificate
Optional
Carton
1x
ETL / C-ETL
41°F - 95°F
30% - 90%RH
115V/60Hz
Yes
9.8 ft.
20 ft.
R410a
Technical Specifications
H50, HT60 & H70B
Other manuals for ECO Series
1
This manual suits for next models
6
Table of contents
Other Seedmax Dehumidifier manuals


