• The amount of free space required to save a file
depends on the software.
For details on the amount of free space required,
refer to the instruction manual that was provided
with the software.
• Although very uncommon, it is possible for files to
be damaged if the Visual Memory Unit has had files
written to it an inordinately high number of times.
• If the Visual Memory Unit will not be used for a
while, unplug either the controller from the
Dreamcast or the Visual Memory Unit from the
controller. Leaving the Visual Memory Unit plugged
in will drain its batteries.
The methods for saving and loading files differ
according to the software. For details, refer to the
instruction manual provided with the Dreamcast,
and the software.
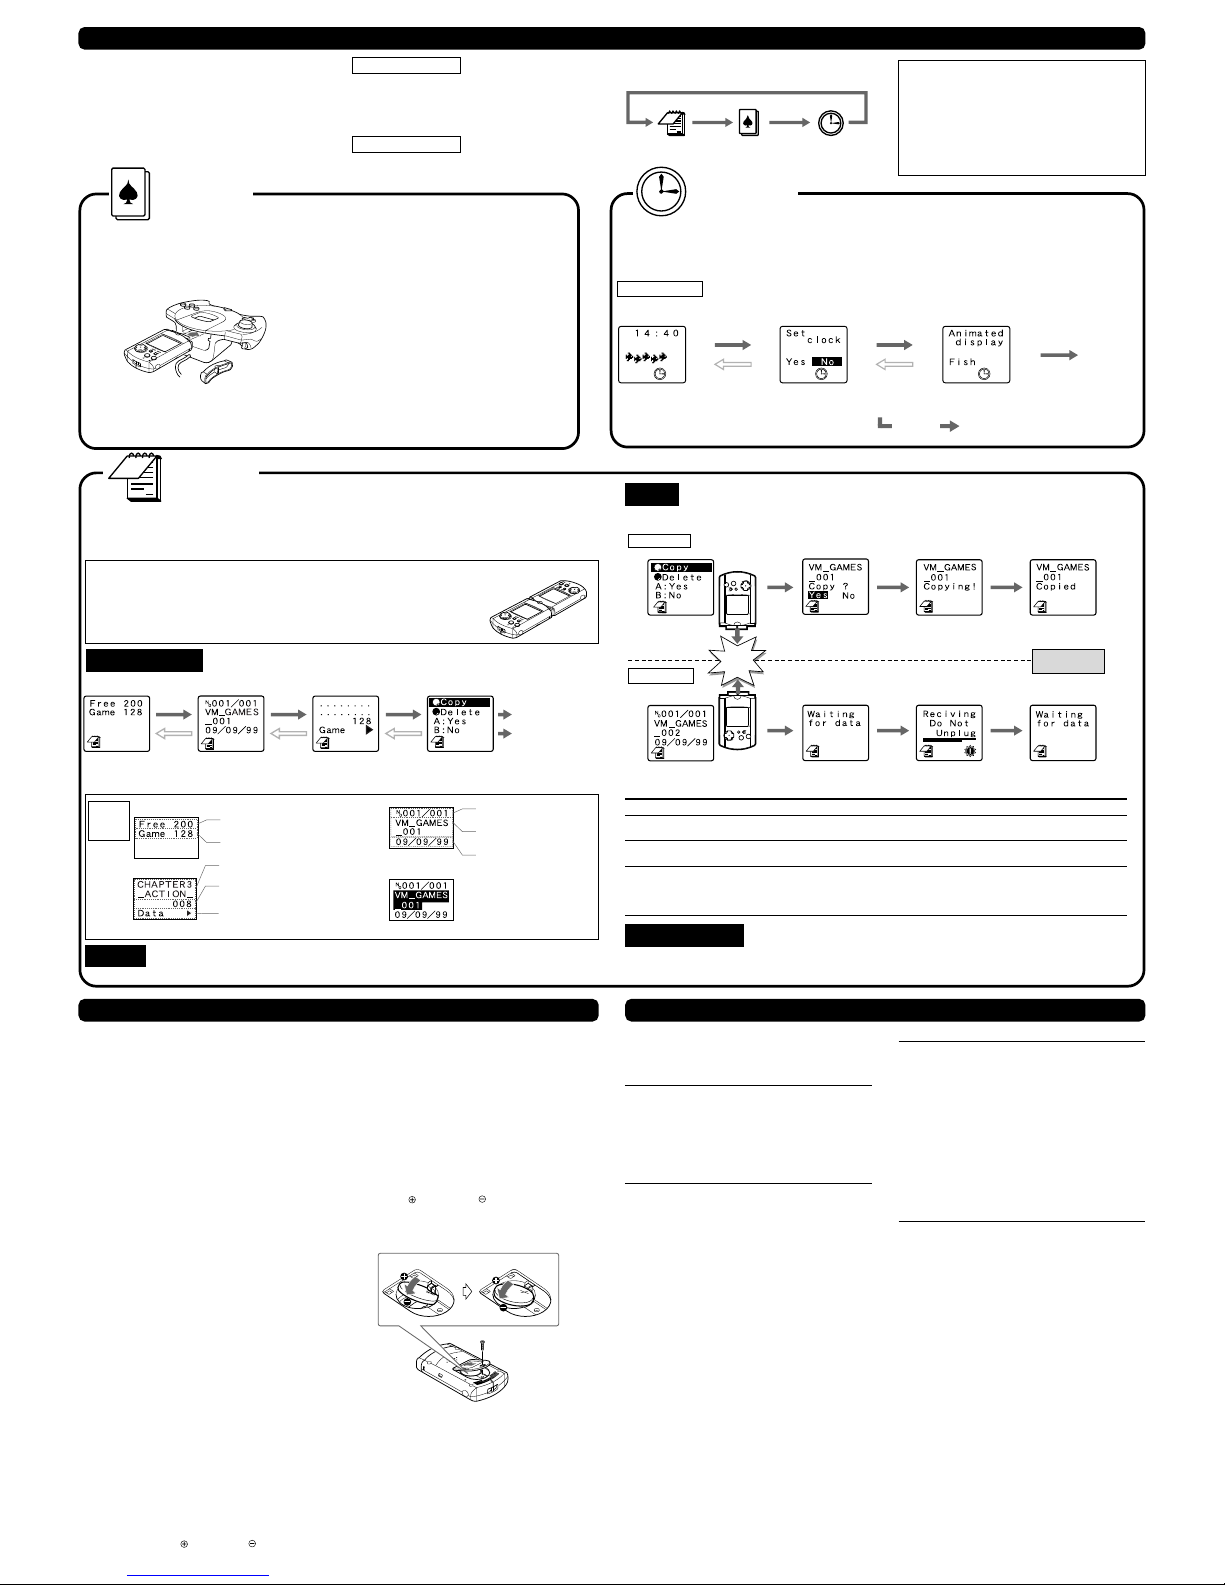
Plugging in the Visual Memory Unit
Dreamcast controller
Remove the cap from the Visual Memory Unit, and then plug
the Visual Memory Unit into the expansion socket on the
controller. Store the cap in a safe place so that you do not
loseit.
Unplugging the Visual Memory Unit
Grasp both sides of the Visual Memory Unit and carefully
pullitout.
Failure to comply with all warnings associated with this symbol could
result in serious bodily injury or death from fire or electric shock.
Failure to comply with all warnings associated with this symbol may
result in property damage, personal injury or fire caused by batteries
bursting or leaking, or by other mishaps.
Visual Memory Unit
Instruction Manual
Contents:
Visual Memory Unit, Instruction Manual (this
document) and two (2) lithium batteries (CR2032)
inserted during manufacturing for testing.
• Do not get the Visual Memory Unit wet or allow any
liquid to get inside. Doing so could result in fire or
electric shock.
• Do not use the Visual Memory Unit in humid locations,
such as in the bathroom or near a humidifier. Doing so
could result in fire or electric shock.
• Do not leave the Visual Memory Unit near heat
sources. Doing so could melt the case, and also could
result in fire or electric shock.
• Never use the Visual Memory Unit while driving a car
or other vehicle. Doing so could cause an accident.
• Never attempt to disassemble or modify the Visual
Memory Unit.
• Immediately flush your eyes with clean water and seek
medical assistance if the lithium battery leaks and you
get some of the liquid in your eyes. If you get any of
the liquid on your skin or your clothes, wash the liquid
away with clean water.
• Use CR2032 lithium batteries only. Never use any
other type of batteries together. Failure to comply with
these cautions may result in batteries bursting or
leaking which could cause a fire or personal injury.
• Do not use the Visual Memory Unit while walking.
Doing so could cause you to trip or otherwise
become involved in an accident.
• In order to prevent the batteries from being
swallowed by a small child, the batteries should
only be replaced by a responsible adult. Batteries
should be stored out of the reach of children.
• Swallowing a lithium battery could result in
choking or poisoning. If someone swallows a
battery, seek medical assistance immediately.
• When inserting batteries in the Visual Memory
Unit, make sure that the positive and negative
sides are oriented correctly as indicated on the
Visual Memory Unit. Inserting the batteries with
the wrong positive and negative polarities
could cause the batteries to burst or leak which
could result in fire or personal injury.
[Usage Environment]
• Do not use or place the Visual Memory Unit in an area
that is very hot or cold, smoky, dusty, humid or in an
area where water is common, such as near a sink or
tub.
• If you carry the Visual Memory Unit into a heated
room from outdoors on a cold day, the sudden
temperature change may cause condensation to form
inside of the Visual Memory Unit. In these
circumstances, the Visual Memory Unit should be left
to rest indoors for one hour before using it.
• The Visual Memory Unit should be used in the
following environmental conditions:
Temperature: 41°F to 95°F; humidity: 10% to 80% RH
(with no condensation)
[Handling the Visual Memory Unit]
• The Visual Memory Unit contains precision electronic
components. Do not drop or strike the Visual Memory
Unit.
• Do not get the Visual Memory Unit dirty. Be especially
careful to keep the connectors clean. If the Visual
Memory Unit does get dirty, wipe the dirt away with a
dry cloth. Never use cleaners, chemicals, or water to
clean the Visual Memory Unit.
• Always keep the cap on the connector when the Visual
Memory Unit is not connected to anything.
• Do not jerk or pull hard on the Visual Memory Unit
while it is connected. Doing so could disable or
damage the Visual Memory Unit.
• Do not leave the Visual Memory Unit connected to
another Visual Memory Unit when it is not being used.
Doing so could result in damage to the Visual Memory
Unit, and will also run down the batteries.
• Do not bend or pull excessively on the cap of the
Visual Memory Unit connector.
[Batteries]
• When the batteries are exhausted, replace them with
new ones promptly.
• Batteries should only be replaced by a
responsible adult. When replacing batteries, be
careful not to lose the screw for the battery
compartment cover.
• Use two CR2032 lithium batteries. When
replacing the batteries, replace both batteries
with new batteries.
• After replacing the batteries, always press the
Reset Button. Use a narrow-tipped instrument to
press the Reset Button.
• If the Visual Memory Unit does not work even if
you just replaced the batteries, remove the
batteries immediately and make sure that:
– The polarity of the batteries (the orientation of
the positive and negative sides) is correct.
– The batteries are of the correct type (two
CR2032 batteries).
– Both batteries are new.
• Do not short-circuit the batteries. Do not attempt
to disassemble, heat, recharge, modify or
otherwise tamper with the batteries. Do not place
the batteries into fire or water.
• When using new batteries, wipe the surfaces of
the batteries with a dry cloth before putting in the
Visual Memory Unit.
• If the Visual Memory Unit will not be used for an
extended period of time, remove the batteries.
[LCD Screen]
• Do not subject the LCD screen of the Visual
Memory Unit to strong impacts. Be particularly
careful when carrying the Visual Memory Unit
around.
• Do not apply pressure to the screen using a pen,
pencil or any other device.
[Miscellaneous]
• Please be sure to dispose of the Visual Memory
Unit package materials and the battery insulating
tab properly.
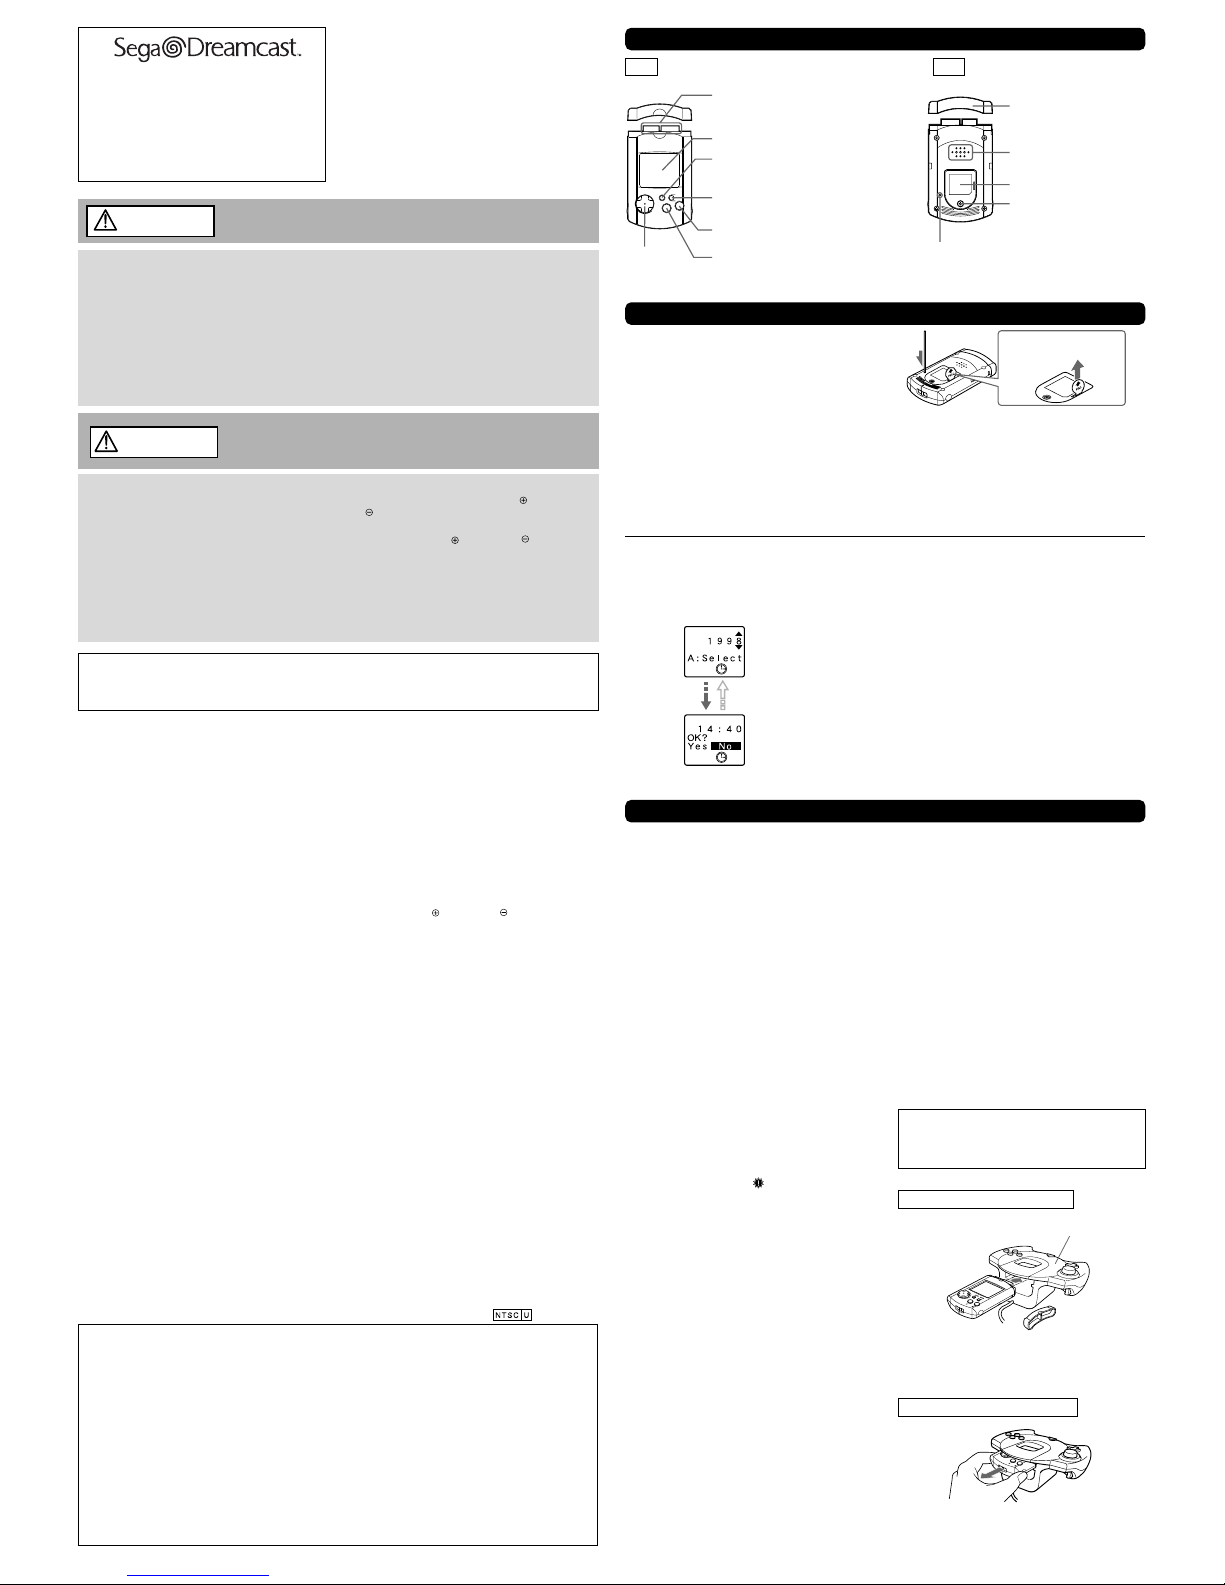
Part Names and Functions
Front Connector
Connects with Dreamcast peripherals (that
have an expansion socket) and with other
Visual Memory Units.
LCD Screen
Sleep Button
Turns the Visual Memory Unit power on/off.
Mode Button
Selects file, game, or clock mode.
B Button
Cancels the selection of an item.
A Button
Selects or enters the selected item.
Back
Cap
Speaker
Battery Compartment Cover
Battery Compartment Cover
Screw
Reset Button
Returns the Visual Memory Unit to its initial state.
Reset Button
Use a narrow-tipped instrument to press the Reset
Button (located on the bottom of the Visual Memory
Unit) in the situations described below. After the Reset
Button has been pressed, the clock setting screen
appears.
• When using for the first time (after removing the
battery insulation tab)
• After the batteries have been replaced
• If the Visual Memory Unit has stopped functioning
due to a strong impact, etc.
• If the screen is not displayed properly
Notes
• Do not press hard on the Reset Button with a sharp-
tipped instrument.
• All clock and other user settings are lost when the
Reset Button is pressed. Saved files however, are
not lost.
• Do not press the Reset Button except when
necessary.
Setting the Date and Time
When the Reset Button has been pressed (for example, after replacing the batteries), the Visual Memory Unit
automatically enters the date and time setting mode. Some games may not run properly if the date and time are
not set correctly. However, if the Visual Memory Unit is only going to be used as backup memory for the
Dreamcast, the date and time do not have to be set.
Select by pressing up or down on the Directional Pad. Enter or cancel by pressing A
or B Button.
Follow the screen display and set the year, month, day, hour, and minute, in that
order.
Once all settings have been completed, confirm whether to finalize those settings. If
there are no changes to be made, select “Yes.” The Visual Memory Unit title screen is
then displayed.
To change the settings, select “No” and then press the A Button (or the B Button) in
order to return to the previous screen and change the settings.
Using the Visual Memory Unit as a Memory Card
The Visual Memory Unit is an external memory card* that is used by plugging it into an expansion socket on a
Dreamcast peripheral, such as the Dreamcast controller.
A Visual Memory Unit has a file storage capacity of up to 200 blocks. It is necessary to initialize the Visual Memory
Unit the first time you use it.
For details on initialization, refer to the instruction manual that was provided with the Dreamcast.
* A “memory card” can be used to save various files from games that support this capability.
Initialization (Deleting All
Files)
The “initialization” procedure is necessary in order to
use the Visual Memory Unit. If you want to delete all
files in a Visual Memory Unit or if you can no longer
load any files from a Visual Memory Unit, connect it to
the Dreamcast and initialize it.
Notes on Initialization
• If a Visual Memory Unit in which files have already
been saved is initialized, all files in the Visual
Memory Unit will be deleted. If those files are
needed, copy them to another Visual Memory Unit
beforehand. Refer to “File Mode” (reverse side) in
the “Selecting the Mode” section for details.
• Never turn off the Dreamcast, disconnect the
controller plug from the Dreamcast, or turn off the
power while initializing, file deleting, or file copying
is in progress (while the warning icon is
displayed). Also, do not connect or disconnect any
other expansion units. Doing so could damage the
files you are saving, making it impossible to load
them. Once a file has been damaged to the point
that it cannot be loaded, the only recourse is to
deleteit.
Notes on Connection
• The Visual Memory Unit can be plugged into or
removed from the Dreamcast controller without
turning off the Dreamcast power.
• When a Visual Memory Unit is plugged into an
expansion socket on a Controller, the screen
display on the Visual Memory Unit will:
1. Auto shut off after a set amount of time if the
Dreamcast power is off, 2. Display the Visual
Memory Units initialized icon if the Dreamcast is
currently displaying its Main menu and 3. Display
an application program or game icon if the
Dreamcast is currently running an application or
game. Please note that how an icon is displayed is
application or game dependant.
• When a Visual Memory Unit is plugged into an
expansion socket on a controller, the screen
display on the Visual Memory Unit will shut off.
SLEEP MODE
AB
First setting
screen
Final setting
screen
Sega of America, Inc.
P.O. Box 7639 San Francisco, CA, 94120-7639
1-800-USA-SEGA & www.sega.com
• Note that files stored in this device could be lost or damaged under certain conditions. Sega makes no guarantees against
the loss or damage of stored files.
• Please note that specifications and product exterior may change without notice.
• Unauthorized reproduction of the contents of this document is prohibited.
• SEGA, Dreamcast, Visual Memory and the Dreamcast logo are either registered trademarks or trademarks of Sega
Enterprises, Ltd.
Export, use for profit, rental or leasing of this product is prohibited.
Further, Sega offers no warranty service or support outside of the US and Canada.
Product covered under one or more of the following U.S. Patent Nos: 5,525,770; 5,396,030; and Japanese Patent No.
2,870,538 (Patents pending in U.S. and other countries).
Thank you very much for purchasing this Visual
Memory Unit.
Before using the Visual Memory Unit, please read
this Instructions Manual as well as the Instruction
Manual and Important Safety Instructions provided
with the Dreamcast. After reading this manual, be
certain to keep it handy for future reference.
WARNING
FCC Warning
This device complies with Part 15 of FCC Rules. Operation is subject to the following two conditions; (1) this
device may not cause harmful interference (2) this device must accept any interference that may be received,
including interference that may cause undesired operation.
Compatible models: This Visual Memory Unit is compatible with Dreamcasts bearing the mark.
Directional
Pad
Selects items.
Please properly dispose of the
battery insulating tab after you
have removed it.
Introduction
CAUTION
Follow the precautions shown below when using the Visual Memory
Unit. Failure to follow these precautions could damage the Visual
Memory Unit or cause it to malfunction.
Usage Precautions
SEGA ENTERPRISES, LTD., 1999 670-14102A