ACME RS User manual

www.acme.eu
RS
racing
wheel

2

3
4 GB User’s manual 147 Warranty card
15 LT Vartotojo gidas 148 Garantinis lapas
26 LV Lietošanas instrukcija 149 Garantijas lapa
37 EE Kasutusjuhend 150 Garantiileht
48 RU Инструкция пользователя 151 Гарантийный талон
59 PL Instrukcja obsługi 152 Karta gwarancyjna
70 DE Bedienungsanleitung 153 Garantieblatt
81 UA Інструкція 154 Гарантійний лист
92 RO Manual de utilizare 155 Fişa de garanţie
103 BG Ръководство за употреба 156 Гаранционен лист
114 ES Manual de usuario 157 Hoja de garantía
125 FR Manuel de l’utilisateur 158 Document de garantie
136 PT Manual do usuário 159 Folha de garantia

4
GB Introduction
Thank you for purchasing ACME gaming wheel. Please read this manual carefully FIRST, before using
the device.
For your convenience, record the complete model number and the date you received the product
together with your purchase receipt and attach it to the warranty and service information. Retain
them in the event warranty service is required. If you found this product faulty or damaged due to
quality problems, please return it to our repair department or the agency where you bought it.
Package contents
• RS racing wheel
• Foot pedals
• Table clamp and screw
• Drivers CD
• User‘s manual + warranty pages inside
Features and specification
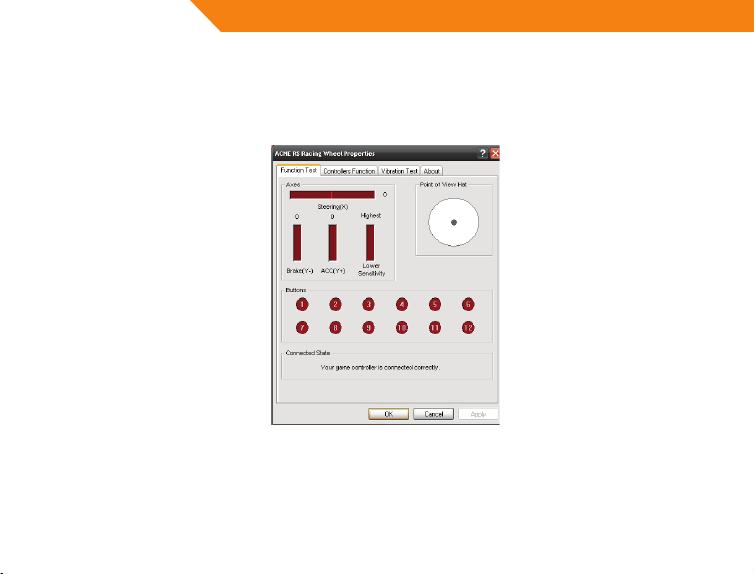
• 2 axes, a D-Pad and 12 separate action buttons
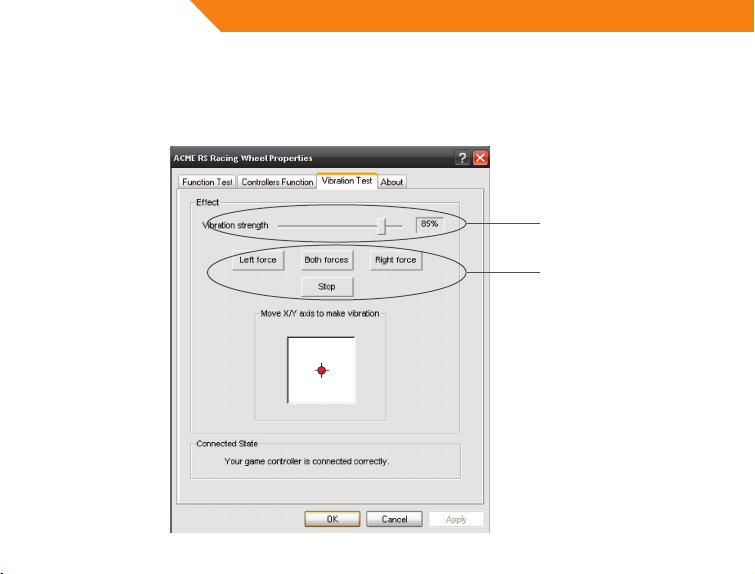
• Built-in motors let you feel every inch of the road for maximum control
• Digital mode and Analog mode are interchangeable
• Works with Windows-based PC: Windows2000/XP/Vista/7™
• Auto-calibration function(DRIVER installation is required)
• 180° wheel rotation

5
GB
• Powerful function for driver settings
• Spring-loaded pedals for acceleration and brakes create a driving experience
• 7 big and durable suction cups make the wheel xed in place and easy to operate
• 2.0 m wheel cable and 1.6 m pedal cable
• Working current is lower than 170mA
Buttons layout
Front Buttons
Mode-LED
D-pad
Power LED
Acceleration (ACC) (Y+)Brake(Y-)

6
GB
Ports
Port for Pedal Cable USB cable
Assembly
Play on the desk or table
Step 1. Place the wheel in acomfortable driving position (on a desk or table) and press the base unit
down rmly on the surface. (See Figure 1)
Step 2. Turn the clamp screw until the base is rmly connected. (See Figure 2):
Figure 1 Figure 2

7
GB
Driver installation and settings
Driver Installation
• Connect the wheel to the PC. Put the CD into the CD-ROM drive. Your PC will detect the driver
automatically. Follow on- screen prompts to complete the installation. A shortcut will be created
on the desktop when installation is done (see Picture 2 as below). Users can simply click this icon
to test and set up
Picture 2
• Double click the shortcut “ACME RS Racing Wheel” to enter game controllers (see picture 3 as
below)
Picture 3

8
GB
Product Test
• TestInterface
Clickthe“Test”buonasseenintheabovePicture3.Enterthewheeltestinterfaceasbelow(see
Picture4)totestaxisandbuons.
Picture 4
Driver Function Test
• You can set the original dead zone for wheel direction (X axis), gas (Y+ axis), brake (Y-axis) as
below. (see picture 5“Dead Zone setup”)
• Wheel sensitivity can be adjusted from low to high in dierent degrees as below. (see Picture 5

9
GB
“sensitivity setup”)
• Wheel acceleration, brake and key 1 to key 12 is interchangeable (key mapping). (See Picture 5
“KeyMap setup”as below.)
• When driver is installed, default is set the rst time you press the MODE button. There is no need
for a manual calibration.
Note: The rst time you press the wheel MODE button, please do not press any other buttons
Picture 5
Sensivityadjustment
KeyMapSet-up
DeadZoneSet-up

10
GB
Vibration Test
• Vibration strength can be adjusted to dierent degrees as below. (See Picture 6 “vibration
strength”)
• Motor test methods (See Picture 6)
Picture 6
Mothor test methods
Vibration strength

11
GB
Driver Uninstall
• Rerun the driver. Click NO to remove the driver. Click YES to reinstall the driver. (See Picture 7 as
below)
Picture 7

12
GB
• Click“Finish” to save and quit. (See picture 8 as below)
Picture 8

13
GB
Troubleshooting
• The wheel is not working when software and hardware installation is completed on the PC.
Please check whether the wheel cable is properly connected to your PC. If the problem still exists,
please restart your PC
• The motors do not vibrate in PC racing games (e.g. Need for Speed 5).
Quit the game and restart it. Do not insert or pull the wheel cable when
gaming. If the problem still exists, please restart your PC.
• Certain axis will be automatically functioning when the game starts (e.g. Need for Speed 5).
Please check whether the wheel is calibrated or set after calibration.
Enter Option > Controllers > Dead Zone.
Adjust the range of Dead Zone and keep the axis within the range
Active Zone Dead Zone Active Zone
Axis
Axis
• Settings for Driver“Controller Function”are not functioning
You probably have forgotten to conrm the settings. Click“Apply”when settings are selected

14
GB
Precautions
• Please carefully read this manual before using the wheel
• Do not hit, drop or otherwise abuse it.
• Do not disassemble, modify or try to repair it by yourself
• Do not store it in places that are moist, hot or greasy.
Caution!
• Do not expose the gaming wheel to direct sunlight, moisture or extremely hot environment. Use
the device in temperature of 5 ~ 35°C.
• Do not allow liquids to penetrate inside the device.
• Do not put heavy objects on the device.
• Do not disassemble.
• Do not pull or twist the USB cable of the device.
• Avoid dropping or breaking.
Waste Electrical and Electronic Equipment (WEEE) Symbol
The use of the WEEE symbol indicates that this product may not be treated as
household waste. By ensuring this product is disposed of correctly, you will help
protect the environment. For more detailed information about the recycling of this
product, please contact your local authority, your household waste disposal service
provider or the shop where you purchased the product.

15
LT
Įvadas
Dėkojame, kad įsigijote žaidimams skirtą vairą „ACME“. Prieš naudodami įrenginį, IŠ PRADŽIŲ
perskaitykite šį vadovą.
Dėl savo paties patogumo užsirašykite visą modelio numerį ir datą, kada įsigijote šį gaminį, kartu su
savo pirkinio kvitu prisekite ją prie garantijos ir techninės priežiūros informacijos lapelio. Laikykite
juos tam atvejui, jei prireiktų atlikti techninę priežiūrą. Jei pastebėjote, kad ši gaminys su defektais
arba neveikia dėl su kokybe susijusių problemų, grąžinkite jį į mūsų taisyklą arba atstovybę, iš kurios
jį pirkote.
Pakuotės turinys
• Žaidimų vairas
• Kojomis valdomi pedalai
• Tvirtinimo prie stalo rinkinys.
• Tvarkyklių CD
• Naudotojo vadovas ir garantiniai puslapiai jo viduje
Funkcijos ir specifikacijos
• 2 ašys, krypčių klaviatūra ir 12 atskirų veiksmų mygtukų.
• Vidinis variklis leidžia pajusti kiekvieną kelio centimetrą ir užtikrinti gerą valdymą.
• Galima keisti tarp skaitmeninio ir analoginio režimų.
• Veikia„Windows“ kompiuteriuose:„Windows2000“/„XP“/„Vista“/„7™“.
• Automatinio kalibravimo funkcija (reikia įdiegti TVARKYKLĘ).

16
GB
• 180° vairo pasukimas.
• Didelė vairavimo funkcijų nustatymų įvairovė.
• Autopiloto funkcija leidžia patogiai mėgautis vairavimu.
• Stabdžių ir akseleratoriaus pedalai užtikrina realistišką vairavimo pojūtį.
• 7 dideli ir patikimi siurbtukai leidžia gerai pritvirtinti vairą ir lengvai jį valdyti.
• 2,0 m ilgio vairo USB laidas ir 1,6 m pedalų laidas.
• Darbinė srovė mažesnė nei 170 mA.
Mygtukų išdėstymas
Priekiniai mygtukai
Režimo
indikatorius
Krypčių mygtukai
Akceleratorius (ACC) (Y+)Stabdis (Y-)
Maitinimo
indikatorius

17
LT
Lizdai
Paminų kabelio lizdas USB kabelis
Žaidimų vairo surinkimas
Žaidimų vairo tvirtinimas ant stalo ar kito kieto paviršiaus:
Žingsnis 1. Uždėkite žaidimų vairą, taip, kad jums patogu būtų žaisti ir atsargiai prispauskite
pagrindinį korpusą žemyn ant paviršiaus, žr. paveiksliuką 1.
Žingsnis 2. Prisukite prispaustuvą, kad vairas tvirtai laikytųsi ant stalo paviršiaus, žr. paveiksliuką 2.
Pav. 1 Pav. 2

18
LT
Tvarkyklių įdiegimas ir nustatymas
Tvarkyklių įdiegimas
• Prijunkite vairą prie kompiuterio. Į CD-ROM įrenginį įdėkite kompaktinį diską. Kompiuteris
automatiškai aptiks tvarkykles. Sekdami nurodymus, pateikiamus ekrane, užbaikite
įdiegimą. Baigus įdiegimą darbalaukyje bus sukurta nuoroda (žr. 2 pav.). Vartotojas,
norėdamas keisti nuostatas ar patikrinti įrangą, gali paprasčiausiai paspausti šią piktogramą
2 pav.
• Dukart spustelėkite nuorodą„ACME RS racing Wheel“, kad atidarytumėte žaidimų valdiklių langą
(žr. 3 pav.).
3pav.

19
LT
Produkto patikrinimas
• Tikrinimo sąsaja
Spustelėkite mygtuką „Test“, kaip parodyta 3 pav. Įjunkite vairo patikrinimo sąsają, kaip nurodyta
toliau (žr. 4 pav.), kad patikrintumėte ašis ir mygtukus.
4 pav.
Vairavimo funkcijų patikrinimas
• Galite nustatyti originalią nejautrumo zoną vairo krypčiai (X ašis), greičio (Y + ašis), stabdžio (Y-
ašis) paminoms, kaip nurodyta toliau (žr. 5 pav. Nejautrumo zonų nustatymas).
• Vairo jautrumą galima nustatyti nuo mažiausio iki didžiausio, parenkant skirtingus toliau
nurodytus laipsnius (žr. 5 pav. Jautrumo nustatymas).

20
• Vairo aksceleravimo, stabdymo funkcija ir 1–12 mygtukai yra keičiami (galima priskirti įvairias
funkcijas) (žr. 5 pav. Mygtukų nuostatos).
• Kai įdiegta tvarkyklė, pirmą kartą paspaudus„MODE“ (režimo) mygtuką, nustatomos numatytos
nuostatos. Nereikia rankinio kalibravimo.
Pastaba: kai pirmą kartą spaudžiate vairo„MODE“ (režimo) mygtuką, nespauskite jokių kitų
mygtukų.
LT
Jautrumonustatymas
Mygtukųnuostatos
Nejautrumozonų
nustatymas
5 pav.
Table of contents
Other ACME Video Gaming Accessories manuals