Seigen S0125 User manual

INSTRUCTIONS FOR
DESCRIPTION. DUAL ACTION PALM SANDER Ø125MM
240W/230V
MODEL NO: S0125
Thank you for purchasing a Sealey product. Manufactured to a high standard, this product will, if used according to these
instructions, and properly maintained, give you years of trouble free performance.
IMPORTANT: PLEASE READ THESE INSTRUCTIONS CAREFULLY. NOTE THE SAFE OPERATIONAL REQUIREMENTS, WARNINGS & CAUTIONS. USE
THE PRODUCT CORRECTLY AND WITH CARE FOR THE PURPOSE FOR WHICH IT IS INTENDED. FAILURE TO DO SO MAY CAUSE DAMAGE AND/OR
PERSONAL INJURY AND WILL INVALIDATE THE WARRANTY. KEEP THESE INSTRUCTIONS SAFE FOR FUTURE USE.
1. SAFETY
1.1. Electrical Safety
WARNING! It is the user’s responsibility to check the following:
Check all electrical equipment and appliances to ensure that they are safe before using. Inspect power supply leads, plugs and all
electrical connections for wear and damage. Sealey recommend that an RCD (Residual Current Device) is used with all electrical
products. You may obtain an RCD by contacting your local Sealey dealer.
if the lamp is used in the course of business duties, it must be maintained in a safe condition and routinely PAT (Portable Appliance
Test) tested.
Electrical safety information, it is important that the following information is read and understood.
1.1.1. Ensure that the insulation on all cables and on the appliance is safe before connecting it to the power supply.
1.1.2. Regularly inspect power supply cables and plugs for wear or damage and check all connections to ensure that they are secure.
1.1.3. Important: Ensure that the voltage rating on the appliance suits the power supply to be used and that the plug is tted with the correct
fuse - see fuse rating in these instructions.
8DO NOT pull or carry the appliance by the power cable.
8DO NOT pull the plug from the socket by the cable. Remove the plug from the socket by maintaining a rm grip on the plug.
8DO NOT use worn or damaged cables, plugs or connectors. Ensure that any faulty item is repaired or replaced immediately by a
qualied electrician.
1.1.4. This product is tted with a BS1363/A 13 Amp 3 pin plug.
If the cable or plug is damaged during use, switch the electricity supply and remove from use.
Replace a damaged plug with a BS1363/A 13 Amp 3 pin plug. If in doubt contact a qualied electrician.
Class II products are wired with live (brown) and neutral (blue) only are marked with the Class II symbol;
A) Connect the BROWN live wire to the live terminal ‘L’.
B) Connect the BLUE neutral wire to the neutral terminal ‘N’.
C) After wiring, check that there are no bare wires and ensure that all wires have been correctly connected.
Ensure that the cable outer sheath extends inside the cable restraint and that the restraint is tight.
DO NOT connect either wire to the earth terminal.
Sealey recommend that repairs are carried out by a qualied electrician.
1.2. General Safety
WARNING! Ensure that Health & Safety, local authority and general workshop practice regulations
are adhered to when using this sander
1.2.1. Familiarise yourself with the application, limitations and potential hazards of the sander.
WARNING! Disconnect from the mains power and ensure that the pad is at a complete standstill before changing accessories,
servicing or performing any maintenance.
1.2.2. Maintain the sander in good condition (use an authorised service agent).
1.2.3. Replace or repair damaged parts. Use genuine parts only. Unauthorised parts may be dangerous and will invalidate the warranty.
WARNING! Keep all holding screws in place, tight and in good working order. Check regularly for damaged parts.
A part that is damaged must be repaired/replaced before the sander is next used.
1.2.4. Use the sander in a suitable work area and keep the area clean and tidy and free from unrelated
materials. Ensure that there is adequate lighting.
1.2.5. Keep the sander clean for best and safest performance.
1.2.6. Before each use check all attachments for condition. If worn or damaged replace immediately.
1.2.7. Ensure that there are no flammable materials near the work area.
1.2.8. WARNING! Wear approved safety eye protection, ear defenders and, if dust is generated, respiratory protection.
1.2.9. Maintain correct balance and footing. Ensure that the floor is not slippery and wear non-slip shoes.
Recommended fuse rating
5 Amp
Refer to
Instruction
Manual
Wear Eye
Protection
S0125 | Issue 2 21/02/17
Original Language Version
© Jack Sealey Limited
Wear
Protective
Gloves
Wear a
Mask
Wear Ear
Protection

1.2.10. Remove ill fitting clothing. Remove ties, watches, rings and other loose jewellery and contain and/or tie back long hair.
1.2.11. Keep children and unauthorised persons away from the work area.
1.2.12. Avoid unintentional starting.
8DO NOT use the sander for any purpose other than that for which it is designed.
8DO NOT operate the sander if any parts are damaged or missing as this may cause failure and/or personal injury.
8DO NOT switch the sander on until the head is in contact with the panel and switch the unit off before removing the head from the panel.
8DO NOT get the sander wet or use in damp or wet locations or areas where there is condensation.
8DO NOT allow untrained persons to operate the polisher.
8DO NOT operate the sander when you are tired or under the influence of alcohol, drugs or intoxicating medication.
8DO NOT use the sander where there are flammable liquids, solids or gases such as paint solvents, etc.
8DO NOT leave the sander operating unattended.
8DO NOT carry the sander with your finger on the power switch.
8DO NOT pull the cord from the power supply
1.2.13. Use a qualified person to maintain the sander.
1.2.14. When not in use, unplug from the mains power supply and store in a safe, dry, childproof area.
2. INTRODUCTION
• Compact, ergonomic and lightweight design nished with soft grip.
• Powered by a 240W motor with easy to use on/off switch.
• Dual action orbit of Ø3mm allows use for various sanding applications.
• Features a self-contained dust extraction port with dust collection bag.
• Fitted with Ø125mm hook-and-loop backing pad and supplied with 2 sanding discs.
3. SPECIFICATION
Model No......................................................................S0125
Pad Size.................................................................. Ø125mm
Power............................................................................240W
Supply.................................................................. 230V-50Hz
No Load Seed ........................................................ 12000rpm
Orbit Size .................................................................... Ø3mm
Weight.........................................................................1.17Kg
4. OPERATION
WARNING: Ensure the tool is disconnected from the power supply before attaching or changing any accessories, or making any
adjustments.
4.1. Selecting the right grade of sanding disc
4.1.1. Sanding discs are available in a variety of different grades: coarse (60 grit), medium (120 grit) and ne (240 grit)
4.1.2. Use a coarse grit to sand down rough nishes, medium grit to smooth the work, and ne grit to nish off.
4.1.3. Always use good quality sanding discs to maximise the quality of the nished task.
4.1.4. It is advisable to do a trial run on a scrap piece of material to determine the optimum grades of sandpaper for a particular job. If there
are still marks on your work after sanding, try either going back to a coarser grade and sanding the marks out before recommencing
with the original choice of grit, or try using a new piece of sandpaper to eliminate the unwanted marks before going on to a ner grit
and nishing the job
4.2. Fitting a sanding disc
WARNING: Always ensure that the tool is switched off and the plug is removed from the power point before tting or removing sanding
discs.
4.2.1. Note: Do not continue to use worn, torn or heavily clogged sanding discs. Ensure foreign objects, such as nails and screws, are
removed from the workpiece before starting to sand.
WARNING: Do not use a sanding disc on wood that has previously been used on metal. This may cause scouring on the wooden
surface.
4.2.2. Remove any dust or debris from the Hook & Loop Sanding Base (1), before tting a sanding disc
4.2.3. Match the holes in a suitable disc with the holes in the base and simply press the disc to the base to attach it.
4.2.4. To remove the disc, peel it away from the base.
4.2.5. Note: To maximise the life of the Hook & Loop Sanding Base, peel the sanding disc off slowly rather than rapidly removing it to avoid
damage to the hook and loop system.
WARNING: Take care to regularly clean out the build-up of dust on the base underneath the sanding disc and not to let the disc wear
completely down before replacing it. Failure to observe these two precautionary measures can lead to damage to the hooks and loops
on the base, and the sanding disc will not attach properly.
WARNING: Never use the sander unless the entire base is covered by the sanding disc.
4.3. Dust extraction
4.3.1. WARNING: Always connect the sander to a suitable vacuum cleaner or workshop dust extraction system if the sanding dust contains
harmful substances, such as particles from old paint, varnish, surface coatings etc. Always dispose of harmful dust according to local
laws and regulations.
WARNING: Take special care to guard against harmful and toxic dusts when sanding lead-based painted surfaces, woods and metals,
particularly if you are unsure about the exact substances involved. All persons entering the work area must wear a mask specially
designed for protection against the toxic dust and fumes involved. Children and pregnant women MUST NOT enter the work area.
DO NOT eat, drink or smoke in the work area.
4.3.2. This sander is designed to be connected to a household vacuum cleaner hose or workshop dust extraction system. This is the
preferred and most effective method of dust extraction
S0125 | Issue 2 21/02/17
Original Language Version
© Jack Sealey Limited

4.3.3. Connect a suitable vacuum hose to the Dust Extraction Port (7)
4.3.4. Note: The Dust Extraction Port is designed to t a 35mm diameter hose.
4.3.5. If no vacuum dust extraction system is available, the supplied Dust Bag (5) must be used:
4.3.6. Attach the Dust Bag to the Dust Extraction Port of the sander by pushing and twisting the bayonet tting on the Dust Bag Collar (6)
WARNING: For optimum dust extraction, remove and empty the Dust Bag when it is no more than half full.
WARNING: Remove and DO NOT use the Dust Bag when sanding metal. Hot metal particles and sparks could ignite residual wood
dust, or cause the Dust Bag to catch re. Always connect the sander to a suitable workshop dust extraction system when
sanding metal. Always clean the tool THOROUGHLY when switching from sanding wood to sanding metal, and vice versa.
4.4. Operation
WARNING: Always wear eye protection, adequate respiratory and hearing protection, as well as suitable gloves, when working with
this tool.
WARNING: Do not touch the moving sanding disc.
Note: Always use clamps to secure your workpiece to the workbench wherever possible.
WARNING: Never allow the sandpaper to completely wear down before replacing it. Failure to observe these precautionary
measures can lead to damage to the hook and loop surfaces, resulting in sanding discs failing to attach properly.
4.5. Switching on and off
WARNING: Always wear safety goggles, an adequate dust mask, hearing protection and suitable gloves, when working with this
tool.
WARNING: Never switch the sander on when the base is in contact with the workpiece or any other surface, as this might cause
the operator to lose control over the machine, and lead to serious injury.
4.5.1. Connect the Power Cord (4) to the mains power supply.
4.5.2. Push the On/Off Switch (2) in to the ‘I’ position, to switch the sander ‘on’.
4.5.3. To switch ‘off’ the sander, push the On/Off switch in to the ‘O’ position
WARNING: Always wait until the machine has stopped vibrating completely before putting it down. Always disconnect from the
power supply after use.
4.6. Sanding
4.6.1. If the tool is connected to a vacuum dust extraction system, switch the extraction device ‘on’ before switching on the sander. Switch
the sander ‘off’ rst, then the vacuum system
4.6.2. Move the machine in a circular motion over the workpiece surface, applying an even, moderate pressure until you reach the desired
surface nish
WARNING: Excessive pressure does not lead to a faster removal of material; it will, however, lead to premature wear of the
sanding disc, and may cause damage to the machine.
4.6.3. If there are still scratches on your workpiece after sanding, refer to ‘Selecting the right grade of sanding disc’
5. MAINTENANCE
WARNING: Always disconnect from the power supply before carrying out any inspection, maintenance or cleaning.
5.1. General inspection
5.1.1. Regularly check that all the xing screws are tight.
5.1.2. Inspect the supply cord of the tool, prior to each use, for damage or wear.
5.1.3. Repairs should be carried out by an authorised service centre.
5.2. Emptying the dust extraction bag
WARNING: Always switch off and disconnect from the power supply before detaching the dust extraction system.
WARNING: Always wear respiratory protection, eye protection and gloves when emptying the Dust Bag (5).
5.2.1. Note: For optimum dust removal, empty the Dust Bag when it is no more than half full.
5.2.2. Detach the Dust Bag from the Dust Extraction Port of the sander by pulling and twisting the bayonet tting on the Dust Bag
Collar(6).
5.2.3. Dispose of the waste.
5.2.4. Attach the Dust Bag to the Dust Extraction Port of the sander by pushing and twisting the bayonet tting on the Dust Bag Collar
5.2.5. Note: If the sanding dust contains harmful substances, such as particles from old paint, varnish, surface coatings etc., always
dispose of according to local laws and regulations.
5.2.6. Note: Always clean the tool THOROUGHLY when switching from sanding wood to sanding metal and vice versa.
5.3. Cleaning
WARNING: Always wear protective equipment including eye protection and gloves when cleaning this tool.
5.3.1. Keep your tool clean at all times. Dirt and dust will cause internal parts to wear quickly, and shorten the device’s service life.
5.3.2. Clean the body of your machine with a soft brush, or dry cloth.
5.3.3. Never use caustic agents to clean plastic parts. If dry cleaning is not sufcient, a mild detergent on a damp cloth is recommended.
5.3.4. Water must never come into contact with the tool Ensure the tool is thoroughly dry before using it.
5.3.5. If available, use clean, dry, compressed air to blow through the ventilation holes (where applicable).
5.4. Lubrication
5.4.1. Slightly lubricate all moving parts at regular intervals with a suitable spray lubricant.
5.5. Brushes
5.5.1. Over time the carbon brushes inside the motor may become worn
5.5.2. Excessively worn brushes may cause loss of power, intermittent failure, or visible sparking
5.5.3. If you suspect that the brushes may be worn, have them replaced at an authorised service centre.
5.6. Storage
5.6.1. Store this tool carefully in a secure, dry place out of the reach of children.
S0125 | Issue 2 21/02/17
Original Language Version
© Jack Sealey Limited
Sole UK Distributor, Sealey Group.
Kempson Way, Suffolk Business Park,
Bury St. Edmunds, Suffolk.
IP32 7AR
www.sealey.co.uk
sales@sealey.co.uk
01284 757500
01284 703534
Web
NOTE: It is our policy to continually improve products and as such we reserve the right to alter data, specications and component parts without prior notice.
IMPORTANT: No liability is accepted for incorrect use of this product.
WARRANTY: Guarantee is 12 months from purchase date, proof of which will be required for any claim.
S0125 | Issue 2 21/02/17
Original Language Version
© Jack Sealey Limited
Environmental Protection
Recycle unwanted materials instead of disposing of them as waste. All tools, accessories and packaging should be sorted,
taken to a recycling centre and disposed of in a manner which is compatible with the environment.
WEEE Regulations
Dispose of this product at the end of its working life in compliance with the EU Directive on Waste Electrical and Electronic
Equipment (WEEE). When the product is no longer required, it must be disposed of in an environmentally protective way.
Contact your local solid waste authority for recycling information.
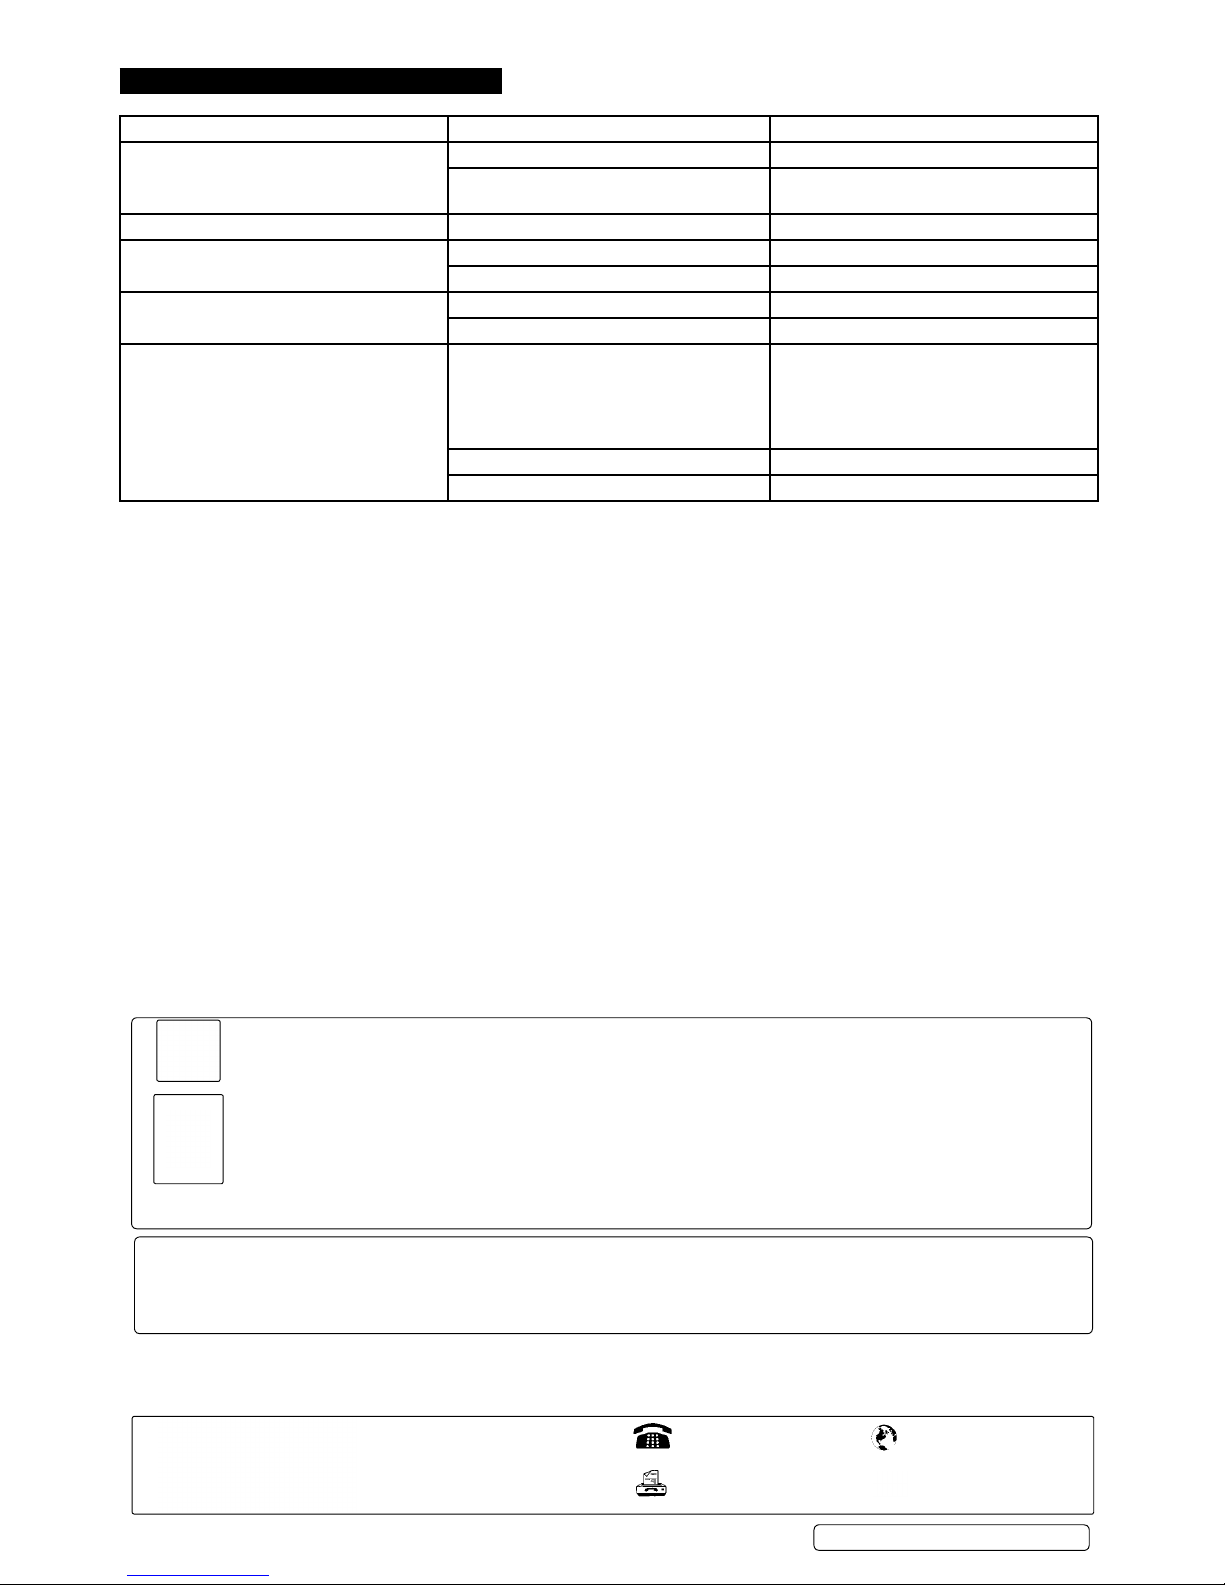
Problem Possible cause Solution
No function when On/Off Switch is operated No power Check power supply
Defective On/Off Switch Have the On/Off Switch replaced by an
authorised service centre
Slow material removal Sanding sheet too ne or worn Fit new sanding sheet with coarser grit
Scratches on workpiece after sanding Sanding sheet too coarse Fit new sanding sheet with ner grit
Not enough material removed Continue sanding
Burn marks on workpiece Sanding sheet incompatible with material Fit correct sanding sheet
Too much pressure exerted on to the sander Use less pressure whilst moving the machine
Excessive dust emission Dust extraction not working; sanding sheet
not aligned
With dust extraction holes in the Hook &
Loop Sanding
Base (1); extraction holes blocked
Realign sanding sheet; unblock dust
extraction holes
Dust Bag (5) full Empty Dust Bag
Dust Bag insufcient for the task at hand Connect a vacuum dust extraction system
6. TROUBLESHOOTING
Parts support is available for this product. To obtain a parts listing and/or diagram, please log on to www.sealey.co.uk,
email sales@sealey.co.uk or telephone 01284 757500.


