Seismic Audio SADIYG-17 User manual

SA
SEISMIC AUDIO
www.seismicaudiospeakers.com
SADIYG-17

Intro
Congratulations on purchasing your new Seismic Audio DIY Guitar Kit. All the parts needed for your own
custom guitar are included. All holes are pre-drilled, making installation a snap. These are general instruc-
tions. There may be small dierences between this manual and your guitar. Following these instructions
will allow you to complete your new custom guitar. If you have questions beyond the scope of this manual,
Tools Needed
Assembly: Phillips Head Screwdriver, Soldering Iron
Finish: Sandpaper (a range of grains from medium to ne), paint, stain, sealer, lacquer
Parts Checklist
1. Body and Necks
2. Tuner pieces and screws
3. Pickguards, Cavity Cover and screws
4. Bridge/TremPickups and screws
5. Switches
6. Knobs
7. Output Jack and screws
8. Neck Plates and screws
9. Strap Buttons and screws
10. Tools (hex wrenches, solder)
11. Strings, Cable
Test Fit
Before beginning nal assembly or nishing, it is benecial to test t all the parts in your kit. You can follow
the nal assembly instructions below, except for making solder points. Also, it isn’t necessary to tighten ev-
ery screw. In this step, you just want to learn how the guitar ts together and identify all the pieces included.
Shaping the Headstock
At this point, you’ll want to reshape the headstock if that is something you want to do. Be sure to clamp the
guitar down rmly while cutting a new shape. This is not necessary and is strictly a cosmetic change. Also,
this applies to the guitar body. If you plan on changing the overall shape, this is the best time to do that.
SA
SEISMIC AUDIO
SADIYG-17

Finishing
There are many ways to nish your new custom guitar. Paint and stain are the most common ways, but a
myriad other options exist. Here, we’ll cover a few popular techniques. These will be very general explana-
tions so be sure to follow the recommended instructions that come with whichever nishing product you
choose to use. The important thing is take time to plan and apply your nish properly. Rushing a guitar’s
nish never turns out well.
No matter what nish you choose, your rst step will be sanding the guitar. Starting with a medium-grit
sandpaper, go over the entire body and all of the neck except for the fretboard. You want to create a smooth
even surface to work with. Applying a grain-ller can be benecial for lling in pores in the wood and creat-
ing a smooth even surface to work with. Before applying any nishing materials, make sure all screw holes
are pre-drilled. Drilling a hole after can easily crack your nish. Reopening a pre-drilled screw hole, howev-
er, is simple with a toothpick or small drill bit and will not damage your nish.
The most common nishes are paint and stain. Stain is preferred when you want to show o the wood grain
of your guitar. This is particularly good for guitars with a veneered top, like the Flamed Maple of SADIYG-08
or the Spalted Maple of SADIYG-09, or with a prominent wood grain, like the swamp ash of SADIYG-05. Paint
will cover the wood grain of your custom guitar in any color or pattern you can imagine. Pretty much any
painting technique can be used on a guitar, from spray-paint to hand-brushing, solid colors to intricate pat-
terns or images.
Following will be a quick rundown of the steps involved in several popular nishes to help you decide which
nish you want to create. These are general rules of thumb. Instructions included with your nishing mate-
rials should be followed closely for best results.
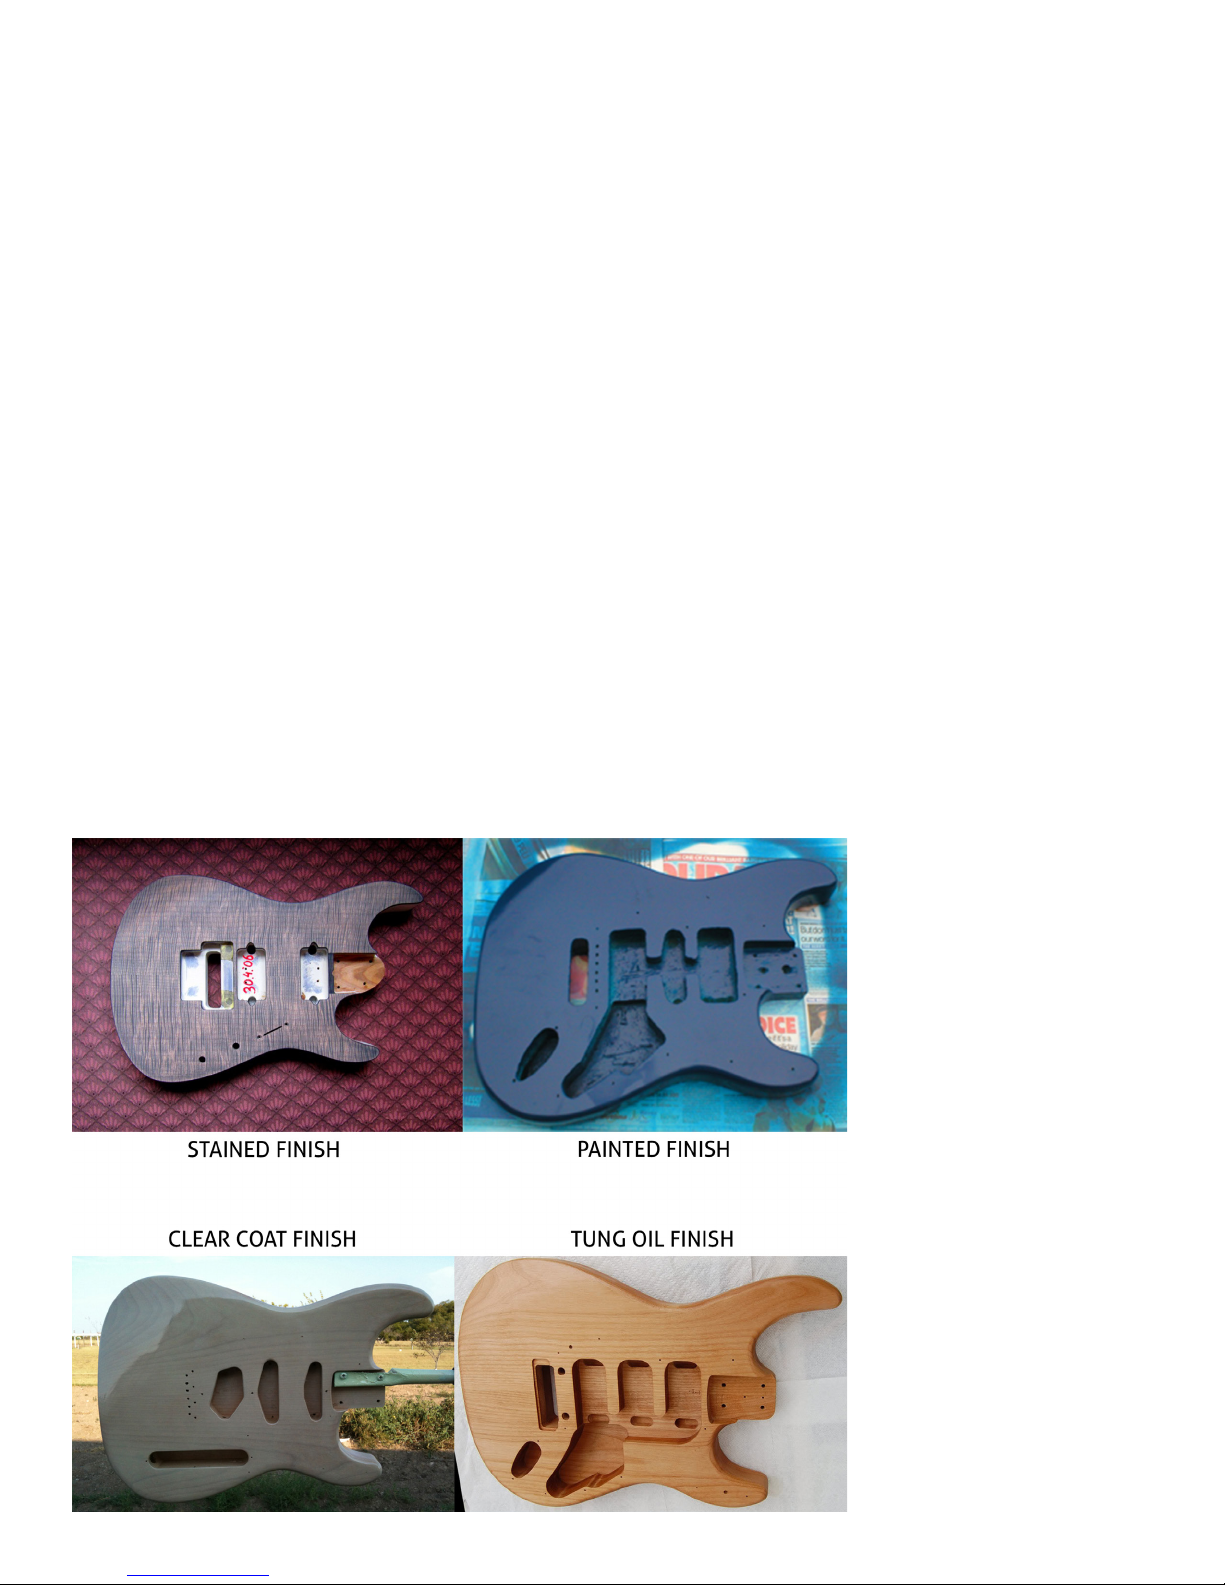
STAINED FINISH
• Start with a well-sanded guitar body and tape o any parts you do not want to stain. The body cavities
can be ignored.
• Use a rag or sponge to apply the stain, keeping it damp throughout the process.
• Allow the stain to dry completely. It will be soaking into the wood during this process. Check the in-
structions on your stain to nd out how long this will take. It usually takes an hour, but some can take
longer, or be ready to work with sooner.
• Sand the stained area with a ne sandpaper or steel wool. The nish will remove a lot of the color and
leave a faded, washed-out look. This is normal and necessary to the process. It will enhance the grain of
the guitar.
• Re-stain and re-sand with progressively ner sandpapers or steel wools until you achieve the desired
eect.
PAINTED FINISH
• Start with a well-sanded guitar body and tape of any parts you do not want to paint. The body cavities
can be ignored.
• When painting a guitar, you’ll want to begin with a primer coat. Bare wood is a dicult surface for a
paint topcoat to adhere to. The primer coat will create an interface between the guitar body and the
topcoat that will keep your nish looking good for many years to come.
• Apply the primer evenly over the surface to be painted. Allow it to dry according to the manufacturer
instructions. There is usually a specic time that is best for applying paint to primer so follow the direc-
tions closely.
• Use a medium grain sandpaper to smooth the primer coat before applying paint.
• Apply the paint evenly across the area to be painted. Lightly sand with wet/dry sandpaper between
coats to smooth imperfections and create a good surface for the next coat of paint.
CLEAR COAT / SEALANT
• After painting or sanding, it is advisable to protect your work with a clear coat or sealant.
• Clear coats and sealers are available in dierent forms. Spray cans make application very easy.
• Apply multiple coats, using damp wet/dry sandpaper between to create a smooth glossy surface. This
will remove the “orange peel” eect, though it will leave a cloudy surface. Use progressively ner sand-
paper between each coat, working up to 2000 grit.
• Use a rubbing compound to remove the cloudiness and create a shine to your nish.
• Finally, use a polishing compound and a dedicated guitar polish to bring out a mirror nish.
TUNG OIL FINISH
• The easiest and cheapest way to nish your guitar while still providing professional results, this method
will not require a clear coat and is commonly used on guitar necks regardless of the body’s nish.
• Start with a well sanded guitar body. Use a paint brush or small rag to completely coat the guitar, ex-
cepting only the ngerboard. Body cavities and the neck joint should receive tung oil during this rst
coat. Wipe of the excess and allow several hours to dry. Check your tung oil packaging for exact times.
• Sand down the dry coat of tung oil to remove imperfections and apply a heavy second coat. It is not
necessary to coat the body cavities or neck joint on this or any remaining coats. Wipe o the excess and
allow to dry.
• Repeat as necessary to achieve the desired eect, using progressively ner sandpaper with each coat.
• Finish with a single coat of furniture oil to bring out the sheen of the wood.
• Tung oil creates a protective waterproof surface so it does not require a sealer for long life.
TIP #1
Tape o the fretboard of the
guitar before applying paint
or stain to the neck. The
fretboard does not require any
nishing.
TIP #2
Be sure to completely mask
the neck pocket and the heel
of the neck when applying n-
ish to the guitar. This will keep
your nish from changing the
dimensions of the neck joint
and possibly pushing it out of
shape.
SA
SEISMIC AUDIO

ASSEMBLY
When your nishing is complete, it is time to start nal assembly. Proceed slowly and carefully. Be sure to
double-check each step before completing it. It is helpful to read the full instructions rst, before assem-
bling anything to gain a better understanding of the entire process and how all the parts work together. We
will begin by installing the neck hardware.
NECK HARDWARE
TUNERS - Each tuner comes unassembled in four parts. You need the tuning machine itself, a washer, a cyl-
inder screw (or ferrule), and a screw. On this model, the double-neck SADIYG-17, you have 18 tuners to as-
semble. The pieces are interchangeable. Place the tuning machine against the back of the headstock, with
the post sticking up through the pre-drilled hole. On the front of the headstock, place the washer over the
post, then loosely screw in the ferrule. On the back of the headstock, align the predrilled screw hole with the
screw guide and insert the screw. When that is tightened, you can nishing tightening the ferrule. The neck
is hard maple so be wary of stripping the screw when installing. Now, repeat this process for each tuner.
TRUSS ROD COVER - Install the truss rod cover. This is a small black triangle-shaped piece of plastic. You will
notice it has a thin plastic sticky lm to protect the shine on it. Leave the lm in place until nal assembly.
There is a truss rod cover for both necks.
NECK TO BODY ATTACHMENT
Locate the neck plate, the plastic bed for the neck plate, and the four large wood screws for each neck. The
12-string neck is traditionally the top neck, but you can assemble it in either way. Start from the heel of the
neck, sliding it carefully into the neck pocket on the guitar. Place the neck plate, shiny side up, into the plas-
tic bed. Align it with the pre-drilled screw holes in the body and attach. Be careful not to allow any gaps in
the wood or angle changes to form while attaching the neck.
BODY HARDWARE
STOP-TAIL AND BRIDGE ANCHORS - Remove the studs from the anchors and tap all the anchors into the
pre-drilled holes. Keep them together in pairs. Tap the anchors into place carefully with a soft mallet.
BRIDGES - The Tune-O-Matic bridge with adjustable saddles will slot onto the the studs you just installed.
Having the screws facing the necks will make intonation adjustments much simpler, though it can be placed
in either directions. The six-string bridge has a single groove on each saddle. The twelve-string bridge has
two grooves on each saddle. Make sure you have the correct saddles placed to agree with the six and twelve
string necks.
STRAP BUTTONS - Install the strap buttons by placing the rubber grommet between it and the body, then
attach both to the body with the long thin wood screws provided. One pre-drilled hole is in the center of
the edge of the guitar, the other is between the neck plates on the back of the guitar.

ELECTRONICS
WIRING - Follow the wiring diagram below to see how to rout the wires through the body cavity. This can be
6423 if you have any questions. All of the remaining hardware on the body is connected to the wiring so
these following steps will be taking place simultaneously. Read the entire instructions before starting to
assemble the rest of the pieces to understand how the whole process should ow.
PICKUPS - There are four humbucker-style pickups included with your guitar, two neck pickups and two
bridge pickups. Although they appear similar, they are not the same. The neck pickups will have a thinner
plastic ring around the base, the bridge pickups will be thicker. When identifying your pickups, also note
that the ring on each is tapered with a thicker side and thinner side. The thinner side should face the neck.
Gently screw down the pickups once all the wires have been run. The plastic rings can break if the screws
are overtightened.
PICKUP AND NECK SELECTOR SWITCHES - Install the three-way switches in the holes in the two pick guards.
The nut and washer needed for each should already screwed onto the switches. The switches are identical.
The two switches closest to the neck will control pickup selection on each neck. The switch closest to the
bridge will handle switching between necks.
TONE AND VOLUME CONTROLS - Included in your package are four rotary controls to be used as tone and
volume controls. Two of the controls have green capacitors attached, these are your tone knobs. Most of
this wiring is already done for you. Place the threaded post on each up through the pre-drilled holes in the
body. Use the attached washer and nut to tighten them into place. For ease of wiring, face the solder lugs
into the center of the body cavity.
OUTPUT JACK - The output jack should be inserted through the large hole drilled into the back edge of the
guitar body which opens into the body cavity. It is attached with four small screws. The ground wire will
connect with the square lead and the signal wire will connect with the round lead. The contact may need to
be adjusted where it contacts the guitar cable to ensure a tight t that locks the guitar cable in place.
ELECTRONICS CAVITY COVER - It doesn’t directly connect to the electronics, but this piece cannot be added
until the wiring job is done. The only thing to be aware of is that the t may have changed when nishing
was applied to the guitar. The easiest x is to sand down the cover to the new size. Usually, it is only a small
adjustment.

SETUP
Setting up an electric guitar is an intricate and rewarding process. It takes time and practice to learn. Also,
some specialized tools are required for a perfect setup. Most music stores will have a guitar tech on duty to
perform a setup for you, if you do not wish to undertake this process yourself or do not have access to the
proper tools.
Truss Rod Adjustment
The rst step in properly setting up your guitar is making sure you have a straight neck to work with. A hex
wrench tool is included in the kit. Sight along the fretboard to identify any curve in the neck. Insert the hex
wrench tool into the end of the truss rod at the headstock. Make small adjustments until the neck is straight.
A notched straight edge tool will sit directly on the fretboard and take the guesswork out of this process.
SADIYG-17 WIRING DIAGRAM

Fret Leveling
It is highly recommended to purchase a fret leveling kit if you want to setup guitars yourself. Tiny dier-
ences, to a fraction of a millimeter, can cause fret buzz. Even starting with perfectly level frets, playing the
instrument over time will cause wear which will translate into height dierences and string buzz. This is
true of all stringed and fretted instruments, from DIY kits like this to top-of-the-line models from the largest
manufacturers.
A fret leveling kit should consist of a Fret Rocker, a Fret Sanding Beam, and a Fret Dressing File. The Fret
Rocker will allow you to identify the high and low points of your frets so you know what areas need to be
sanded down. The Fret Sanding Beam is used to create a uniform height across all the frets on the guitar.
The Fret Dressing File smoothes imperfections left from the Fret Sanding Beam and creates an ideal playing
surface on the fret itself.
Setting Action
A guitar’s action is the dierence in height between the strings and the frets, or how high the strings are
above the frets. Action is determined by personal preference. Some people like it higher and some people
like it lower. Start by checking the action over the rst fret while fretting the low E string between the sec-
ond and third frets. The action here needs to be .006 of an inch. If it is too high, use a needle le to deepen
the string groove in the nut. If it is too low, you can build up the groove with nut a combination of nut shav-
ings and super glue.
Once the nut action is set properly, the overall action can be set at the bridge. A small hex wrench is includ-
ed in your kit to make these adjustments. Measure the height of the strings over the twelfth fret. Starting
at a height 1/16th of an inch will get you in the right neighborhood. Adjust to taste, higher or lower, from
there.
Intonation
Intonation means having the string sound the correct pitch at every fret up and down the length of the
fretboard. This is a simple adjustment, accomplished with a screwdriver on the bridge to shorten or length-
en the string itself. Check the intonation by comparing the open string note against the harmonic on the
twelfth fret. Use a digital tuner, because you want this to be exact. Tighten and loosen the screw for each
string until the open note and the harmonic match pitch.
Keep in mind that there is a break-in period for guitar strings and you may need to repeat this step several
times over the course of a few days until the strings settle.
Guitars and basses and all stringed instruments are based on tension of the strings, the metal
and the wood. There is no such thing as a one-time setup. Through the life of the instrument,
you will be performing these tasks multiple times to keep it in top shape. Purchasing the cor-
rect tools and learning to use them will save you money in the long run. There are numerous
resources available on the internet and we are always happy to help. Contact us at (877) 347-
6423 or email customerservice@seismicaudiospeakers.com with any questions.
Table of contents


