Selax Electronics SE300 Series User manual
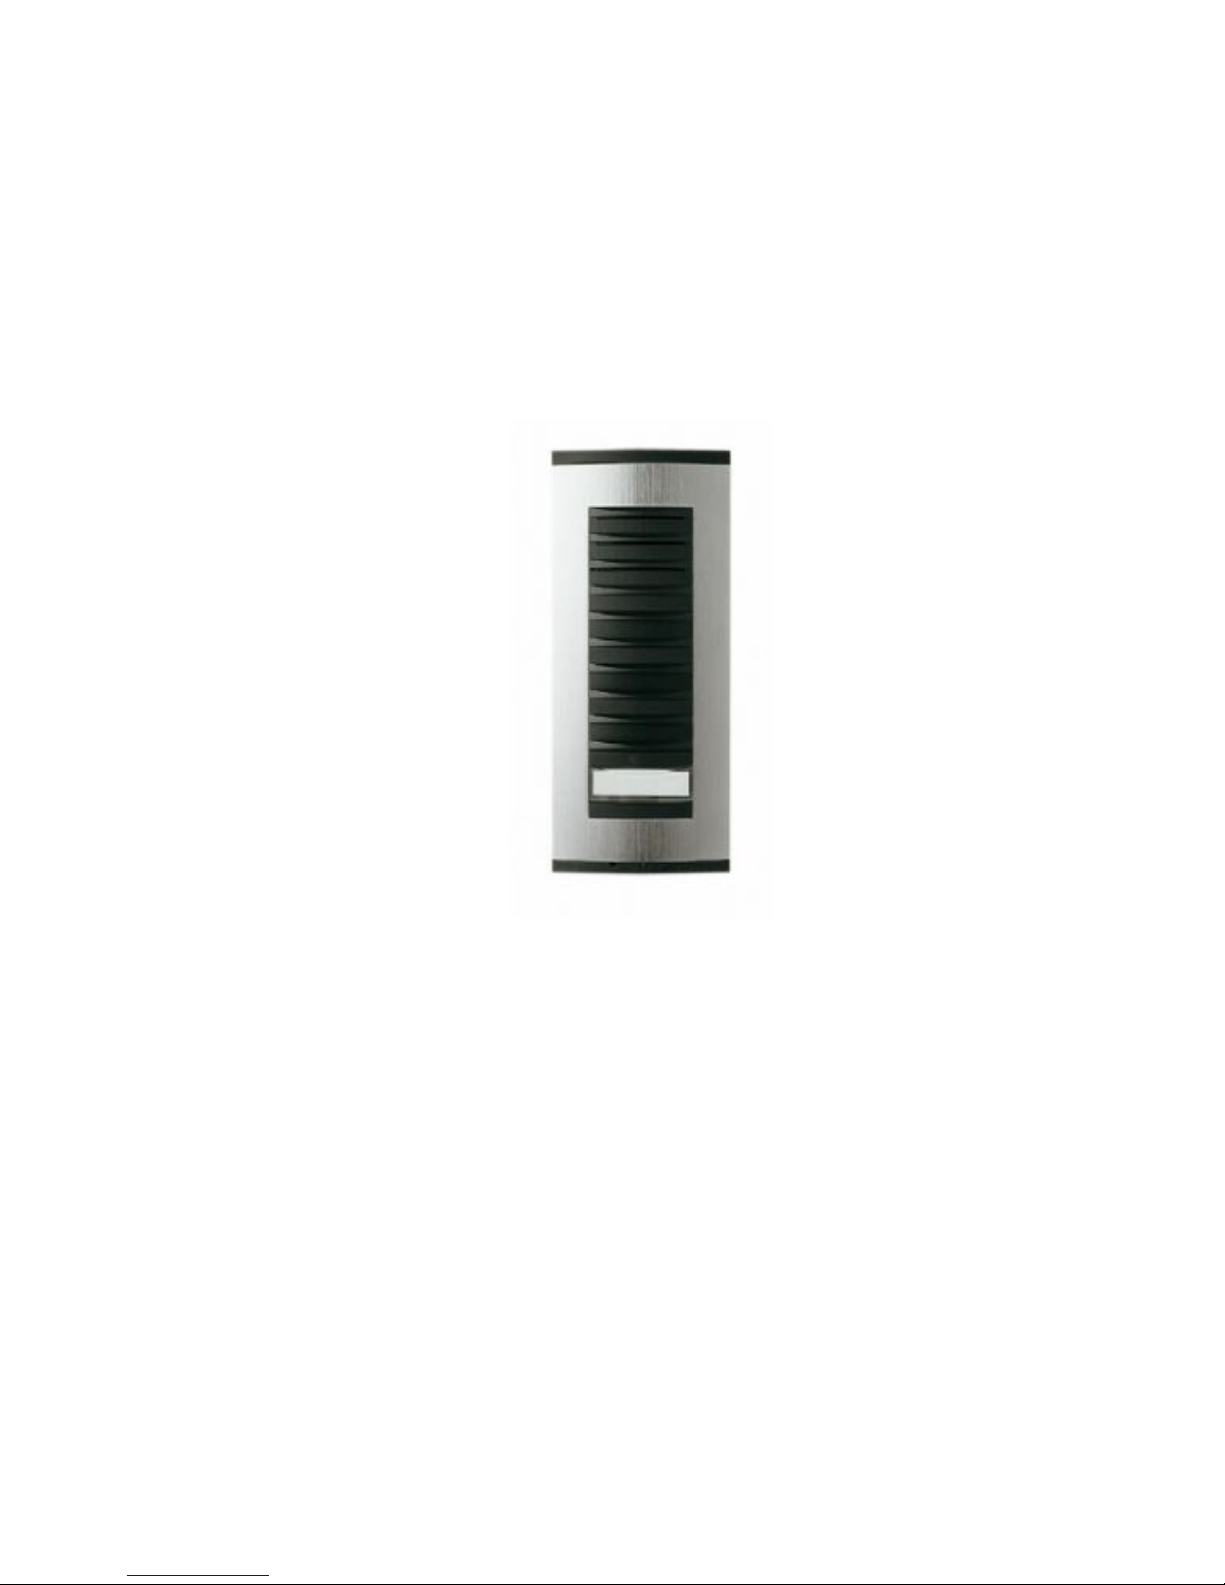
GSM MODULAR DOOR BELL
SE300 and SE300R line
GSM modular door bell enables to use 1 button, or step by step to add more buttons if necessary.
There is unique system. Possible to use as many as 16 buttons altogether.
How does it work?
As soon as anybody push a button, GSM door bell immediately call to preset mobile or telephobne
number and you can call ith a visitor, ho pushed the button and stand in front of your door. It is
possible via mobile or classical telephone to open the door, garage and so on, using a mobile
phone keypad. Using SE300R model line means, you can use the same GSM modular door bell
fitted in RFID reader in addition. All models have 2x relays, hich can open not only a gate, but
even garage door and so on. Possible to operate 1 relay, 2 relay or both relays at a time. You can
s itch all relay by number of ringing only, it means free. Of course, you can add more 4 relays, too,
if necessary.
- 1 -

If you ant to use more buttons, you can line the singular modules side by side (see pictures on
eb site), Luxury design ith silver and black colours. Using on the all or into the all. Very easy
and fast assembly.
Using this GSM door bell you can open the door for a visitor from any place orld ide.
You can use it yourself, for example, if you come home, just ring the GSM door bell and a gate
(even garage) door ill be opened. Again free.
W at are t e main features our GSM door bells?
. as many as 4 phone numbers for each button
. delete the separate phone numbers
. erase phone numbers according to phone number or its position
. ask the phone number under each separate button
. arm or disarm any button (suitable, if o ner does not ant to be disturbed ithin eekend)
. using DTMF (numbers of phone keypad) to s itch relays on (to open the gate, garage and so on)
. turn relay on by ringing only (according to number of ringing you can s itch the first relay, second
one or both relays at a time)
. possible to change turn relay on time (increase or decrease)
. conference call
. info SMS
. change PIN code for separate buttons, in other ords, you can setup separate code for each
button.
. undershining buttons
. re-loaded ne firm are via USB connector
. Android app
- 2 -
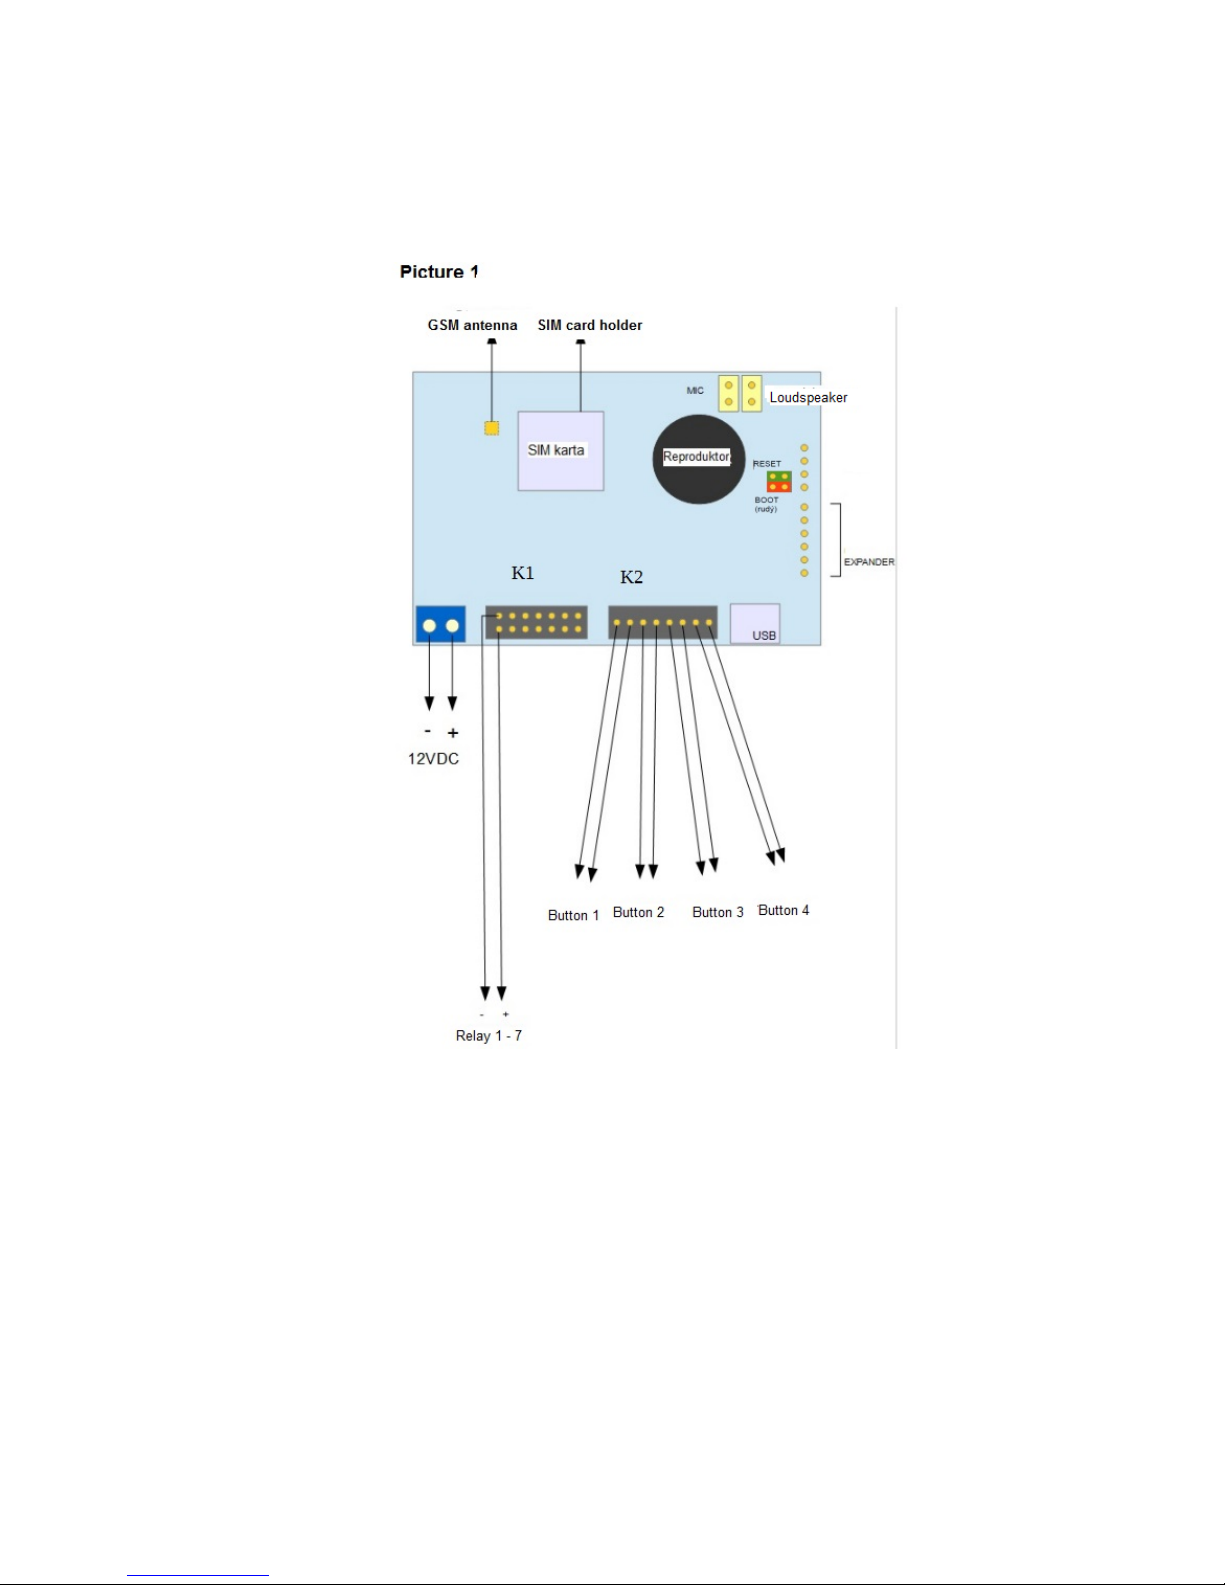
GSM door bell wiring diagram (schematic)
GSM door bell wiring
Really very easy. Just connect po er supply 12V to the connector signed Po er supply.
Relay 1 and 2 are connected to K1 connector. It is possible to connect to the same connector more
4 relays.
- 3 -
Power supply
Standard product is ith 1 button. There is no problem to connect more buttons to the flat
conductor , hich is pre-prepared from our production. Easy ay to put the micros itches in our
GSM door bell, including the button on the top panel. Then just connect the ires from the flat
conductor.
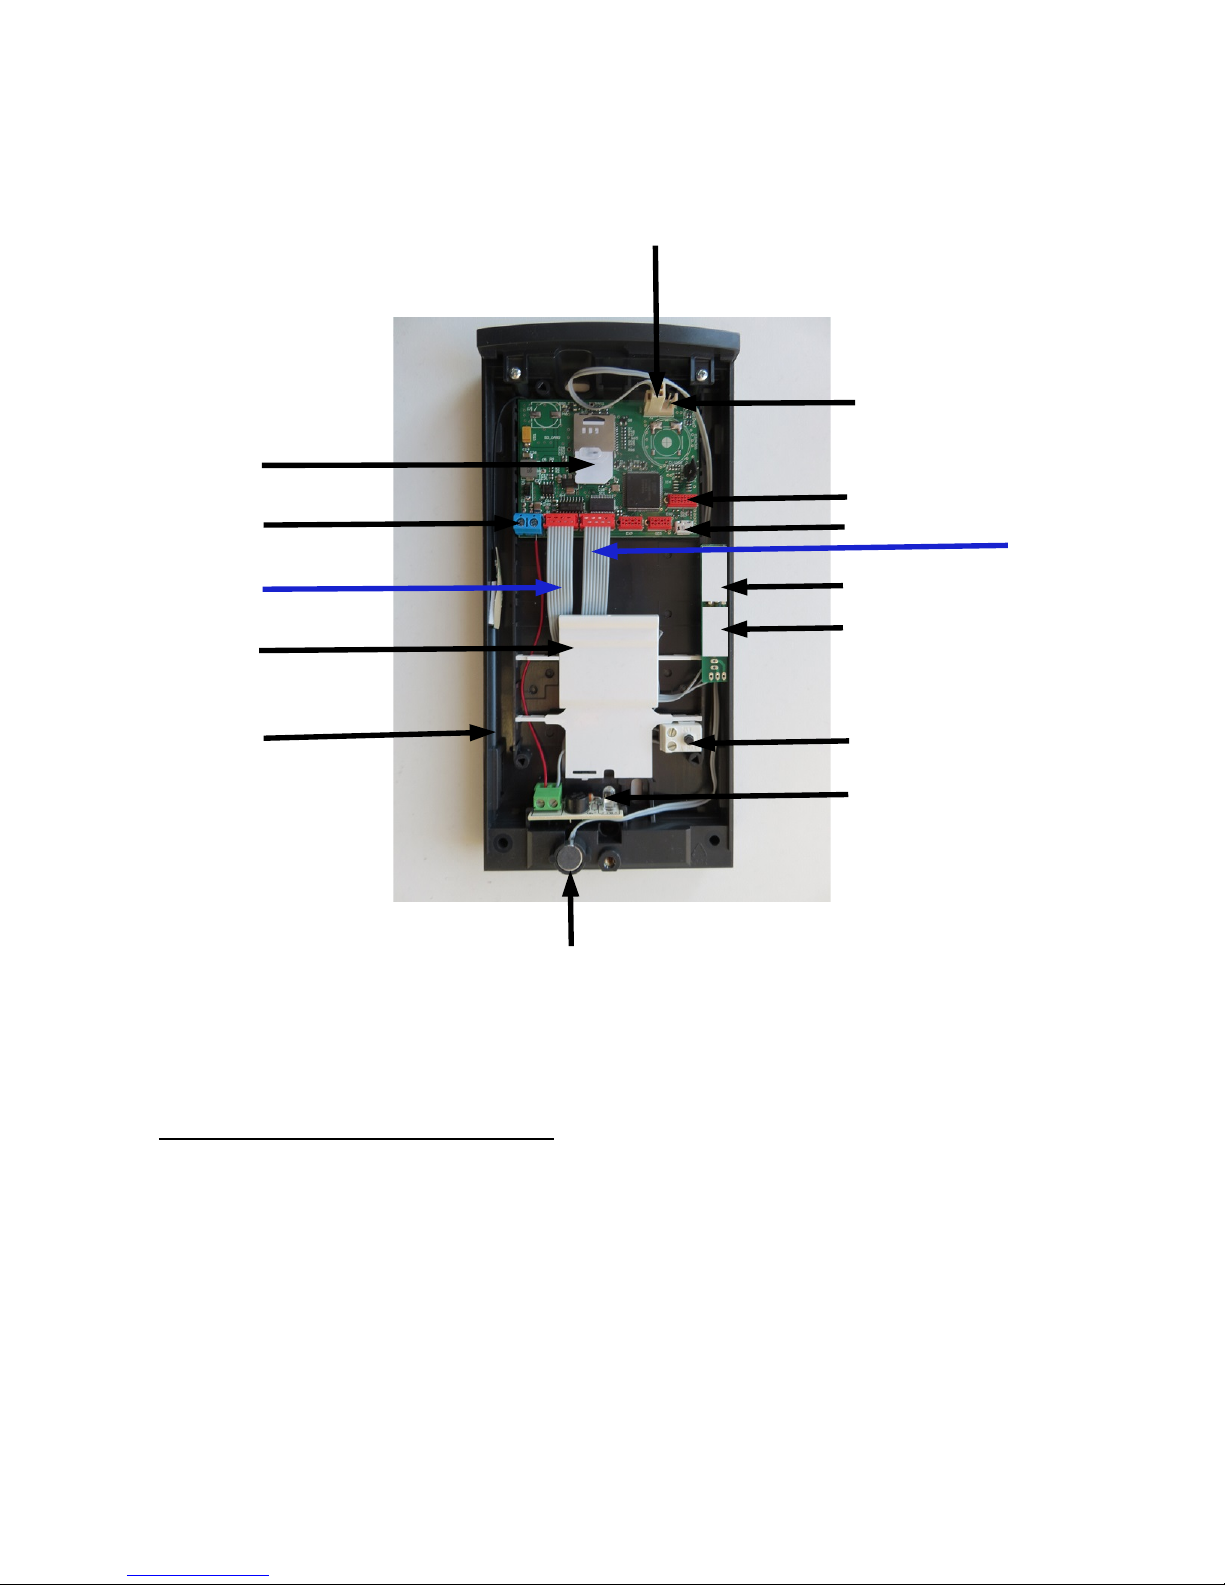
Picture 2
Button number 1 is al ays belo , over LED and microphone. Button number 2 is above and so on.
Ho to put micros itch and button you can see at
.youtube.com/ atch?v=7a0CHW7Ikoc
Relays are in, so that you can dra n them out to connect ires to control gates, garage door and
so on and give them back then.
- 4 -
Microphone
Plastic cover
Microphone connector
Loudspeaker connector
SIM card
Power supply connector
Button
Relay
Relay
RFID connector
USB connector
LED
Button wires
Relay wires
GSM antenna

SIM card installation
Put SIM card into SIM card holder. SIM card must have no PIN and erased all SMS, phone
numbers. After starting po er supply, automatic control ill be performed concerning all internal
microprocessor setting and parameters. As soon is finished, LED begins to shine and you ill hear
a short beep. After button pushing and its release, LED starts to blink and call the first preset
phone number. If there is no ans er, automatically starts the next phone number and and so on. All
the time you ill hear a ring tone.
GSM door bell assembly
GSM door bell assembly in vertical position. There are t o assembly holes to mount on the all.
Just put all ires via trough hole and after their connecting, put on them cover plastic (see picture
3) We recommend to tighten perfectly ith silicone or other ater-proof material. It is
recommended tighten upper side and both side ays sides. Attention! Just tighten upper and both
side ays sides. Never tighten belo side! First mount the ires and then put the plastic cover.
Picture 3
- 5 -
ssembly hole
ssembly hole
Plastic cover
On the wall
On the wall
Trough hole for wires

GSM door bell programming
All system is setting by SMS commands. No computer needed.
1) New p one numbers for one button (MAX. 4)
SMS command: **pinYYYY*uu*nn*XXXXXXXXXXXX*
here X are phone numbers ith an international prefix wit out mark „+“
Y is 4 PIN code (current (factory) 0000)
uu digits determining sequence number of the button. It must be in t o-digits form all the time, as
01, 02, 03 and so on.
Example: **pin0000*01*nn*420776852159*
number 420776852159 ill be save on the first free position for given button. (01). Product ill
send SMS ith phone number list back for existing button.
2a) Delete p one number of t e list
SMS command: **pinYYYY*uu*en*XXXXXXXXXXXX*
here X are phone numbers ith an international prefix ithout mark „+“
Y is 4 PIN code (current 0000)
uu digits determining sequence number of the button. It must be in t o-digits form all the time, as
01, 02, 03 and so on.
Example: **pin0000*01*en*420776852159*
number 420776852159 ill be save on the first free position for given button. (01). Product ill
send SMS ith phone number list back for existing button.
2b) Delete p one number according to position of t e list
SMS command: **pinYYYY*uu*ep*X*
Possible to delete from the first position of the list (admin number) (1. from 4)
uu digits determining sequence number of the button. It must be in t o-digits form all the time, as
01, 02, 03 and so on.
here X is number position in the list (range 1-4).
Example: **pin0000*01*ep*2*
In this case ill be deleted 2nd number of button number 1. Product ill send SMS ith phone
number list back for existing button.
- 6 -

3) Asking p one list of eac button
SMS command: **pinYYYY*uu*ln*
uu digits determining sequence number of the button. It must be in t o-digits form all the time, as
01, 02, 03 and so on.
Example: **pin0000*03*ln*
Product ill send SMS ith phone number list back for existing button. In this case it ill be the
third button.
4) Info SMS about product status
SMS command: **pinYYYY*uu*info*
Example: **pin0000*02*info*
you ill get SMS about GSM door bell status
5) C ange PIN code:
SMS command: **pinYYYY*uu*pc*NNNN*
YYYY – current code (0000)
uu digits determining sequence number of the button. It must be in t o-digits form all the time, as
01, 02, 03 and so on.
NNNN – ne PIN code
Change factory PIN code for ne one
Example: **pin0000*01*pc*1234
Ne PIN then ill be 1234
6) Turn on relay (relays) wit in a call
If you push ithin a call on phone keypad 1, relay 1 ill be turned ON, if you push 2, relay 2 ill be
turned ON, if you push 3 both relays ill be turned ON at a time. Total s itching time is about 5
seconds. It can be changed. Just use low current electromagnetic lock wit max. curent
300mA!
- 7 -

Example ow to connect 4 relays
It is possible to connect relays by t o ays ith jointing by t o little areas marked by black arro .
You can choose t o possibilities ho to do that. These t o little areas is possible to connect by a
tin or a small ire. If you use red colour variant, relay ill turn ON, if blue variant, relay ill turn
OFF. It is possible to choose even different mode for t o relays, it means, that one relay ill be
turned ON and second ill be turned OFF. Factory setting for both relays are ON.
7) Turn on relay by ringing
If you hang up after first ringing, relay 1 ill be turned ON. If you ant to turned ON relay 2, hang
up ringing immediately after start second ringing. For tunrning ON both relays, hang up after
second ringing or during the third ringing. Relay time is the same for both relays. If you let call on,
GSM door bell hang up after sixth ringing and both relay ill be turned ON.
8) Relay closure time setting:
SMS command: **pinYYYY*uu*trele*PP*
YYYY – current code (0000)
uu digits determining sequence number of the button. It must be in t o-digits form all the time, as
01, 02, 03 and so on.
PP – value 0-9 (this value ill be increased about 3 seconds all the time. It means, hen PP is 0,
relay ill be turned ON for 3 seconds If value is 1, it ill be 6 seconds and hen value is 4, it ill
be 15 seconds. This setting is the same for turn relay ON by ringing and via DTMF as ell.
Example: **pin0000*01*trele*1*
Relay ill be turned ON for 6 seconds. Time is the same for both relays. This setting time orks
ith relay turn on by ringing only.
- 8 -

YYYY – current code (0000)
uu digits determining sequence number of the button. It must be in t o-digits form all the time, as
01, 02, 03 and so on.
Y – value 0-9 (From 0 - 9 volume setting, 0 = 10% and 9 = 100%).
Example: **pin0000*01*vol*5*
This set loudspeaker volume to 60%, very pleasent sound. Recommended.
9) Ringing time setting
SMS command: **pinYYYY*uu*tr*F*
YYYY – current code (0000)
uu digits determining sequence number of the button. It must be in t o-digits form all the time, as
01, 02, 03 and so on.
F – value 0-9 ( here 0 = ringing time is 15 seconds, 1 = 18 seconds, and so on. Simply, if you
increase value about 1, it means, ringing time ill be 3 seconds longer.
Example: **pin0000*01*tr*2
GSM door bell ill be ringing for 21 seconds.
10) Record RFID card
SMS command: **pinYYYY*uu*ntag*
YYYY – current code (0000)
uu digits determining sequence number of the button. It must be in t o-digits form all the time, as
01, 02, 03 and so on.
Example: **pin0000*01*ntag*
After sending SMS command, just ait about 15-20 seconds and then RFID card to RFID reader
(under plastic cover) approximately bet een 2 and 3 button, until you hear beep and after that 3
short beeps again. It means, that card as recorded. Used RFID card is type of 13,56MHz Mifare
Classic (1K or 4K) or Ultralight.
After that GSM door bell ill send RFID list hich are recorded under given button. Then, just
approach RFID card bet een 2 and 3 button and relay 1 ill be closed. Possible to record 6 RFID
card under 1 button. The hole number RFID cards is 99. (It is possible to record more RFID card
ith models ith FRAM memory). Using RFID card, relay 1 ill be turn on about 10 seconds.
- 9 -

11) Delete RFID cards
SMS command: **pinYYYY*uu*etag*x*
YYYY – current code (0000)
uu digits determining sequence number of the button. It must be in t o-digits form all the time, as
01, 02, 03 and so on.
Example: **pin0000*01*etag*1*
RFID card on position 1 under button 1 ill be cleared.
12) Info SMS about RFID card list
SMS command: **pinYYYY*uu*itag*
YYYY – current code (0000)
uu digits determining sequence number of the button. It must be in t o-digits form all the time, as
01, 02, 03 and so on.
Example: **pin0000*01*itag*
GSM door bell ill send RFID card list recorded under button 1.
13) Switch-o er language ersion
Possible to change language ersion.
SMS command: **pinYYYY*uu*lanP*
YYYY – current code (0000)
uu digits determining sequence number of the button. It must be in t o-digits form all the time, as
01, 02, 03 and so on.
P – value are 0,1,2 as follo s:
0 = czech, 1 = english, 2 = italian
příklad: **pin0000*01*lan2*
S itch all SMS messages into italian.
- 10 -
This manual suits for next models
1


