Selecline XJ-9K111A6 User manual

600086982 / XJ-9K111A6
USER MANUAL
Deep fryer (P.03)
MANUAL DE UTILIZACIÓN
Freidora (P.24)
INSTRUKCJA OBSŁUGI
Frytkownica (S.46)
MANUAL DE UTILIZARE
Friteuza (P.67)
ІНСТРУКЦІЯ З ЕКСПЛУАТАЦІЇ
Фритюрниця (C.89)
MANUEL D’UTILISATION
Friteuse (P.13)
MANUAL DE UTILIZAÇÃO
Fritadeira (P.35)
HASZNÁLATI ÚTMUTATÓ
Olajsüto (57.O.)
РУКОВОДСТВО
ПОЛЬЗОВАТЕЛЯ
Фритюрница (C.78)
4
5
6
7
1
2
3
9
8
10
11
13
12
2
1/ SAFETY INSTRUCTIONS
Read this manual thoroughly before rst use. It contains
important safety information as well as instructions
concerning the use and maintenance of the appliance. Keep
these instructions for future reference and pass them on to
possible new owners of the appliance.
1. Do not touch hot surfaces.
2. To protect against electrical hazards, do not
immerse the appliance, power cord or plug in
water or any other liquids. Never rinse them under the tap.
(see CLEANING AND CARE).
3. Regarding the instructions for cleaning surfaces in
contact with food or oil. (See section 6.2 CLEANING).
4. To avoid the risk of an electrical shock, do not place
liquids of any kind into the main unit containing the electrical
components.
5. This appliance is not intended to be operated by means
of an external timer or separate remote control system.
6. This appliance shall not be used by children from 0 year
to 8 years. This appliance can be used by children from 8
years and above if they are continuously supervised. This
appliance can be used by people with reduced physical,
TABLE OF CONTENTS:
1/SAFETY INSTRUCTIONS ______________________________ P. 3
2/TECHNICAL SPECIFICATIONS__________________________ P. 6
3/PRODUCT DESCRIPTION______________________________ P. 6
4/BEFORE FIRST USE ___________________________________ P. 6
5/OPERATION _________________________________________ P. 7
6/CLEANING AND CARE ________________________________ P. 9
7/STORAGE __________________________________________ P. 11
8/WARRANTY AND LIMITATION OF LIABILITY ____________ P. 11
3

sensory or mental capabilities or lack of experience and
knowledge if they have been given supervision or instruction
concerninguseof the appliancein a safewayand understand
the hazards involved. Keep the appliance and its cord out of
reach of children aged less than 8 years. Cleaning and user
maintenance shall not be made by children.
7. Children shall not play with the appliance.
8. Before plugging the appliance, ensure the voltage
indicated on the rating plate of the appliance matches your
local voltage.
9. Make sure the appliance is plugged into a wall outlet.
Always make sure that the plug is inserted into the wall
outlet properly.
10. Make sure the appliance and frying basket are properly
assembled before use.
11. Before plugging or unplugging the appliance, always set
the Thermostat Control to the OFF position. To unplug, grasp
and pull the plug. Do not pull on the cord.
12. Do not use this appliance if the plug, power cord or the
appliance itself is damaged in any way.
13. If the supply cord is damaged, it must be replaced by the
manufacturer, its service agent or similarly qualied persons
in order to avoid a hazard.
14. To avoid spillage on the connector, do not overll the
frying basket.
15. Always keep the lid closed when frying food.
16. Use the handle of the frying basket to raise and lower
the basket.
17. Never move or clean the appliance when the oil is hot.
Unplug as indicated and wait until the oil has cooled down
completely.
18. RISKOFBURNS:Surfacesof the appliance marked
with this sign become very hot during use and
can remain hot for some time after use. Do not touch these
surfaces. Use the handles or knobs.
4

19. Cooking appliances should be positioned in a stable
situation with the handles positioned to avoid spillage of
the hot liquids. When cooking, do not place the appliance
against a wall or other devices. Ensure there is a gap of at
least 15 cm (5”) on all sides of the appliance. Do not place
anything on top of the appliance.
20. The use of accessory attachments not recommended by
the appliance manufacturer may cause injuries.
21. Keep the power cord away from hot surfaces. Do not
plug in the power cord or operate the control panel with wet
hands.
22. Do not let the power cord hang over the edge of table
counters or allow it to touch hot surfaces.
23. When the power socket serves as the means to
disconnect the appliance, the power socket must remain
easily accessible.
24. Do not place the appliance on or near a hot gas stove or
electric burner, or in a heated oven.
25. Do not use the appliance for any purpose other than
described in this manual. Misuse of the appliance may cause
injury.
26. Never operate the appliance unattended.
27. The appliance’s outer surfaces and the frying basket may
become hot during use.Wear oven mitts or use fetching tools
when handling hot components or touching hot surfaces.
Allow the appliance to completely cool before any cleaning
or maintenance.
28. Iftheapplianceemitsblacksmoke,unplugitimmediately
and wait for the smoke to stop before removing the frying
basket.
29. This appliance is intended to be used in household and
similar applications such as:
– sta kitchen areas in shops, oces and other working
environments;
5

– farm houses;
– by clients in hotels, motels and other residential type
environments;
– bed and breakfast type environments.
30. The symbol with the exclamation mark in an
equilateral triangle indicates the presence of
important operating and maintenance instructions
(maintenance and repair) in the appliance’s supporting
documentation.
31. Defective electrical appliances must be recycled,
not disposed of with household waste. Help us to
activelyengageinouractionstoconserveresources
and protect the environment by placing this appliance in a
collection centre or drop-o centre.
2/ TECHNICAL SPECIFICATIONS
Voltage: 230 V, 50 Hz
Power consumption: 1800 W
Operating temperature: 130 – 190 °C
Maximum capacity: 2.5 L
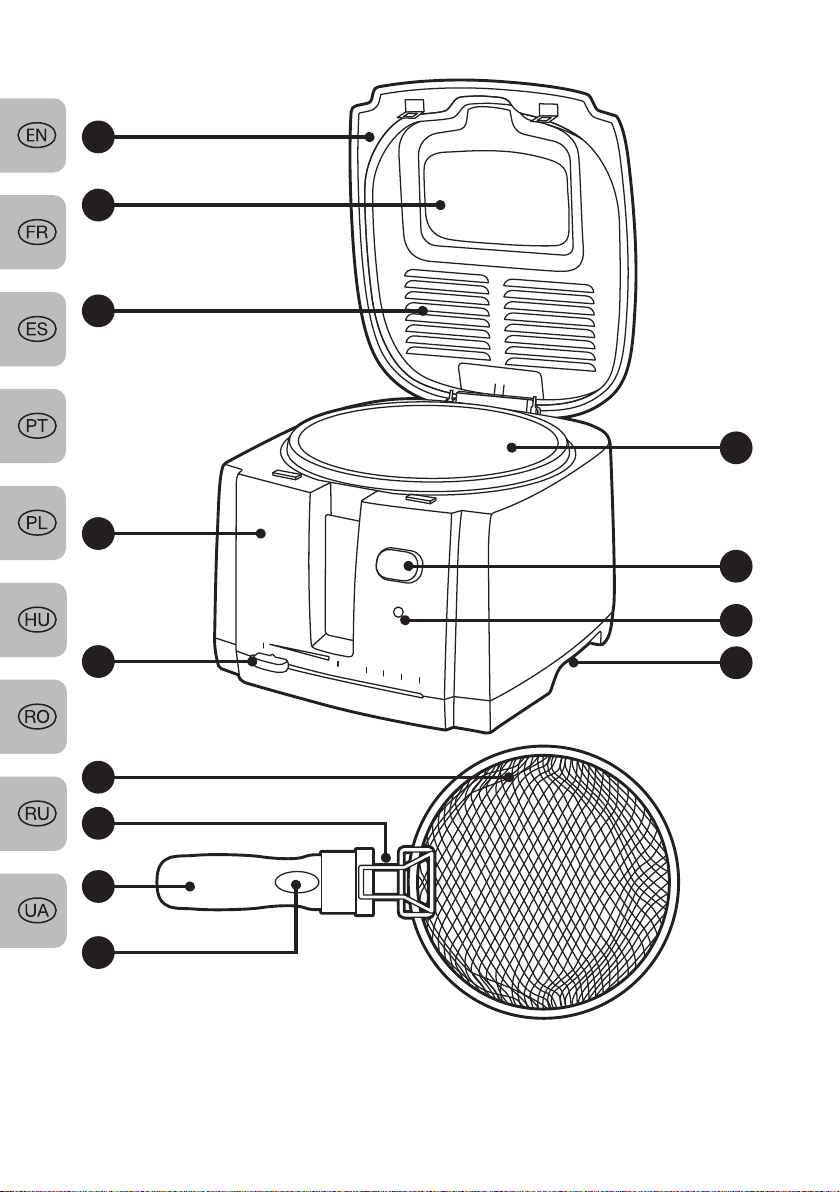
3/ PRODUCT DESCRIPTION
1- Lid
2- Viewing window
3- Air vents with removable lter
4- Oil tank
5- Lid release button
6- HEATING indicator light
7- Carry handles
8- Thermostat Control sliding switch
9- Base unit
10- Frying basket
11- Drain hook
12- Handle release button
13- Frying basket handle
4/ BEFORE FIRST USE
1. Unpack the product and all parts.
2. Make sure the product is not damaged and that there are no missing accessories.
Contact our after-sales service if there are any missing or damaged parts.
3. Clean the product and all accessories (→“6. CLEANING AND CARE”).
6

5/ OPERATION
WARNING: Always unplug the deep fryer from the wall socket before
assembling/disassembling, lling/emptying the oil tank, cleaning, and after
use.
5.1 ASSEMBLING THE DEEP FRYER
Make sure that the lid (1) is assembled to the base unit (9), and the lter and lter
cover are properly assembled in place (→6.1 DISASSEMBLING THE LID AND FILTER
FOR CLEANING).
5.2 USING THE DEEP FRYER
1. Place the deep fryer on a at, stable and heat-resistant surface.
2. Press the Lid release button (5) to open the lid.
3. Press the Handle release button (12) and unfold the handle of the frying basket
until it“clicks”into the usage position.
4. Remove the frying basket (10), ll it with prepared food and set aside. Do not
exceed 2/3 of the basket.
5. Fill the oil tank (4) with fresh cooking oil up to the “MAX” level mark. Do not ll
below the“MIN”or above the “MAX”level marked inside the oil tank.
NOTE:
■Only ll the oil tank with cooking oil. Do not ll any other liquids, such as
water, milk or coee.
■Do not ll solid fats in the oil tank to avoid re or overheating the appliance.
Solid fats must be completely melted before adding into the oil tank.
■Always use oil that can withstand high temperature.
■Do not mix dierent types of oil. Avoid adding fresh oil to used oil.
WARNING: Never use the deep fryer without oil in the tank. It may result in
overheating, re or damage to the appliance.
6. Close the lid (1).
7. Ensure the Thermostat Control (8) is moved to “OFF”, then plug the power cord
into the wall socket.
8. Slide the Thermostat Control (8) to the desired temperature (OFF-130-160-170-
180-190 °C), according to the type of food being fried.The HEATING indicator light
(6) will illuminate when the appliance is heating up the oil to the set temperature,
and will go o when the set temperature is reached.
9. When the HEATING indicator light (6) goes o, press the Lid release button (5) to
open the lid, and lower the frying basket (10) slowly into the oil tank (4) to avoid
splashes or overowing.
10. Close the lid.
NOTE:
■During frying, the HEATING indicator light will cycle on and o. This is
normal and indicates that the appliance is automatically maintaining the
set temperature.
■The appliance may emit a large amount of steam at the beginning of the
cooking process. This is due to the water content of the food and moisture
on the surface of the food. The steam may escape from the air vents (3). As
the food cooks, the surface dehydrates rapidly to leave a crispy skin.
7
11. When the food is cooked, slide the Thermostat Control (8) to “OFF”.
12. Wear heat-resistant gloves. To prevent the lid from opening too quickly, hold the
front top of the lid with one hand and then press the Lid release button (5). The
lid will ip-open automatically.
CAUTION: Beware of escaping hot steam or oil splattering.
13. Lift the frying basket and hook it on the rim of the oil tank with the drain hook
(11) to drain excess oil, and transfer the food to a plate lined with kitchen paper.
14. Once nished using the appliance, slide the Thermostat Control (8) to “OFF” and
unplug the power cord from the wall socket.
15. Allow the deep fryer and oil to cool down for at least 3 hours before emptying
and cleaning (→“6. CLEANING AND CARE”).
WARNING: Never leave the deep fryer unattended while it is plugged or
cooling down. Serious hot oil burns may result from a deep fryer being
accidentally pulled o a countertop. Keep children and pets away at all
times. Do not allow the cord to hang over the edge of the counter where
it may be grabbed by children or accidentally tripped by anyone.
RISK OF FIRE: Overheated oil or fat can ignite very quickly. Never leave
heating oil or fat unsupervised. Should the oil ignite, do not try to put
it out by pouring water on it. Cover the oil tank with a lid or plate
immediately. Turn o and unplug the fryer, and allow the oil to cool
down in the appliance.
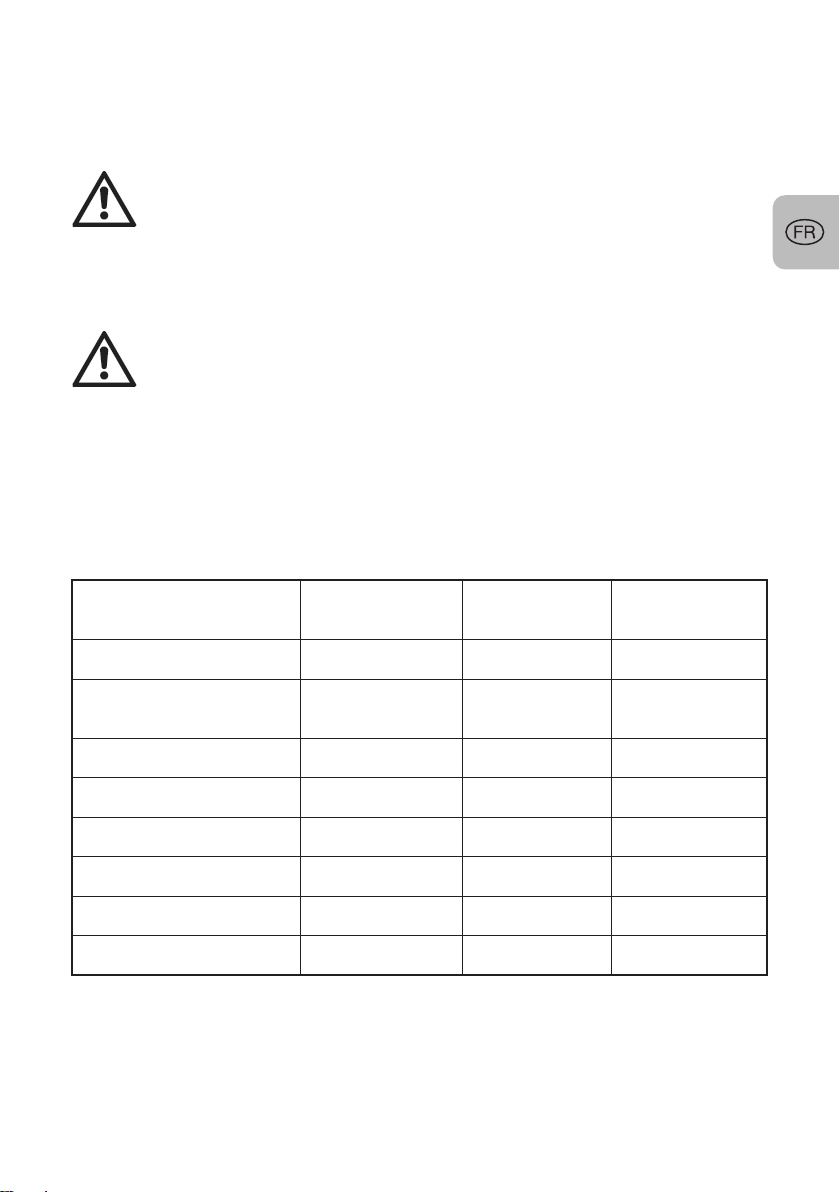
5.3 FRYING GUIDE
Use this table or the frying guide printed on the appliance as a general guidance.
Always check that food is thoroughly cooked. The frying temperature and time may
vary depending on the size and portion of the food, adjust as required.
Food Quantity Temperature Time (minutes)
Chips 400g 160 °C 6-9
Potato croquettes 4-5 pieces 170 °C 3-4
Mushrooms single layer 170 °C 4-5
Aubergine slices 350g 190 °C 3-4
Breaded sh llets 3 pieces/215g 160 °C 5-7
Camembert wedges 3-4 pieces 190 °C 2-3
Raw prawns 8-10 pieces 180 °C 3-4
Chicken nuggets 8-10 pieces 180 °C 3-4
8
Frozen Food Quantity Temperature Time (minutes)
Chips 200g 180 °C 4-5
Potato croquettes 6-8 pieces 190 °C 5-6
Breaded mushrooms 10 pieces 190 °C 4-5
Breaded scampi 250g 180 °C 4-5
Fish llets 3 llets 180 °C 8-10
Fried onion rings 6-8 pieces 190 °C 3-4
Fish ngers 8 pieces 190 °C 3-5
5.4 FRYING TIPS
■Cut foods such as chips into the same size, and choose similar sized pieces of sh
and chicken.
■Before deep frying, make sure that food is as dry as possible. Use kitchen paper to
absorb excess moisture from foods, such as sh, meats and vegetables.
■Set the Thermostat Control to the minimum temperature while waiting between
two batches.
■Do not leave the frying basket with food hooked in the draining position for too
long. The vapours could cause the food to lose its crispness and go soft.
■Do not heat the oil at high temperatures for long periods. This will cause the oil
to lose its properties.
■Replacedeepfryingoilfrequently.Iftheoil isverydark,cloudy, emitsanunpleasant
odour, smokes excessively or foams when heated, it should be discarded safely.
WARNING: Do not add water, wet foods or icy frozen foods to the appliance
as this will cause the oil to splatter and can lead to burns.
6/ CLEANING AND CARE
WARNING: Before disassembling/cleaning, unplug the
deep fryer and allow the oil to cool down completely in
the appliance.
WARNING: Do not immerse the base unit (9), oil tank (4),
power cord or plug in water or any other liquids. Do not
rinse them under the tap as they contain electrical
components. Do not let water get inside.
9

6.1 DISASSEMBLING THE LID AND FILTER FOR CLEANING
1. Press the Lid release button (5) to open the lid.
2. To remove the lid, press the 2 prongs on both sides of the hinge
towards the back (Fig. 1) and pull the lid upwards (Fig. 2).
Fig. 1
Fig. 2
3. To remove the lter cover, press the clip in the direction of the
arrow and slide it out. Then remove the lter (Fig. 3).
Press
Filter
Fig. 3
4. To re-assemble after cleaning, reverse the above steps.
10

6.2 CLEANING
■Clean the deep fryer after each use.
■Never use solvents, chemical or abrasive cleaning agents, wire
brushes, sharp objects or scouring pads to clean the appliance.
■To discard the oil, carefully lift the base unit (9) and pour the
cold oil into a disposable bottle with the help of a funnel. Wipe
o any remaining oil in the oil tank with kitchen paper. Dispose
of the oil in an environmentally safe way. Never pour the oil
into drains. Contact your local recycling centre for advice on
the disposal of the oil.
■Base unit (9) and oil tank (4) – Wipe with a soft cloth lightly
moistened with water or warm soapy water. Dry thoroughly.
The oil tank is permanent and not removable.
■Frying basket (10), lid (1), lter and cover – After removing
them, clean in warm soapy water. Rinse and dry thoroughly
before re-assembling to the base unit.
■Fully assemble the appliance before using or storing. Store
the frying basket inside the appliance and press the Handle
release button (12) to fold down the handle.
7/ STORAGE
Store unplugged in a dry and well-ventilated place, out of the reach of children.
8/ WARRANTY AND LIMITATION OF LIABILITY
This product is guaranteed for a period of 12 to 24 months (as dened by local
legislation, with the period as per the till receipt) from the date of purchase, against
any fault resulting from a defect in materials or manufacturing.
This warranty does not cover damages caused by improper use or normal wear and
tear of the product.
Specically, the warranty does not cover:
- Damage or problems caused by improper use, an accident, an alteration or power
supply of unsuitable current or voltage.
- Modied products, or those whose warranty seal or serial number is damaged,
altered, removed or oxidised.
- Replaceable batteries and accessories are guaranteed for a 6-month period.
- Battery failure, caused by excessively lengthy charging or by the failure to observe
the safety precautions explained in the manual.
- Visual damage, including scratches, dents or any other elements.
- Damage caused by any intervention conducted by a non-accredited person.
- Defects caused by normal wear and tear or due to normal ageing of the product.
- Software updates, due to a change in network settings.
- Product failures due to the use of third-party software to modify, change or adapt
11

the existing software.
- Product failures due to the use of accessories that have not been approved by the
manufacturer.
- Oxidised products.
The manufacturer cannot, under any circumstances, be held responsible for the loss
of data stored on the disc. Likewise, the manufacturer is not obliged to verify that
SIM/SD cards are properly removed from returned products.
Repaired or replaced products may include new and/or reconditioned components
and equipment.
METHODS FOR INVOKING THE WARRANTY
To obtain a warranty service, please bring your product to your point of sale’s
welcome desk along with your proof of purchase (till receipt, bill, etc.), the product
and the accessories provided, along with its original packaging.
It is important to have the following information: date of purchase, model, and serial
or IMEI number (this information generally appears on the product, packaging or
your proof of purchase).
Failing that, you must bring back the product along with the accessories required for
it to operate properly (power supply, adapter, etc.).
In the event that your claim is covered by the warranty, the customer service
department may, within the limits of local legislation, either:
- Repair or replace the defective components.
- Exchange the returned product for a product that has at least the same functions
and that is equivalent in terms of performance.
- Reimburse the product at the price of purchase of the product as indicated on the
proof of purchase.
If one of these 3 solutions is used, this does not entitle the purchaser to an extension
or renewal of the warranty period.
12

1/ CONSIGNES DE SÉCURITÉ
Lisez attentivement ce mode d’emploi avant la première
utilisation. Il contient des informations de sécurité
importantes ainsi que des consignes sur l’utilisation et
l’entretien de l’appareil. Conservez ces consignes pour
consultation ultérieure et transmettez-les aux nouveaux
propriétaires de l’appareil.
1. Ne touchez pas les surfaces chaudes.
2. An d’éviter tout danger électrique, ne plongez
pas l’appareil, le câble d’alimentation ou la che
dans l’eau ni dans tout autre liquide. Ne les rincez jamais
sous le robinet (voir NETTOYAGE ET ENTRETIEN).
3. Pour obtenir des instructions de nettoyage des surfaces
en contact avec les aliments ou l'huile, veuillez consulter la
section 6.2 (NETTOYAGE).
4. An d’éviter le risque d’électrocution, ne mettez jamais
du liquide dans l’unité principale car elle contient des
composants électriques.
5. Cet appareil n’est pas conçu pour fonctionner avec une
minuterie externe ou un système de commande à distance
séparé.
TABLE DES MATIÈRES
1/CONSIGNES DE SÉCURITÉ ___________________________ P. 13
2/CARACTÉRISTIQUES TECHNIQUES ____________________ P. 17
3/DESCRIPTION DU PRODUIT __________________________ P. 17
4/AVANT LA PREMIÈRE UTILISATION____________________ P. 17
5/FONCTIONNEMENT _________________________________ P. 17
6/NETTOYAGE ET ENTRETIEN __________________________ P. 20
7/RANGEMENT _______________________________________ P. 22
8/GARANTIE ET LIMITES DE RESPONSABILITÉ____________ P. 23
13

6. Cet appareil ne doit pas être utilisé par les enfants de 0
à 8ans. Cet appareil peut être utilisé par les enfants de 8ans
ou plus s’ils sont constamment surveillés. Cet appareil peut
être utilisé par les personnes ayant des capacités physiques,
sensorielles ou mentales réduites ou dénuées d’expérience
ou de connaissance, si elles sont correctement surveillées
ou si des instructions relatives à l'utilisation de l’appareil en
toute sécurité leur ont été données et si les risques encourus
ont été appréhendés. L'appareil et son câble d'alimentation
doivent toujours être maintenus hors de portée des enfants
de moins de 8 ans. Le nettoyage et l’entretien par l’usager ne
doivent pas être eectués par des enfants.
7. Les enfants ne doivent pas jouer avec l’appareil.
8. Avant de brancher l’appareil, vériez que la tension
indiquée sur la plaque signalétique de l’appareil correspond
à celle de votre réseau électrique local.
9. Assurez-vous que l'appareil est branché. Veillez toujours
à ce que la che soit correctement insérée dans la prise de
courant.
10. Veillez à assembler correctement l’appareil et le panier à
friture avant usage.
11. Avant de brancher ou débrancher l’appareil, mettez
toujours le bouton du thermostat sur OFF. Pour débrancher
l’appareil, tirez sur la che. Ne tirez pas sur le câble
d’alimentation.
12. N’utilisezpascetappareilsilache,lecâbled’alimentation
ou l’appareil lui-même est endommagé de quelque façon
que ce soit.
13. Si le câble d’alimentation est endommagé, il doit être
remplacé par le fabricant, son agent de réparation ou des
personnes de qualication similaire, pour des raisons de
sécurité.
14. An d’éviter tout déversement sur le connecteur, évitez
de trop remplir le panier à friture.
14

15. Gardez toujours le couvercle fermé pendant la cuisson.
16. Utilisez la poignée prévue à cet eet pour monter et
descendre le panier.
17. N’essayez en aucun cas de déplacer ou nettoyer l’appareil
alors que l’huile est encore chaude. Débranchez l’appareil de
la manière indiquée, et laissez à l’huile le temps de refroidir
complètement.
18. RISQUE DE BRÛLURES: Les surfaces de l’appareil
marquées de ce signe sont portées à très haute
température en cours d’usage, et peuvent rester brûlantes
pendant un certain temps après usage. Ne touchez pas ces
surfaces. Utilisez les poignées et les boutons.
19. Les appareils de cuisson doivent être placés dans une
position stable avec les poignées positionnées de manière
à éviter tout déversement de liquides brûlants. Lors de la
cuisson, ne placez pas l’appareil contre un mur ou d’autres
appareils. Veillez à ce qu’un espace d’au moins 15cm soit
présent tout autour de l’appareil. Ne placez rien sur le dessus
de l’appareil.
20. L’utilisation d’accessoires non recommandés par le
fabricant de cet appareil peut provoquer des blessures.
21. Veillez à ce que le câble d'alimentation reste à distance
de toute surface chaude. Ne branchez pas le câble
d’alimentation et n’utilisez pas le panneau de commande
avec les mains mouillées.
22. Ne laissez pas le câble d’alimentation pendre du bord
d’une table ou d’un comptoir ni toucher des surfaces
chaudes.
23. Si la prise de courant sert à déconnecter l'appareil, celle-
ci doit rester facilement accessible en permanence.
24. Ne placez pas l’appareil sur ou près d’un foyer électrique
ou à gaz chaud ni dans un four chaud.
25. N’utilisezpasl’appareilàdesnsautresquecellesdécrites
dans ce manuel. Une utilisation incorrecte de l’appareil peut
causer des blessures.
15

26. Ne laissez jamais l'appareil sans surveillance quand il est
en marche.
27. Les surfaces extérieures de l’appareil et le panier à friture
peuvent s’échauer durant l’utilisation. Portez des gants
isolants ou utilisez des outils de préhension lorsque vous
manipulez des parties chaudes ou lorsque vous touchez des
surfaces chaudes. Laissez l’appareil refroidir complètement
avant de procéder au nettoyage ou à l’entretien.
28. Si l’appareil rejette de la fumée noire, débranchez-le
immédiatement et attendez l’arrêt de la fumée avant de
retirer le panier à friture.
29. Cetappareilestdestinéàêtreutilisédansdesapplications
domestiques et similaires telles que :
– cuisines du personnel dans les magasins, les bureaux et
autres environnements professionnels ;
– fermes;
– clients d'hôtels, de motels et d'autres environnements à
caractère résidentiel;
– environnements de type chambres d’hôtes.
30. Le point d'exclamation inscrit dans un triangle
équilatéral indique la présence d'importantes
consignes d'utilisation et d'entretien (entretien et réparation)
dans la notice d'utilisation de l'appareil.
31. Les appareils électriques défectueux doivent être
recyclés et non pas jetés avec les ordures
ménagères. Aidez-nous à contribuer activement à
la protection des ressources et de l’environnement en
rapportant cet appareil dans un centre de tri ou une
décharge.
16
2/ CARACTÉRISTIQUES TECHNIQUES
Tension: 230V, 50Hz
Consommation électrique: 1800 W
Température de fonctionnement: 130 – 190°C
Capacité maximale: 2,5 L
3/ DESCRIPTION DU PRODUIT
1- Couvercle
2- Fenêtre d'observation
3- Orices de ventilation avec ltre
amovible
4- Réservoir d’huile
5- Bouton d’ouverture du couvercle
6- Témoin lumineux de CHAUFFAGE
7- Poignées de transport
8- Bouton coulissant de contrôle
du thermostat
9- Unité de base
10- Panier à friture
11- Crochet d’égouttage
12- Bouton de déverrouillage de
la poignée
13- Poignée du panier
4/ AVANT LA PREMIÈRE UTILISATION
1. Déballez le produit et l’ensemble des pièces.
2. Assurez-vous que le produit n’est pas endommagé et qu’aucun accessoire n’est
manquant. Si une pièce est manquante ou endommagée, contactez notre service
après-vente.
3. Nettoyez le produit et l’ensemble des accessoires (→« 6. NETTOYAGE ET
ENTRETIEN»).
5/ FONCTIONNEMENT
AVERTISSEMENT: Débranchez systématiquement la friteuse après usage,
avant de la monter ou de la démonter, avant de remplir ou de vider la cuve,
et avant le nettoyage.
5.1 MONTAGE DE LA FRITEUSE
Assemblez le couvercle (1) sur l’unité de base (9), puis installez correctement le ltre
ainsi que son panneau à leurs emplacements respectifs (→6.1 DÉMONTAGE DU
COUVERCLE ET DU FILTRE POUR LE NETTOYAGE).
5.2 UTILISATION DE LA FRITEUSE
1. Posez la friteuse sur une surface plane, stable et thermorésistante.
2. Appuyez sur le bouton d’ouverture (5) pour ouvrir le couvercle.
3. Appuyez sur le bouton de déverrouillage (12) puis déployez la poignée du panier
jusqu’à entendre un déclic indiquant qu’elle est en position d’utilisation.
17
4. Sortez le panier à friture (10), remplissez-le avec les aliments préparés, et mettez-
les de côté. Ne remplissez pas le panier au-delà des 2/3.
5. Remplissez la cuve (4) avec de l’huile de friture fraîche jusqu’au trait de niveau
MAX. Ne remplissez pas la cuve en-deçà du trait MIN ou au-delà du trait MAX.
REMARQUE :
■Ne remplissez pas la cuve avec autre chose que de l’huile de friture. Tout
autre liquide (eau, lait, café etc.) est à proscrire.
■Ne remplissez pas non plus la cuve avec de la graisse solide, il y aurait risque
de surchaue de l’appareil voire d’incendie. Si vous utilisez de la graisse
solide, faites-la fondre complètement avant de la mettre dans la cuve.
■Utilisez toujours de l’huile capable de supporter de hautes températures.
■Ne mélangez pas diérents types d’huiles. Évitez de mélanger de l’huile
fraîche à de l’huile usagée.
AVERTISSEMENT: N’utilisez en aucun cas la friteuse sans huile dans la cuve.
L’appareil risquerait de surchauer et d’être endommagé, voire de provoquer
un incendie.
6. Refermez le couvercle (1).
7. Mettez le bouton du thermostat (8) sur OFF s’il ne l’est pas, puis branchez le câble
sur une prise de courant.
8. Mettez le bouton du thermostat (8) sur la température souhaitée (OFF-130-160-
170-180-190°C), en fonction du type d’aliment à frire. Le témoin de CHAUFFAGE
(6) s’allume quand l’appareil est en train de chauer l’huile jusqu’à la température
de réglage, puis s’éteint une fois la température atteinte.
9. Quand le témoin lumineux de CHAUFFAGE (6) s’éteint, appuyez sur le bouton
d’ouverture (5) pour ouvrir le couvercle, et faites descendre lentement le panier
(10) dans la cuve (4) an d’éviter tout risque d’éclaboussures ou de débordement.
10. Refermez le couvercle.
REMARQUE :
■En cours de cuisson, le témoin de CHAUFFAGE s’allume et s’éteint par
intermittence. Ce phénomène est normal et indique que l’appareil maintient
automatiquement la température de réglage.
■L’appareil peut générer une grande quantité de vapeur au début du
processus de cuisson. Cela est dû à l’eau contenue dans les aliments et
à l’humidité présente sur la surface des aliments. Il est possible que de la
vapeur s’échappe par les ouvertures d’aération (3). Lorsque les aliments
cuisent, la surface se déshydrate rapidement et laisse une peau croustillante.
11. Une fois les aliments cuits, remettez le bouton du thermostat (8) sur OFF.
12. Protégez-vous les mains avec des gants résistant à la chaleur. An d’éviter que le
couvercle ne s’ouvre trop rapidement, tenez d’une main l’avant du couvercle avant
d’appuyer sur le bouton d’ouverture (5). Le couvercle s’ouvre automatiquement.
ATTENTION : Faites attention aux jets de vapeur brûlante et aux
éclaboussures d’huile.
13. Sortez le panier à friture, accrochez-le sur le rebord de la cuve au moyen du
crochet prévu à cet eet (11) an d’égoutter l’excédent d’huile, puis transférez les
aliments dans une assiette recouverte de Sopalin.
18
14. Quand vous avez ni d’utiliser l’appareil, mettez le bouton du thermostat (8) sur
OFF puis débranchez l’appareil.
15. Laissez la friteuse et l’huile refroidir pendant au moins 3 heures avant de jeter
l’huile et de nettoyer l’appareil. (→«6. NETTOYAGE ET ENTRETIEN»).
AVERTISSEMENT: Ne laissez jamais la friteuse sans surveillance quand
elle est branchée ou en train de refroidir. Des brûlures d’huile brûlante
très graves peuvent se produire si la friteuse tombe accidentellement
d’un plan de cuisine. Veillez à ce que les enfants et les animaux de
compagnie ne s’approchent jamais de l’appareil. Ne laissez en aucun
cas le câble pendre du bord d’un plan de cuisine: un enfant risquerait
de l’attraper, ou quelqu’un risquerait de trébucher dessus.
RISQUE D’INCENDIE: L’huile ou la graisse surchauées peuvent prendre
feu très rapidement. Ne laissez jamais de l’huile ou de la graisse chauer
sans surveillance. Si l’huile prend feu, n’essayez pas de l’éteindre en
versant de l’eau dessus. Couvrez immédiatement la cuve avec un
couvercle ou une assiette. Éteignez et débranchez la friteuse, et laissez
l’huile refroidir dans l’appareil.
5.3 GUIDE DE CUISSON
Vous pouvez utiliser ce tableau ou le guide de cuisson imprimé sur l’appareil
comme référence. Vériez toujours que les aliments sont bien cuits. Le temps et la
température de cuisson peuvent varier en fonction de la taille et du portionnement
des aliments, et doivent donc être ajustés en conséquence.
Aliment Quantité Température Durée
(minutes)
Frites 400g 160°C 6-9
Croquettes de pommes
de terre 4-5 pièces 170°C 3-4
Champignons 1 couche 170°C 4-5
Tranches d’aubergines 350g 190°C 3-4
Filets de poisson panés 3 pièces/215g 160°C 5-7
Quartiers de camembert 3-4 pièces 190°C 2-3
Crevettes crues 8-10 pièces 180°C 3-4
Nuggets de poulet 8-10 pièces 180°C 3-4
19

Surgelés Quantité Température Durée
(minutes)
Frites 200g 180°C 4-5
Croquettes de pommes
de terre 6-8 pièces 190°C 5-6
Champignons panés 10 pièces 190°C 4-5
Langoustines panées 250g 180°C 4-5
Filets de poisson 3 lets 180°C 8-10
Rondelles d’oignon frites 6-8 pièces 190°C 3-4
Bâtonnets de poisson 8 pièces 190°C 3-5
5.4 CONSEILS DE CUISSON
■Coupez les aliments en morceaux de taille identique (ex: frites) ou choisissez des
aliments de taille identique (poisson, poulet etc.).
■Avant de commencer une friture, veillez à ce que les aliments soient les plus secs
possibles. Absorbez l’excédent d’humidité avec du Sopalin (notamment pour le
poisson, la viande et les légumes).
■Entre deux fournées, remettez le bouton du thermostat sur la température
minimale.
■Évitez de laisser trop longtemps le panier rempli des aliments frits accroché en
position d’égouttage. Les vapeurs d’huile pourraient les ramollir et leur faire
perdre leur croustillant.
■Évitez de garder l’huile à haute température pendant trop longtemps. Cela ferait
perdre à l’huile ses propriétés.
■Remplacez fréquemment l’huile de friture. Si l’huile est très sombre, trouble,
émet une odeur désagréable, ou dégage une quantité excessive de mousse ou
de fumée lorsqu’elle est chauée, elle doit être éliminée en toute sécurité.
AVERTISSEMENT: Ne mettez pas d’eau, d’aliments humides ou d’aliments
congelés recouverts de givre dans l’appareil, car cela pourrait causer des
éclaboussures d’huile et des brûlures.
6/ NETTOYAGE ET ENTRETIEN
AVERTISSEMENT:Avant dedémonter/nettoyerlafriteuse,
débranchez-la et laissez l’huile refroidir complètement
dans l’appareil.
AVERTISSEMENT: N’immergez jamaisl’unité de base (9),
la cuve (4), le câble d’alimentation ou la che électrique
dans de l'eau ni dans tout autre liquide. Ne les rincez en
aucun cas sous le robinet, car ils contiennent des composants
électriques. Évitez toute inltration d’eau à l’intérieur.
20
This manual suits for next models
1
Table of contents
Languages:


