SELTZA SeltzaHub Technical Document

Installation, Operation,
and Maintenance Guide
SeltzaHub/ SeltzaTap/ SeltzaTap Compact
Table of contents
1. SeltzaHub
Technical Specifications
What’s included
Installation
Operation
Maintenance
2. SeltzaTap
Technical Specifications
Installation
Operation
Maintenance
3. SeltzaTap Compact
Operation
3
3
4
5-8
9
10
13
13
14-15
16
17-18
19
20
Installation, Operation,
and Maintenance Guide 2

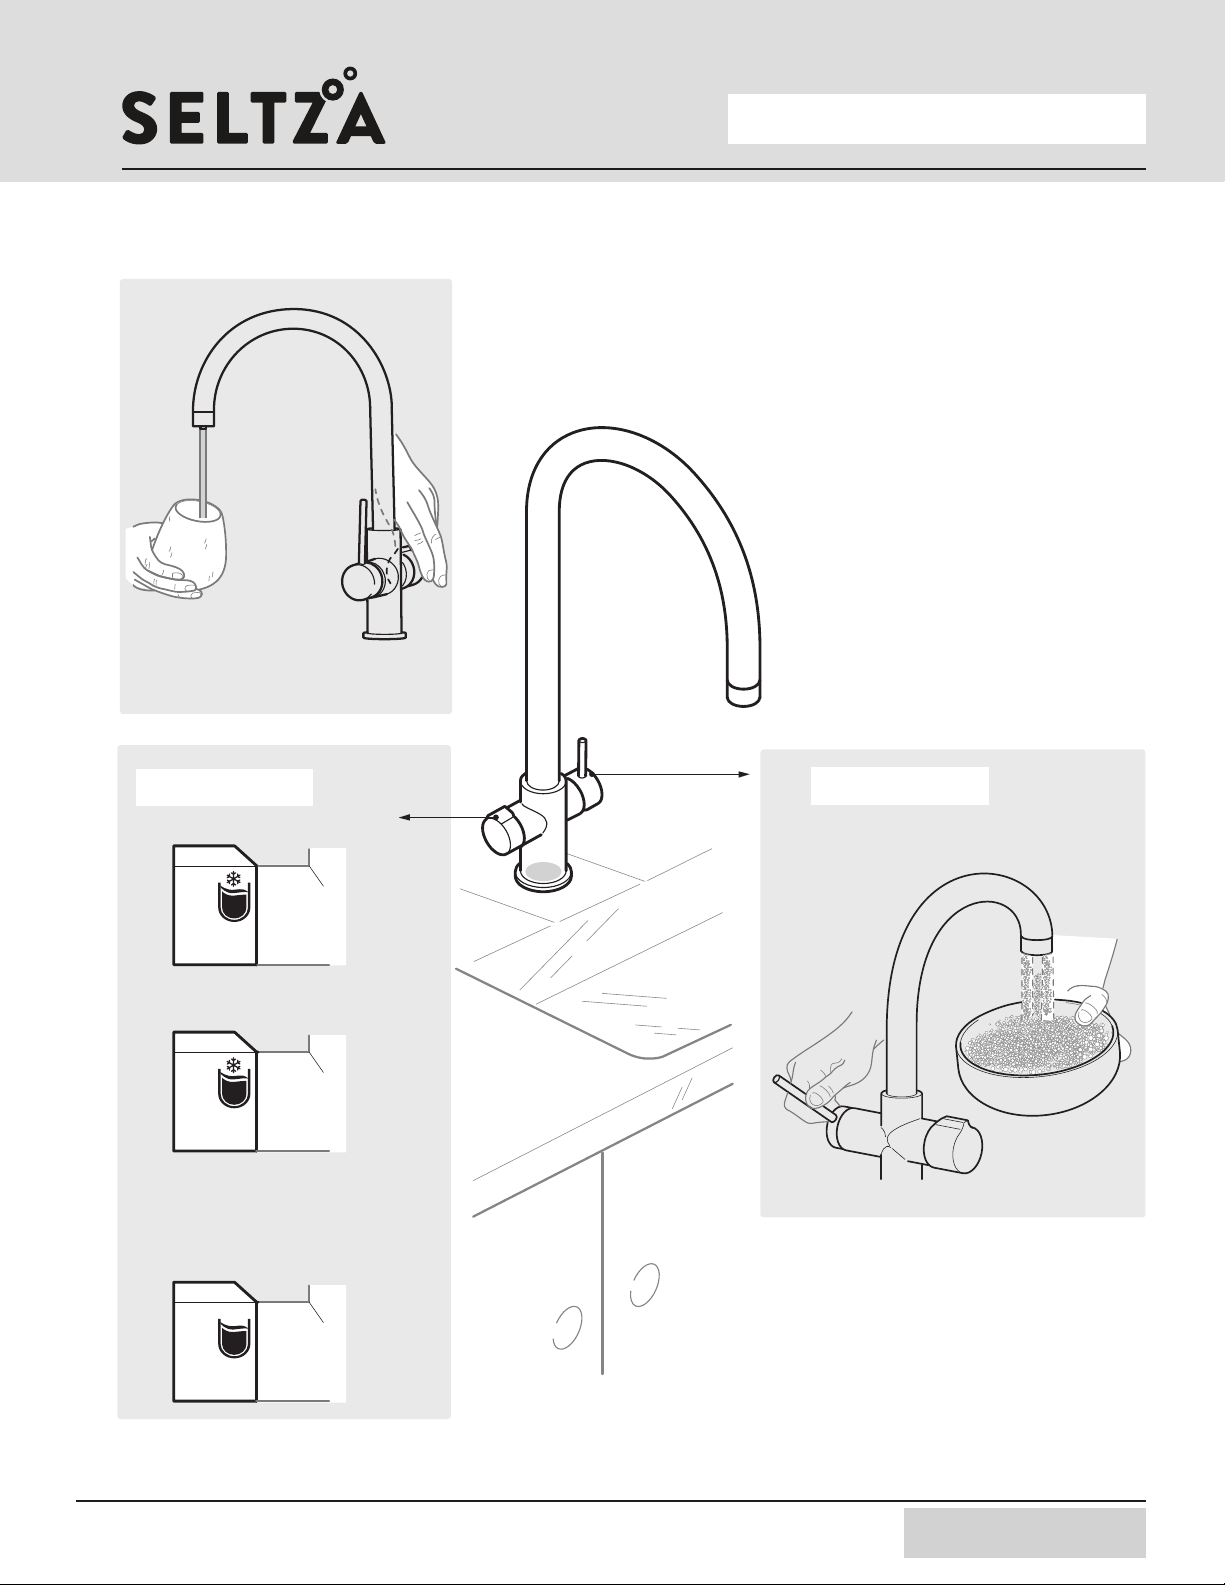
SeltzaHub has 3 valves ont the side and
the machine is 210mm (8 1/4”) at that point.
Voltage
Current
Chilled still water capacity
Soda water capacity
Refrigerant Type and Charge
Cooling temperature
CO2 inlet pressure
Water inlet pressure
A-Weighted Sound Pressure Level
SeltzaHub only weight
120V 60Hz
4A
3 litre/ hour
4-6 litre/ hour
R134a 55grams
2-12°C
65-80 psi
29 – 60 psi
40 to 50 dB
17.5kg (38.6 lbs)
Packaging weight 20.0kg (44.1 lbs)
410mm
450mm
Tecnical Specifications
170mm
(6 5/8”)
(17 3/4”)
(16 1/4”)
SELTZAHUB
Cold water
Ambient water
Seltza water
Installation, Operation,
and Maintenance Guide 3

What’s included?
SELTZAHUB
SeltzaHub
1. SeltzaHub
2. CO2 Regulator with TR21-4 threads
(SodaStream style cartridge)
3. Regulator adapter to CGA-320
(Larger style CO2 Tanks 5, 10, 20 lbs)
4. T-Stop Valve
5. Tubing as per below
6. Power Cord
T-Stop valve
1@ 3ft x 1/4’
for water inlet
4@ 3ft x 5/16’
for ambient,
cold, soda and gas.
Seltza regulator
TR21-4 threads
Regulator adapter
for CGA-320 threads
Power Cord
Installation, Operation,
and Maintenance Guide 4

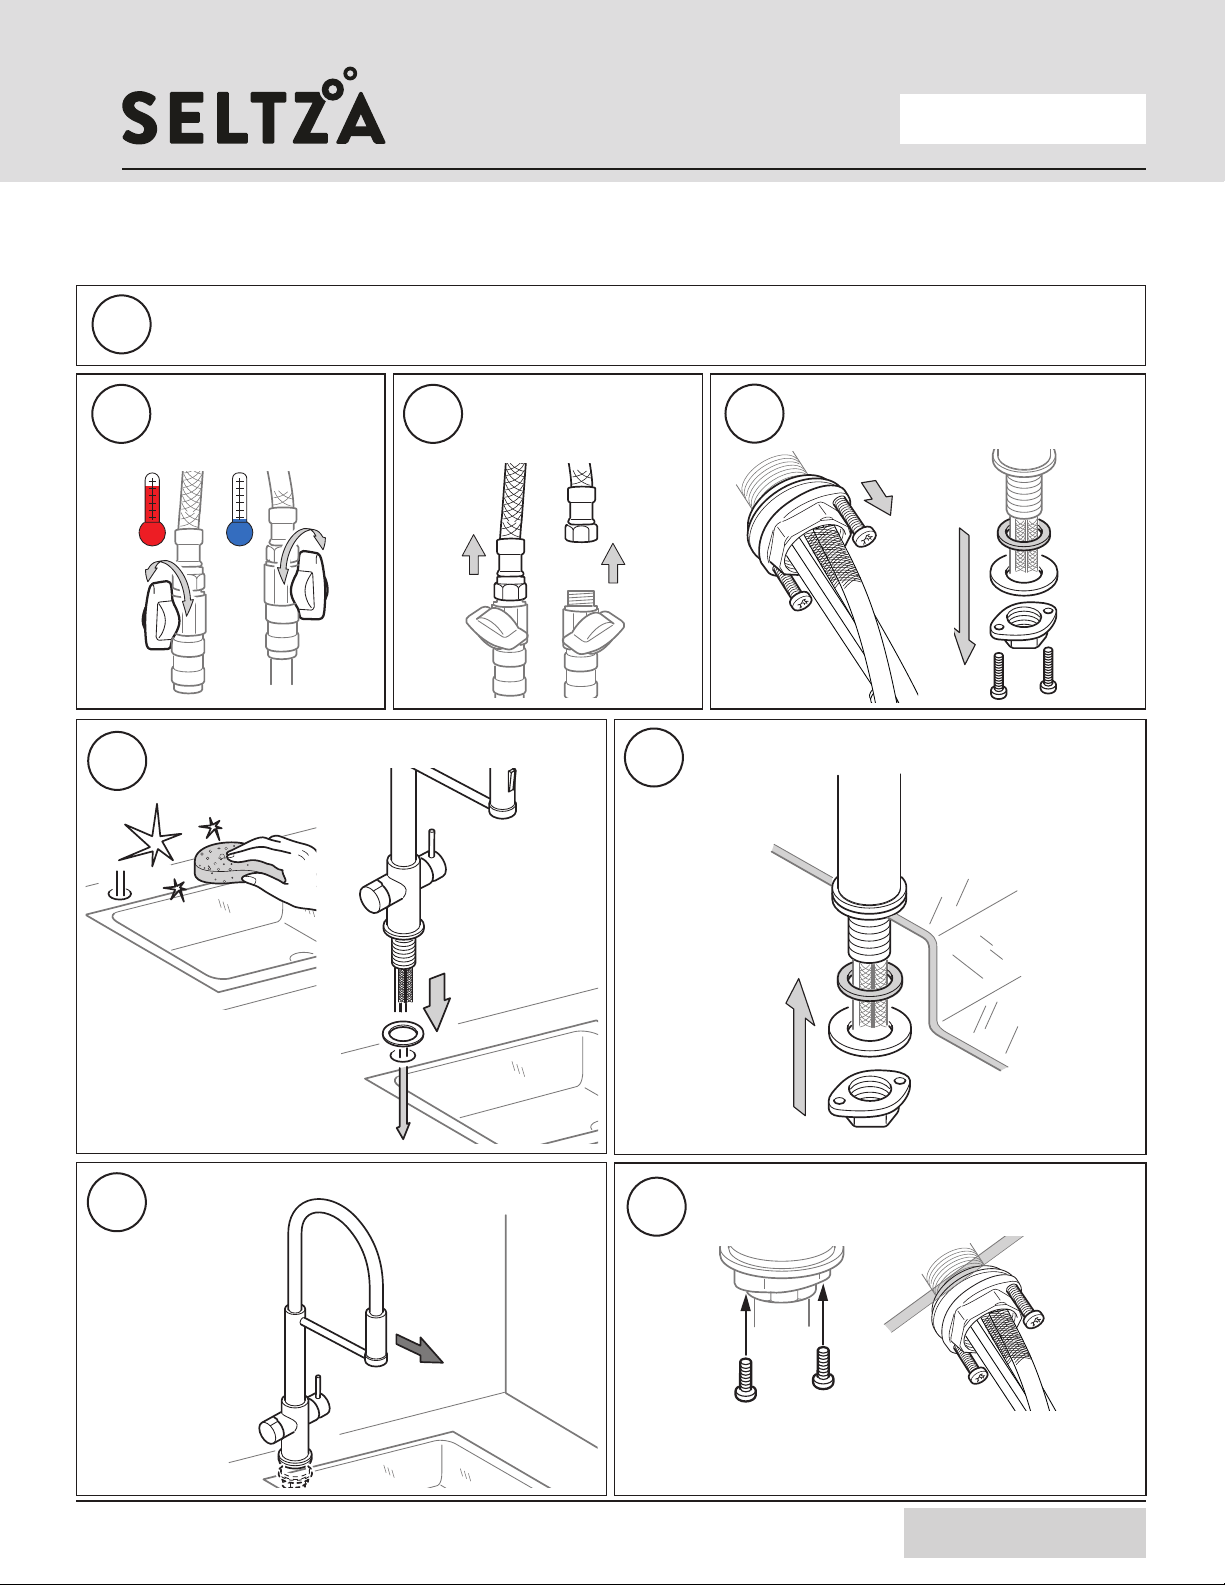
Installation
SELTZAHUB
Overall view of installation
Regulator
CO2 cylinder
(not included)
5/16”
5/16”
SeltzaHub
SeltzaTap
Filter
(not included)
T-stop
valve
Ambient water
Seltza water
Cold water
1/4”
(existing valves)
Installation, Operation,
and Maintenance Guide 5

SELTZAHUBSELTZAHUB
2
13Disconnect existing
cold water lines from
existing valve.
Ensure the SeltzaHub is put into the
proposed installation location 24hours
before starting up. This ensures there
will be no issues with refrigerant system.
Installation
Turn off cold
water from existing
valve under the sink.
Install T-Stop Valve in existing cold water line.
Connect cold water faucet hose to
the T-Stop valve.
4
5
Sample image under the sink
T-stop
valve
Existing valves
Check for leaks. Ensure T-Stop Valve is turned
off. Turn on Main Cold Water supply and check
for any leaks. (Show picture of T-Stop valve off
and Main water on)
Installation, Operation,
and Maintenance Guide 6

Chilled water
Ambient water
Seltza water
(White)
(Clear)
(Blue)
Disassemble the blue safety clip and
take out the plug. (if applicable).
Connect the 1/4” diameter water pipe to the T-stop valve
or the filter system and the SeltzaHub water inlet.
Connect the chilled sparkling, chilled still, and ambient still
5/16” tubing from SeltzaHub to SeltzaTap.
For third party faucets modify connections to work with
the SeltzaHub
CO2
inlet
Water
inlet 1/4”
5/16’
1
2
4) Check for water leaks in the system.
a) Ensure all the valves on the side of the machine are off.
b) Turn on Main water valve. Check for leaks
c) Turn on T-Stop valve Check for leaks
d) Turn on Each valve on the side of SeltzaHub and wait
for 5 seconds. Check each valve for leaks.
e) Leave valves open
Cut the tube square and push
into the tube stop. For metal
tube, remove burrs and chamfer
tube end to prevent O-ring seal
from being damaged.
Fitting grips before it seals.
Ensure tube is pushed into
the tube stop.
Tube is secured in position
DISCONNECTION PROCEDURE
Push collet against body
and slide tube out fitting.
How To Use Quick Connect Fittings
Existing
Filter
T-stop
valve
4
3
2
1
1 2 3 4
SELTZAHUB
Installation
Installation, Operation,
and Maintenance Guide 7

SELTZAHUB
on/off
420gram
Existing CO2
Connect 5/16” tube in the back of the
SeltzaHub to CO2 inlet.
5/16”
Assemble the pressure reducer to the CO2 cylinder.
Ensure regulator is off. Turn counter-clockwise till it stops.
7
6
Plug in and turn on power. Let the cooling
system inside the SeltzaHub cool and carbonate
for 20 minutes. You should hear the pump feed
water into the machine and the compressor start up.
810 minutes after turning power on adjust the CO2
pressure regulator to 75 psi. Ensure no CO2 leaks
9
5
5, 10, or 20lbs
Existing CO2
Regulator adapter
CGA-320
Take the 5/16” gas tubing, cut as needed and assemble
the tubing to the pressure reducer.
Any CO2 bottles should always
be upright during use, storage and
transit. If the bottle has been left
horizontal, place upright and let it
stand for 60+ minutes to allow
content to settle before initialising.
mins.
mins.
20 minutes after operation
open the faucet valve and let
500ml (16 oz) of sparkling water.
10 Wait 20 minutes to let the system re-cool
and then tap 500cc of sparkling water.
11 Let system cool for 20 minutes.
Enjoy your Seltza water.
12
Water coming out
of second nozzle.
500ml/
(16oz)
mins.
mins.
Water coming out
of second nozzle.
500ml/
(16oz)
mins.
mins.
Left hand lever Left hand lever
to Seltza
regulator
5/16’
Installation, Operation,
and Maintenance Guide 8
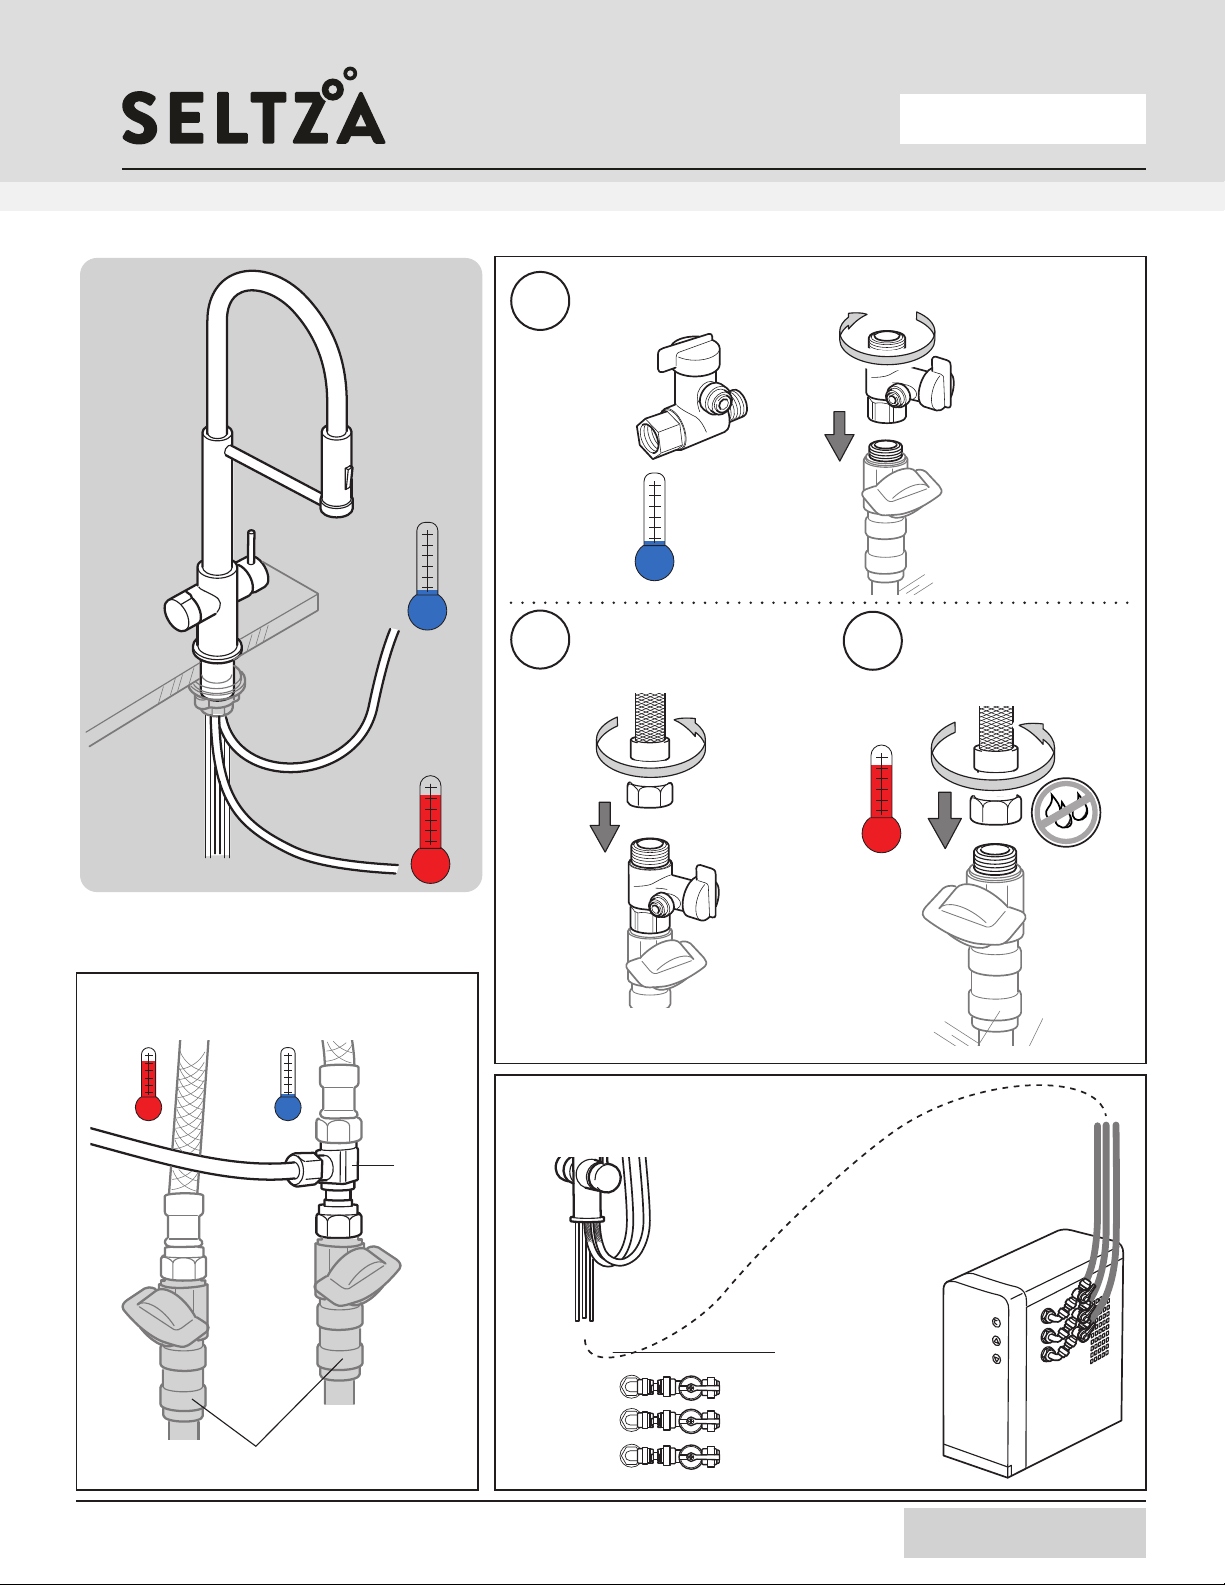
SELTZAHUB
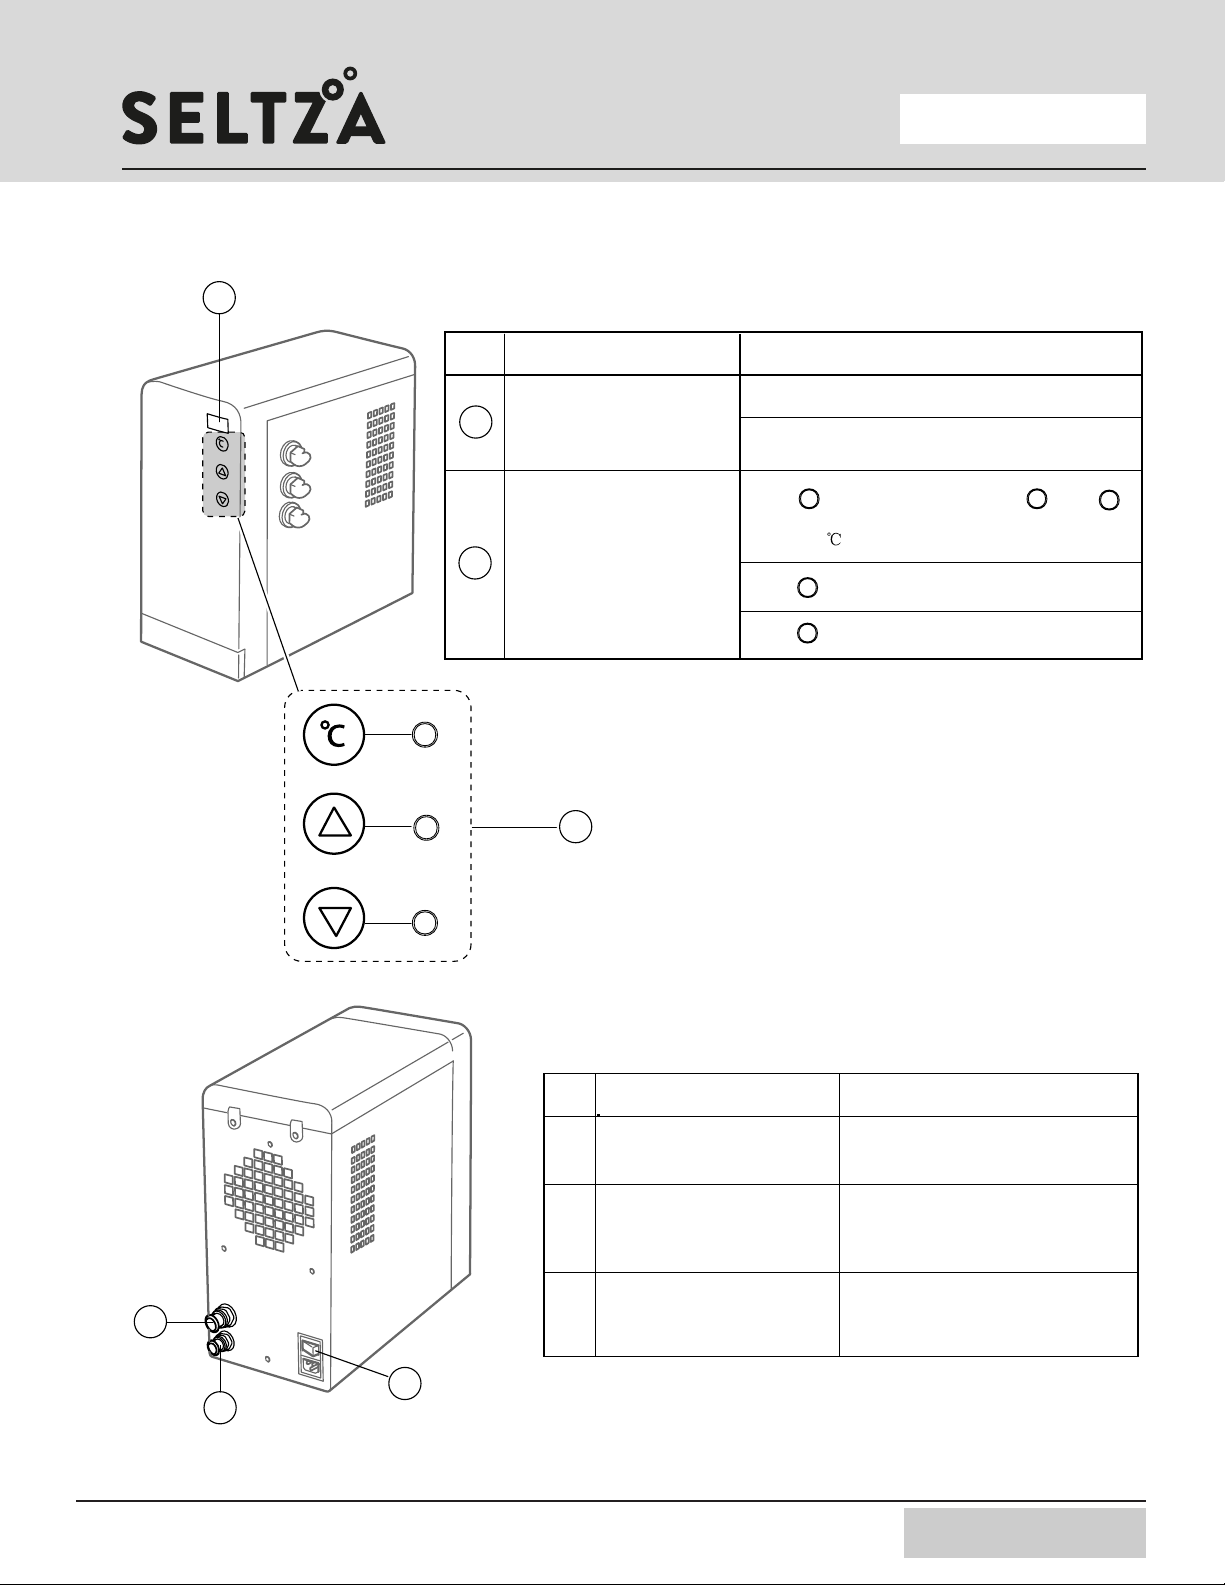
Button functions
Back side of the machine
No Name and function Comments
No Name and function Comments
3
2
1
4
5
1
3
2
5
4
2 3 4
3
4
2
3
4
LED Lamp -- status of the
cooling system
Temperature adjustments
Operational buttons ON - OFF button
Water inlet
(1/4” = 6.35mm) Water pressure to be 29-65 Psi
CO2 inlet
(5/16” = 7.95mm) CO2 gas to be 65-80 Psi
Show temperature of the cooling
Error: Fault of the machine (see detail below)
press , temperature goes up.
press , temperature goes down.
Press for five seconds, button and
will start to shine, then adjust the temperature
(from 2-12 )
Operation
Installation, Operation,
and Maintenance Guide 9
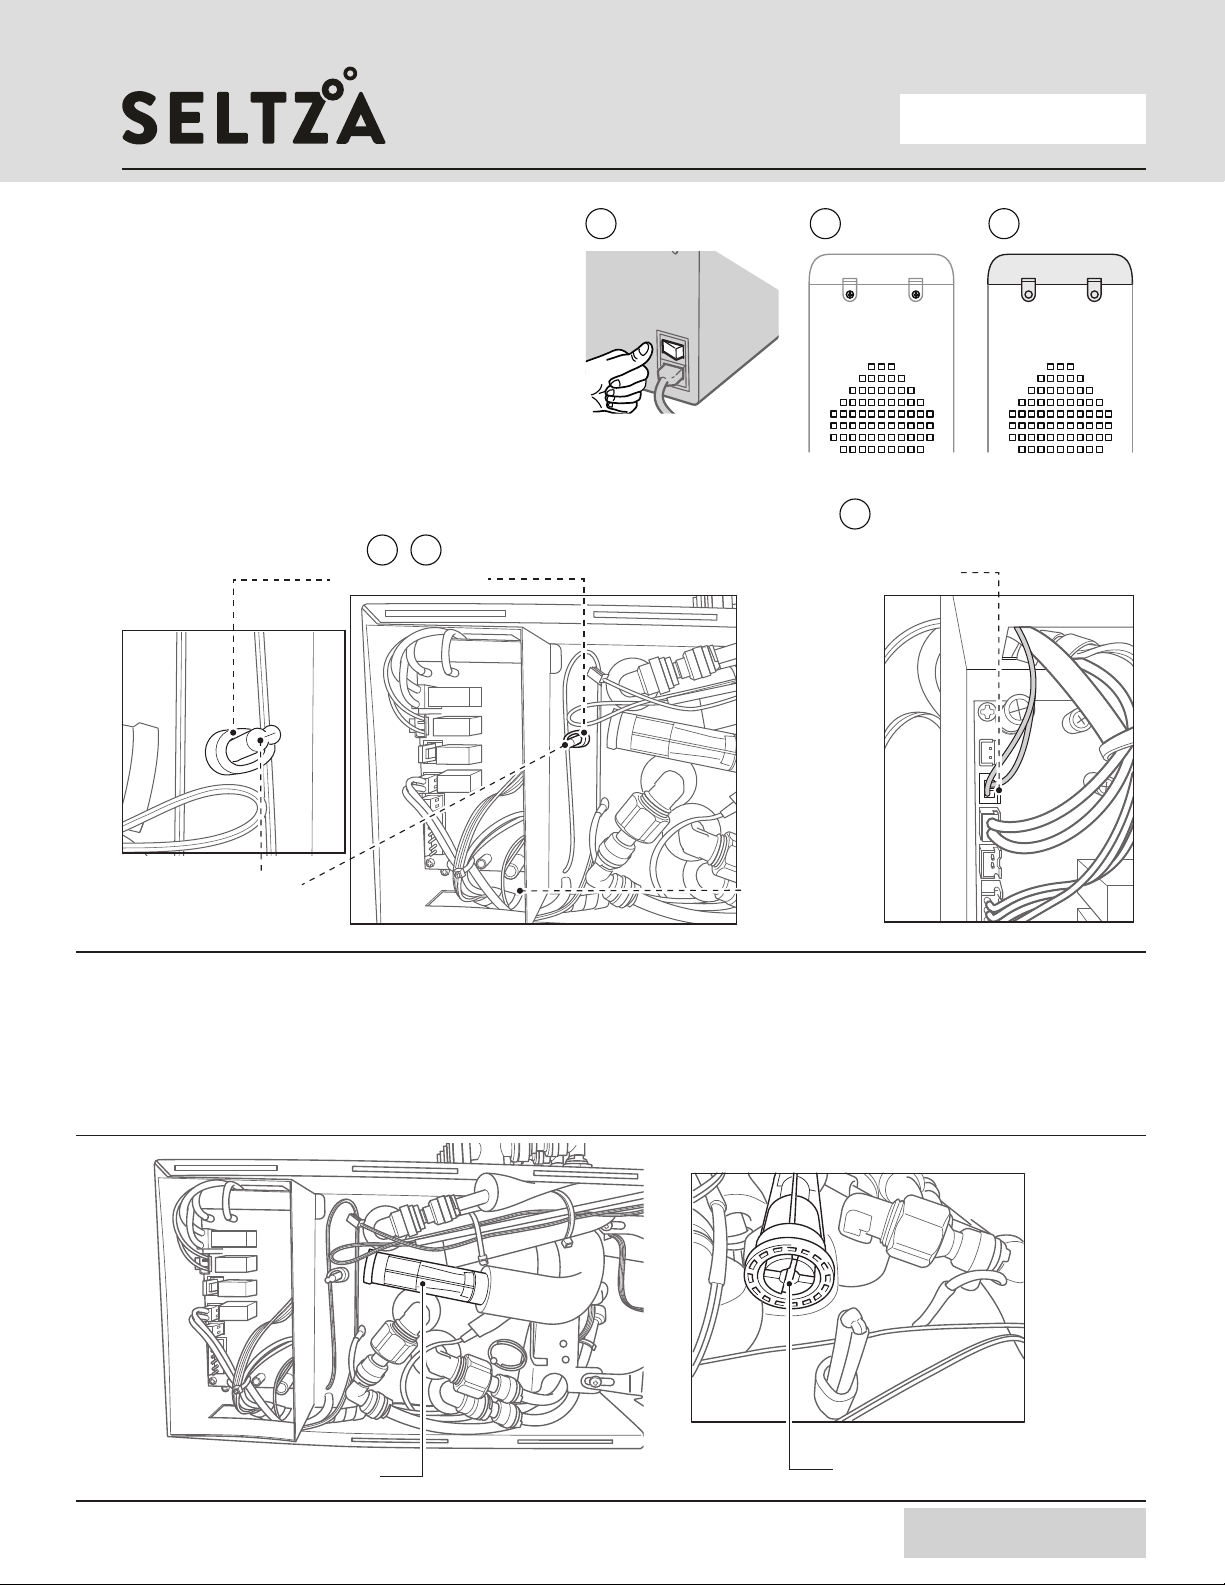
SELTZAHUB
The temperature sensor has a limited life span.
A new one is included inside the top of the machine.
1. Turn off SeltzaHub.
2. Remove 2 screws at the back and top of the seltzaHub.
3. Remove plastic cover.
4. Remove elastic band around temperature sensor.
5. Pull temperature out of well.
6. Follow the wire back and remove from connect marked CN 16 on board.
7. Install in reverse.
Replacing the temperature sensor.
SeltzaHub Maintenance
on/o
1 2 3
Temperature
sensor connection
to control board
Temperature sensor connection
to control board.
Marked CN16.
Pull out to disconnect.
Existing
temperature
sensor
White rubber band
4 5
6
It is possible to adjust the flow rate up or down inside the SeltzaHub. This may
increase the instance of E4 error codes and is not detrimental to the machine.
1. Turn off SeltzaHub
2. Remove 2 screws in the back top of the SeltzaHub
3. Remove the top cover
4. Locate the flow regulator. Mark the current screw location with a marker
in case you want to go back to the factory setting of 15 mL/second.
5. Turn flow regulator screw counter clockwise for increased flow.
Turn clockwise for decreased flow.
Flow Rate Adjustment
Flow regulator Flow regulator screw
Installation, Operation,
and Maintenance Guide 10
SELTZAHUB
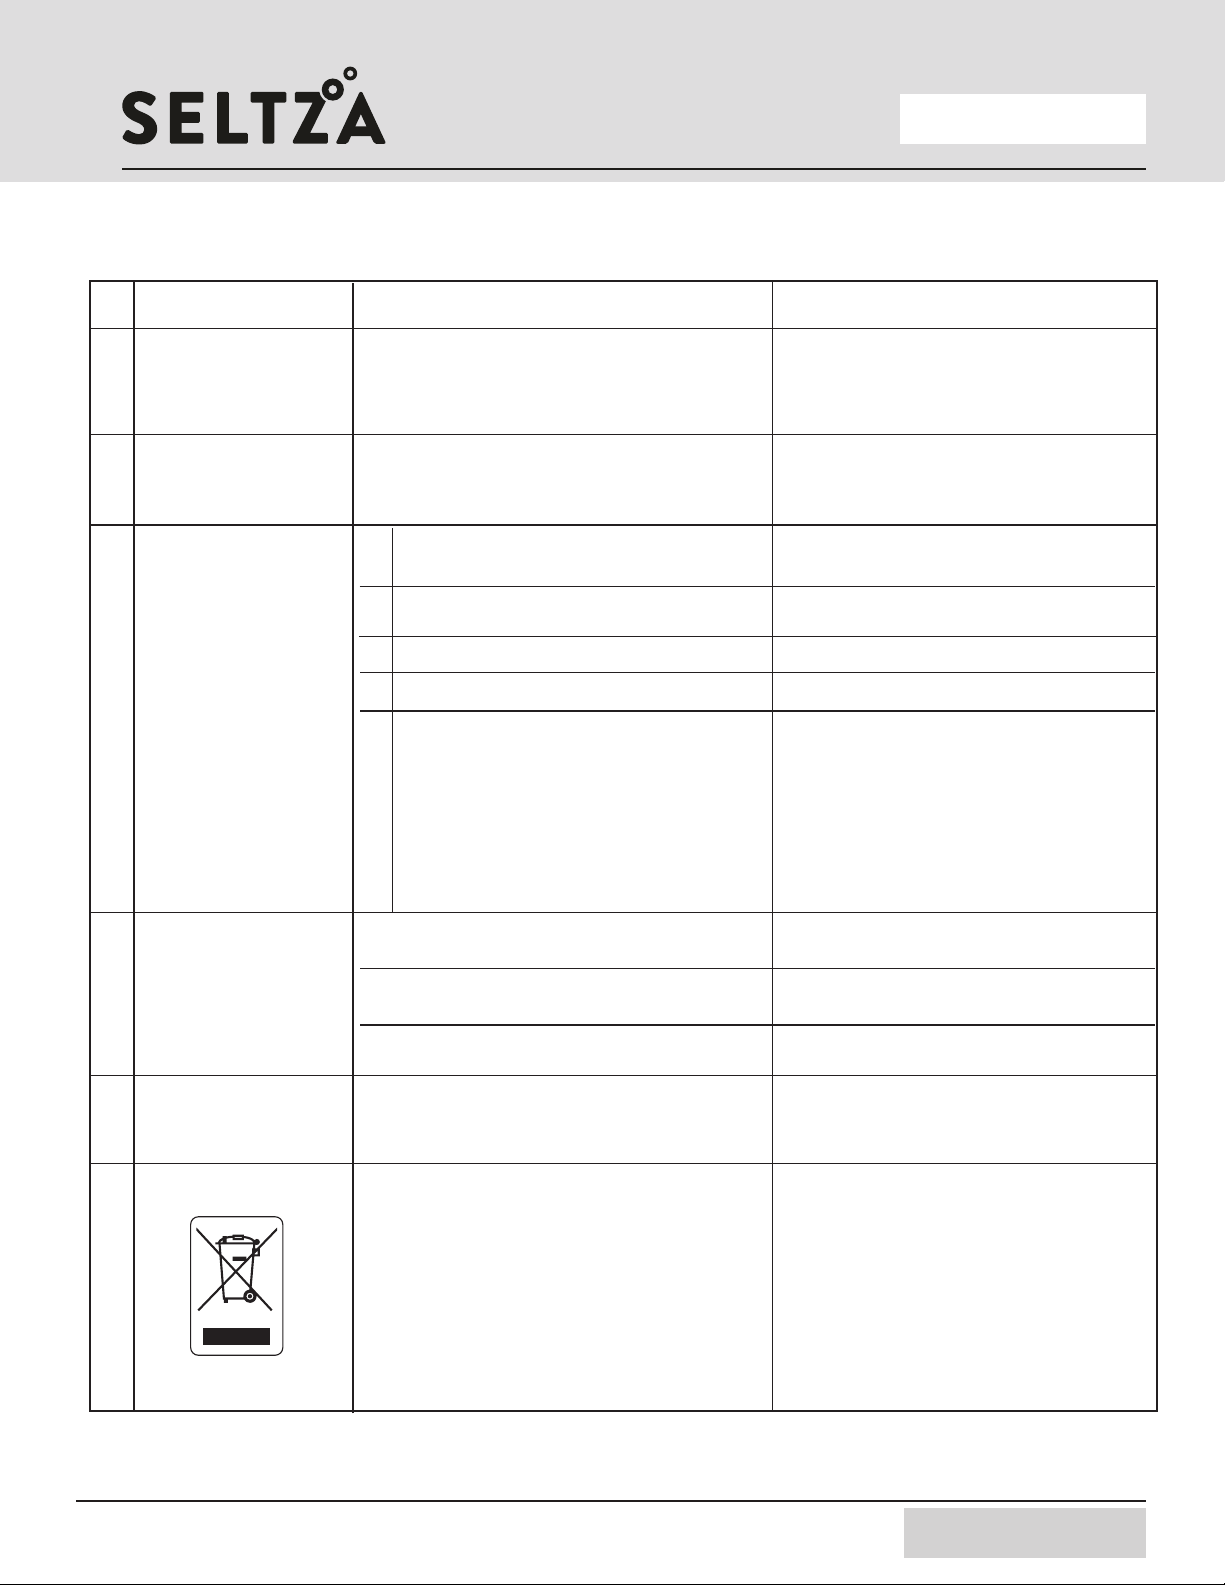
No Fault Actions to be taken Comments
1
2
When using the Soda
water, gas comes out of
the Seltza Tap.
Machine is not working
properly
Recommended to wait a little, then problem will be
solve by itself.
CO2 bottle is empty.
Power is off.
Not enough bar pressure.
Replace CO2 bottle.
Turn on the power switch.
Slightly increase CO2 bar pressure.
This happens when taking to much soda water
at one time.
Recommended to shutdown the machine and
re-operate it after 30 seconds.
3
5
SeltzaHub display error
Noise
4Soda not working
or flat
E1 NTC connection is open.
NTC is short-circuited.
Replace temperature sensor as per maintenance
instructions
Replace temperature sensor as per maintenance
instructions
E2
Temperature is too low. Shut down the machine, restart after 30 seconds.
Shut down the machine, restart after 30 seconds.
1. Check for proper ventilation under the counter.
2. Check that fan is operational and that is not
blocked.
3. Check the temperature shown on the front of
the display. If it shows 35 or more than the
temperature sensor needs replacement.
See maintenace requirements below.
4. Room temperature may be to high.
E3
Pump Protection as the pump is working to long.
E4
E5 Compressor protection, the compressor
works too long time
Potential faults and actions to be taken
If there are any unusual NOISE, shutdown the
SeltzaHub, close the water inlet and gas inlets.
Do not try to fix the machine.
Shutdown the machine and contact
Seltza customer support.
6
This marking indicates that this product should
not be disposed with other household wastes.
To prevent possible harm to the environment
or human health from uncontrolled waste disposal,
recycle it responsibly to promote the sustainable
reuse of material resources.
Correct Disposal of this product.
Installation, Operation,
and Maintenance Guide 11

WARRANTY
Any claim under this warranty must be made within 1 year of the date of purchase ofthe product. This
product is warranted to be free of defect of material and workmanship for 1 year from date of purchase. To
make claim under warranty, take the product and proof of purchase to place where you purchased the
product, and they will lodge a Warranty Request Seltza.
The warranty only applies if the product was used and/ or installed in accordance with the user guide and/or
installation instructions. This warranty is given in lieu of all other express or implied warranties and manufac-
turer shall in no circumstance be held liable
for damages consequential or otherwise or delays caused or faulty manufacturing except as excluded by law.
Applicable to all above, is that the warranties need to be approved by Seltza to ensure product was not
incorrectly used, installed or claimed. False and incorrect claims will be pursued at Seltza discretion, includ-
ing chargeable inspection and labour costs incurred.
SELTZAHUB
Installation, Operation,
and Maintenance Guide 12

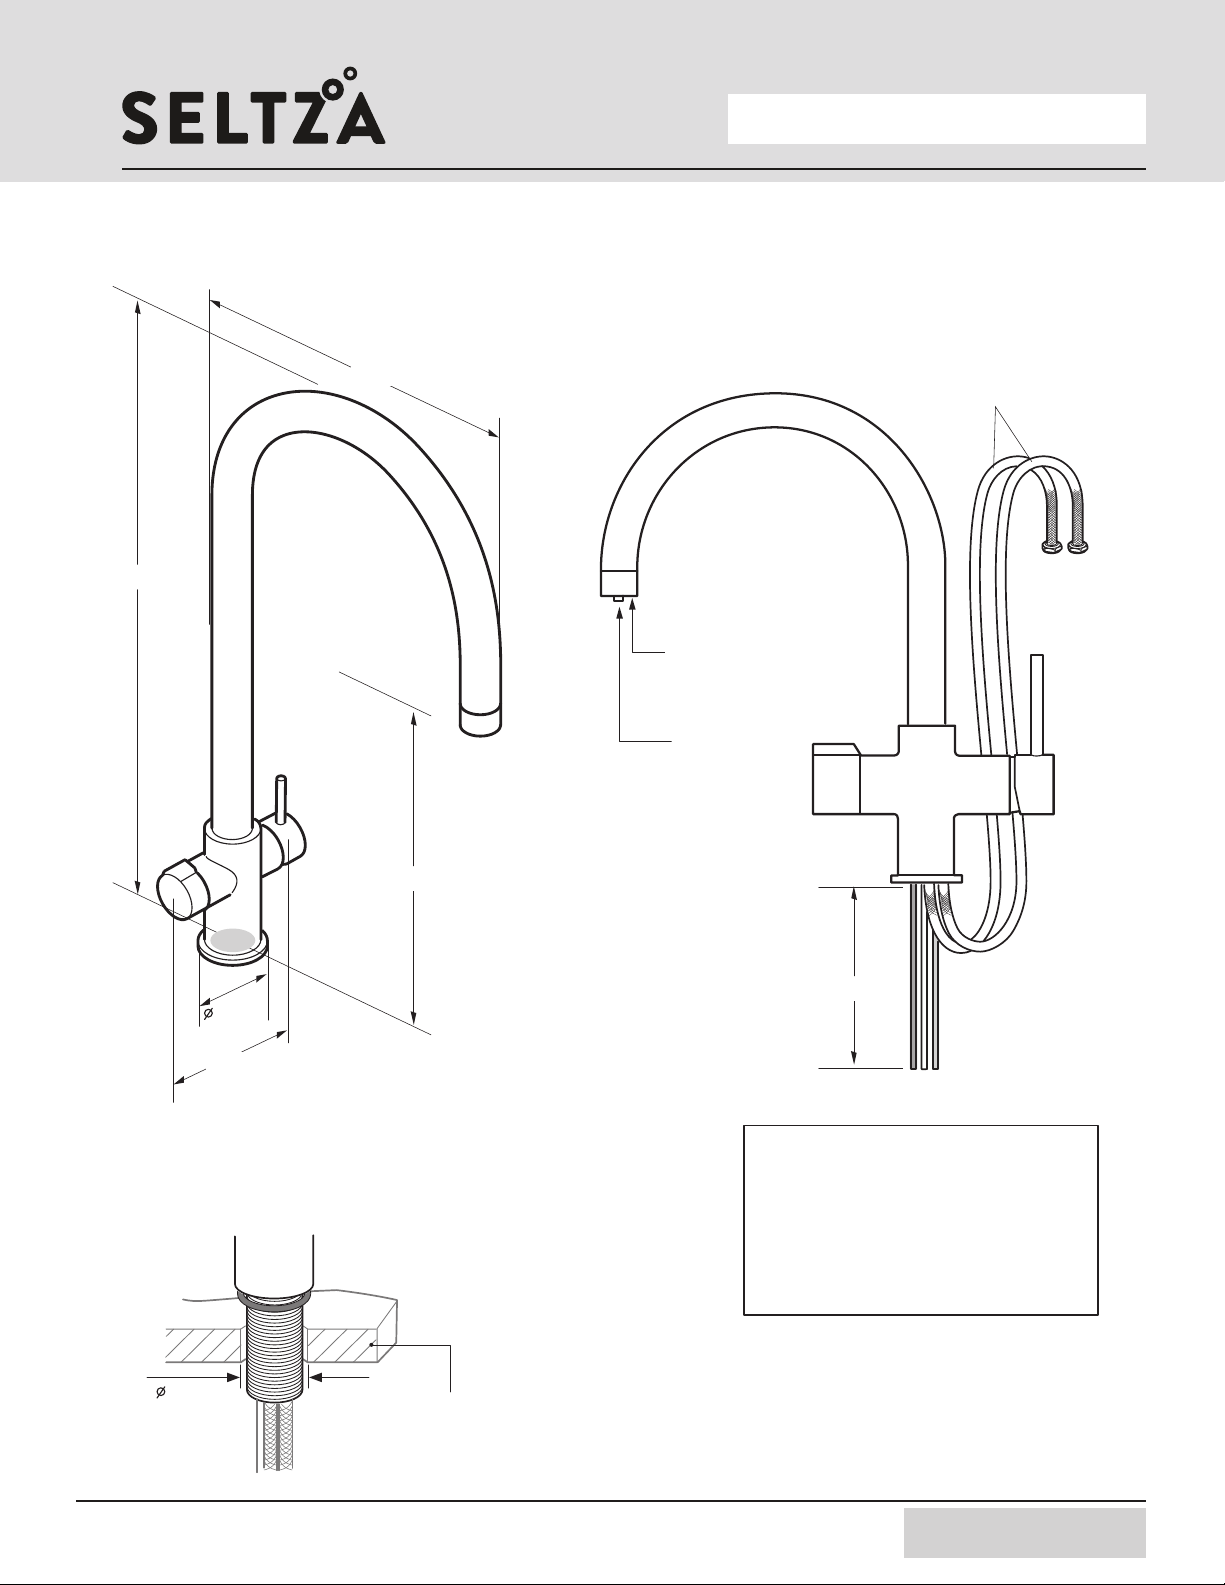
90 cm long 5/16 inch PE tubing
Blue tubing = Chilled Seltza
White Tubing = Chilled Still
Clear Tubing = Ambient Still
Faucet hole diameter
in Countertop is
1 3/8" (35mm)
Max Countertop thickness
is 1 3/4" (45mm)
Countertop hole and
thickness requirements
SELTZATAP
Technical Specifications
90 cm hoses with 3/8”
compression fitting
SeltzaTap
255mm
175mm
508mm
216mm
90cm
50mm
35mm
Installation, Operation,
and Maintenance Guide 13
SELTZATAP
Installation
1
2
Make sure faucet is aligned with sink. Tighten the two screws on the faucet nut
to ensure faucet is tight.
2
1
4
3
6
5
78
Disconnect existing hot
and cold water lines from
existing valves.
Remove faucet nut from existing faucet.
May have two screws or just be a nut.
Ensure the SeltzaHub is put into the proposed installation location 24hours before starting up.
This ensures there will be no issues with refrigerant system.
Install SeltzaTap faucet in countertop. Tighten screw faucet nut till finger tight.
Turn off hot and cold
water from existing
valves under the sink.
Installation, Operation,
and Maintenance Guide 14
SELTZATAP
Installation
Install T-Stop Valve in existing cold water line.
May require an adapter.
Connect cold water faucet
to the T-Stop valve.
May require an adapter.
Connect the chilled sparkling, chilled still,
and ambient still 5/16” tubing from
SeltzaHub to SeltzaTap.
Connect hot water faucet hose
to the hot water piping.
May require an adapter
Sample image under the sink
T-stop
valve
1
23
existing valves
cold
water
ambient
water
5/16’
Chilled water
Ambient water
Seltza water
White
Clear
Blue
Installation, Operation,
and Maintenance Guide 15

SELTZATAP
Left hand lever
Right hand lever
Chilled sparking water
Push button on spray
function on hot and
cold water
Hose is removable
Hot and cold water for
cleaning and dishes.
Water coming out
of second nozzle.
Chilled Still water
Ambient Still water
(will be the temperature
of the main building
supply water)
SeltzaTap Operation
Installation, Operation,
and Maintenance Guide 16

Changing Cartridges
Sparkling water (Left Hand Cartridge)
1. Turn the water off to the faucet at the SeltzaHub valves.
2. Put a piece of painters tape between the faucet body and handle to have a clear line
to line it up when reinstalling it.
3. Loosen set screw below. (Set screw is a 2.5mm hex screw)
4. Remove the nut with an adjustable wrench.
5. Check the gasket is in good condition (Not shown and is between the nut and cartridge below).
6. Pull out old cartridge
7. Install new cartridge ensuring the tabs lineup.
Handle Nut
Cartridge
2.5mm
hex screw
12
Cartridge
Faucet body
Faucet body
SELTZATAP
SeltzaTap Maintenance
Ensure tabs lineup
Installation, Operation,
and Maintenance Guide 17
Changing Cartridges
SELTZATAP
SeltzaTap Maintenance
1Turn off hot and cold
water from existing
valves under the sink.
Regular water (Right Hand Cartridge)
1. Turn the water off to the faucet at the Hot and Cold valves below sink. (As shown.)
2. Loosen set screw 6 below. (Set screw is a 2.5mm hex screw)
3. Remove 4 below by screwing out with hand
4. Remove the nut with an adjustable wrench ( 3 )
5. Check the gasket is in good condition
(Not shown and is between 3 and 8 below)
6. Pull out old cartridge
7. Install new cartridge ensuring the tabs lineup
1 2 3 4
7
5
6
Cartridge
Faucet body
Ensure tabs lineup
Installation, Operation,
and Maintenance Guide 18
Identical installation as SeltzaTap.
Only differences are in the operation and dimensions.
See below.
SELTZATAP COMPACT
SeltzaTap Compact
90 cm long 5/16 inch PE tubing
Blue tubing = Chilled Seltza
White Tubing = Chilled Still
Clear Tubing = Ambient Still
Faucet hole diameter
in Countertop is
1 3/8" (35mm)
Max Countertop thickness
is 1 3/4" (45mm)
Countertop hole and
thickness requirements
90 cm hoses with 3/8”
compression fitting
SeltzaTap
90cm
Sparkling water
Left Lever
Regular Hot and Cold
Right Lever
35mm
324mm
350mm
202mm
172mm
50mm
Installation, Operation,
and Maintenance Guide 19
SELTZATAP COMPACT
Installation, Operation,
and Maintenance Guide 20
SeltzaTap Compact Operation
Left hand lever Right hand lever
Chilled sparking water Hot and cold water for
cleaning and dishes.
Chilled Still water
Ambient Still water
(will be the temperature
of the main building
supply water)
This manual suits for next models
2
Table of contents
Popular Water Heater manuals by other brands

alphainnoTec
alphainnoTec WWS 121 operating manual

RED-RING
RED-RING TS10 Instructions for use and maintenance

German pool
German pool cex9 user manual

Astral Pool
Astral Pool Genus IV JX Series Installation and operating instructions

MrHeater
MrHeater F235350 Operating instructions and owner's manual

Ariston
Ariston CONTRACT ST 50 Instructions for installation


