Semi Korea AIRWOLF User manual

Before using the system AIRWOLF features
Thank you for choosing AIRWOLF, a remote engine starter system
manufactured by Semi Korea Inc. You are about to experience
convenience through the various carefully designed functions for customer
satisfaction. To fully benefit from the capabilities of your AIRWOLF
system, we encourage you to read this user manual thoroughly before
using the system.
※ Caution
1. Semi Korea warrants the operation of AIRWOLF system for a
period of 2 years. Defects in parts or workmanship will
be repaired by the manufacturer, but any installation problems
will be resolved by your installation dealer.
2. Even though this product provides a theft deterrent function, Semi
Korea gives no warranty against the theft or damage of any vehicle.
3. The manufacturer is not responsible for any accident caused
by unauthorized installation or modification of the equipment.
4. The repair cost of this equipment due to the damage caused
by natural calamity or customer fault will be charged. In addition to
that, exchanging expendable supplies such as motor, remote control
case, and battery will be charged regardless of the warranty period.
5. The battery for the remote control lasts about 100 days if it
is used 10 times a day (It might be different depending on the
type of the battery).
User is responsible for purchasing and exchanging the battery
(AAA Size V)
■Provides easy-to-use menu-driven user interface that allows easier
function operation for user's convenience.
■Immediately displays the answer from the vehicle to the user
commands through the LCD and the beeper of the remote control so
that user would not be anxious about the current status of the vehicle.
■Displays the signal sensitivity between the vehicle and the remote
control by using 4-step signal sensitivity antenna.
■Allows detailed time configuration in all menus to meet
customer's various needs.
■Displays the current vehicle status on the LCD, when an alarm
occurs so those users can easily recognize the status of the vehicle.
Also different beeping sound is provided for each individual status
of the vehicle by the remote control for easier distinction of the status.
■Saves all user configurations even if power is not supplied. Therefore,
reconfiguration is not needed after replacing batteries.
■Notifies by sound if the vehicle is unreachable area from the
remote control.
■Provides easy-to-use time data configuration function (INITIAL SETUP)
designed to meet various requirements of vehicles including special-
purpose, and imported vehicles in which other remote starter systems
could not be installed.
■Adopted the most advanced code hopping technology.
※ Code hopping technology offers the most advanced protection available against
"code-grabbing" devices that thieves may use to record the digital code transmitted by
your remote control. When you leave the area, a thief can then play back the code to
start or stop your system. The remote control of AIRWOLF randomly changes the code
every time you use it by using the code hopping technology, and makes code-
grabbing devices useless.
TThhiissddeevviicceeccoommpplliieesswwiitthhppaarrtt1155oofftthheeFFCCCCRRuulleess..OOppeerraattiioonniissssuubbjjeeccttttootthheeffoolllloowwiinngg
ttwwooccoonnddiittiioonnss::(1) This device may notcause harmful interference, and (2) thisdevice must
accept any interference received, including interference that maycause undesired operation.
ccaauuttiioonn::Any changes or modifications in construction of this device which are not expressly
approved by the party responsible for compliance could void theuser's authority to operate the
equipment.
4
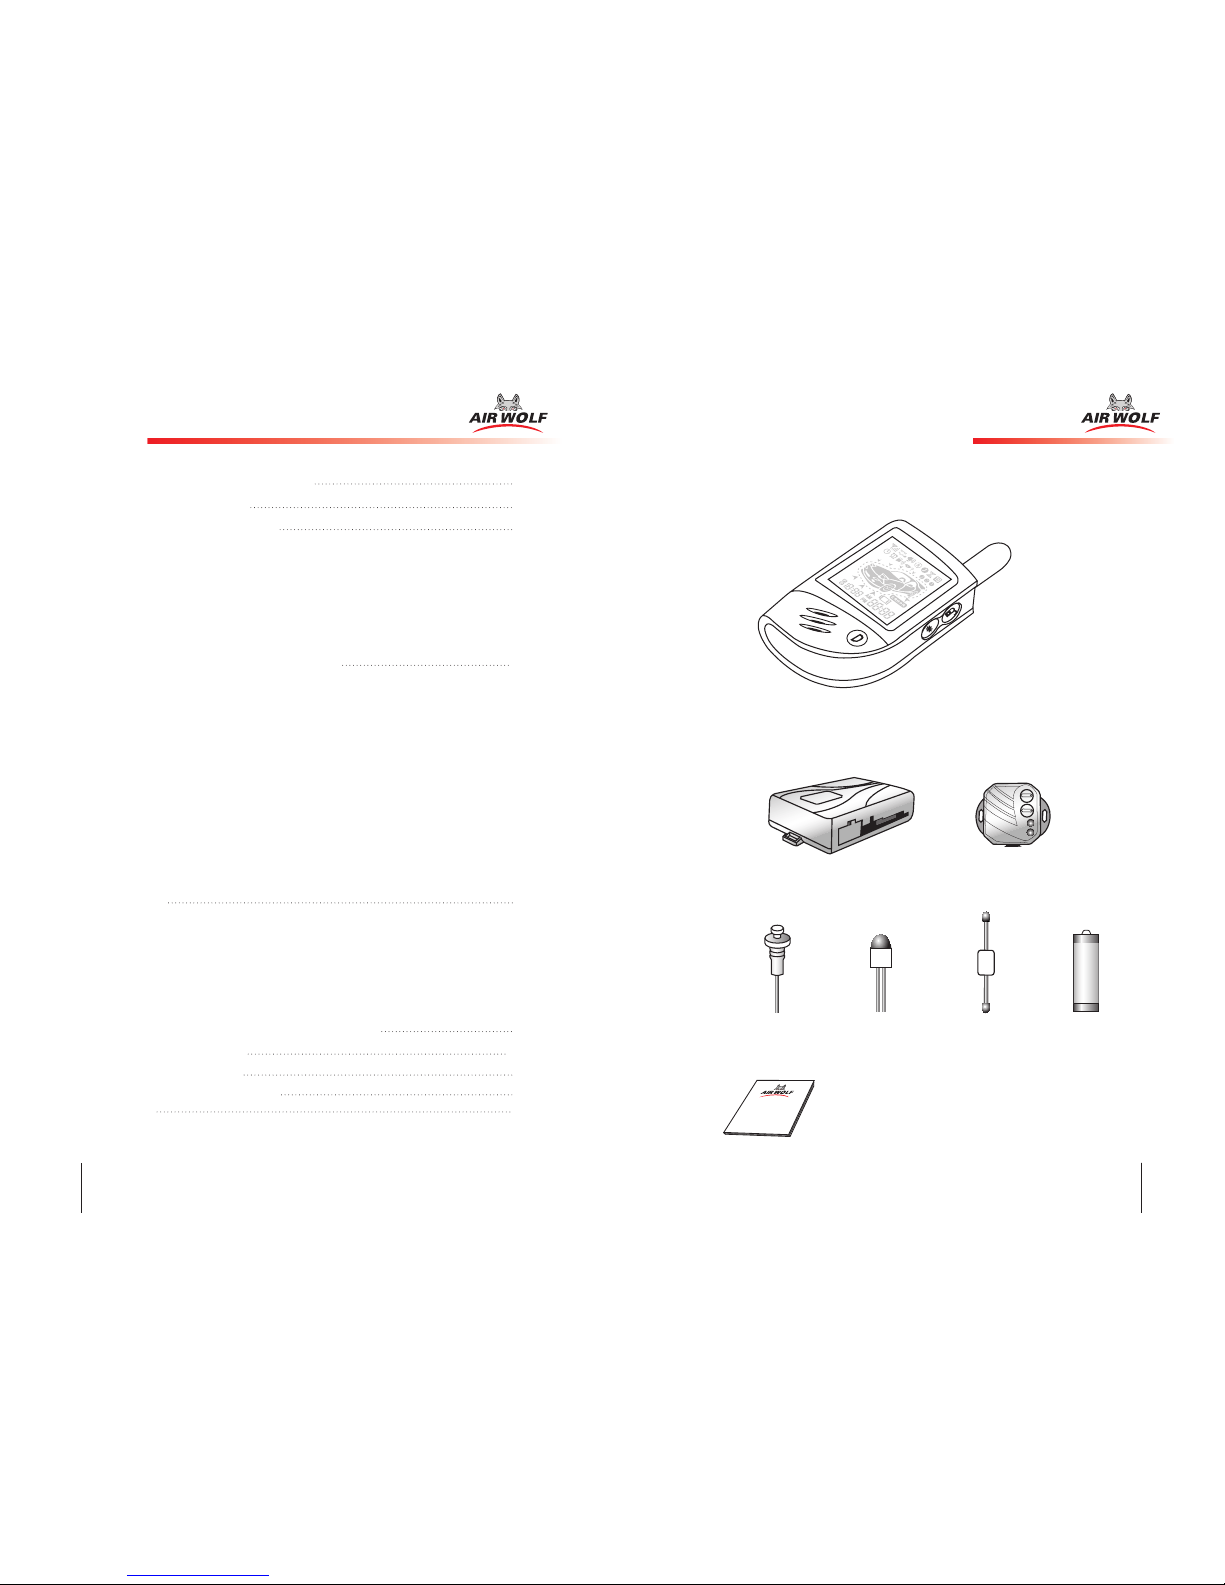
Contents 1. The contents of the package
5
11.. TThhee ccoonntteennttss ooff tthhee ppaacckkaaggee
22.. BBuuttttoonn ddeessccrriippttiioonnss
33.. FFuunnccttiioonnss ooff tthhee bbuuttttoonnss
3-1. Remote engine start
3-2. Door Lock/Unlock
3-3. Emergency siren
3-4. Status check including finding the vehicle,
checking the communication status, and checking the vehicle status.
3-5. Opening the trunk
3-6. Turning the LCD lamp on
3-7. Configuring auxiliary output 1/2/3
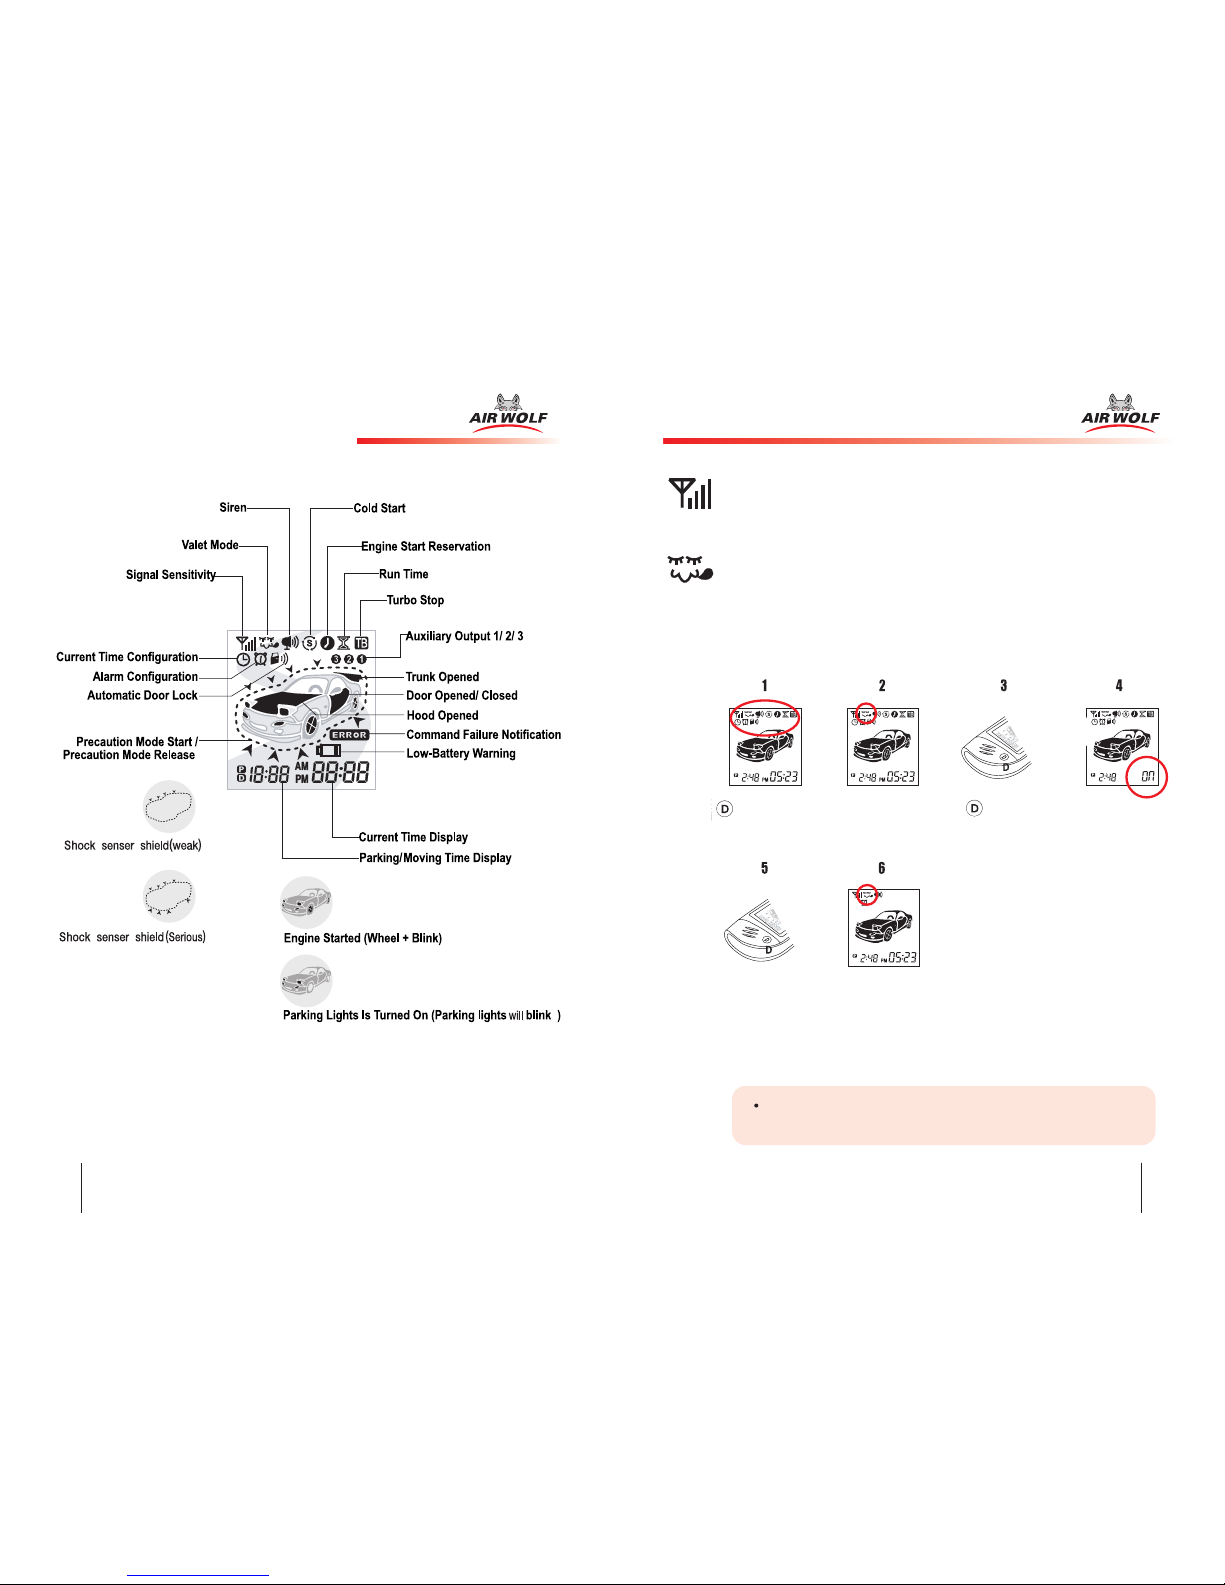
44.. FFuunnccttiioonnss ooff tthhee iiccoonnss oonn tthhee LLCCDD
4-1.
Signal sensitivity
4-2.
Configuring valet mode
4-3.
Configuring siren
4-4.
Configuring cold start
4-5.
Configuring engine start time
4-6.
Configuring run time
4-7.
Configuring turbo stop
4-8.
Configuring current remote control time
4-9.
Configuring remote control alarm
4-10.
Configuring automatic door lock
4-11.
Parking/driving time display
4-12.
Configuring auxiliary output 1, 2, and 3
4-13.
Command failure notification
4-14.
Low-battery warning
4-15.
Current time display
55.. AAllaarrmmss
5-1. Weak shock detection
5-2. Serious shock detection
5-3. Door open detection
5-4. Engine start detection
5-5. Hood open detection
5-6. Trunk open detection
5-7. Error occurr detection
66.. IInn ccaassee ooff mmaannuuaall ttrraannssmmiissssiioonn vveehhiicclleess
77.. VVaalleett mmooddee bbuuttttoonn
88.. FFuunnccttiioonn SSuummmmaarryy
99.. MMiisscceellllaanneeoouuss ffuunnccttiioonnss
1100.. FFAAQQ
5
6
10
20
22
23
23
24
25
7
Remote
brain(main Control Box)
valet mode button LED antenna battery
(AAA)
shock sensor
user guide

7
33--11.. RReemmoottee eennggiinnee ssttaarrtt ((PPrreessss bbuuttttoonn DD ffoorr sseeccoonnddss))
The remote started engine will stop when you press the brake
without placing the key to‘ON’position.
In case of starting failure, the unit attempts to start
engine 2 times continuously.(Total 3 times engin Start attempt.)
T
ip
3. Functions of the buttons
33--22.. DDoooorr LLoocckk//UUnnlloocckk ((PPrreessss bbuuttttoonn BB ffoorr aa mmoommeenntt))
If the engine is started,
headlight and tire will blink.
Even if the doors are
unlocked, they are locked
automatically. The engine runs
for the configured time in the
run time configuration
Press
for few seconds
If the door is closed, a shield
appears and the vehicle
enters precaution mode in 20
seconds turning the red LED
of the driver's seat on.
※ To adjust the 20 seconds
waiting time, ask your installation
dealer
If the shield disappears,
precaution mode is released
and the LED is turned off
Press for a moment
(4× times)
(× one time)
(×2 times)
Blink & Sound
Blink & Sound
Blink & Sound
6
2. Button descriptions
/ /
■ Functions of the buttons
Button
Time ABC D
Press for a moment
Press for few seconds
※ Press for a moment means press for about 0.5 second or more, and press for few seconds means
press for more than 2 seconds.
To display menu
To lock or
unlock door Finding vehicle
To turn
the LED lamp on
to start engine
To operate
emergency siren To open trunk
To configure auxiliary
output 1/2/3

9
8
33--66.. TTuurrnniinngg tthhee LLCCDD llaammpp oonn ((PPrreessss bbuuttttoonn AA ffoorr aa mmoommeenntt))
If LCD screen is dim, you can turn the lamp on
using this button. Pressing button A for a moment
turns the remote control LCD lamp on, and it is
turned off in about 5 seconds. To turn off the lamp
manually, press the button again while the
lamp is turned on.
Auxiliary output is used to control heater, air conditioner, sunroof,
or power windows. The auxiliary output port should be connected
to the corresponding equipment of the vehicle.
Press button A for seconds to configure auxiliary output, and press
button A, C, and B to enable auxiliary output 1, 2, and
3 respectively as described above.
When the icon is on, if you select AUX again, the icon
becomes disappeared.
AUX output is released at the moment you apply the brake
as the car is already started.
T
ip
33--77.. CCoonnffiigguurriinngg aauuxxiilliiaarryy oouuttppuutt 11//22//33 ((PPrreessss bbuuttttoonn AA ffoorr sseeccoonnddss))
Press
for few seconds
1. Press button A for seconds to
display all ①②③ icons.
2. Press button A once again to
enable auxiliary output 1
and make icon ① blink.
3. Press button B to enable auxiliary
output 2 and make icon ② blink.
4. Press button C to enable auxiliary
output 3 and make icon ③ blink.
Press
for a moment
33--33.. EEmmeerrggeennccyy ssiirreenn ((PPrreessss bbuuttttoonn BB ffoorr sseeccoonnddss,, ddeeffaauulltt sseettttiinngg iiss 3300
sseeccoonnddss))
Since this function does not
affect the status of the
vehicle, you can utilize this
function easily in the following
cases
To find your vehicle in a complex and large parking area
To check the communication status and signal strength
To confirm the status of your vehicle
T
ip
In case of emergency, you can
let people know the
emergency status by flashing
the parking lights and siren.
To stop emergency siren,
press button B or C
33--44.. SSttaattuuss cchheecckk ((PPrreessss bbuuttttoonn CC ffoorr aa mmoommeenntt))
33--55.. OOppeenniinngg tthhee ttrruunnkk ((PPrreessss bbuuttttoonn CC ffoorr sseeccoonnddss))
You can open the trunk of the
vehicle by using this function
Press
for few seconds
Press
for a moment
Press
for few seconds
(setup time)
(×3 times)
(×2 times)
Blink & Sound
Blink & Sound
Blink & Sound
11
10
44--11.. SSiiggnnaall sseennssiittiivviittyy
Signal sensitivity represents the signal strength between the vehicle
and the remote control in 4 steps.
44--22.. CCoonnffiigguurriinngg vvaalleett mmooddee ((DDeeffaauulltt sseettttiinngg iiss OOFFFF))
Place your system in valet mode to stop all functions whenever your
vehicle is being serviced by mechanics, car wash personnel or driven
by valet parking attendants. Only door lock/unlock function will work in
this mode but door ststus will not be displayed on LCD. If there is no
remote, see page 24.
Press button D to
display all the
menu icons.
The valet mode icon
blinks.
Select the icon
with button D.
The current setting, ON
appears.
Press button B to set
the valet mode ON, or
button C to set it OFF.
After completing the
valet mode
configuration, press
button D.
Finish the configuration.
※ If the communication with the vehicle is failed, the function will not’be set.
4. Functions of the icons on LCD
If a command or configuration that needs the communication between the
remote control and the brain is installed in the vehicle completely successfully, a
simple tone will sound and the corresponding information will be displayed on
the LCD panel, but if it is failed, an error tone will sound without any display.
Press the button D three times in a low to select or release
Disable.
T
ip

13
12
44--44.. CCoonnffiigguurriinngg ccoolldd ssttaarrtt ((DDeeffaauulltt sseettttiinngg iiss OOFFFF))
This function enables the vehicle to start the engine periodically when
it is very cold. To enable this function, select the icon, and input
desired operation interval. Then the engine periodically at the specified
interval will start and being the warm-up procedure. Configurable
period range is 1~12 hours. Engine run time is configured in run time
configuration.
Press button D
to display all the
menu icons.
Use button B and C to
move to the cold start
setup icon.
The cold start setup
icon blinks.
Select the icon
with button D.
The current setting,
OFF appears.
Press button B to set
the function to ON.
The current interval
configured is displayed.
Press D button, to
select ‘ON’.
Press button B to
increase the interval by
1 hour, and button C to
decrease it by 1 hour.
After completing the
configuration, press
button D.
Finish the configuration.
※ If the communication
with the vehicle is
failed, the function
will not’be set.
44--33.. CCoonnffiigguurriinngg ssiirreenn ((DDeeffaauulltt sseettttiinngg iiss OONN ffoorr 55 sseeccoonnddss))
Set operation of siren built into a vehicle. Set whether the siren
operates or not and how long the siren operates (1 ~ 25 sec.) in
case of a reply for remote, alarm occurrence or emergency siren
operation.
Press button D to
display all the
menu icons.
Use button B and C to
move to the siren icon.
The siren icon blinks. Select the icon
with button D.
The current setting, ON
appears.
Press button B to set
the siren to ON, or
button C to set it to
OFF.
Current configured
operation duration is
displayed in seconds.
Finish the configuration.
Press button B to
increase the duration by
one second, or button C
to decrease it by one
second.
After completing the
configuration, press
button D.
※ If the communication with the
vehicle is failed, the function will not’be
set.
※ Set the siren OFF so that only
remote can generate an alarm in
emergency, enabling you to identify an
unauthorized intruder while he or she
doesn’t know.
15
14
44--66.. CCoonnffiigguurriinngg rruunn ttiimmee ((DDeeffaauulltt sseettttiinngg iiss 55 mmiinnuutteess))
The run time can be configured for cold start, engine start reservation,
and remote engine start depending on the personal taste, weather,
or the model of the vehicle. Configurable period range is
1~30 minutes.
① Press button
D to display all
the menu icons.
Use button B and C to
move to the run time
icon.
The run time icon
blinks.
Select the icon
with button D.
The current configured
run time appears.
Press button B to
increase the run time
by 1 minute, or button
C to decrease it by 1
minute.
After completing the
run time configuration,
press button D.
Finish the configuration.
※ If the communication with the vehicle is failed, the function will
not’be set.
44--55.. CCoonnffiigguurriinngg eennggiinnee ssttaarrtt ttiimmee ((DDeeffaauulltt sseettttiinngg iiss OOFFFF))
This function allows you to start engine at a specified time everyday
automatically. To enable this function, select the icon, and input
desired time to start engine.
※ If the communication with the vehicle is failed, the function will not’be set.
※ Brain starts operation according to the remoter time. Therefore,
set the remoter time accurately.
※ You can cancel this function just do same as above.(But, you should
choose‘OFF’at the No.6 step)
12 13
Press button D to
display all the
menu icons.
Use button B and
C to move to the
engine start
reservation icon.
The engine start
reservation icon
blinks.
Select the
engine start
reservation icon
with button D.
The current setting,
OFF appears.
Press button B to
set the function to
ON, or button C to
set it to OFF.
Press button D,
then the current
time setting
appears and ‘07’
blinks.
Press button B to
increase the run time
by 1 minute, or
button C to decrease
it by 1 minute.
After completing
the configuration,
press button D.
(Setup the minute
to start engine in
the same
manner.)
After completing
‘minute setting AM or
PM Icon’will be
twinkled. you just
press button ‘B’ or
‘C’to choose AM or
PM.
Finish the
configuration.
For example, you
can reserve the
engine start time
to 08:30 AM.
After completing the
configuration, press
button D.

17
16
Press button D
to display all the
menu icons.
Use button B and C to
move to the automatic
door lock icon.
The automatic door
lock icon blinks.
Select the icon
with button D.
The current setting,
OFF appears.
Press button B to set
the function to ON, or
button C to set it to
OFF.
After completing the
configuration, press
button D.
Finish the configuration.
44--88.. CCoonnffiigguurriinngg ccuurrrreenntt rreemmoottee ccoonnttrrooll ttiimmee
The alarm function of the remote control can be configured
The clock of the remote control can be configured if necessary
in the same manner as that of Configuring engine start time.
44--99.. CCoonnffiigguurriinngg rreemmoottee ccoonnttrrooll aallaarrmm ((DDeeffaauulltt sseettttiinngg iiss OOFFFF))
The alarm function of the remote control can be configured
if necessary in the same manner as that of Configuring engine
start time.
44--1100.. CCoonnffiigguurriinngg aauuttoommaattiicc ddoooorr lloocckk ((DDeeffaauulltt sseettttiinngg iiss OOFFFF))
Automatic door lock feature provides the following functions:
① If door is not opened within 20 seconds after unlocking the
doors with the remote control, the doors are automatically locked.
② The door lock is automatically applied to secure safety during the driving.
* If the starter is connected to the generator, the door lock is applied when you step on
the brake twice, and if the starter is connected to TACH, it is applied when RPM goes over 1500.
③ When the ignition key is removed after driving, doors are unlocked
automatically.
※ If the communication with the vehicle is failed, the function will not’be set.
※ Brain operates based on the time set of the terminal. That's why
accurately setting up the timing of the terminal is so important.
44--77.. CCoonnffiigguurriinngg ttuurrbboo ssttoopp ((DDeeffaauulltt sseettttiinngg iiss OOFFFF))
Turbo Stop Mode allows you to leave your vehicle running when the
ignition key is removed to cool the engine especially after high-speed
or long-distance driving. To stop the engine by force, press and hold
button D for seconds, or press the brake pedal. Configurable
period range is 1 ~ 20 minutes.
Press button D
to display all the
menu icons.
Use button B and C to
move to the turbo stop
icon.
The turbo stop icon
would blink.
Select the icon
with button D.
The current setting,
OFF appears.
Press button B to set
the function to ON, or
button C to set it to
OFF.
The current configured
time period is
displayed.
Press button B to
increase the period by 1
minute, or button C to
decrease it by 1 minute.
After completing the
configuration, press
button D.
Finish the configuration.
※ If the communication with the vehicle
is failed, no icon will be displayed and
only an error tone will sound.
※ No icon appears during LPG gas
switch operation.
Table of contents


