SEMTOM ST-2620 User manual

BILL COUNTER
OPERATION MANUAL
BILL COUNTER
OPERATION MANUAL

Content
2.Self- check and fault diagnoses
1. Specification
3. Error codes and solutions
4.The instruction of the main parts
5.The introduction of the display and keys
6. The introduction of the parameter setting
7. Restore to the factory setting
8. Feeding clearance adjustment
9. Precaution for handling the machine
11. Maintenance
..................................................................................................................................................................
..................................................................................................................................................................
..................................................................................................................................................................
..................................................................................................................................................................
..................................................................................................................................................................
..................................................................................................................................................................
..................................................................................................................................................................
..................................................................................................................................................................
..................................................................................................................................................................
..................................................................................................................................................................
..................................................................................................................................................................
10.Cautions
..................................................................................................................................................................
introduction

1. Specification
Rated voltage
/Frequency AC220V±10% 50Hz±5%
Power
consumption 110W(Max)
Counting range 4 digit
Counting speed ≥1000 pcs/min
Feeding system Roller Friction Type
Batch range 1-999pcs
Banknote size MIN:50×110mm MAX:90×180mm
Banknote thickness 0.075~0.15mm
Hopper capacity 150PCS
Stacker capacity 150PCS
Net weight 5.3KG
Dimension 260mm×308mm×178mm
2.Self- check and fault diagnoses
When turn on the machine, it will start self-check by itself. This function can check whether all the sensors and
relative circuit are in good working condition or not. When detecting a fault, the fault code will be showed in the
counting display:
Fault Code Reasons Solutions
L_Length Sensor Fault/
R_Length Sensor Fault Problem with the counting sensor Clean or replace the counting sensor
Problem with the relative circuit of the
counting sensor in the main board
Replace the main board or replace the
left/right length receiving board
Reset Sensor Fault Problem with the reset sensor Replace the reset sensor
Problem with the relative circuit of reset
sensor in the main board Replace the main board
Speed Sensor Fault Driving belt damaged or broken Replace the driving belt
Problem with the speed sensor or the
connector is not in the good connection
Replace the speed sensor or make the
connector in good connection
Problem with the main motor or the
connector is not in the good connection
Replace the main motor or make the
connector in good connection
The main board is damaged Replace the main board
L_Length Sensor Fault/
R_Length Sensor Fault
Reset Sensor Fault
Speed Sensor Fault
AC220V±10% 50Hz±5%

Start Sensor Fault There is something covered with the start
sensor Clean the start sensor
UV Sensor Fault Problem with the UV sensor Replace the UV sensor
L_IR Sensor Fault
R_IR Sensor Fault
Problem with the length sensor Replace the left/right length receiving
board
Problem with the relative circuit of the
length sensor in the main board
3. Error codes and solutions
The display may shows some error messages when counting, which means there are some problems with the
notes. Refer to the following diagram to find way to solve it.
Error Code Reasons Solutions
UV Suspicious note detected by UV detection Remove the suspicious note from the stacker;
press “RESET”to continue;
UV sensitivity level is too high Decrease the UV sensitivity level
MG Suspicious note detected by MG detection Remove the suspicious note from the stacker;
press “RESET”to continue;
MG sensitivity level is too high Decrease the MG sensitivity level
DBL Double note detected by the IR detection Remove the suspicious note from the stacker;
press “RESET”to continue;
IR sensitivity level is too high Decrease the IR sensitivity level
DD Different size(width) note detected by the DD
detection
Remove the suspicious note from the stacker;
press “RESET”to continue;
HALF Half note Remove the suspicious note from the stacker;
press “RESET”to continue;
CHAIN Chain note Remove the suspicious note from the stacker;
press “RESET”to continue;
SLANT Slant note Remove the suspicious note from the stacker;
press “RESET”to continue;
LEN Different size(length) note Remove the suspicious note from the stacker;
press “RESET”to continue;
DD sensitivity level is too high Decrease the DD sensitivity level
UV
MG
DBL
DD
L_Length Sensor Fault/
R_Length Sensor Fault
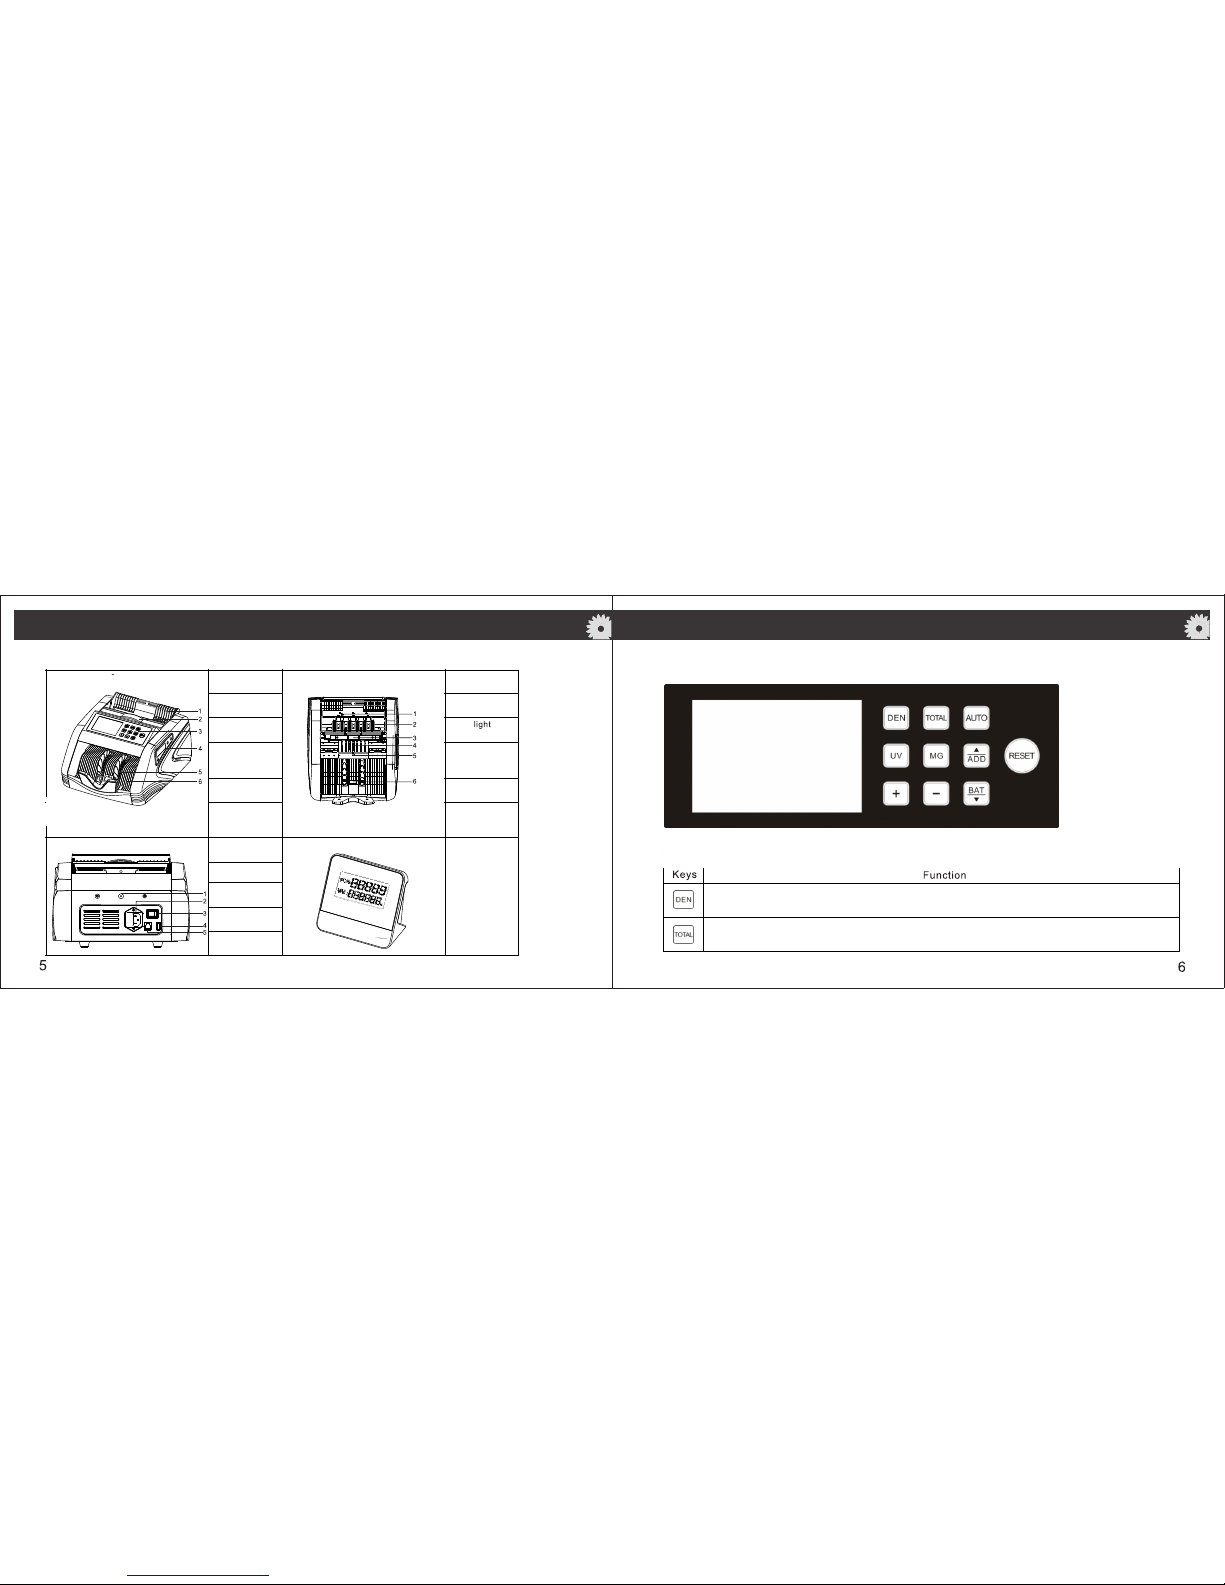
4.The instruction of the main parts
1.counting
guide 1.start sensor
2.handle 2.banknote
feeding wheel
3.main display
assembly
3.UV light
assembly
4.side display
4.banknote
transporting
wheel
5.banknote
receiving wheel
5.counting tube
frame assembly
6.transporting
platform 6.reset sensor
1.hopper fixing
screw
External display
(optional)
2.power socket
3.power switch
4.USB upgrade
port
5.external
display port
5.The introduction of the display and keys
5.1 The diagram of the main display and the keys
5.2 The introduction of the key function
introduction
Keys Function
Press this key to turn on/off the denomination clearance function(based on the first counting note).
Press this key to turn on/off the mix value counting.

Press this key to switch the AUTO/MUL counting mode.
Press this key to turn on/off the UV detection.
Press this key to turn on/off the UV detection.
1.Press this key to turn on/off the accumulation function.
2.In the sensitivity level setting, press this key to turn to the previous page.
1.In the BATCH mode, short press this key can increase the batch number one by one.
2.Long press this key, the batch number can be increased continuously, batch rang is 1-100.
1.In the BATCH mode, short press this key can decrease the batch number one by one.
2.Long press this key, the batch number can be decreased continuously, batch rang is 100-1.
1.Press this key can turn on the BATCH function, if press it again, the user can select among “100, 50, 20,
10, off”.
2.In the sensitivity level setting, press this key to go to the next page.
1.Press this key can clear all the fault message, then keeping counting.
2.In the sensitivity level setting, press this key to save and exit.
3.Long press this key for 3 seconds, after hearing the “beep”sound, then the machine is restored to the
factory setting.
5.3 The introduction of the side display panel and the key function
Key Function Side display
1.Press this key can clear all the fault message, then keeping
counting.
2.In the sensitivity level setting, press this key to save and exit.
3.Long press this key for 3 seconds, after hearing the
“beep”sound, then the machine is restored to the factory
setting.
Press this key to turn on/off the accumulation function.
Press this key to turn on/off the UV, MG detection.
1.Press this key can clear all the fault message, then keeping
counting.
2.In the sensitivity level setting, press this key to save and exit.

6. The introduction of the parameter setting
6.1 Sensitivity level setting
When the display shows some error codes during the counting, the user can adjust the according sensitivity level
to make the counting more smoothly.
In the normal state, this machine can enter into the sensitivity level setting by pressing the ”UV”and “MG”at the
same time, and press “ADD”or “BATCH”to check each page, then press “+”or “-”to adjust the sensitivity level, then
press the “RESET”to save and exit, the details showed as below:
6.1.1 Voice Switch(optional function):“0”is VOICE off, “1”is VOICE on;the default is “0”.
6.1.2 Fake Enable: fake note counted or not counted.“0”is fake note not counted, “1”is fake note counted; the
default is “0”.
6.1.3 Pcs Compare: showing the previous counting number and the current counting number at the same time.
“0”is off, “1”is on; the default is “1”.
6.1.4 External port Sel: external display port selection. “0”is computer communication, “1”is the 4 digit LED
side display + LCD external display; the default is “1”.
6.1.5 Slant: slant adjustment. “0”is no adjustment, “1”is medium adjustment, “2”is the senior adjustment;
the default is “1”.
6.1.6 Standby Time: the time of the LCD background automatically off, the default is 3 minutes.
6.1.7 Break Time: the time to stop counting. The range is 10-100ms; the default is 33ms.
6.1.8 Start Val: start sensor sensitivity value, ranging from 0 to 9(“0”is the lowest, “9”is the highest); the
default is “4”.
6.1.9 Reset Val: reset sensor sensitivity value, ranging from 0 to 9(“0”is the lowest, “9”is the highest); the
default is “4”.
6.1.10 Thcount Val: the threshold value of counting tube, ranging from 0-200; the default is 200.
6.1.11 Hole Time: the hole repairing time for the single counting tube.
6.1.12 Lcount Light: left counting tube emitting light value, ranging from 0-99; the default is “80”.
6.1.13 Rcount Light: right counting tube emitting light value, ranging from 0-99; the default is “80”.
6.1.14 UV Light: UV emitting light value, ranging from 0 to 99; the default is “60”.
6.1.15 Double Val: double note sensitivity value, ranging from 0 to 10 (“0”is off, “10”is the highest); the default
is “0”.
6.1.16 Chain Val: chain note sensitivity value, ranging from 0 to 5(“0”is off, “5”is the highest);the default is
“3”.
6.1.4 Ext Port Sel: external display port selection. “0”is computer communication, “1”is the 4 digit LED side

6.1.17 UV Val: UV detection sensitivity value, ranging from 0 to 10 (“0”is off, “10”is the highest); the default is
“4”.
6.1.18 MG INR val: MG detection sensitivity value for the INR, ranging from 0 to 30(“0”is off, “30”is the
highest); the default is “6”.
6.1.19 MG USD val: MG detection sensitivity value for the USD, ranging from 0 to 30(“0”is off, “30”is the
highest); the default is “6”.
6.1.20 Width Set: the note width sensitivity value, ranging from 30 to 90; the default is “63”.
6.1.21 Len500Max: the maximum of the Rs.500 length, ranging from 167 to 177; the default is “150”.
6.1.22 Len100Max: the maximum of the Rs.100 length, ranging from 157 to 167; the default is “162”.
6.1.23 Len50Max: the maximum of the Rs.50 length, ranging from 147 to 157; the default is “152”.
6.1.24 Len10Max: the maximum of the Rs.10 length, ranging from 137 to 147; the default is “142”.
6.1.25 Currency Sel: currency selection. “0”is for USD with UV/MG counting; “1”is for INR with mixed value
counting. The default is “1”.
7. Restore to the factory setting
Press “UV+MG+RESET”at the same time, meanwhile turning on the machine, after hearing “beep”sound, the
machine is restore to the factory setting.
8. Feeding clearance adjustment
8.1 The good feeding clearance condition: smooth feeding, accurate counting, good friction.
8.2 The bad feeding clearance condition: after a long time of usage, the roller and the rubber tape will be loose,
then it will result in inaccurate counting(generally the counting number will be less than the right notes number).
Adjustment operation: rotate the adjustment screw anticlockwise until the machine can count smoothly and
accurately. Do not rotate it too much, it will result in unsmooth counting or breaking the note.
6.1.18 MG INR val: MG detection sensitivity value for INR, ranging from 0 to 30(“0”is off, “30”is the
6.1.19 MG USD val: MG detection sensitivity value for USD, ranging from 0 to 30(“0”is off, “30”is the
length of Rs.500, ranging from 167 to 177; the default is “150”.
length of Rs.100, ranging from 157 to 167; the default is “162”.
length of Rs.50, ranging from 147 to 157; the default is “152”.
length of Rs.10, ranging from 137 to 147; the default is “142”.

9. Precaution for handling the machine
Damp and/or badly stained notes should be
avoided;
Check no other things(paper clip, rubber band,
pieces of paper etc.)mixed in the notes
Folded or curled notes should be straightened
before counting
As for the bundle of new notes, should bend
and flex before counting
The notes should be tidied up before counting,
or it will lead to the some problem when the
machine work
Damp and/or badly stained
note
Stack of notes mixed with
pieces of paper, clip or rubber
band
Curled note Folded note
10. Cautions
Please read all the instructions as below before using the machine, or it will lead to some danger and fault
——Avoid exposing the product to the sunlight.
——The product should have well earthing performance
——The product may affected by the wireless device interference(like phone, intercom etc.).
——Please use the qualified power cable.
——Turn off the machine or pull out the power plug before moving it.
——Do not put tools, hand, hair or cloth close to the rotating parts of the machine, in case of some danger
——Do not press the keys with something pointed.
——Keep the machine in the dry condition, this machine is not waterproof.
——Do not repair the machine by yourself, should ask qualified service person to repair and maintain it.
Warning:
Before cleaning the machine should pull out the power cable.
Don’t use the chemical cleaning agent to clean the machine.

11. Maintenance
The counting sensor and the feeding sensor are belong to the optical equipment. If there is some dust and dirty things
covering the sensor, it will lead to the fault when the machine is working. The user should clean the machine after
using.
For example, if there is some pieces of paper, dust or something else covering the reset sensor in the stacker, it
will result in fault when the machine is working. The user should clean the machine after using.
Table of contents


