SENEC HOME LI User manual

SENEC.HOME LI
TRANSLATION OF
INSTALLATION INSTRUCTIONS
Valid for : SENEC.Home Li 10.0 - Energy Storage DEV-SH-300_V2
Document version: 1.0
Publication date: 10.01.2017
Document number: TD140-010
Country: Australia

2
Please read these documents carefully and observe the safety instructions.
Additional copies of all installation instructions must be made available by Deutsche Energieversorgung
GmbH on request throughout the foreseeable service life of the product.
Original in German - This version ist for Australia only.
Imprint
All rights reserved.
© Copyright:
Deutsche Energieversorgung GmbH
Wittenberger Straße 15
04129 Leipzig
Phone: +49 341 87057-0
Fax: +49 341 87057-300
Email: [email protected]
Website: www.senec-ies.com
These installation instructions may only be reprinted or reproduced – even in extract – with the express written
permission of Deutsche Energieversorgung GmbH.

3
Inhalt
Change history . .................................................................................................................................................................5
1 Basic Information. ...........................................................................................................................................................6
1.1 Target group for these instructions...........................................................................................................................6
1.2 Liability/guarantees ..................................................................................................................................................6
1.3 Validity ......................................................................................................................................................................6
1.4 Symbols and conventions used ...............................................................................................................................6
1.5 Storage .....................................................................................................................................................................7
1.6 Modification on the product......................................................................................................................................7
1.7 Product identification................................................................................................................................................7
2 Safety................................................................................................................................................................................9
2.1 Use as intended .......................................................................................................................................................9
2.2 Use not as intended .................................................................................................................................................9
2.3 Requirements on the installer ...................................................................................................................................9
2.4 General safety instructions .....................................................................................................................................10
2.5 Safety-related components.....................................................................................................................................12
2.6 Safety symbols .......................................................................................................................................................13
2.6.1 Safety symbols on the SENEC.Inverter ........................................................................................................13
2.6.2 Safety symbols on the identification plate ....................................................................................................13
2.6.3 Safety symbols on the battery module..........................................................................................................14
2.6.4 Further safety symbols .................................................................................................................................14
2.7 Personal protective equipment...............................................................................................................................14
3 Transport/installation/storage......................................................................................................................................15
3.1 Transport.................................................................................................................................................................15
3.2 Installation...............................................................................................................................................................15
3.2.1 Installation location .......................................................................................................................................15
3.2.2 Temperature adjustment after transport .......................................................................................................16
3.2.3 Warning and information labels ....................................................................................................................16
3.2.4 Temperaturbereich........................................................................................................................................16
3.2.5 Space requirement and minimum distances.................................................................................................16
3.3 Storage ...................................................................................................................................................................17
4 Scope of delivery...........................................................................................................................................................18
5 Material required............................................................................................................................................................19
5.1 Tools........................................................................................................................................................................19
5.2 Electrical .................................................................................................................................................................19
5.3 Other materials required.........................................................................................................................................19
6 Product description.......................................................................................................................................................20
6.1 Overview.................................................................................................................................................................20
6.1.1 Product Overview..........................................................................................................................................20
6.1.2 Control elements and indicators ...................................................................................................................22
6.1.3 Bus system ...................................................................................................................................................23
6.1.4 SENEC.Home Li connections .......................................................................................................................23
6.2 Description of functions..........................................................................................................................................25
6.2.1 SENEC.Inverter battery inverter ...................................................................................................................26
6.2.2 Charging electronics .....................................................................................................................................26
6.2.3 Battery...........................................................................................................................................................26
6.3 Technical data ........................................................................................................................................................27

4
7 Installation......................................................................................................................................................................29
7.1 Preconditions..........................................................................................................................................................29
7.1.1 Configuration password ................................................................................................................................29
7.1.2 Access to the Internet ...................................................................................................................................29
7.2 Determine connection variant.................................................................................................................................30
7.2.1 Connection via certified inverter....................................................................................................................30
7.2.2 Connection via non-certified inverter ............................................................................................................31
7.2.3 Connection where the metering point cannot be assigned ..........................................................................32
7.3 Connection to the house wiring ..............................................................................................................................33
7.4 Preparation of the installation location....................................................................................................................34
7.5 Preparations for assembly......................................................................................................................................34
7.6 Installation of the battery modules..........................................................................................................................34
7.7 Connection of the AC line.......................................................................................................................................40
7.8 Connection of the PV inverter .................................................................................................................................41
7.9 Installation of mains backup operation (optional)...................................................................................................41
7.10 Commissioning/configuration ...............................................................................................................................43
7.10.1 Switching on for the first time......................................................................................................................43
7.10.2 Preparations for configuration.....................................................................................................................43
7.10.3 Configuration wizard ...................................................................................................................................44
7.10.4 First charge .................................................................................................................................................54
8 Cascading multiple systems. .......................................................................................................................................58
8.1 Preconditions..........................................................................................................................................................58
8.2 Operating principle.................................................................................................................................................58
8.3 Configuration ..........................................................................................................................................................58
9 Complete the installation..............................................................................................................................................62
10 Problems encountered in installation. ......................................................................................................................63
11 System registration.....................................................................................................................................................64
12
Registration with the grid operator/electricity supply company. ...................................................................................65
13 Operation......................................................................................................................................................................66
13.1 Front display operation.........................................................................................................................................66
13.2 IP address in the front display ..............................................................................................................................66
13.3 MCU blink codes ..................................................................................................................................................66
13.4 Shutting down the battery modules if they are not to be used for some time ......................................................67
13.5 Operation of local monitoring ...............................................................................................................................67
13.6 Online monitoring mein-senec.de.........................................................................................................................69
13.6.1 Creating an account....................................................................................................................................69
13.6.2 Functions on mein-senec.de.......................................................................................................................69
13.7 Status displays .....................................................................................................................................................69
13.8 Operating statuses ...............................................................................................................................................72
14 Maintenance/servicing................................................................................................................................................73
14.1 Servicing the battery modules..............................................................................................................................73
14.2 Software update....................................................................................................................................................73
15 Spare parts/accessories. ............................................................................................................................................74
16 Index of abbreviations. ...............................................................................................................................................74
5
Change history
Version of the instructions From system serial number Amendments
1.0 DE-V2-01Li10-00001 Initial version
6
1 Basic Information
In these installation instructions you will find all the information you need for the installation of the SENEC.
Home Li. In addition, this document contains all specifications and information regarding safety, transport,
storage, a description of the product including a description of operation. Information relating to the scope
of delivery, materials required, cascading multiple systems and registration of the system, registration of the
Econamic Grid, registration with the utility company, maintenance and servicing, and spare parts or required
accessories may also be found in these installation instructions.
Observe the safety regulation with care!
1.1 Target group for these instructions
These installation instructions are aimed at persons installing the SENEC.Home Li. This equipment must
only be installed by qualified electricians who have been trained in working on SENEC energy storage units.
Functions may only be brought into service by the end customer under specific conditions. Installation of the
SENEC.Home Li by the end customer himself – if he is not an installer – is expressly forbidden.
1.2 Liability/guarantees
In the event of a faulty installation or incorrect operation, hazards can arise for life and limb of the user or third
parties or damage may be caused to the installation or other assets. Setting up, installation, commissioning
and maintenance as well as the use of the SENEC.Home Li cannot be monitored by the manufacturer. For this
reason, Deutsche Energieversorgung GmbH (DEV) accepts no responsibility or liability for damage, costs
and losses arising as a result of incorrect installation, incorrect operation, use not as intended or faulty main-
tenance. The same is true for damage caused by force majeure (e.g. thunderstorms, overvoltage, storm or
fire). The use or operation of the SENEC.Home Li and its components is always the responsibility of the end
customer. Likewise, DEV accepts no responsibility for infringements of patent law or infringements of any third
party rights arising from the use contrary to that intended of the components. Further details may be found in
the Guarantee Conditions document on www.senec-ies.com.
DEV accepts no liability for any conflicts arising with the German Renewable Energies Act (EEG) or other
state subsidy programmes and remuneration schemes.
The Guarantee Conditions for the SENEC.Home Li and DEV’s Terms of Supply and Purchasing shall apply.
Further details may be found in the documents available on www.senec-ies.com.
1.3 Validity
These installation instructions are valid for all SENEC.Home Li energy storage units (from September 2016).
They contain some abstractions and exemplary illustrations. These are used for illustration only and can
therefore differ from the product.
1.4 Symbols and conventions used
If there is a risk of injury or damage, or if instructions are required, the appropriate safety instructions are giv-
en in these installation instructions before a sequence of actions or together with this action.
7
The measures described must be observed to prevent the hazards!
The warnings are as follows:
Type and source of danger!
Consequences at non-observance
ä Measure to avoid danger
The following symbols are used for this purpose::
Symbol Kind of danger
This symbol indicates a dangerous situation which will certainly cause a serious injury or
death if it is not prevented.
This symbol indicates a dangerous situation which can cause a serious injury or death if it
is not prevented.
This symbol indicates a dangerous situation which can cause a minor to moderate injury if
it is not prevented.
This symbol identifies indications of material damage or general notes on operation.
This symbol indicates a prohibition which must always be complied with.
The following conventions are used to aid in the understanding of the installation instructions:
Symbol Meaning
1. Action step Action step in sequence
• Level 1 list Level 1 list
1.5 Storage
Keep the instructions close to the SENEC.Home Li at all times so that you can quickly get the necessary
information in case of a fault.
1.6 Modification on the product
Unauthorized modifications to the SENEC.Home Li are expressly prohibited, unless confirmed in writing by
DEV (Deutsche Energieversorgung GmbH).
1.7 Product identification
Please state the serial number in any queries to the manufacturer. This may be found beneath the barcode on
the identification plate on the SENEC.Home Li energy storage unit.

8
Figure 1 Identification plate with serial number and installer’s data
The SENEC.Home Li’s identification plate may be found both on the left-hand side of the complete system
(to be affixed and completed by the installer) and inside it beneath the SENEC.Inverter. It contains the most
important safety instructions and brief information regarding conformity and technology. The contact informa-
tion for DEV is also given. If you have technical questions for the manufacturer, please always write an email
Deutsche Energieversorgung GmbH
Wittenberger Straße 15
04129 Leipzig
Tel.: +49 341 87057-0
Mail: [email protected]
The electrical circuit of the SENEC.Home V2 Li was
labeled as _______________________ in the houses
distribution line and secured with a ____ A fuse.
Installation Company
Address
Date of installation
SENEC.IES is a brand name of Deutsche Energieversorgung GmbH.
Made in Germany Rev. 1.0
Follow the installation instruction!
Serial number:
Type: SENEC.Home V2 Li
2.5 / 5.0 / 7.5 / 10.0
UAC 3 x 230 V
UDC 46,8 V
I 3 x 16 A
C5at 30° C 56,7 Ah
(per module)
f 50 Hz
Tmin - Tmax 0° C - 30° C
Pmax 3 x 3680 W
Smax 3x 3680 VA
International
protection code
IP20
Year of
manufacture 2017
DE-V2-01Li10-00001

9
2 Safety
The following safety instructions must be observed without fail to avoid injury or damage and to guarantee
long-term safe operation of the SENEC.Home Li. The safety instructions must be observed and complied with
during all operations, since the installer is also responsible for the safety of the system installed.
The general regulations for occupational health and safety shall always take priority.
2.1 Use as intended
The SENEC.Home Li and its components have been developed and constructed in accordance with rec-
ognised rules of safety engineering. It is intended for storing power in the low voltage range generated by PV
installations, small wind turbines, CHP plants, fuel cells or other energy sources.
The SENEC.Home Li operates as a charge controller and converter from direct current to alternating current
and from alternating current to direct current. The battery module stores electrical energy in chemical form
and discharges it into the domestic power network in the form of electricity on demand.
Mains backup operation is limited to the discharge of the battery by way of user friendly discharge logic, as
long as sufficient battery capacity is available.
2.2 Use not as intended
The use of the SENEC.Home Li on or in the water (e.g. boats, ships, offshore installations), in the air or for mo-
bile uses is expressly prohibited. Modifications to the SENEC.Home Li, which are not expressly authorised by
DEV in writing, are not permitted. Warranty and guarantee terms are voided by conversions or modifications
performed without permission.
The SENEC.Home Li does not have an uninterruptible power supply (UPS) and thus must not be used for the
operation of medical equipment, particularly not for systems employed to sustain life, which require a UPS.
The SENEC.Home Li must only be operated in parallel with the mains and does not permit stand-alone op-
eration.
The use of third-party rechargeable batteries is not permitted.
2.3 Requirements on the installer
Only trained qualified electricians who meet the following conditions are considered to be installers for the
purposes of these installation instructions:
• Knowledge of the general functions of energy storage units on/in the low-voltage network
• Authorisation to work up to 1000 V and knowledge of electrical devices and installations
• Knowledge of the relevant standards and directives in the VDE series
• Knowledge of the documentation for the SENEC.Home Li energy storage unit
• Knowledge of the transportation of hazardous materials in accordance with the ADR
10
2.4 General safety instructions
Please read the following safety instructions carefully to prevent injury and damage. Only in this way can
long-term safe operation of the SENEC.Home Li be guaranteed. The safety instructions must be observed
in full for any work on the SENEC.Home Li.
• Immersion in liquid: Never immerse the battery modules in water, spirits or other liquids. This can cause
overheating, smoke, explosion or fire.
• High temperatures: Do not use the battery modules next to a naked flame or a radiator. Do not expose
them to temperatures above 80 °C. Exposing the battery modules to high temperatures can trigger an internal
short circuit which can cause heat, smoke or an explosion or can cause a fire.
Danger to life from electric shock!
The capacitors carry a lethal voltage internally and at the terminals of the
PV generator.
ä Wait at least five minutes before you open the system.
ä Use PPE.
Danger to life from electric shock!
Exposed electrical components inside the case.
ä Do not touch any exposed electronic components.
ä Do not remove any protective covers.
ä Never reach beneath covers.
Danger to life from electric shock!
Take special care in electrical works on the SENEC.Home V2 Li and
on the electrical distribution box.
ä Switch the SENEC.Home V2 Li off before working on the electrical system.
ä Switch off the relevant electric circuits.
ä Secure the SENEC.Home Li against being restarted.
ä Check that it is isolated from the supply.
Danger to life from electric shock!
ä Remove all metal items, e.g. personal jewellery from your hands,
wrists and neck before you start work.
Danger!
The following hazardous situations will certainly cause a serious injury
or death if they are not prevented.

11
• Charge state: Only charge the modules under the prescribed conditions (temperature range, voltage and
current). Heat generation, smoke, fire or an explosion may result if you do not charge the modules under the
prescribed conditions.
• Reversed polarity: Do not fit or insert the battery modules with reversed polarity. Check the polarity, if the
battery module cannot be easily inserted into the storage case. Never use force to insert the battery module
into the storage case. Heat generation, smoke, fire or an explosion may result if you install the modules in the
storage unit with reversed polarity.
• Direct connection: Never connect the battery module to an AC connection or a DC charging plug. Heat
generation, smoke, fire or explosion may result if you connect the battery module directly to a power socket.
• Use in equipment for which it is not intended: Never use the battery module in equipment for
which it is not intended. The module can be permanently damaged. Furthermore, heat generation, smoke, fire
or an explosion may result.
• Fire and heat: Keep the battery module away from fire and heat. Either can cause smoke, fire or an explo-
sion. Lithium cannot be extinguished with water in the event of a fire.
• Short circuit: Do not cause a short circuit. Never connect the positive and negative poles together with a
conductive material. Do not store or transport the battery modules with metal objects. The unit can overheat if
short-circuited. Heat, smoke, fire or an explosion may result.
• Force: Avoid using force on the battery module. This can damage the battery module and cause it to leak.
Furthermore, heat, smoke, fire and explosions are possible.
• Penetration: Never pierce the battery module with a sharp object, or use a hammer on it. The battery mod-
ule can be damaged or destroyed by this. A short circuit may also be caused. Heat, smoke, fire or an explosion
may result.
• Soldering: Do not solder directly on the battery module. This can destroy the spacer or damage the gas
release valve or other safety components. Heat, smoke, fire or an explosion may result.
• Disassembly: Do not disassemble the battery module while it is in operation. Dismantling or modifying the
battery module can damage the protective circuit. Heat, smoke, fire or an explosion may result.
• Charging at high temperatures: Do not charge the battery module at high temperatures. The protec-
tive circuit will be activated and the module will not be charged. Battery failure, heat, smoke, fire or an explosion
may result.
• Storage: Do not store the module near a microwave or kitchen equipment. Exposure to heat or electromag-
netic radiation can cause leakage, heat, smoke, fire or an explosion.
• Mixed use: Do not combine the battery modules with other batteries. Differences in capacity, composition or
use by other manufacturers can cause heat, smoke, fire or an explosion.
• Rust/discolouration/deformation: Do not use any battery modules that are in an abnormal condition.
Halt operation as soon as you detect any deviation from the normal condition of the battery module such as
odour, heat, discolouration, deformation. The battery module may be faulty.
• Leakage: Do not use a battery module that is leaking. If a battery module is leaking or emitting an unusual
odour, you must keep it away from any naked flame. The battery module could ignite and explode if you expose
it to a naked flame.
• Leakage: Do not touch a battery module that is leaking. Flush your eyes immediately and seek medical help
if battery fluid has got into your eyes. Significant damage could be caused to your eyes.
• Transport: Pack the battery module securely in its original cardboard box to prevent short circuit or destruc-
tion.
12
Note!
The following situations indicate damage.
• Do not expose to direct sunlight: Do not use the battery module in or expose it to direct sunlight. The
battery’s service life and performance declines with increasing temperature.
• Static charging:The battery module has a protective circuit. Do not use it in locations where a static charge
in excess of 100 V is generated. Heat, smoke, fire or an explosion may result if the protective circuit fails.
• Charging at operating temperature: Only charge the battery module in the specified temperature
range to prevent leaking, the development of heat or functional damage.
• Leakage: Rinse your clothing and skin with water without delay if you have come into contact with the elec-
trolyte. Skin irritation may result.
• Long-term storage: The battery cell is in the shut-down mode when it is delivered, to protect it against
deep discharge. Disconnect the connection from the energy storage unit. Charge the battery cell before first
use if it has been stored for more than six months.
• Storage location: Do not store the battery module in locations in which water vapour, oil vapour, smoke,
dust, salt, corrosive materials, sulphides, explosive/combustible gases or chemicals are to be found. Similarly,
do not store it in locations that are exposed to permanent vibration or mechanical shocks. Protect the battery
module against liquids.
• Voltage difference: Ensure that the voltage difference between battery modules connected in a parallel
circuit is no more than 1 V.
• Mounting orientation: Always position the side with the connection terminals on the top.
2.5 Safety-related components
Safety aspect Location
Safety fuse (DC) SENEC.Inverter
Safety fuse (AC) SENEC.Inverter
Insulation monitor (optional) in the case, on the top-hat rail
SENEC.Inverter temperature regulation by fan in the SENEC.Inverter
Thermal sensors on the MCU
Grid connection protection for monitoring
mains and frequency
in the SENEC.Inverter
Overcurrent protection SENEC.Inverter
DC isolating switch on the top cover of the case

13
2.6 Safety symbols
2.6.1 Safety symbols on the SENEC.Inverter
Symbol Meaning
Do not reach inside!
Warning against electrical voltage!
Warning against hot surface!
2.6.2 Safety symbols on the identification plate
Symbol Meaning
Wear eye protection!
Observe the operating instructions!
Earth prior to use!
Warning against hazards arising during charging of
batteries!
Warning against electrical voltage!
Warning against explosive materials!
The product bearing this label must not be disposed of in
the domestic waste!

14
2.6.3 Safety symbols on the battery module
Symbol Meaning
Danger to life.
The product bearing this label must not be disposed of in the domestic waste.
2.6.4 Further safety symbols
Symbol Bedeutung
Danger of life due to unloaded capacitors! After disconnecting the unit from
the mains and the PV generator, wait at least one minute before opening the
system.
Caution!
High leakage current!
In any case, connect ground prior
to main lines.
Caution! High leakage current! In any case, connect ground prior to main lines.
2.7 Personal protective equipment
Use insulated tools and the correct protective equipment (PPE) for any work. The basic equipment for work-
ing on and with lithium batteries includes:
• Safety shoes
• Protective clothing
• Insulating protective gloves
• Fire extinguisher
• Insulated tools
Fabrics, safety shoes and protective gloves shall have a surface resistance of less than 108 ohms and an
insulation resistance of at least 105 ohms (DIN EN 50272-2) to prevent electrostatic charging when working
with batteries.
15
3 Transport/installation/storage
3.1 Transport
The shipment must be inspected for completeness in the presence of the courier immediately after delivery.
Please check the shipment for transport damage. Also check the battery modules for possible defects. Prü-
fen Sie die Lieferung gleich nach Anlieferung, in Anwesendheit des Spediteurs, auf Vollständigkeit.
• Enter a brief defects report on the delivery note before signing it off. The defects report shall be examined by
the courier before signing it off.
• Make a note of the name of the courier, and the vehicle’s number plate.
• Write a detailed defects report which must be sent both to your distributor and to the shipping company within
two weeks. This deadline must be observed, otherwise all claims are voided.
The battery modules are shipped with a charge state (SOC - state of charge) of less than 30% in accordance
with UN 3480.
3.2 Installation
3.2.1 Installation location
The floor shall be designed to take the weight of the SENEC.Home Li. The area of the floor in which a person
would be within an arm’s reach of the battery module shall be sufficiently conductive that electrostatic charge
is avoided. Avoid dusty or humid rooms, because of the risk of a short circuit.
Certain minimum distances shall also be observed:
• An unobstructed escape route at least 600 mm in width shall be provided for a possible evacuation.
• Maintain a minimum distance of 300 mm from any other electronic components located at the installation loca-
tion.
The following conditions also apply:
• Ensure accessibility of the operating and display elements.
• Install the system standing vertically, to allow adequate free convection.
Note!
An incomplete shipment, transport damage or any detected fault
shall be documented.
Note!
The battery modules may be destroyed in the event of deep discharge.
ä Never allow the battery modules to deep discharge.
ä Switch the battery modules off completely if they are not to be used
for some time.
ä Never continue using the deep discharged battery modules.

16
3.2.2 Temperature adjustment after transport
Condensate can form inside the storage system if the temperature of the SENEC.Home Li on delivery is below
the ambient temperature of the installation location. In this event, do not start using the SENEC.Home Li until
you have left it standing for at least 24 hours with the side panels open.
3.2.3 Warning and information labels
The following warning and prohibition labels shall be affixed to the system after it has been installed:
• “Fire, naked flame and smoking prohibited” label.
• “Rechargeable battery, battery room” warning label
• Completed identification plate on the left-hand case cover
The installer is responsible for proper installation and compliance with standard EN 50272-2 and other nation-
al standards and regulations regarding the safety of battery systems.
3.2.4 Temperaturbereich
The SENEC.Home Li works best in a temperature range of 0 – 30 °C.
3.2.5 Space requirement and minimum distances
The area shall be suitable for the installation of the SENEC.Home Li.
Plan at least the following installation area (W x H x D):
• 580 mm x 1300 mm x 420 mm
This also takes into account the area required for maintenance and for replacing the battery modules.
Damage to components when operating the SENEC.Home Li!
ä Check the interior of the SENEC.Home Li for condensation prior to installation.
ä Only install the SENEC.Home Li if there is no condensation on the surfaces.
Danger to life from fire!
Overheating as a result of mutual heating of the system components is possible.
ä Do not fit the inverter for the PV installation above or below the SENEC.Home Li.
ä Ensure that there is a safe distance of at least 500 mm to combustible materials.
Damage to components when operating the SENEC.Home Li!
ä Do not use the SENEC.Home Li in the open air, or in a room that cannot
be heated in winter.
ä Never charge the storage system at temperatures below 1 oC.
Temperatures above 45 °C are likewise harmful since the electrolyte
can break down as a result of the heat generated at the anode in addition
to the discharge process.

17
3.3 Storage
You should install and charge the battery modules as soon as possible after delivery. Battery modules that
are to be stored for more than six months must be charged to approximately 75 % of the full charge every six
months.
They shall be stored in a cool place (approximately 15 °C) with as low a humidity as possible. Do not expose
the battery modules to direct solar radiation and protect them against the effects of the weather.
The following shall be noted if the battery modules are to be stored for a longer period of time:
• Storage temperature: -20 to 35 °C
• Humidity: 45 to 85 %
Note!
Do not store the battery modules with metal objects, water,
acids or strong oxidants.
Note!
Use electrically insulating packaging material to prevent a short circuit.
Do not use any fragile or electrically conductive packaging materials.
Note!
The SENEC.Home Li has an air outlet on its upper side through which the hot air
can escape. Components may be damaged if the ventilation outlet is covered.
ä Do not set down any objects on the ventilation outlet.
ä Do not cover the ventilation outlet.
Keep a minimum distance of 100 mm above the unit.

18
4 Scope of delivery
The following components are delivered with the SENEC.Home Li:
• 1 x SENEC.Home Li system
• for the SENEC.Home 5.0: 2 x lithium ion modules (not included in delivery)
• for the SENEC.Home 7.5: 3 x lithium ion modules (not included in delivery)
• for the SENEC.Home 10.0: 4 x lithium ion modules (not included in delivery)
• including side panels: 2 x side panels, 1 x front panel with SENEC logo, 1 x rear panel with cable bushing
• 1 x power flow direction sensor 1 - 63 A direct measurement
• 1 x identification plate (outer panel, left)
• 2 x Cat.6 data cable, 250 mm
• 1 x Cat.6 data cable, 1,000 mm
• 1 x Cat.6 data cable, 2,000 mm
• 1 x modular adapter cat.6 STP snap-in metal
• 2 x DC terminal connector, 320 mm
• 2 x DC terminal connector, 370 mm
• 2 x DC terminal connector, 430 mm
• 2 x DC terminal connector, 530 mm
• 28 x cheese head screw, ISO 4762 - M6 x 10 - 8.8
• 20 x S6 thrust washer
• 1 x jumper
• 24 x washer, ISO 125 - M6 x 6 - 140
• 2 x SENEC.Home SH5_G3_69_001 guard
19
5 Material required
5.1 Tools
The following insulated tools are required for problem-free installation of the SENEC.Home Li:
• calibrated torque wrench, specified torque for M 6 - terminal screw: 5 Nm
• slotted head screwdriver
• cross-head screwdriver
• 5 mm Allen key
• multimeter
5.2 Electrical
Data cables:
• Cat.6 data cable with RJ45 plug connector for connecting to the PV inverter and/or power flow direction sensors
2/3
• Cat.6 data cable with RJ45 plug connector for configuring the monitoring system
• Cat.6 data cable with RJ45 plug connector for cascading multiple SENEC storage units and/or SENEC.Heat
Connection from the house wiring to the power flow direction sensor and SENEC.Home Li:
• Cable, 5-core NYM, at least 2.5 mm2to a maximum of 6 mm2,flexible with wire end ferrules
In the house wiring:
• Residual current device, MCBs (3-pin B 16 A or 3-pin B 32 A on Econamic Grid)
• Wiring set, customer-specific (check situation on site)
• Recommended: overvoltage protection
Where connecting mains backup operation:
• Cable, 3-core NYM, at least 2.5 mm2to a maximum of 6 mm2,flexible with wire end ferrules
• Insulation monitor
• B 10 A miniature circuit breaker
When using the controllable outputs:
• Cable, 3-core NYM, at least 2.5 mm2to a maximum of 6 mm2,flexible with wire end ferrules
5.3 Other materials required
• Conduit, fixings, cable ties
• Laptop with LAN connection for configuring the monitoring system
• Indelible pen for filling out identification plate
20
6 Product description
The SENEC.Home Li is a powerful, low maintenance energy storage system. Reliable and safe operation is
guaranteed if the system is properly installed and regularly maintained. The SENEC.Home Li can be operated
in conjunction with common, grid-connected PV systems.
6.1 Overview
6.1.1 Product Overview
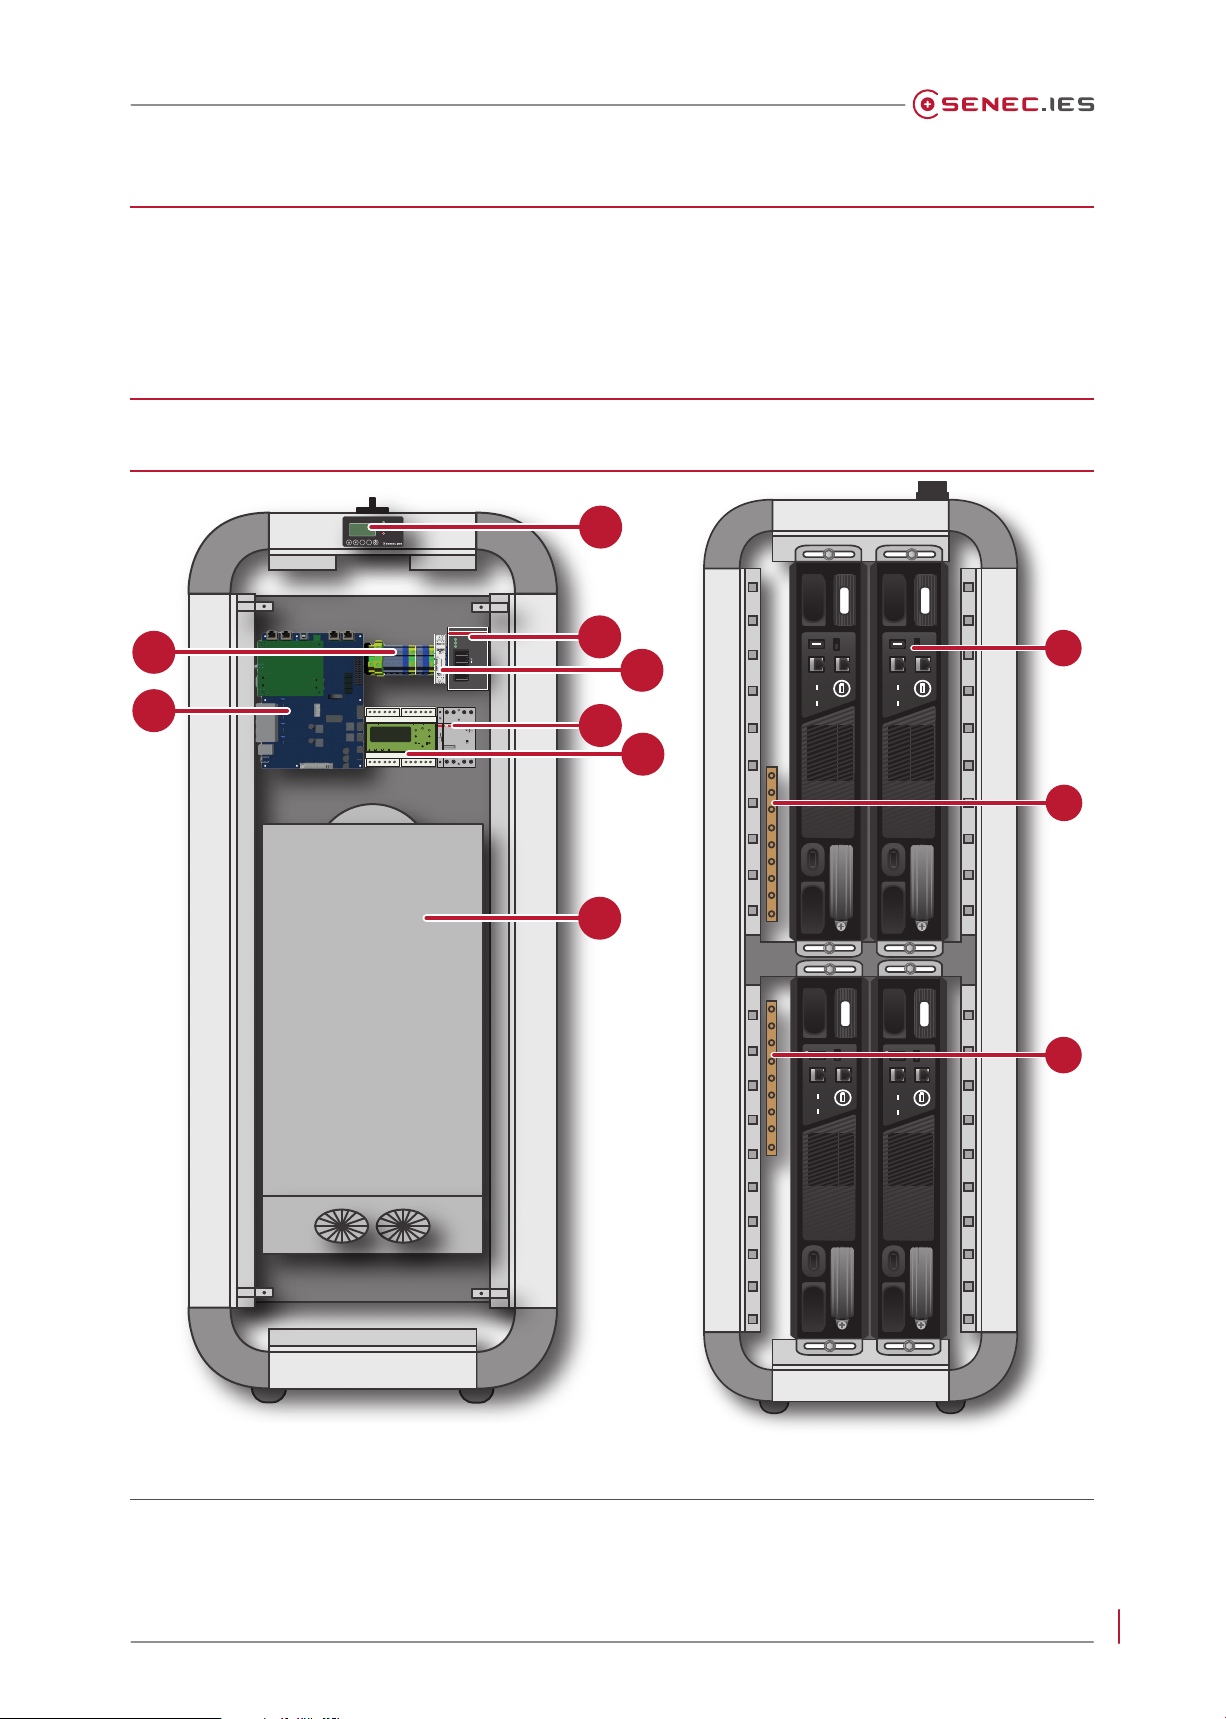
OK ESC
Passiv
Laden
Entladen
Störung
OPERATION
INPUTOK
BUFFERSTATUS
CP-B24/3.0
ABB
L+IN
L-IN
INPUTOK
EXT+
EXT -
L+OUT
L-OUT
L-OUT
A1 A2 N L1 L2 L3 11 12 14 21 22 24 31 32 34
R1
R2
R3
ESC ENT
PROG
+
-
|1 |2 |3 |4 |5
RE NA003- www.tele-online.com
21
33
22
34
EH04
-11
ESB24-40
230V-240
AC/DC
40-450Hz
AC-1:24A /3~400V
16KW/3~400V
AC-3:4KW/3~400V
A1
A2
24 6 8 (14)
13 5 7 (13)
EC/EN60947-4-1
EC/EN61095
1
2
4
6
3
5
7
8
Figure 2 Product view of SENEC.Home Li (without cabling), front view (on left) and right-hand side (on the right)
POWER
0 I
OFF - ON
S <-> MLOW
UP COM
STATUS SOC
POWER
0 I
OFF - ON
S <-> MLOW
UP COM
STATUS SOC
POWER
0 I
OFF - ON
S <-> MLOW
UP COM
STATUS SOC
POWER
0 I
OFF - ON
S <-> MLOW
UP COM
STATUS SOC
9
10
11
Table of contents


