SenHaiX 8800 User manual

DUAL BAND
PROFESSIONAL RADIO

PREFACE
Thank you for purchasing our dual band portable two way radio. This easy-to-use radio will
deliver you secure, instant and reliable communications at peak efficiency. Please read this
manual carefully before use. The information presented herein will help you to derive
maximum performance from your radio.

Contents Unpacking And Checking Equipment
Supplied Accessories
Unpacking and Checking Equipment
Product Overview
Function Keypad
Before Use
Charging the Battery Pack
Charger LED indicator and charging status
USB Charging
Battery LED Indicator and battery status
Preparation
Installing/Removing the Antenna
Installing/Removing the Belt Clip
Installing/Removing the Battery
Installing the Optional
Speaker/Microphone(or Headset)
Status Indication
LED Indicator
LCD Icons
Basic Operations
Powering On/Off
01
02
03
05
05
05
06
06
07
07
07
07
08
08
08
09
10
10
10
10
10
10
10
10
10
10
10
10
10
10
10
11
12
12
13
14
Adjusting the Volume
VFO/Channel Switch
Channel Mode
Frequency Mode
Push To Talk
Enter/Exit Menu
A/B Band Switch
Keypad Lock/Unlock
Flashlight
Emergency Alarm
Scan
1750Hz Tone
Battery Voltage
Menu Functions
Bluetooth Programming (Option)
Search Frequency
Troubleshooting
Care and Cleaning
Note: If you need to know more information about optional accessories. Please contact us.
Item
Antenna
Belt Clip
Hand Strap
Li-polymer Battery
Charger
Adaptor
User Manual
1
1
1
1
1
1
1
Quantity
01
Carefully unpack the transceiver. We recommend that you identify the items
listed in the following table before discarding the packing material. If any
items are missing or have been damaged during shipment, please contact
the carrier or the dealers immediately.

Product Overview Function Keypad
0302
No. Key Function
2
3
4
6
【MENU】 Menu/Enter Key
Exit/Delete Key
Switch A/B Band in standby mode
Press for 2 Seconds to up rapidly
Change the Scan direction in scan status
【UP】
Press for 2 Seconds to down rapidly
Change the Scan direction in scan status
In Standby status:
Input frequency in VFO mode
Input channel number in Channel mode
In Transmitting status:
Input DTMF Code in transmitting status
【DOWN】
【Numeric Keypad】
【EXIT】
5
NFOV FYJU
2 3
45
6
No. Part Name No. Part Name
PF1 Key
(LAMP Key)
PTT-1
PTT-2
PF2 Key
(Programmed Key)
LED Indicator
Antenna
Power On/Off
Volume Knob
LCD Display
Function Keypad
Numeric Keypad
Speaker
Microphone
Flashlight
Accessories Jack
Charging Indicator
USB Charging Port
Battery Contacts
Battery Screw
2
3
4
5
6
7
8
9
:
21
22
23
24
25
26
27
28
29
Function Keypad
0504
7
8
9
:
Before Use
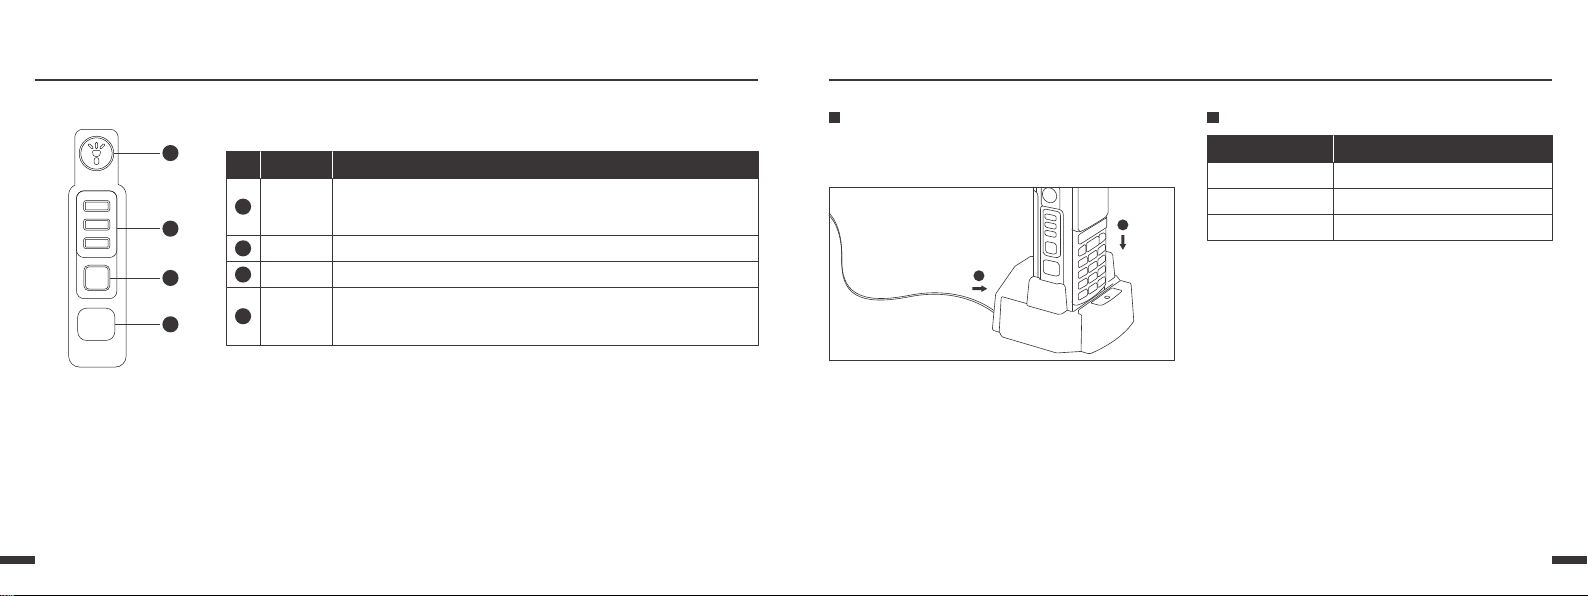
Charging the Battery Pack Charger LED indicator and charging status
Use only the charger and battery specified by the
manufacturer. The charger LED indicates the charging
progress.
1.As ① shown, Plug the AC adaptor into the AC outlet, and
then plug the cable of the AC adaptor into the DC jack
located on the back of the charger.
2.As ② shown, Plug the radio into the charger. Make sure the
battery terminals are good in contact with charging terminals.
3.The indicator light turns to red, the charging begins.
4.The indicator light turns to green, the charging is completed.
LED indication
Constant Green
Constant Red
Constant Green
Standby (no-load)
Charging
Fully charged
Charging status
2
3
7【PF1】
Press PTT-1 key to transmitting A Band
LAMP Key,
Short press to turn on/off flashlight
Long press for emergency alarm
8【PTT-1】
Press PTT-2 key to transmitting B Band
9【PTT-2】
:【PF2】
Short Press: FM/TX Power/Monitor/Scan Default: FM
Long Press: FM/TX Power/Monitor/Scan Default: TX Power
Note: PF2 Key can be setup in PC software.
No. Key Function

Preparation
Installing/Removing the Antenna
Installing/Removing the Battery
Screw the antenna into the
connector on the top of the
transceiver by holding the
antenna at its base and
turning it clockwise until
secure.
Note: Turn the antenna
counter-clockwise until you
can remove it.
1.Attach the belt clip above
the corresponding holes on
the back of the radio, and
screw it clockwise with the
two supplied screws.
2.Loosen the screws to
remove the belt clip.
1.Match the two top grooves
of the battery pack on the
back of the radio and then
push it.
2.Screw it clockwise to install
the battery.
3.Unscrew counter-clock-
wise to remove the battery.
Installing/Removing the Belt Clip
2 53
4
0706
Before Use
Constant Red
Constant Green
Charging
Fully Charged
USB Charging Battery LED Indicator and battery status
1.Plug the USB charging cable into the charging port on the
back of the battery.
2.The indicator light turns to red, the charging begins.
3.The indicator light turns to green, the charging is completed.
Use only the USB charging cable specified by the manufac-
turer. Charger LED can indicate the charging status. LED indication Charging status

Preparation Status Indication LCD Icons
LED Indicator
Uif!upq!MFE!joejdbups!xjmm!ifmq!zpv!fbtjmz!jefoujgz!dvssfou!
sbejp!tubuvt/
Radio Status
Transmitting
Receiving
LED glows red
LED glows green
LED Indicator
Installing the Optional
Speaker/Microphone(or Headset)
Insert the speaker/mi-
crophone (or headset)
plugs into the
speaker/microphone
jacks.
0908
Icon Radio status
Signal Strength Level
Low Power
High Power
DTMF activated
CTCSS activated
Keypad lock function activated. Press 【*】 Key for 2 Seconds to unlock the keypad
VOX function enabled
Narrow Band selected
Battery Level indicator
A/B Band Direction, Operation frequency
Bluetooth programming function activated
DCS activated
Position: TX frequency = RX frequency + Offset frequency
Negative: TX frequency = RX frequency - Offset frequency
Dual watch/ dual reception functions activated

Basic Operations
Powering On/Off
Turn the 【Power/Volume knob】 clockwise to switch the
transceiver power ON till a click is heard.
Adjusting the Volume
Rotate the 【Power/Volume knob】 to adjust the volume.
Turn clockwise to increase the volume and counter-clock-
wise to decrease the volume.
VFO/Channel Switch
Long Press 【MENU】 Key to switch between VFO and
channel mode.
Channel Mode
In channel mode, input the channel numbers by the keypad.
For example, If you want to switch to channel 1, input
0+0+1 (total 3 digits), and it will switch to channel 1.
Frequency Mode
In VFO Frequency mode, input the VFO frequency directly
by the keypad.
Push To Talk
Press 【PTT-1】 to transmit in A Band.
Press 【PTT-2】 to transmit in B Band.
Enter/Exit Menu
Short Press 【MENU】 Key to enter menu, and press
【UP/DOWN】 key to select the function. Press 【MENU】
Key to confirm, Press 【EXIT】 to exit.
A/B Band Switch
In standby, press 【EXIT】 Key to switch A/B Band.
Keypad Lock/Unlock
In standby, long press 【*】 Key to lock/unlock keypad.
Flashlight
Short press 【PF1】 to turn on/off flashlight.
Emergency Alarm (SOS Mode)
Long press 【PF1】 to turn on/off alarm function.
Scan
In frequency mode, long press 【#】 key to turn on/off scan
function.
1750Hz Tone for Access to Repeater
In transmitting status, press 【PF1】 to transmit a 1750Hz
tone.
Battery Voltage
In standby, long press 【0】 Key to check the current
battery voltage.
Menu Functions
Radio Set
SQL(Squelch Level)
Transmit Power
Bandwidth
Busy Channel Lockout
TOT(Trans over time)
Level 0/1/2/3/4/5
High/Low
Wide 25K/Narrow 12.5K
ON/OFF
OFF/30/60/90/120/150/180/210/240s
VOX Level Voice Operated Transmission
Battery Save
Dual Standby
SOS Mode
Scan Mode
Back Light Time
Beep Prompt
VOX Delay
Menu Exit Time
ON/OFF
ON/OFF
On Site/ Send Sound/Send Code
Time/Carrier/Search
Bright/5s/10s/15s/20s/30s/1min/2min/3min
ON/OFF
0.5S/0.6S/....2.0S
5S/10S/15S...60S
Keypad Auto Lock
Receive CTCSS
Receive DCS
Transmit CTCSS
OFF/67.0HZ...241.HZ
OFF/D023N...D754I
OFF/67.0HZ...241.HZ
ON/OFF
OFF/Level1/2/3
Setting
CTCSS/DCS
Menu Function/Description Available settings
1110
Transmit DCS
Encryption
OFF/D023N...D754I
ON/OFF

Frequency Mode
Step 2.50/5.00/6.25/10.00/12.50/25.00/50KHz
Direction
Offset
None/Plus/Minus
00.000....69.990MHz
Phenomena Analysis Solution
TroubleshootingMenu Functions
Menu Function/Description Available settings
1312
Channel Storage
CH-Memory 000,CH-001....CH-127
CH-Delete
CH-Edit Name
000,CH-001....CH-127
Name display can be set by PC software.
Program on the dedicated APP ON/OFF
VFO Mode Delete all the setting in VFO mode
Reset All Delete all settings
Search Frequency Search the other radio's TX frequency and CTCSS/DCS Code when it is in transmitting
Bluetooth
Hardware Version, Software VersionAbout Radio
Reset
Bluetooth Programming Function (Option)
Press MENU Key to select Bluetooth to turn on this function.
After connecting the walkie talkie through the mobile phone bluetooth, you can modify the frequency, channel information,
function setting on the dedicated APP. The bluetooth function will turn off automatically after finished the programming
on the APP.
Note: When bluetooth programming function is on, the radio can not program via programming cable.
Search Frequency
If you want to search other radio's frequency, pls turn on the search frequency function on our radio, and keep a distance of
20-40cm from that radio when it is transmitting, after a while, the transmitting radio’s TX frequency and CTCSS/DCS Code
will be displayed on our screen. Press Menu key to save the frequency.
Note: Frequency offset is about ± 2.5KHz.
If the solutions below cannot fix the problems for you, or you may have some other queries, please contact us or your local
dealer for more technical support.
The battery may be improperly installed. Remove the battery and reassemble it.
Low battery voltage.
Low volume level.
The antenna may be loosened or improperly installed.
You may be too far away from the group members.
The radio may be set with no signaling.
You may be too far away from other members. Move towards other members.
Move to an open and flat area, and restart the radio to try again.
Stay away from equipment that may cause interference.
You may suffer from external disturbance
(such as electromagnetic interference).
You may locate in an unfavorable position.
For example, your communication may be blocked by
high buildings or frustrated in the underground areas.
Set signaling for all member radios to avoid interference at the same
frequency. And change the signaling settings for all portable radios
at the same time.
The speaker may be blocked or damaged.
Recharge or replace the battery.
Increase the volume by rotating the Volume Control knob.
Reassemble the antenna after turning off the radio.
The battery power may be used up. Recharge or replace the battery.
The battery is poorly connected due to dirtied or
damaged battery contacts.
Clean the battery contacts. If the problem cannot be solved, contact
your dealer or authorized service center for inspection and repair.
Clean the surface of the speaker. If the problem cannot be solved,
contact your dealer or authorized service center for inspection and repair.
Set your TX/RX frequency and signaling to the same as that of other
members.
The frequency or signaling may be inconsistent with
that of other members.
The channel type (digital/analog) may be set
inconsistently.
You may be interrupted by radios using the same
frequency. Change the frequency, or adjust the squelch level.
Power-on Failure
During receiving,
the voice is weak,
discontinuous
or totally inactive.
Unable to
communicate
with other
members.
Irrelevant
communication or
noise is heard
on the channel.
The noise is
too loud.
Make sure all members are on the same digital/analog channel.
Move towards other members.

14
Care and Cleaning
Do not puncture or scratch the product with hard objects.
Do not place the product in corrosive agents, solutions or water.
Do not handle the radio by its antenna or external microphone directly.
When not in use, keep the accessory jacks covered with the protective caps.
To guarantee optimal performance as well as a long service life of the product, please follow the tips below.
Clean up the dust and fine particles on the product parts with a clean and dry lint-free cloth or a brush regularly.
Use a non-woven fabric with neutral cleanser to clean the keys, control knobs, and shell after long-time use. Do not use
chemical preparations such as stain removers, alcohol, sprays or oil preparations.
Make sure the product is completely dry before use.
Power off the product, and remove the battery before cleaning.
Other manuals for 8800
1
Table of contents
Other SenHaiX Two-way Radio manuals


