Senix CSPE6.5-M User manual

8458-4347007-001
Electric Pole Saw
Operator’s manual
Model: CSPE6.5-M
For customer support, please call 1-800-261-3981 or send email to:
SAVE THIS MANUAL FOR FUTURE REFERENCE.
2WWW.SENIXTOOLS.COM
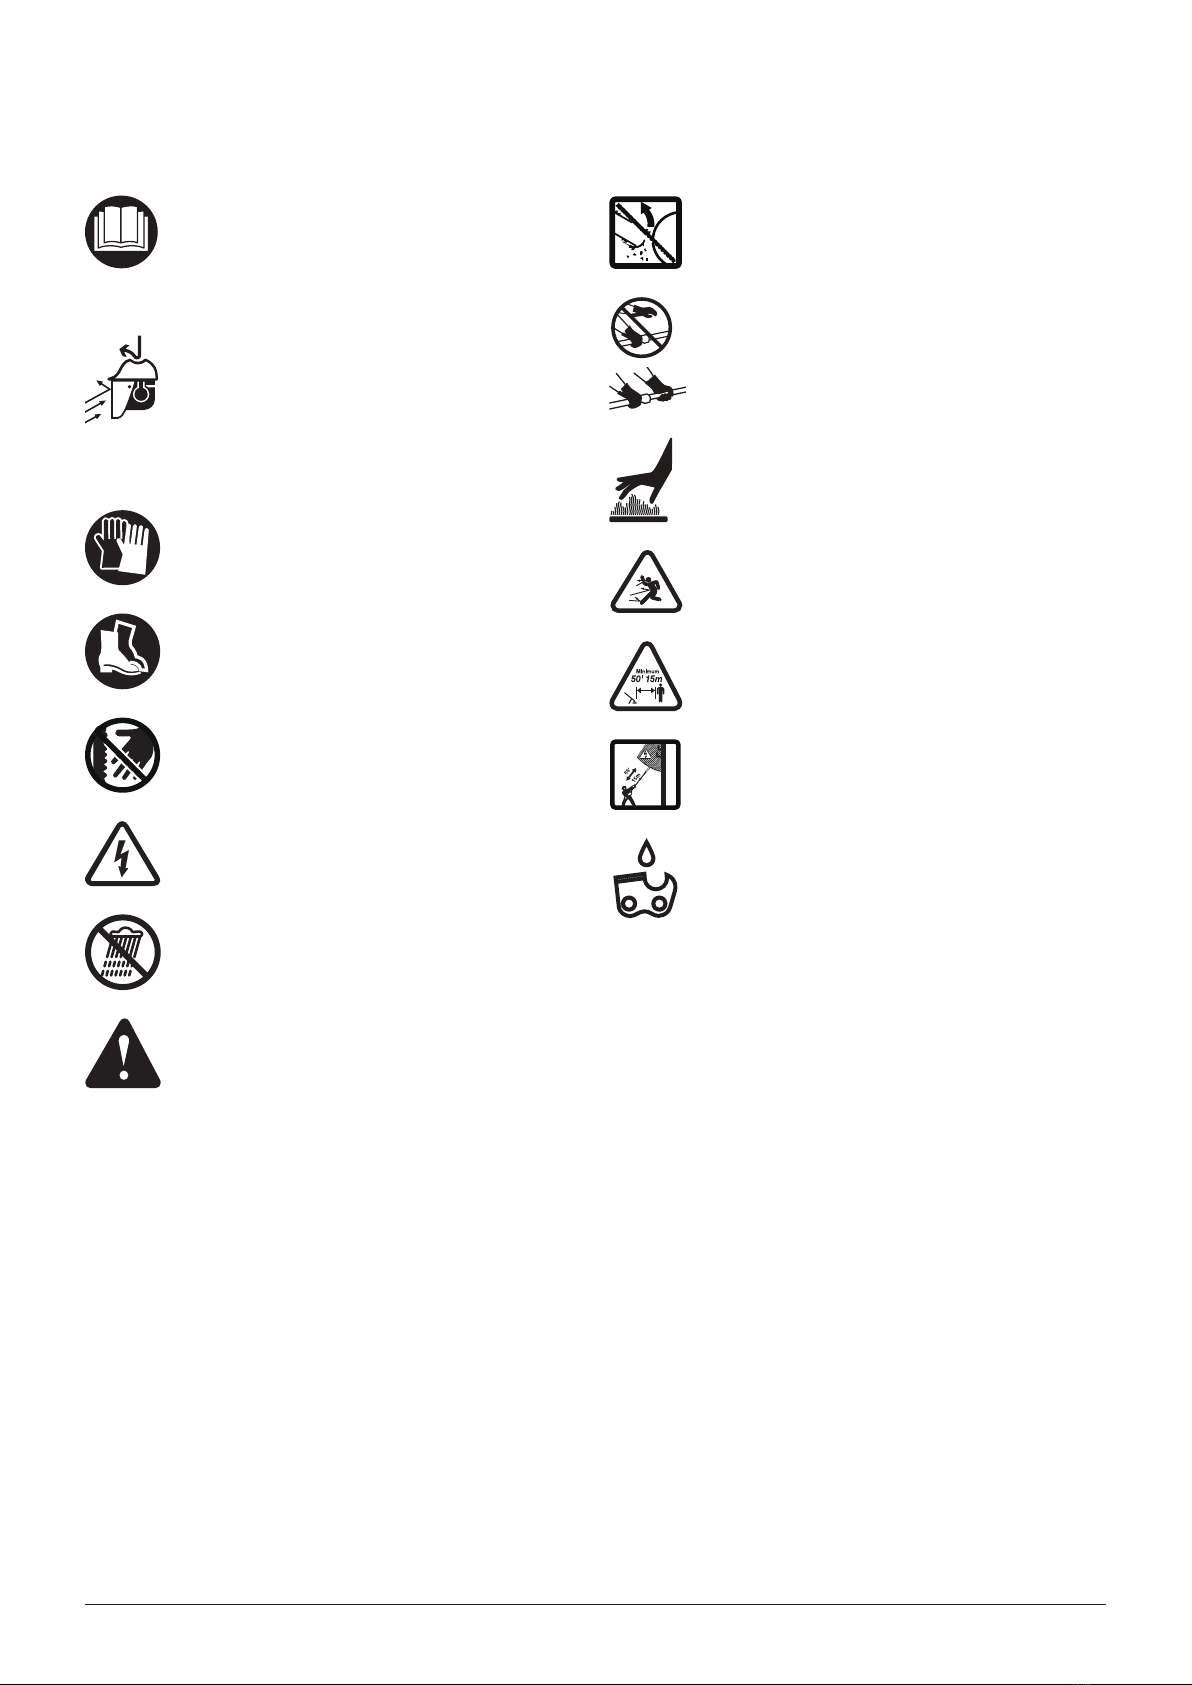
• SAFETY & INTERNATIONAL SYMBOLS •
This operator’s manual describes safety and international symbols and pictographs that may appear on this product.
Read the operator’s manual for complete safety, assembly, operating and maintenance and repair information.
To reduce the risk of injury, user must read
instruction manual.
Contact of the guide bar tip with any object
should be avoided.
Always use two hands when operating the
pole saw.
Hot surface. Do not touch a hot motor.
You may get burned. The motor get
extremely hot from operation. It remains hot
for a short time after the unit is turned off.
Thrown objects can ricochet and result in
personal injury or property damage.
Keep all bystanders at least 50 ft. away.
DANGER!
Risk of electrocution!
The chain must be continously coated with
oil to function correctly. Verify oil level before
each use.
Wear hand protection.
Wear non-slip safety footwear.
Failure to keep your hands away from the
blade will result in serious personal injury.
Avoid power lines, use in dry conditions.
Do not expose to rain.
Indicates danger, warning or caution.
Precautions that involve your safety.
Thrown objects and loud noise can cause
severe eye injury and hearing loss. Wear
eye protection meeting current ANSI Z87.1
standards and ear protection when operating
this unit. Wear head protection when
operating this unit. Fallen objects can cause
severe head injury. Use a full face shield
when needed.
3WWW.SENIXTOOLS.COM
TABLE OF CONTENTS
SAFETY..........................................................................................3
KNOW YOUR UNIT........................................................................7
SPECIFICATIONS*.........................................................................7
ASSEMBLY.....................................................................................8
OPERATION..................................................................................11
MAINTENANCE............................................................................14
TROUBLESHOOTING..................................................................17
PARTS...........................................................................................18
PARTS LIST..................................................................................19
WARRANTY...................................................................................20
1. Avoid Dangerous Environment – Don’t use
appliances in damp or wet locations.
2. Don’t Use In Rain.
3. Keep Children Away – All visitors should be kept at a
distance from work area.
4. Dress Properly – Do not wear loose clothing or
jewelry. They can be caught in moving parts.
Use of rubber gloves and substantial footwear
is recommended when working outdoors. Wear
protective hair covering to contain long hair.
5. Use Safety Glasses – Always use face or dust mask
if operation is dusty.
6. Use Right Appliance – Do not use appliance for any
job except that for which it is intended.
7. Ground Fault Circuit Interrupter (GFCI) protection
SAFETY
Some dust created by power sanding, sawing, grinding,
drilling and other construction activities contains
chemicals known to the state of California to cause
cancer, birth defects or other reproductive harm. Some
examples of these chemicals are: Lead from lead-
based paints, crystalline silica from bricks and cement
and other masonry products, and arsenic and chromium
from chemically treated lumber.
Your risk from these exposures varies, depending on
how often you do this type of work. To reduce your
exposure to these chemical: Work in a well ventilated
area and work with approved safety equipment,such
as dust masks that are specially designed to lter out
microscopic particles.
This product can expose you to chemicals including
lead, a chemical known to the State of California to
cause cancer and birth defects or other reproductive
harm. For more information go to
www.P65Warnings.ca.gov.
When using electric gardening appliances, basic safety
precautions should always be followed to reduce
the risk of re, electric shock, and personal injury,
including the following:
WARNING!
WARNING!
WARNING!
should be provided on the circuit(s) or outlet(s) to be
used for the gardening appliance. Receptacles are
available having built-in GFCI protection and may be
used for this measure of safety.
8. Warning – To reduce the risk of electric shock, use
only with an extension cord intended for outdoor
use, such as an extension cord of cord type SW-
A, SOW-A, STW-A, STOW-A, SJW-A, SJOW-A,
SJTW-A. or SJTOW-A.
9. Avoid Unintentional Starting – Don’t carry plugged-in
appliance with nger on switch. Be sure switch is off
when plugging in.
10. Don’t Abuse Cord – Never carry appliance by cord
or yank it to disconnect from receptacle. Keep cord
from heat, oil, and sharp edges
11. Don’t Force Appliance – It will do the job better and
with less likelihood of a risk of injury at the rate for
which it was designed.
12. Don’t overreach – Keep proper footing and balance
at all times.
13. Stay Alert – Watch what you are doing. Use
common sense. Do not operate appliance when you
are tired.
14. Disconnect Appliance – Disconnect the appliance
from the power supply when not in use, before
servicing, when changing accessories such as
blades, and the like.
15. Store Idle Appliances Indoors – When not in use,
appliances should be stored indoors in dry, and high
or locked-up place – out of reach of children.
16. Maintain Appliance With Care – Keep cutting edge
sharp and clean for best performance and to reduce
the risk of injury. Follow instructions for lubricating
and changing accessories. Inspect appliance cord
periodically, and if damaged, have it repaired by an
authorized service facility. Inspect extension cords
periodically and replace if damaged. Keep handles
dry, clean, and free from oil and grease.
17. Check Damaged Parts – Before further use of the
appliance, a guard or other part that is damaged
should be carefully checked to determine that it will
operate properly and perform its intended function.
Check for alignment of moving parts, binding of
moving parts, breakage of parts, mounting, and any
other condition that may affect its operation. A guard
or other part that is damaged should be properly
repaired or replaced by an authorized service center
unless indicated elsewhere in this manual.
Read All Instructions

4WWW.SENIXTOOLS.COM
• Always disconnect the appliance from the power
supply before assembling, adjusting or cleaning, and
before leaving the machine unattended for any period.
SAVE THESE INSTRUCTIONS
ELECTRICAL SAFETY
SPECIFIC SAFETY RULES FOR POLE
PRUNERS
EXTENSION CORDS
1. Wear head, and eye protection and personal
protective equipment (PPE), including correct
clothing.
2. Keep bystanders, especially children at a safe
distance during operation of the saw chain pole
pruner.
3. Keep all parts of the body away from the saw chain.
Do not remove cut material or hold material to be cut
when blades are moving. Make sure the switch is off
when clearing jammed material. Saw chain continues
to move after the switch is turned off. A moment of
inattention while operating the extended-reach pruner
may result in serious personal injury.
4. Carry the extended-reach pruner by the handle with
the saw chain stopped. When transporting or storing
the extended-reach pruner, always t the saw chain
device cover. Proper handling of the extended-reach
pruner will reduce possible personal injury from the
saw chain.
5. Hold the extended-reach pruner by insulated gripping
surfaces only, because the saw chain may contact
hidden wiring. A saw chain contacting a ″live″wire
may make exposed metal parts of the extended-
reach pruner ″live″ and could give the operator an
electric shock.
6. Keep cable away from cutting area. During operation
the cable may be hidden in shrubs and can be
accidentally cut by the saw chain.
7. Do not use the extended-reach pruner in bad
weather conditions, especially when there is a risk of
lightning. This decreases the risk of being struck by
lightning.
8. To reduce the risk of electrocution, never use near
any electrical power lines. Contact with or use near
power lines may cause serious injury or electric
shock resulting in death.
9. Always use two hands when operating the extended-
reach pruner. Hold the extended-reach pruner with
both hands to avoid loss of control.
10. Always use head protection when operating the
extended-reach pruner overhead. Falling debris can
result in serious personal injury.
1. Double insulated tools are equipped with a polarized
plug (one blade is wider than the other and will
require the use of a polarized extension cord. The
Pole Saw’s plug will t into a polarized extension
cord only one way. If the plug does not t fully into
the extension cord, reverse the plug. If the plug still
does not t, obtain a correct polarized extension
cord. A polarized extension cord will require the use
of a polarized wall outlet. This plug will t into the
polarized wall outlet only one way. If the plug does
not t fully into the wall outlet, reverse the plug. If the
plug still does not t, contact a qualied electrician
to install the proper outlet. Do not change or alter
the equipment plug, extension cord receptacle, or
extension cord plug in any way.
2. Double insulation eliminates the need for the three-
wire grounded power cord and grounded power
supply system. Applicable only to Class II (double-
insulated) tools. This Pole Saw is a double insulated
tool.
• Checking the completeness, assembly and setting
of the tool (see details below) before start to work.
Repeat the checking regularly during your work.
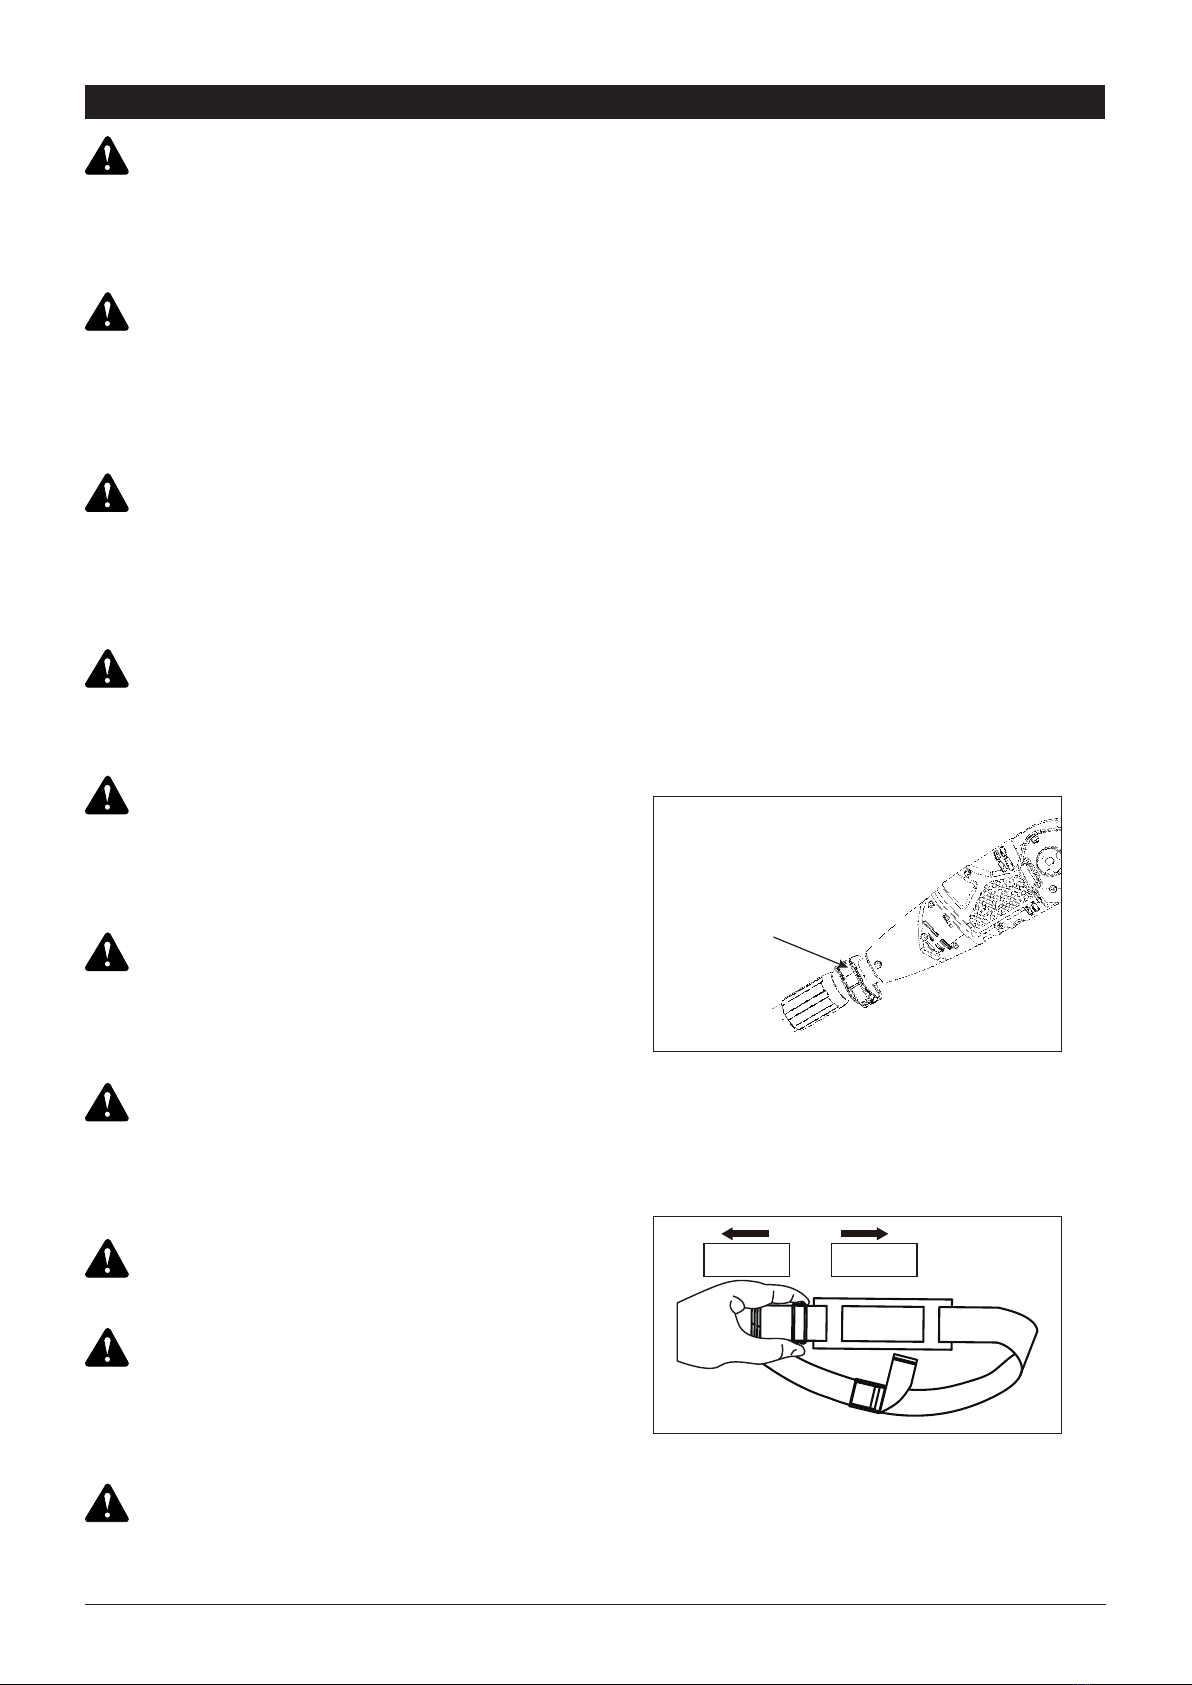
• Always use the harness to carry the tool weight on
the shoulder. If you use the harness cross your body,
please learn how to use the quick release clamper on
the harness and keep it in front of your body.
• It is recommended that the unexperienced user
should have practical instruction in the use of the
pole saw and the protective equipment from an
experienced operator. The initial practice should be
cutting logs on a saw horse or cradle.
• This tool is not intended for use by persons (including
children) with reduced physical, sensory or mental
capabilities, or lack of experience and knowledge,
unless they have been given supervision or
instruction concerning use of the appliance by a
person responsible for their safety. Children should
be supervised to ensure that they do not play with the
appliance.
• Children and juveniles, with the exception of
apprentices older than 16 years and under
supervision, may not operate the product. The same
applies for persons who do not or do not sufciently
know how to handle the product.
• The operating instructions should always be ready to
hand. Persons unt or tired must not operate the tool.
• Wait until the chain has come to a standstill completely
before placing it down.
• Any servicing should be performed by an authorized
service representative.
Do not permit ngers to touch the terminals of plug
when installing or removing the extension cord from the
plug.
Use a proper extension cord. ONLY use cords
listed by underwriters Laboratories (UL). Other
extension cords can cause a drop in line voltage,
WARNING!
Do not operate near electrical power lines. The unit has
not been designed to provide protection from electric
shock in the event of contact with overhead electric
lines, Consult local regulations for safe distances from
overhead electric power lines and ensure that the
operating position is safe and secure before operating
the saw chain pole pruner.
WARNING!
ADDITIONAL SAFETY WARNINGS FOR
OPERATION
5WWW.SENIXTOOLS.COM
• Damage to lungs if an effective dust mask is not worn.
• Damage to hearing if effective hearing protection is
not worn.
• Health defects resulting from vibration emission if the
unit is being used over long periods of time or not
adequately managed and properly maintained.
RESIDUAL RISKS
CAUTION:
WARNING:
WARNING:
WARNING:
WARNING:
WARNING:
resulting in a loss of power and overheating of tool.
For this tool an AWG (American Wire Gauge) size of
a least 14-gauge is recommended for an extension
cord of 25-ft. or less in length. Use 12-gauge for an
extension cord of 50-ft. Extension cords 100-ft. or
longer are not recommended. Remember, a smaller
wire gauge size has greater capacity than a larger
number (14-gauge wire has more capacity than
16-gauge wire; 12-gauge wire has more capacity than
14-gauge). When in doubt use the smaller number.
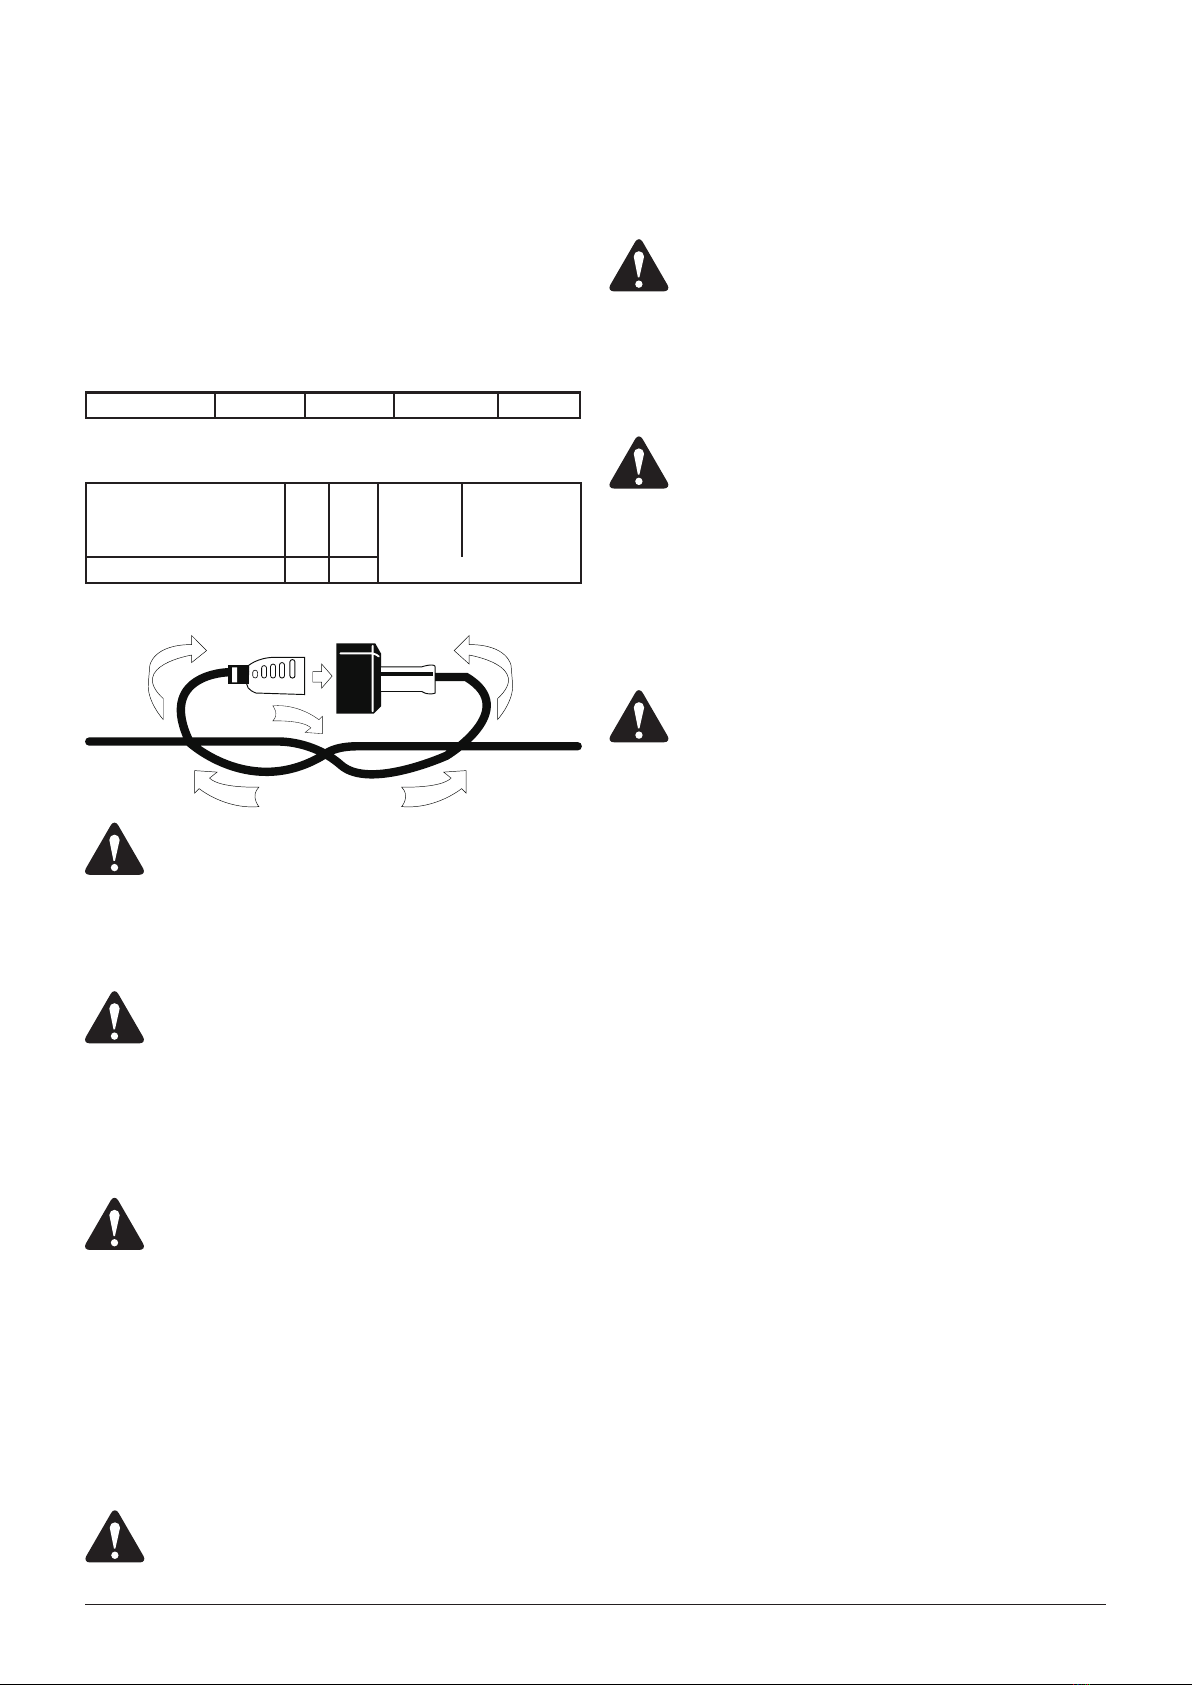
Minimum gauge for extension cords
Ampere Rating
Volts Total length of cord in feet
More than/Not more than AWG
120 V 25 50 100 150
0-6
6-10
10-12
18
18
16
16
16
16
16
14
14
14
12
12
12-16 14 12 Not recommended
Securing extension cord
Keep the extension cord clear of the work area. Position
the cord so that it will not get caught on bushes,
hedges, tree trunks, lawnmowers or other obstructions
while you are working with the pole saw.
Check extension cords before each use. If damaged
replace immediately. Never use tool with a damaged
cord since touching the damaged area could cause
electrical shock, resulting in serious injury.
Even when the unit is used as prescribed it is not
possible to eliminate all residual risk factors. The
following hazards may arise in connection with the unit’s
construction and design:
This unit produces an electromagnetic eld during
Inspect unit before each use. Replace damaged parts.
Make sure all fasteners are in place and secure.
Replace parts that are cracked, chipped, or damaged in
any way. Make sure the cutting attachment is properly
installed and securely fastened.
Do not operate the unit inside a closed environment,
such as a room or building.
operation. This eld may, under some circumstances,
interfere with active or passive medical implants. To
reduce the risk of serious or fatal injury, we recommend
persons with medical implants to consult their physician
and the medical implant manufacturer before operating
this unit.
Kickback can occur when the tip of the guide bar
touches an object or when the wood closes in and
pinches the saw chain inside of the cut. Tip contact can
kick the guide bar up and back towards the operator.
Pinching the saw chain along the top of the guide bar
can push the bar rapidly towards the operator. Either of
these reactions may cause a loss in control of the saw,
increasing the chances of serious personal injury. Do
not rely on the safety devices built into the saw.
Kickback is the result of tool misuse and/or incorrect
operating procedures. These conditions can be
minimized with the following steps:
REDUCING KICKBACK
WARNING:
The danger of a kickback is greatest when attempting
to cut near or with the guide bar tip. Always apply the
saw as atly as possible in order avoid a loss of control
during operation.
1. Maintain a rm grip, with thumbs and ngers
encircling the pole saw handles. Both hands should
be on the saw with your body and arms in a position
to resist kickback forces.
2. Do not overreach and keep the work area free from
obstructions.
3. Only use replacement bars and chains specied by
Senix. Replace dull blades as necessary.
4. Do not let the tip of the guide bar contact any
surfaces.
5. Keep proper tension on the blade at all times. Check
the tension at regular intervals.
6. Cuts should only take place while the chain is moving
at full speed. Do not turn the saw ON or OFF in
the middle of a cut. Use extreme caution when re-
entering a previous cut.
7. Cut one branch at a time. Do not attempt plunge or
bore cuts. Watch for shifting logs or other external
forces that could close a cut and pinch the chain.
8. Make a precut on the opposite side of the log to
avoid the blade from being pinched during operation
as another safeguard against kickback.

6WWW.SENIXTOOLS.COM
SAWING TECHNIQUES
• Saw off the lower branches on the tree rst. By doing
so, it is easier for the cut branches to fall to the
ground.
• At the end of the cut, the weight of the saw suddenly
increases for the user since it is no longer being
supported by a branch. There is a risk of losing
control of the saw, so make sure to stay alert during
the entire sawing operation.
• Only pull the saw out of a cut while the saw is
running. By doing so, you prevent the chain from
jamming in the wood.
• Do not saw with the tip of the guide bar. Do not saw
into the branch formations (where the tree branches
outwards). This will impede the tree’s ability to heal.
• For sawing off smaller branches, place the stop face
of the saw on the branch. This prevents unwanted
movements of the saw at the beginning of the cut.
While applying light pressure, guide the saw through
the branch from top to bottom.
• For sawing off larger branches, rst make a relief
cut. Saw through 1/3 of the branch diameter from the
bottom to top using the top side of the guide bar. Then
saw from top to bottom for the other 2/3 using the
bottom side of the guide bar.
• Saw off longer branches in sections in order to
maintain control over the location of impact.
• When working on an incline, always stand above or
to the side of the branch being sawed. Hold the tool
as close as possible to your body. By doing so, you
maximize your balance.
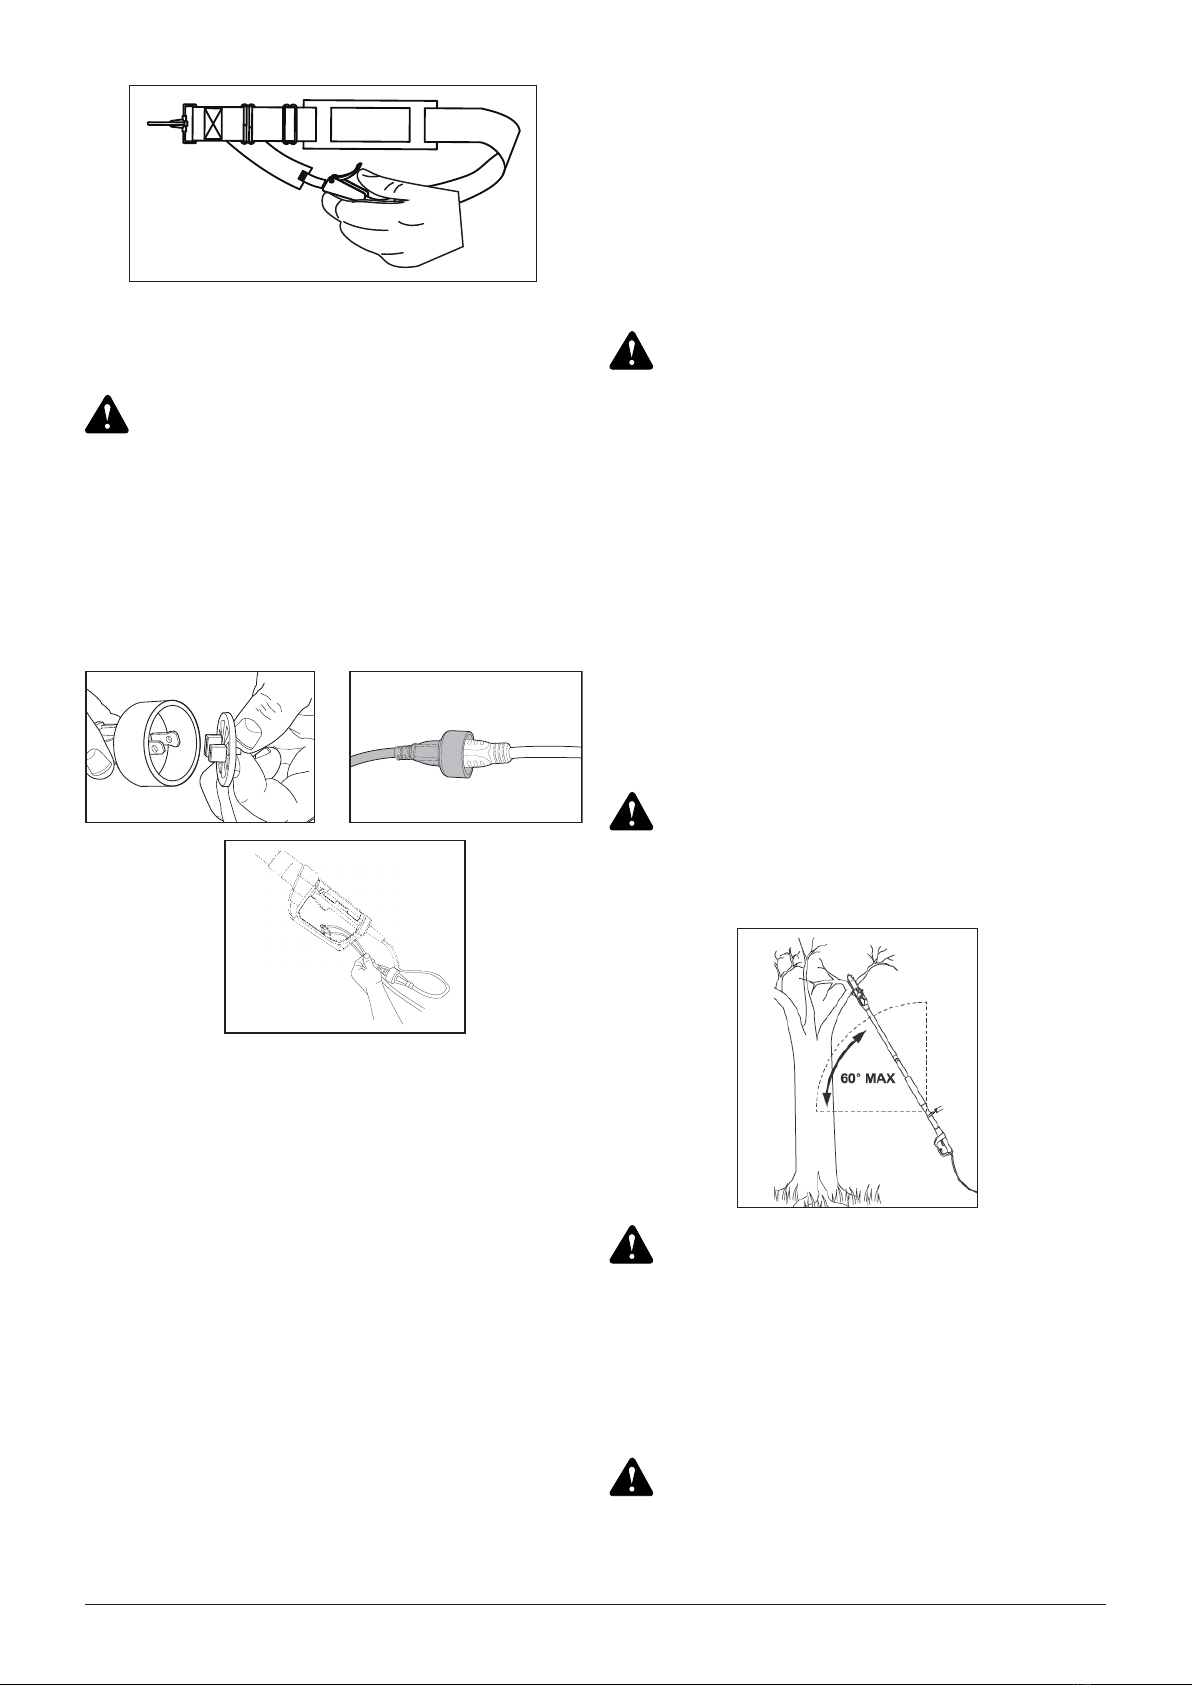
WARNING:
When removing branches, hold the pole saw at an
angle ranging from 0 to 60° in order to avoid being
struck by a falling branch. The saw should never be
operated directly above head.
7WWW.SENIXTOOLS.COM
As a pole saw:
• Cutting small limbs
• General tree pruning
Rated Voltage ............................................................................................................................................120V~ 60Hz
Rated current.......................................................................................................................................................... 6.5A
Motor type............................................................................................................................................. Universal Motor
No load speed ...............................................................................................................................................5200 RPM
Oil tank capacity ....................................................................................................................................2.04 oz. (60 ml)
Saw chain ......................................................................................................... 8 inch (203 mm), Oregon, 91PJ033X
Guide bar....................................................................................................... 8 inch (203 mm), Oregon, 080SDEA041
Weight .................................................................................................................................................. 6.8 lbs. (3.1 kg)
* All specications are based on the latest product information available at the time of printing. We reserve the right
to make changes at any time without notice.
APPLICATIONS
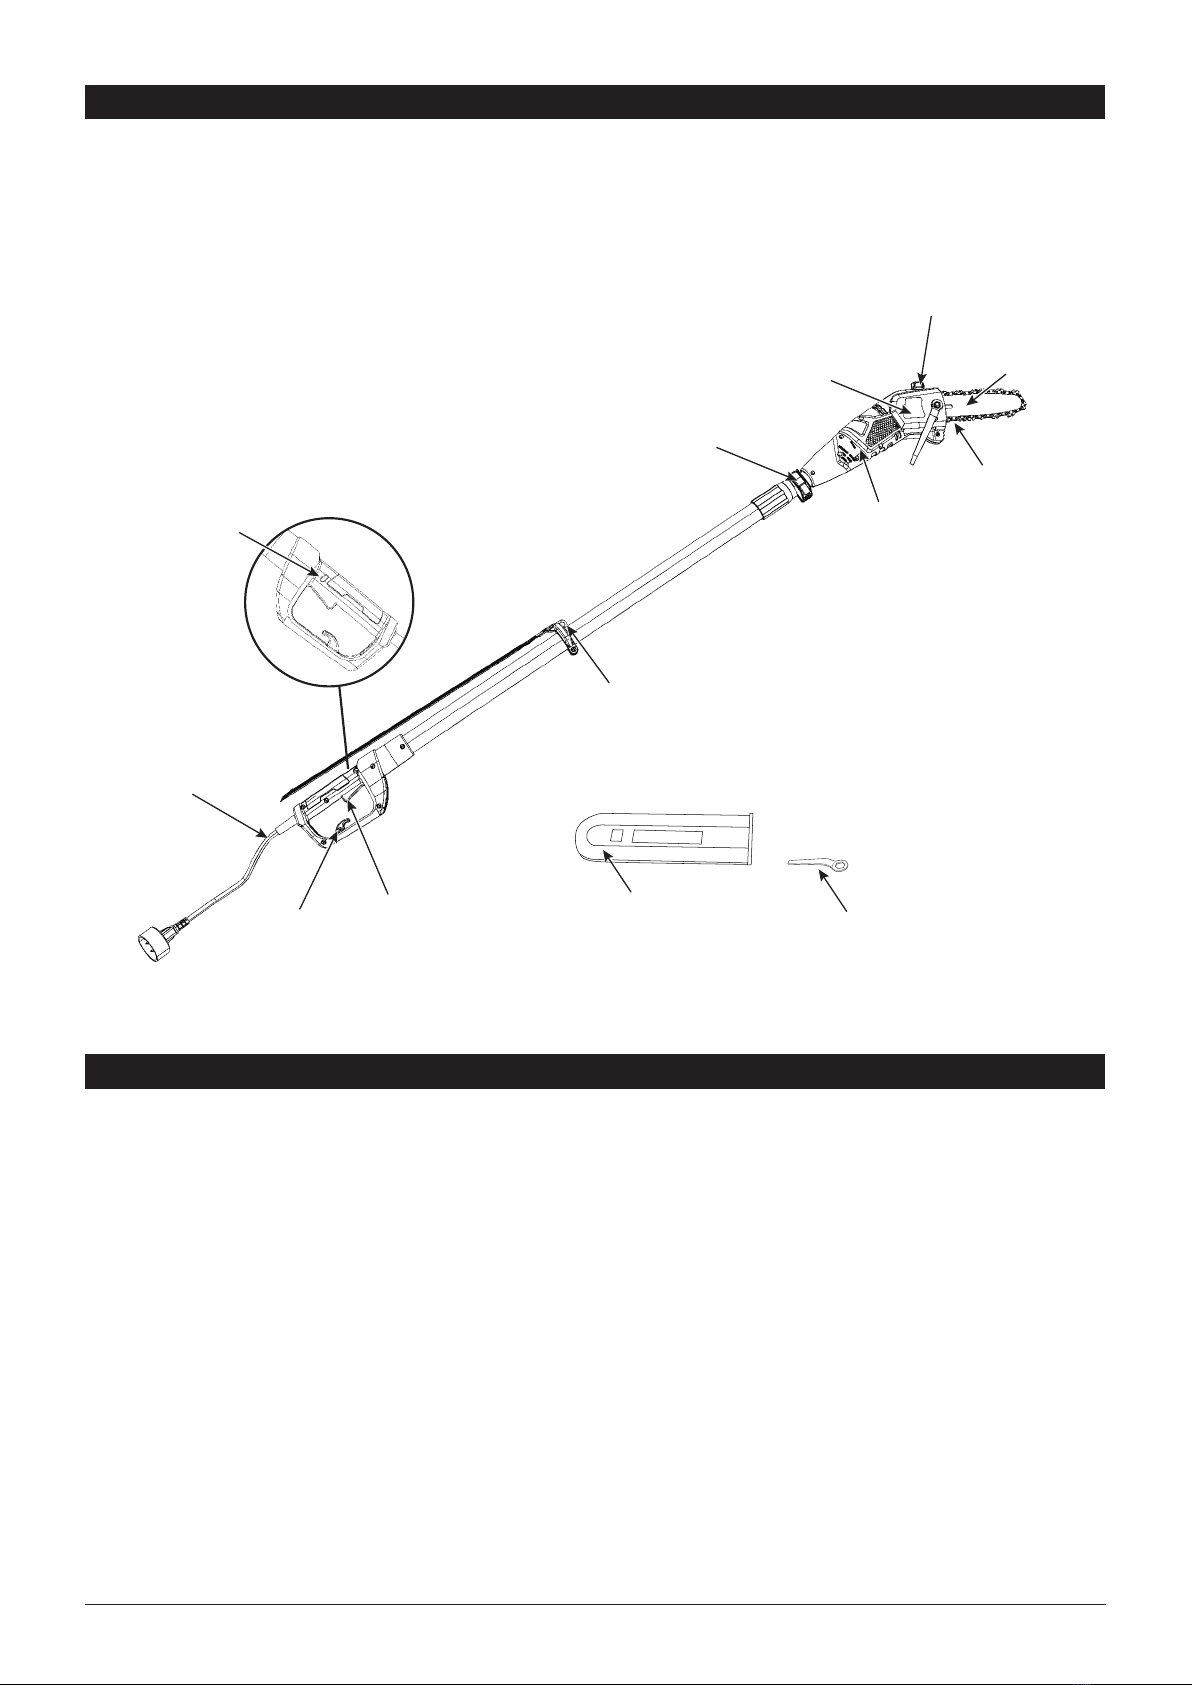
KNOW YOUR UNIT
SPECIFICATIONS*
Power Cord
& Plug
Sprocket
Cover
Harness Attachment
Guide Bar
Saw Chain
Oil
Tank
Cap
Wrench
Chain/Bar/Blade
Protective Cover
Switch
Trigger
ON/OFF
Chain Cover
Nut
Safety
Switch
Safety Cord
Retainer
Telescoping
Release
Lever

8WWW.SENIXTOOLS.COM
Locking Nut/
Step Washer
Wrench
Cover
USING THE RIGHT OIL
INSTALL THE CHAIN BAR AND CHAIN
ASSEMBLY
INCLUDED PARTS
This product requires assembly. Carefully remove the
product and any accessories from the box. Make sure
that all items listed in the packing list are included.
Inspect the product carefully to make sure no breakage
or damage occurred during shipping.
Do not discard the packing material until you have
carefully inspected and satisfactorily operated the
product. If any parts are damaged or missing, please
call 1-800-261-3981 for assistance.
Do not use this product if any parts on the packing
list are already assembled to your product when you
unpack it. Parts on this list are not assembled to the
product by the manufacturer and require customer
installation. Use of a product that may have been
improperly assembled could result in serious personal
injury.
o prevent an accidental start that could cause serious
personal injury, always disconnect the motor spark plug
wire from the spark plug when assembling parts.
Never install, remove, or adjust any attachments while
power head is running. Failure to stop the motor can
cause serious personal injury.
Do not allow familiarity with this product to make you
careless. Remember that a careless fraction of a
second is sufcient to inict serious injury.
Always wear eye protection with side shields marked to
comply with ANSI Z87.1, along with hearing protection.
Failure to do so could result in objects being thrown into
your eyes and other possible serious injuries.
If any part of the pole saw is missing or damaged, do
not connect to power source or operate the pole saw
until the damaged part is repaired or replaced.
Disconnect the spark plug wire before performing
maintenance or assembly procedures.
Cutting edges on chain are sharp.
Use protective gloves when handling chain.
ALWAYS maintain proper chain tension. A loose chain
will increase the risk of kickback. A loose chain may
jump out of chain bar groove. This may injure operator
and damage chain. A loose chain will cause chain,
chain bar, and sprocket to wear rapidly. The chain
life of the saw chain mainly depends upon sufcient
lubrication and correct tensioning. Avoid tensioning the
chain if it is hot, as this will cause the chain to become
over tensioned when it cools down.
1. Place the saw body on a rm and level surface.
2. Using the supplied wrench, turn the bar adjustment
locking nut counter-clockwise to loosen it. Remove
the locking nut, step washer, and cover.
DO NOT discard box or packing material until all parts
are examined.
NOTE: Chain and Bar Oil is not included. You must ll
the Pole Saw with SAE30 oil BEFORE use.
NOTE: Remove the Chain/Bar/Blade Protective Cover
before use.
Quantity Item
1Operator’s manual
1Chain protective cover
1Bar nut wrench
1Harness
WARNING:
WARNING:
WARNING:
WARNING:
WARNING:
WARNING:
WARNING:
WARNING:
WARNING:
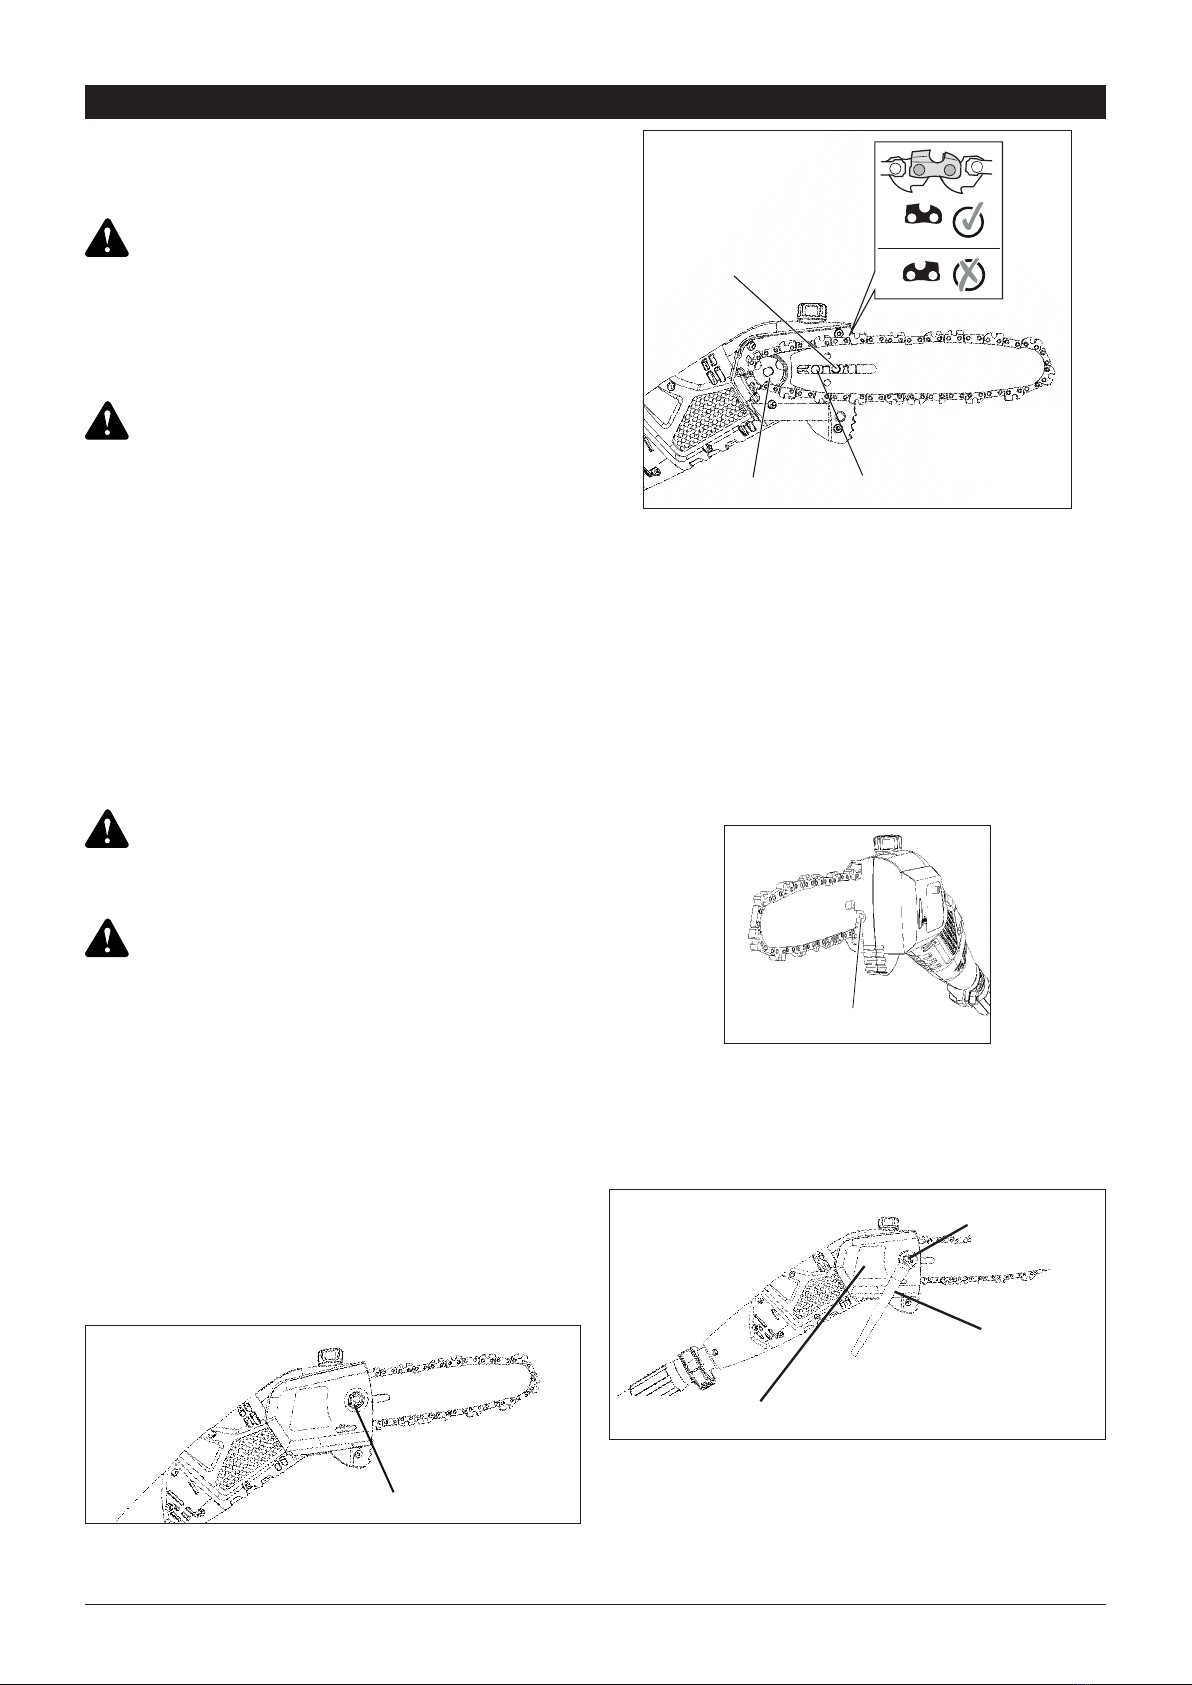
Internal Bolt
Sprocket Chain Tensioning Pin

9WWW.SENIXTOOLS.COM
SAW CHAIN LUBRICATION
FILLING THE OIL TANK
The saw chain must be tensioned properly in order to
ensure safe operation.
Make sure that no dirt gets into the oil tank to prevent
clogging in the oil nozzle.
Because the saw chain heats up during operation, its
length can uctuate. Check the chain tension every
10 minutes of operation and adjust as necessary,
particularly for new saw chains.
The pole saw features automatic chain lubrication.
Never operate the pole saw without saw chain oil. The
use of the pole saw without enough saw chain oil will
damage the unit.
1. Place the saw on a level surface. Clean the area
around the oil tank cap and then open it.
IMPORTANT: Only use SAE300 saw chain oil. Other
oils will run the risk of damaging the unit and voiding the
warranty. Take note of temperature conditions. Using
the saw at various temperatures requires the use of
differing oils. To ensure a sufcient layer of lubricant at
lower temperatures, use liquid oil (low viscosity).
TIP: The saw chain shortens when cooling down.
Loosen the saw chain after work is completed to
elongate the chain’s life and prevent possible damage.
3. Wearing protective gloves, wrap the saw chain
around the chain bar, making sure that the teeth are
aimed in the direction of rotation. The chain should
be properly set in the slot running along the entire
outside edge of the chain bar.
4. Place the saw chain around the sprocket while lining
up the slot in the chain bar with the internal bolt at the
base of the saw and the chain tensioning pin in the
chain bar’s pin hole. The chain tensioning pin may
need adjustment to properly align with the hole in the
chain bar. Use a at-blade screwdriver to turn the
chain tensioning screw to adjust the location of the
pin until it ts in the chain bar.
5.Turn the chain tensioning screw clockwise to
preliminarily tighten the chain bar enough that it stays
in place.
6. Install the step washer and locking nut. Using the
supplied wrench, turn the locking nut clockwise to
tighten it. DO NOT overtighten.
2. Fill the oil tank with 2.04 oz. (60 ml) of saw chain and
bar oil.
3. Close the oil tank cap.
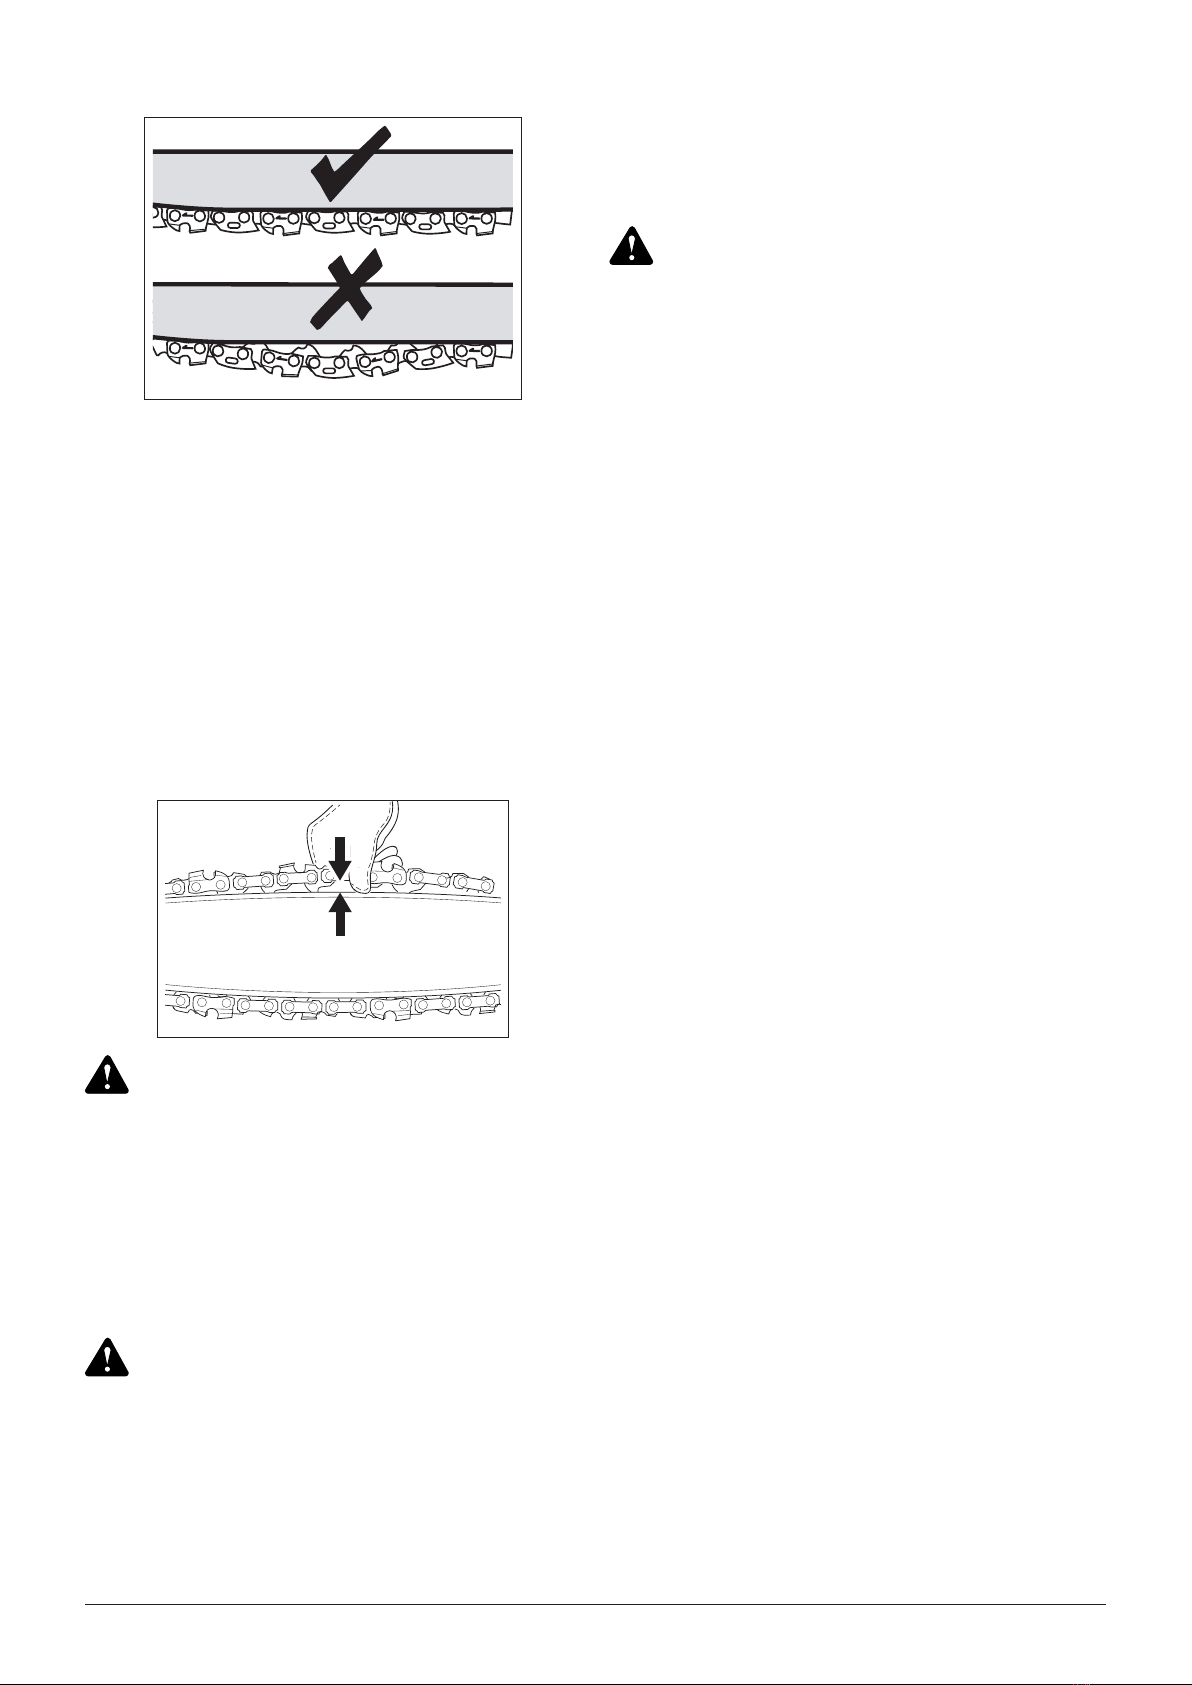
7. Check the chain tension by pulling the saw chain
away from the chain bar. A properly tensioned chain
should have roughly 0.08 inch (2 mm) of distance
between itself and the bar guide.
8. If adjustments are needed, loosen the bar adjustment
locking nut one full turn.
9. To adjust the saw chain tension, turn the chain
tensioning screw. Turning the screw clockwise
increases the tension while turning it counter-
clockwise decreases tension. A properly tensioned
chain should have no sag and should only be able to
be pulled 0.08 inch (2 mm) away from the chain bar
of the saw.
10. Once the chain is properly tensioned, tighten the bar
adjustment locking nut. DO NOT over-tension the
chain: this will lead to excessive wear and reduces
the life of both the bar and chain.
CAUTION:
CAUTION:
Chain
Tensioning
Screw
Chain Tensioning
Screw
0.08” (2 mm)
Oil tank cap

10 WWW.SENIXTOOLS.COM
INSTALL THE HARNESS
The harness with quick release function can be hooked
behind the rear hand if needed.
NOTE: Harness use is optional.
11WWW.SENIXTOOLS.COM
OPERATION
Do not use any attachments or accessories not
recommended by the manufacturer of this product. The
use of attachments or accessories not recommended
can result in serious personal injury.
Operate this unit only in a well-ventilated outdoor area.
Do not overwork yourself. Take regular breaks and
change working position to ensure you can concentrate
on the work and have full control over the product.
Maintain rm footing and balance during operation.
Inspect unit before each use. Replace damaged parts.
Check for fuel leaks. Make sure all fasteners are in
place and secure.
Motor housing can become hot during pole saw
operation. Do not rest or place your arm, hand, or any
body part against the motor housing. Extended contact
with the motor housing can result in burns or other
injuries.
Always position the unit on the operator’s right side. The
use of the unit on the operator’s left side will expose
the user to hot surfaces and can result in possible burn
injury. To avoid burns from hot surfaces, never operate
unit with the bottom of the motor above waist level.
Do not allow familiarity with this product to make you
careless. Remember that a careless fraction of a
second is sufcient to inict serious injury.
Always wear eye protection with side shields marked to
comply with ANSI Z87.1, along with hearing protection.
Failure to do so could result in objects being thrown into
your eyes and other possible serious injuries.
Do not use any attachments or accessories not
recommended by the manufacturer of this product. The
use of attachments or accessories not recommended
can result in serious personal injury.
Operation of this equipment could create sparks that
can start res around dry vegetation. The operator
should contact local re agencies for laws or regulations
relating to re prevention requirements.
WARNING:
WARNING:
CAUTION:
CAUTION:
WARNING:
WARNING:
WARNING:
WARNING:
WARNING:
WARNING:
PREPARATION
ADJUSTING THE TELESCOPING HANDLE
ADJUSTING THE HARNESS
Before each use, check the following items to ensure
safe working conditions.
POLE SAW: Before beginning work, inspect the pole
saw for damage to the housing, the saw chain and the
guide bar. Never use a damaged machine.
OIL TANK: Check the ll level of the oil tank. Also check
whether there is sufcient oil available while working.
Never operate the saw if there is no oil or the oil level is
not visible in order to prevent damage to the pole saw.
SAW CHAIN: Check the tension of the saw and the
condition of the blades. The sharper the saw chain is,
the easier and more manageable operations will be.
The same applies to chain tension.
Check the tension every 10 minutes of operation
to maximize safety. New saw chains in particular
are subject to changes due to the heat created by
operation.
PROTECTIVE CLOTHING: make sure to wear the
appropriate close- tting protective clothing such as
hainsaw-protective pants, gloves and safety shoes.
Wear a safety helmet with integrated hearing protection
and a face guard to provide protection against falling
and recoiling branches.
Telescoping
Release
Lever
1. Unlock the telescope release lever so that the pole
can freely extend outwards and inwards.
2. Extend it to the desired length and lock the telescope
release lever to hold it in place.
Adjust the harness to a length which is suitable for your
operation.
Always use the harness to carry the product weight on
your shoulder (on the same side of tool or cross your
body). Ensure that the quick release is on your chest
(NOT on your back).
Short Long
12 WWW.SENIXTOOLS.COM
HANDLING POLE SAW
• Hold the Pole Saw with both hands using the soft
grip.
• Fully grip both handles at all times during operation.
• Hold the Pole Saw at a max. angle of 60° from the
horizontal level.
• Maintain a minimum distance of thirty feet to
bystanders.
Do not operate Pole Saw using only one hand.
Do not stand directly under the limb you are sawing.
Objects may fall different than expected. Position
yourself well out of the path of falling limbs. Keep
bystanders away from cutting end of garden power tool
and a safe distance from the work area.
Do not stand on a ladder or other support while using
Pole Saw.
WARNING:
WARNING:
WARNING:
ATTACHING THE EXTENSION CORD
Open the quick release clamp if it is necessary to open
the harness quickly.
You should only use extension cords for outdoor use,
PVC or rubber cord ordinary duty with a cross sectional
area not less than 1.5 mm. Before and during use,
check the supply and extension cords for damage. Do
not use the appliance if the cord is damaged or worn.
Keep extension cord away from cutting elements. If the
cord is damaged during use, disconnect the cord from
the supply immediately. Do not touch the cord before
disconnecting the supply.
WARNING:
HOLDING THE UNIT
AVOIDING KICKBACK DURING USE
Remove the plug safety cap. Insert the extension cord
socket into the pole saw plug. An extension cord retainer
is attached to the handle to reduce strain on the cord.
To use the cord retainer, double the extension cord as
shown, about a foot from the end, and insert it into the
end of the retainer. Place the
loop formed by doubling the cord over the hook. Gently
tug on the cord
to ensure that it is rmly situated in the retainer.
Keep the extension cord clear of operator, unit, and any
obstacles at all times. Do not expose the cord to heat, oil,
water, or sharp edges.
When kickback occurs, the pole saw can react
unpredictably and cause severe injures to the operator
or bystanders.
To avoid kickback:
Kickback occurs when the chain (at the tip of the guide
bar) comes in contact with a log or wood, or when
the saw chain becomes jammed, often when sawing
sideward, slanted or during lengthwise cuts.
WARNING:
• Stand in the operating position Stand up straight. Do
not bend over.
• Keep feet apart and rmly planted.
• Hold the shaft grip with the right hand. Keep the right
arm slightly bent.
• Hold the handle with the left hand. Keep the left arm
straight.
• Hold the unit at waist level.
• Saw with guide bar at a at angle
• Do not work with a loose, overstretched or worn out
chain
• Ensure chain is sharpened correctly
• Do not work with the tip of the guide bar
• Hold the pole saw rmly with both hands
• Use a low kickback chain
• Ensure correct chain tension.
• Position the cutting head a few inches above the
ground.
• Do not over-reach; Keep all parts of your body away
from the rotating cutting attachment and hot surfaces.

13WWW.SENIXTOOLS.COM
CUTTING THIN BRANCHES
STARTING AND STOPPING
IF ASSISTANCE IS REQUIRED FOR THIS PRODUCT:
CUTTING THICK BRANCHES
• Thin branches can be cut off with a single cut.
• To prevent the branch from slivering and buckling, cut
the branch off in several pieces.
When cutting larger branches, the following four cuts
are necessary:
• First cut into the branch from below, outside of the
location where you intend to cut off the branch.
• The cut should go one third to halfway through the
branch (1).
• Cut into the branch from the top, making sure it’s
outside from where the branch is to be sawed (2).
• To keep stump and branch from splintering, do a stub
undercut below branch (3).
• Cut off the stump with one clean cut from top to
bottom. If desired, seal the cut with a suitable
compound (4).
• When nished cutting, turn off the Pole Saw and
disconnect its power supply after use.
• Clean, then store the appliance indoors out of
children’s reach.
• Make sure the power cord is located to the rear, away
from the chain and wood, and kept free of branches
during cutting.
• Hold the Pole Saw to the side of your body.
• Keep a rm, steady pressure on the Pole Saw while
working. Do not try to force the Pole Saw through
the wood, let the chain do the work. Use the gripping
teeth to apply minimal leverage pressure.
• Use caution when reaching end of cut. The Pole
Saw’s weight may change unexpectedly as it cuts free
from the wood. Always remove the Pole Saw from a
wood cut while it is running.
Do not operate the Pole Saw with arms fully extended
or attempt to saw areas that are difcult to reach.
To turn ON, hold the pole saw rmly with both hands.
Press and hold the safety switch located on the left-
hand side of the rear handle above the main power
trigger.
Press the trigger to turn it ON. The safety switch can
now be released. To turn OFF, release the ON/OFF
trigger switch.
Do not return this product to the retail store where it
was purchased. Please call our Customer Service
Department for any issues you may have. For Help Call:
1-800-261-3981
WARNING:
Trigger
Safety switch
14 WWW.SENIXTOOLS.COM
Locking Nut/
Step Washer
Wrench
Cover
MAINTENANCE
To avoid serious personal injury, always stop the motor
and allow it to cool before cleaning or maintaining the
unit. Never perform cleaning or maintenance while
the unit is running. Disconnect the spark plug wire to
prevent the unit from starting accidentally.
Wear protective clothing and observe all safety
instructions to prevent serious personal injury.
Only use replacement bar/chain combination listed. DO
NOT use any other bar/chain combination.
Replace chain when cutters are too worn to sharpen or
when chain breaks. Only use replacement chain noted
in this manual. Always include new drive sprocket when
replacing chain. This will maintain proper driving of
chain.
When handling saw chains, always wear protective
gloves.
Guide bar: 8 inch (203 mm), 080SDEA041, Oregon
Saw chain: 8 inch (203 mm), 91PJ033X, Oregon
Use a small brush to clean the outside of the unit. Do
not use strong detergents. Household cleaners that
contain aromatic oils such as pine and lemon, and
solvents such as kerosene, can damage plastic. Wipe
off any moisture with a soft cloth.
Correct and regular cleaning is not only important for
the safe use of this product, but also extends its life
span.
When servicing, use only identical replacement parts.
Use of any other parts could create a hazard or cause
product damage.
WARNING:
WARNING:
WARNING:
WARNING:
CLEANING
REPLACING THE SAW CHAIN AND CHAIN
BAR
1. Place the saw body on a rm and level surface.
2. Using the supplied wrench, turn the chain sprocket
cover nut counter-clockwise to loosen it. Remove the
nut and cover.
3. Wearing protective gloves, wrap the saw chain around
the chain bar, making sure that the teeth are aimed in
the direction of rotation. The chain should be properly
set in the slot running along the entire outside edge of
the chain bar.
4. Place the saw chain around the sprocket while lining
up the slot in the chain bar with the internal bolt at
the base of the saw and the chain tensioning pin in
the chain bar’s pin hole. The chain tensioning pin may
need adjustment to properly align with the hole in the
chain bar. Use a at-blade screwdriver to turn the
chain tensioning screw to adjust the location of the pin
until it ts in the chain bar.
5. Turn the chain tensioning screw clockwise to
preliminarily tighten the chain bar enough that it stays
in place. While holding the bar still, place the cover
back onto the saw. Make sure the tab properly lines
up with the slot on the body of the saw.
6. Install the collar and locking bolt. Using the supplied
wrench, turn the locking nut clockwise to tighten it. DO
NOT overtighten. Adjust the chain tension.
Chain Cover Nut
Internal Bolt
Sprocket Chain Tensioning Pin
Chain
Tensioning
Screw
Chain Tensioning
Screw
15WWW.SENIXTOOLS.COM
The saw chain must be tensioned properly in order to
ensure safe operation.
Install the guide bar cover when transporting to prevent
personal injury.
Install the guide bar cover when transporting to prevent
personal injury.
If the supply cord of this power tool is damaged, it must
be replaced by a specially prepared cord. Inspect the
power cord and plug often. If damaged, have replaced
by a qualied service dealer.
Examine the unit thoroughly for worn, loose or damaged
parts. If you need to repair or replace a part, contact
Senix customer service at 1-800-261-3981.
Transport the unit in a horizontal position. If not
possible, transport the unit vertically with the motor at
the top. Secure the pole saw to prevent damage during
transportport.
CAUTION:
CAUTION:
CAUTION:
TENSION THE CHAIN
REPLACING THE POWER CORD
STORAGE
TRANSPORTATION
1. Check the chain tension by pulling the saw chain away
from the chain bar. A properly tensioned chain should
have roughly 0.08 inch (2 mm) of distance between
itself and the bar guide.
2. If adjustments are needed, loosen the bar adjustment
locking nut one full turn.
3.Toadjustthesawchaintension,turnthechaintensioning
screw. Turning the screw clockwise increases the
tension while turning it counter-clockwise decreases
tension. A properly tensioned chain should have no
sag and should only be able to be pulled 0.08 inch (2
mm) away from the chain bar of the saw.
4. Once the chain is properly tensioned, tighten the bar
adjustment locking nut. DO NOT over-tension the
chain: this will lead to excessive wear and reduces the
life of both the bar and chain.
• Clean the unit before storing.
• Store the unit with the chain protective cover installed.
• Store the tool out of reach for children and other
0.08” (2 mm)
unauthorized persons in a well-ventilated, dry and
frost-free environment.
• Protect the machine against dust and moisture.
• Cover it in order to provide added protection.
16 WWW.SENIXTOOLS.COM
Unplug unit from power source before servicing. Severe
injury or death could occur from electrical shock or body
contact with moving chain. Cutting edges on chain are
sharp. Use protective gloves when handling chain.
WARNING:
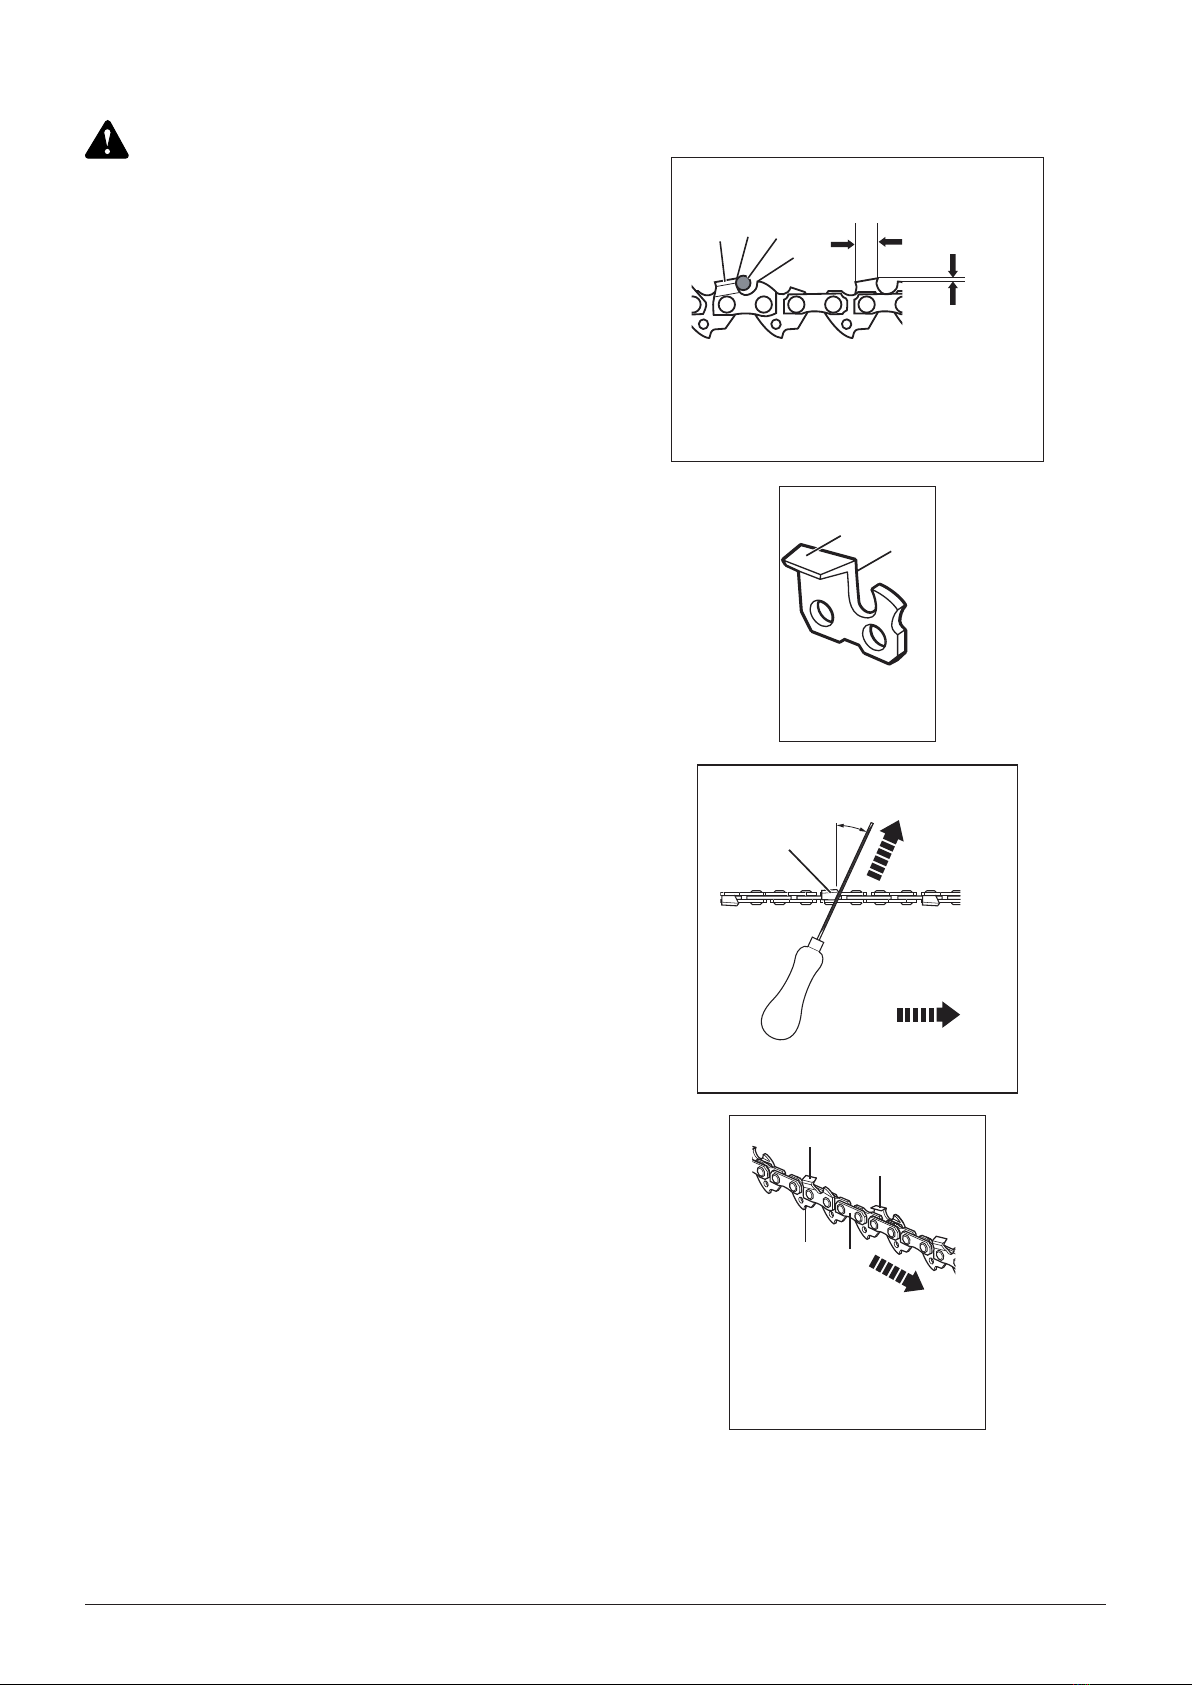
SHARPENING THE SAW CHAIN
Keep chain sharp. Your saw will cut faster and more
safely. A dull chain will cause undue sprocket, guide
bar, chain, and motor wear. If you must force chain into
wood and cutting creates only sawdust with a few large
chips, then chain is dull.
Purchase a new chain, have your chain sharpened
professionally at a qualied service center, or sharpen
the chain yourself using a proper sharpening kit. The
height difference between the cutting tip and the ridge is
the depth gauge setting.
When you sharpen the cutting tip, the depth gauge
setting between the tip and the side plate ridge will
decrease. To maintain optimal cutting performance, the
ridge has to be led down to achieve the recommended
depth gauge setting.
To sharpen the chain:
1. Using protective gloves, ensure the chain is correctly
tensioned on the guide bar.
2. Use a round le with a diameter 1.1 times the cutting
tooth depth. Make sure 20% of the le diameter is
above the cutter’s top plate.
NOTE: A le guide is available from most pole saw
retailers and is the easiest way to hold the le at the
correct position.
3. File at an angle perpendicular to the bar, and at an
angle of 25˚ to the direction of travel.
4. File each tooth from the inside towards outside only.
File one side of the chain rst then turn the saw around
and repeat the process.
• Sharpen each tooth equally by using the same
number of strokes.
• Keep all cutter lengths equal. Each time the cutting tip
is sharpened the cutting length is reduced. When the
cutter length is reduced to 0.16 inch (4 mm), the chain
is worn out and should be replaced.
• The depth gauge setting is also reduced with each
sharpening.. Every 5 sharpenings use a depth gauge
measuring tool to check the height between the
cutting tip and the ridge. When necessary, use a at
le to le down the ridge to achieve the .025 inch
depth gauge setting. Depth gauge measuring tools
are available from most pole saws retailers.
• If the saw is not functioning properly, take it to a
qualied pole saw service center to have the saw
inspected. Use only identical parts as listed in this
manual.
ABC
D
Cutter
Length
Depth Gauge
Setting 0.025 in.
A - Top Plate
B - Cutting Tip
C - File Position
D - Ridge
B
A
A - Top Plate
B - Side Plate
25°
A
SA
W CHAIN DIRECTION
Sharpening Angle
FILE
DIRECTION
Outside
Inside
A - Left-hand Cutter
A
B
CD
A - Right-hand Cutter
B - Left-hand Cutter
C - Bumper Drive Link
D - Tie Strap
SA
W CHAIN DIRECTION

17WWW.SENIXTOOLS.COM
TROUBLESHOOTING
SYMPTOM POSSIBLE CAUSE Fill the fuel tank with fresh fuel
Motor stops while cutting
Chain pinched in cut. Undercut limb to relieve pressure on limb.
Overheating of control system. Let the unit cool down.
Safety switch not pressed. Press the safety switch before squeezing the
trigger switch.
Debris in side cover. Remove chain sprocket cover and clean out
debris.
Overheating of motor. Let the motor cool down.
Motor runs, but saw
chain does not rotate
Chain not engaging drive sprocket. Reinstall the chain, making sure the drive
links on the chain are fully seated on the
drive sprocket.
Guide bar nose sprocket is not turning. Replace the guide bar.
Pole saw does not cut
properly
Insufcient chain tension. Tension the chain.
Dull chain. Sharpen or replace the chain.
Chain installed backwards. Install the chain with the teeth facing the
correct direction.
Worn chain. Replace the chain.
Dry or excessively stretched chain. Check the oil level. Rell oil reservoir if
necessary.
Chain not in bar groove. Reseat chain onto groove.
18 WWW.SENIXTOOLS.COM
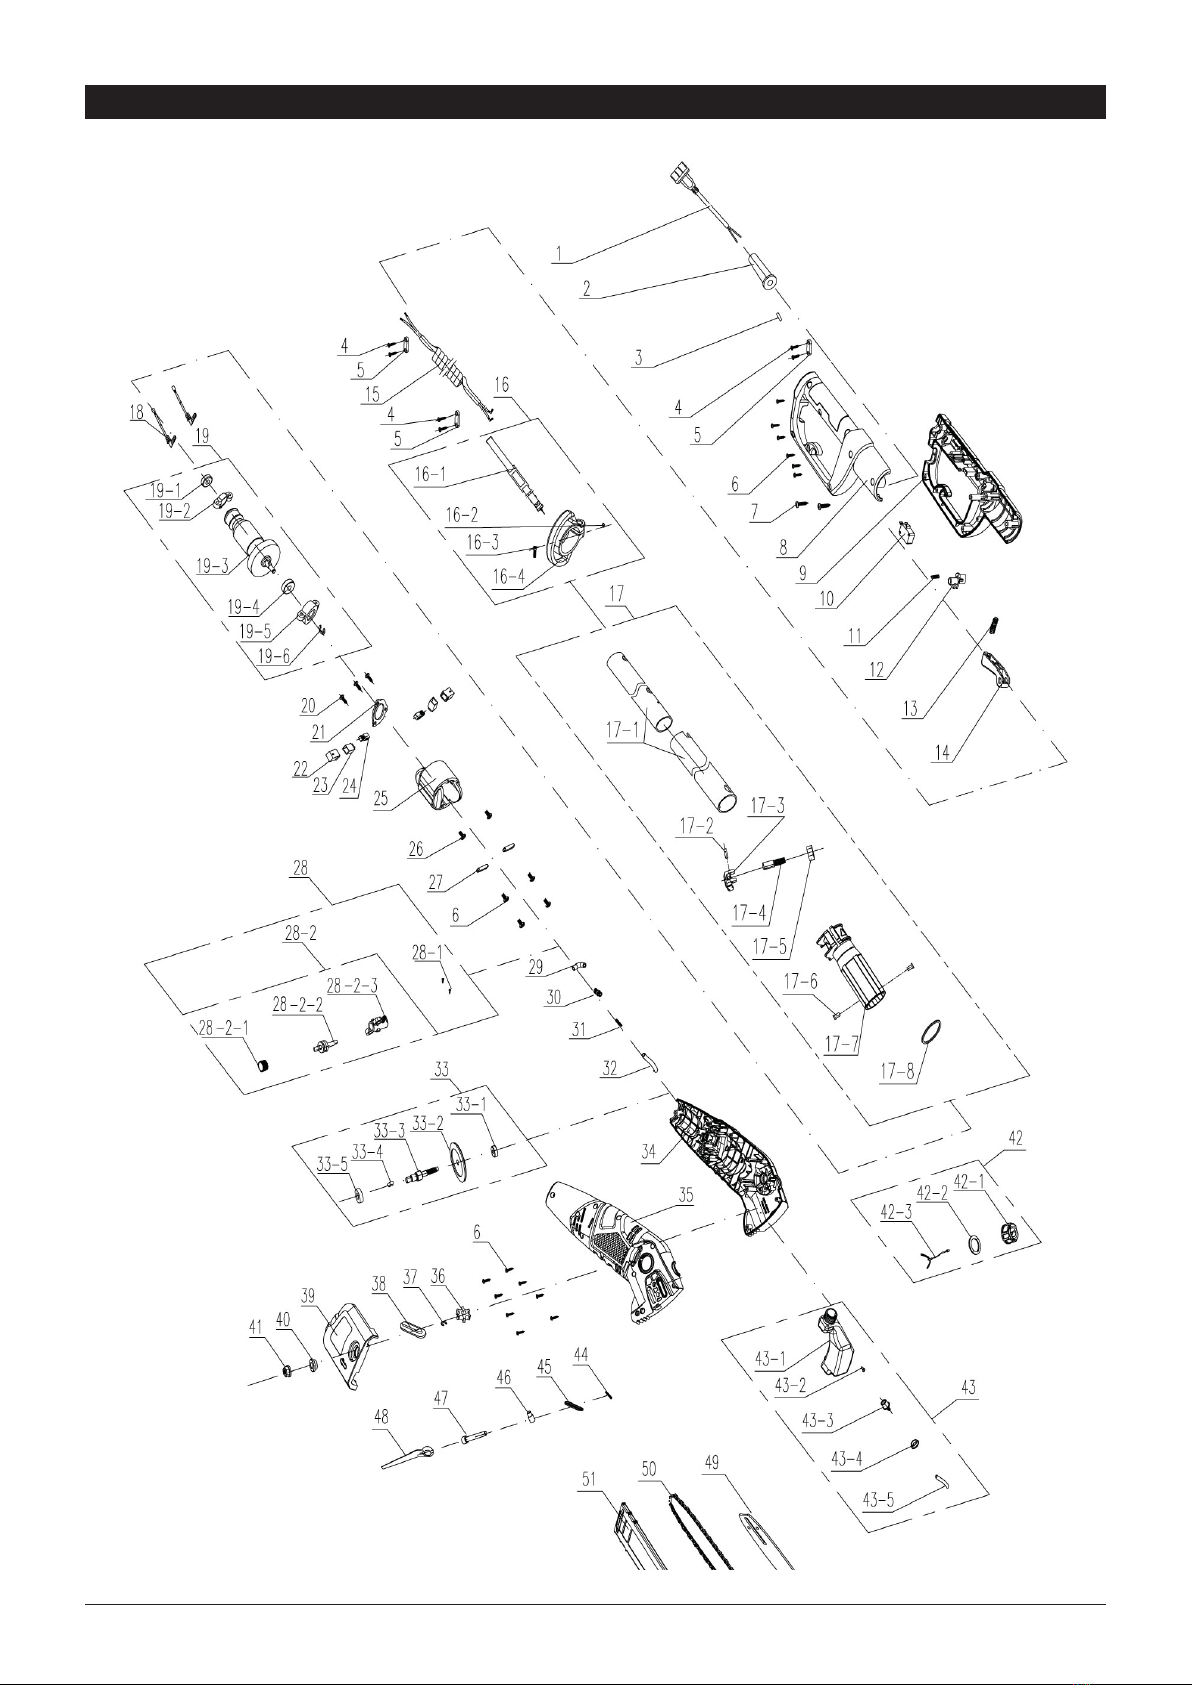
PARTS

19WWW.SENIXTOOLS.COM
PARTS LIST
No. Part # Description
1203002000015 Cable/Plug
2207099900006 Cable sheath
3301200005 Heat shrinkable tube
4207310100041 Self tapping screw
5207089900001 Cable clamp
68SJAB40-14D Self tapping screw
7207310100073 Self tapping screw
8202024002424 Right handle
9202024002423 Left handle
10 207180800008 Control switch
11 207019900024 Anti lock button spring
12 202003001777 Lock off button
13 207019900315 Switch spring
14 202003001776 Switch button
15 207039900469 Spring connection
16 199007000045 Backband Ring Component
16-1 208008000004 Backband
16-2 207320100008 Nut
16-3 207310100704 Screw
16-4 202040000031 Backband Ring
17 199060000507 Tube assembly
17-1 199060000347 Tube assembly
17-2 207199900054 Cylindrical pin
17-3 202026000219 Adjust the button
17-4 207229900169 Quick clamping adjusting bolt
17-5 207320100050 Lock nut
17-6 207199900110 Fixed pin
17-7 202031000164 Connecting bracket
17-8 207269900014 Big Split washer
18 207039900040 Carbon brush connection
wire
19 199133000044 Rotor component
19-1 207390100018 Bearing 607
19-2 202032000013 Bearing sleeve
19-3 106001000088 Rotor assembly
19-4 207390100069 Bearing 6000
19-5 202032000015 Bearing sleeve
19-6 207340100049 Split washer
20 207310100148 Countersunk head tapping
screws
21 201057000095 Bearing Pressure plate
22 207129900022 Bushing
23 207119900044 Carbon brush
24 202016002615 Brush shell
25 107001000061 Stator
26 207310100022 Self tapping screw
No. Part # Description
27 299999000054 Pressure plate
28 199010000040 Oil pump assembly
28-1 207310100324 Flange tapping screw
28-2 199010000147 Oil pump assembly
28-2-1 202001000002 worm gear
28-2-2 201004000103 Worm gear tooth
28-2-3 202999001599 Pump body
29 202019000177 Rubber joint
30 202019000171 Pipe connection connector
31 207019900001 Tubing setting spring
32 302000002 Transparent oil tube
33 199101000045 Output shaft assy
33-1 207390100011 Bearing 606
33-2 201004000091 Big gear
33-3 201999000724 Woodruff key
33-4 201025000118 Output shaft
33-4 207390100180 Bearing 6900
34 202016003791 Left housing
35 202016003790 Right housing
36 201035000003 Sprocket
37 207340100049 Split washer
38 207279900043 End cap seal ring
39 202011000543 End cover
40 207289900054 Axle sleeve
41 207320100061 Hexagon ange nut
42 199123000363 Oil box cap assy
42-1 202165000571 Oil box cap
42-2 207279900031 Oil box cap seal rings
42-3 202014000001 Prevent loss hook
43 199124000015 Oil box assembly
43-1 202164000013 Oil box
43-2 202074000003 Valve
43-3 199071000126 Oil-out connector assembly
43-4 207279900050 Oil outlet sealing ring
43-5 302000000 Transparent oil tube
44 207019900002 Tubing setting spring
45 207279900050 Oil outlet sealing ring
46 207169900011 Tighten the nut
47 207229900133 Tighten the screws
48 207179900012 Spanner
49 202009000201 Knife set
50 205001000003 Chain
51 205001000090 Chain board

20 WWW.SENIXTOOLS.COM
WARRANTY
2-year limited warranty on all Senix E series outdoor electric powered equipment.
FOR TWO YEARS from the original date of retail purchase this Senix product is warranted against defects in
materials or workmanship on power tools. Defective product will receive free repair.*
This warranty does not cover normal wear of parts and components such as cutting chain, line or blades nor does
this warranty cover product transportation cost for warranty or service.
Any implied warranty granted under state law, including warranties of merchantability or tness for a particular
purpose, are limited to three years from the date of purchase on power tools and chargers and seven years on
batteries. The manufacturer is not responsible for direct, indirect, incidental or consequential damages. Some
states and provinces do not allow limitations on how long an implied warranty lasts and/or do not allow the
exclusion or limitation of incidental damages, so the above limitations and exclusions may not apply to you. This
warranty gives you specic legal rights, and you may also have other rights which vary from state to state or
province to province.
The YAT USA declines any responsibility in regard to civil liability arising from abusive use or not in conformity with
proper use and maintenance of the machine as described in the operator’s manual.
YAT USA is not responsible for direct, indirect, incidental or consequential damages.
After the purchase, the manufacturer recommends proper maintenance of the machine and to read the operator’s
manual before using the machine.
*Original purchase receipt may be required for proof of purchase
For customer service contact us toll free at 1-800-261-3981 or Senixtools.com.
YAT USA, Inc. 9048 E Bahia Dr, suite 105, Scottsdale, AZ 85260
LIMITED TWO-YEAR WARRANTY
Additional Limitations
Warranty is subject to the following conditions:
• Warranty applies to the original purchaser at retail and is not transferrable*
• Warranty Registration at www.senixtools.com
• The tool has not been misused, abused, neglected, altered, modied or repaired by anyone other than an
authorized servicecenter
• Only genuine Senix accessories have been used with or on this product
• The tool has been subjected to normal wear and tear
• The tool has not been used for trade or professional purposes
• The tool has not been used for rental purposes
• This warranty only covers defects arising under normal usage and does not cover any malfunction, failure or
defect resulting from misuse, abuse (including overloading the product, exposure to water or rain) accidents,
neglect or lack of proper installation and improper maintenance or storage.
To locate your nearest Senix service provider call toll free at 800-261-3981 or email us at [email protected].
Table of contents
Languages:
Other Senix Pole Saw manuals


