Sensata SmartWitness KP2 User manual

Device Tab
Page 1of 42
KP2 CONFIGURATION
TOOL GUIDE
V5.2
A jumpstart to video
telematics
configuration

Page 2of 42
Table of Contents
1.0 Welcome to your KP2 Configuration Guide ................................................................................................................................................ 3
2.0 KP2 Configuration Tool Installation ............................................................................................................................................................ 4
2.1 Downloading & Installing Your Configuration Tool.................................................................................................................................. 4
3.0 Configuration Tool Layout & Settings ......................................................................................................................................................... 5
3.1 ADAS Event Definitions .......................................................................................................................................................................... 6
3.2 DSM Event Definitions............................................................................................................................................................................ 7
4.0 Configuring Your Device............................................................................................................................................................................. 8
4.1 How to Configure Device Tab ................................................................................................................................................................. 8
4.2 How to Configure Record Tab................................................................................................................................................................11
4.3 How to Configure Event Tab..................................................................................................................................................................15
4.3.1 G-Sensor Fields..............................................................................................................................................................................15
4.3.2 Misc. Fields....................................................................................................................................................................................18
4.3.3 Geofence Fields.............................................................................................................................................................................20
4.3.4 ADAS Fields ...................................................................................................................................................................................23
4.3.5 DSM Fields ....................................................................................................................................................................................26
4.4 How to Configure Info Tab ....................................................................................................................................................................30
4.4.1 Date/Time Fields ...........................................................................................................................................................................30
4.4.2 Service Fields.................................................................................................................................................................................31
4.5 How to Configure Connectivity Tab .......................................................................................................................................................35
4.6 How to Configure Server Tab.................................................................................................................................................................38
5.0 Finishing Up/Support ................................................................................................................................................................................41
5.1 Support Information .............................................................................................................................................................................42

Introduction
Page 3of 42
1.0 Welcome to your KP2 Configuration Guide
This guide aims to inform users of the proper processes involved in setting up your
SmartWitness KP2 device.
This step-by-step walkthrough will act as your teacher as you learn our product's layout,
functionality, and configuration settings. Each section shown in this guide features the KP2’s
default settings.
You can find an overview of the configuration tool's layout in section 3.0.
The fastest way to find information in this document is through the Table of Contents.
We hope that this training document will remove common end-user pain points involved with
the setup process. If you experience any issues with this guide, please lend us your feedback
and/or contact our support teams.

KP2 Configuration Download & Installation
Page 4of 42
2.0 KP2 Configuration Tool Installation
Goal: Find your configuration wizard and learn about your device’s capabilities
2.1 Downloading & Installing Your Configuration Tool
•Download configuration software HERE.
1. After download, proceed to installation.
2. Open the configuration tool and insert your SD Card*.
3. Click Initialize SD Card.
4. Select SD Card from your preferred internet browser.
5. Click Start to initialize.
Note: SD cards from SmartWitness come pre-installed and initialized.
*The maximum size supported for your SD card is 256 GB.

KP2 Configuration Tool Layout
Page 5of 42
3.0 Configuration Tool Layout & Settings
Goal: Understand your tool’s main features

ADAS Event Definitions
Page 6of 42
3.1 ADAS Event Definitions
To better understand the settings and functions of ADAS (Advanced Driver Assistance
System) events in the Event tab, please see the definitions below.
Note: Sensitivity settings are on a scale of 1 – 5, 1 being the lowest and 5 being the highest.
Event Type
Event Definition
Sensitivity Setting
FCW
Forward Collision Warning - Detects an imminent
collision with something ahead.
The higher the sensitivity, the earlier the alert
arrives before a possible collision.
PCW
Pedestrian Collision Warning – A pedestrian is in
forward proximity, and an imminent collision is
possible.
The higher the sensitivity,the greater the distance
you’re alerted before a potential collision.
HMW
Headway Monitoring Warning - Monitors
distance to the vehicle ahead (tailgating).
The higher the sensitivity,the earlier you’re alerted
for breaching unsafe distances to vehicles ahead.

DSM Event Definitions
Page 7of 42
3.2 DSM Event Definitions
To better understand the settings and functions of DSM (Driver State Monitoring) events in
the Event tab, please see the definitions below.
Note: Drivers must exceed the set sensitivity % for longer than the sensitivity time (sec) to
trigger a DSM event.
Event
Type
Event Definition
Sensitivity Settings
Sleeping
Driver Fatigue Warning (DFW) – Driver is yawning and
has prolonged eyelid closure.
Driver face area is detected.
The total time of a driver’s closed eyes lasts longer
than the sensitivity time (longer than 20 sec).
A yawn lasts longer than thesensitivity time.
Distraction
Driver Distraction Warning (DDW) – Driver’s eyes are
off the road for a prolonged period of time.
Driver face area is detected.
The driver’s face is larger than the face area’s
sensitivity (%) horizontally and vertically, for longer
than the sensitivity time.
Smoking
Driver Smoking Warning (DSW) - Driver is smoking in
the vehicle.
Driver face area is detected.
The smoking value is greater than the face area’s
sensitivity (%) for longer than the sensitivity time.
Calling
Driver Phone Use Warning (DPUW) – Driver is holding
up a phone to their ear.
Driver face area is detected.
The calling score value is greater than the face
area’s sensitivity (%) for longer than the sensitivity
time.

Device
Page 8of 42
4.0 Configuring Your Device
Goal:Personalize and optimize device settings
4.1 How to Configure Device Tab
Device Tab Layout: At a Glance

Device
Page 9of 42
Camera
1. To activate your desired camera(s), check
CAM1 and/or CAM2.
Power Connection
2. To automatically apply appropriate
power settings, select the device power
Type.
3. Manually adjust these values to your
preferred ACC On Voltage 12v and ACC
On Voltage 24v.
Note: This is only available for the KP2-
OBD-PWR type.

Device
Page 10 of 42
Power ON/OFF
4. Select the amount of time your KP2
remains on after ignition off via Delayed
Power Shutdown’s options.
5. Enter a Power Off Voltage. This signals
the device shutdown at a specified
voltage level to protect the vehicle
battery from draining.
6. Set the time your KP2 stays awake during
its Wakeup Interval by choosing a
Register Interval.
7. Set a time that your KP2 powers on again
after shutting down by selecting your
Wake-up Interval.

Record
Page 11 of 42
4.2 How to Configure Record Tab
Record Tab Layout: At a Glance

Record
Page 12 of 42
Channel
1. Select your Resolutionfor CH1, CH2:
•HD (720p), FHD (1080p).
2. Select from the following Frame Rate
(FPS) options:
•30, 15, 10, 5, 4, 3, 2, 1 and 0.
3. Choose your default video Quality from
the following:
•Normal, High or Super Bitrate.
Note: The lower the video quality, the
lossier its output.
Video Data
4. Select your preferred Record Mode:
•Event: Events only. Pre and post-event
settings determine recording settings.
•Continuous (Default &
Recommended): Video continuously
records, with no events recorded
separately on the SD card (Events are
still sent to SmartAPI if configured on
Server Tab).
•Continuous+Event: Video
continuously records at 1 FPS. Events
will record at your chosen FPS.

Record
Page 13 of 42
5. Set the Continuous+Event ratio of video
data recording (applicable only when you
set Continuous+Event record mode).
6. Determine the amount of time video
records before an event by selecting your
Pre-Event Setting.
7. To set the amount of time video records
after an event, select a Post-Event
Setting.
8. Parking Mode reduces your camera’s FPS
to 1 when your vehicle is idle for 5 min.
•Click Record Audio to turn on the
internal microphone for audio
recording.
•Click By Panic to trigger audio
recordings ONLY when you press the
panic button (audio records for 2
minutes).
Record
Page 14 of 42
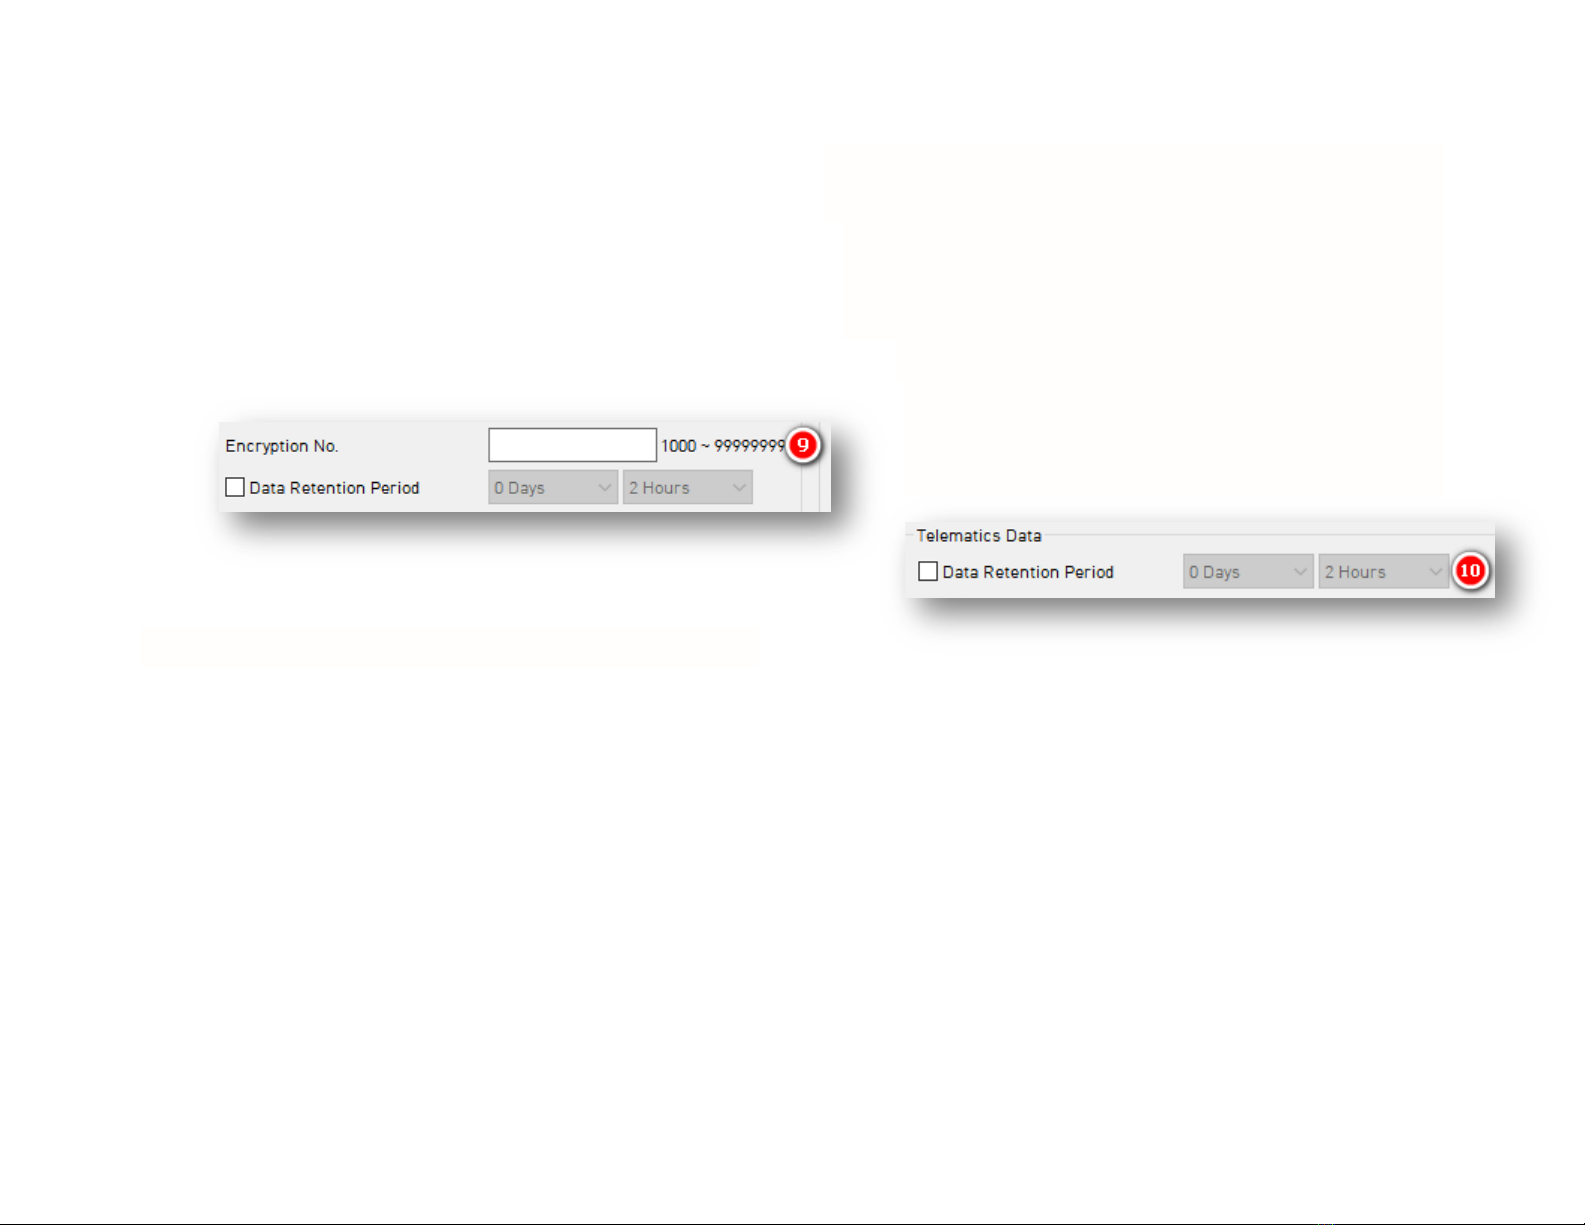
9. Protect SD card data from being easily
viewable by entering an 8-digit
Encryption No.
•Set how long video data remains on
the SD card before being rewritten via
Data Retention Period.
Telematics Data
9. Select the Data Retention Period, or how
long telematics data (DRV file) remains
on the SD card before being rewritten.
•Based on your applied recording
settings, use the Data Usage
Calculator to estimate your SD card’s
storage capacity.

Event
Page 15 of 42
4.3 How to Configure Event Tab
4.3.1 G-Sensor Fields
Event > G-Sensor Tab Layout: At a Glance

Event > G-Sensor
Page 16 of 42
G-Sensor
1. Calibrate the G-Sensor speed threshold by
clicking Auto adjust G-Sensor to vehicle
speed. This increases your G-Sensor event
threshold on each axis by 300mcg when
your vehicle’s speed exceeds 20 km/h.
2. To specify event recordings for camera
channels 1 and 2, check Record CH.
•Only available for Event and
Continuous+Event modes.
3. Turn on in-vehicle notifications for G-Sensor
event triggers by clicking Speaker.
Smart G-Sensor Sensitivity
Determine your G-Sensor sensitivity
settings, either with Pre-Set options or
event-specific values using Custom options.
4. To use default options for G-Sensor
sensitivity, check Pre-Set.
•Disable Simple Setting Mode to set
responsiveness for Shock, Accel/Brake
and Turning events.
5. Select an overall G-Sensor sensitivity by
clicking Simple Setting Mode and choosing
a Sensitivity.

Event > G-Sensor
Page 17 of 42
6. Set the threshold for Emergency Call
Trigger (Severe Shock) G-Sensor values.
Click Custom to set personalized G-Sensor
sensitivity settings.
7. Set High Impact event shock range for X
and Y axis (Activate Z axis via Turn Z Axis
on).
8. Set X axis Harsh Accel/Brake shock range.
9. Set Harsh Turn shock range for the Y axis.
10. Check High Impact Trigger to limit alerts to
high impact events.
•Disables Accel/Brake and Turn events
(see #7).

Event > Misc.
Page 18 of 42
4.3.2 Misc. Fields
Event > Misc. Tab Layout: At a Glance

Event > Misc.
Page 19 of 42
Panic Button
1. Determine your Panic Button response
settings.
2. To obscure camera channels 1 and 2
during Panic events, check Mask CH.
3. To prevent the device’s audio recording
during Panic events, check Mask Audio.
Overspeed
4. Set your speed threshold for recording
Overspeed events by entering a Speed
Limit.
•This accounts for vehicle speed only,
not posted speed limits.
5. Turn on audible alerts for Overspeed
events by clicking Speaker.

Event > Geofence
Page 20 of 42
4.3.3 Geofence Fields
Event > Geofence Tab Layout: At a Glance
Other manuals for SmartWitness KP2
1
Table of contents


